
HOLIDAY DONATION DRIVE - SUPPORT MSW - DO YOUR PART TO KEEP THIS GREAT FORUM GOING! (Only 20 donations so far - C'mon guys!)
×


Robin Lous
-
Posts
564 -
Joined
-
Last visited
Content Type
Profiles
Forums
Gallery
Events
Everything posted by Robin Lous
-
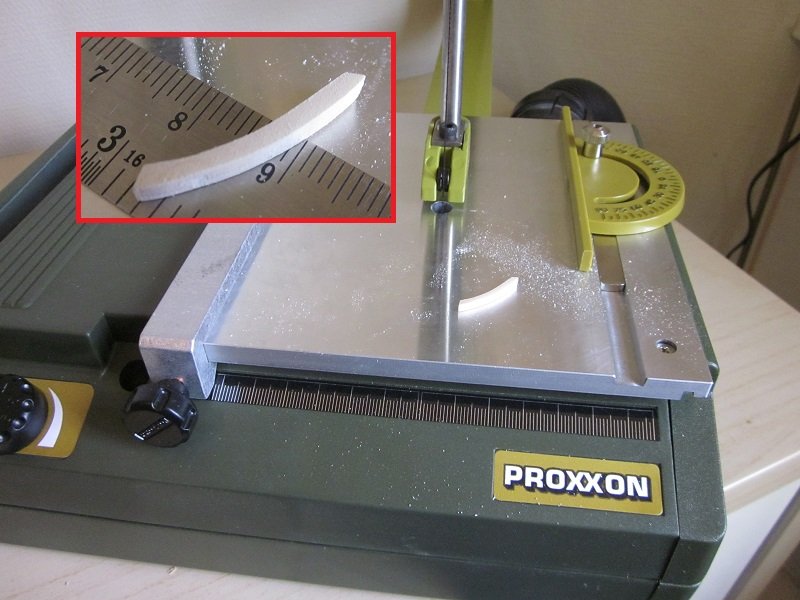
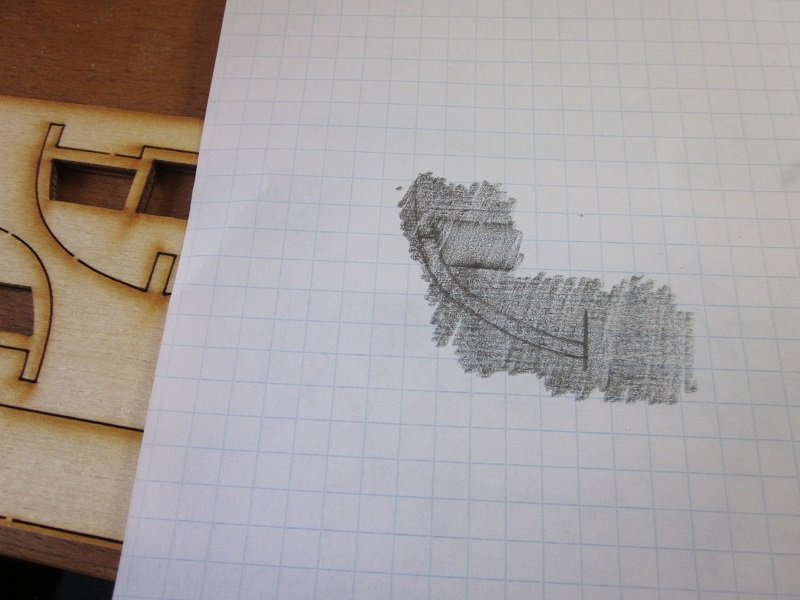
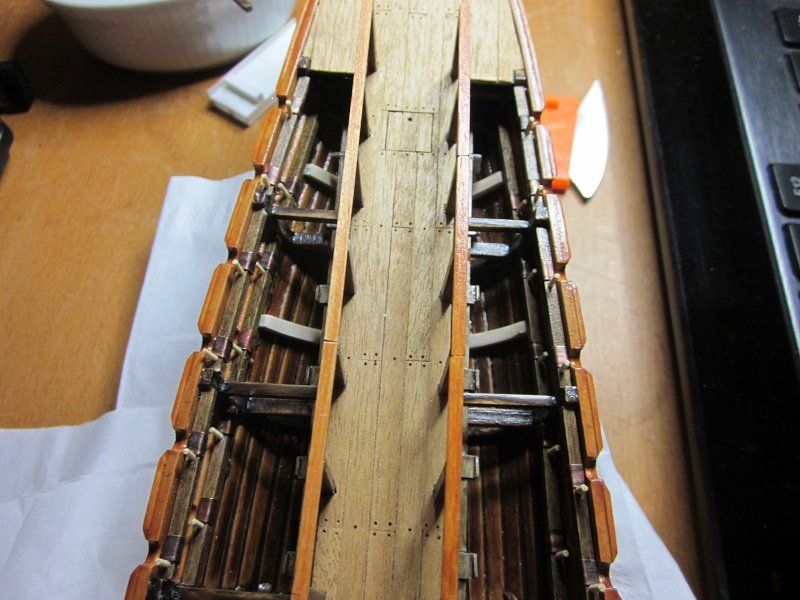
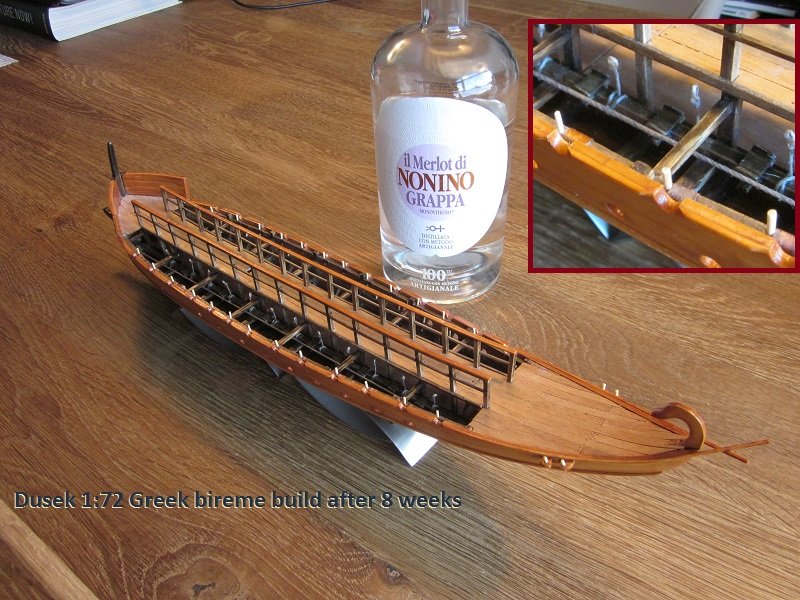
 Instead of making the pin rail I made up my mind about making the extra frames. I'll make them! Imho there's too much "nothing" in between the frames and I think there should be more frames. I hesitated to make them, because they won't be that visible. Top oar bench and all the oars will hide much of the inside of the hull, but I know I will feel guilty when I let it go. Another...silly... reason. I got myself a Proxxon scroll saw table and the Admiral started to make funny comments about me not using it. That's bad news for my Christmas wish list, so I better do something with it. So...here we go! Used the frames of my other bireme kit to mark the lines. (old fashioned gravestone rubbing technique ). Neat thing! Very handy indeed! dry fitting the extra frames. I'll stain them before I glue them in place. When I finished this...I can do the tensioning cables and top seat beams....and the pin rail of course. More soon, Robin
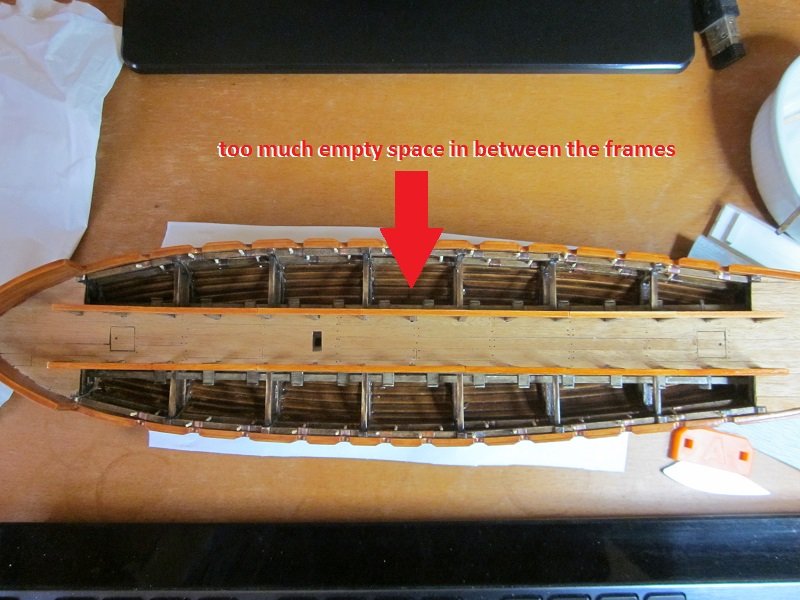
- 473 replies
-
- 11
-

-
- greek bireme
- dusek
- (and 1 more)
-
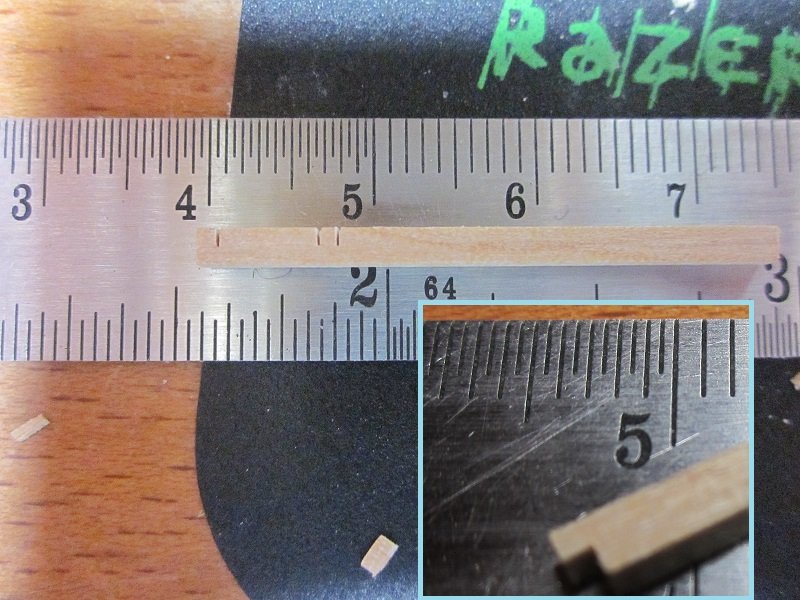
0,5 mm...that's indeed very thin Robin
-
Looks smooth! Robin
-
Perhaps add a drop of white glue or Micro Cristal Clear to the paint to give it some lasting body. Test on a piece of scrap pastic with some holes in it first. It's just an idea...and I'm not 100% sure it's a good idea. When the port holes are drilled through the hull....you can also glue some plastic sheet (Evergreen, or whatever) on the inside. Now...go to bed! ....I should do that also btw
-
The daily shipyard fix...but we're not addicted huh? Looks great! Robin
- 134 replies
-
- 2
-
-
- artesania latina
- mare nostrum
- (and 1 more)
-
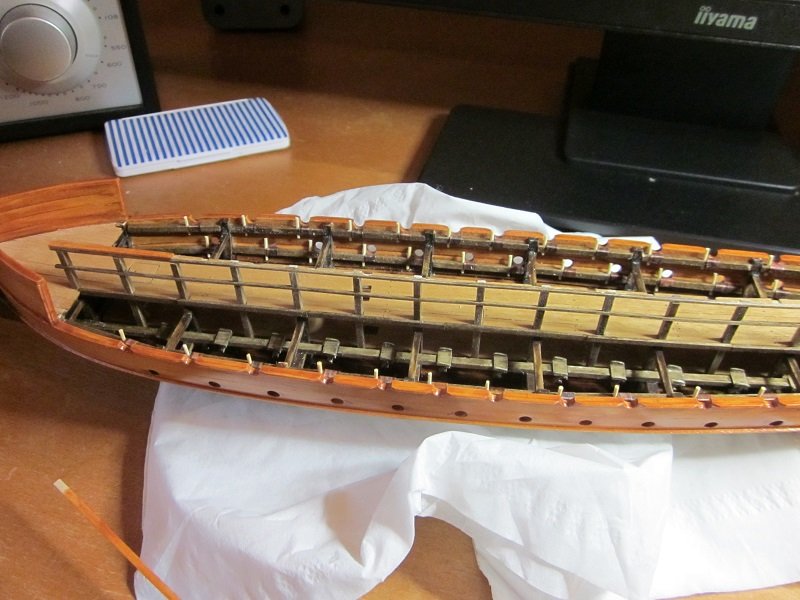
With some unexpected extra shipyard time and the help of the thin saw...finished the railing. Next job will be the pin rail on the stern deck. (*) It will be wider, lower, devided and with 2x4 belaying pins. Placed more to the rear. More or less a copy of the pin rail seen on a Greek trade ship reconstruction. The 3 posts will be made of 3 x 3 mm rod, the rail of 2 x 2 mm rod, the pins I'll make of thinned down cocktail sticks. I also bought the 0,8 mm rope needed for the tensioning cables and more wood. Can't have enough wood right? More soon, Robin *Note: All can download the bireme manual from the Dusek website (PDF file), so I don't see any harm in showing some of it.
- 473 replies
-
- 12
-
-
- greek bireme
- dusek
- (and 1 more)
-
Ancient Tireme being maintained by the Greek Navy
Robin Lous replied to dgbot's topic in Nautical/Naval History
I apologize for sounding a bit negative, that was rude of me and not even justified. The economic crisis hit Greece hard and I understand maintaining issues of a replica ship wasn't the most important problem the Greek had...and still have. I highly appreciate what they do now and it's fantastic she's out for regular swim again. Spring next year I'll give her a big hug! -
Sorry to hear this OC, pe can be a bitch and the port holes...let them be. Keep in mind you're with your nose on them now and that may not look super, but when the model is finished...nobody will notice. We stare through magnifyers when we build, we're on it point blank and to make things worse...we make close up photos of it to post on a forum. What's not pretty in your eyes now is viewed at from an unrealistic close distance. Take a step back and look at it from a normal viewers distance...now you see the whole ship. The shape the nice wooden deck...the big picture. All the sudden your port holes won't stand out like a sore thumb...they're still there, but it won't make your ship look bad whatsoever. Perhaps take a few days off or work at another part of the ship for a while. Build some main gun turrets for instance...there you have an eyecatcher with the "wow factor"! cheer up! Robin
-
Same! Robert, you make it all look so easy. Very beautiful! Robin
-
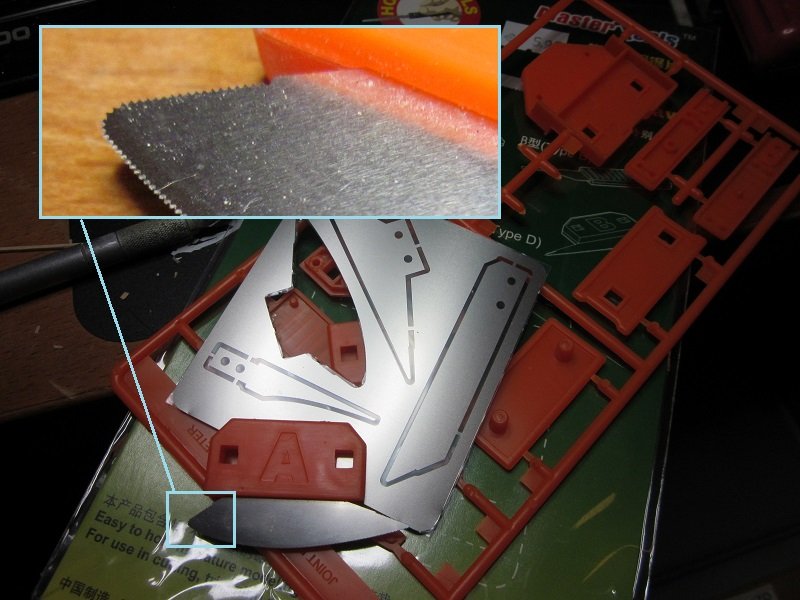
Thanks guys! I got them from a local shop (Houtloods in The Hague or Wapstad in Rijswijk). Pretty sure I also seen the in the Aviation Megastore in Amstelveen. It's still sharp. Since the sawblade itself is razor thin, it will stay sharp as long as it has teeth. I only cut linden wood with it so far. Robin
- 473 replies
-
- 5
-
-
- greek bireme
- dusek
- (and 1 more)
-
3 hands...that's cheating! Great start Michael! Robin
-
Looks amazing! Beautiful! Robin
-
Take your time...easy does it (that they keep telling me also). Inevitable trial and error will happen, but when you spot an issue early, it won't be much of an issue, because you can find a solution (here or common sense). The right side of my build looks better than the left side, because I always start on the left side. When I do the same thing on the right side...I already figured out how to do it better! So with my first wooden ship...left is the "experimental" side and right is the "I learned something" side. You're eager to learn...your future is bright! Robin
-
lol! you guys are funny! Of course I'll start with the trieres before Christmas, because this one will be ready before Christmas. Because of work..."No news from the Hellenic front", but I found some time to work on the other side railing. Nothing worth showing, but I used a very handy tool to make the recesses in the posts now. I did this with an X-acto blade on the other side...and it worked, but was a lot of work. I now use the dead cheap (Chinese) model saw from Master Tools. And it's a gem! Normally not a big fan of China made stuff, but this is really nice! 4 super fine (photo etched) saw blades with handles for 6 euros. I did the whole lot (14 posts) in 30 minutes...the other side with the X-acto took me a whole day! Very easy to saw sharp, crazy thin cuts with this cheapo! Stained and ready to go on...I can do that tomorrow evening. More soon, Robin
- 473 replies
-
- 9
-
-
- greek bireme
- dusek
- (and 1 more)
-
HMS Victory by juzek
Robin Lous replied to juzek's topic in - Build logs for subjects built 1751 - 1800
This is so cool! Robin -
I didn't reply here yet, but checking your Warspite build for a while now. Love it! Robin
-
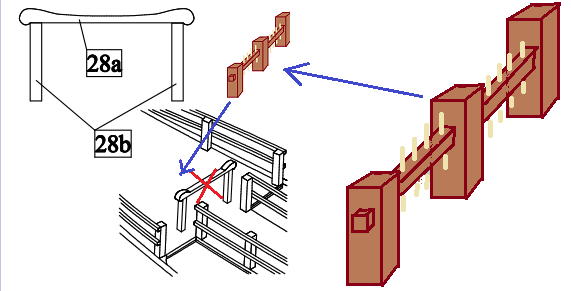
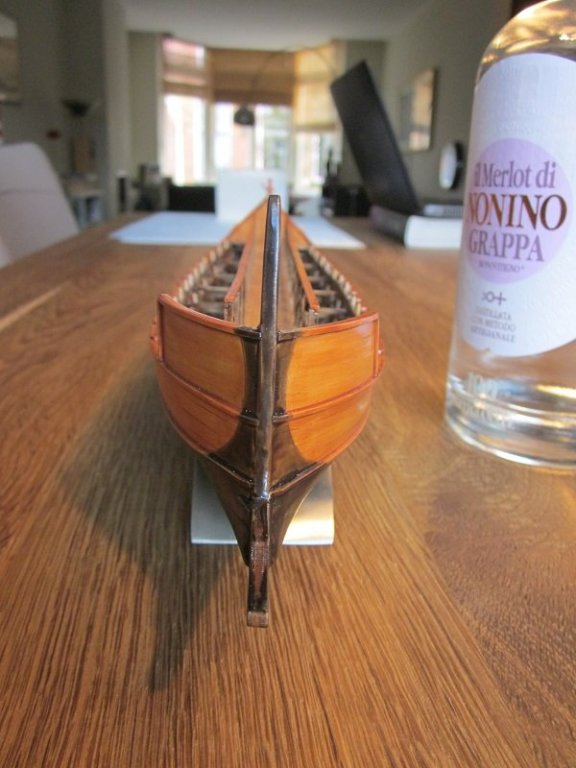
Thanks EJ and Joe! Some things I planned way ahead, like the longer rail posts (annex extra deck support posts). Other stuff I come up with later or even on the spot...like the planks running along the side of the deck and the cap rail. Yesterday I remembered these ships had tensioning cables running from stem to stern. From one to four cables. So I'll get some nice quality 0,8 or 1 mm rope and I'll make 2 tensioning cables underneath the lower rower seats...one each side of the ship. Still making up my mind about making extra frames in between the existing frames. I now have a scroll saw, so it can't be too difficult. To be decided. Other things I'll scratch build or modify: -The ram. I'll make it from copper sheet. I have ideas, but exact shape and construction...to be decided. -The rigging and attachment points. Different. I figured this out already. Must make 16 one eyed deadeyes and some pin rails. -The oars. the 2mm wide blades are too narrow. Will add 1 x 2 mm strips where the blades will be. -Top rower seat beams...still not finished. Modified like the lower seats. -Ropes to limit the oar movement. -oar loops -leather bags around the lower oars where they stick out of the hull. -Mast and yard. some modifications needed. -The rudders. I'll make new ones. A different style and with more detail. -Beams and a pin rail on the inside of the forecastle. -Painting the ship's eyes. I must get this right. It's a major eyecatcher (typical!) so it must be good. -8 spare oars. attached to the centre railing 2 x 2 each side. -The ladder. Typical for these and other greek ships. -A wind vane (annex flag). The tube / bag type. something like the ones you see near airstrips. Painted. Above the stern. -Sail. Probably tied up. Undecided. What I still need to do following the manual: -The stern railing. And that's about the complete to do list. Oh...and a stand and case I guess. So it will take a while before the trireme will appear on the shipyard, but already thinking about what I'll do different with that one. btw...I change things, but that doesn't mean it's a bad kit. I think it's great and when someone build it straight from the box it will look as good. I didn't change the look of the ship whatsoever. Just different bits and bobs. This said...I have another bireme...and that one will look different! But that's after the trireme, so...far, far away. Okey...bedtime for me now. Robin
- 473 replies
-
- 10
-
-
- greek bireme
- dusek
- (and 1 more)
-
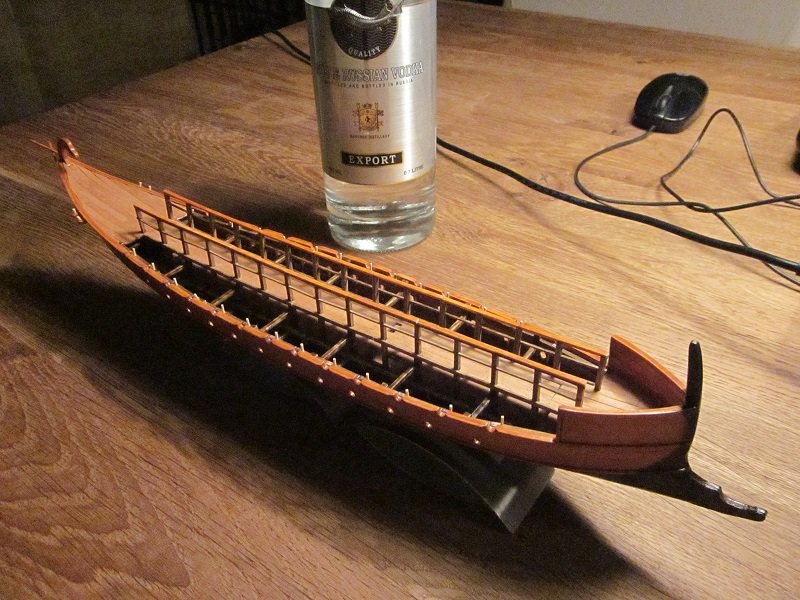
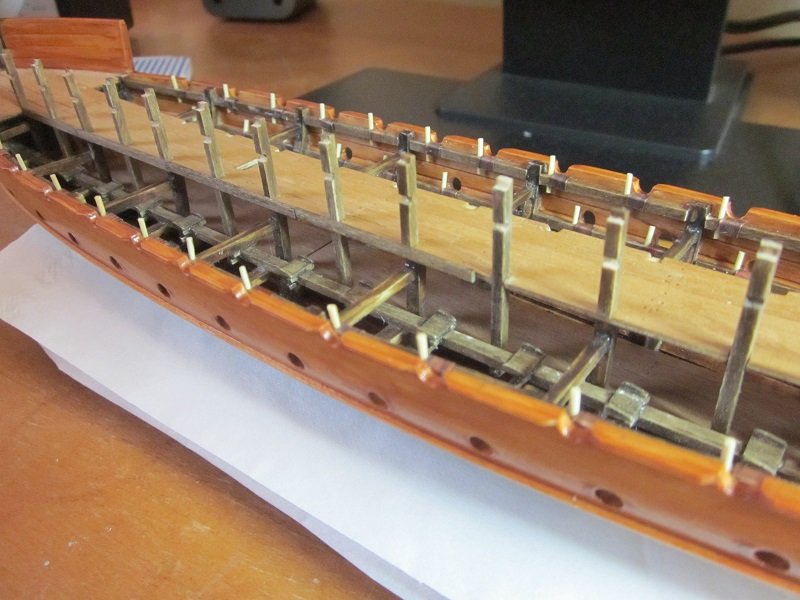
2 more... a close up of the construction... and with the cap rail on... The rest of the week I work long hours (real work lol), so next update not before sunday or monday. Thanks for all the kind words and...more soon, Robin Edit: on Facebook my sister in law complained about no bottle on these photos. She's right...completely forgot about it.
- 473 replies
-
- 13
-
-
- greek bireme
- dusek
- (and 1 more)
-
I wish you more snow, so we can see more build! Looks fantastic Don! Robin
- 653 replies
-
- 7
-
-
- trabakul
- marisstella
- (and 1 more)
-
Thanks again...and Bob, Carl and EJ... Of course I underestimated the amount of work, but I almost finished the railing. It went rather well and I think it looks good. With the railing on it shows the humble size of a bireme better. Still need to do the cap rail, but it gives an idea of how it will look now. The planks running along the side of the deck serve two purposes. It looks good...and it hides the plywood of the deck. Also happy with the posts running down to the lower deck. More soon! Robin
- 473 replies
-
- 10
-
-
- greek bireme
- dusek
- (and 1 more)
-
OMG! that's fantastic! I already own the Olympias book from the Trireme Trust, but it's 99% text (nothing wrong with text of course) and 1% fuzzy sketches and blurry photo's....no plans whatsoever. So this will be more than welcome! Thanks a lot...I'll order it straight away. Robin
- 473 replies
-
- 4
-
-
- greek bireme
- dusek
- (and 1 more)
-
And all the sudden I feel like an experienced wooden ship builder. ...as if Robin
- 608 replies
-
- 3
-
-
- la couronne
- corel
- (and 1 more)
-
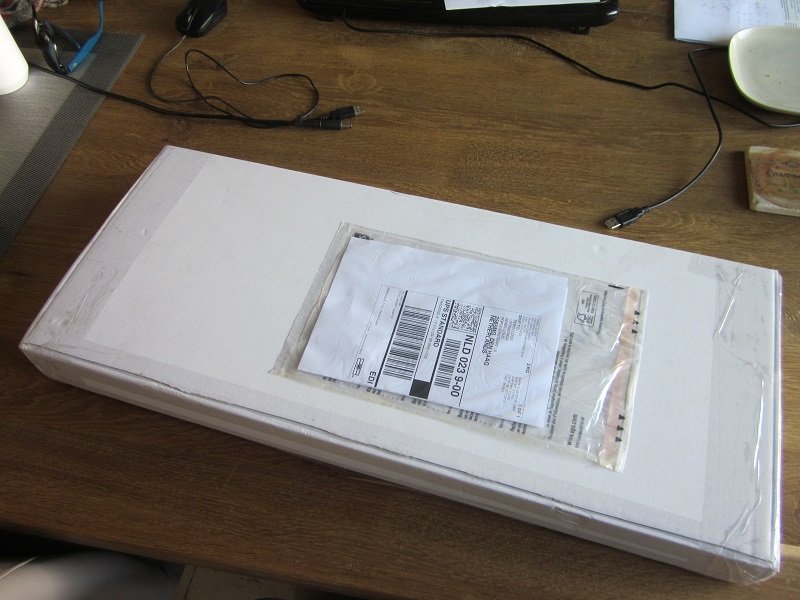
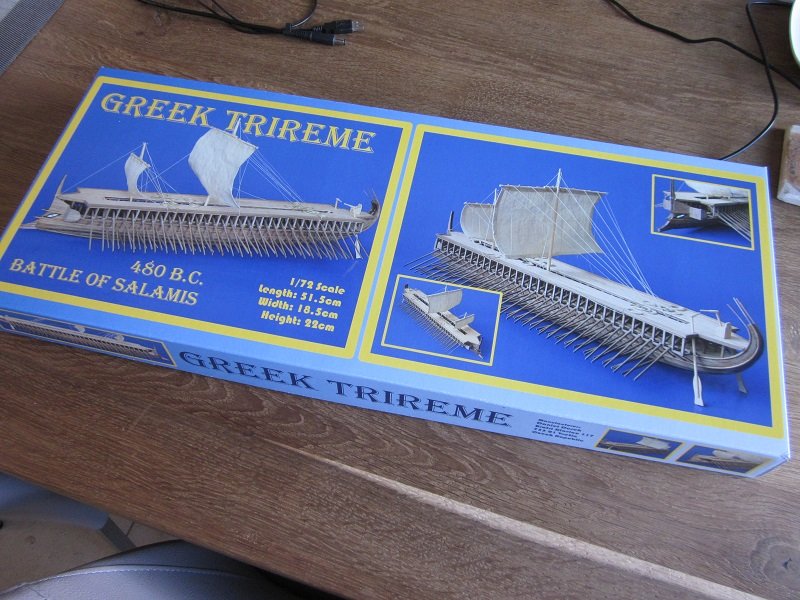
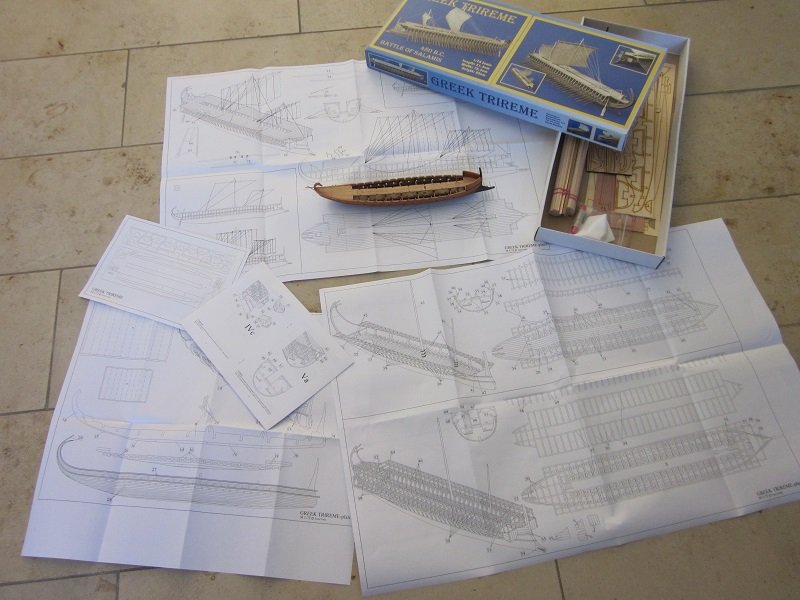
Thanks guys. Looks like we all suffer from the same eye issues. Nothing we can do about, so let's make the best of it. Just had an UPS guy at the door..... A parcel! I got a parcel! look what I got! Sturdy box, well packed...nice! Yay! my trieres! Wow! even though it's only 12 cm longer...it will dwarf my bireme. That's a lot of oars, seats and tholepins to make...oh dear! Thanks Daniel! From ordering to my doorstep in 8 days. And that's with custom alder wood hull planks and the cheapskate delivery option. Really very impressive! I'll try my best to do this kit justice. Looking forward to start working on it. but...I finish the bireme before I start. Robin
- 473 replies
-
- 8
-
-
- greek bireme
- dusek
- (and 1 more)
