
HOLIDAY DONATION DRIVE - SUPPORT MSW - DO YOUR PART TO KEEP THIS GREAT FORUM GOING! (Only 20 donations so far - C'mon guys!)
×


Robin Lous
-
Posts
564 -
Joined
-
Last visited
Content Type
Profiles
Forums
Gallery
Events
Everything posted by Robin Lous
-
 Behold my self inflicted misery! And so I invented the word "boaring". Well it's actually not that bad, only mediocre stamina involved so far. Finished the turning and I'm now glueing on the side strips, so I think I'm doing pretty ok. I lost 3 while turning, but I still have 61 left, so I can mess up another 3 down the road. Today I received the 1:72 scale Greek hoplites from Caesar Miniatures. An obscure brand, but they're the nicest available. The Zvezda hoplites are ok also, but I don't need a charging phalanx...I only need a couple of hoplites at rest. Truly beautiful are the Victrix miniatures, but they're 28 mm scale (at about 1:60), so I can't use them. More about this on sunday or monday....until then...oars, oars and some more oars. More soon guys! Robin
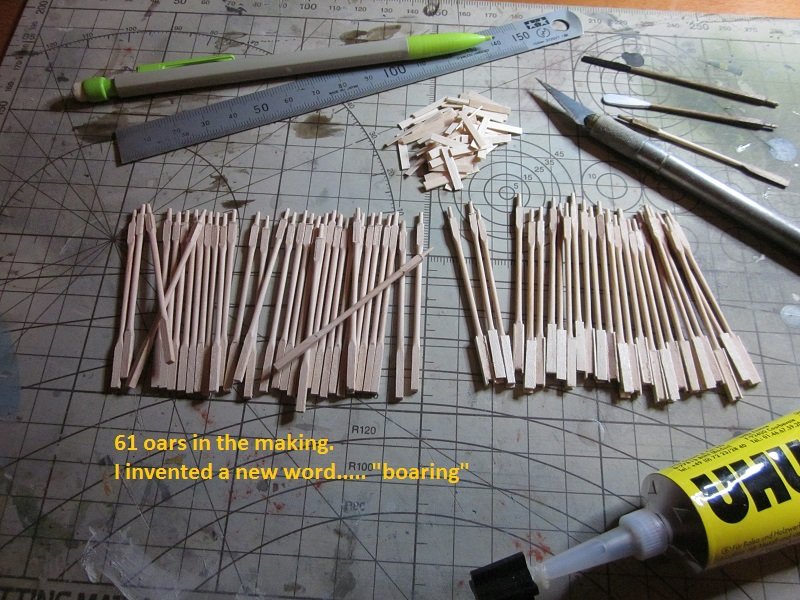
- 473 replies
-
- 13
-

-
- greek bireme
- dusek
- (and 1 more)
-
It's not like I'm the master of oars More like...the fool who condemned himself to make a lot of them
- 84 replies
-
- 2
-
-
- hanse kogge
- dusek
- (and 1 more)
-
Looks good! I'm glad you managed to get those planks in place. Don't forget to make the oars for it.
- 84 replies
-
- 1
-
-
- hanse kogge
- dusek
- (and 1 more)
-
I dare say...it's not 100% watertight yet, but you can fix that! Robin
- 134 replies
-
- 1
-
-
- artesania latina
- mare nostrum
- (and 1 more)
-
Thanks gentlemen! (Turned 34 and cutting the 0,5 mm blade strips. Wasted 1 oar so far...snapped while turning) Received some books. The VOC Duyfken is on my Christmas wish list and the Osprey Hoplite book will be handy soon, because I ordered some miniatures. I won't plaster my builds with miniature soldiers, but 1 or 2 to add some atmosphere and to give it a sense of scale. And...it's been a while since I painted miniatures. It's fun to do some on the side. Never a dull moment Robin (espresso and a Frapin VSOP cognac atm)

- 473 replies
-
- 9
-
-
- greek bireme
- dusek
- (and 1 more)
-
First things first and we wait patiently until you settle down again....or at least...we try
- 608 replies
-
- 4
-
-
- la couronne
- corel
- (and 1 more)
-
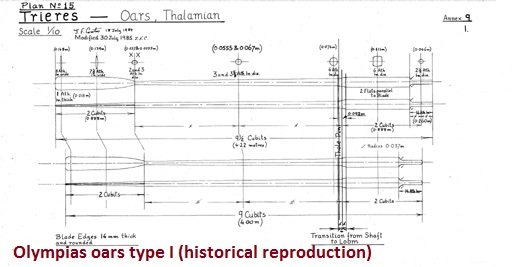
Hi Carl, I didn't thin down the looms. I made the shafts longer and slightly less bulky and shortened the looms. This is more historical (see Olympias oar plan) and I think it looks better. I abandoned the idea to make batches of 5. Instead I go full swing oar mass production 58 needed, 50+8 spares (spares attached to the centre deck railing), so it will become boring to do small batches. I cut to size and marked all and turned 1/3 of what I need yesterday. It will take me a week or so to finish the whole bunch, but better this way I think. They're made of alder wood....turns very nicely. More in a week, Robin
- 473 replies
-
- 8
-
-
- greek bireme
- dusek
- (and 1 more)
-
Oops! Before you start a demolition party....it looks like you can get them in place without the use of a hammer. When you fit one side underneath the board...gently bend the seat and get it underneath the other side...it looks as if it's possible. I hope When that's not possible, because the plywood is too stiff....can make them from easier to work with scrap/spare wood perhaps? You can do it! Robin
- 84 replies
-
- 2
-
-
- hanse kogge
- dusek
- (and 1 more)
-
Thanks Frank....and thanks to all who follow, like or just drop in. I like the oars also, but I think I can thin down the shaft just a tad bit more...also a somewhat more pronounced transition between the shaft and the loom. It's good to look at my own photo's with an open mind. Back to work now...oars to make and hearts to fiddle with. More soon, Robin
- 473 replies
-
- 5
-
-
- greek bireme
- dusek
- (and 1 more)
-
Great! It's a tray for sunglasses and other small things. The dashboard looks fantastic...and the compass...wow! Robin
- 414 replies
-
- 3
-
-
- riva aquarama
- amati
- (and 2 more)
-
Sure...it's gathering dust here. When you message me an adress...I'll send it to you tomorrow.
- 291 replies
-
- 6
-
-
- bounty
- billing boats
- (and 1 more)
-
Nice Steve! When you like...I can borrow you the Anatomy of the Ship Bounty book. I have it for 25 years or so and I don't have plans to build a Bounty, so when you can use it...just let me know. Robin
- 291 replies
-
- 4
-
-
- bounty
- billing boats
- (and 1 more)
-
Not sure if it's of any use for you, but I found a nice image of a truck in a book about masts and rigging.. With one or two holes.
- 1,144 replies
-
- 4
-
-
- snake
- caldercraft
- (and 1 more)
-
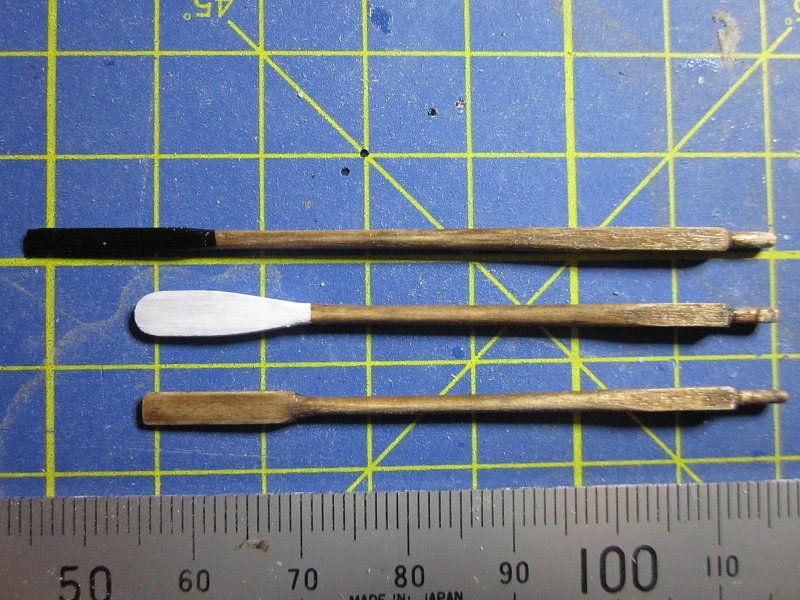
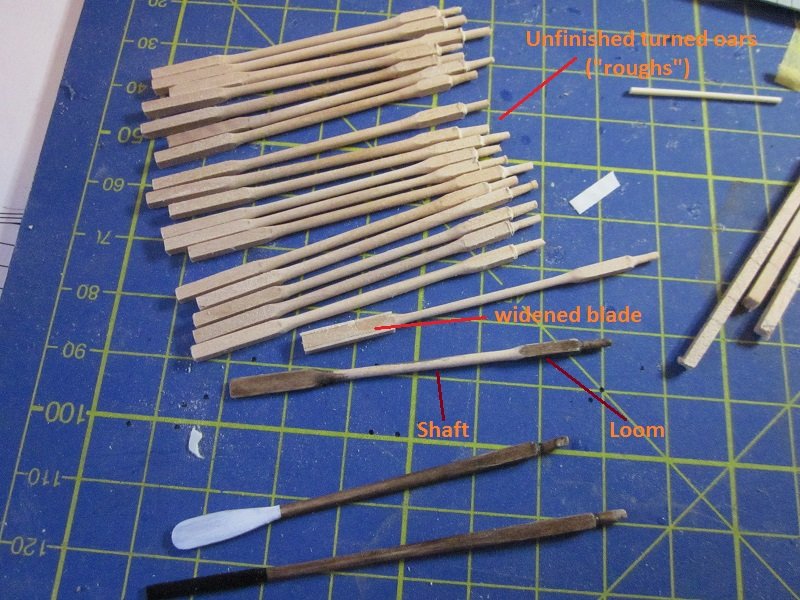
The finished oars after final sanding and staining. Painted the blade of the "Dusek oar" black. Like the Argo replica oars. The Olympias has it's teardrop shaped blades painted white. Probably for observation and / or camera visibility purposes. Likely not historical. Yes.... Well...they're pretty easy to make and I think I can do a batch of 5 in an hour. I'll try to do one batch per day..on the side. Tomorrow I'll start with attaching the 3 heart blocks to the top of the mast. My first step in the world of rigging. More soon, Robin
- 473 replies
-
- 10
-
-
- greek bireme
- dusek
- (and 1 more)
-
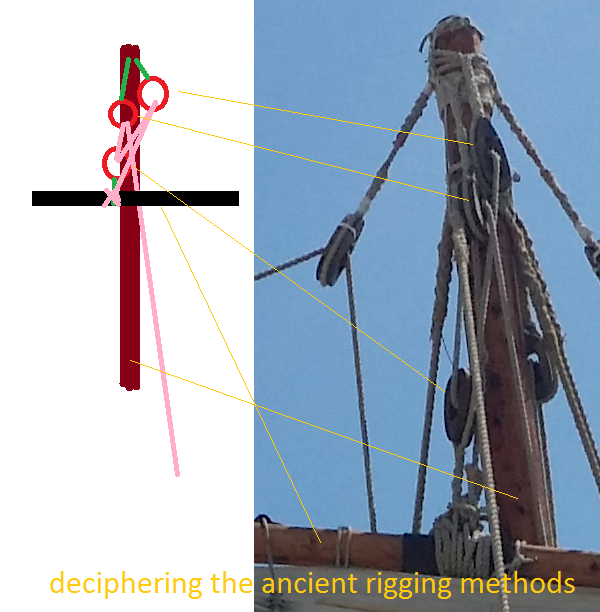
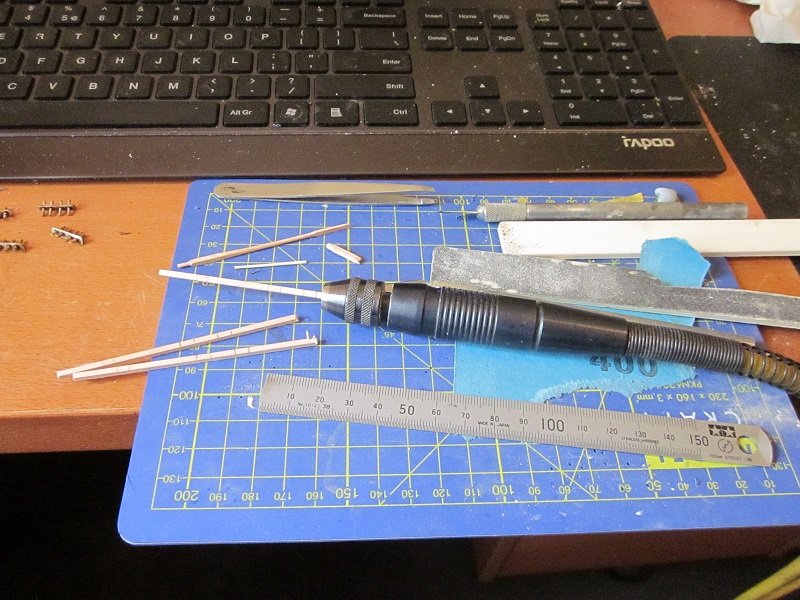
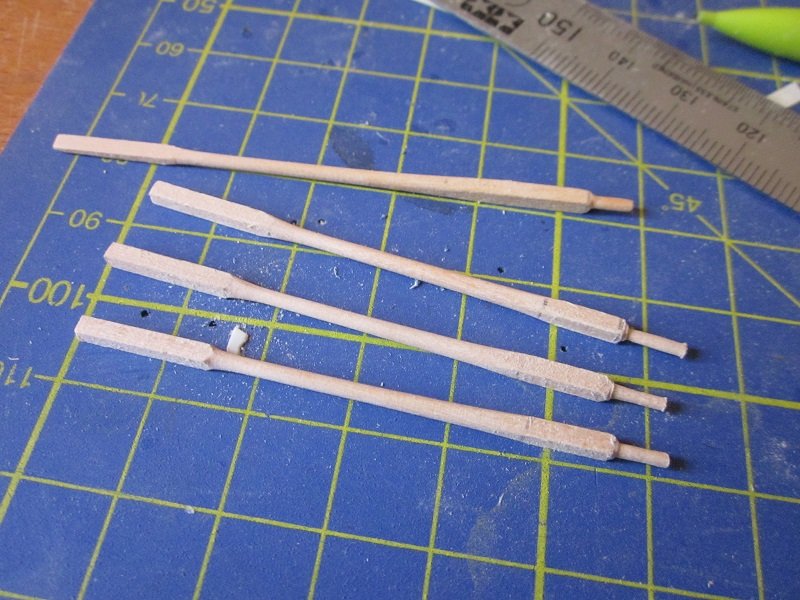
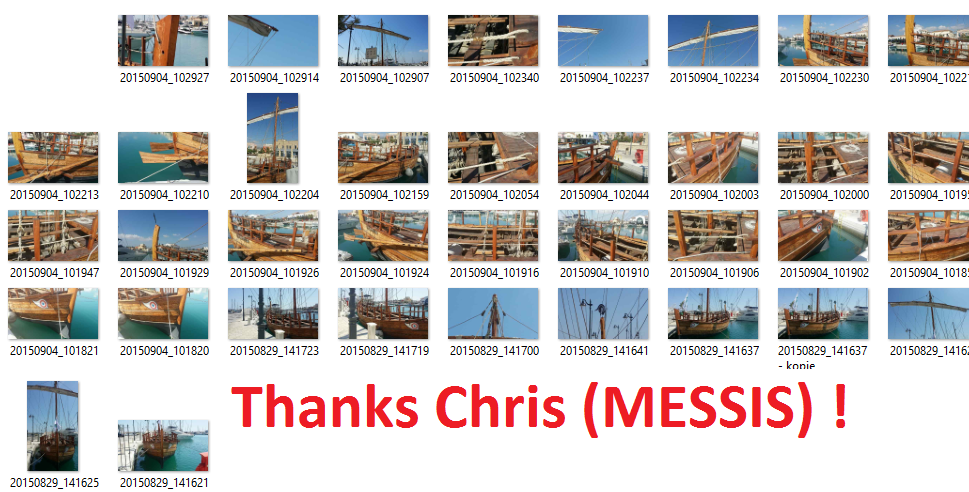
Here we are again... With the photo's MESSIS provided I can figure it all out. Takes time, so I'm slowing down a bit at the moment. But....I did some more. The oars I promised.... Olympias (origninal) oar plan. To bump performance they equiped the Olympias later with oars with teardrop or paddle shaped blades. These oars are not historical correct and I wondered why, so I asked a friend who was a university rower (in younger years). His verdict: larger (teardrop, or whatever) shaped blades perform well on calm water, but are less suitable for rougher sea condictions. The Olympias only goes for a swim when the weather is nice, so straight blades make more sense for sea going "real" ships. So...making the oars... With the Dusek tutorial video...it's a piece of baklava to make them. After turning the 2x2 mm dowels, using my proxxon flex shaft...low speed...I call them "roughs". The 3 types of oars. The Dusek plan oars are too long and have narrow blades, so I glued 0,5 mm wood strips to the sides before sanding the blades and adjusted the lenght to the historical 9,5 cubits (4,22 m). The third is the Olympias "cheater" oar. (1 mm woode strips) I'll use the historical correct (Olympias type I) oar. Furthermore...made some more pin rails, but not worth showing. More soon, Robin
- 473 replies
-
- 12
-
-
- greek bireme
- dusek
- (and 1 more)
-
Congrats on finishing your first. It surely doesn't look like a first! Such a nice build. I look forward to your next. Robin
- 114 replies
-
- 1
-
-
- swift
- artesania latina
- (and 2 more)
-
I have the Amati cutter. It's a neat tool, but not fantastic. When you push down the arm with the blade it can easily move sideways, so you won't cut straight. I solved this to mark the base where it's 90 degrees, bit still...keep an eye on it. Other issue...there's no workable scale (there is something, but useless), so you need to mark the right lenght with a piece of tape. Overall....nice and cheap, but it could be better. I'm still happy with it. Robin
-
Well...sometimes. On most plastic models, because decals can look bad on matt varnish ("silvering" and water and decal glue stains) and they're a pain to apply on matt. So, gloss varnish....then the decals and matt varnish to finish with. Since I have to work with ropes now, I was afraid the paint can chip or wear off. Acrylic isn't that tough. Gloss varnish is an extra insurance, not sure it's needed, but better safe than sorry.
- 473 replies
-
- 7
-
-
- greek bireme
- dusek
- (and 1 more)
-
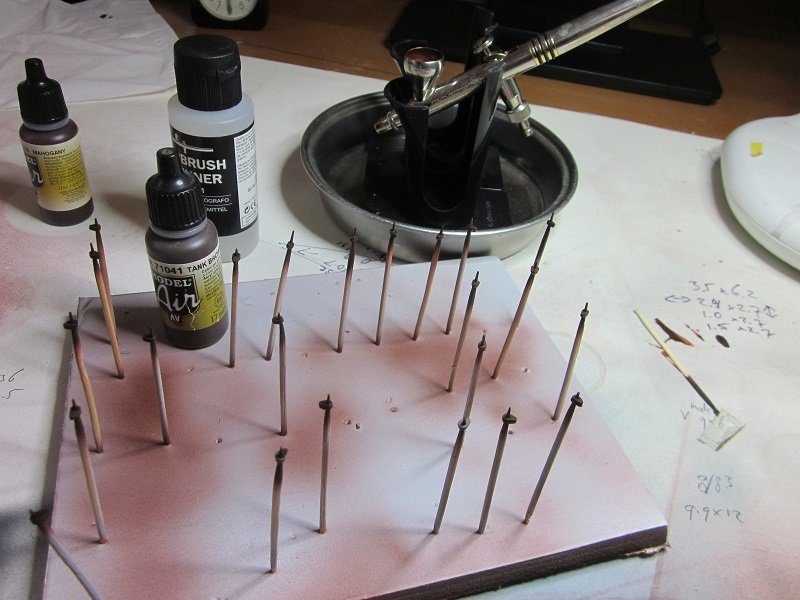
Found 36 fantastic photos showing about all I need to know in my mail box.... I've not much to show at the moment. Been a bussy week, but I finished the hearts.... Painted them a mix of mahogany and panzer red brown, a layer of gloss varnish to protect the paint and a final layer off matt varnish. With the photo's MESSIS mailed (good timing! ) me I can now start working on the mast, stay and rigging. So far not a very productive week, but that's okey. More soon, Robin
- 473 replies
-
- 6
-
-
- greek bireme
- dusek
- (and 1 more)
-
Thanks Messis! I love to see more of it. I'll message you my e-mail adress. Next year I'll visit the Olympias trieres and I'll make loads and loads of detail photos of her. I'll share them with anyone who like to see them. Thanks again, Robin
- 473 replies
-
- 7
-
-
- greek bireme
- dusek
- (and 1 more)
-
I also had issues with photobucket this week. Took me ages to get a single photo uploaded. Good luck with your rope quest! Robin
- 84 replies
-
- 1
-
-
- hanse kogge
- dusek
- (and 1 more)
-
Those are the moments where it's best to take the rest of the day off.
- 84 replies
-
- 3
-
-
- hanse kogge
- dusek
- (and 1 more)
-
Well....I tried to make them from wood, but they're just too small. I tried, but the result wasn't as nice and way too fragile to withstand the tension. Now they look good, they do the job and they're more or less the right size. A bit of paint magic is needed of course. So, I think this is the best choise. Better good looking plastic than bad looking wood. More soon, Robin
- 473 replies
-
- 6
-
-
- greek bireme
- dusek
- (and 1 more)
-
Yep! it's very handy. Cheap and sturdy. I also have some Punch and Die sets, but I only use them for really tiny punch outs on even thinner styrene. Robin
- 473 replies
-
- 4
-
-
- greek bireme
- dusek
- (and 1 more)