
HOLIDAY DONATION DRIVE - SUPPORT MSW - DO YOUR PART TO KEEP THIS GREAT FORUM GOING! (89 donations so far out of 49,000 members - C'mon guys!)
×


Robin Lous
-
Posts
564 -
Joined
-
Last visited
Content Type
Profiles
Forums
Gallery
Events
Everything posted by Robin Lous
-
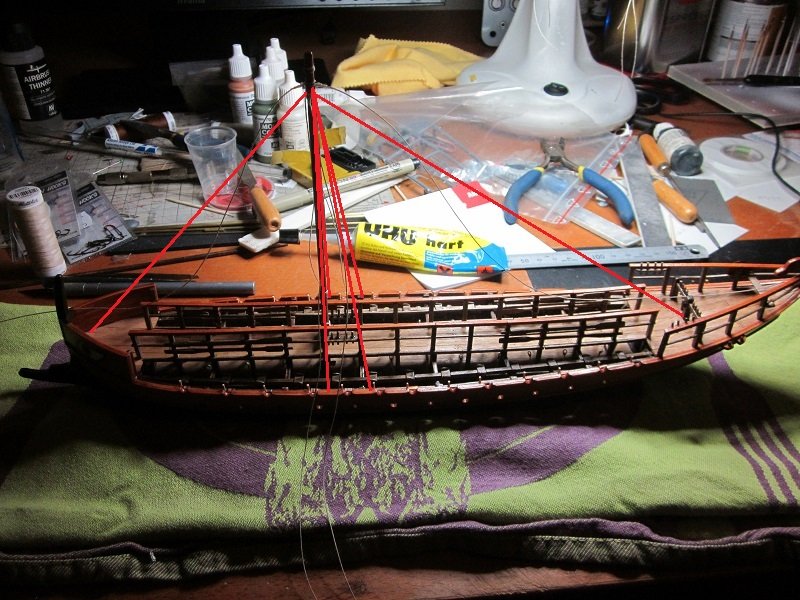
 Mast done. Nothing spectacular and the only reason I post this is because it's a "I'm back on track" photo. So I placed the mast with the 6 stays attached to it (1 goes forward, 1 goes to the rear and 2 to each side). I now must do the blocks. One on each stay and the same amount of blocks attached to the ship to tention the stays. I'm still struggling with the proper nautical word for them. In the Dutch language...and nautical terminology... these blocks are called "jufferblokken"...dead eyes in the English language. The Dutch language makes no difference between one or three eyes. They serve the purpose of a dead eye block...just 550 BC...with one eye. It's what the ancient Greek used. English nautical terminology call one eyed blocks...heart blocks. I just don't know how to call them here. Pfff....anyway....the first update in almost 3 weeks. Now...12 blocks (give them a name...I don't know) to do to attach the stays to the ship. With some luck....monday. More soon. Robin
- 473 replies
-
- 9
-

-
- greek bireme
- dusek
- (and 1 more)
-
Welcome aboard Jedd! Robin
-
Hello From David - A new member
Robin Lous replied to David of Berwick's topic in New member Introductions
Welcome aboard! Robin -
I agree with this. The different shades make the individual planks stand out more..and I think that's nice. Robin
- 174 replies
-
- 3
-
-
- gaeta falcata
- marisstella
- (and 1 more)
-
I'm back on the shipyard! Things slowed down early december and I've done nothing at all the last 2 weeks, but now it's January and I have the time, peace of mind and energy needed to work on my build again. Where was I? Ah! yep....the mast! Here I go again!....more soon! Robin
- 473 replies
-
- 6
-
-
- greek bireme
- dusek
- (and 1 more)
-
Nice start! I look forward to see this come together. Robin
-
Merry Christmas to you all! The kind people here make my build even more enjoyable! I'm not even sure I could manage to do it without you guys. Not even asked for much advise, but the encouraging words are very helpful. I'm so looking forward to continue and finish the bireme. Extreme december business now.....think 450+ customers per day who need advise and gifts wrapped. It's insane! The shipyard will go full swing again soon...right now I'm glad I survived the day! Thanks guys! Robin
- 473 replies
-
- 4
-
-
- greek bireme
- dusek
- (and 1 more)
-
Thanks guys! I learned something. Still wondering how much stuff went overboard while doing this while under fire, smoke, stress, waves? "oops...there goes the rammer...sorry!"
-
Thanks Messis...I can't thank you enough for the photo's you send me. They help me tremendously! It's not only nice for my build, but to know the purpose of all lines and blocks made me understand the rigging of ancient Greek ships. Without your photo's it would look like..."ok, it looks a bit like something greek"...but not even close to the real thing. Thanks a lot! Robin
- 473 replies
-
- 4
-
-
- greek bireme
- dusek
- (and 1 more)
-
Today I finally found some time and...more important...energy to do at least something. Finished the yard (hey! it's something!) 5 of the lines will go down alongside the mast. The rest will go to the several pin rails on the rear deck. The 2 sheet lines and the 2 lines from the tips of the yard can wait. I'll now "do" the mast. Not too much work...6 stays and 5 blocks fixed to the top of the mast...plus 6 blocks on the end of the stays. Maybe the mast and yard can go on before Christmas? That will be nice. More semi-soon again! Robin
- 473 replies
-
- 10
-
-
- greek bireme
- dusek
- (and 1 more)
-
weren't the guns turned to the lenght of the ship to reload? Seems close to impossible to properly clean the barrel and ram in the next shot otherwise.
-
Don't worry too much about it, you're learning and improving. No idea how you managed to do it, but your hull looks pretty good. Is it some kind of sorcery? The first photo's of your planking scared me, but it really does look smooth (and watertight) now! Perhaps not perfect, but who cares? and your next build will benefit from what you learn now, A full bonus point for stamina. Well deserved! Cheers! Robin
-
When you're looking for something like this... I found them on a Dutch modelshop (mainly RC) website...several sizes. The smallest is 8mm long, but it doesn't say anything about the eyebolt diameter. http://www.quartel.nl/webshop/productdetails.php?id=AE5300-08 Hope this helps. Robin
-
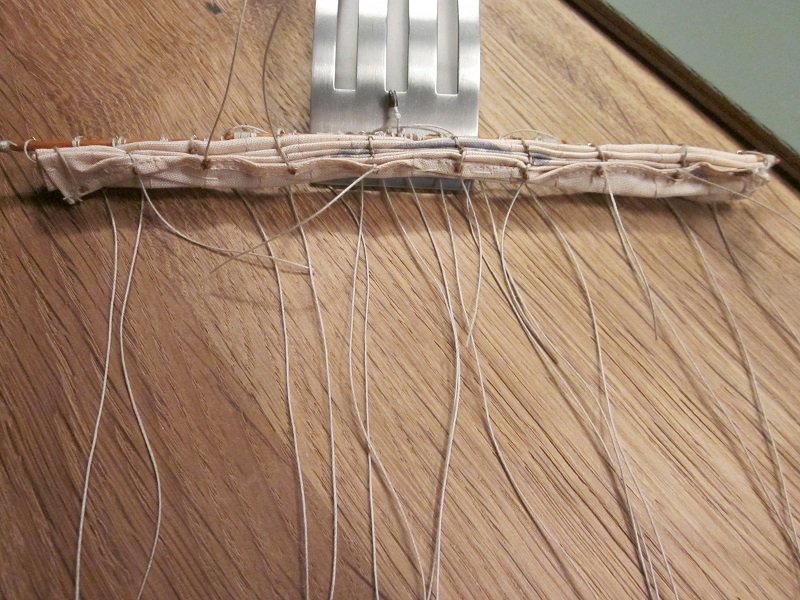
Thanks Carl...and...yes...I read and thought about that, but I wasn't sure about what to do with the sail, so I kept the full size. I was also curious about the the curtain system, so I made it 100% functional. I'll reduce the size of the bundle more, but it will still be oversized.....for future builds I'll use half size or tissue paper. Edit: I just checked what's possible with what I have now...on the photo shown the thickness of the bundle is 1 cm (loosely pulled up). When I pull it tight and press the sail together to the max it will be about 5 mm thick (35 cm converted to real size). I think that's acceptable, specially since the sail wasn't tied to the yard...just pulled up by the bunt and clewlines. I plan to tighten the centre part of the sail (8 buntlines) and let the edge (the clewlines) sag a bit. (pulled down by the sheet lines (Dutch: "schoot"). Note: the 8 buntlines will go to the large pin rail on the rear deck. The 2 clewlines and the sheet will go to the pin rail on the railing on the rear deck. Lines from the tip of the yard will also go there. With 1 stay going aft...15(!) lines altogether. This will result in the typical ancient Greek "harp look" rigging.
- 473 replies
-
- 7
-
-
- greek bireme
- dusek
- (and 1 more)
-
A bit quiet on the bireme front at the moment. December is a busy month for me. Not much shipyard time...and when I have time, I'm often too tired to do anything. For a while I thought I was able to finish this build before the end of the year, but I'm afraid it will take me about 2 more months. I more or less finished the yard, sail and most lines involved (6 more will go on...4 of them after I fixed it to the mast). With the sail loosely pulled up. It works! I'll tighten the sail to the yard a bit more and fix the tight bundle with sail coloured sewing thread. That won't be visible. Even when tightened to the max, the sail bundle will be somewhat too bulky, but not too bad I think. More... semi-soon I hope! Robin
- 473 replies
-
- 7
-
-
- greek bireme
- dusek
- (and 1 more)
-
I'm in the middle of an epic fight with yard, mast, sail and countless lines at the moment. So glad I'm doing this on my desk instead of on the ship! Still struggling, but I'm sure it's easier this way.
-
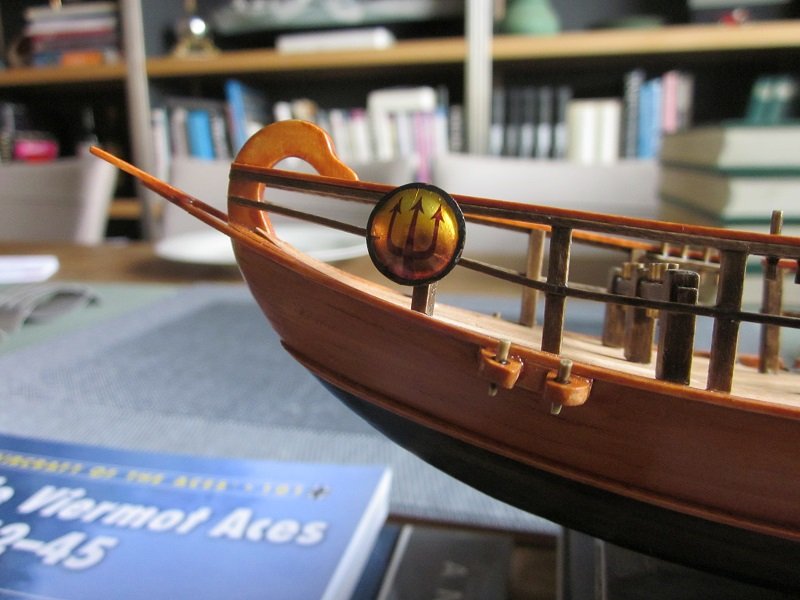
Hi Steven, Sure...I used 0,15 mm thick brass sheet (Albion Alloys). To shape the bowl I drilled a 1 cm hole in a scrap piece of 2mm thick plywood. Lay an oversized piece of brass sheet on it and pressed the bowl with a round tipped hammer. I didn't hammer...just pushed and turned it around until I had a nice bowl in the sheet. Pushed the edge next to the bowl flat...think I used therear end of an Xacto handle for that...not sure. Cut out the shield with scissors and filed the edge until I was happy with the result. A trident decal, painted the edge black, gloss varnish. Since the brass sheet is very thin, it's easy to shape. Hope this helps. Or...your build is 1:50 scale, that's very close to 28mm wargaming scale. Take a look at this... http://www.victrixlimited.com/collections/greek-ancients/products/greek-unarmoured-hoplites-and-archers Robin
- 473 replies
-
- 10
-
-
- greek bireme
- dusek
- (and 1 more)