Hubac's Historian
-
Posts
2,950 -
Joined
-
Last visited
Content Type
Profiles
Forums
Gallery
Events
Everything posted by Hubac's Historian
-
 No worries, Wefalck - technical know-how, such as this, is always welcome here! T_C, I struggle to explain the problem, but it may be easier to visualize with better photography. I’ll try to take some better pictures a little later on.
- 2,444 replies
-
- 4
-

-
- heller
- soleil royal
- (and 9 more)
-
On my working vacation to Batavia Werf, a good number of years ago, I had the opportunity to go aloft to Batavia’s main topmast top. One of the volunteers was a professional climber - Peter (?, if I remember correctly) Meijer and his son Jurrien. They took me up there, one day, and it was simultaneously the most exhilarating and terrifying experience of my life!
- 444 replies
-
- 2
-
-
- Cutty Sark
- Revell
- (and 2 more)
-
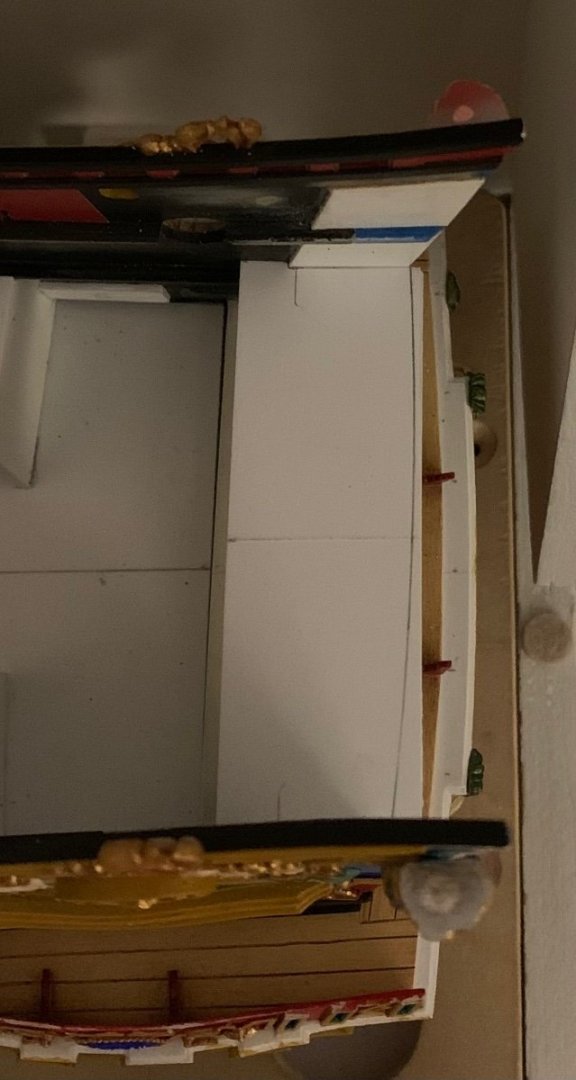
Keith - thank you for posting this excellent link. I believe strongly in this kind of cross-pollination - not the least for which, I now have a new interesting project to follow. That is some beautiful work, Wefalck! Kevin, I’ll be jumping over to your CS page, in a moment, to catch-up. I’m glad this has been helpful, and I love what you are doing there. Yes, Druxey, that is my poor approximation of an overhead plan view. I’m attempting to show how, at each level that I have installed one of these braces, the round-up becomes increasingly tangential. I agree with you and Jan that the best solution to the problem would be to true the starboard profile to the port profile. Unfortunately, the time to do that has long passed; I might have done that before framing-in the stern counter. At this point, though, the whole lower QG is established and it would create a weird break to true the bulwarks above the level of the lower gallery rail. Not to mention the fact that the starboard quarter piece has no place to go, but where it currently resides. I think I have no choice but to play with perception, in this instance, so I will draw some lines on plastic and see what that looks like. A big “thank you” to you all for looking-in and offering suggestions. More to follow.
- 2,444 replies
-
- 5
-
-
- heller
- soleil royal
- (and 9 more)
-
Okay, Kevin - thank you for your thoughts on my problem. I agree that whatever happens, it should all pivot from the centerline. I will mess around with all of that later. Now, as for painting teak: Like mahogany, when teak is used for brightwork, it often has the same iridescent ribbon stripe. I believe there are numerous ways to go about this. The inks are nice because they are only semi-opaque. If I were to modify your particular approach - after my medium sand basecoat, I would apply a slightly dilute solution of the orange ink with a fine sable brush - not too wet - in the long flowing lines of ribbon stripe; not too sparse, and not too dense. Once I was satisfied with that, I would spray a satin varnish seal coat to lock that all in place. Next, I would do the same with your slightly darker ink color. Seal it under satin. Finally, I’d apply a washcoat of near-full-strength ink to get into all the creases and panel lines. Because the stripes are sealed-in, you can then cut the wash ink back with a wet brush, until you achieve just the right depth of color and blending of the stripes. Last, I’d seal the whole, again, with one more coat of clear satin varnish. Achieving the stripe effect, at scale, is difficult with a brush, but my advice would be to not overthink it. As long as the first ink color, the orange, is not such a striking contrast from the base, then it should show well if you make light, sweeping gestures with a barely wet brush tip. You can do and re-do to your heart’s content, right up until the satin coat. If you are good with an airbrush, and have the appropriate fine nozzle tips, you can probably achieve the same or better result. I don’t know enough about ink viscosity to make any suggestions for airbrush thinning, though.
- 2,444 replies
-
- 2
-
-
- heller
- soleil royal
- (and 9 more)
-
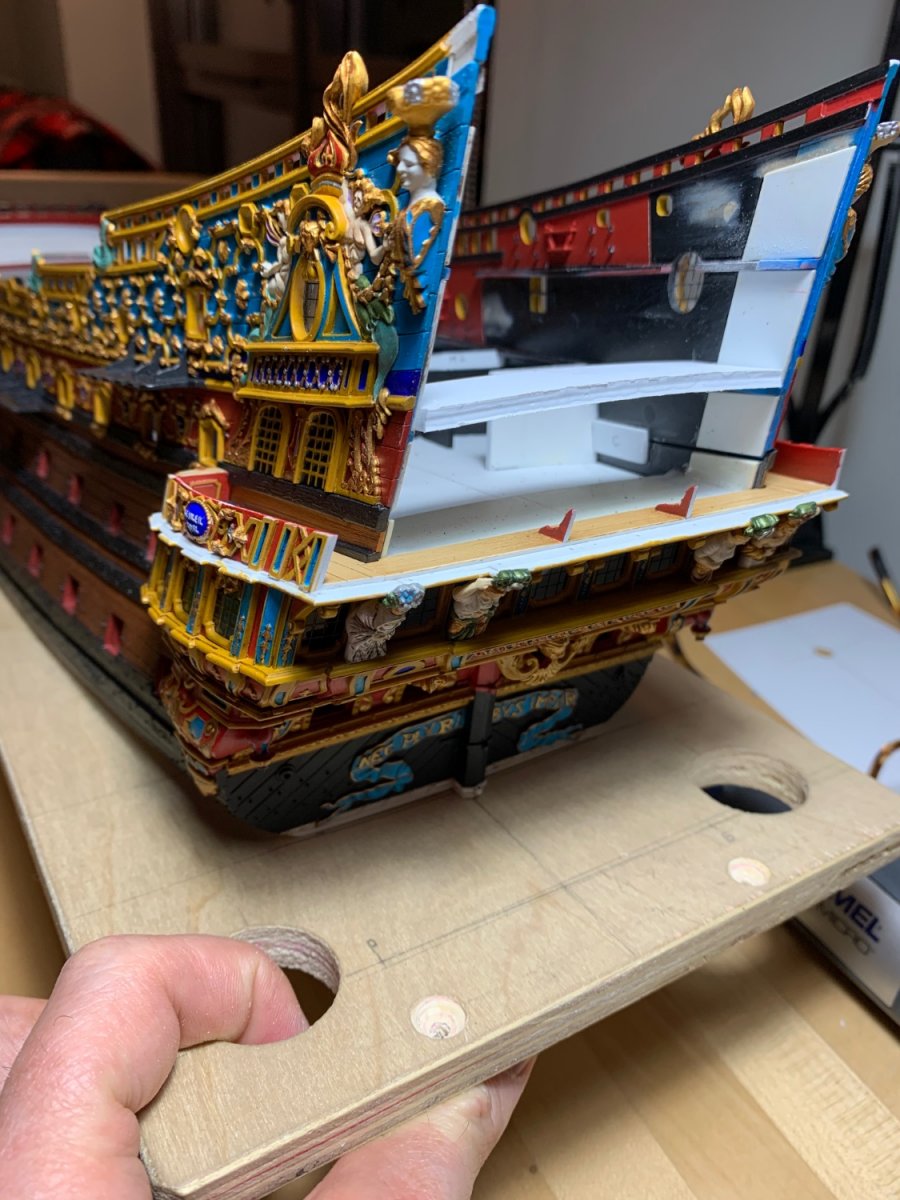
Thank you, Bill! Kevin, let me think on it, and I will respond more fully. Jan, I considered altering the starboard profile, much earlier in the build, because I saw this problem coming. I decided against it at the time because I needed every bit of space available to me to lay out the frieze and the quarter piece and the Africa figure - all relative to the amortisement. Seeing the problem in my imagination, and then seeing it in concrete reality, though, are two different things. So far, the whole stern has been coped together so carefully that these discrepancies of square aren’t really apparent unless you know to look for them. The round-up appearing to flatten out, though, seems likely to draw more attention to this problem area of the stern. Fortunately, the second balcony doesn’t wrap to the quarters. I think I won’t really have a sense for how this will all play out until I can draw a few different arcs of round-up onto the brace, so that I can compare the perception of winding with the balcony below. Now that I have the fit where I want it, I do not think that I will attempt to let the brace further aft. Instead, I’ll glue a strip of styrene to the aft face and that will give me a little extra material to play with.
- 2,444 replies
-
- 3
-
-
- heller
- soleil royal
- (and 9 more)
-
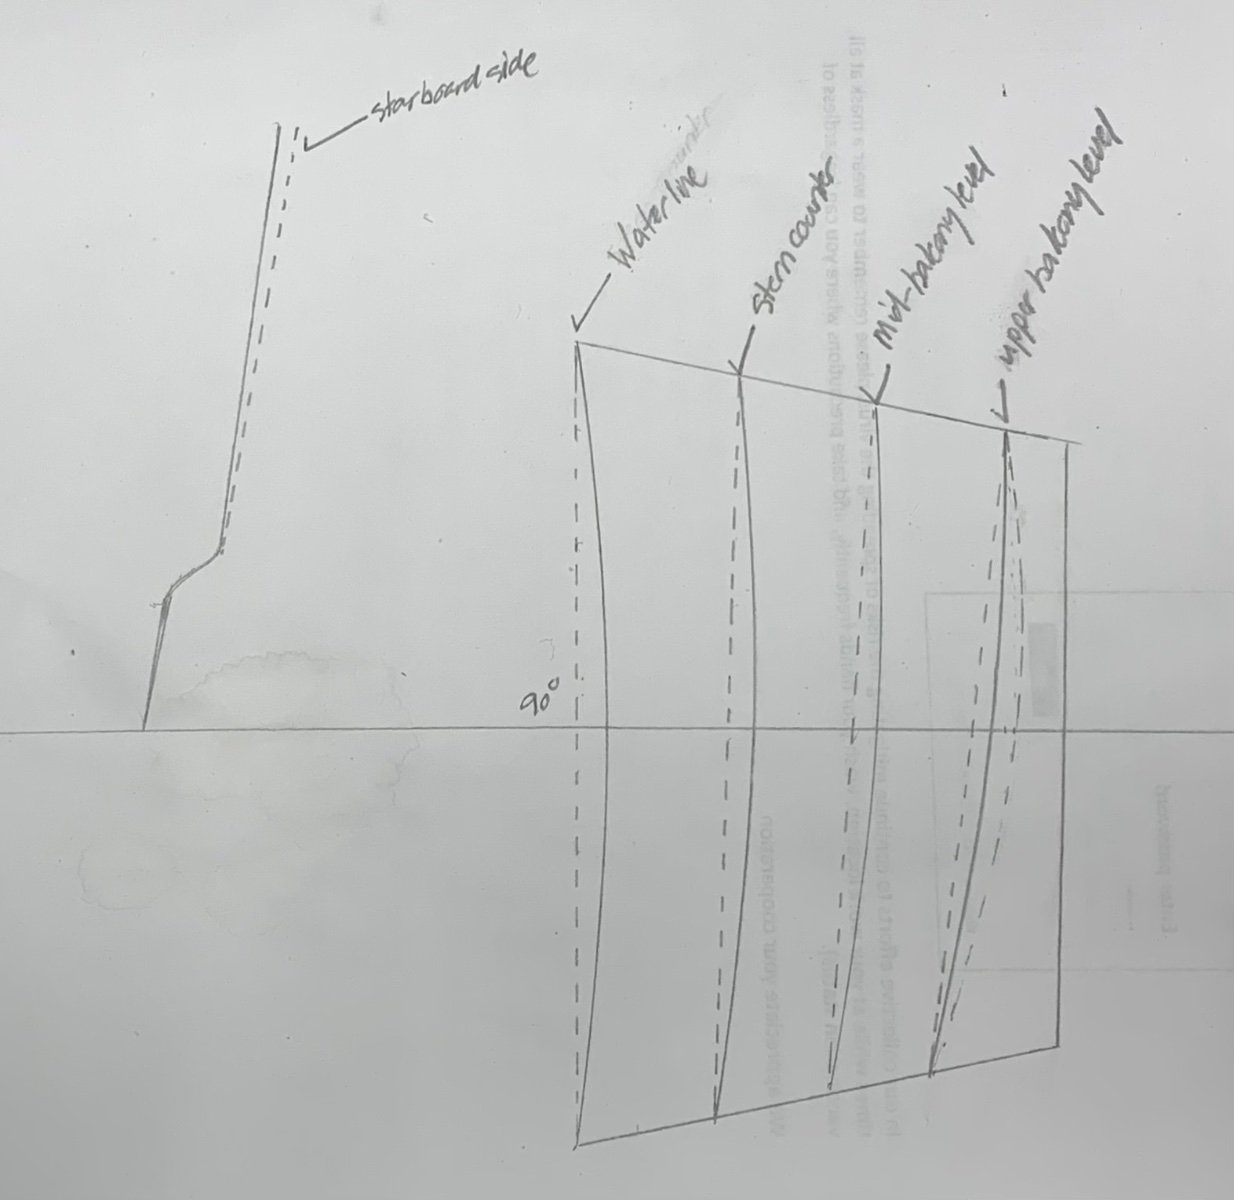
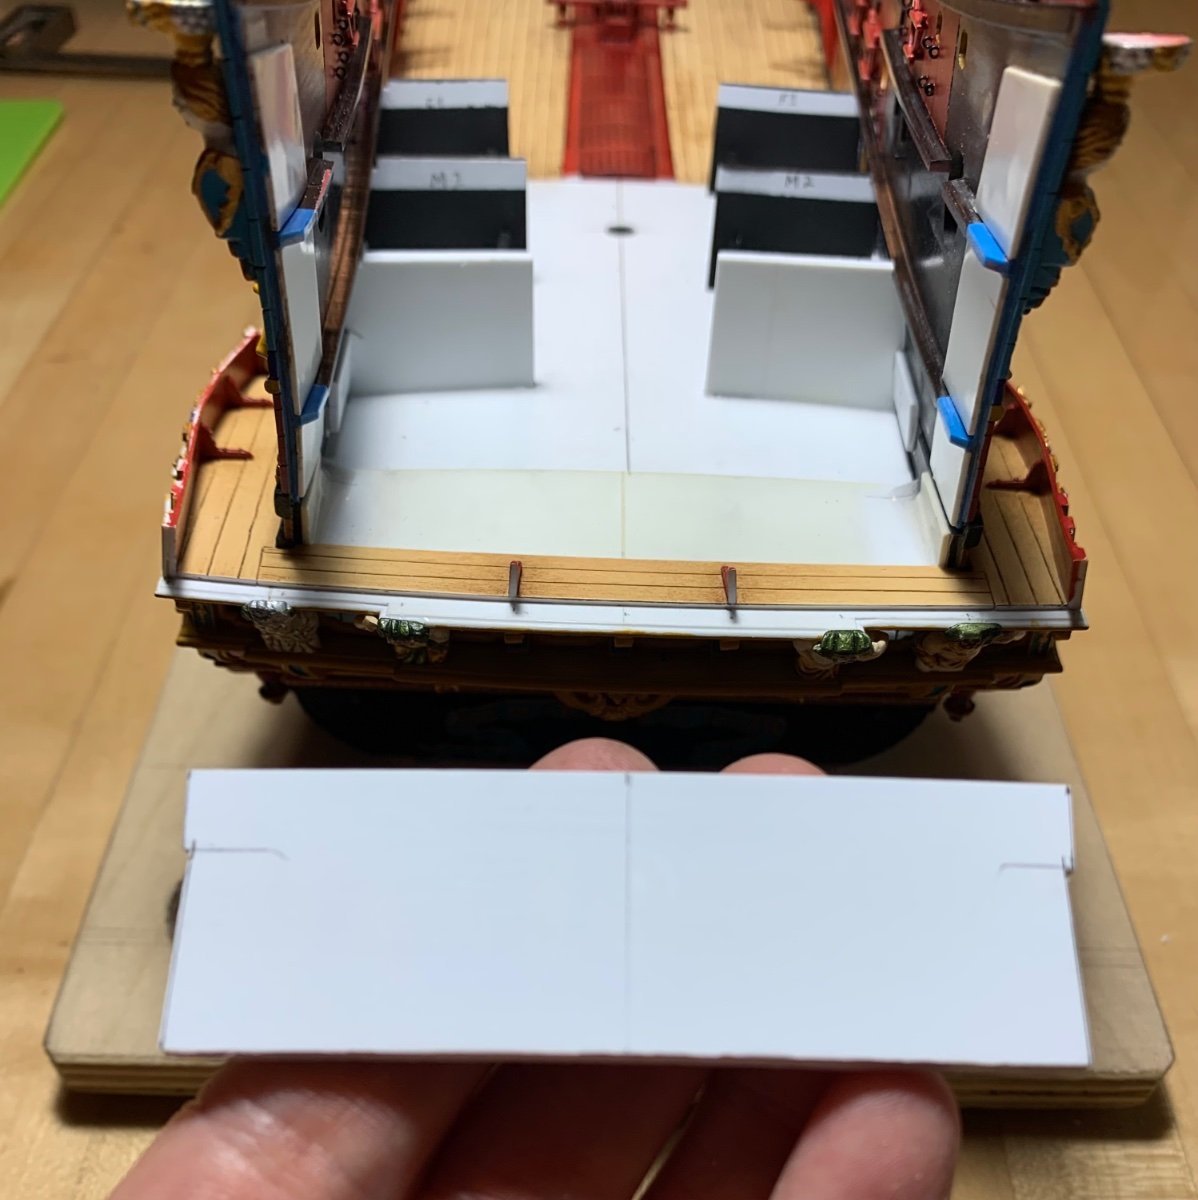
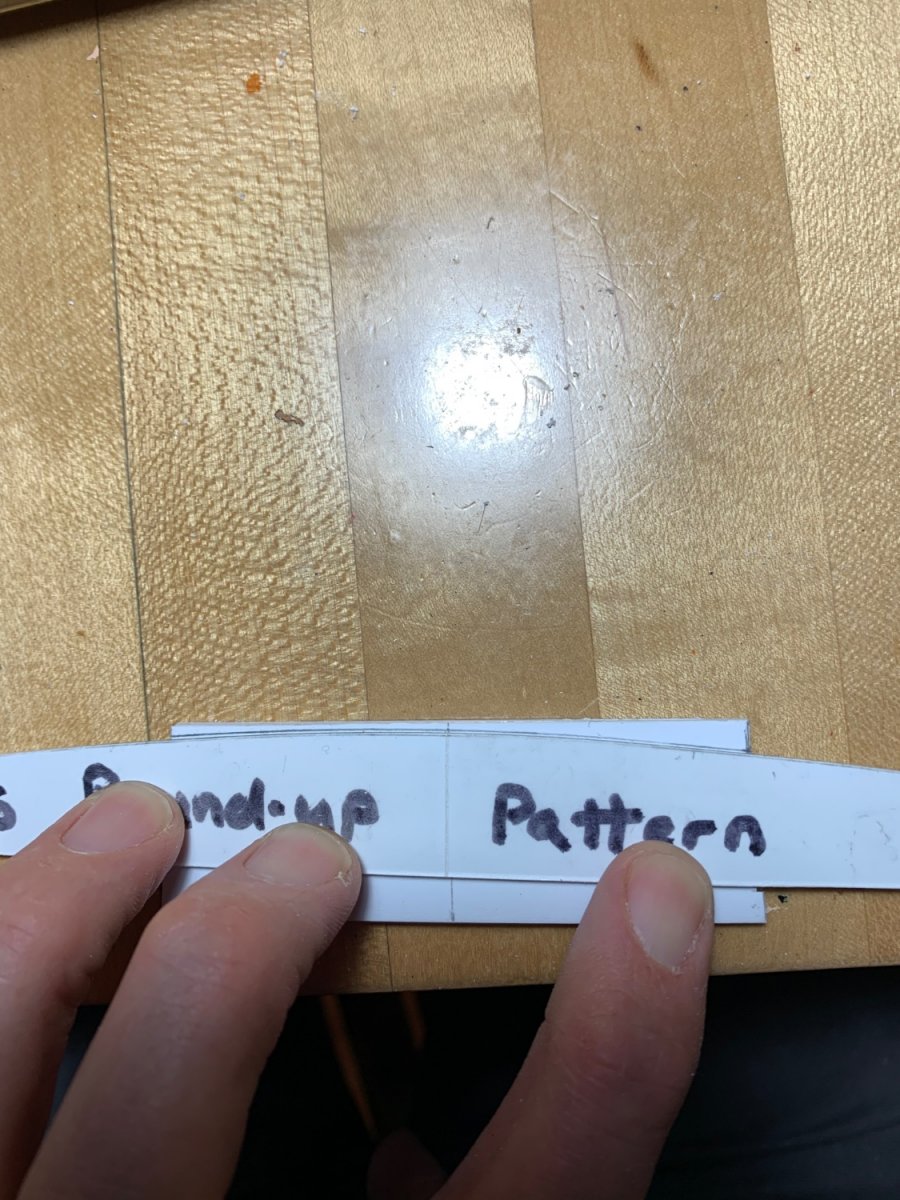
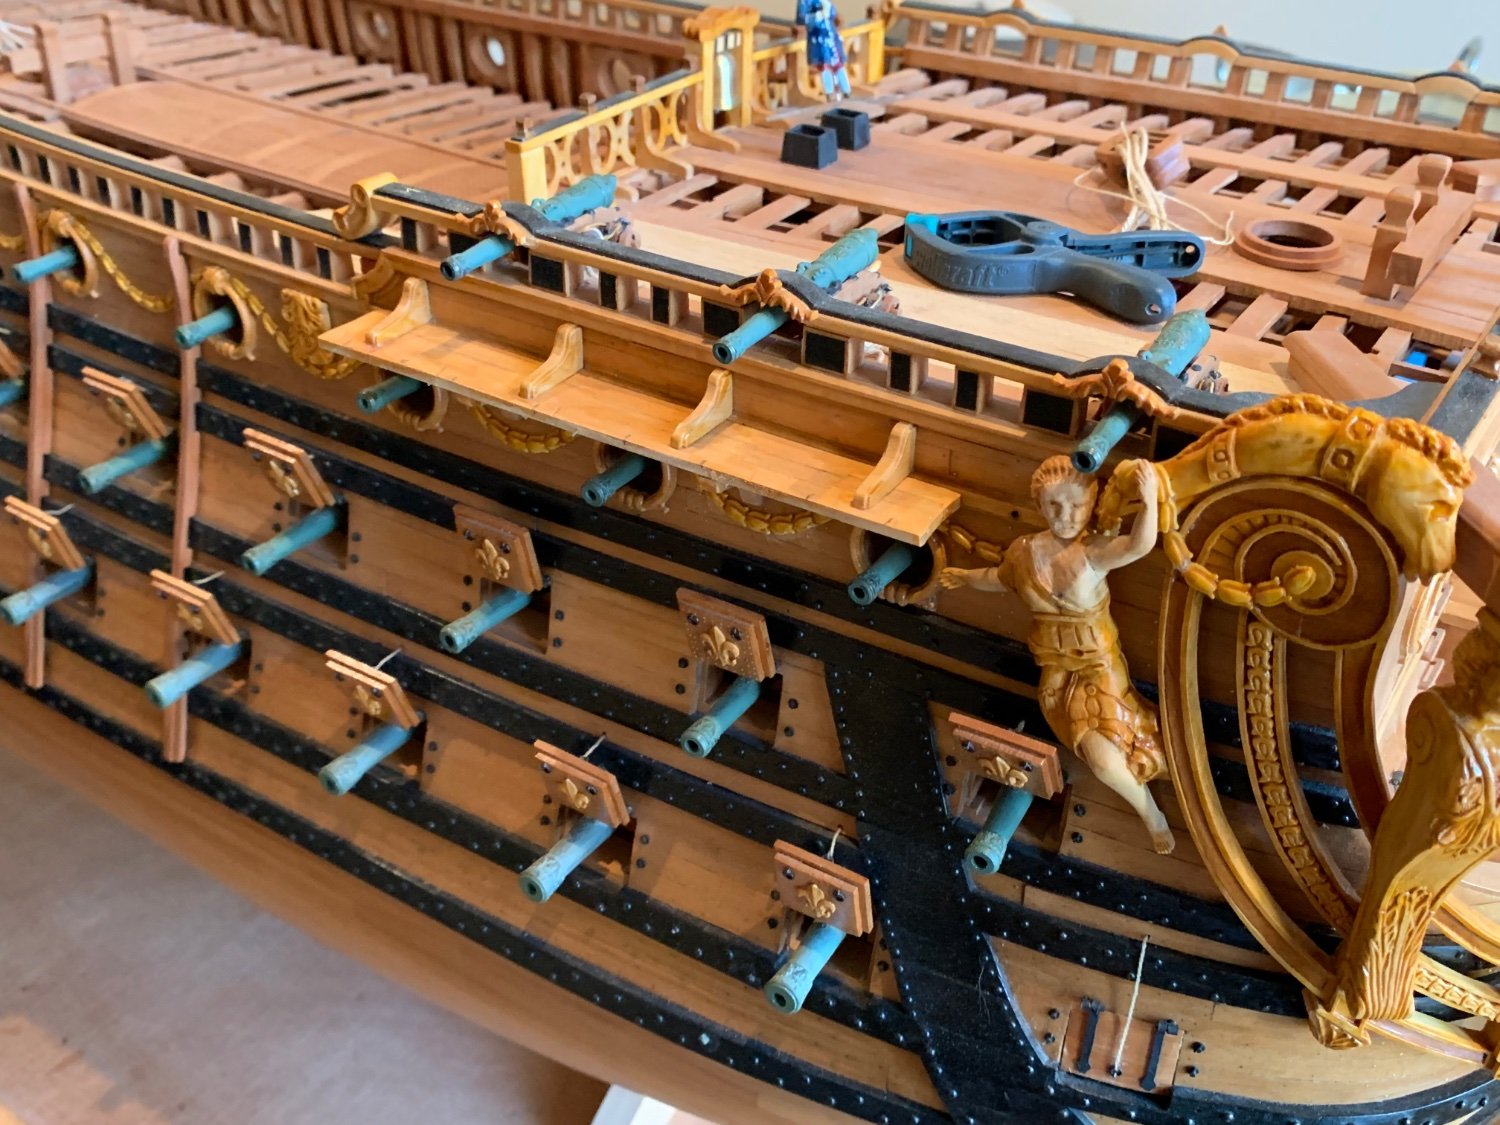
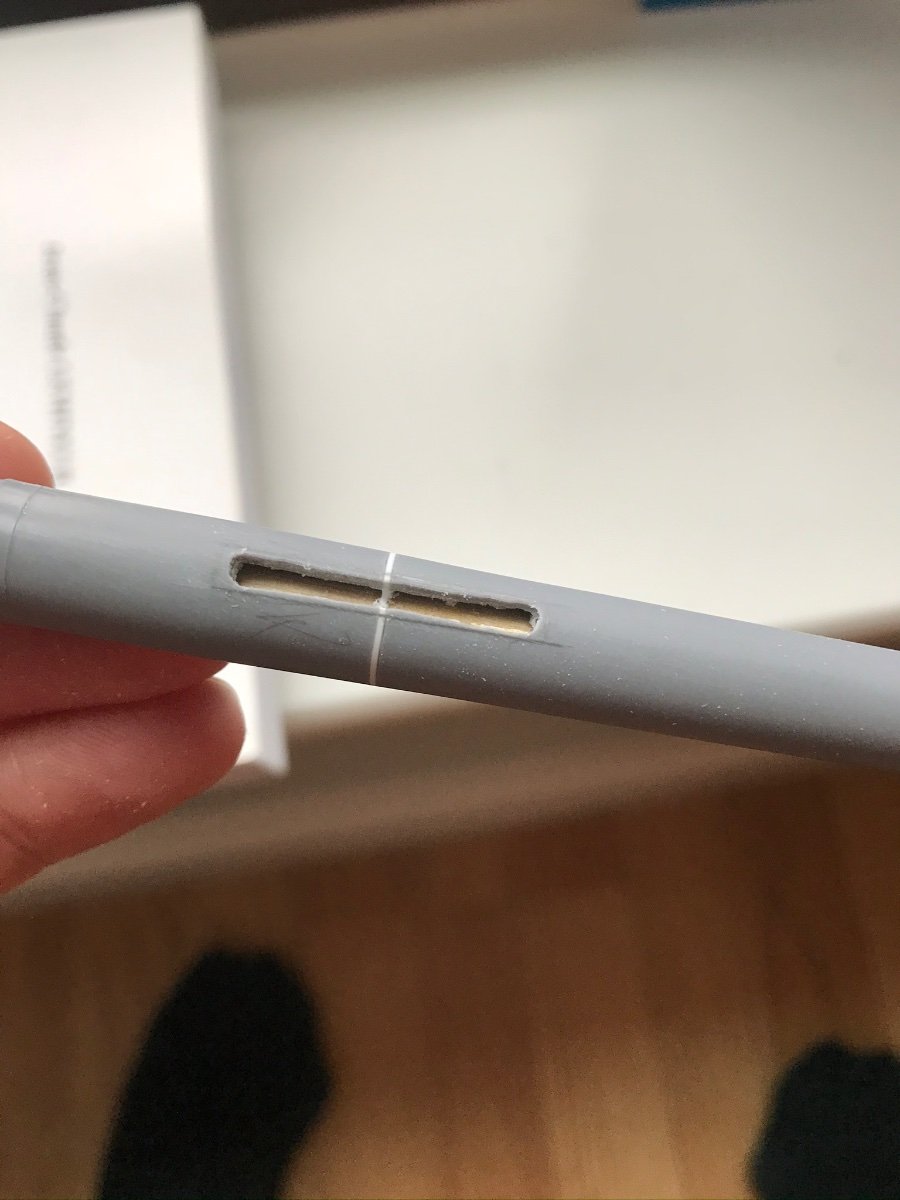
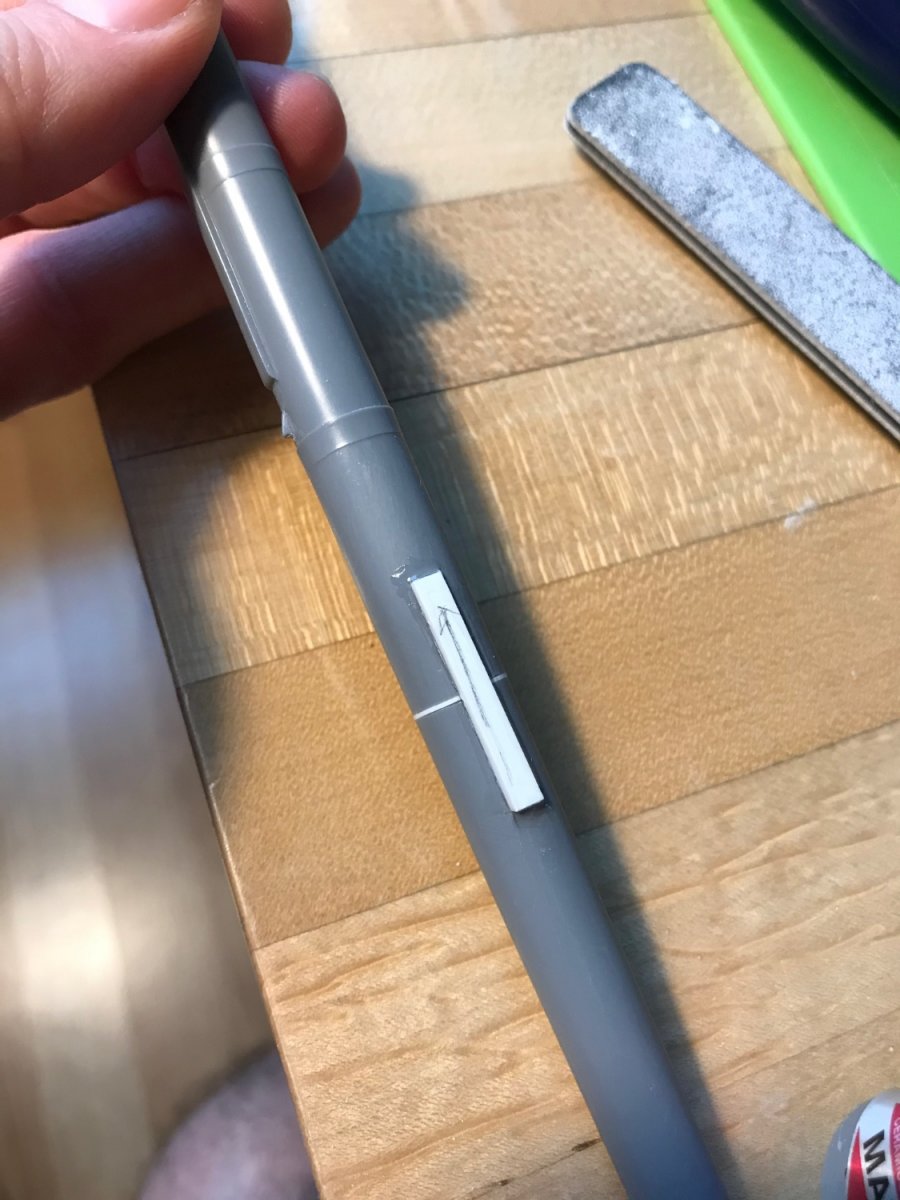
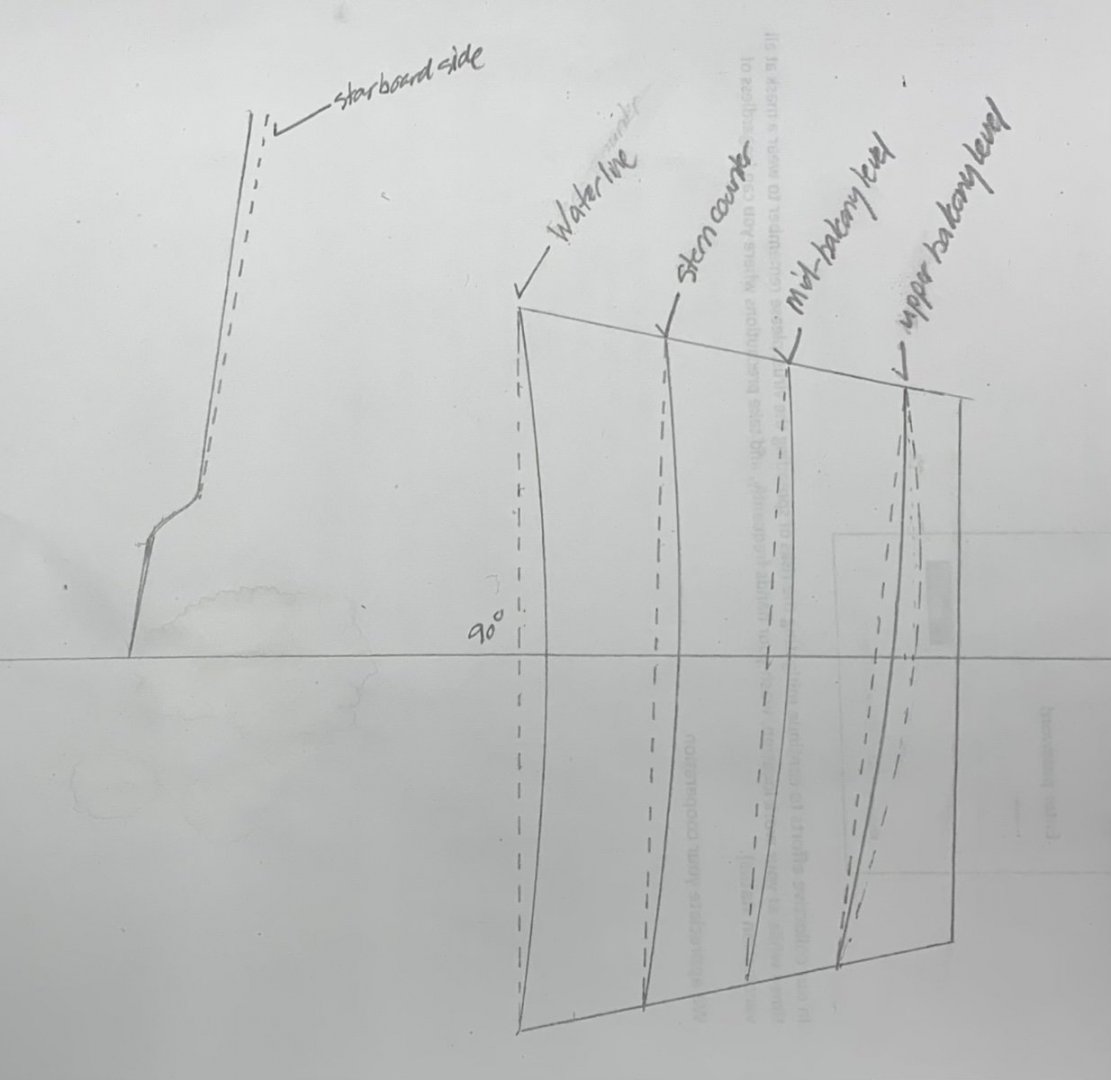
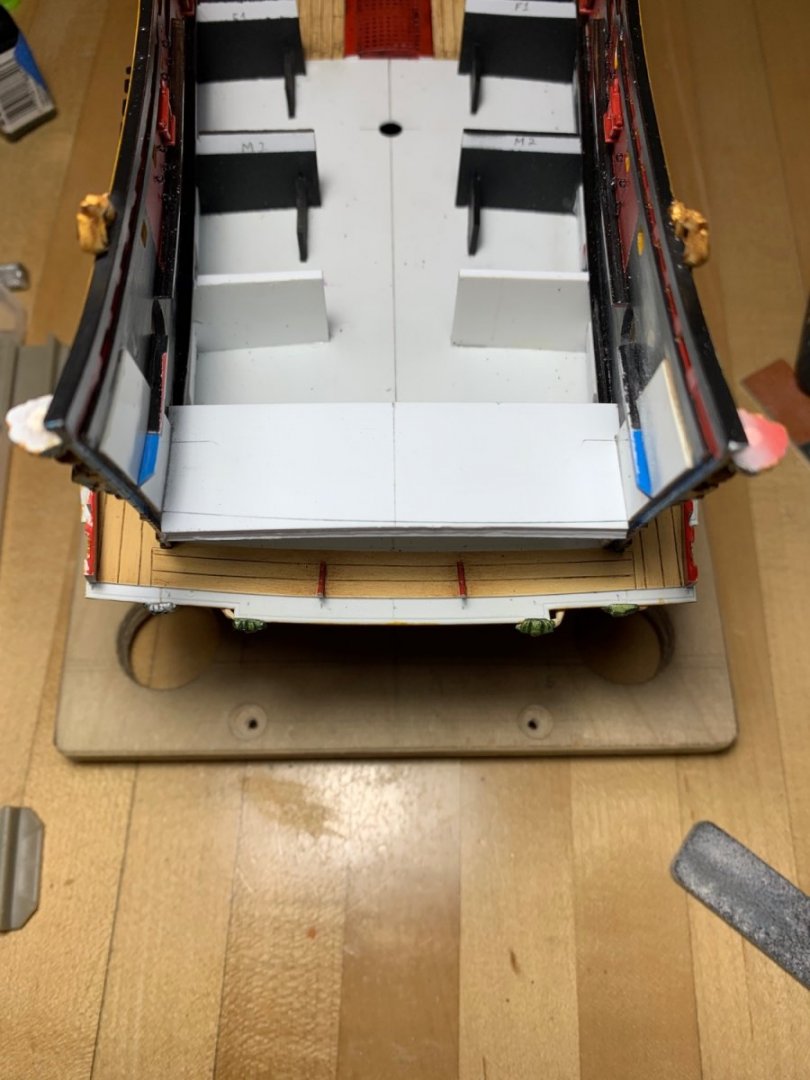
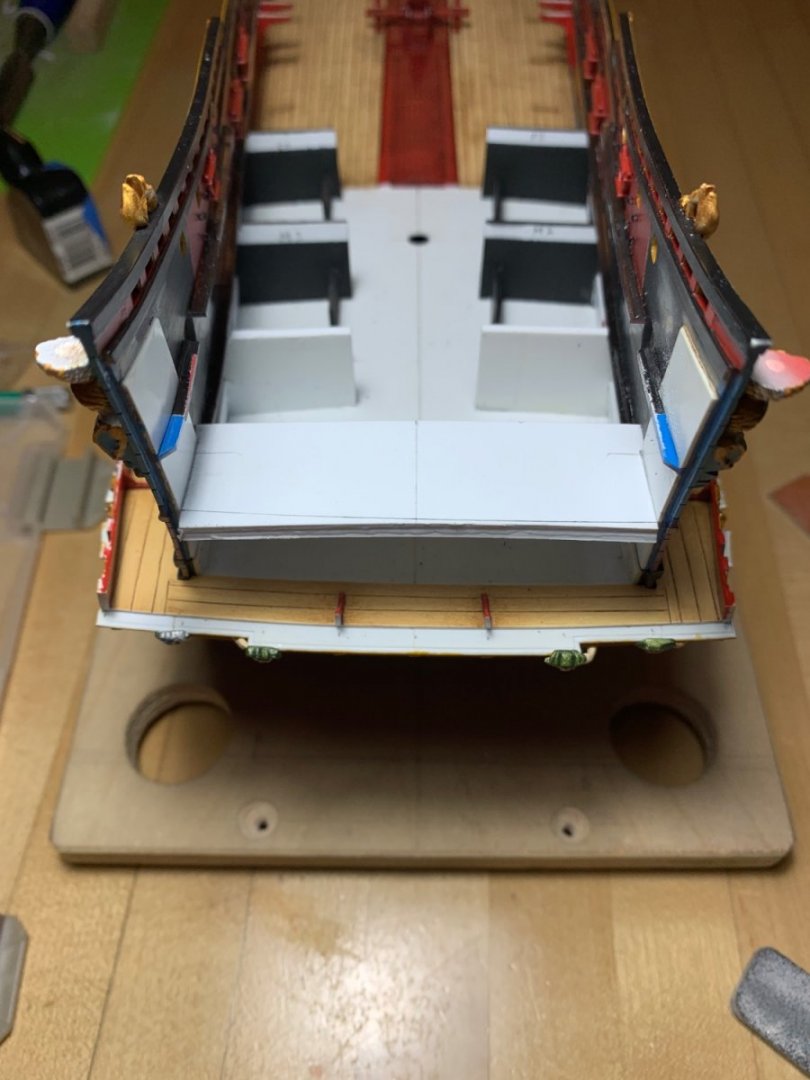
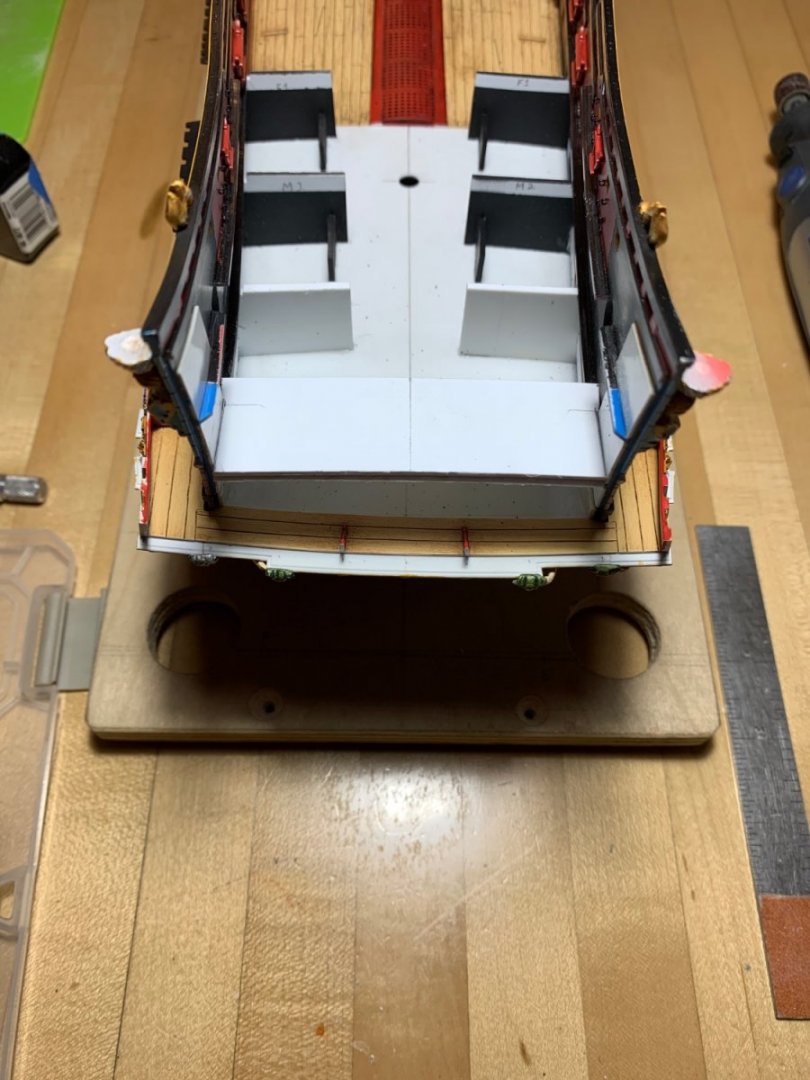
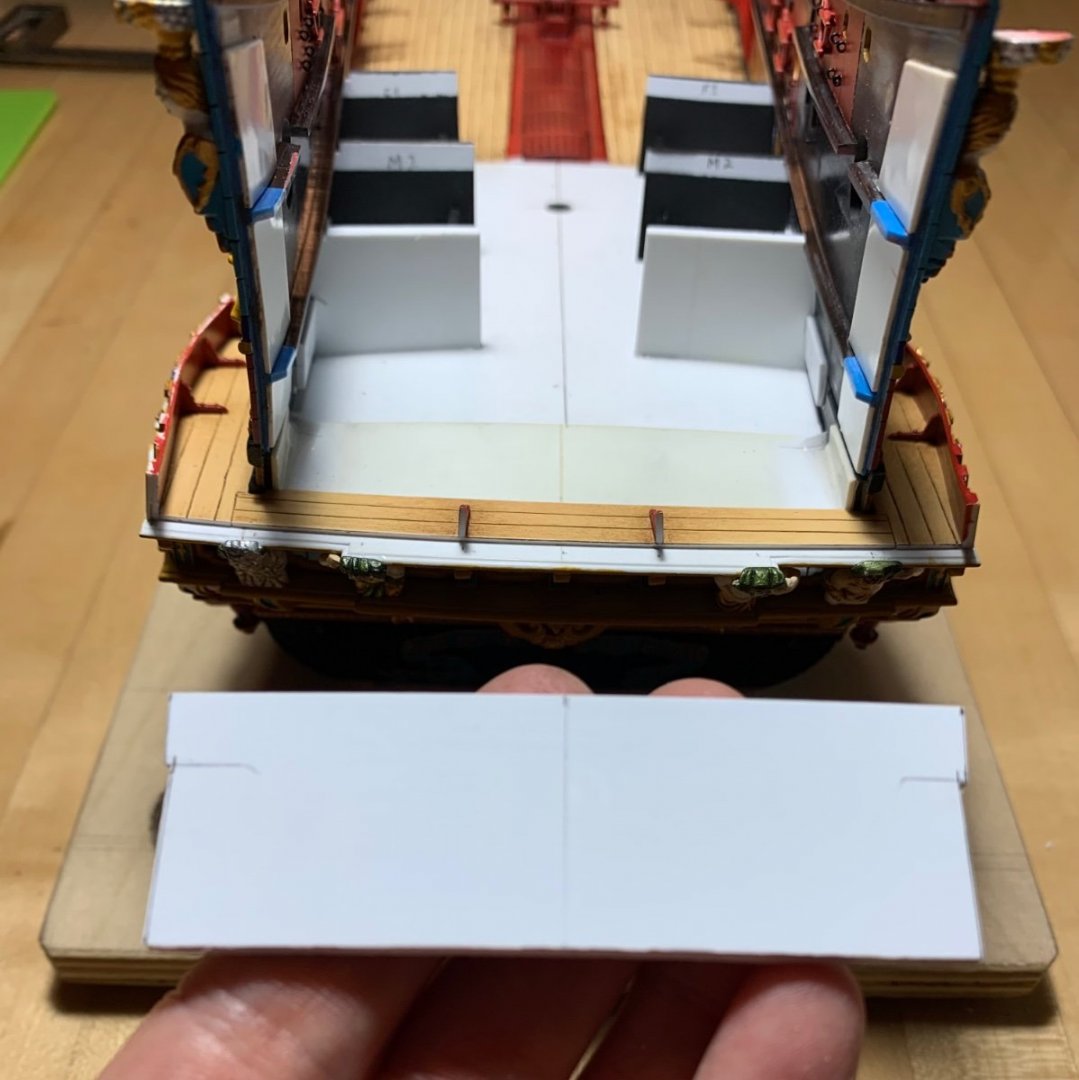
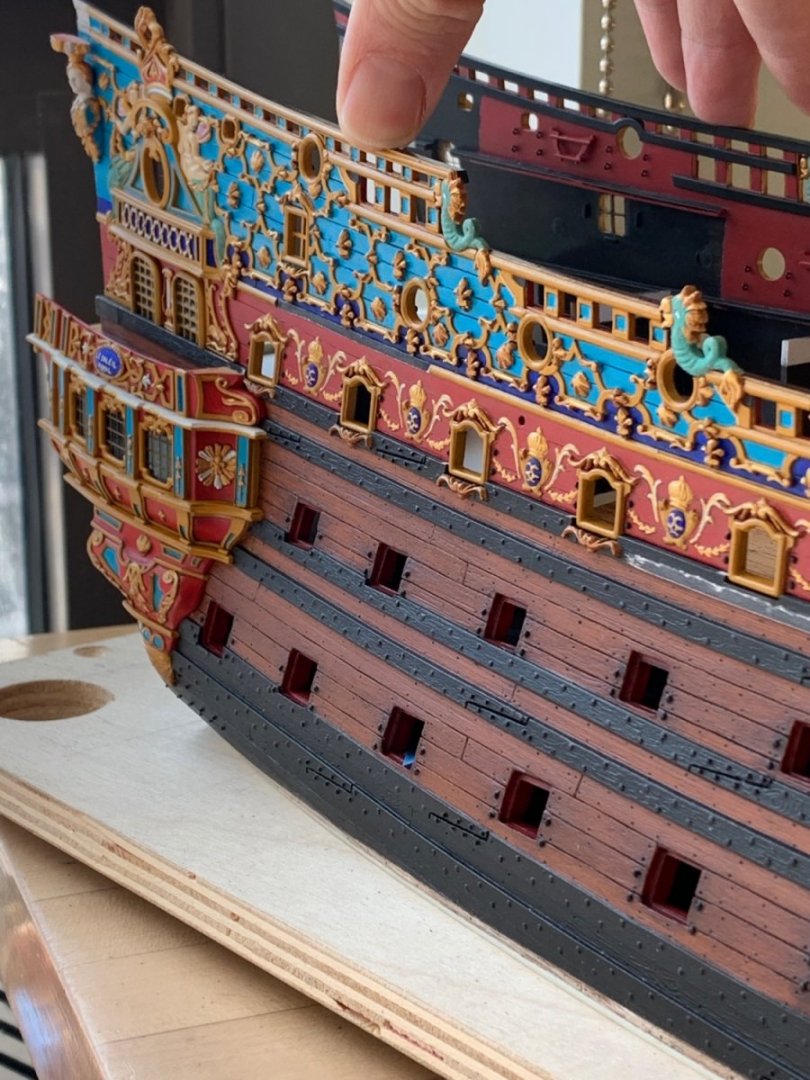
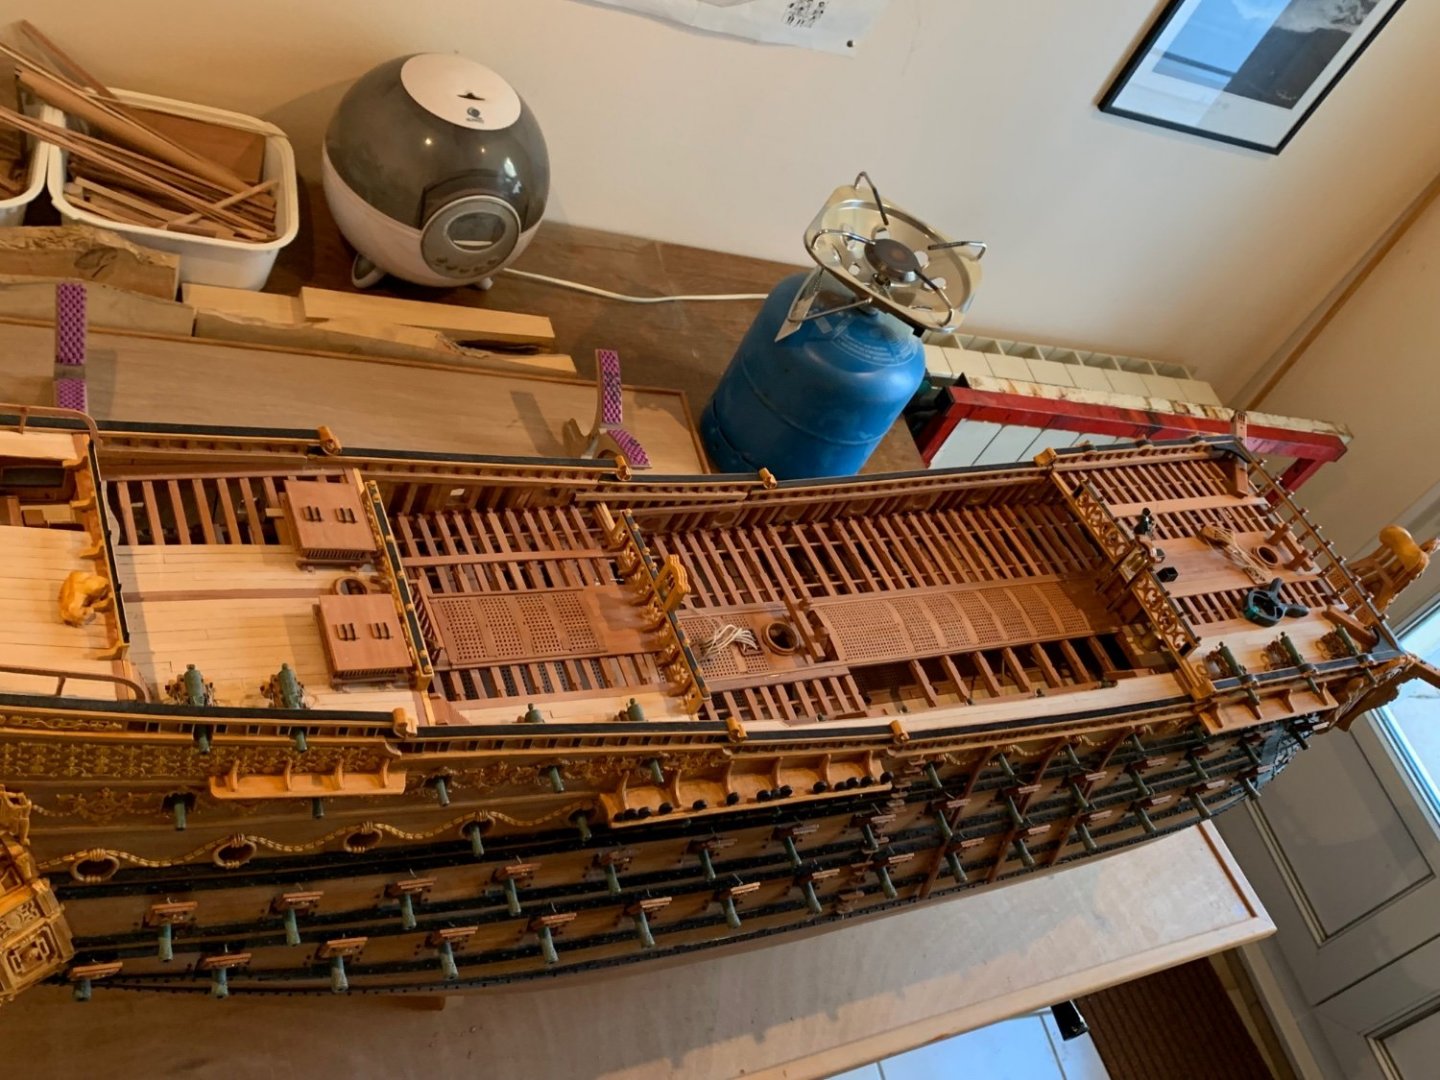
Last night, I spent a few hours fitting the stern cross-brace that delineates the upper limit of the middle tier of stern lights. I took a few pictures that illustrate the degree to which the starboard side projects aft-wards, beyond the same point on the port side. First, I layout a series of widths, from the centerline I scribed into the brace, using a pair of overlapping tic-strips to accurately record these inside dimensions. The resulting layout is within a heavy pencil line of where I need to end up: Then, it’s just a back and forth process of fitting and fettling to get a nice cope with proper bevels to match the interior tumblehome: Not quite there, yet Closer. You can see how much deeper I have to let the brace, on the port side, just to reach the planking rabbet on the starboard side. Still more to go, though. At this point, I was far enough past the starboard plank rabbet to trace the round-up line. Just take a look, though, at the degree to which that round-up line is out of square: I was going to trim to the round-up line and glue-in the brace, before calling it a night, but I decided to let it sit overnight. I am glad I did. This morning, I took a look with fresh(er) eyes. Here is crude illustration of what is happening to the round-up, as the stern rises and becomes increasingly out of square. On the left is a basic plan view, where we are square at the waterline, and the starboard side (dotted line) begins to project further aft than port - up to a heavy 1/8” at the tafferal: In an exaggerated way, the right side of the drawing illustrates what is happening with my arc of round-up, as the stern rises. Two things are at play here. As the tumblehome increases, the segments of that round-up arc become shorter, and give the appearance of being flatter. More significantly, though, as the stern grows increasingly out of square, the round-up arc becomes increasingly tangential, so that it does not bellow-out beyond the stern profile. Much of this project of reverse engineering amounts to tweaking things so that they look right, even if they aren’t right. My inclination, here, is to tweak the round-up arc, at this level, so that it is a tighter radius across this shortened span (hash line furthest right); then, I will restore some projection beyond the starboard stern profile. The other consideration is that the upper stern balcony, at this level, will certainly provide a sense of projection, but it may amplify this discrepancy when viewed against the lower balcony - particularly, if I do not alter the arc of round-up; one viewed against the other like winding sticks. So, what say the real shipwrights - does what I am proposing make good sense? Is this a reasonable hedge against my stern beginning to appear flattened and twisted?


- 2,444 replies
-
- 12
-
-
- heller
- soleil royal
- (and 9 more)
-
Yves, your coppering work really looks terrific; very meticulous and neatly done!
-
Does that mean that the interspace to the coamings would be regular butt-shift planking out of deal?
-
I am far from knowledgeable on 18th C. practice, but would a deck be done in anchor-stock planking?
-
Thank you Henry! I knew I could count on you for correct rigging terminology.
- 2,444 replies
-
- 4
-
-
- heller
- soleil royal
- (and 9 more)
-
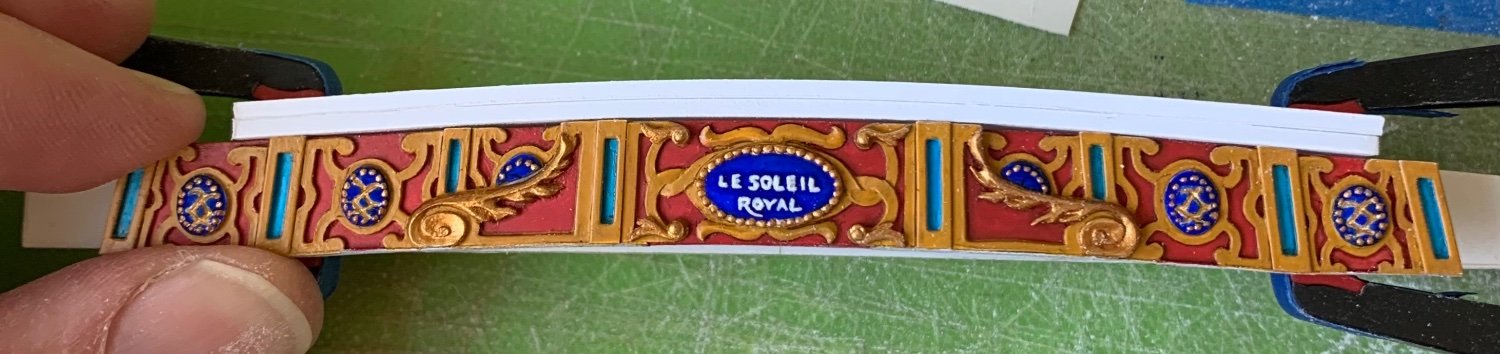
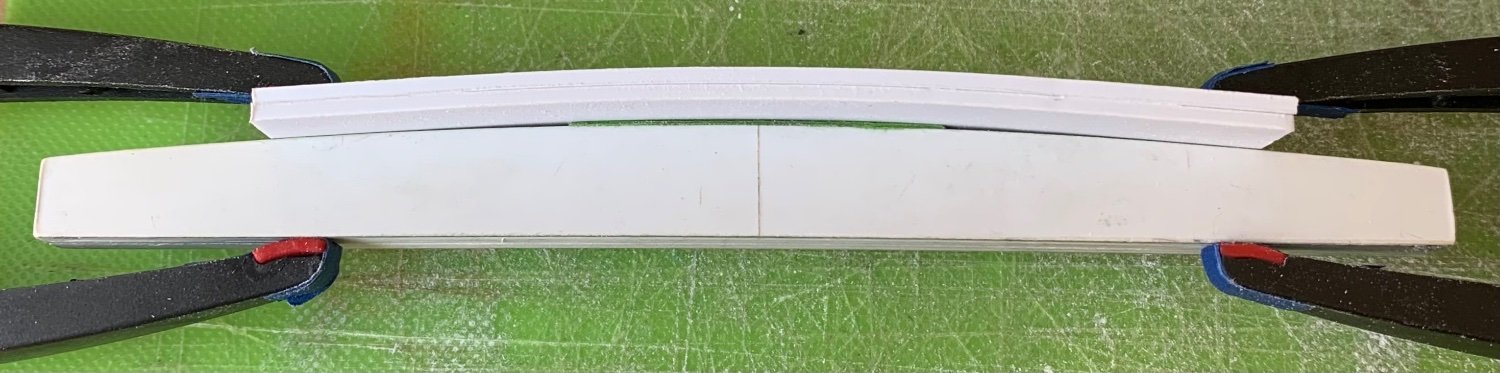
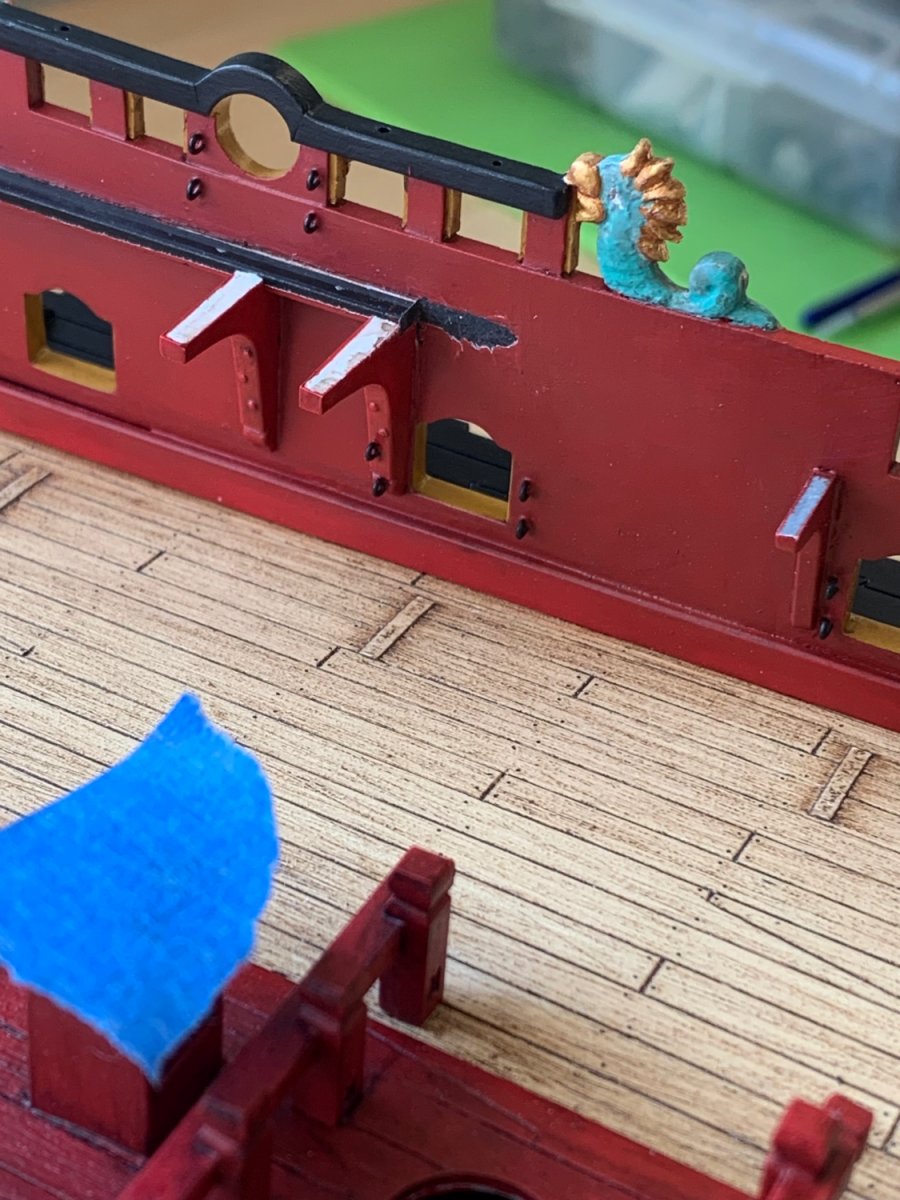
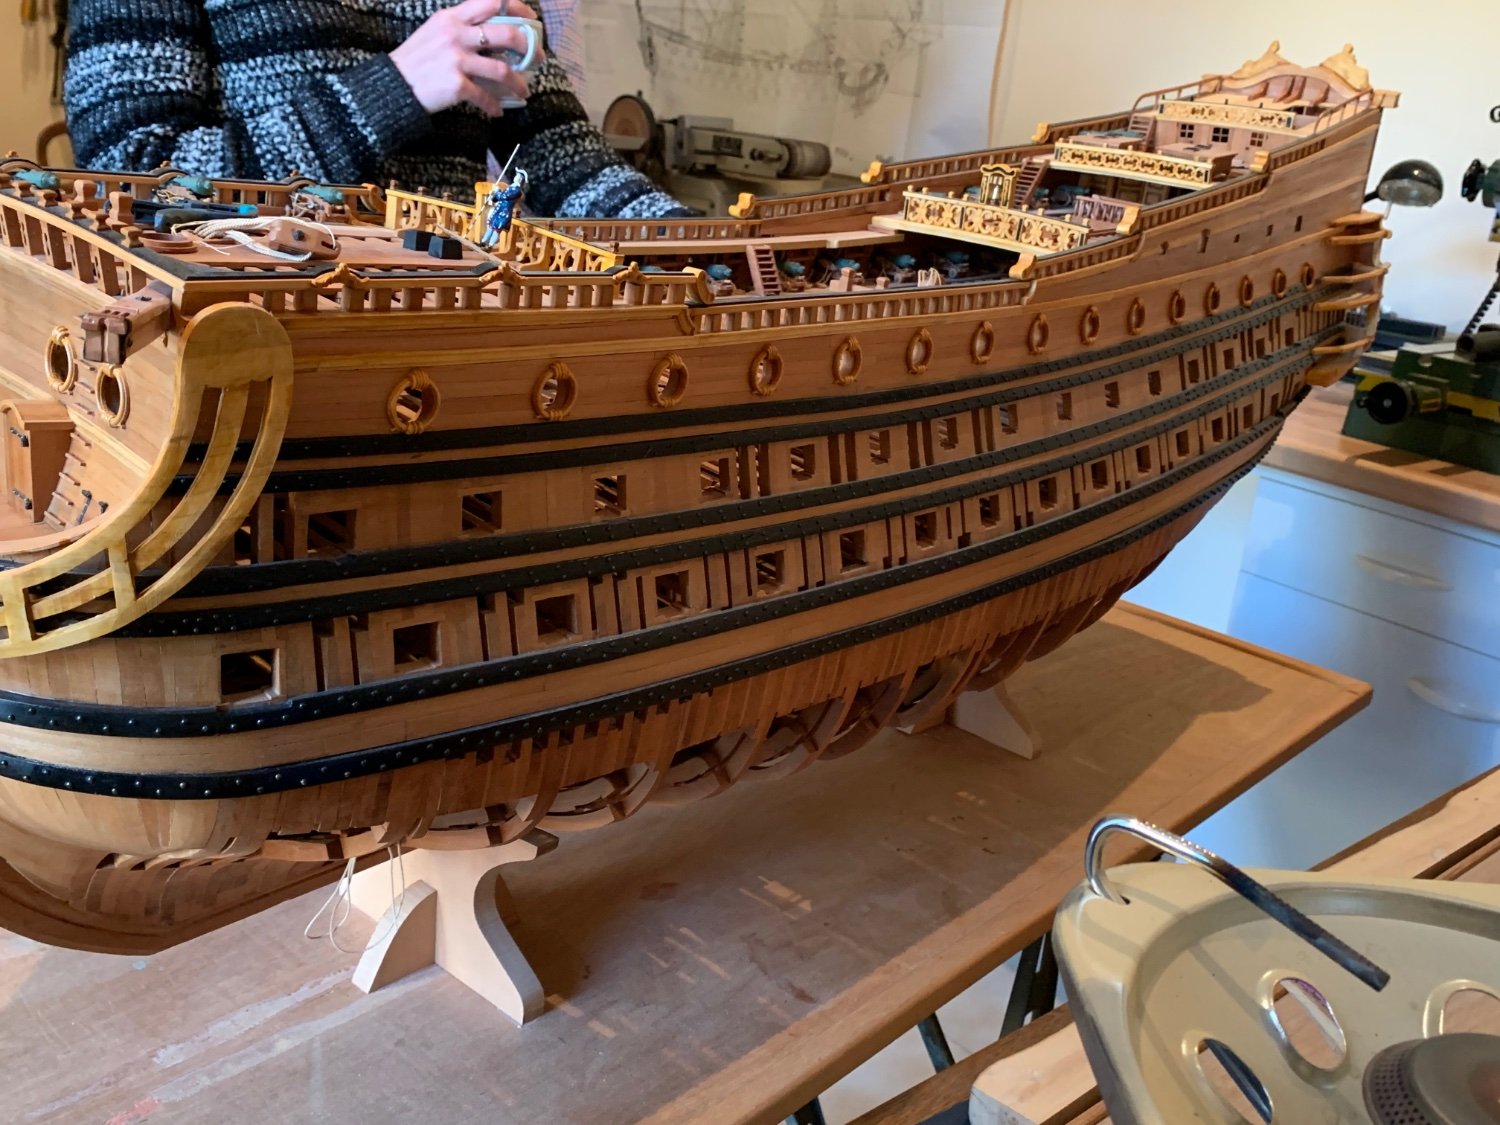
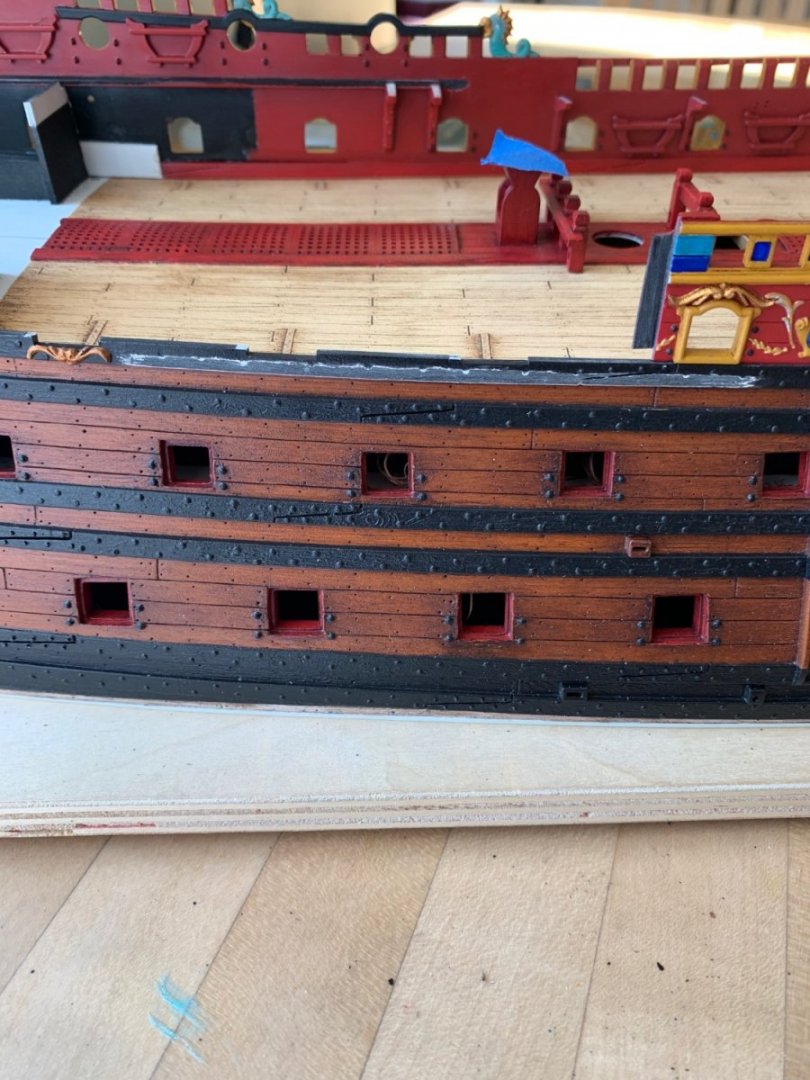
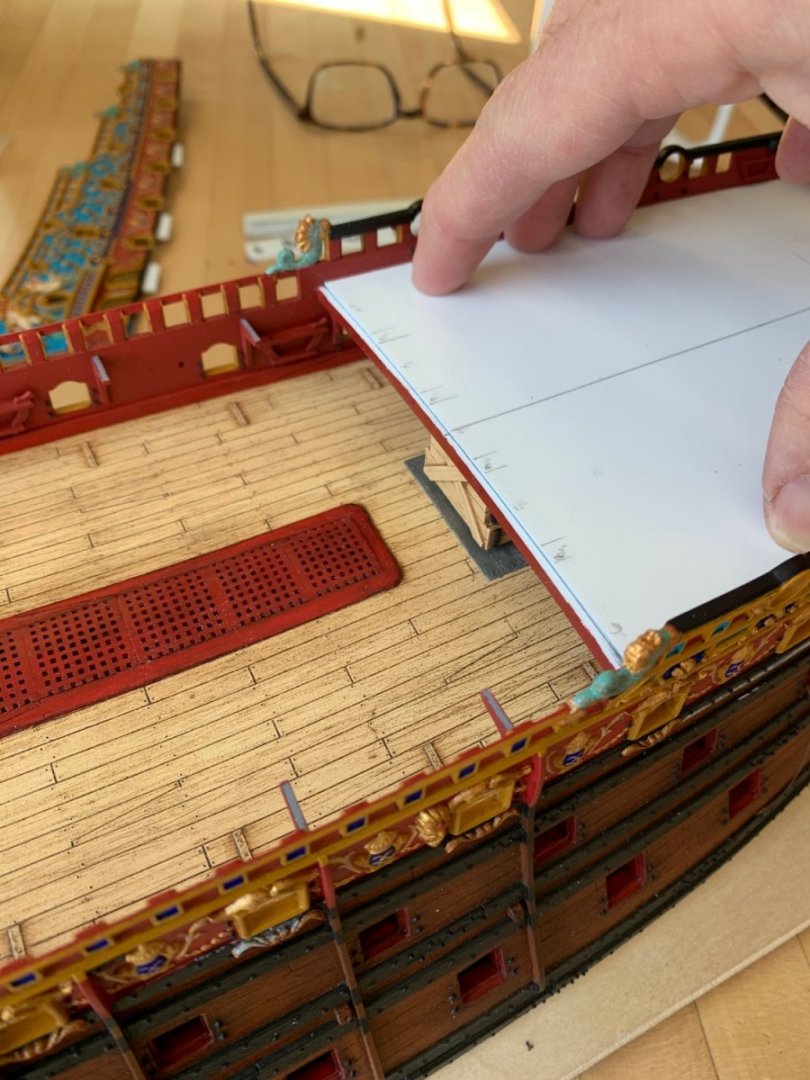
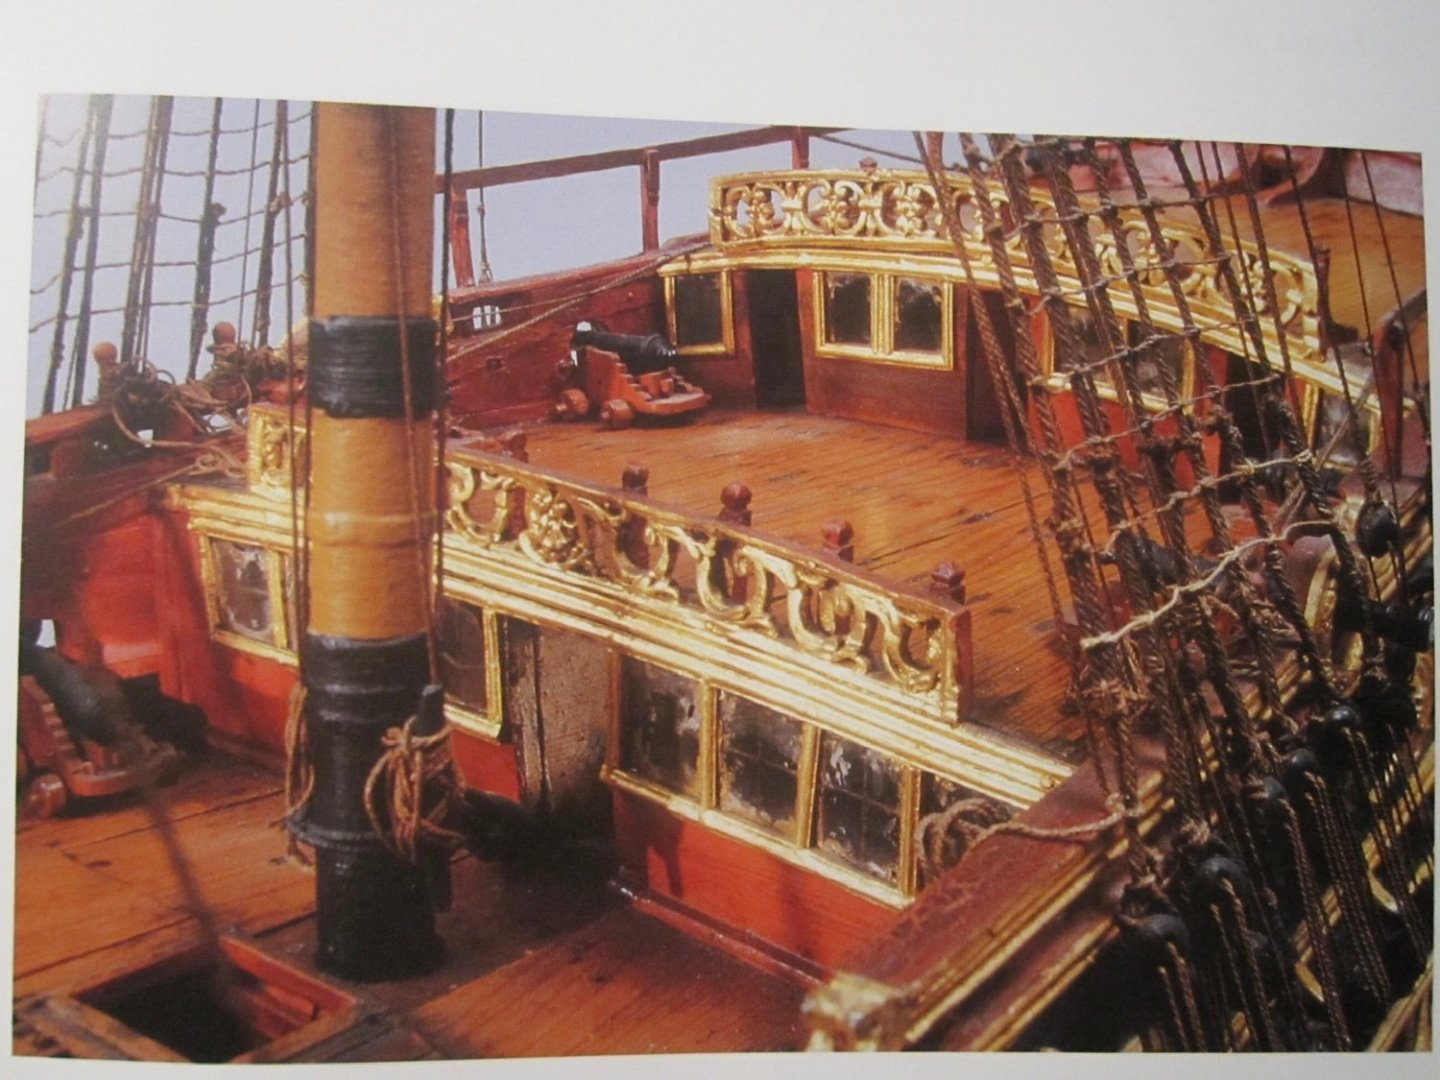
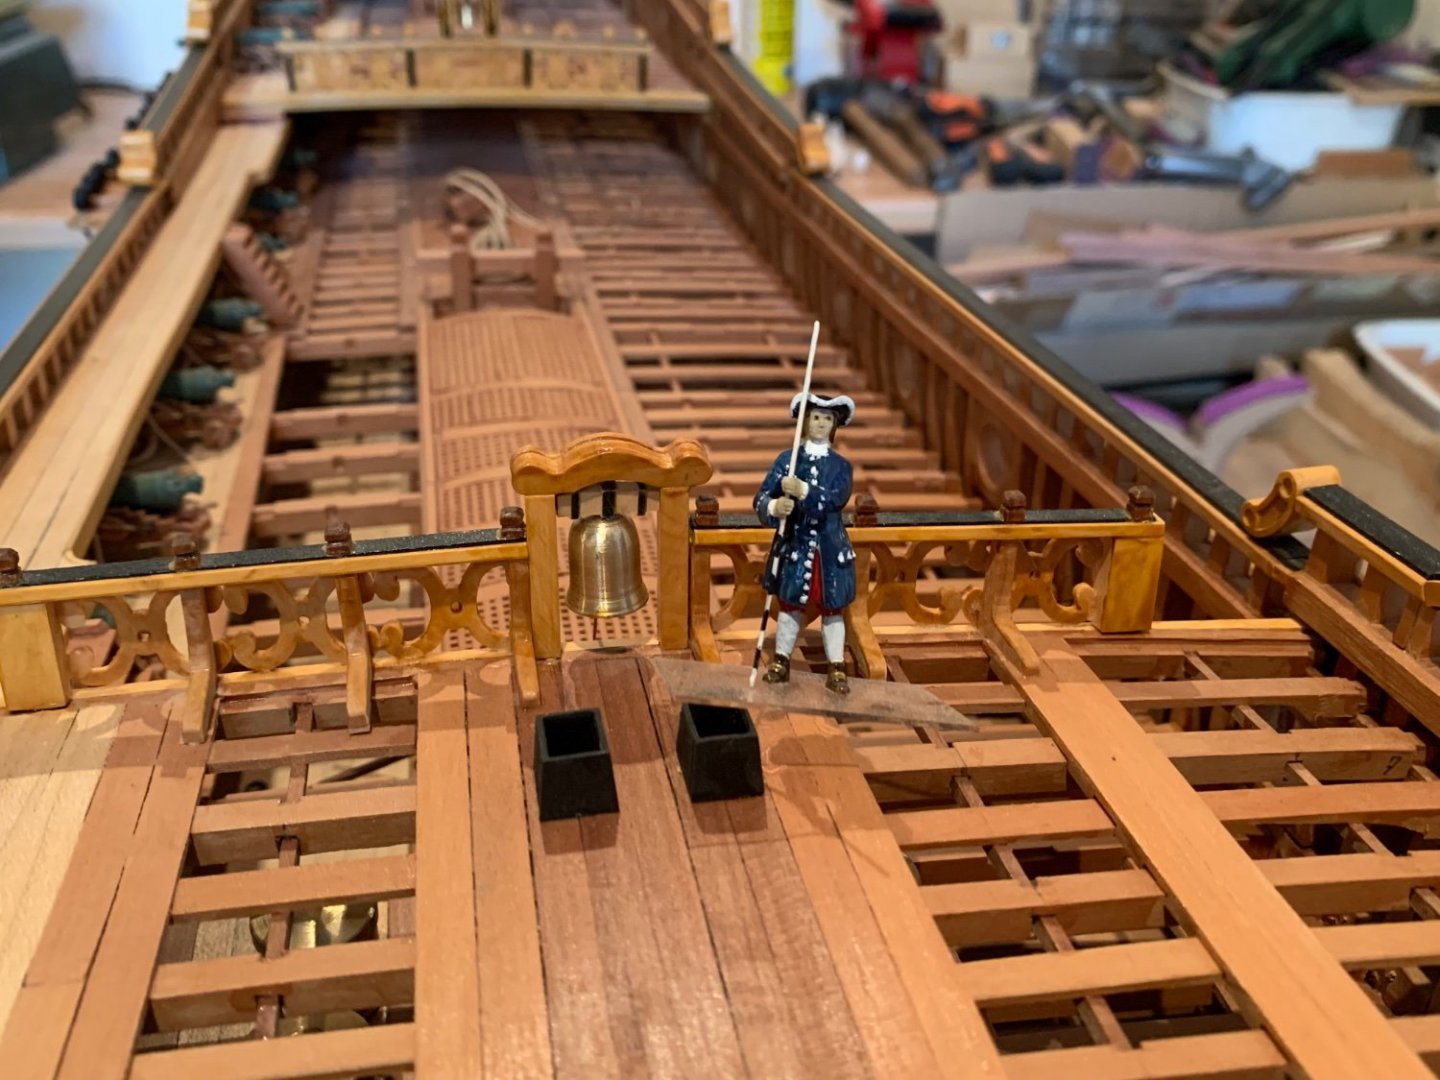
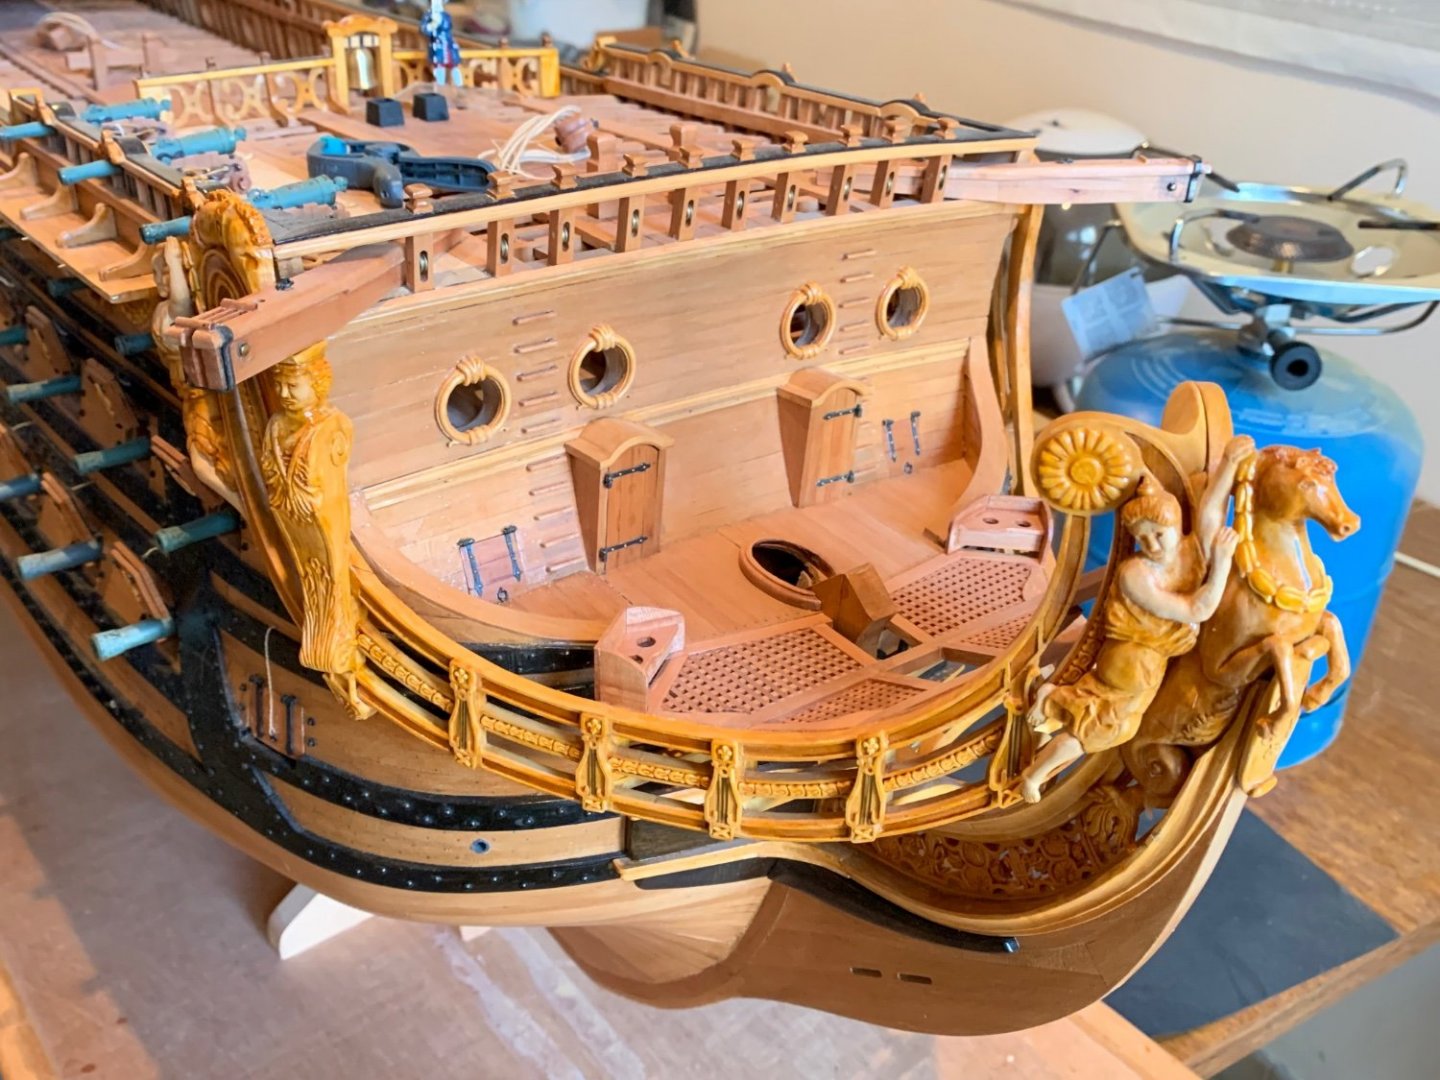
Alive and kickin’, part II. I have finally painted the last bulwark to satisfaction. Here it is, dry-fit: I have fitted all the channels and scraped away paint in the glue locations: A couple of troublesome little details needed to be resolved. First, I was thinking about how the plank-ends of the f’ocsle and quarter deck were supposed to resolve, over the last exposed beam. My first instinct was to have the plank ends exposed, with a slight overhang beyond the beam. The more I studied other models, though, it dawned on me that this would not be correct for French practice in the latter half of the 17th C. Take a look at the following examples: On Michel Saunier’s SR, the plank ends are let into the last beam, which is dimensionally deeper to accept the plank thickness. The same can be seen on the louis Quinze: above photos courtesy of Marc Yeu So, I decided to cut back my deck piece, and I will in-fill a strip of styrene with a just-broken edge to highlight the demarcation ever so slightly: My f’ocsle beam isn’t perfectly straight, apparently, but this discrepancy will be concealed by the f’ocsle break railing and belfry. You will see the detail at the deck entry points. I will also apply a simple half-round moulding to cover the joint between the beam and the applied strip. Next, I realized that I needed to cut-back more of the kit deck ledge so that I could abut my quarter deck beam to the hanging knee, as I did at the f’ocsle. This shortening of the Q-deck also provided more clearance for the main halyard tackle. I’m not sure if I’m correctly referencing the line, but it reaves through the large bitt, just aft of the mast (with a piece of blue tape on it). Lastly, I wanted to make-up the supporting brace that ties each successive level of the stern together. I laminate two pieces of 1/16” stock together, and leave them to dry over a camber former. The one caveat is that I wanted to introduce ever so slightly more camber over the next two levels of the stern. I had done so, along the top edge of the mid-balcony rail. Here is how that compares with the former: The difference is barely perceptible, but it is one of many small details that will improve the overall perception of the thing. For my lamination, I applied three pieces of green tape to the center inch of the former: And the match was spot-on: When I get to the top tier of windows, I may do as many as six pieces of tape, as the camber would be greatest at the poop and poop-royal decks. Well, that’s where things stand for now. Hopefully, tomorrow, I will glue-in the bulwark. Then, I can cope the brace to delineate the upper limit of the second window tier, while strengthening the bulwark connection. Then, I can pattern the window piece in cardboard and do an exact layout drawing. Thank you all for your continued interest in the project. Best, Marc


- 2,444 replies
-
- 21
-
-

-
- heller
- soleil royal
- (and 9 more)
-
I would think common rubbing alcohol would work just fine.
- 444 replies
-
- 1
-
-
- Cutty Sark
- Revell
- (and 2 more)
-
I also really like it, but I would go over it with a matte spray, once it is completely dry.
- 444 replies
-
- 2
-
-
- Cutty Sark
- Revell
- (and 2 more)
-
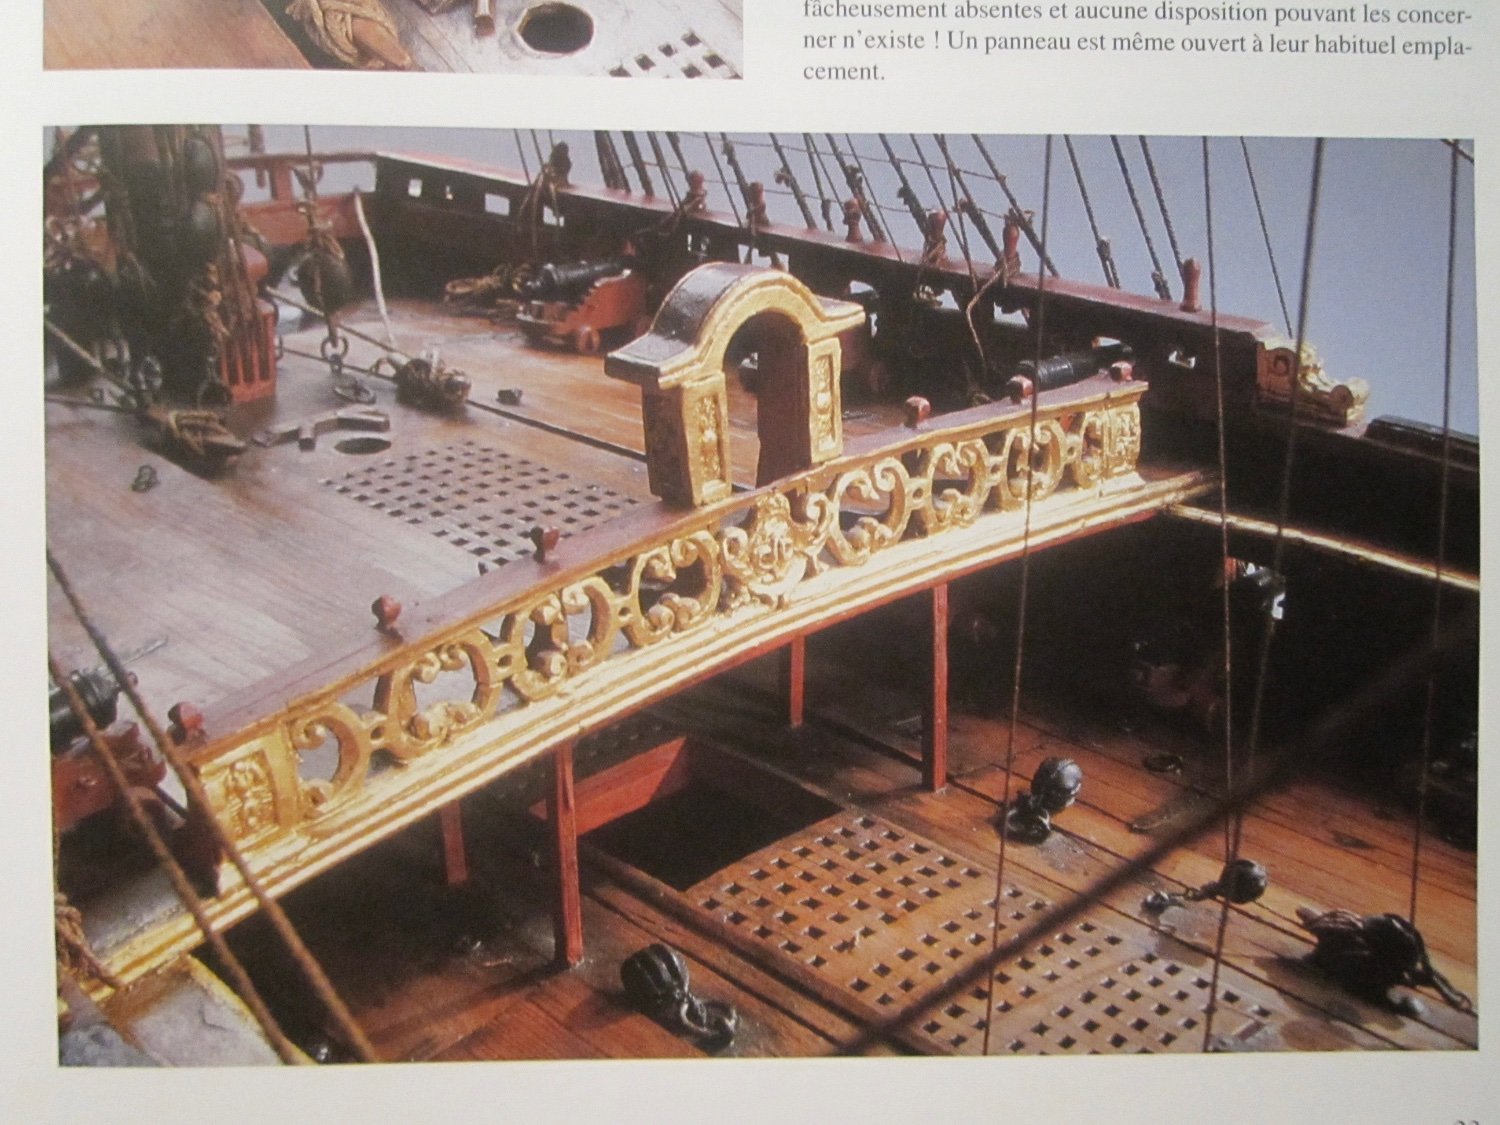
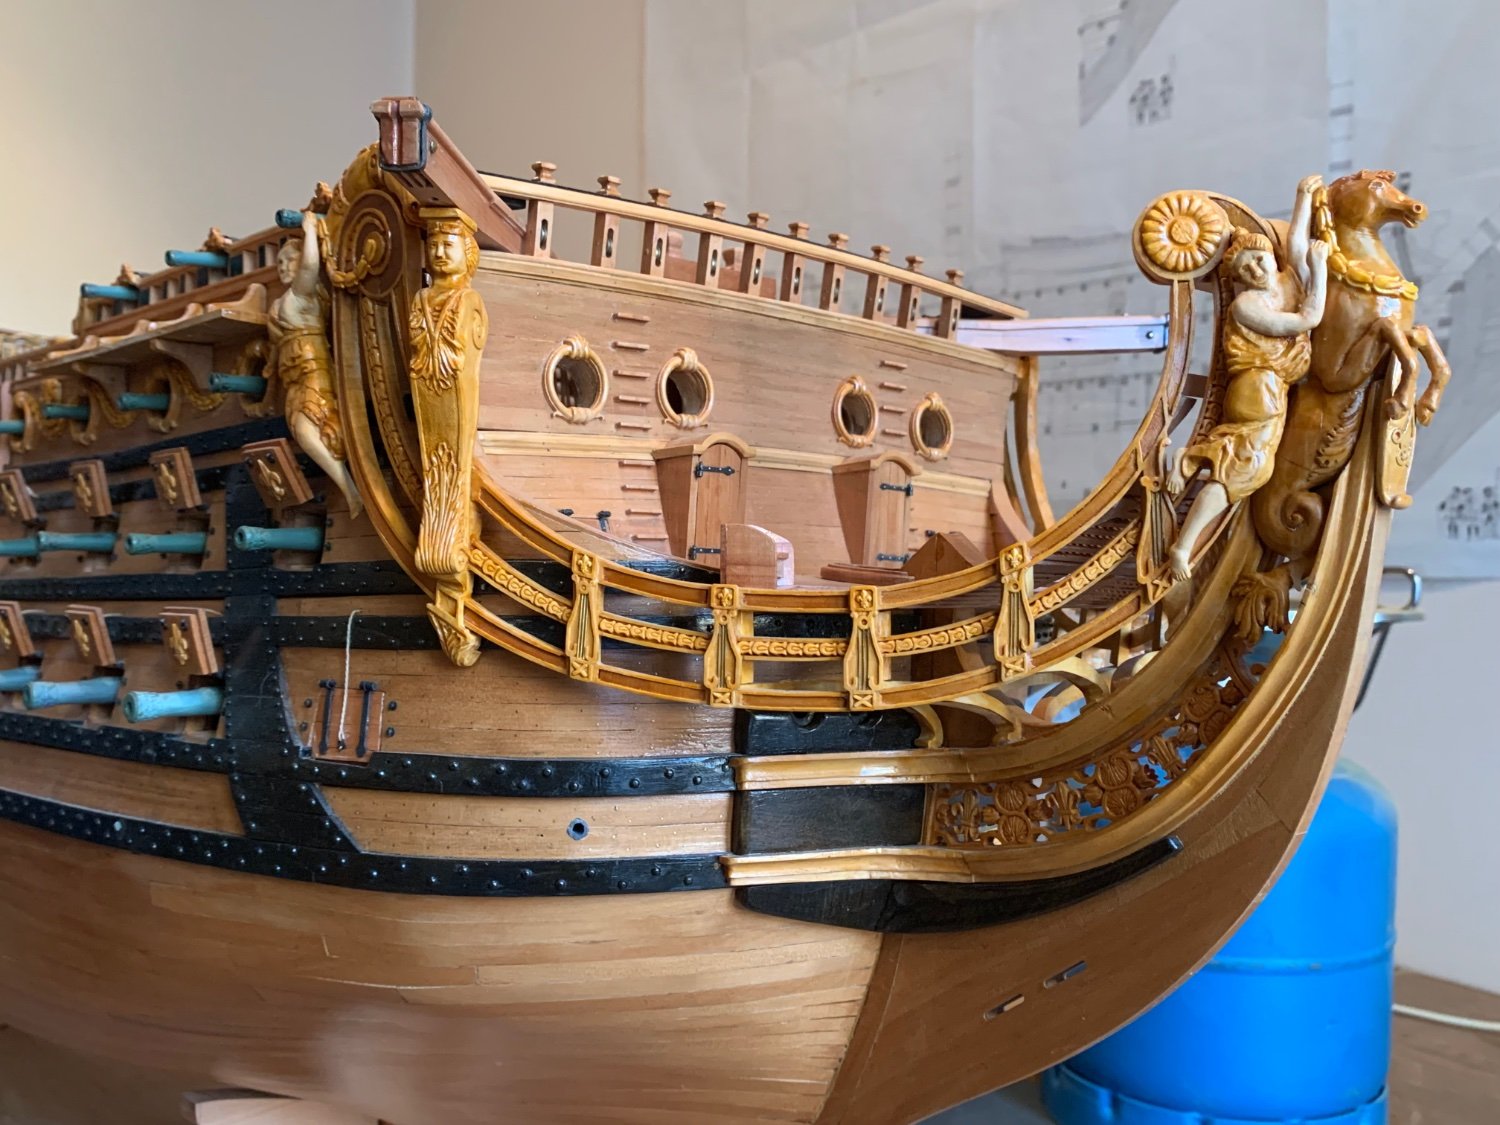
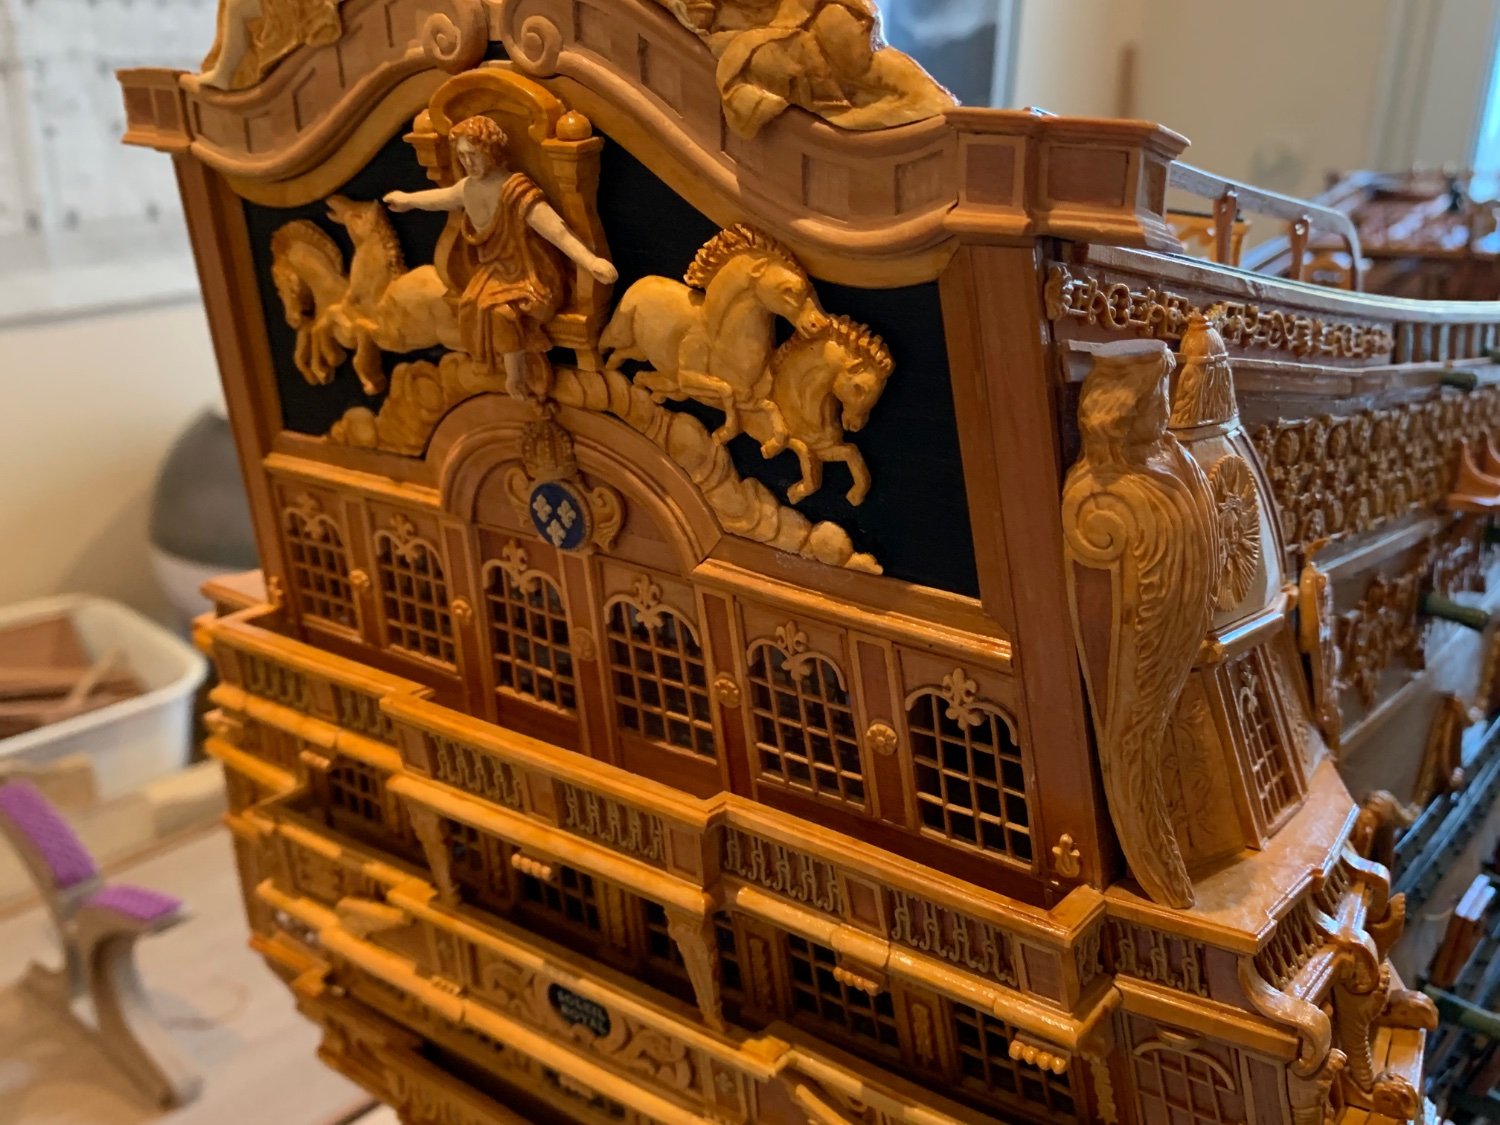
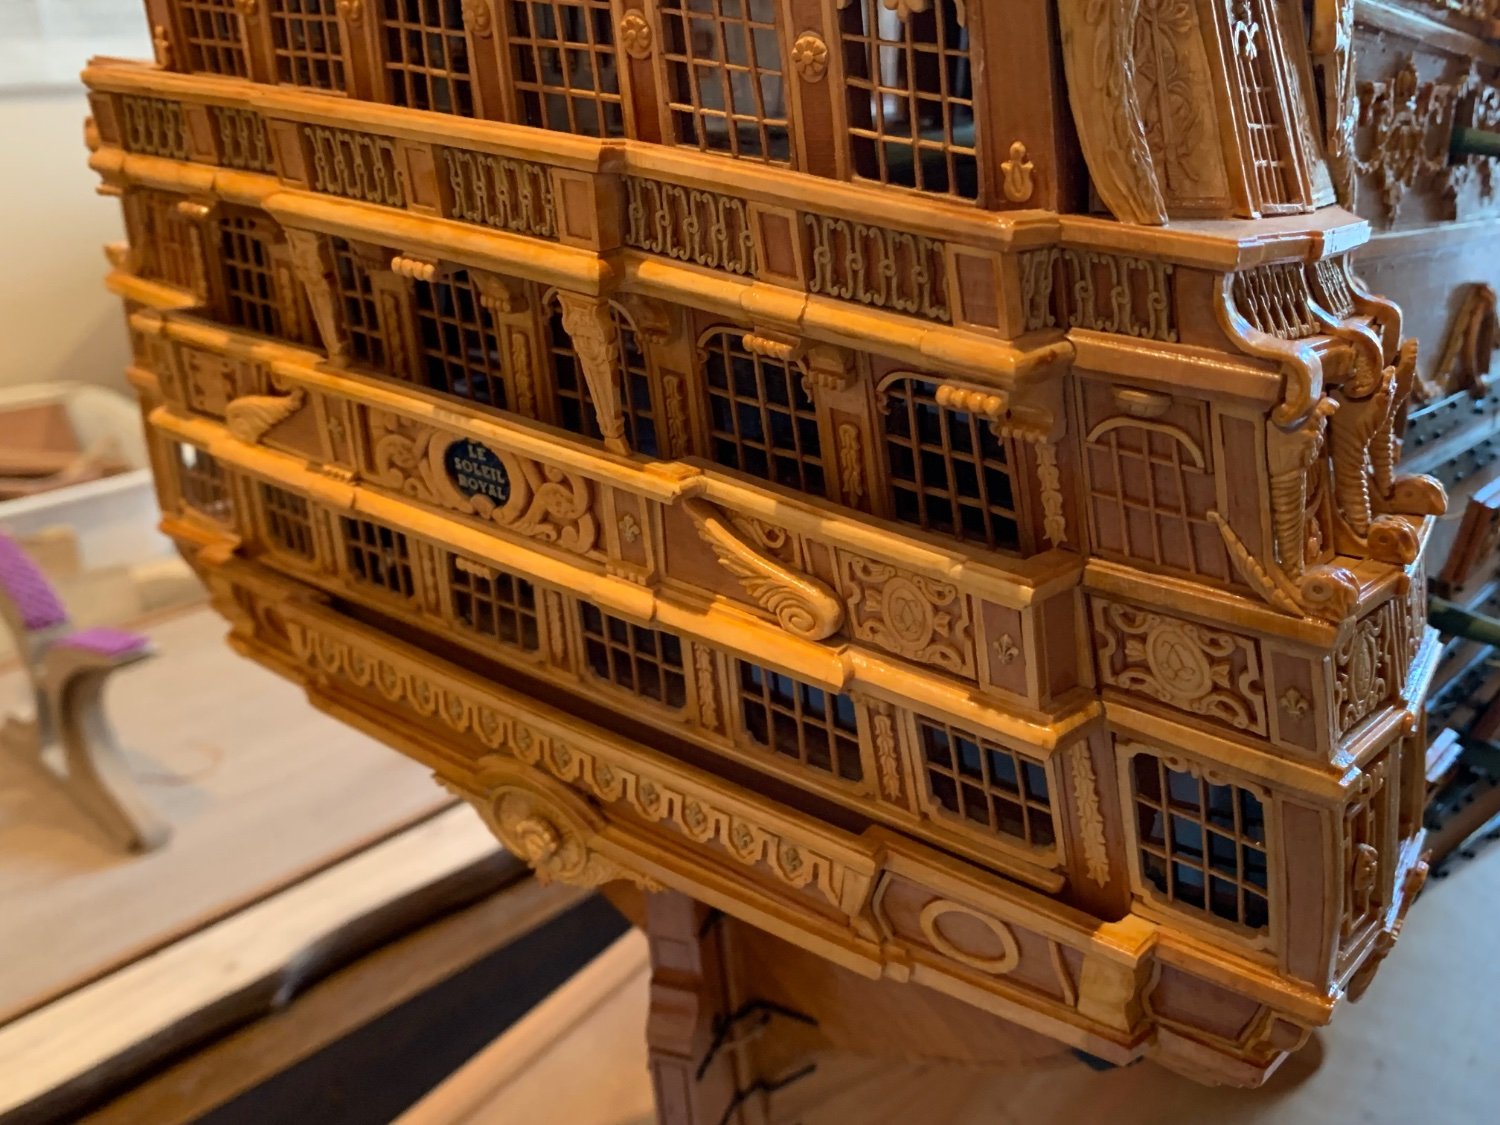
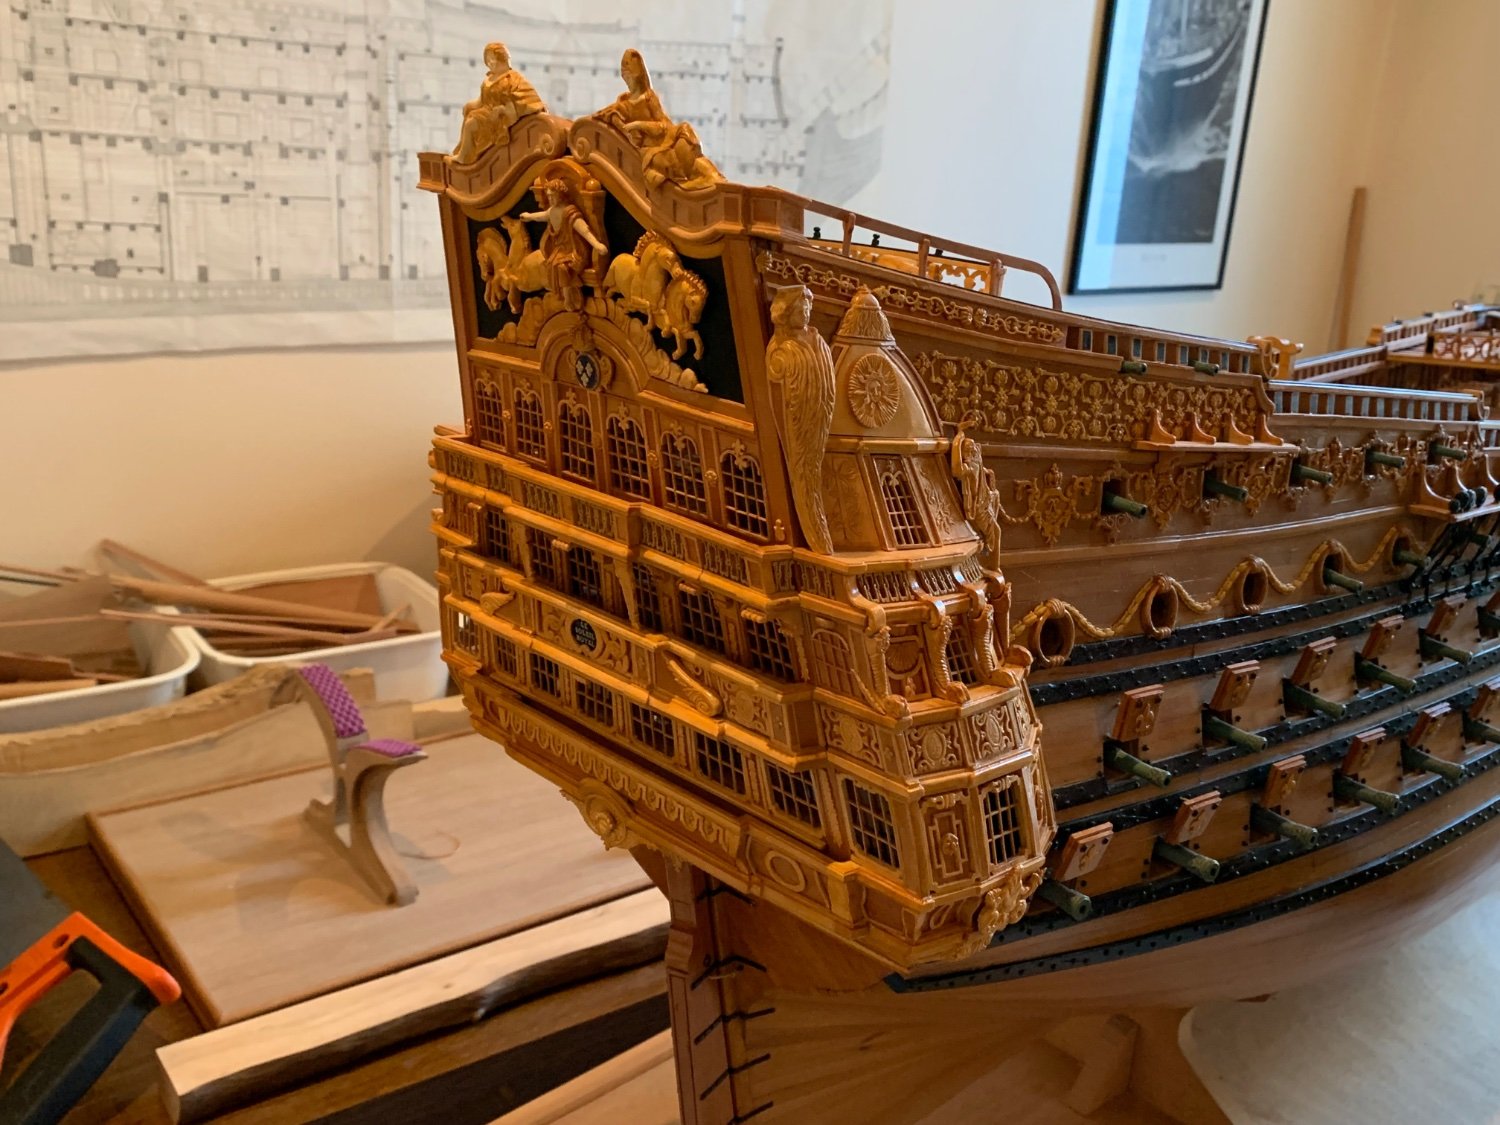
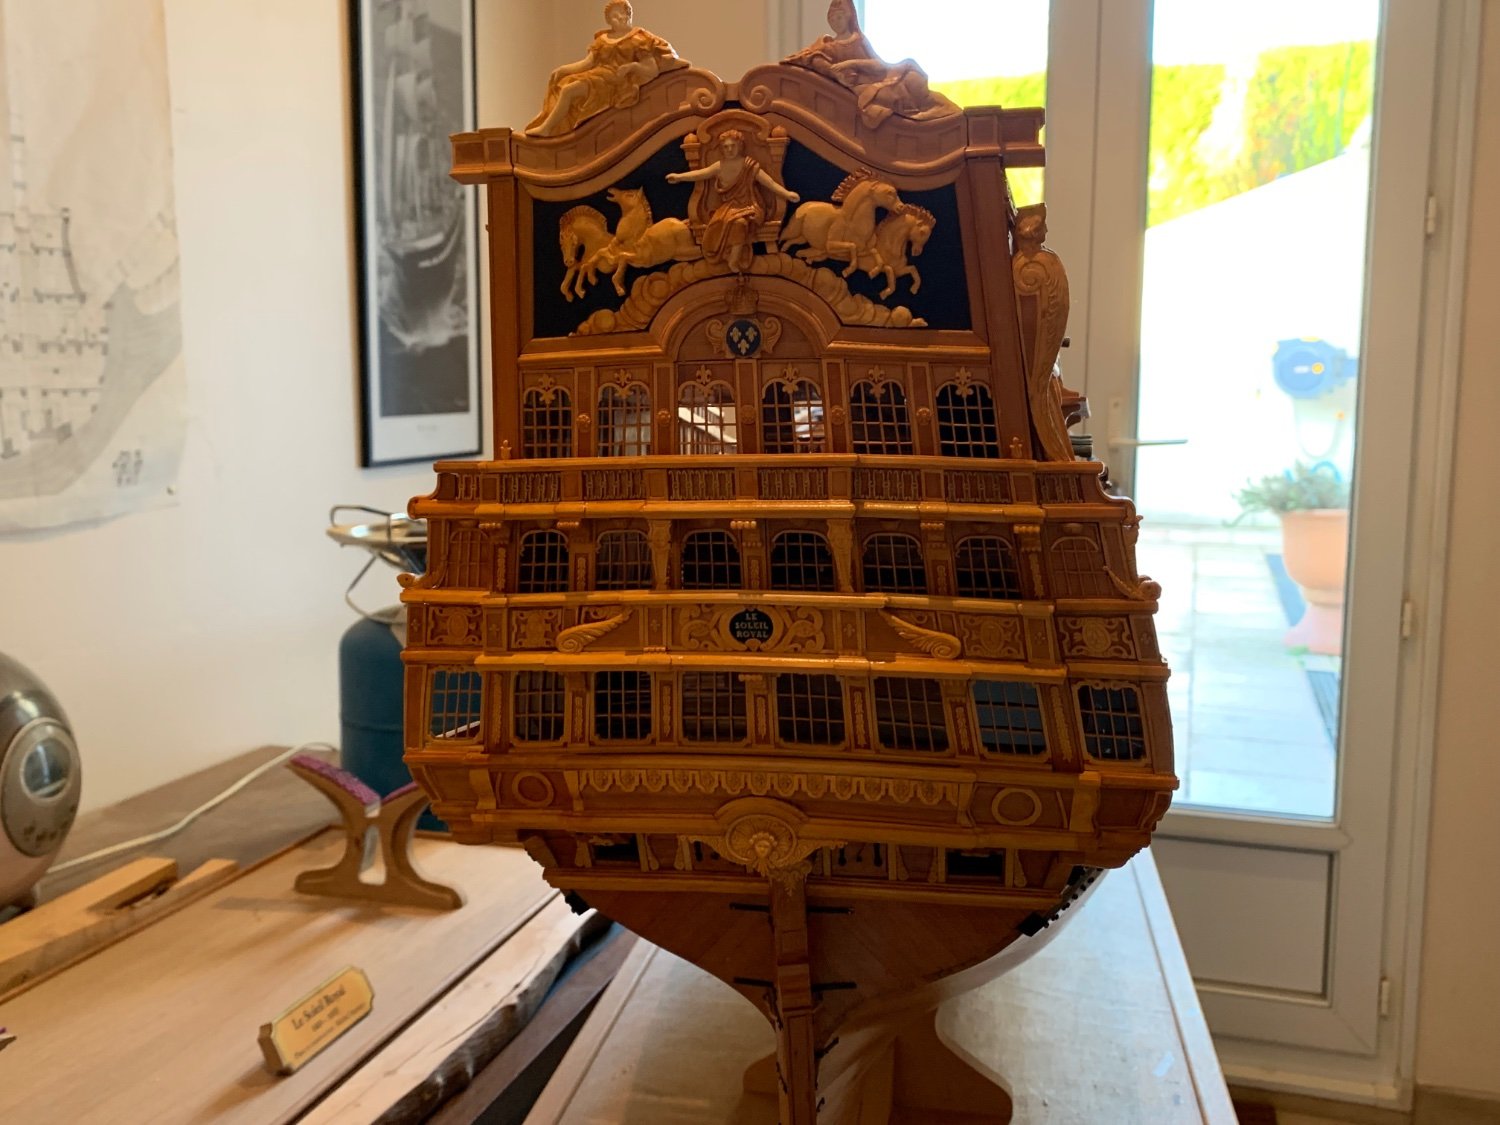
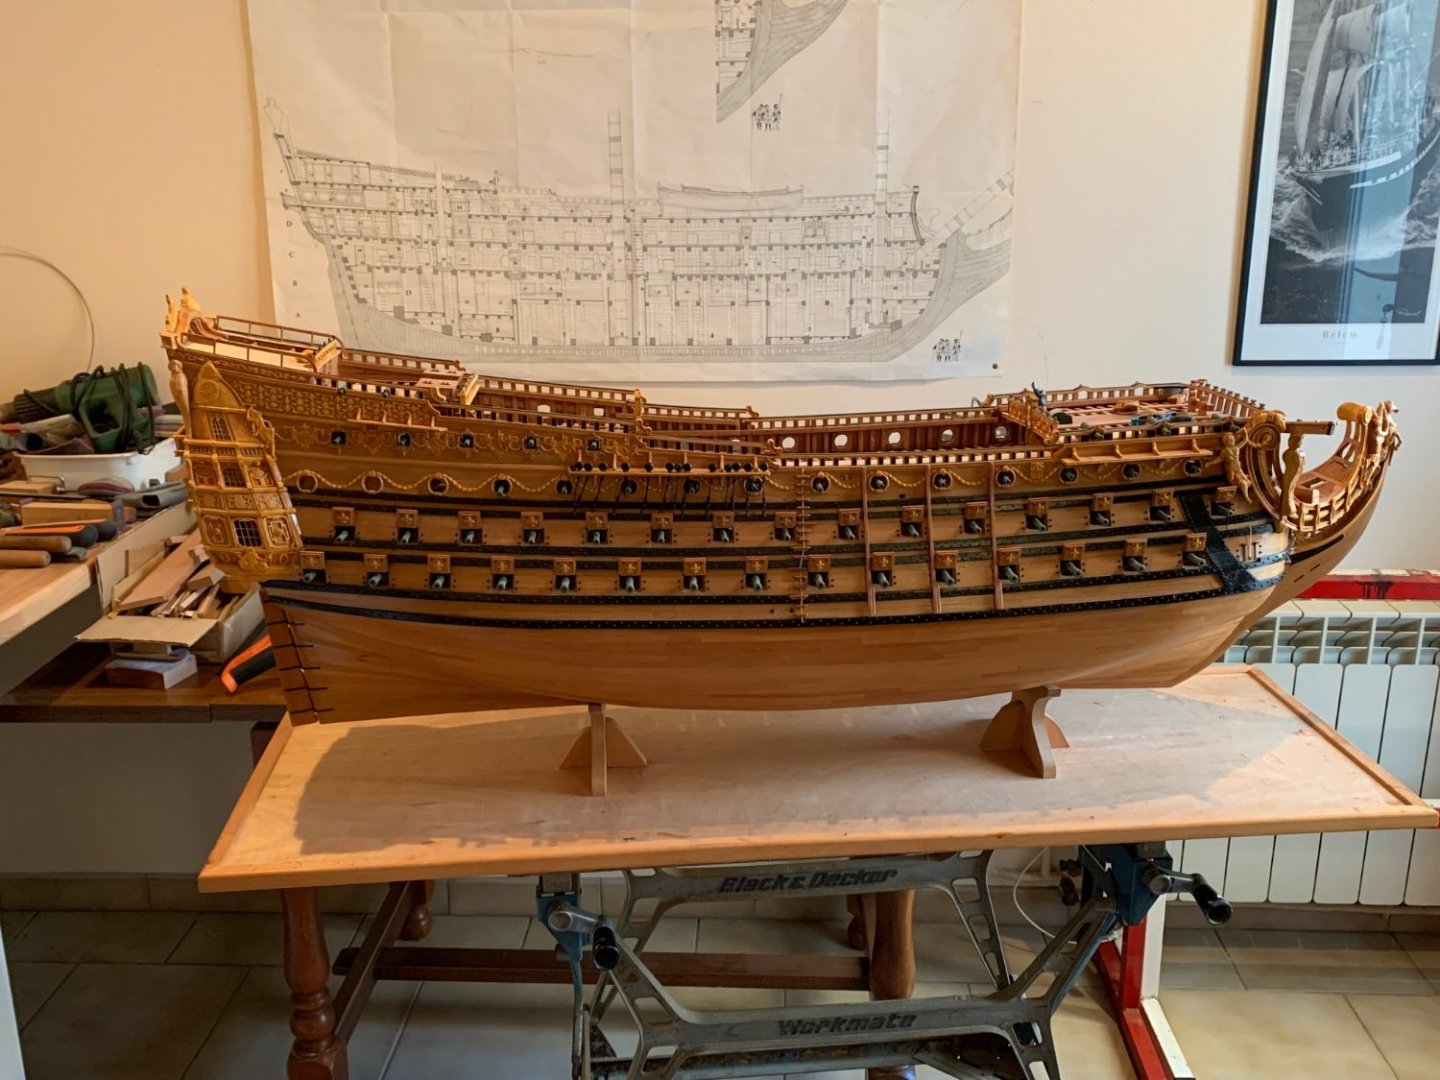
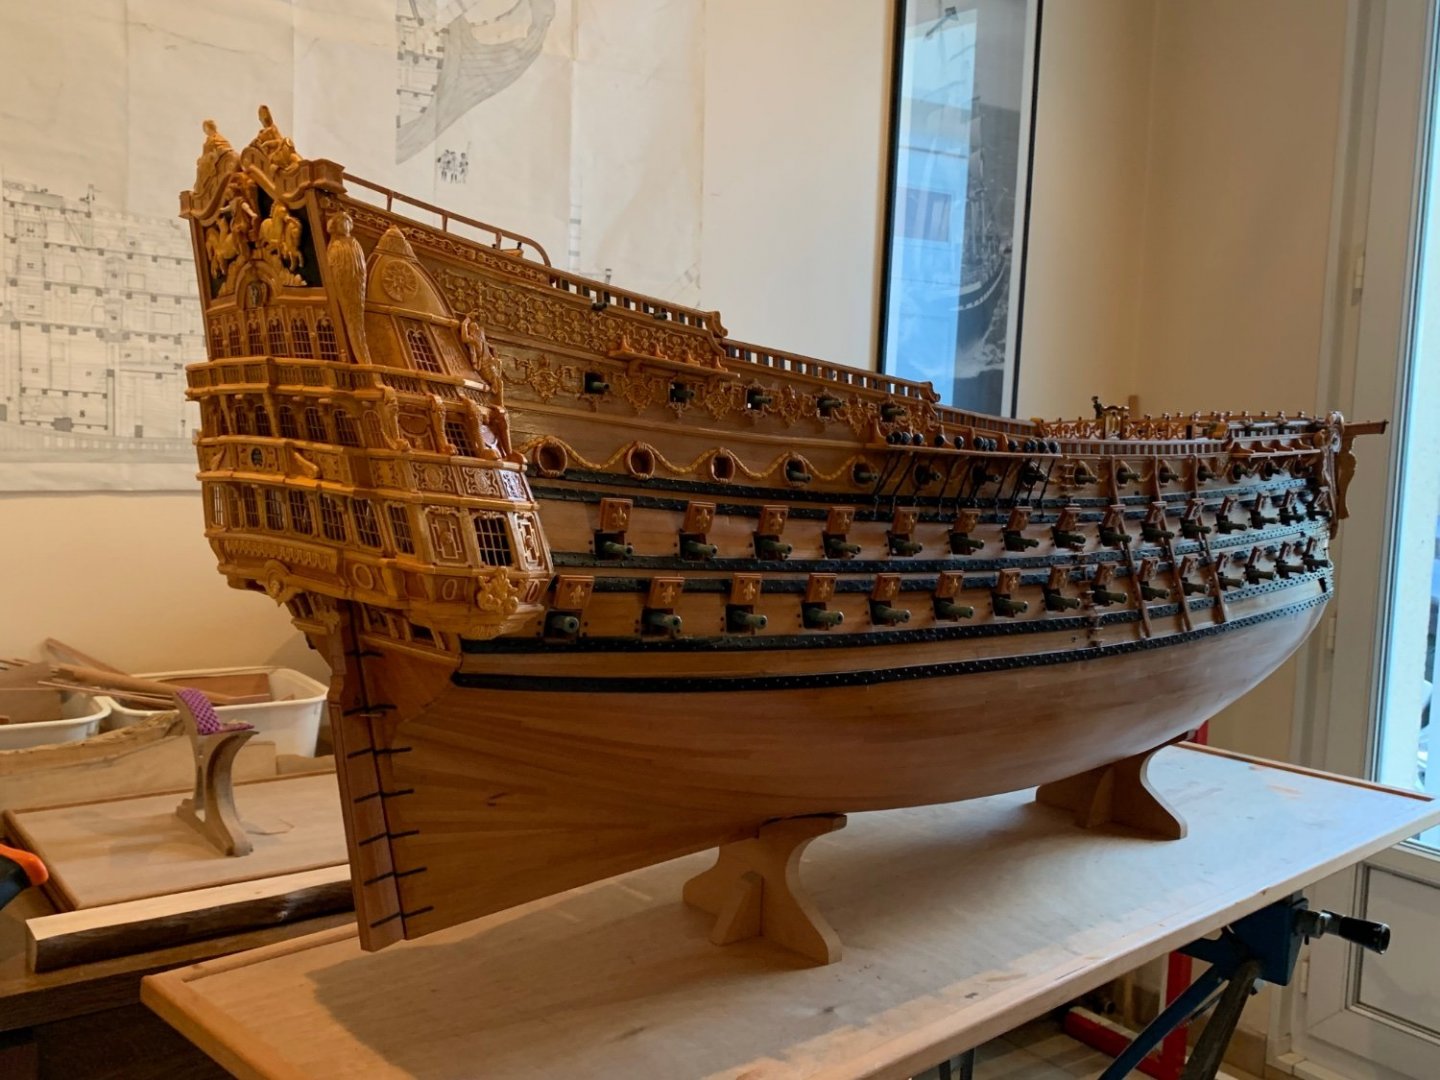
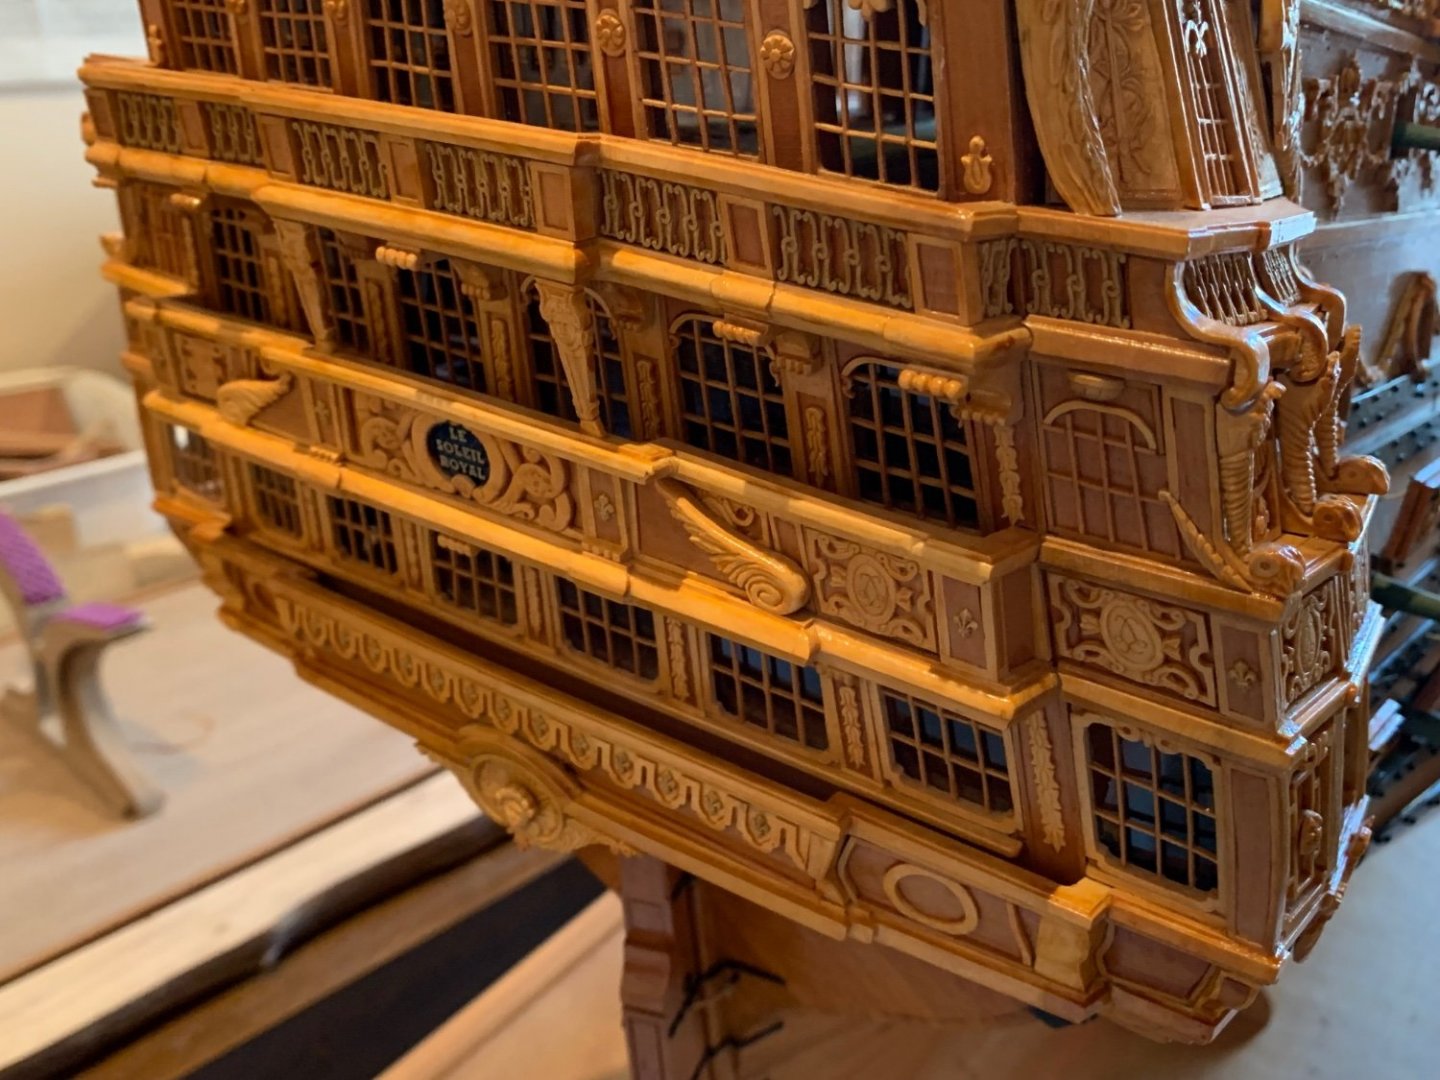
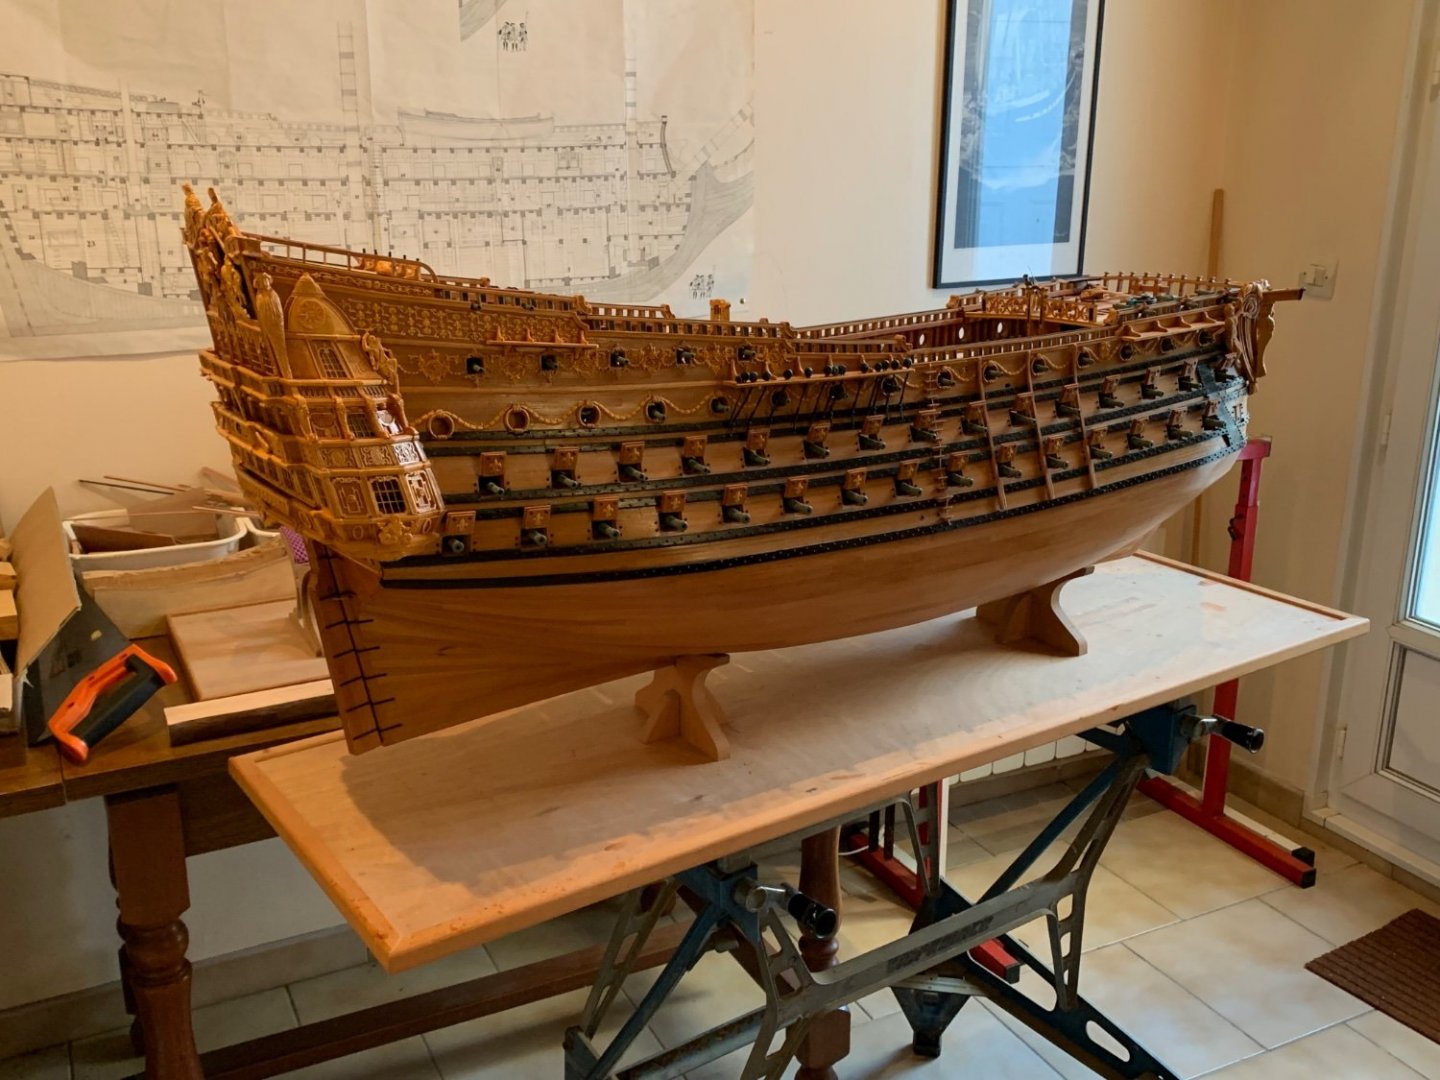
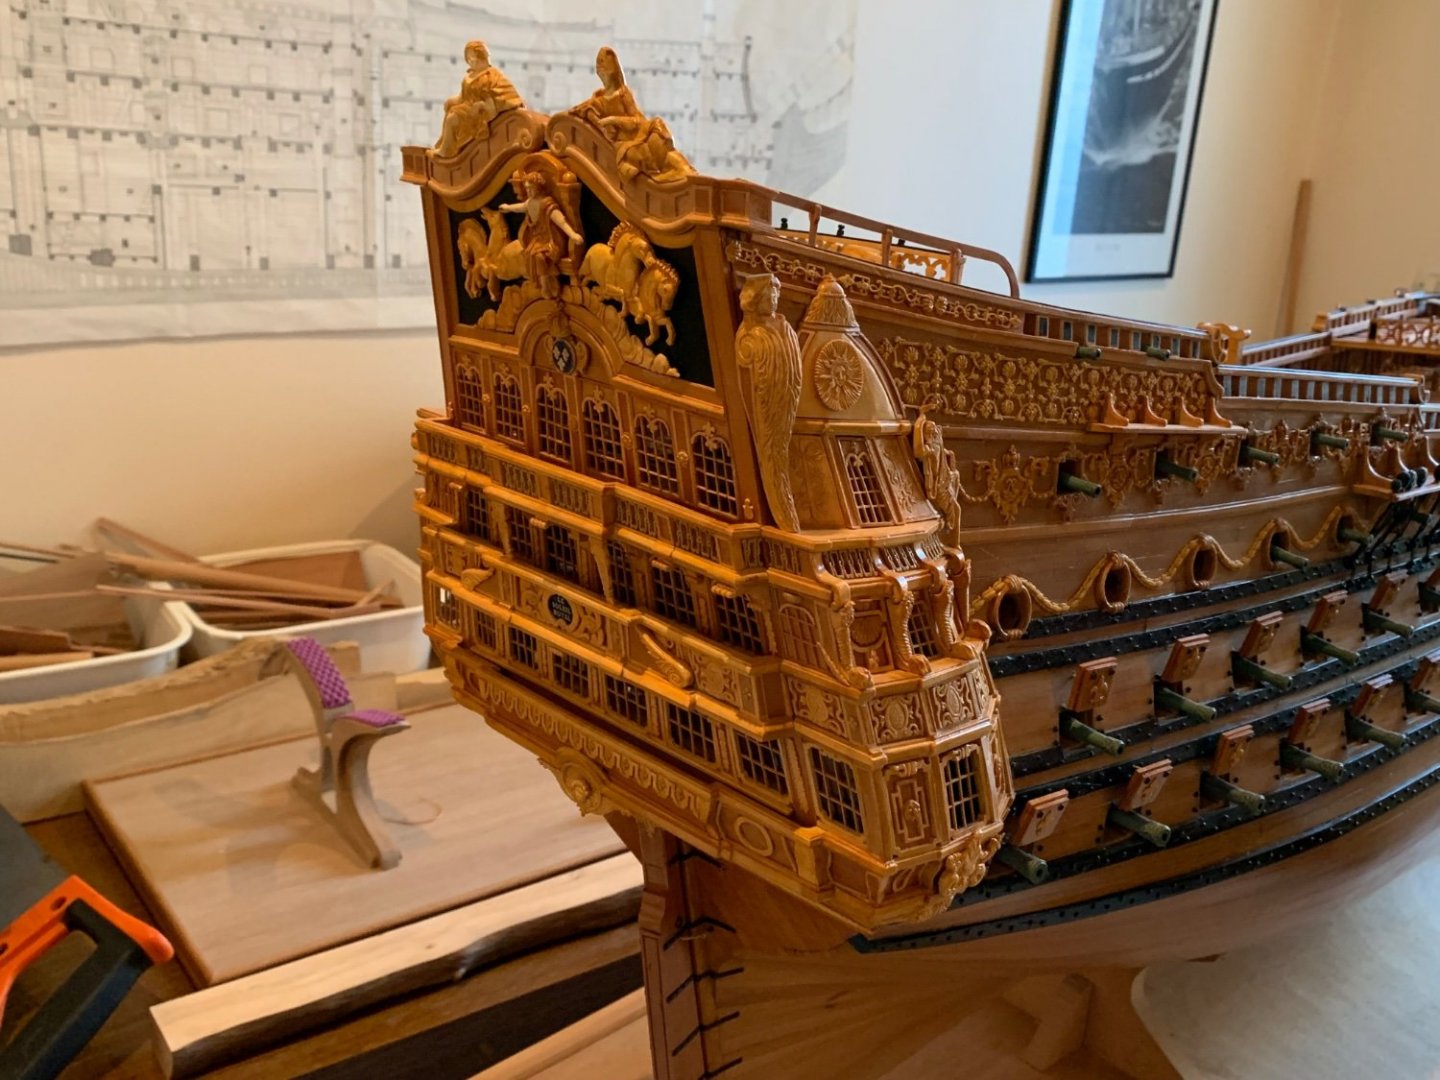
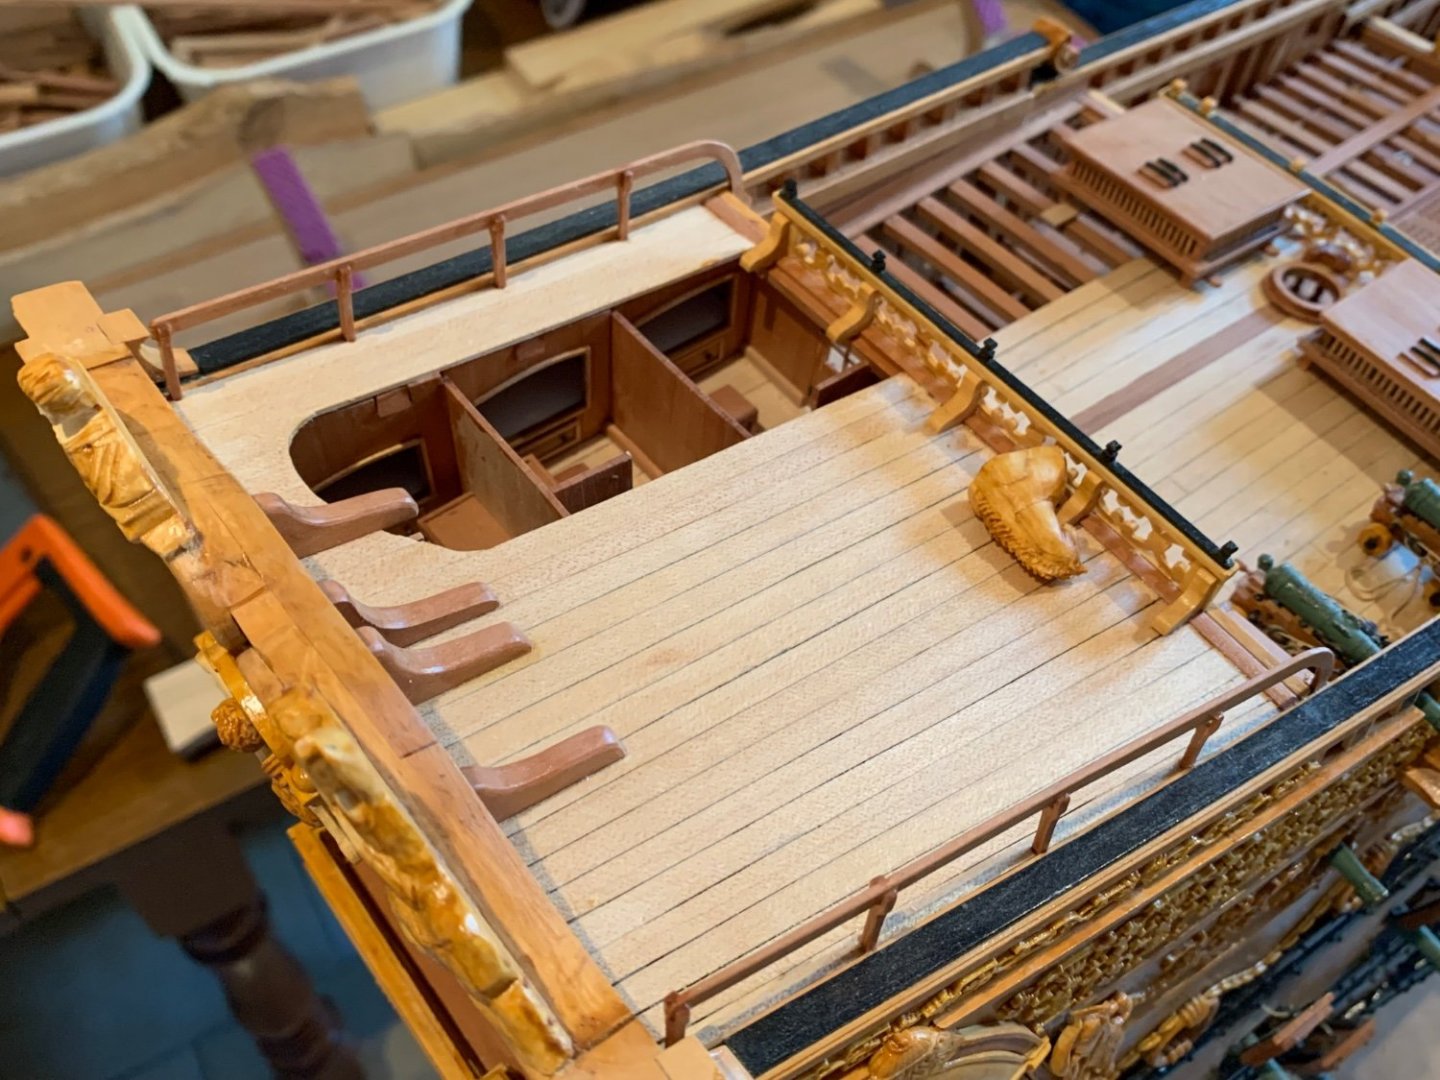
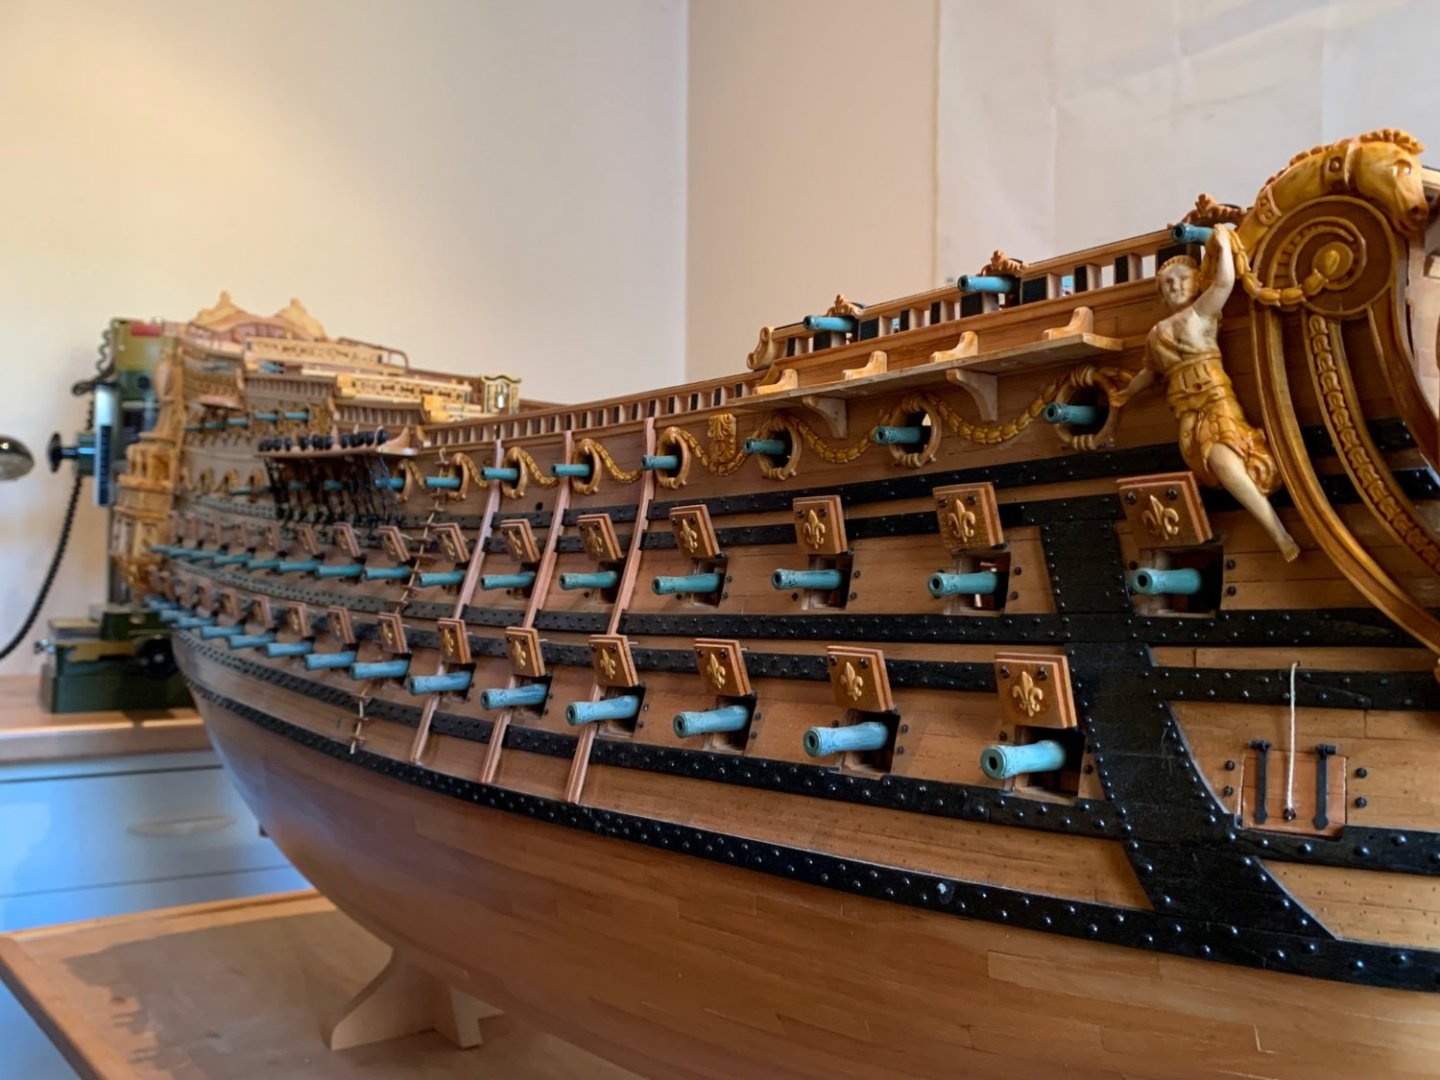
I realize that a number of you following this build may not be aware that Michel Saunier passed away, earlier this month. Michel had been working diligently to complete his masterwork, however, a fatal heart attack robbed him of that opportunity. His loss, among the worldwide community of ship-modelers, is deeply felt by people such as myself and many others whom Michel helped along our way with his deep knowledge and advice. Following funeral services for Michel, on February 7th, Marc Yeu was invited back to the family home and afforded the opportunity to photograph the model one last time. While it remains a possibility that one of Michel’s children will be inspired, some day, to complete the model, Michel’s Soleil Royal will virtually disappear from public view. Marc Yeu has granted me permission to post his high-res photographs, and it seemed to me that Michel’s own build-log was the most sensible place to do so. Marc captured numerous angles so that this photo essay is an invaluable and enduring resource to all who are interested in this ship, and contemporaries of her time. As Marc commented to me, just recently - regarded in its entirety, it truly is a staggering piece of work! Enjoy these pictures, mes amis: photos courtesy of Marc Yeu, AKA Nek0


-
Lovey work, Mark, and a very nice repair!
-
Thank you, Ian! Yes, I do have RC Anderson, and also James Lees. Those two, together with the SP monograph should enable me to map out the particularities of French practice.
- 2,444 replies
-
- 3
-
-
- heller
- soleil royal
- (and 9 more)
-
Trust me, Kevin - there are bodies buried all over this model; I’ve just gotten better at disguising their appearance, or better - turning mistakes into features. Just look back to when I nearly cut clear-through my mainmast at deck level because I fell asleep at the wheel, so to speak. First, I filled the kerf with a piece of styrene sheet, but then I needed to mortise a dutchman to bring strength back to the mast: I sometimes am tempted to have a side project, but I know myself too well - I won’t finish anything. What I like to do is jump around within the model, and make mini- models out of certain aspects of the build just to keep my interest high. The stove is a good example of that - it didn’t need to be nearly as detailed as it ended up being. In the near future, the f’ocsle capstan will be fun bit of scratch.


- 2,444 replies
-
- 9
-
-
- heller
- soleil royal
- (and 9 more)
-
I suppose I shouldn’t be surprised that you are still hooping, Bill, with you being a native Kentuckian; the bluegrass tradition runs strong through your veins! I had to stop competitively playing the greatest game ever invented, at 42, when I had my hip replaced. I still love to shoot the ball, though. In fact, shooting a basketball is a lot like shooting a Kentucky rifle; you have to be absolutely locked-in, in the moment, to be any good at it. Thank you for asking about Dad. Yes, he has settled-in really well at the new place. He has made friends, and it’s a very comfortable and up-lifting place. The food is really, pretty good and varied. And, so far, keeping his dog has not been the issue I feared it would; I was imagining her sneaking out of the apartment and running crazy through the halls, bolting past unsteady seniors, etc. We got him there, just in-time. On a basic conversational level, he still seems fine, but he is increasingly incapable of holding onto any new information, and he quickly becomes confused. He seems much more contented than he has for a long while, now, so that’s all that really matters. As always, thank you for your thoughts and for looking in.
- 2,444 replies
-
- 6
-
-
- heller
- soleil royal
- (and 9 more)
-
Personally, I consider it a good thing to be confused with Kevin, so no worries there! Thank you, Bill! Lately, I feel as though I will never finish painting this last bulwark, but the devil’s in the details, so I will laboriously slog-on. I am similarly inspired by your rigging efforts on the Vic, as to do it right is a true exercise in patience and perseverance. I am sorry I don’t have much to contribute, there, as I am a novice to rigging, myself.
- 2,444 replies
-
- 4
-
-
- heller
- soleil royal
- (and 9 more)
-
That walnut ink is magic, as far as I’m concerned. Your deck sample has a subtly weathered appearance that I find very pleasing.
- 444 replies
-
- 2
-
-
- Cutty Sark
- Revell
- (and 2 more)
-
Awesome pic! I could tell you what I think it really is, but it’s more fun to imagine that it’s my boss’s stomach.