Jim Rogers
NRG Member-
Posts
1,381 -
Joined
-
Last visited
Content Type
Profiles
Forums
Gallery
Events
Everything posted by Jim Rogers
-
I always install the stem, keel and stern post prior to planking.
- 171 replies
-
- artesania latina
- bounty
-
(and 1 more)
Tagged with:
-
Interesting new model ship company
Jim Rogers replied to Erebus and Terror's topic in Wood ship model kits
Looks enticing but.... I’ll wait. -
Brass piano hinges
Jim Rogers replied to Chariots of Fire's topic in Metal Work, Soldering and Metal Fittings
Check Rockler. -
Is that a 57 Chevy hood she is sitting on? Wow She is a big girl! Welcome aboard by the way. She is worthy of a refit. Actually IMO a model in that scale is much easier to refit as everything is bigger.
-
The first thing I do now when I open a kit is throw out all the included rope and blocks and begin ordering Syren Ship Company after markets. They DO make a difference. My only issue is that I hate waiting for Chuck to replace stock 😂......Like now, waiting for 1/8 singles. And don’t forget the specialty block kits hearts, fiddles and strapped blocks. I use the inner strapped Blocks for my anchors and I don’t care if that is historically accurate or not because man they look good with and anchor attached.
-
Looks Great! 30 Knot Burke would be proud.
-
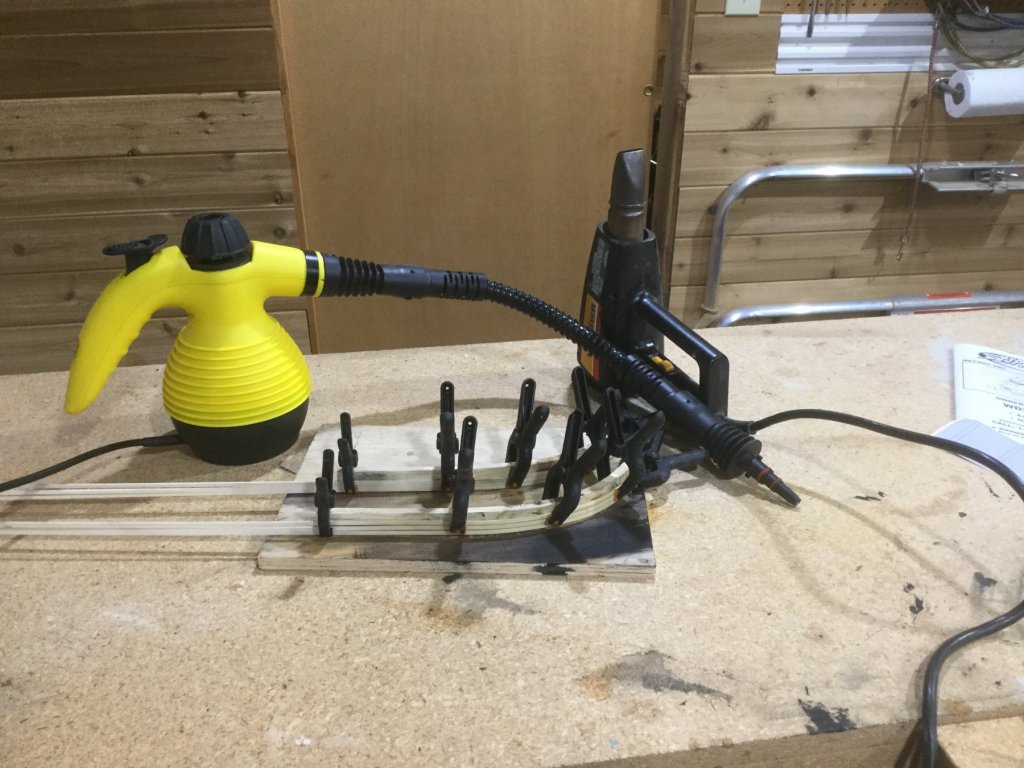
I build a plywood form about 3/4 of an inch thick that matches the curvature of the bow, you should be able to trace this from plans, I then epoxy this to a plywood base. I only steam bend so I clamp the planks to the nose of the frame and apply steam to the plank using a stem cleaner with nozzle. Steam it and began bending right behind the first clamp. Add another clamp and so forth then let them dry and remove from form. I can usually do 4 at a time. 8 if you do a Port and Starboard form. System works well
- 171 replies
-
- artesania latina
- bounty
-
(and 1 more)
Tagged with:
-
My great-aunt's Travel Diary c.1903
Jim Rogers replied to Mike Shea's topic in Nautical/Naval History
And the reason nobody uses cursive anymore is that schools don’t teach it and teens don’t text it. I tried to read the page but had trouble. Great find though. -
Piet you have had quite the life. I believe your Father is honored by this build. I will most definetly be following.
- 378 replies
-
- java
- pacific crossroads
-
(and 2 more)
Tagged with:
-
Sorry for your loss Jesse. Get some rest.
- 1,306 replies
-
- syren
- model shipways
-
(and 1 more)
Tagged with:
About us
Modelshipworld - Advancing Ship Modeling through Research
SSL Secured
Your security is important for us so this Website is SSL-Secured
NRG Mailing Address
Nautical Research Guild
237 South Lincoln Street
Westmont IL, 60559-1917
Model Ship World ® and the MSW logo are Registered Trademarks, and belong to the Nautical Research Guild (United States Patent and Trademark Office: No. 6,929,264 & No. 6,929,274, registered Dec. 20, 2022)
Helpful Links
About the NRG
If you enjoy building ship models that are historically accurate as well as beautiful, then The Nautical Research Guild (NRG) is just right for you.
The Guild is a non-profit educational organization whose mission is to “Advance Ship Modeling Through Research”. We provide support to our members in their efforts to raise the quality of their model ships.
The Nautical Research Guild has published our world-renowned quarterly magazine, The Nautical Research Journal, since 1955. The pages of the Journal are full of articles by accomplished ship modelers who show you how they create those exquisite details on their models, and by maritime historians who show you the correct details to build. The Journal is available in both print and digital editions. Go to the NRG web site (www.thenrg.org) to download a complimentary digital copy of the Journal. The NRG also publishes plan sets, books and compilations of back issues of the Journal and the former Ships in Scale and Model Ship Builder magazines.


