


cotrecerf
-
Posts
137 -
Joined
-
Last visited
Content Type
Profiles
Forums
Gallery
Events
Posts posted by cotrecerf
-
-
you achieved very good results although working on some wood parts (judging from the pics) seem to be quite of poor quality (like cigar box soft wood) must have been very difficult...... A nice boat!
greetings
Joachim
-
-
Micha,
you might have a look here on tons of figurines ( for Vikings you need to adapt to style): https://www.ebay.de/str/3drifter
3D-printed figurines on printing supports, unpainted
greetings
Joachim
-
Mirabelle,
thnaks for the pics. Interesting combination of anchor gears. I apologize for not having considered that as an expert you did your thorough study of all details of the vessel well before the actual build....kudos again. ;-))
Greeting
Joachim
- GrandpaPhil, Mirabell61, Canute and 6 others
-
 8
8
-
 1
1
-
Hey MIrabelle,
very nice work on the ship and good looking smushroom anchor. In case you show (part of) the anchor chain, should it have stud links though?
best regards and enjoy a sunny weekend in Glinde
Joachim
.jpeg.32348638c4ef737fda1dc74e3b0668de.jpeg)
- Mirabell61, Canute, Glen McGuire and 3 others
-
6
-
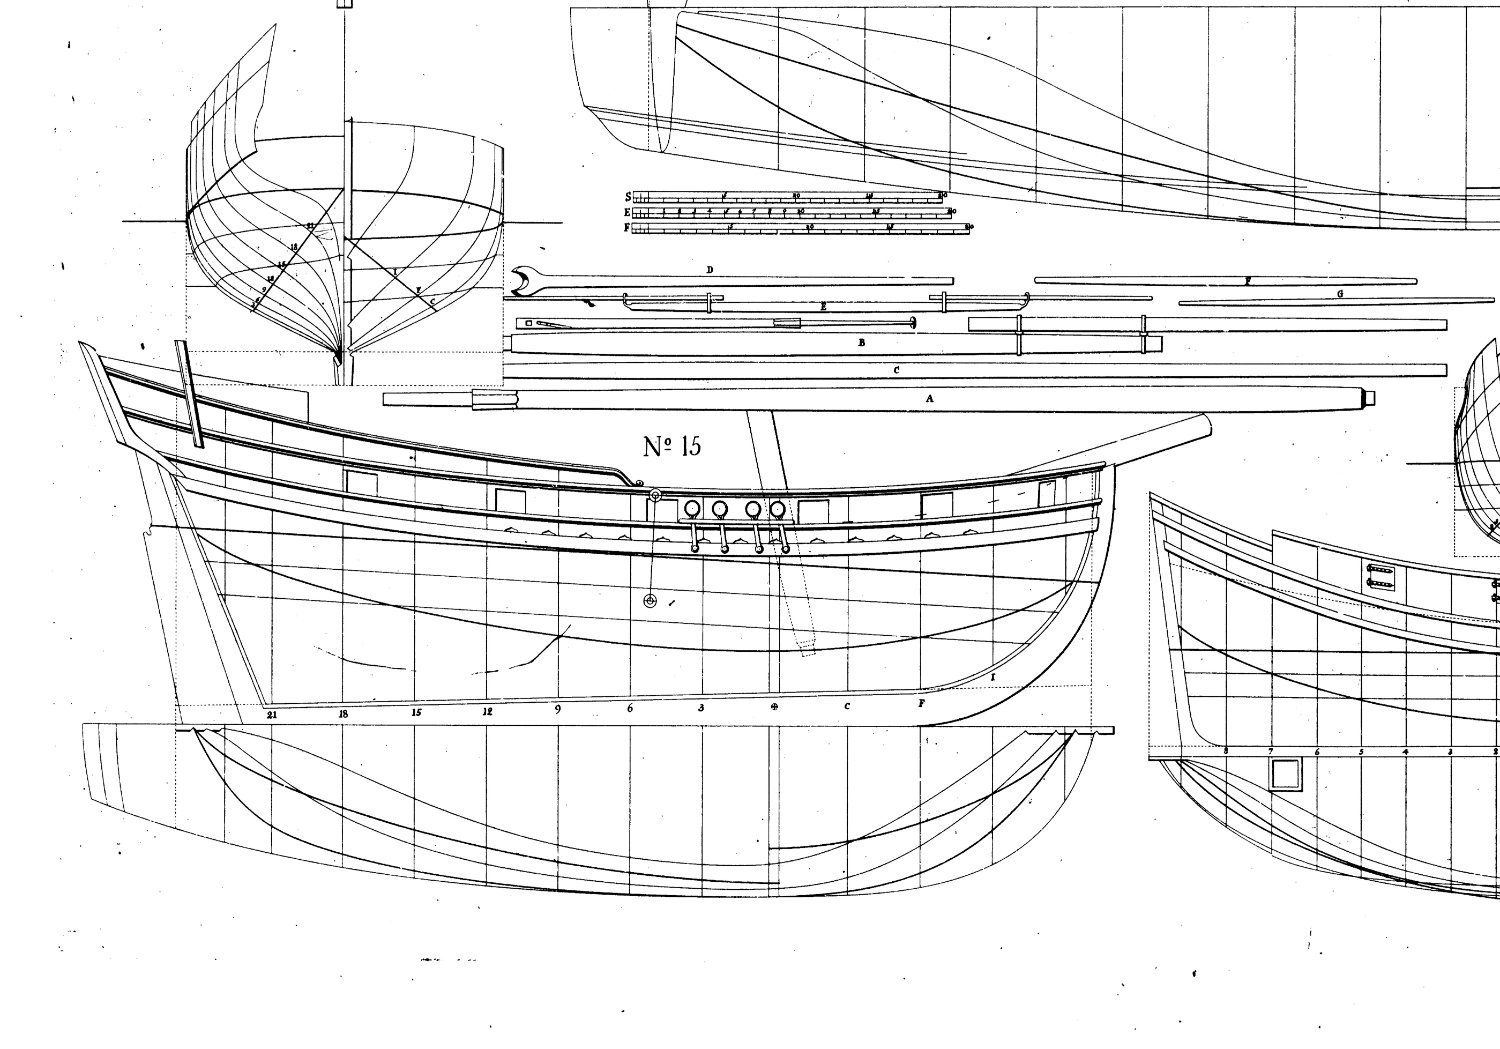
Hello George,
I cannot contribute to your question of how the bowsprit was fitted to the stem resp. deck, but the pic here shows the dimensions of the bowsprit and other spars of the Bermuda sloop on plan LVII of af Chapman`s Architectura Navalis Mercatoria of 1763.
The scale is given in Swedish, English and French feet.
Maybe you are able to find the complete illustrated build log of a Bermuda sloop issued in Ships in Scale, if I remember right. Good luck
Greetings

-
I envy you your ample preesentation space for your superb models and the new workshop accommodating all your machines and tooling in one space and on the same level.
Congratualations!
salutazioni cordiali
Joachim
- No Idea, giampieroricci, billocrates and 1 other
-
3
-
1
-
-
Hello Cristiano,
I refer to Allyaned's question, whether the hardware on hulls such as rudder pintles horseshoe brackets etc. were painted with white stuff as the hull was.
Imho, these metal parts were always installed before the hull was payed with some stuff and nobody took the trouble of e.g. covering the metal parts or working meticulously not to touch the original colour of the parts or applying a layer of black on them later. These ships were fighting ships and nobody would waste time and effort in achieving "showlike" condition on parts below the water line..
Salutazioni
Joachim
-
Hello David,
I have an ongoing POB scratch building project of the af Chapman English cutter based on af Chapman's plan.
There I first cut the bulkheads without any bevel and placed then on their individual position according to plan with one face exactly meeting the line. From the 0 bulkhead the thickness of each bulkhead points forward to the bow resp. backwards to the stem. It is important to colour the true edge of each bulkhead and keep it untouched while sanding down to smooth the hull.
Greetings
Joachim
-
Hello SilversaxMan,
to keep brass shiny (after polishing and degreasing) apply ZAPON-lacquer either by spraying or dipping. It is quite thin fluid and so does not build up too heavily.
Have a look at Wikipedia:
Zaponlack
Zaponlacke sind dünnflüssige, transparente Nitrolacke auf der Basis hochviskoser Cellulosenitrate (Kollodiumwolle), die in leicht flüchtigen Lösungsmitteln wie Amylacetat, Ethanol und Ethylacetat gelöst sind. Sie sind meist farblos, können aber auch Farbstoffe enthalten.[1] Sie dienen meist zum Oxidationsschutz (als Schutz gegen Anlaufen) von Metallen wie Messing, Bronze oder Silber. Zaponlacke sind ungeeignet für die Anwendung bei Eisen oder Stahl, da sie keine rostschützende Wirkung haben. Sie dienen daneben als Firnis sowie zum Lackieren von Holz, Glas und Leder.
Der Vorgang des Behandelns mit Zaponlack wird zaponieren genannt.
Zaponlacke können gesundheitsschädlich wirken und sind meistens leicht entzündlich.
Ein ähnliches Produkt ist Nagellack.Sorry, no translation available.
greetings and a happy year 2024 to you
Joachim
- thibaultron, mtaylor and Canute
-
3
-
-
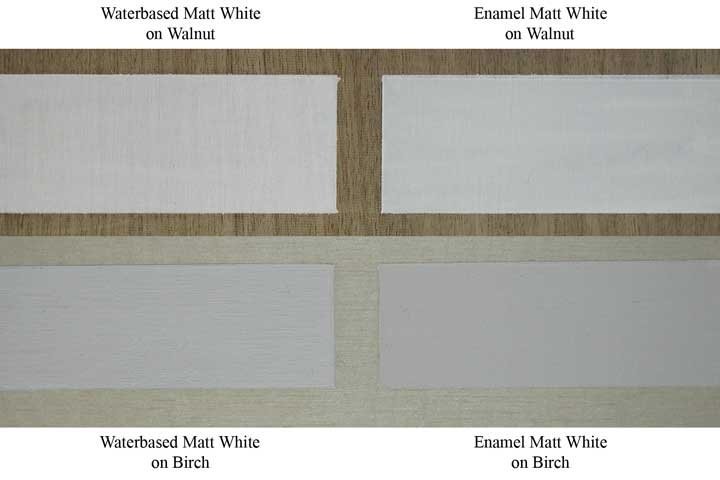
The white stuff question is troubling me too. Here's a paint and colour recommendation I've just found:
JoTiKa Ltd. ~ Admiralty Paints, Matt White. (jotika-ltd.com) Looking at the original ship paintings shown above, I do not go for the yellowish hue of Vallejo RAL 9001 out of the bottle but give it a definite light white cream colour. But as said above, there is no reliable original and it's up to the modeller's eye.
Joachim
- Keith Black, thibaultron, Canute and 1 other
-
4
-
As for the rivetting: I came across the following on youtube in a very informative channel Blondiehacks where she shows the making of a tool for producing uniform rivetting on items of a steam locomotive:
- bruce d, Retired guy, Ras Ambrioso and 5 others
-
5
-
3
-
-
Valeriy,
deep admiration,....as was not else to be expected viewing your work!
Joachim
- Valeriy V, druxey, Keith Black and 2 others
-
5
-
This is what I bought from dictum.com a couple of years ago: www.dictum.com/de/europaeische-hoelzer-caa ;www.dictum.com/de/europaeische-hoelzer-caa/buchsbaum-sortiment-4-5-kg-520038
Present price offer: 54.00 € for 4.5 kg incl. VAT
assortment of European Boxwood ; Buchsbaum-Sortiment, 4,5 kg.
The rectangular piecves are like pen blanks and the wood chunks are not in the right dimensions for very large (long) parts as one-piece, but to make e.g. carved decorations for scale 1:48 or 1:50 it's fully ok.
I do not know about shipment cost to the USA
best regards
Joachim

-
4 hours ago, Cathead said:
I'm in no way an expert on this, but on my builds involving exposed wood, I've always used natural food-grade wood oil, the kind you'd use on cutting boards or wooden utensils. You can see the resulting finish on builds like my revenue cutter or NRG capstan in the signature below if you want to assess the look. The oldest model I've treated this way is 9 years old, has gone through lots of temperature and humidity swings in my house, and has been just fine.
My strongest reason for doing this is I really don't like using hazardous stuff in my modeling. Poly comes with all sorts of concerns from being an oil-based flammable to needing adequate ventilation for application to not wanting it on your skin. Whereas food-grade wood oil is as benign as it gets.
It's probably true that, in the long run, an initial application of wood oil won't protect as well as one of poly, because it doesn't create a hard seal. In other applications (like countertops) you would normally apply more wood oil every now and then to maintain the surface, which isn't practical on a ship model. So down the road it's possible that wood oil would still lead to some level of warping, cracking, etc. But I haven't seen it yet, and my guess is that a well-built model kept in reasonably stable indoor conditions shouldn't see major problems; our models aren't subjected to the same stress as countertops or utensils. At least I assume you aren't planning on eating off the Cheerful's deck!
I don't have a deeply educated opinion on the long-term value of one or the other, but I've seen no problems with this approach over multiple models, and really value the simplicity and benign nature of the material. I'd be interested to hear counterarguments from someone with relevant experience.
On a few other than ship modelling projects (wood toys for grandchildren) I have recently used linseed oil varnish WITHOUT any desiccants in it. It can be applied with a brush (in narrow places) or with a rag on smooth larger surfaces. Removed excess oil after a while. It well penetrates into wood, accentuating its grain and needs 48 hrs to thoroughly dry creating a firm seal. I like to employ it because its food proof.
Joachim
-
What terrible news and so sad to learn that he passed away so early. I own some of his machines and really appreciate their fine execution and quality.
Though I had only very little contact with Donna over the purchase process I send my condolences to her and the family.
Once she decides to continue the business I hope to be in contact again.
Joachim
-
On 11/8/2023 at 5:51 AM, Valeriy V said:
Thank you Joachim!
")
If your experience is successful, please let me know.This means the bottom rectangular hole is for water inlet, and the top one is for outlet.
Hi Valeriy,
as concerns Marine-Modellbau forum: I got a email confirming my registration there with mxy user-name and my password. I tried to access the forum right away; the access was denied again. I guess it is a dead site.
best regards
Joachim
-
2 hours ago, Valeriy V said:
Most likely, this rectangular and relatively large hole is really for receiving water from the condenser. It is located at the very bottom of the vertical side, at the side keel.
A little higher to the right you can see one round hole.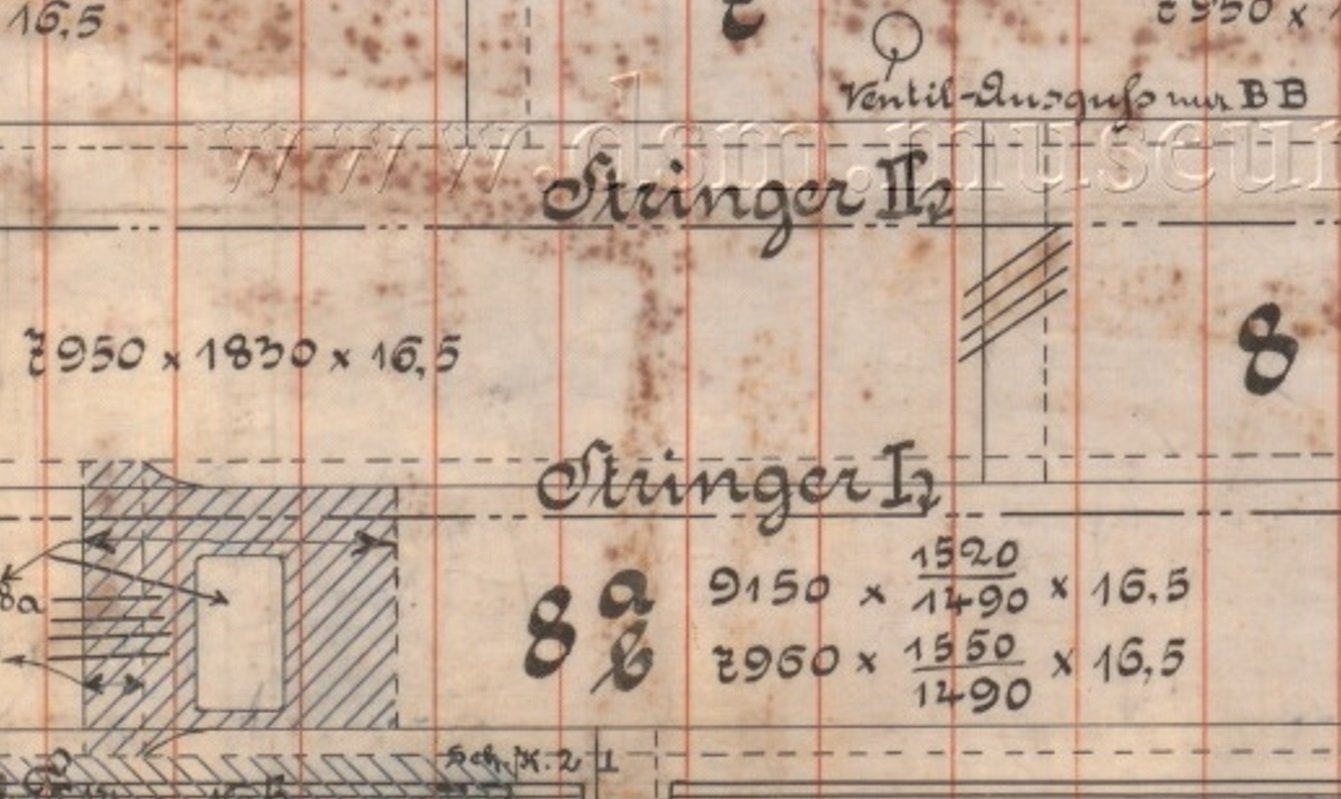
The round hole says: "Ventil-Ausguss nur BB (Backbord)" which means: Valve-Discharge only portside
-
8 hours ago, Valeriy V said:
Sasha and Joachim, thank you for your nice reviews!
By the way, I wanted to look at the work of German modelers and tried to register on the forum a couple of times.
https://www.marine-modellbau-und-mehr.de/
But both times they didn’t let me go beyond the security check step. And now I’m at a loss as to whether I’m doing something wrong or whether I’m dangerous in some way (just kidding).


Hi Valeriy,
I have just visited marine-modellbau forum and found the following:
1. You have to REGISTER there AND have to WAIT for their confirming email to the email-address you indicated BEFORE you can enter the forum.
2. There are 2 small tick boxes somewhat hidden in the text of their Terms and Conditions you have to agree to during registration process. These can be easily overlooked.
So, right now I am waiting for said email confirmation......Just received: it says I will receives a second email in acouüple of days, when my reidtrating will have been manually checked. And: I can visit the forum as a GUEST, which I am going to check right now.
Best regards
Joachim
-
Dear Valeriy,
and again: thank you very much for your technology insight...a lot to learn and to keep in mind as a reference for own projects.
I appreciate your adaptiveness to materials locally at hand as you are bringing me back from my tendency of applying technical "overkill".
I am looking forward to this fine built.
Best regards, greetings
Joachim
- Keith Black, Valeriy V, Canute and 1 other
-
4
-
7 hours ago, Valeriy V said:
The most reliable source of information is photographs!
These photographs show Cyclone-class destroyers.
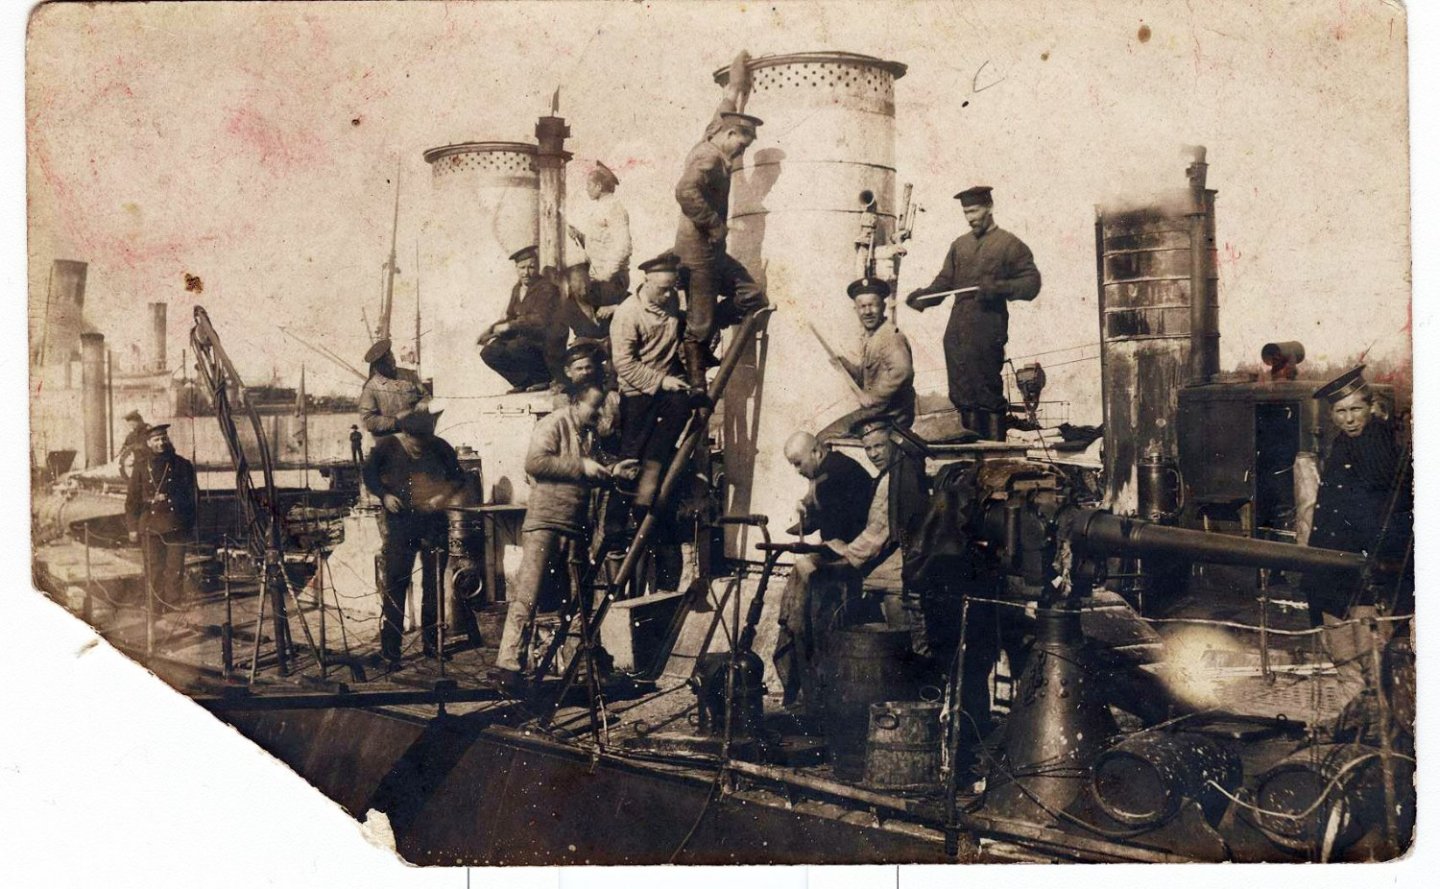
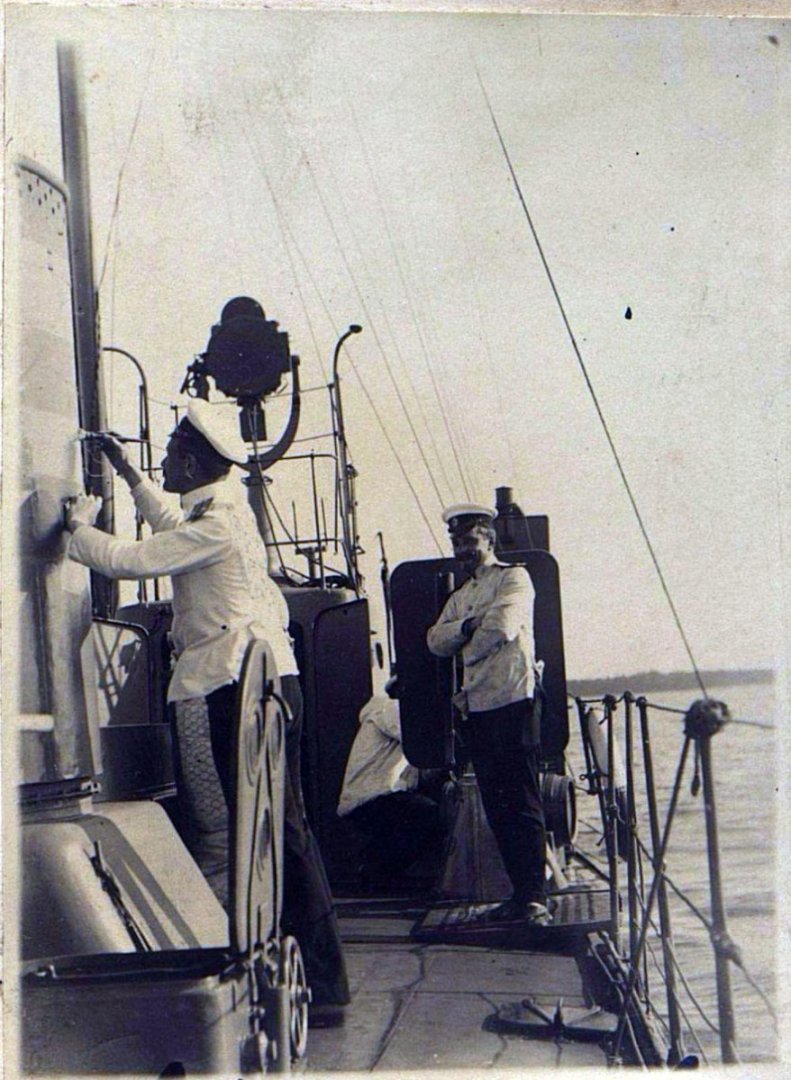
Best source are photos.....until AI entered the market. I feel a growing doubt in their reliability but hope that our hobby ist not prone to this technology.


US Brig Oneida 1809 by rlb - The Lumberyard - 1:48 scale - POF - Lake Ontario Warship
in - Kit build logs for subjects built from 1801 - 1850
Posted
Hi Ron,
I've only just now stumbled upon your build log; to express my admiration in words: excellent skills, super photos, textual explanations to the very point.
I'm amazed and I'll follow this build from today on Thank you ever so much.
Greetings
Joachim