src
-
Posts
2,300 -
Joined
-
Last visited
Content Type
Profiles
Forums
Gallery
Events
Everything posted by src
-
Sjors, been kind of laying low lately and getting caught up with you. I see you have kept you building gnomes busy, VERY nice decking! I may try your filling method on my next build. Sam
-
Mark/Frank, the scary sharp method is nice, especially to get started. You can make a base plate large enough to flatten/sharpen most anything, and its super cheap to boot. Edit: That little sharpening system on the link is nice too, I may have to look into that. Hmmmm Birthday is coming up....... Sam
-
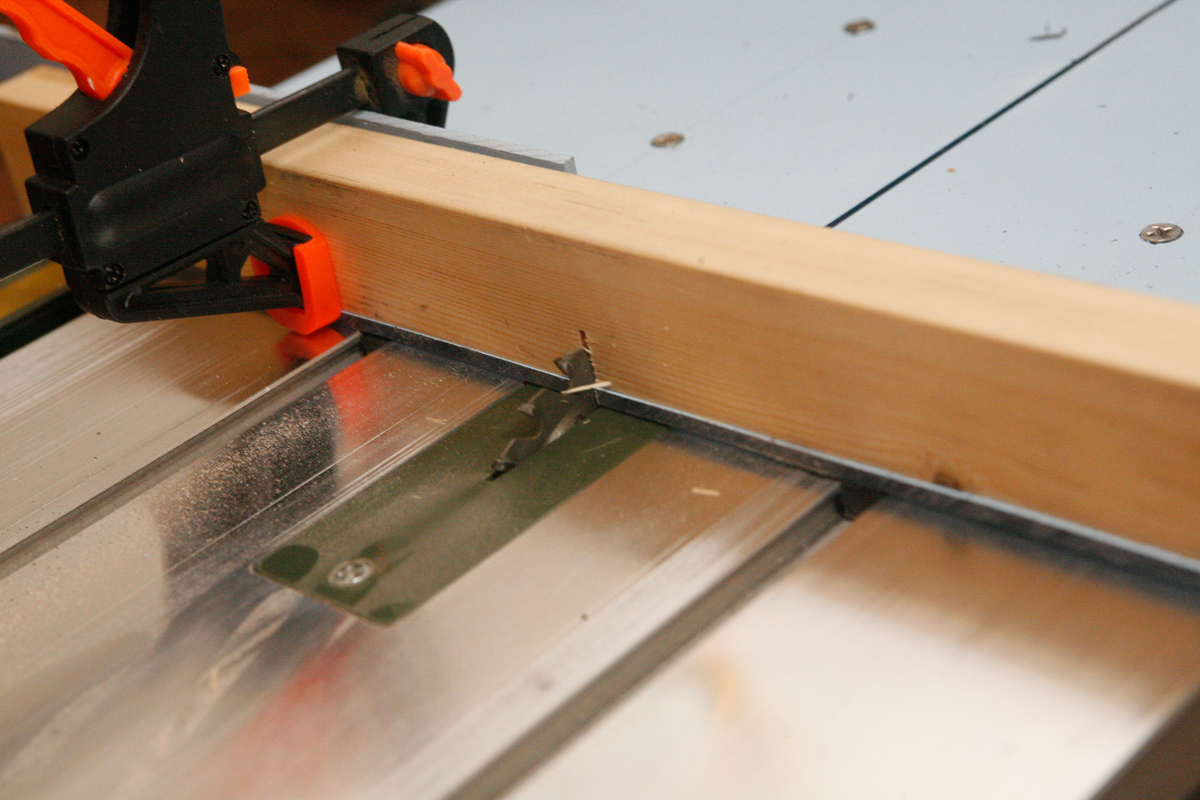
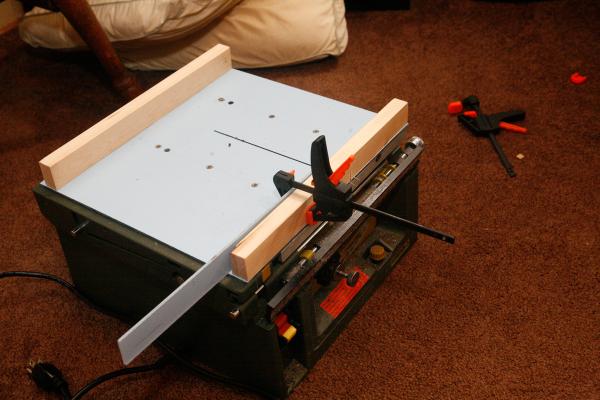
Richard, here is my very crude sled for my Proxon. In the second picture you can see what I mean about the blade exiting out the back side. Its very easy to leave your thumb in the path of the blade as it exits. I have plans to make a new sled in the somewhat near future. My thought is to extend the base back several inches to extend the rails and to add some additional material to kep the blade buried on the back end to prevent "Phalange Modification Syndrome" Perhaps a stop also for over travel. Also if you (or anyone) build one for the Proxon, extend the rails on the backside. It gets a little sloppy and wobbly towards the end of the travel. I used Polycoabonate for the base and Polyethylene for the rails,, mainly because we have lots of scrap at the shop I could dig out of the trash. In the past I have used maple for the rails and 1/2-3/4" melamine coated MDF for the base. Hope this helps you or somebody. Sam Edit: I see leaving myself logged in and not updating my screen leaves me somewhat behind. Singidunum thats a nice little handle on your sled.

-
Q-As Revenge, I think your right about the chisels being more difficult to make, also perhaps since they are more of a specialty item that might make them more expensive? Frank, I use a Tormek for most of my sharpening it has several jigs that make it easy to sharpen most anything to a reasonable level. Its kind of prcey PRICEY if you want it just for micro chisels but you can but BUY the guide bar and attachment seperately and install them on your own slow grinder. Also take a look at Micro Mark, I saw a screwdriver sharpener the other day, maybe you could modify something like that as a guide to help you? Sam
-
Rich, Sorry for the delayed response, Been neglecting my build here. Thanks for the kind words. His passing was really unexpected, it was supposed to be a bladder infection not cancer. Not much building going on at the moment, a variety of things including the dog passing are keeping me from building. Sam
-
Singidunum, Richard Cross cut sleds are one of the best additions you can make for any table saw. Far superior to a miter guage. One thing to watch out for Richard is the outfeed end (the end closest to you as you work) The blade is exposed unless you add a block of wood there. I am off to work at the moment, if nobody gets a picture up sooner I will post something tonight showing the back of my rather crude sled for my Proxon. Sam
-
End snippers, what can we use them for?
src replied to Modeler12's topic in Modeling tools and Workshop Equipment
My thought was micro Marc also, or a train store. Those would be good for tree nails also. Cdog, yes! Buy it and THEN find a use for it. Sam -
Mark, I was looking at those also. I have the dog leg flat set, love em. I was surprised to see a set from two cherries and down to 0.5 mm for some. The Two Cherries brand is partially responsible for my chisel love affair (fetish? Obsession?) Micheal, yea I hear you, I have become a bit of a chisel lover over the years, the guys at work always rib me when I pull out one of my rolls of chisels. "Uh-oh! Geppetto is in the house!" But who do they go too when they need a sharp chisel??? Sam
-
Micheal, good point about standing to the side, its such an unconscious habit I forgot all about it. I suspect most everybody who has been around a table saw for any length of time has similar stories too. I was once cutting a miter in a cabinet end panel to mate up with the face frame on a right tilting saw (blade tips into the fence) the waste got caught up between the fence and blade and shot back 10-15 feet where it embedded itself into the sheetrock wall. Looked like Robbin Hood was practicing his archery on the wall. Had I not been standing to the side I would have been the one going to the hospital. Both stories illustrate the need to be aware of what you are doing and also never allow yourself or anyone else to stand in "The Danger Zone" behind the blade. Sam
-
Found these online. Thought somebody might like them. http://twocherriesusa.com/category/carving/micro-carving-tools/ Sam
-
Richard, There has been some great advice given to you and every one here. In my opinion probably the most important safety tool out there is the one on your shoulders. If you are the least bit unsure or uncomfortable about what you are doing stop and ask yourself why, if you dont know ask somebody - a habit you have already started here. One of the commenters here brought up kick backs - They are frightening when they happen and they happen so fast you cant believe it - blink of an eye fast. On second all is well in your world, the next your on the ground doubled over in pain. I am fortunate, I have never been hurt by the couple I have had in my 30+ years as a carpenter. But, I remember a guy when I was in my early 20's who ended up in surgery to remove a piece of oak from his gut from a kick back. He was cross cutting a board down and left the smaller part between the blade and the fence, it caught the blade and shot back like a bullet. Even a simple hobby knife can send you to the hospital. There is a builder here who has/had nerve damage to their hand from a simple slip. Also since I havent seen it mentioned here yet, look up feather boards, they can be your best friend for some operations. Not only are they a safety device but can improve the quality and accuracy of your cut. Well, not trying to scare you, just wanted to put my 2 cents in. After all that - enjoy this great hobby and be safe. Sam
-
Interesting observation: Atlantic vs Mediterranean. Not sure myself, will be interesting to see what you find out. Please post when you do. Sam
- 188 replies
-
- 1
-

-
- latin caravel
- artesania latina
- (and 1 more)
-
Sjors, Maybe I should have gone with the 230 then. Like I said, its not a total waste, it is better than doing things by hand. Today is my first day at the bench since last weekend, between work and having to put our dog down a couple of weeks ago there has been neither time nor real desire to work till now. If I get anything real worth posting done today I will get some pictures up tomorrow. Sam
-
Welcome back Z! Good to see your work again. I am curious why you bought a sheet instead of strips? Were strips not available in the correct thickness? Sam
-
Vivian, I love how you are giving her the aged look. Very unique and all yours. I find for myself I just cant seem to pull it off, so I have to go with the clean more refined look - I dont always get that either. regardless I am enjoying following your progress. Sam
-
Mark, I jut dont know what to say. Its almost like hearing somebody passed away. I am not sure I could make the same decision, I am too darn stubborn! I will be watching for v2.0. Sam
-
Russ, Your metal work is always so clean, it gives me something to aim for. I have noticed you are painting rails,etc before you install them. I am assuming that is to limit masking, is there another advantage? Sam
-
Ron, There is something about making your own stain that is very satisfying, time consuming in a way, but satisfying. Smelly too. Will wait patiently... Sam
-
John, I missed that and I commented right after you! Sheesh! Interesting, I wonder if the lower cure temp on your material has anything to do with it. I went over to the BJB site: ( http://www.bjbenterprises.com/polyurethanes/castable/rigid/water-clear/ ) to look up some of the resins we use and none of the TDS showed an actual cure temp, just cure times at ambient temps and post cure oven temps. Most of the stuff we use gets pretty warm to the touch, I am guessing 125 F or greater. I am thinking the smaller parts cast here and the lower cure temp doesnt allow excess bubble to form? Thanks for the info, something to look into. Sam
-
Jim, What were you using? All my experience is with more large scale type casting; parade float parts, costume items and some props. Sam
-
Brian, Sjors, Now you have me wondering if I just got a bad unit or if their quality has dropped. Brian, I seem to recall you bought yours about the same time I bought mine, 2-3 months ago? And yes, here in the states the go for $300.00 and up. I would have to look up the receipt but I recall it being in the $350 range with shipping. Maybe I need to make a phone call. Wonder if its too late to do anything about it. Sam BTW I have the FET model
-
Sherry, if you do go with the casting method going with steves idea for a vacuum chamber is well advised. just make sure your mixing pot is at least twice as big as the amount you want to mix. The whole mess will foam up and over as you apply vacuum, like pouring warm soda, especially as you get to the max that your vacuum will create. Its messy when it overflows. Not that I have ever made that mistake, nope not me! Never! Sam
-
Robbyn, I expect a lot out of a tool when it claims to be the "Most Accurate Hobby Saw on the market" Or something to that effect. If it had been Harbor Freight I would have said, "Ok I know what I am getting here" and been fine with it. I passed on the Byrnes saw cause I couldn't justify the expense at the time, now I feel like I wasted $300.00 and still will end up buying the Byrnes saw at some point in the distant future. Live and learn I guess. I will say that its still better than cutting by hand so its really not a complete waste of money. Once I accurise it maybe I will change my tune. Who knows? Russ, that was my assumption. "Fully Framed" indicated the same thing although that was for English ships, I understand American builders followed British procedures at this time period. I am ok with altering the process here if it makes my carriages consistent and makes the process easier. I have made my "planks" for the axel trees long enough to get two out of each length, that will keep my fingers away from the saw blade. 30+ years working on and around table saws and never felt the bite of the saw blade, wanna keep it that way. Sam
-
Ron, Just getting caught up. I m starting to sound like a broken record, but she looks awesome. I learn something almost every time I stop by, thanks. Sam
-
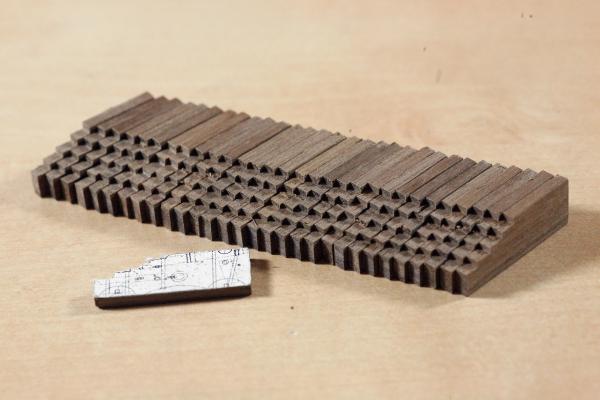
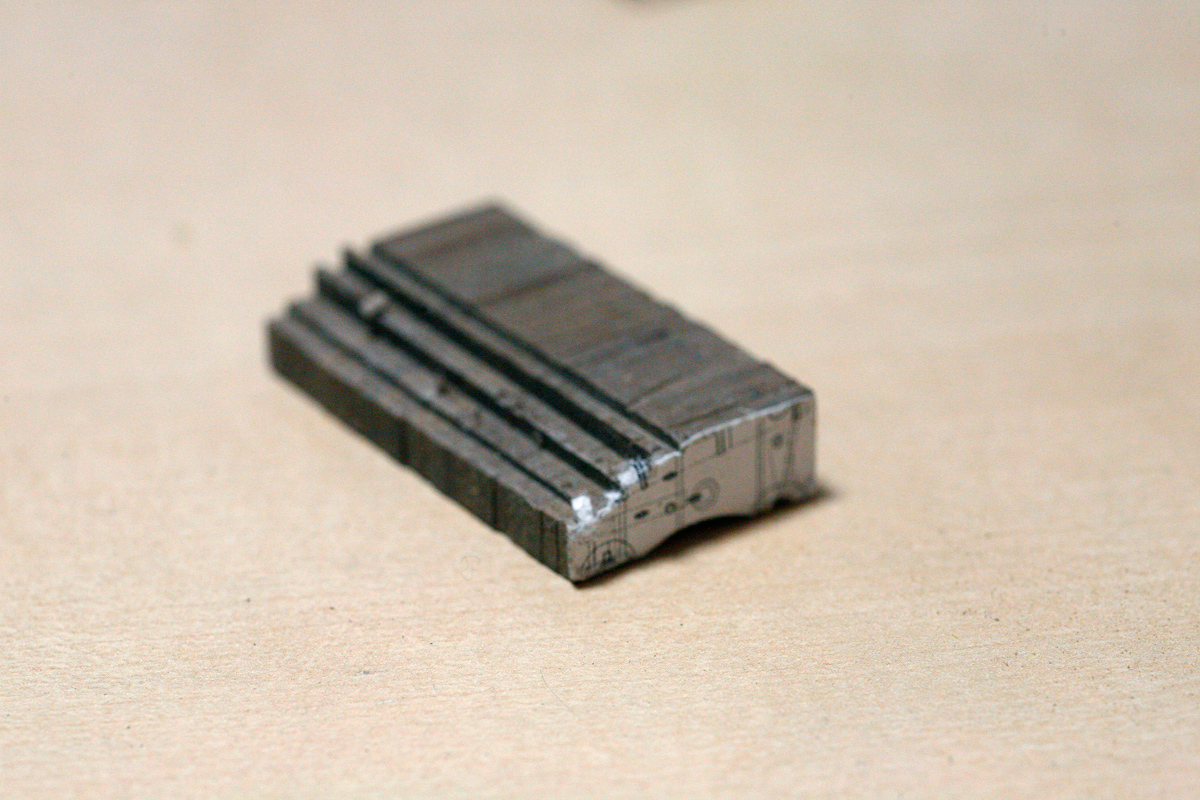
Small update. Sometime back I bought a Proxon table saw. Finally got a chance to see what it could do, and I am............ underwhelmed. Maybe I am being over critical but for $300.00 I expected more. The micro adjustment on the fence is really sloppy and inconsistent, fixable with a nylon or delrin shim. The cross cut/miter gauge is pretty sloppy too, hard to get repeatable cuts unless you push the guide all the way over to one side or the other and then I am afraid it will wear funny. Sigh, I should have sprung for the benchmark and bought the Byrnes saw. I made a crosscut sled for the Proxon and that went a long way towards making repeatable crosscuts and slots. I used .180 polycarbonate for the base and some polypropylene for the guides. Its kind of crude looking so I didnt post pictures of it. I have some ideas on improvements once I do that and make it presentable I will post a picture. Its likely to be several weeks though. Once the sled was operable I started in on the gun carriages. I am using the dimensions for the Armstrong 6 pound gun found in the database here at MSW. My first set I used some 3m number 77 adhesive lightly sprayed on one side and stacked them up and gang milled the steps, the slots for the trucks and roughed in the curve at the base. I made two mistakes here. The worst was not considering the angle of the sides in relation to the trucks. I made my cuts perpendicular to the sides instead of at an angle and that would have showed up in the finished carriage I think. Also the spray adhesive I used wasnt cleaning up like I wanted and may have interfered with the stain. I didnt want to spend what looks like it will be weeks of work only to find I hate the gaps at the trucks and the stain was uneven so I started over. This time I cut each side separately. That required more care in holding the part safely and took quite a bit longer. They need some clean up but these should work out. Rather than roughing in the curve on the table saw and then filing to shape I think I am going to get a carving chisel with the correct sweep and try that. My next step is to make a jig and cut a slot into the trucks. I dont think this is how a real carriage is built, it appears weak but it will help keep a consistent space and angle to the barrel. More to follow Comments and constructive criticisms always appreciated. Sam