

.JPG.57a378a2fb5032f11af5def7ae16c0b2.JPG)
Retired guy
-
Posts
561 -
Joined
-
Last visited
Content Type
Profiles
Forums
Gallery
Events
Posts posted by Retired guy
-
-
8 hours ago, RickyGene said:
Thanks for the info. I thought you cut the grove w/the homemade too/blade. And thanks f/photo. Saved.
Rick
Hi Rick,
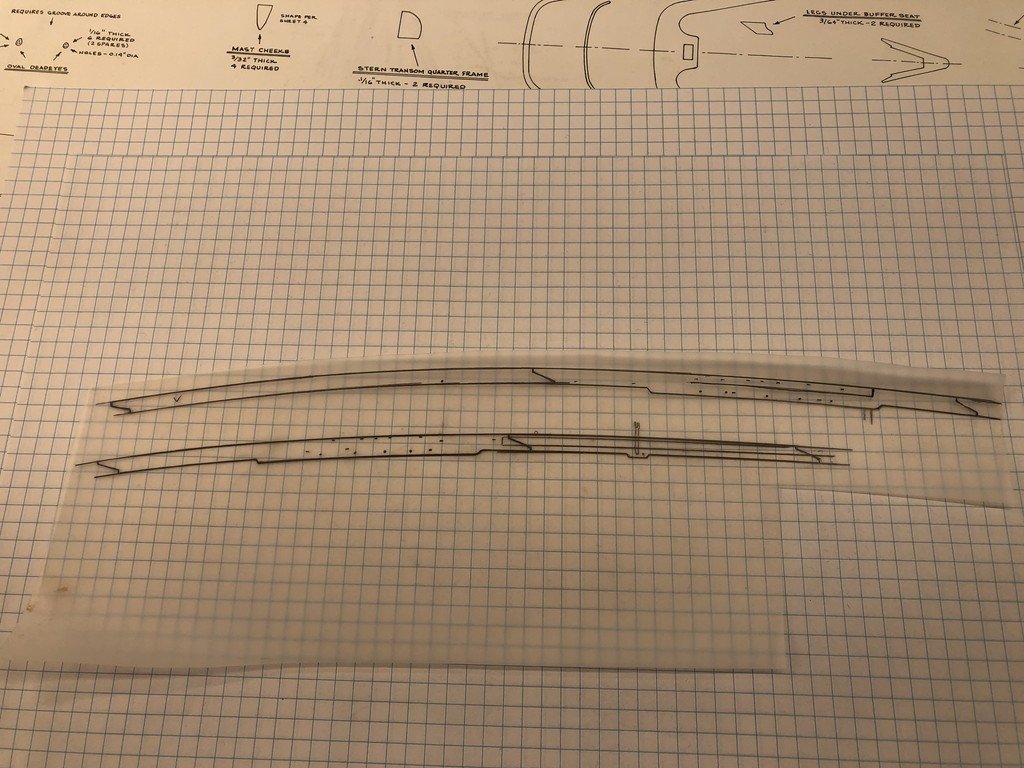
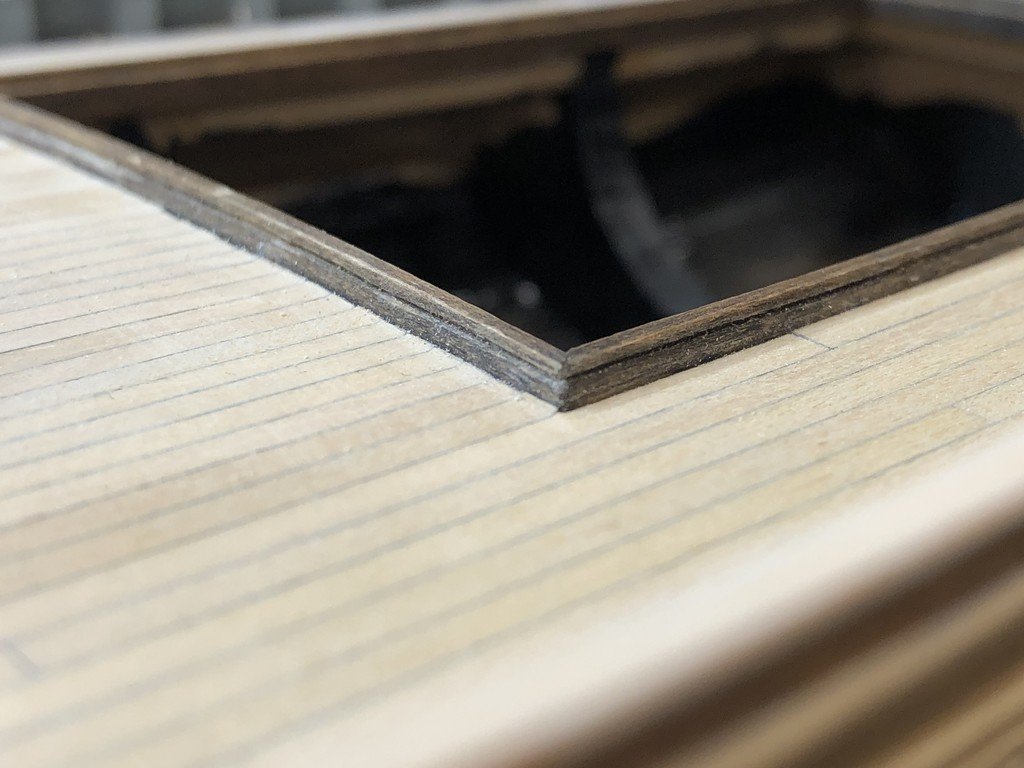
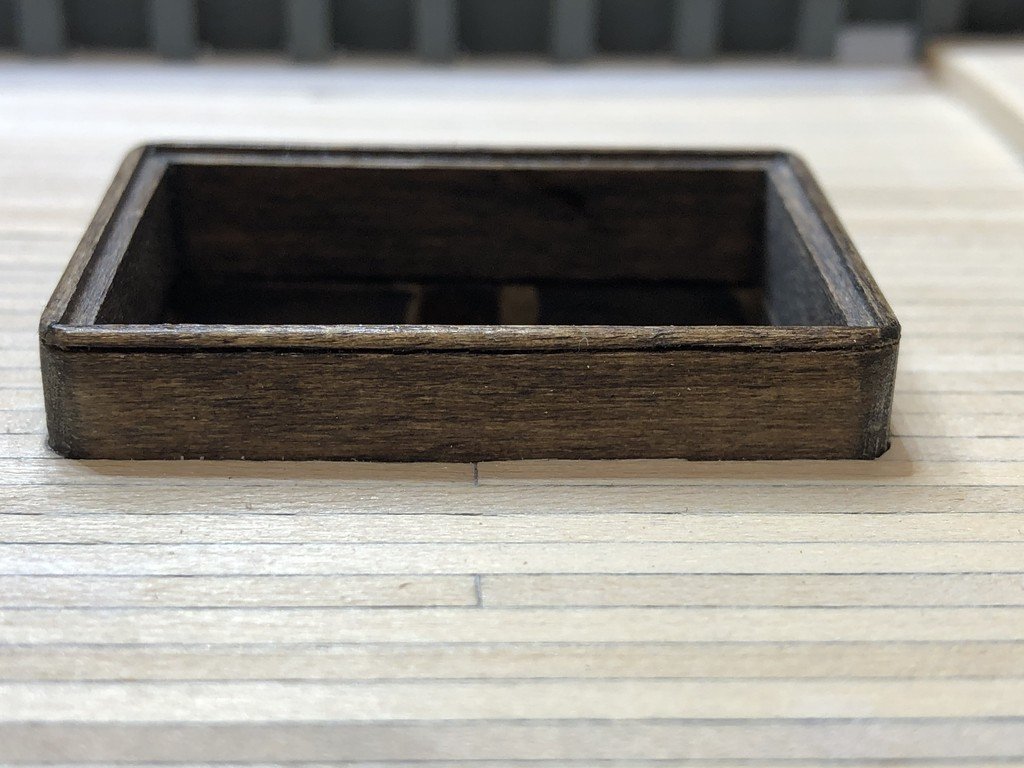
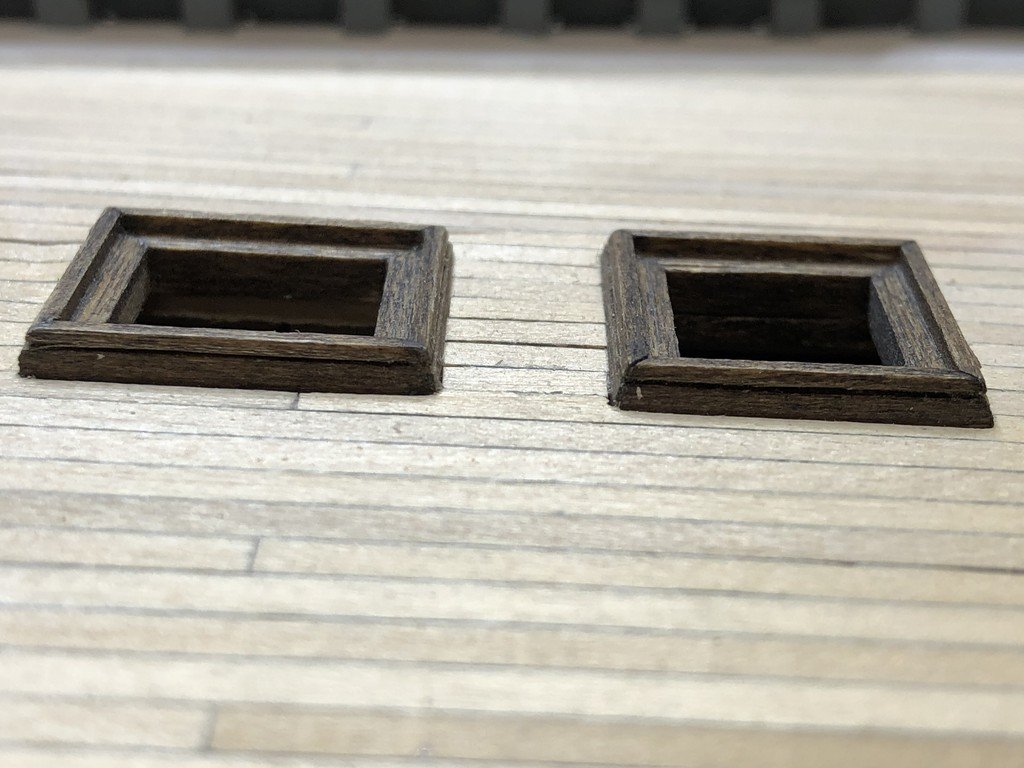
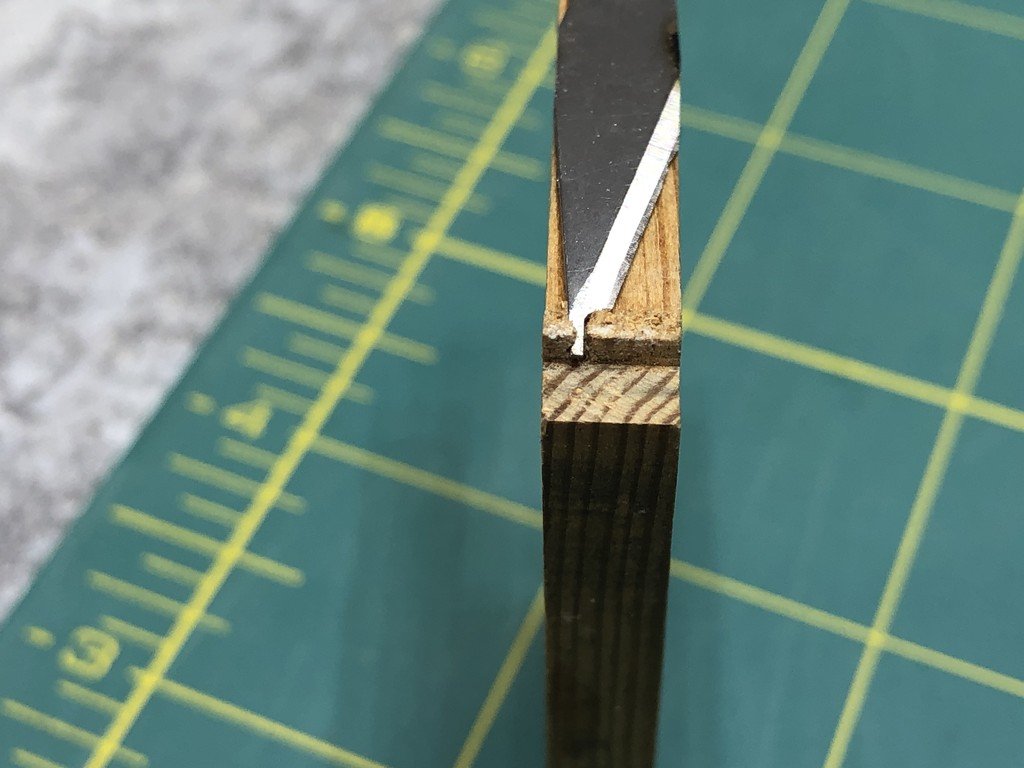
Just to clarify, on post #32 I made the tool/blade to make the groove in the coamings for stern cabin, hatches for deck, Forward companionway and Forward Cabin skylight on the deck I needed a very small groove.
I cut the cove in the plank which you have shown with picture above (I think this is what you mean) with my Byrnes table saw
From looking at the picture you posted you can see the stern is different from the picture I posted so you might not need to change the AL Bluenose 11
Regards
Richard
-
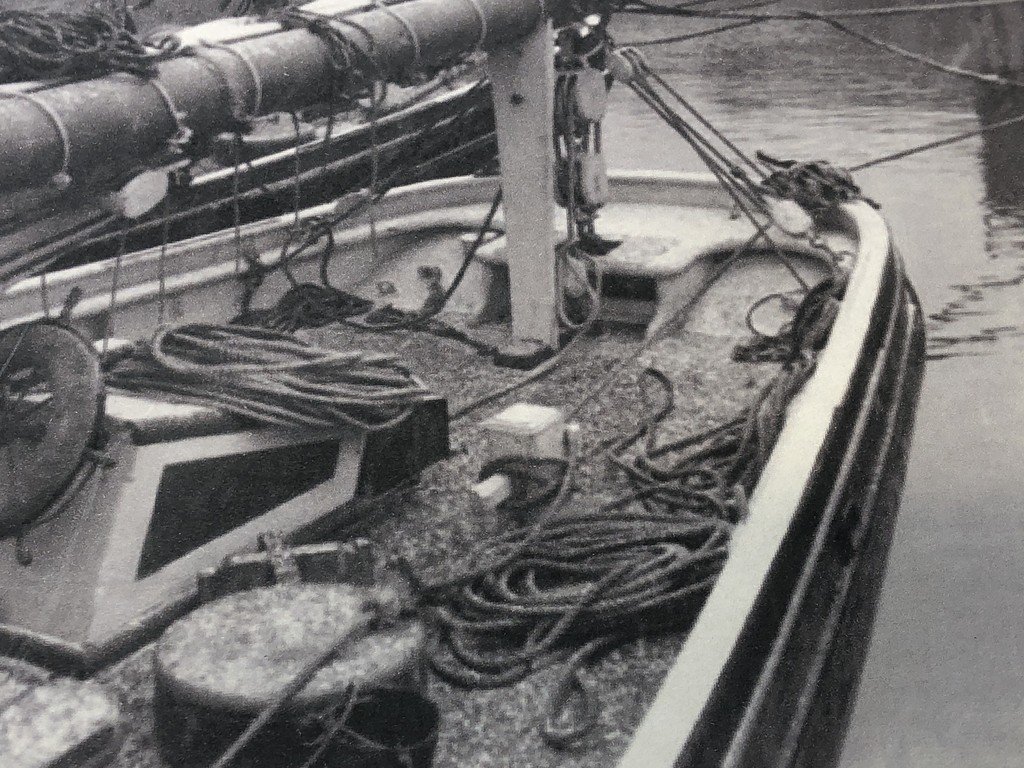
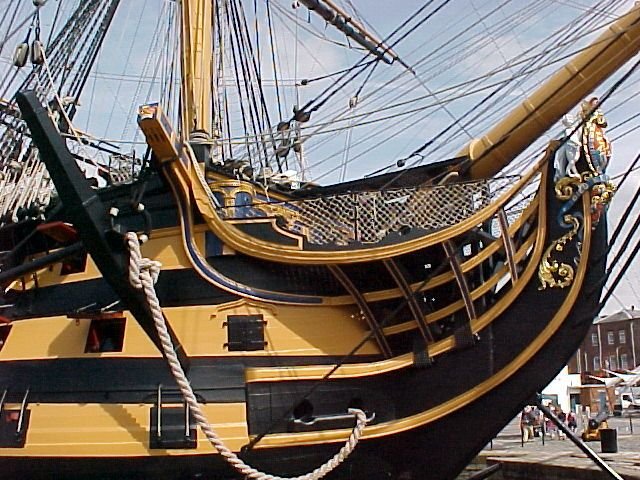
Coming along nicely Phil, here are a couple more of my pic's from the inside looking out at the Bowsprit thought you might like to see
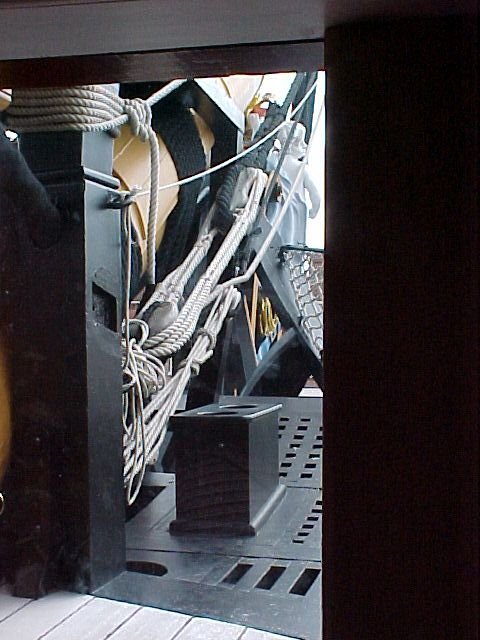
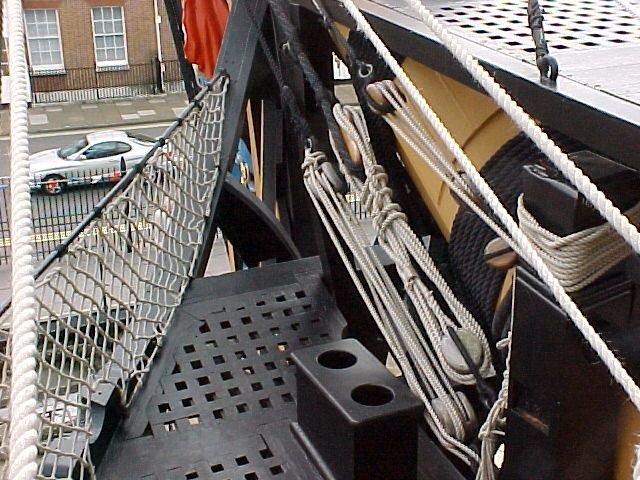
Regards
Richard
-
On 11/21/2019 at 11:02 PM, mugje said:
You did a wonderful job! Also regarding the pictures by the way👍
Thanks very much Mugje she is look quite good, I am very pleased with the way she has gone together seeing this is my second wood frame ship.
10 hours ago, CPDDET said:Your skill in building is amazing. Thank you for sharing !
Perhaps you could enlighten me on how you cut the slits in the cap rail for the chainplates?
Dave
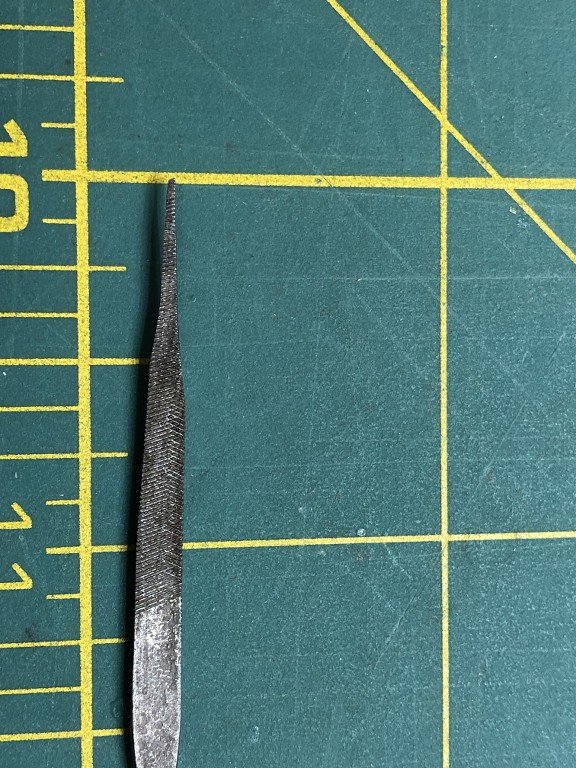
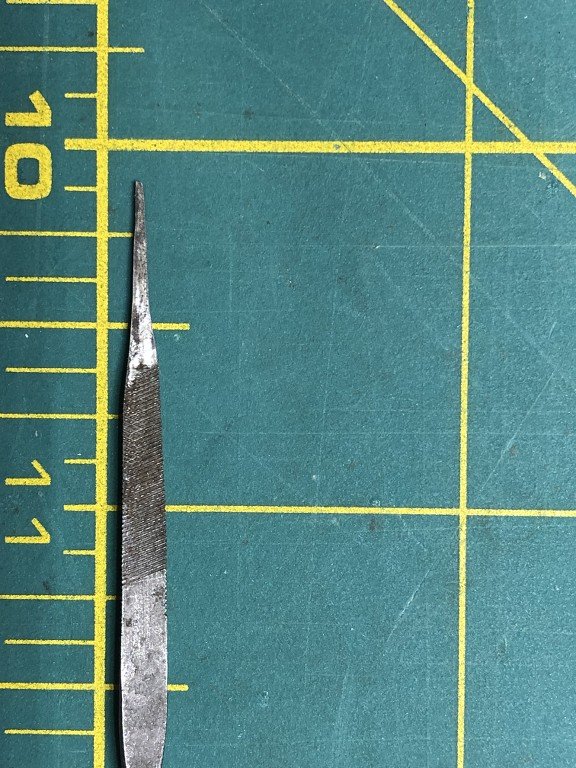
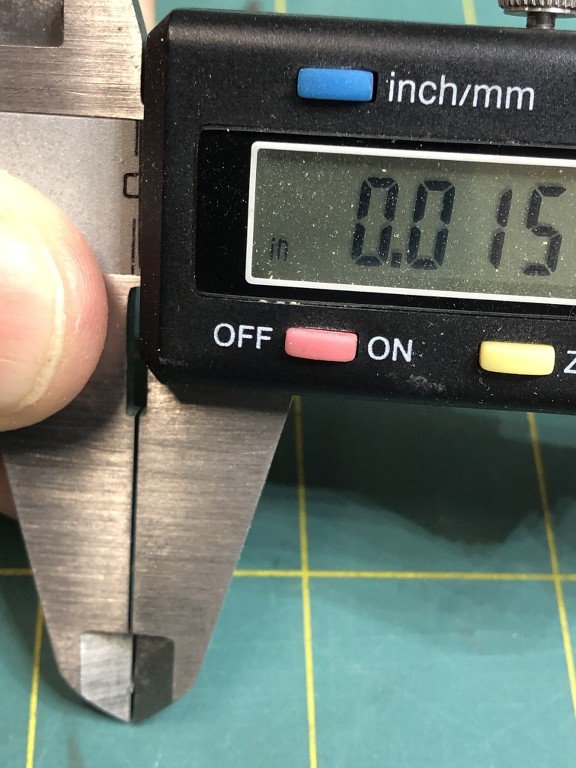
Thanks Dave hope the build will help in anyway, regarding your question here is how I made the slits for chainplates
Traced the top rail from the drawings marking the slit, transferred tracing to cap rail, the chain rail is .016" thick so I used a .016" drill and drilled two holes in each slit (taking great care to make sure I didn't drill into plank), then used a #11 blade very carefully remove some of the wood in between the holes I had drilled, then I took a 4" swiss file and ground sides to the size of slit, on one flat side I ground it down to the thickness of just under .016" thick and then I carefully filed slit so that I could get the chainplate to go through.
It was quite time consuming but it did work for me,

 4 hours ago, RickyGene said:
I have always loved the lines of this sleek lady. And your craftmanship w/wood has again shown those lines. I have never built a Bluenose and for some time have looked at different kits of. After seeing what you have done and wanting to give a hull shape like this ago, I pulled the trigger and ordered a AL Bluenose II. I did look at the Model Shipways and decided was too complicated. Then I looked at Billing Boats versions, but one was just too big and the other was one of their 600 series, you build in two halves and then join the two. I have never been too found of this, kind of outside my scope of how it is done! So I saw the AL kit f/Bluenose II and it fit the requirements for what I was looking for. Though not as detailed in construction/method as the Shipways. I also ordered the book Bluenose II Saga of the Great Fishing Schooners, LB Jensen. So w/this info, hope to turn the AL kit into a decent replica. From photos I have looked at of the deck and furniture/fittings, AL did a pretty good job. Have seen some areas that need attention, but nothing overly complicated. Look forward to more of your thread. What paint did you use for the bottom. I am a fan of Danish Oil and how it brings wood to life. Really liked the home made cut tool. Thanks for sharing.
Rick
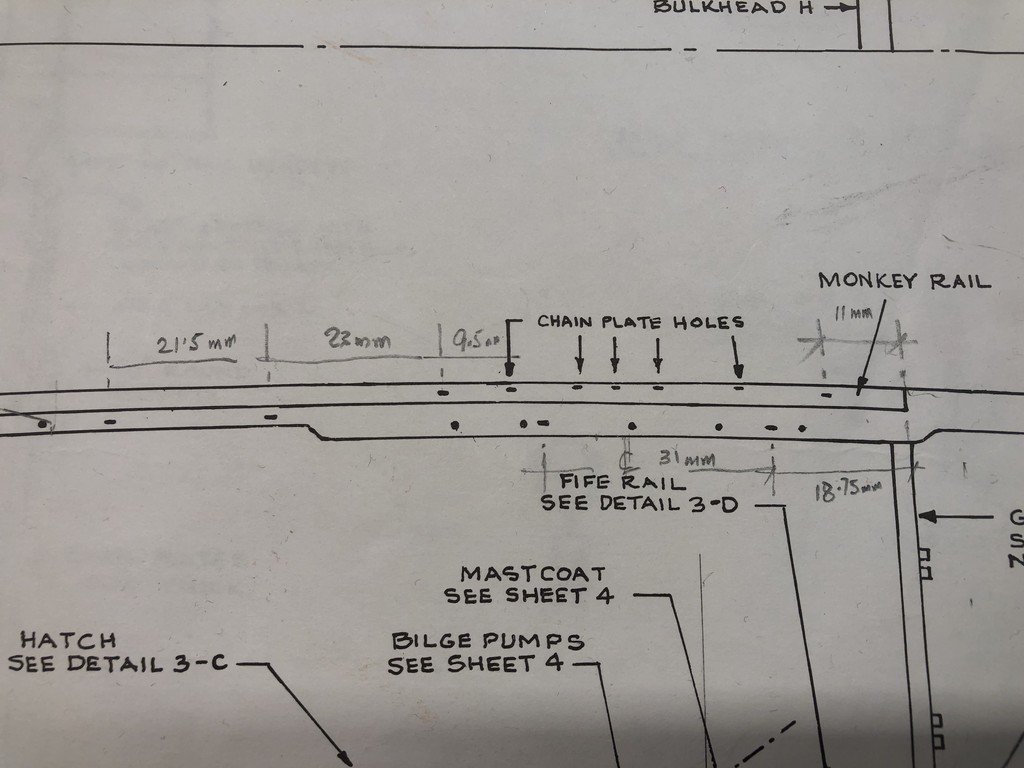
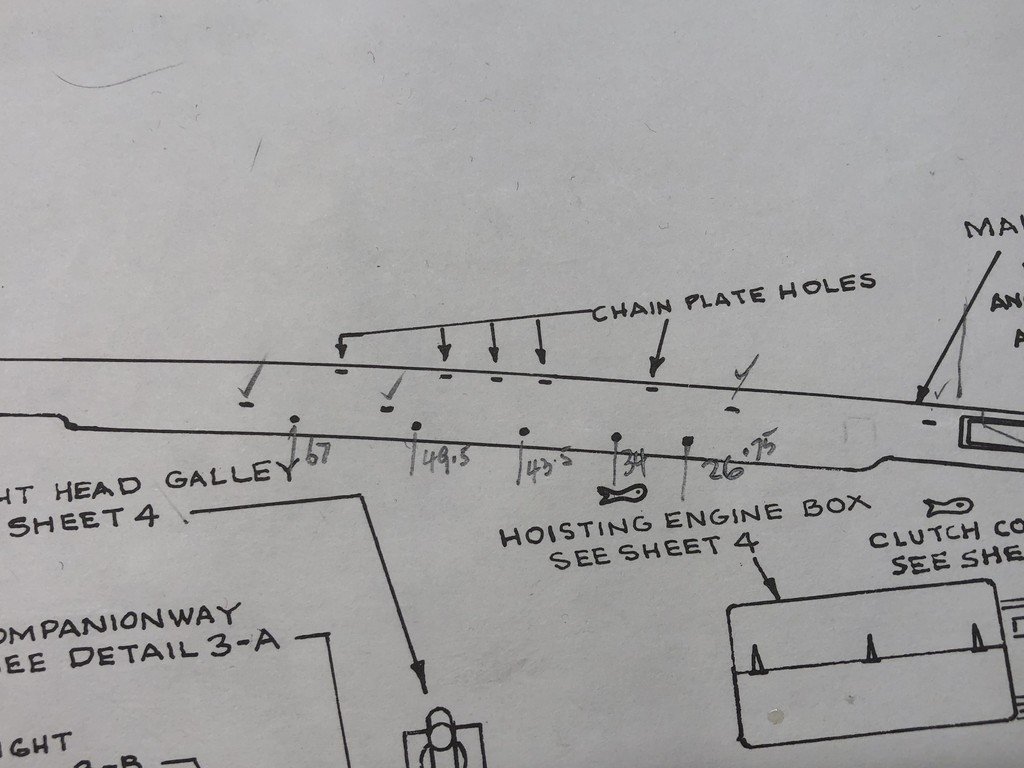
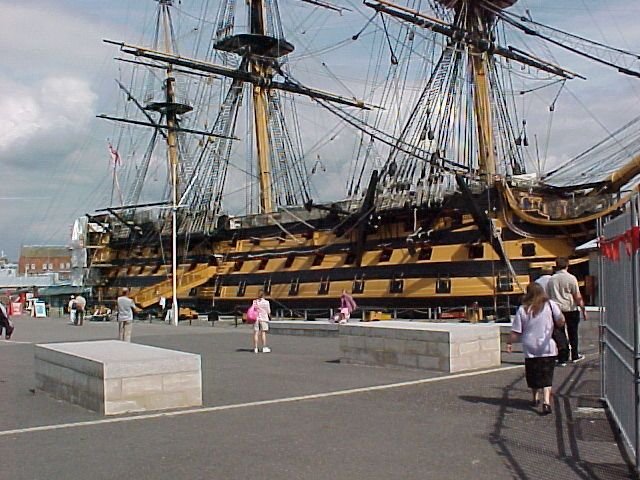
Hi Rick we will see another Bluenose in the horizon yeah, I have no idea what the AL kit is like but you will find the Bluenose 11 is different than the first Bluenose, I have also bought the book Bluenose 11 Saga of the great fishing schooner by LB Jensen great book, but you will see that the deck hatches, cabins etc are different between each one, also not sure why the stern is more square than the original Bluenose, anyway hope you will have fun building her just as I am with mine, attached below picture of Bluenose 1921 this pictures is to show stern if this is not allowed please delete.
The bottom I prime painted with a mix of floquil railway colours zinc chrome and red oxide will be painting it copper red later, will have an update soon.
Regards
Richard
- BETAQDAVE, JeffT, popeye the sailor and 2 others
-
 5
5
-
Made the lower shroud chain plates they are made so that they can be pinned to hull, and also got the lower hull prime painted
Until next time
Regards
Richard
-
-
Hi Jeff thanks a lot not the pretties but did get what I wanted.

Regards
Richard
-
9 hours ago, md1400cs said:
Richard,
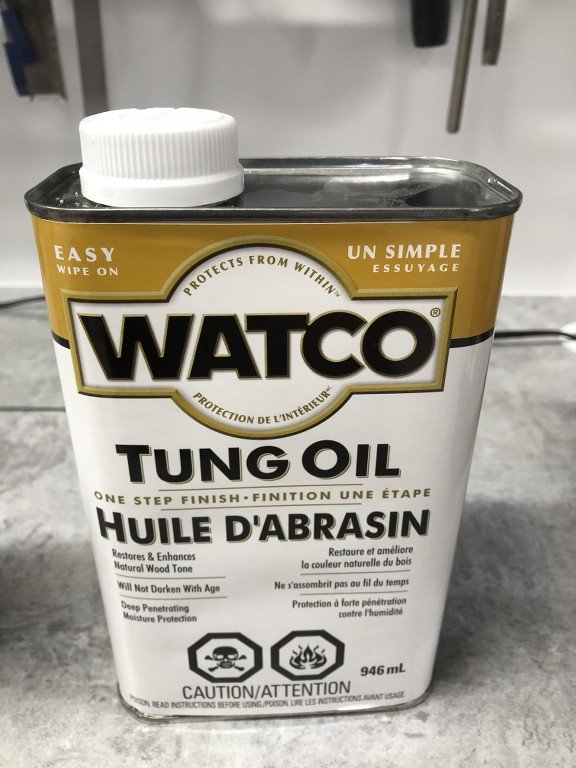
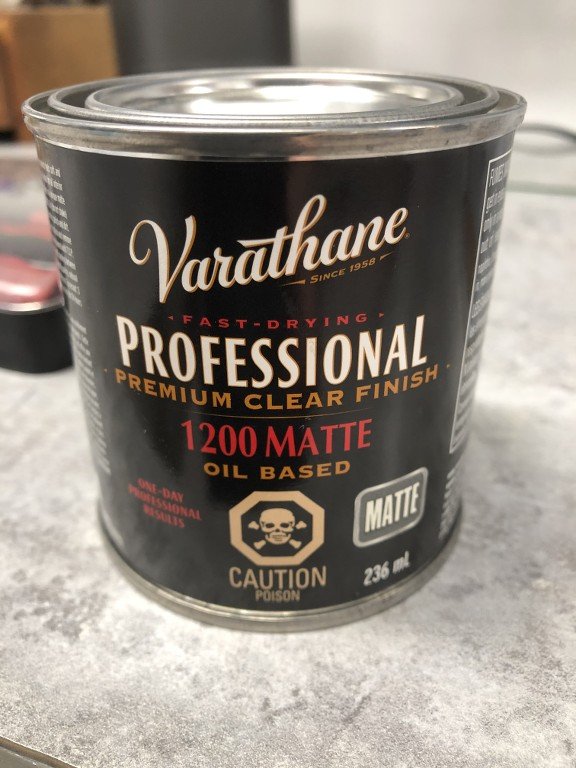
In MVHO Watco is the "go to" option. I know many builders protect their work with Varathane types of sealers. Again just my very own personal opinion - I typically don't like the "looks" that result.
I totally understand why builders add sealers - time would dry timbers, glues etc - protection is important. That said my Santa Maria was Watcco'd 43 years ago and still looks exactly the same. My second build (Vasa) no sealing at all. It will be the same for my current 3rd build. In any case it won't be "my" problem in the future - just my son's haha
Lastly your skills with planking are so perfectly in scale - I would think that certain types of sealers would look "out of scale" given the quality of your work. And looking at your new posts those skills are continuing in Spades.
Cheers,
Did a test on wood and yes the Tung oil will be used once I glue all deck pieces and thanks very much for your kind words.
Regards
Richard
-
Take your time it will look perfect once complete
")
Regards
Richard
-
The ship is starting to take shape nice fit up Mark 👍
Regards
Richard
- J11, fmodajr, Old Collingwood and 1 other
-
4
-
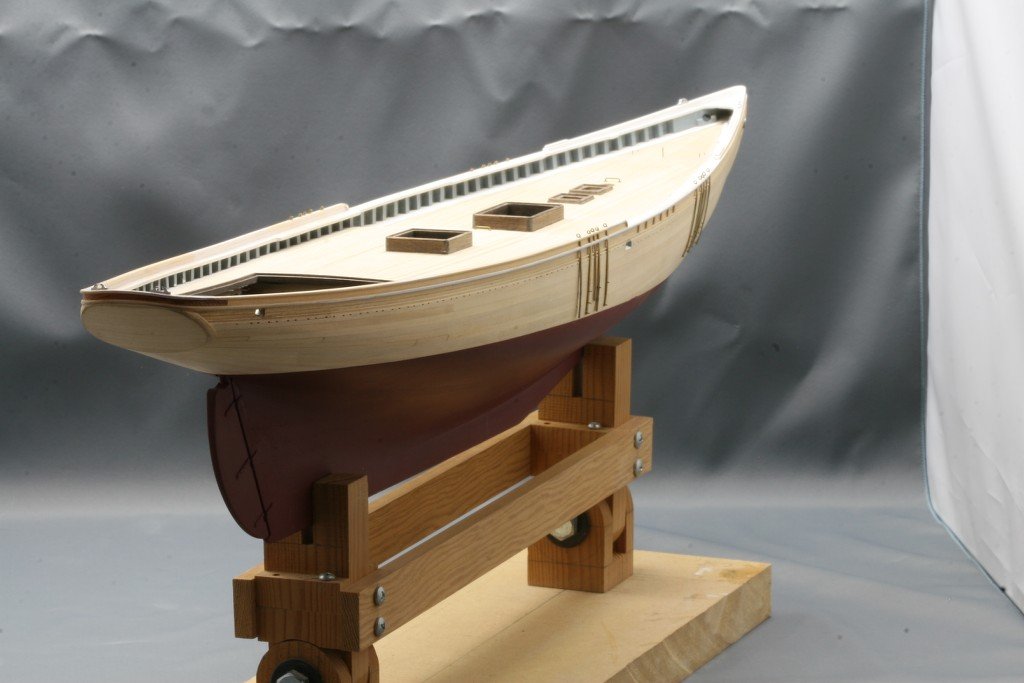
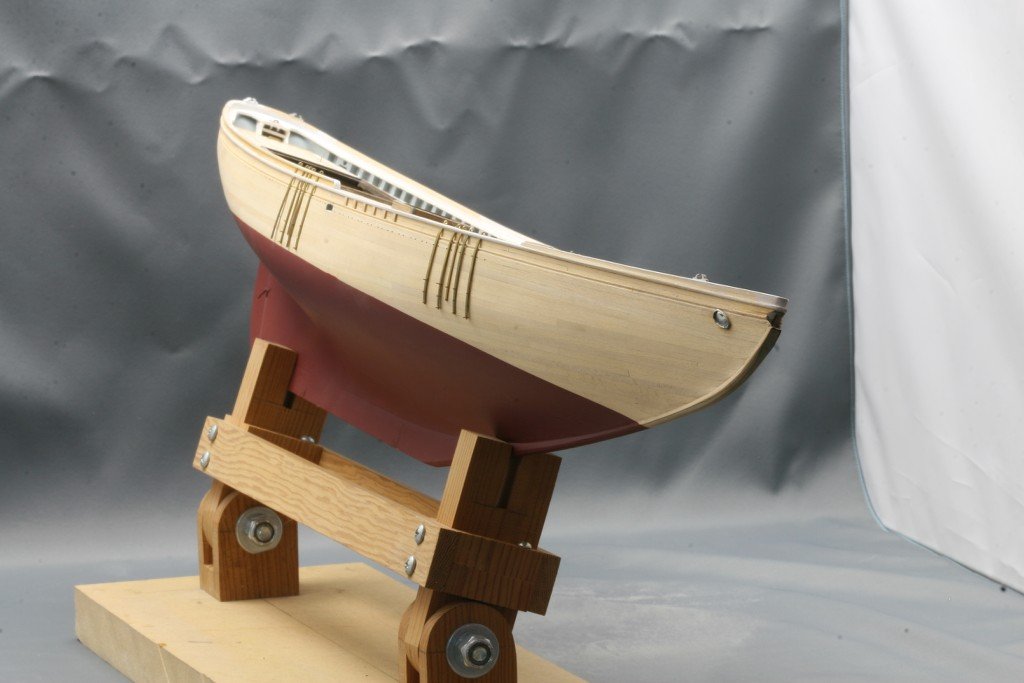
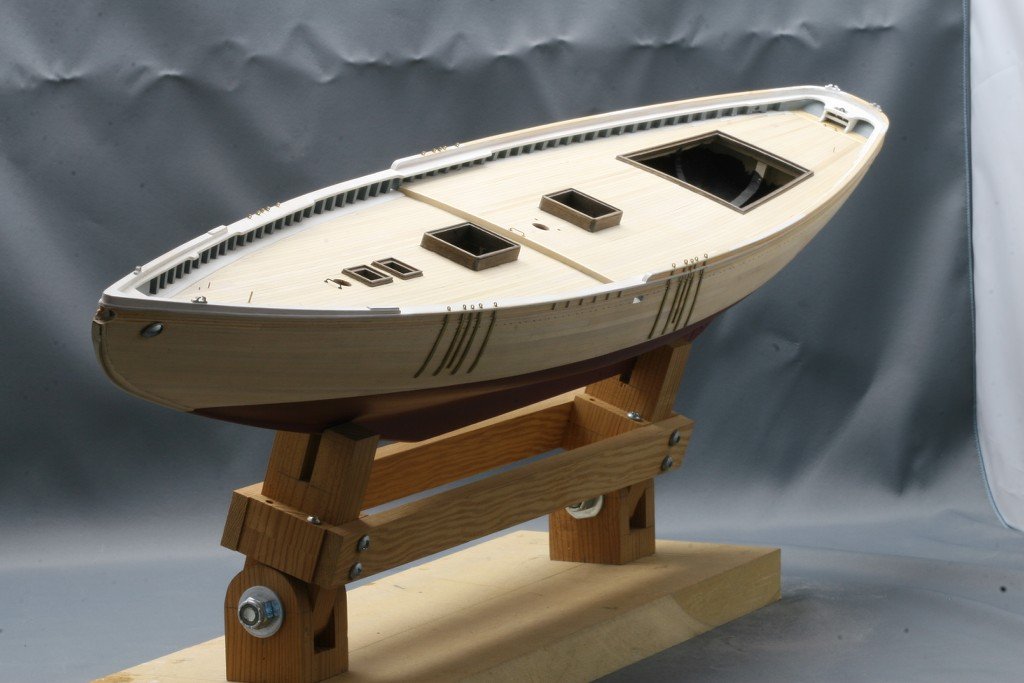
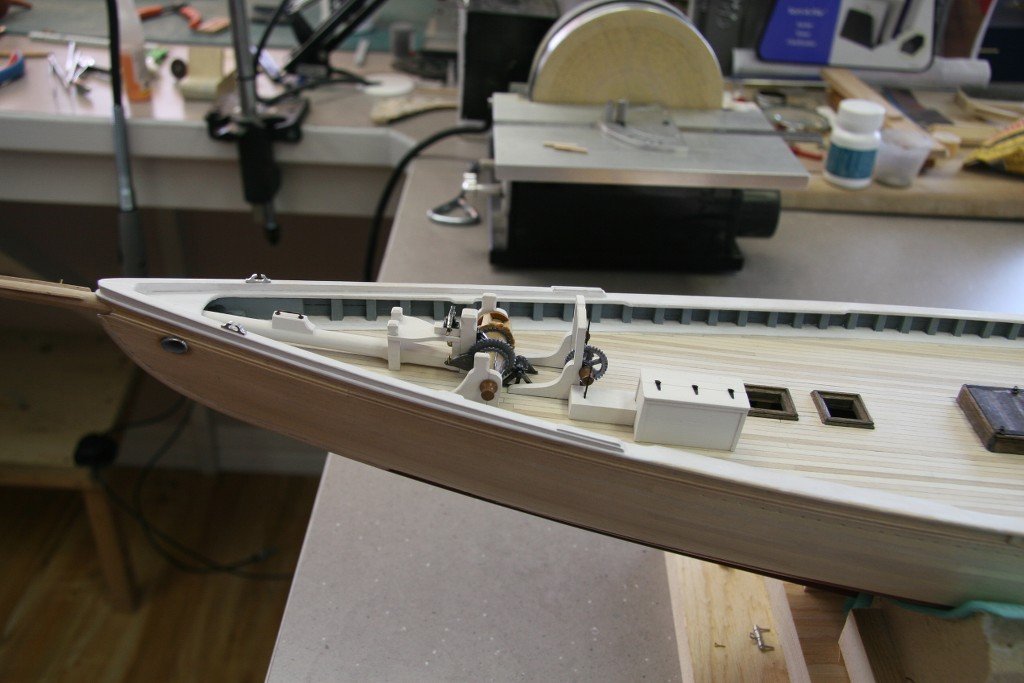
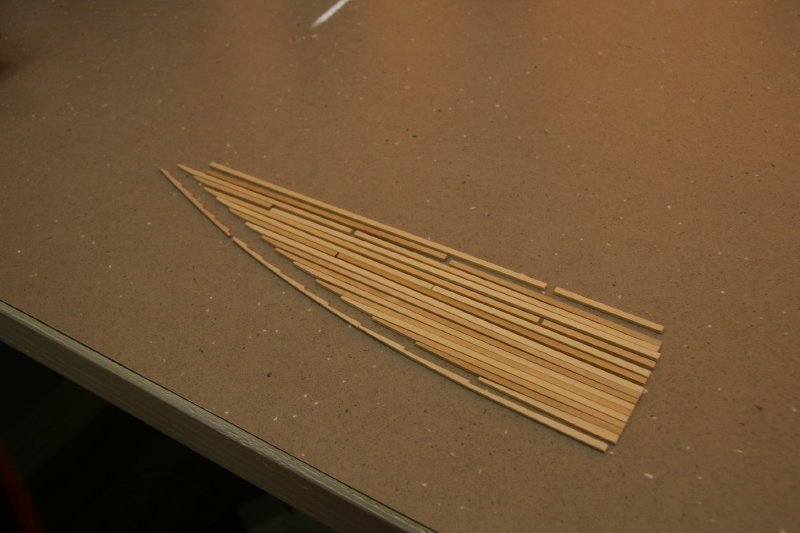
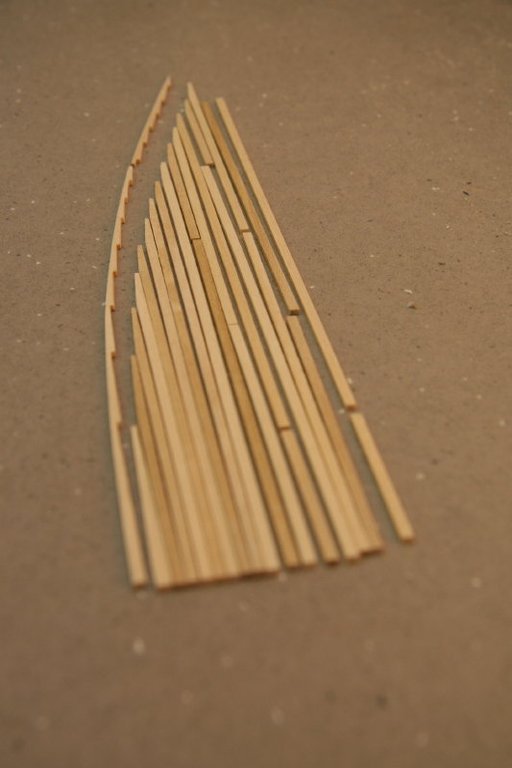
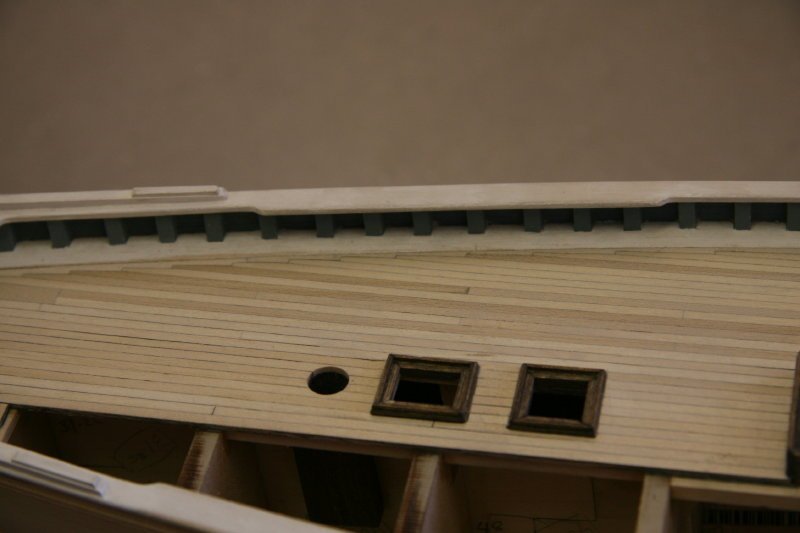
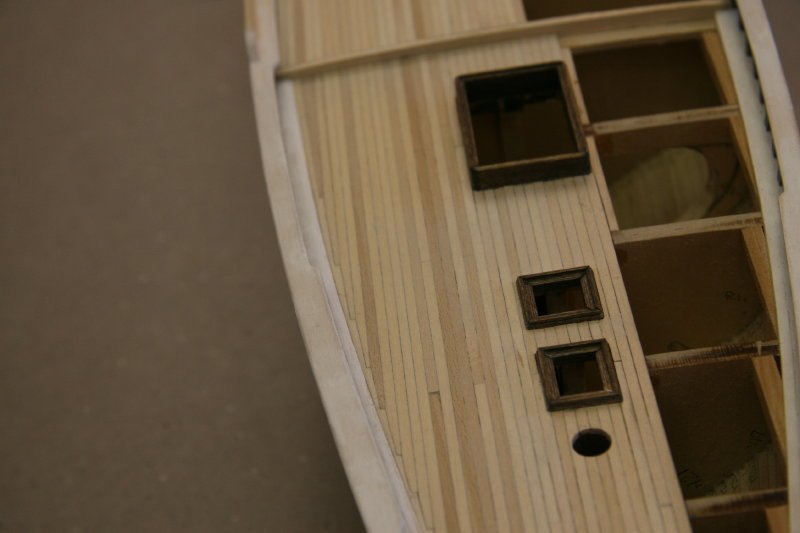
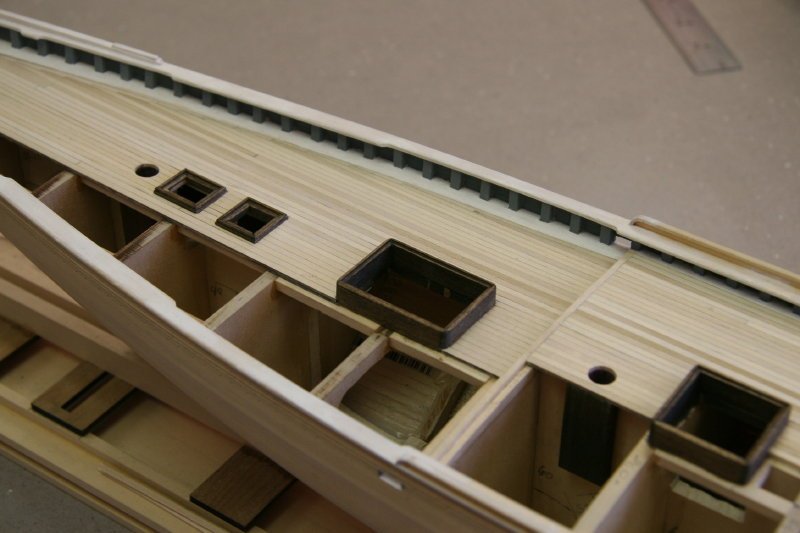
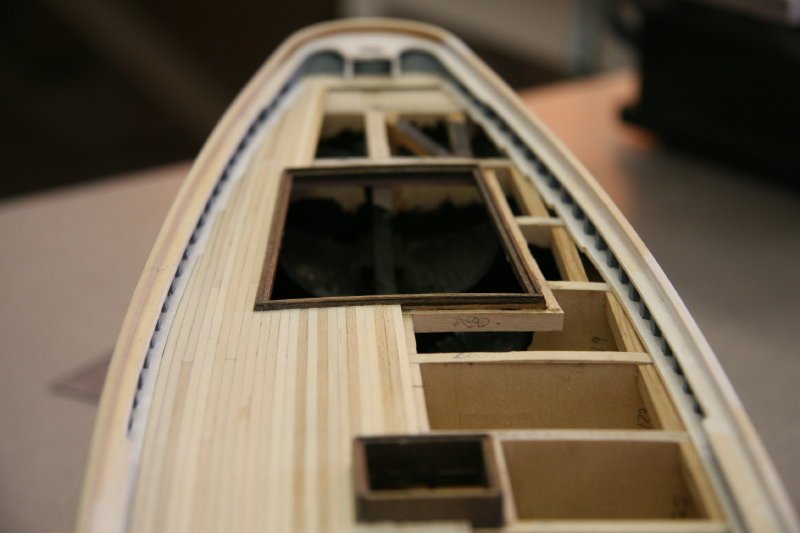
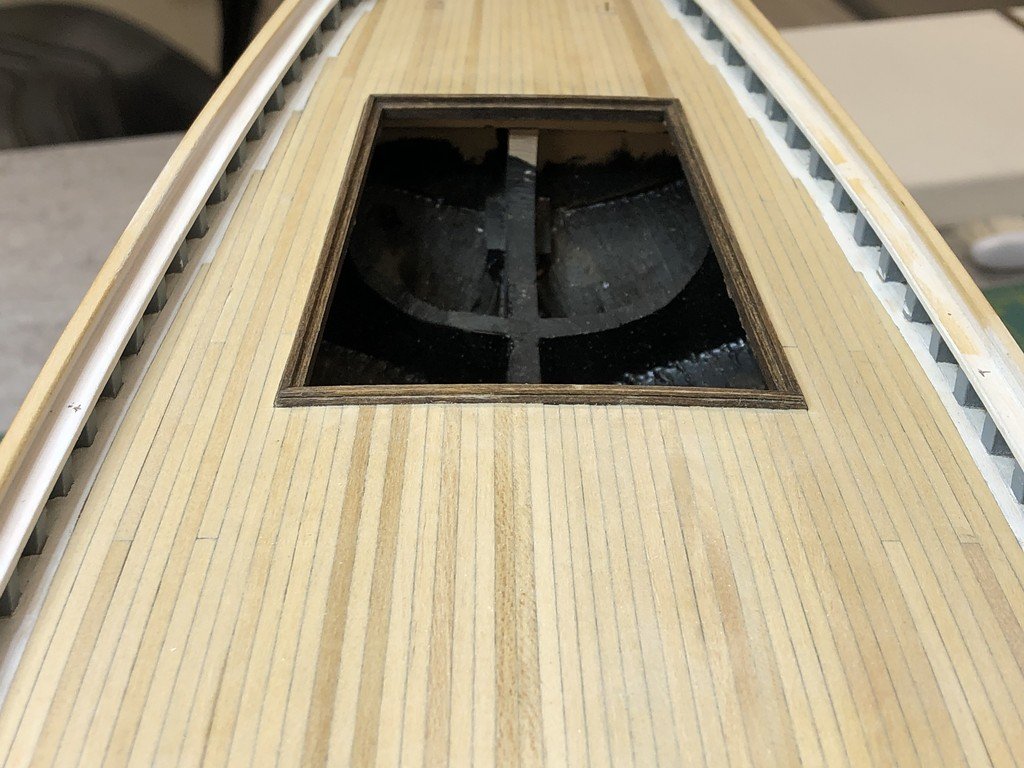
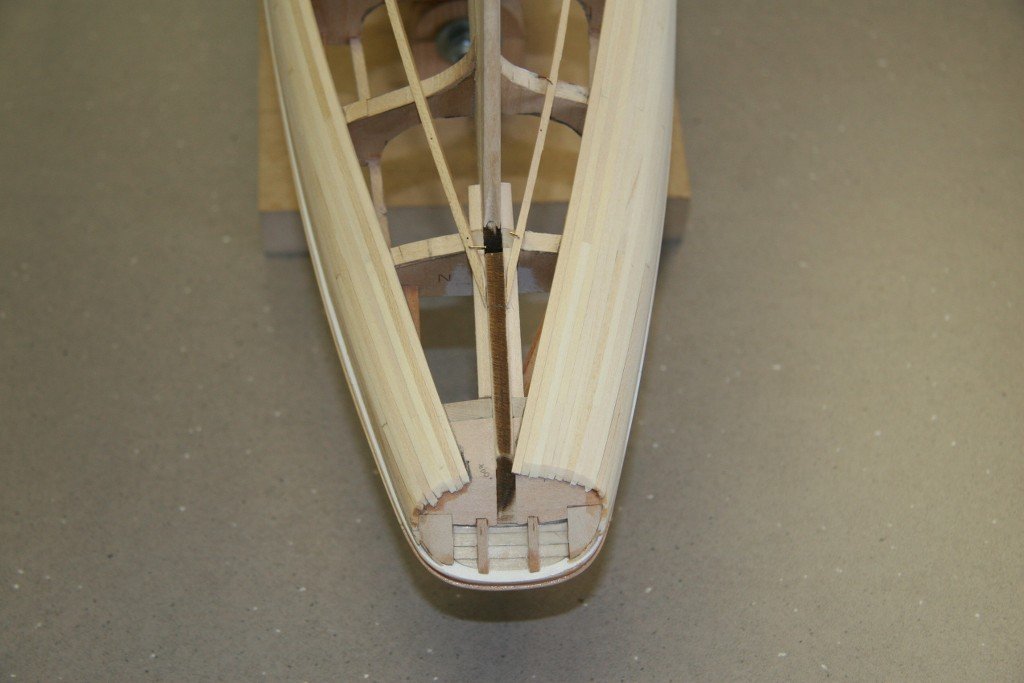
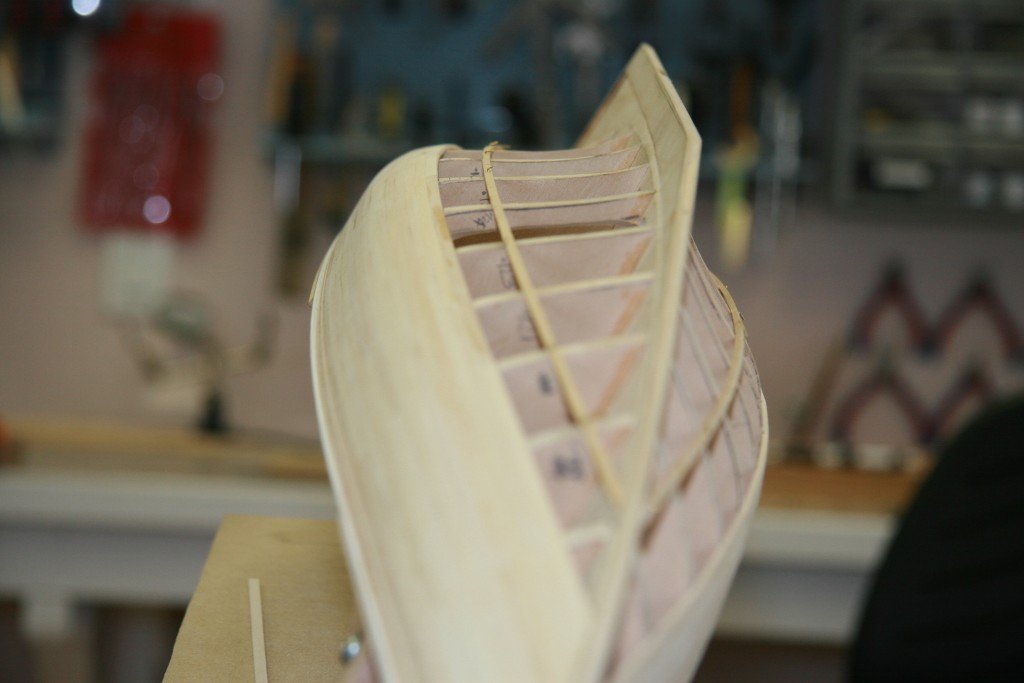
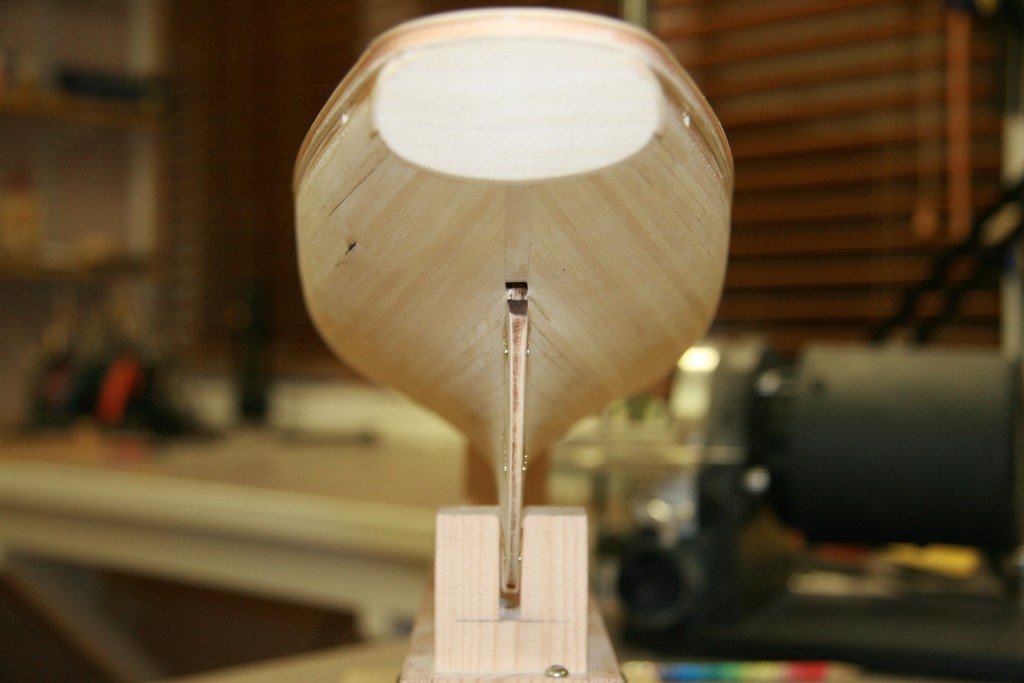
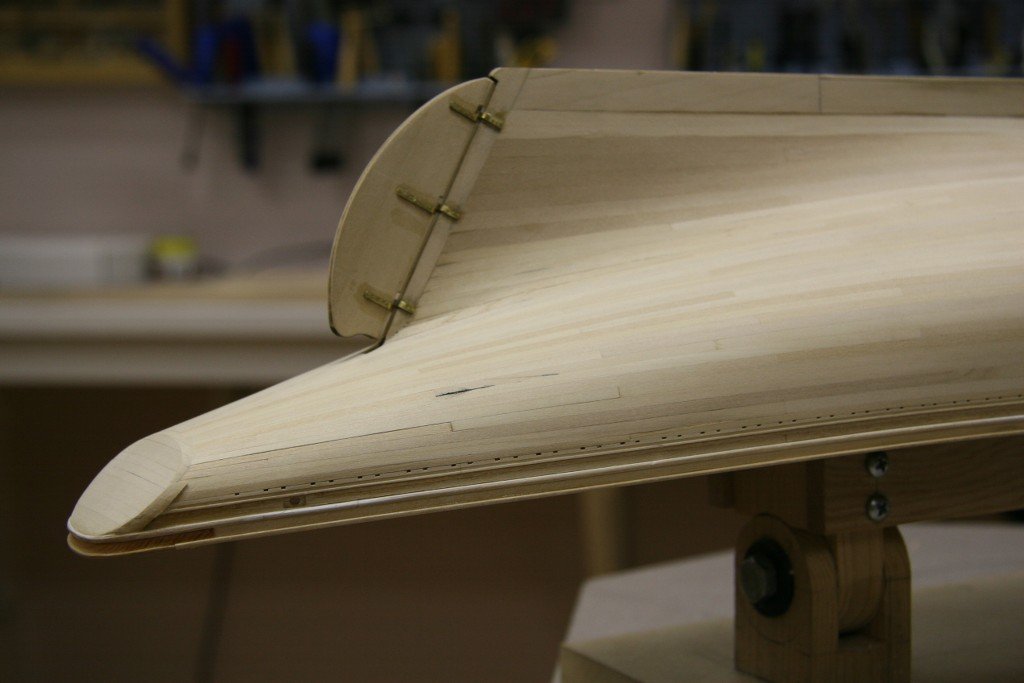
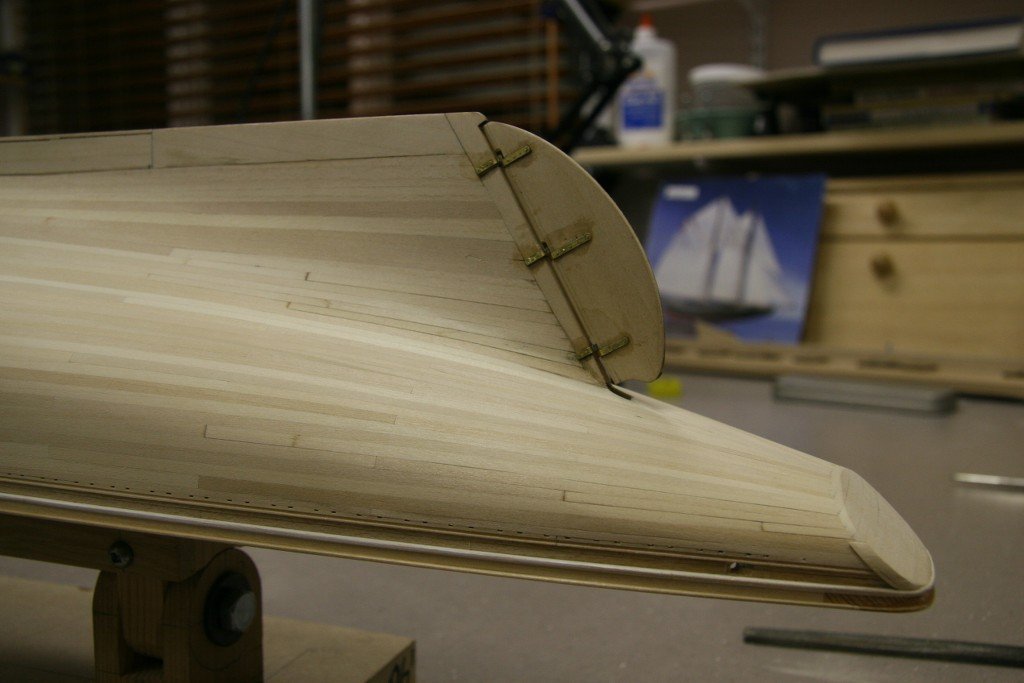
Thought I would show a few more pictures of the coamings, the small grove in each I made with a tool I made up.

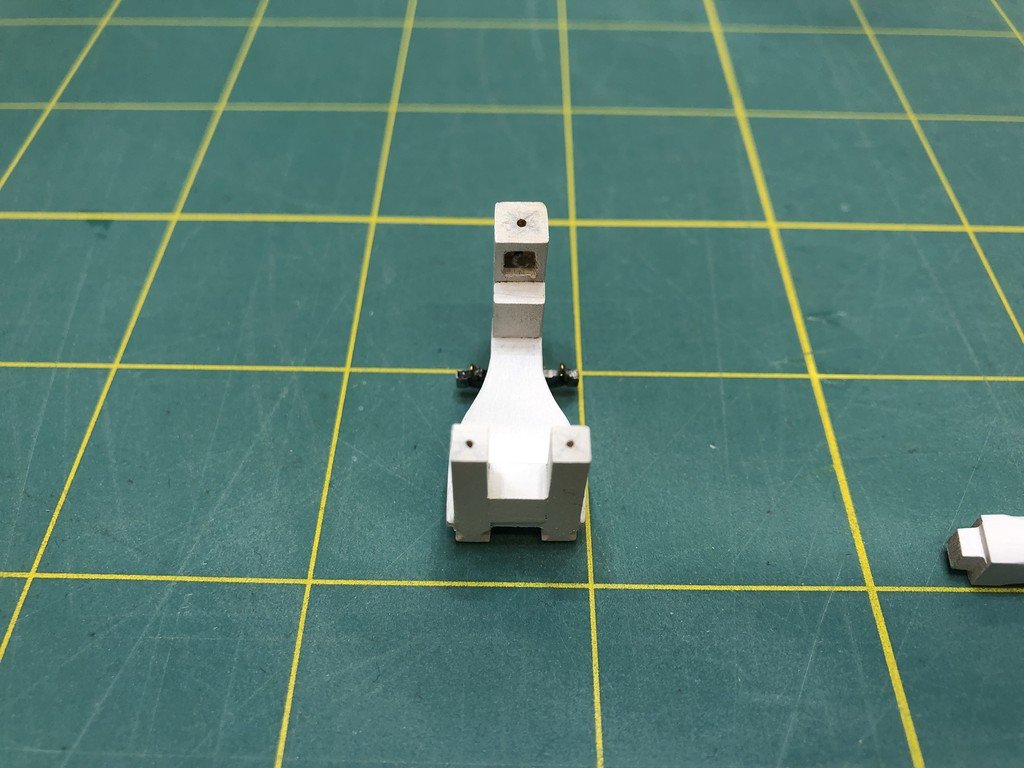
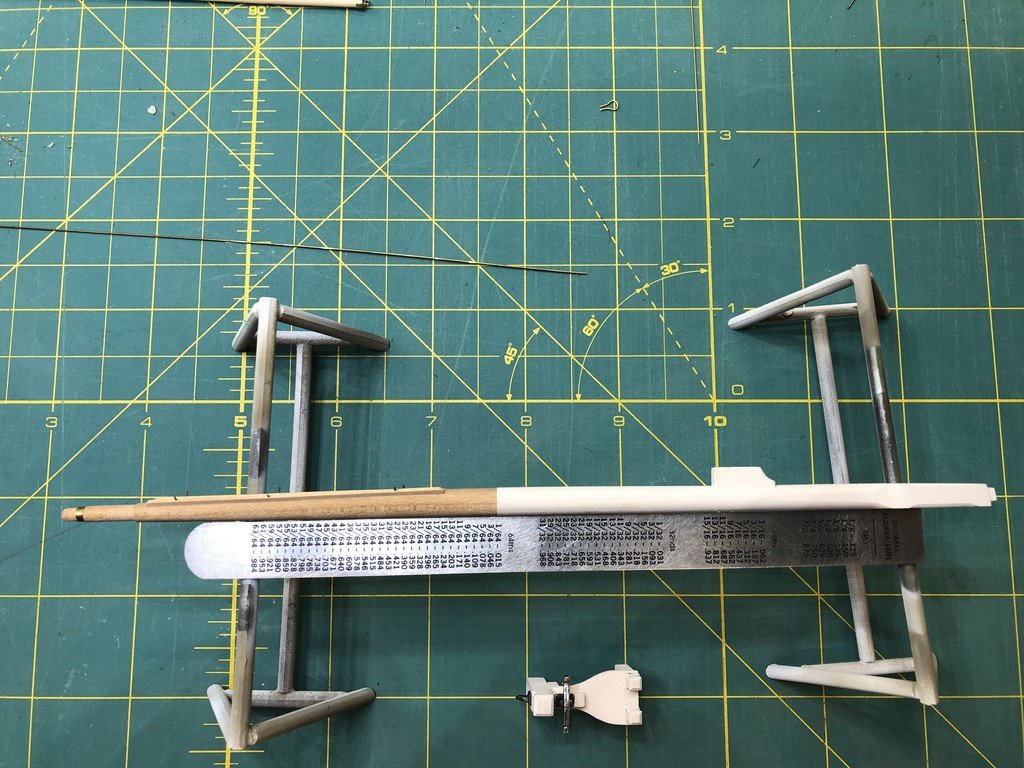
Next up I have built the Bowsprit, Bowsprit bits, Samson post, Windlass & Counter Shaft, Jumbo Jib Boom Crutch and last the engine and clutch cover boxes
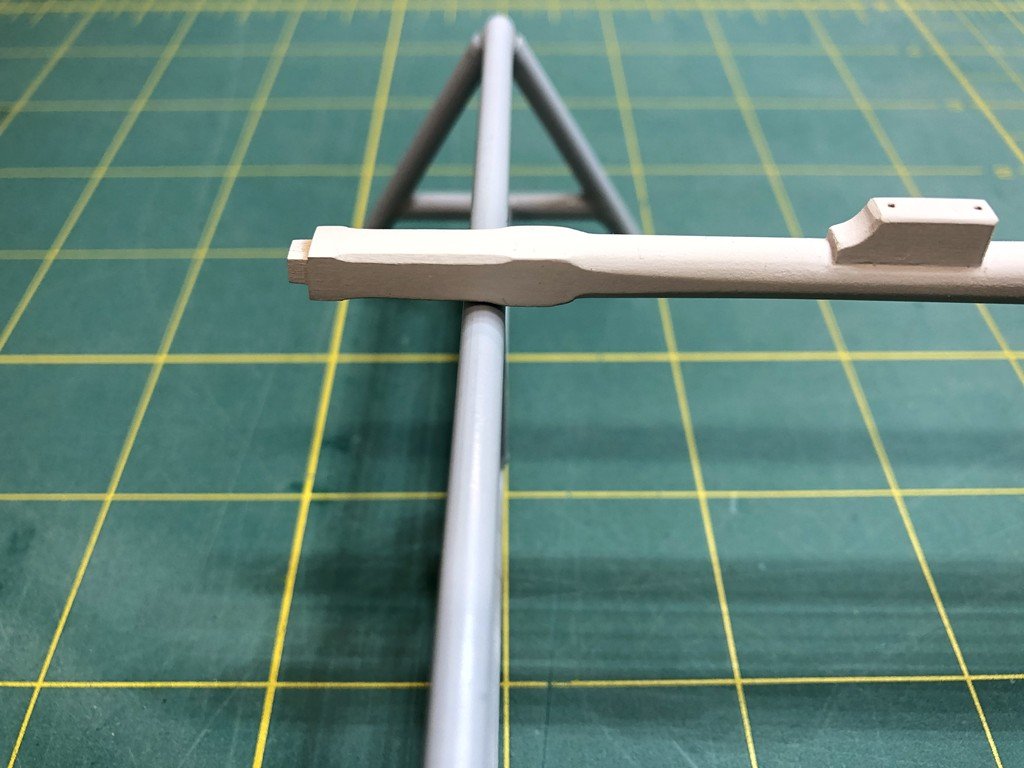
Bowsprit I made from a square piece of wood and filed, sanded to shape, note bottom of Bowsprit is straight and tapers on top
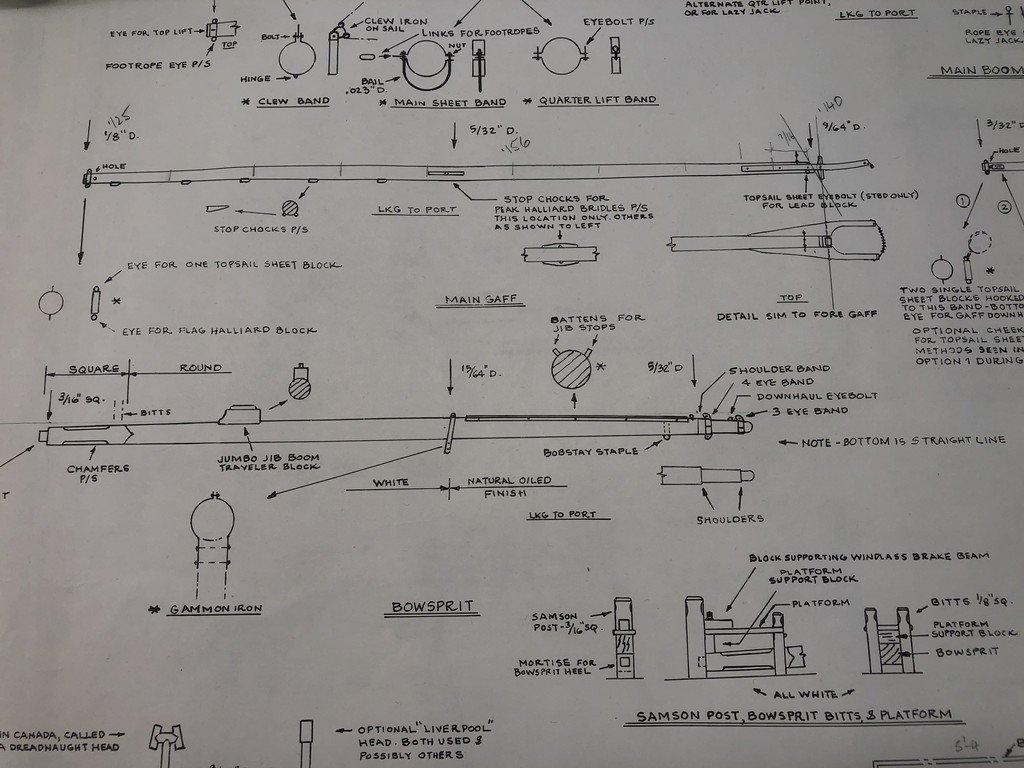

Made the Batterns for Jib stops and just pined these for now will glue once I mount, wont be able to go through hole

Here are some pic's of the Counter shaft assembly and Jumbo jib boom crutch
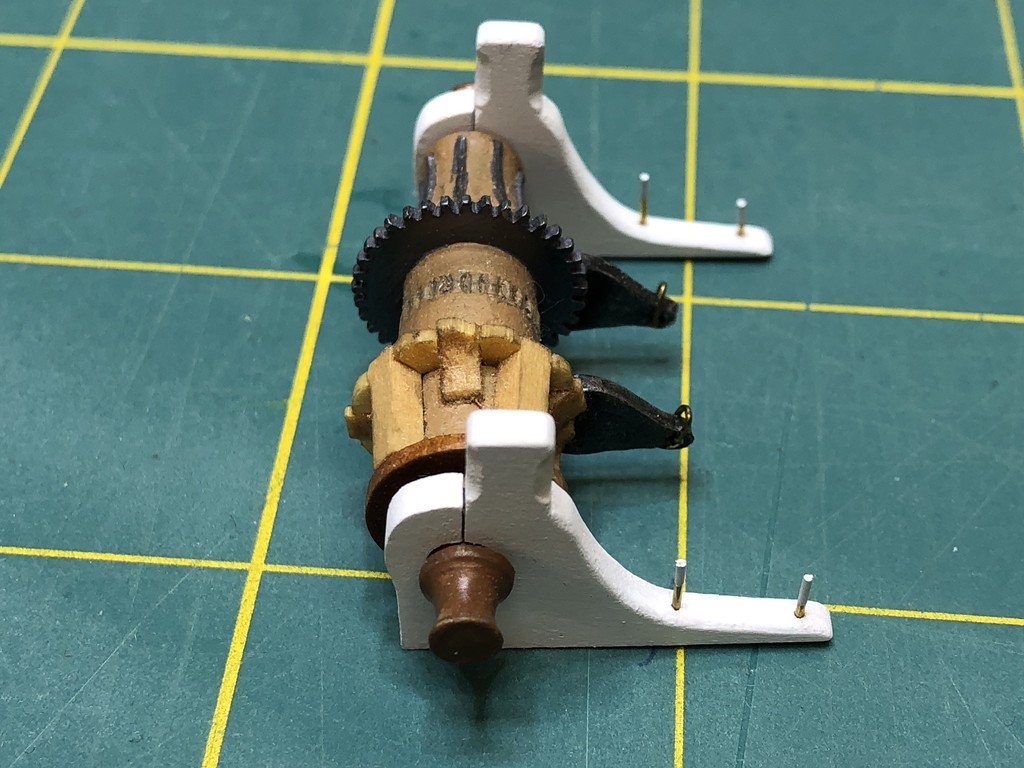

And this is how it all looks
REgards
Richard
-
On 11/5/2019 at 6:57 AM, marktiedens said:
Wow - very nicely done!
Mark
Thanks Mark a lot of filing planks to shape but the end result I do like.
On 11/5/2019 at 4:17 PM, md1400cs said:Well your superb deck won't be covered in paint - but clear "marine lacquer" - perfect!- your attention to scaled details are simply a pleasure to look at.

Thanks Michael I was thinking of using one or the other of these, what do you think, also thinking of Danish Oil
Regards
Richard
- J11, popeye the sailor and md1400cs
-
3
-
Making good progress Lazy Saint, guns would look good black, but it is your ship you chose 😉
Here are a couple of my pictures I took when I last saw her hope this helps your decision

Regards
Richard
-
Thanks again everyone for all the likes do appreciate very much 👍
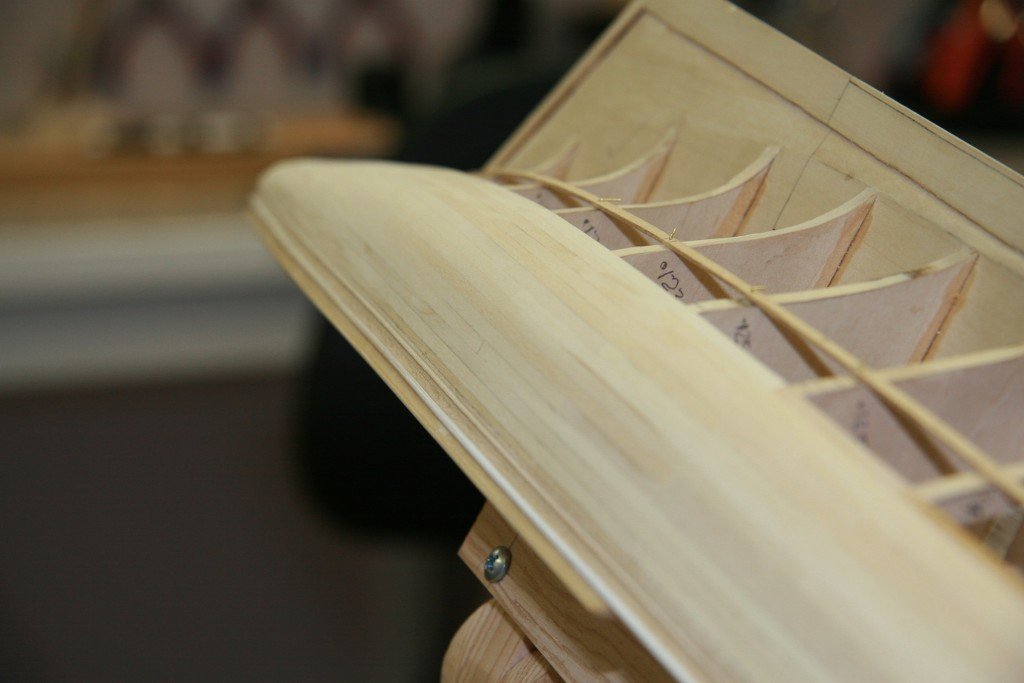
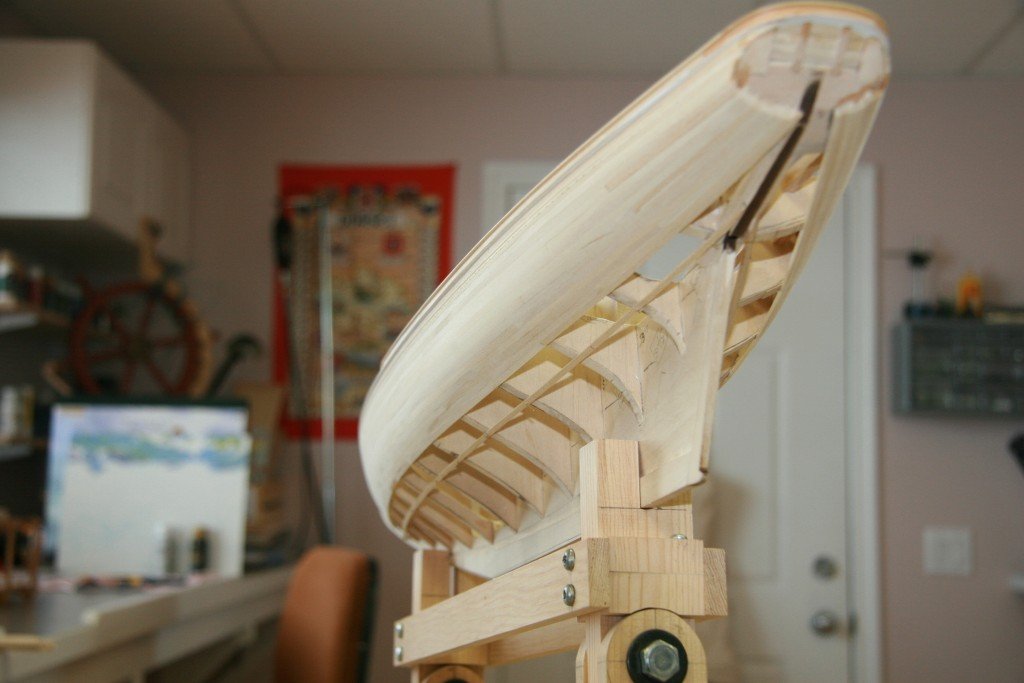
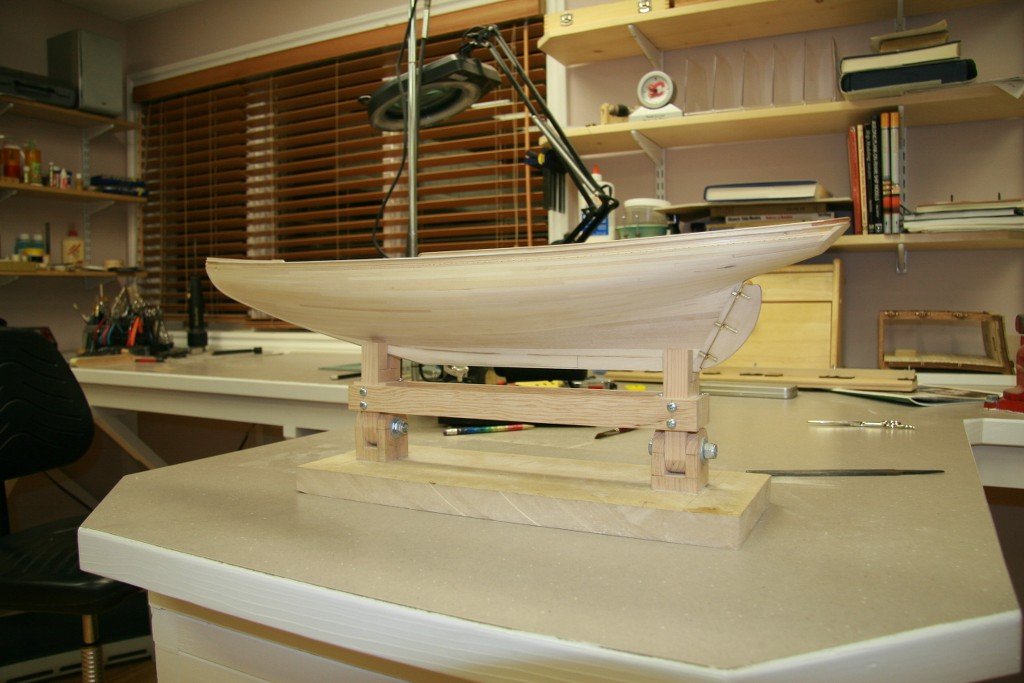
Made all the coamings for hatch, cabin skylight and companionway as per drawings and installed onto supports I had added, made the nibbing strake for the fore deck and made deck planking from kit supplied wood 1/16" thick trial fitted before gluing, each plank I ran a 2B pencil along on side to show caulking once laid.
Fore deck runs parallel to the center line and stops at the step then planks taper on the quarter deck
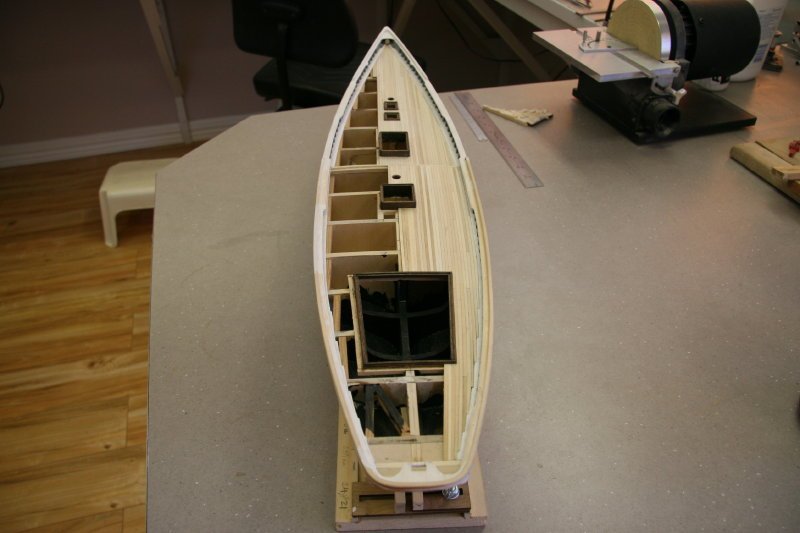
Once this was done did a very light sanding of deck
Regards
Richard
- J11, Duanelaker, md1400cs and 18 others
-
21
-
On 11/2/2019 at 3:06 PM, md1400cs said:
Richard,
Awesome start - yes your planking is indeed beautiful work. -almost a shame that it will be covered with paint. Brought my chair will also follow along...
Cheers,
Thanks Micheal took my time doing it and it paid off, working with smaller lengths works a treat.
Regards
Richard
-
Love the extra detail you are adding.
Regards
Richard
-
Coming along brilliantly Mugje
Regards
Richard
- mugje and Old Collingwood
-
2
-
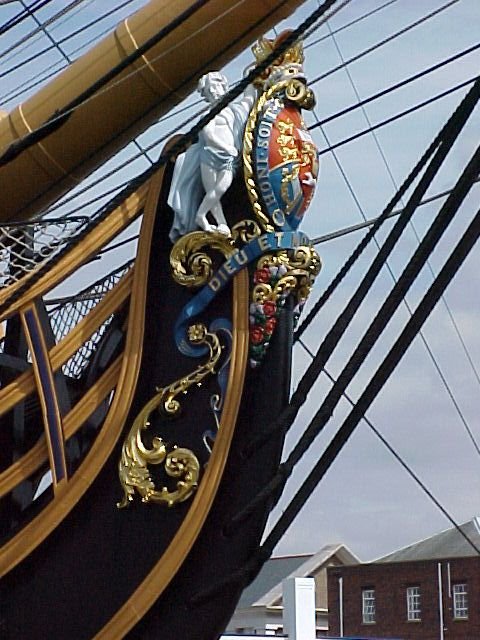
Very nice carving Phil, have done a little bit myself but I use boxwood it does not splinter as bad as basswood.
Thought you might like these two pictures I took back in 2004
Regards
Richard
- J11, GrandpaPhil, Old Collingwood and 1 other
-
4
-
On 10/28/2019 at 10:26 AM, The Lazy Saint said:
You are making a beautiful job of this Richard, l really must try this build myself next. It is certainly on my short list.
Best wishes as always,
The Lazy Saint.
Thanks very much Lazy Saint it is a nice ship to build
On 10/28/2019 at 12:17 PM, RickyGene said:My correction is nothing like yours sir. The wood channel for placing the keel is much too wide to effectively hold/tight. Billing Boats give you strips of wood to shim the keel with and to hold in place. With that said, if one tries as they might to center everything into the slip, nothing will line up and work. However if you adjust and place the keel over to one side and shim there with material sourced from outside the kit, you can get the keel to set straight and level, held tightly. I almost gave up and file 13'd the thing and just by chance, my last attempt got it to work this way. 500 year old year tree, wow. And still to be usable as you have shown. I have two pieces of wood I hope to use one day in a build. 1st, is from some wood work needed on the HMS Victory and 2nd is from the rebuild of the USS Constitution. I just think it would be over the top to incorporate wood from the actual vessel into a build. My camera down load plug is awol, as soon as I can, I will post a photo of my slip with the frame up f/Esmeralda.
Rick
Sounds like you had a lot of issues with the slip
Regards
Richard
-
Coming along nicely Lazy Saint
Regards
Richard
-
Will join you on your journey Joe love the shape of the schooners
Regards
Richard
-
Decking and Bulwarks look very good Mark
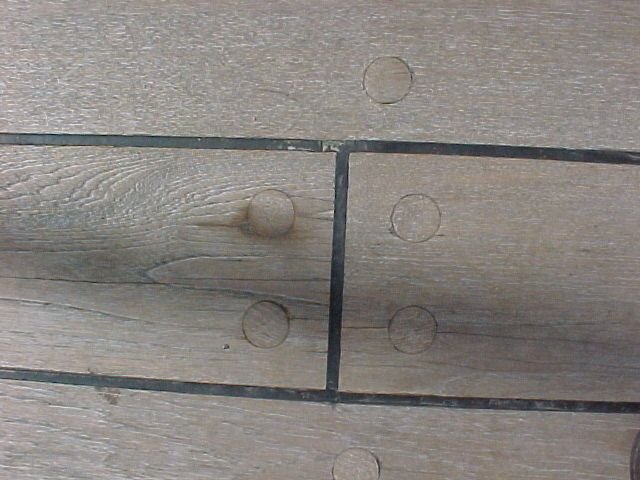
Like the way you have shown very light tree nails took a couple of pictures of the deck on HMS Victory and as you will see it is very hard to see
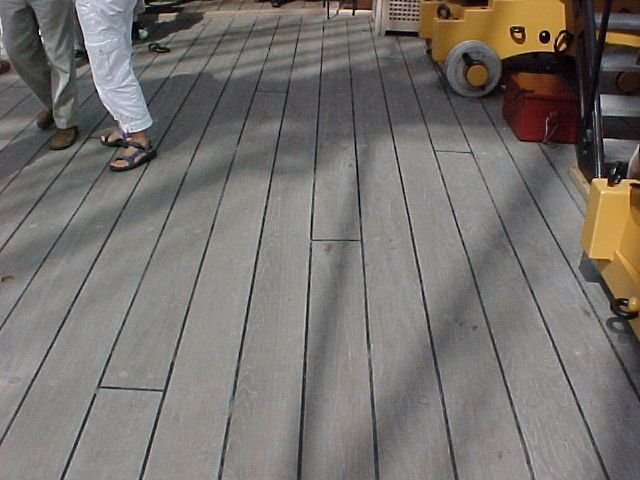
pic taken close up
Regards
Richard
- Bill Morrison, AON, marktiedens and 7 others
-
10
-
1 hour ago, RickyGene said:
Thanks for the info. Went back and studied the photos. I believe I got it figured out. Agree, the wood for the slip is too soft but one can adjust as needed and replace material. I just went thru a process of correcting a Billing Boats Build Slip #359 and as you pointed out, they are designed to do a job, but one must make corrections. I can not wait to see what you do with the Doulas Fir and the decking.
Rick
Would like to see your correction on the Billings boat slip.
Regarding the Douglas Fir this chunk comes from a 500 year old tree I was told, and as you see the grain is way to big for the scale so all I can use it for is spacing's or parts which will need painting after

Regards
Richard
-
22 hours ago, mugje said:
lovely planking job!
Thanks Mugje, I found doing the planking in small length (same length approx as 1 : 1 ) really helps and with this way you don't need to use filler just a light sanding
13 hours ago, The Lazy Saint said:I agree, it's a beauty that's for sure. Thanks for sharing.
Best wishes as always,
The Lazy Saint.
I was very pleased how it turned out, it is the 2nd model I have done, again thanks for looking in
7 hours ago, RickyGene said:Art......nuff said.
Thanks a lot Ricky wooden ship building is an art and I see a lot of art on this site
Regards
Richard
- popeye the sailor, RickyGene and mugje
-
3
-

HMS Vanguard by marktiedens - Model Shipways - scale 1:72
in - Kit build logs for subjects built from 1751 - 1800
Posted
Great canvas for the 2nd planking, like the way the tapering of the planks went 👍
Regards
Richard