HOLIDAY DONATION DRIVE - SUPPORT MSW - DO YOUR PART TO KEEP THIS GREAT FORUM GOING! (89 donations so far out of 49,000 members - C'mon guys!)
×


Mirabell61
-
Posts
7,409 -
Joined
-
Last visited
Content Type
Profiles
Forums
Gallery
Events
Everything posted by Mirabell61
-
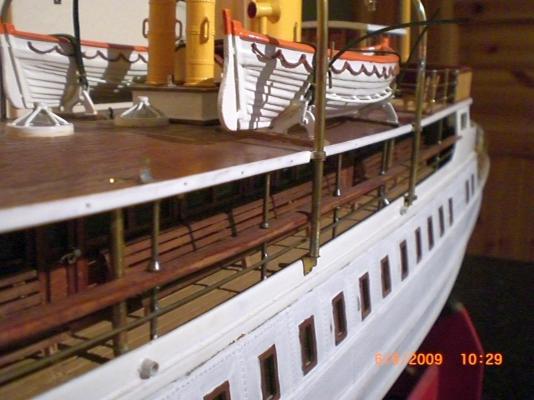
 Build log part 4 White part above waterline only primered bulleyes fitted, hull "riveted", plated and painted tackle brackets for fastening the aft mast stays, soldered to the railing stanchions (through deck below above the rectangular wooden window Frame there shall be fitted Ornament decors later on model for making the clay-mould for the ornaments (intend to use low meting Point metal for that) stair to 2nd passenger deck, swan neck vents, and fastening bracket rail for Front mast stays anchor crane and bowpost flagstock Progress well under way Build log part 5 to follow.... Nils


- 70 replies
-
- 13
-

-
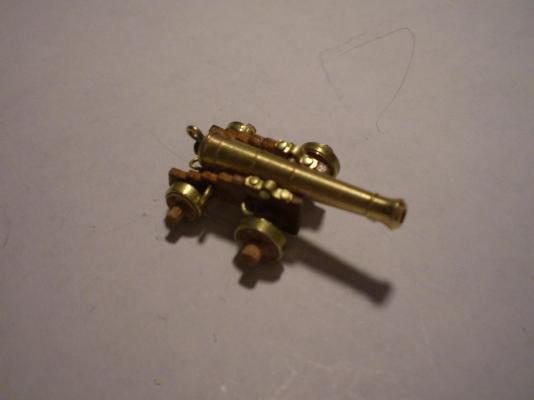
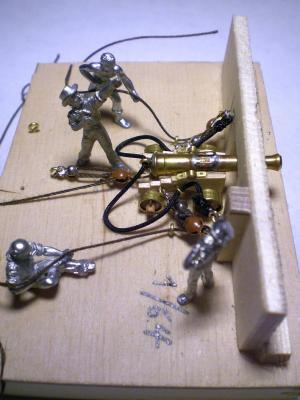
I agree Popeye, good idea, the gun Lifting / changing Detail would be for an action-type Diorama. It could be inspiring for the diorama builders here on MSW. Nils wheels attached now, I think I should`nt put more to it...
-
Hapy birthday Robert, I wish you an enjoyable birthday amoungst freinds and realitives, and of course a big new bag of fine dryed bones Best regards Nils
-
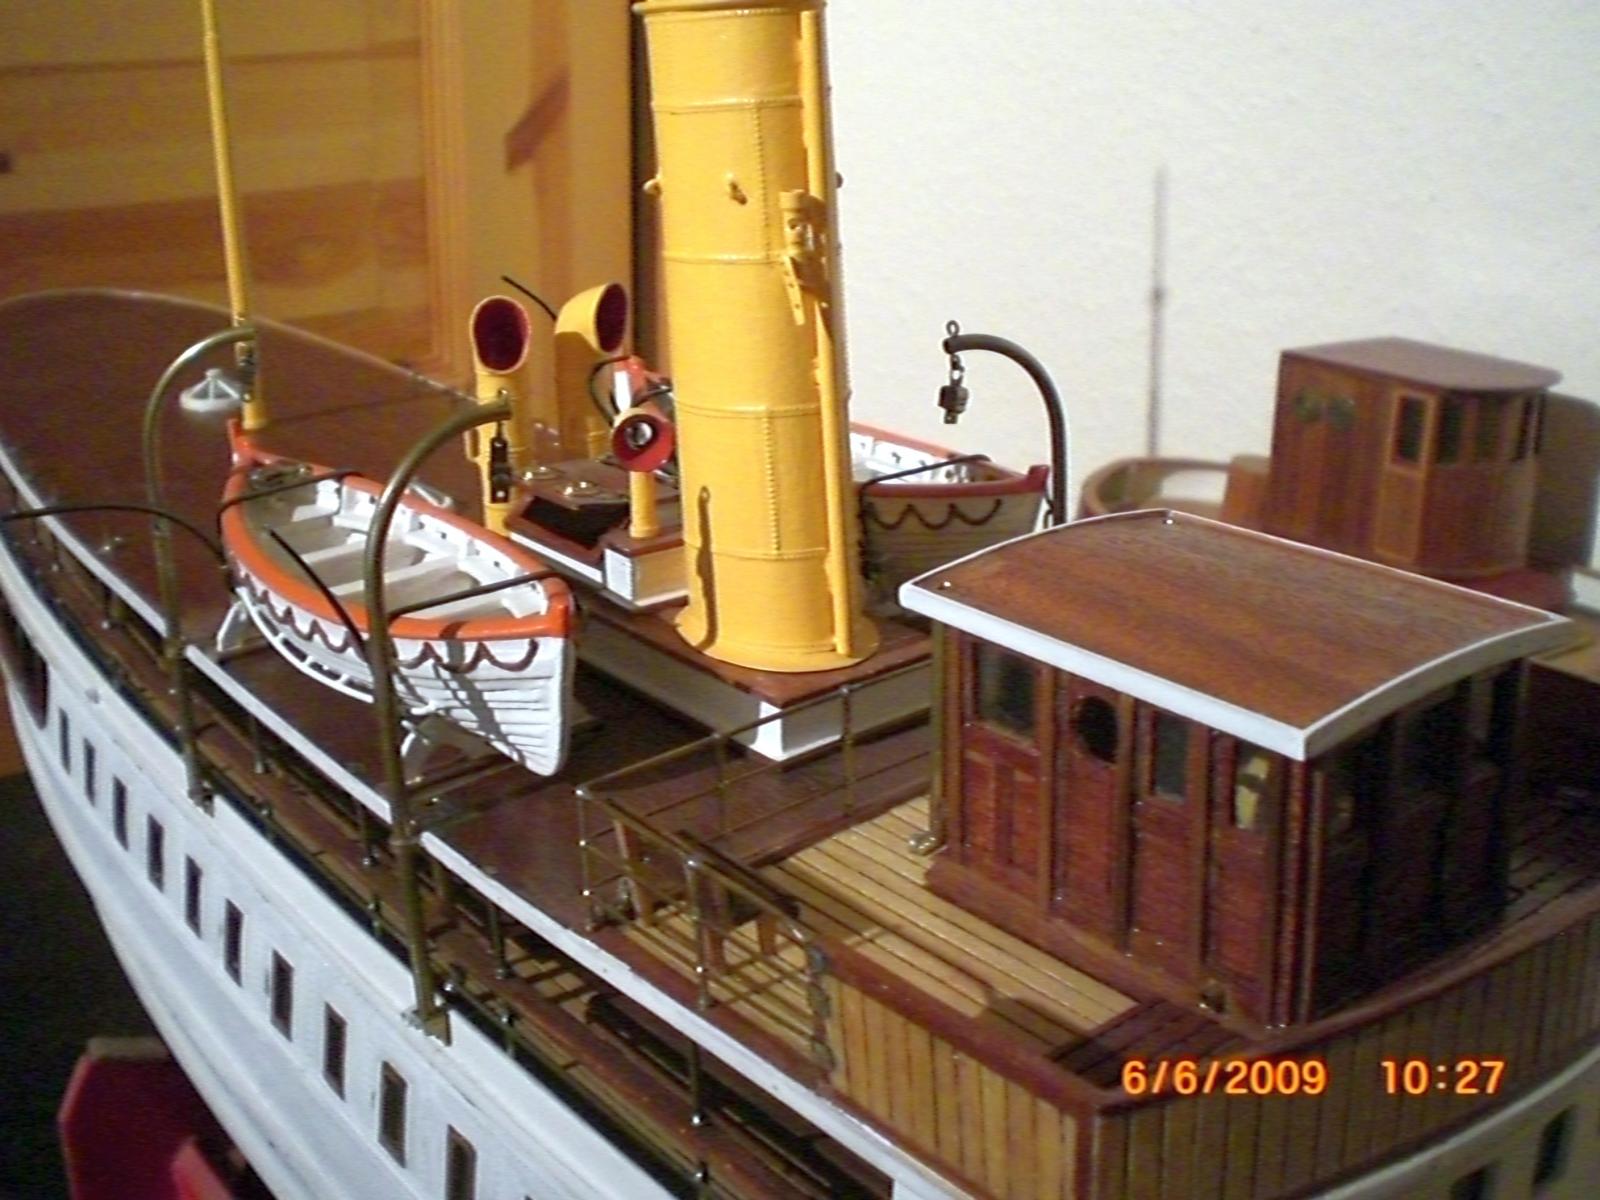
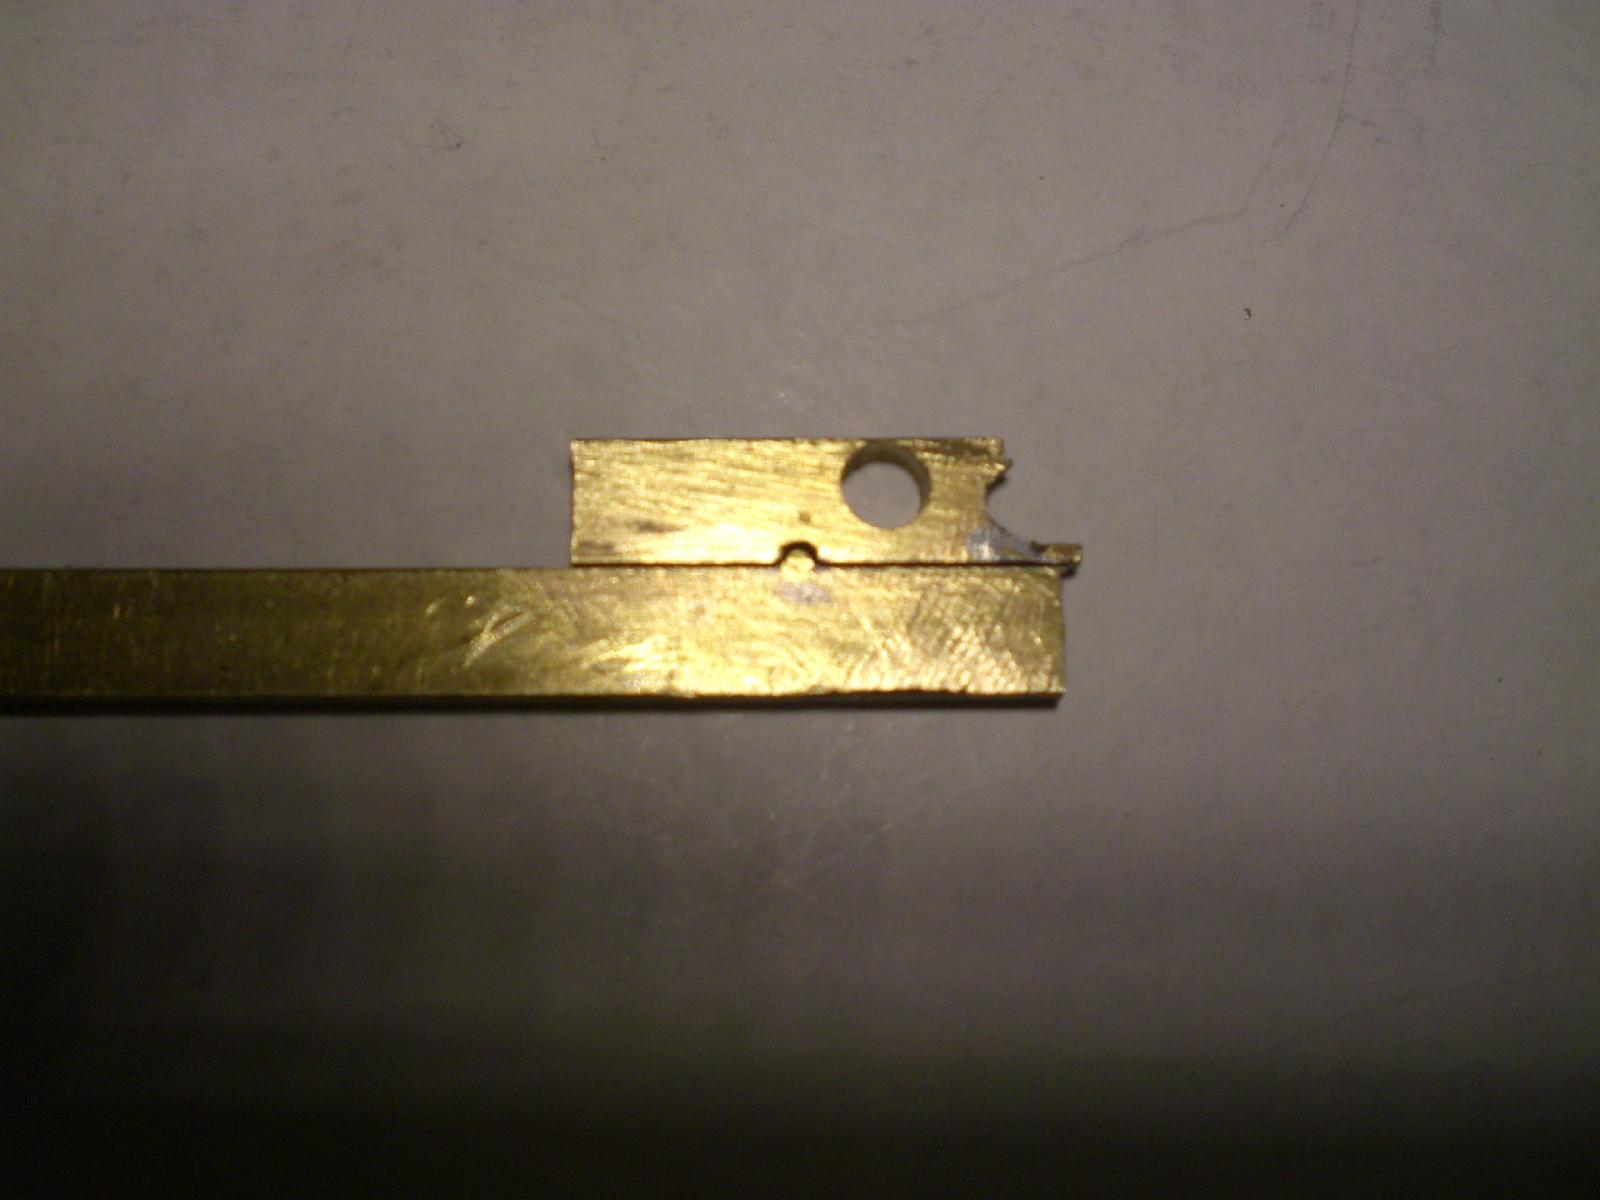
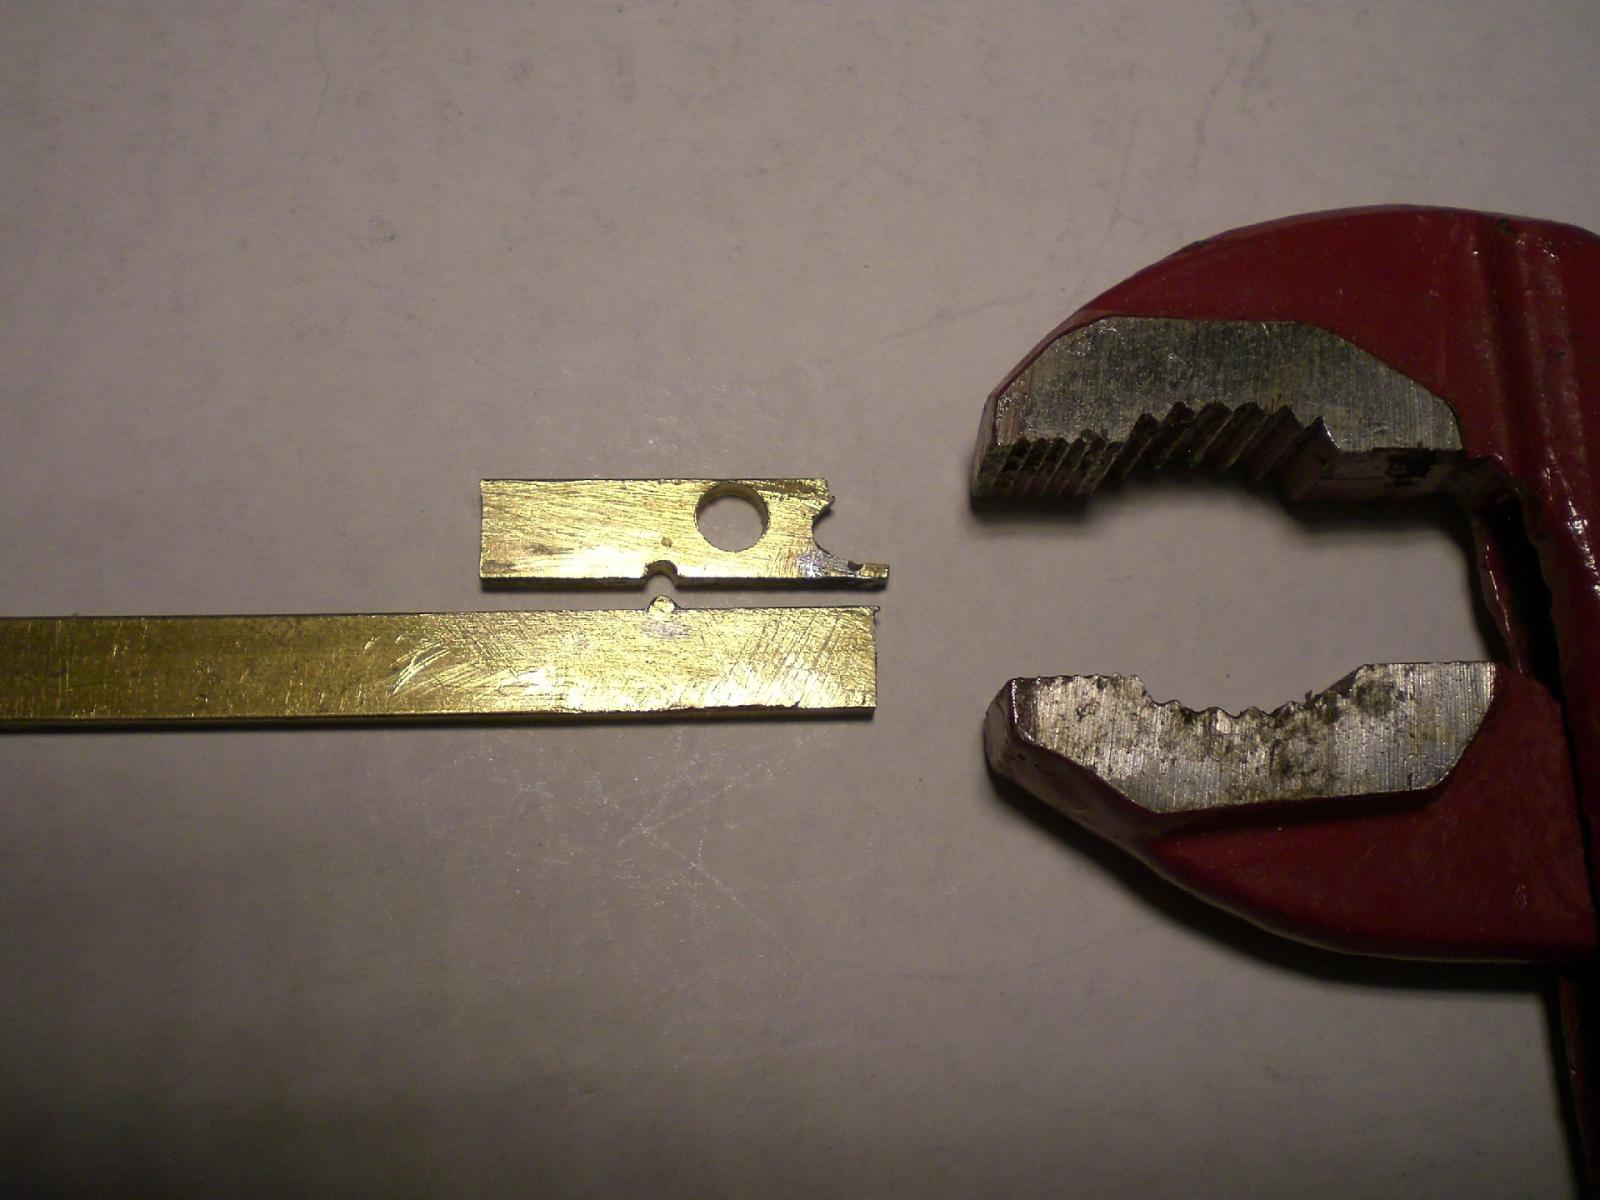
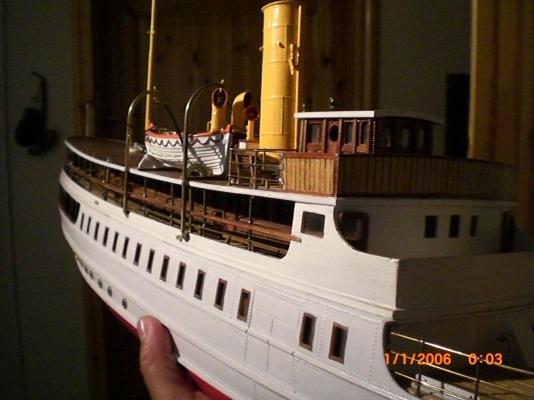
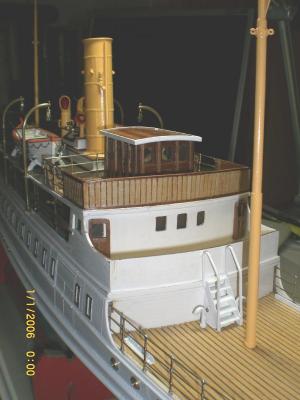
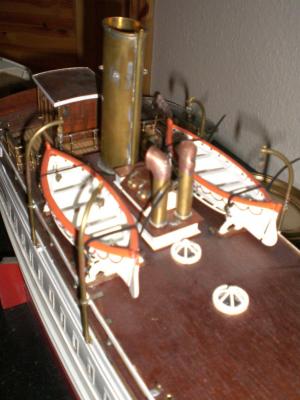
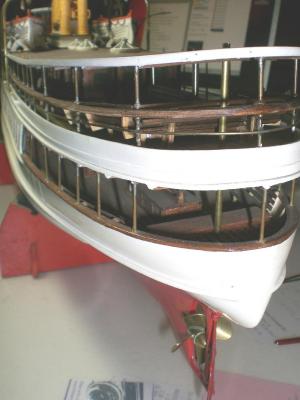
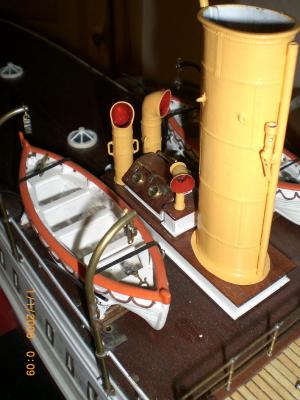
Build log part 3 the double sheaved boat brass blocks are selfmade, also the round Skylights from Wood rings and brass "spokes" sorry the pic is not too good, but here the hull has been plated and the portholes drilled for the bulleyes the wheel- / charthouse foof has become a rim around and drainpipes for rain in the aft corners here and in the next pic the plating can be seen better behind the railings the many Mahagoni sitting benches can be seen. Drainpipes from the boat deck go down from the upper cabins Roof and in 90° angle out through scupper like openings in the low hight bulwarks front deck hatch and brass made masts fitted, angle meets that of the funnel Build log part 4 to follow... Nils


- 70 replies
-
- 12
-
-

-
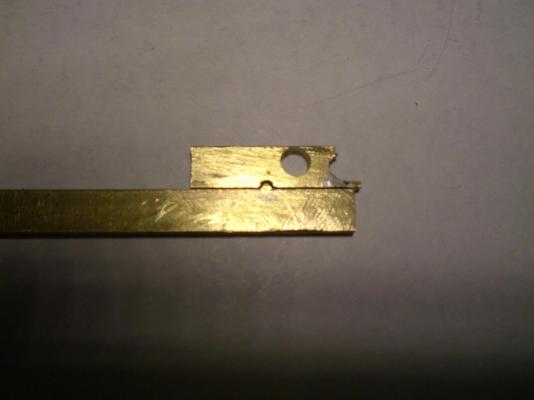
Thanks Jason, yes I trust it could`nt be simpler to get the capping squares in shape, and I did`nt have any scrap by now. I know that the capping squares should be removeable, openable, but I am just happy that the brass Pins (0,5mm diam. that secure them are Holding well in the carriage cheeks. Nils
-
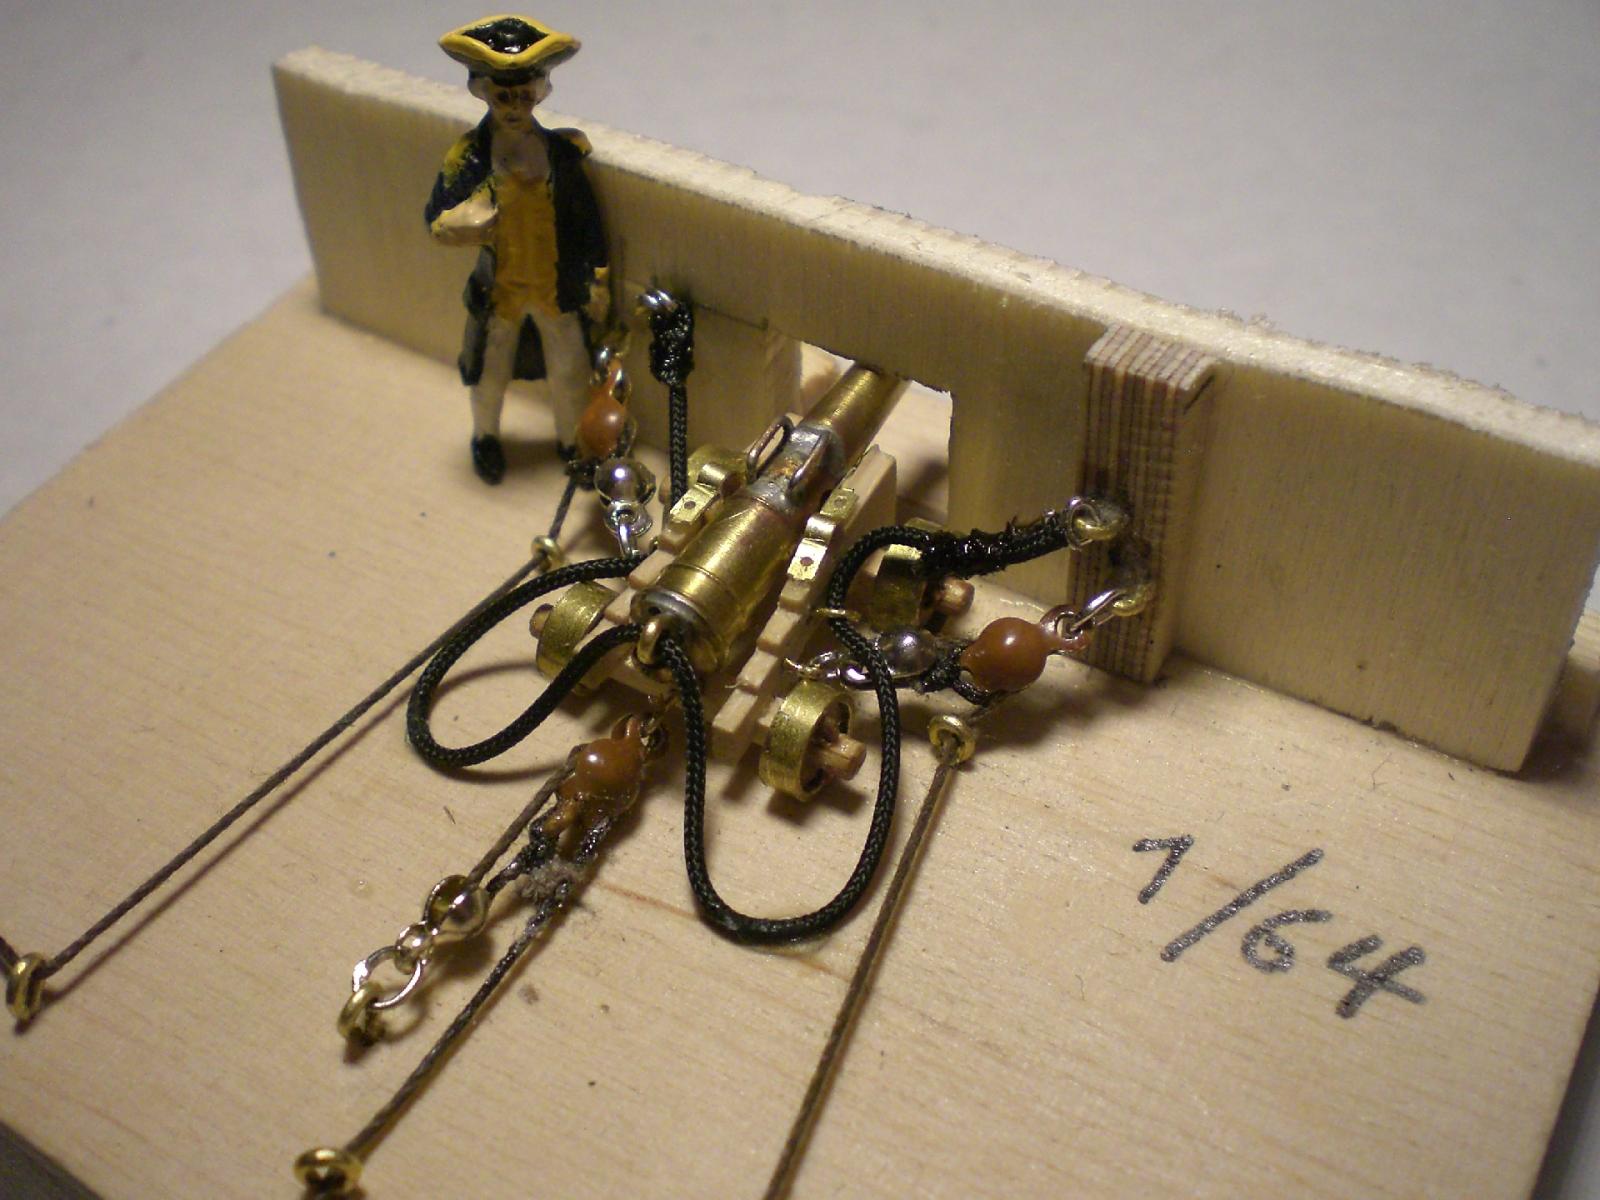
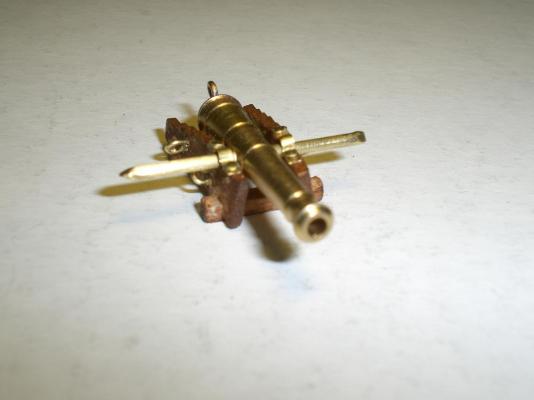
Build log part 22 beginning with the guns.... this was thie first mock up model for checking dimensions, breech rope to be exchanged against natural hemp Color, dolphins on Barrel to be left away staining the carriages breechrope eyelet, other block tackle eyelets, caps on barrel Pivot pin, wheels still in the pipe... here my jig for making the caps use ordinary plumbers plyers for pressing the caps in shape Nils


-
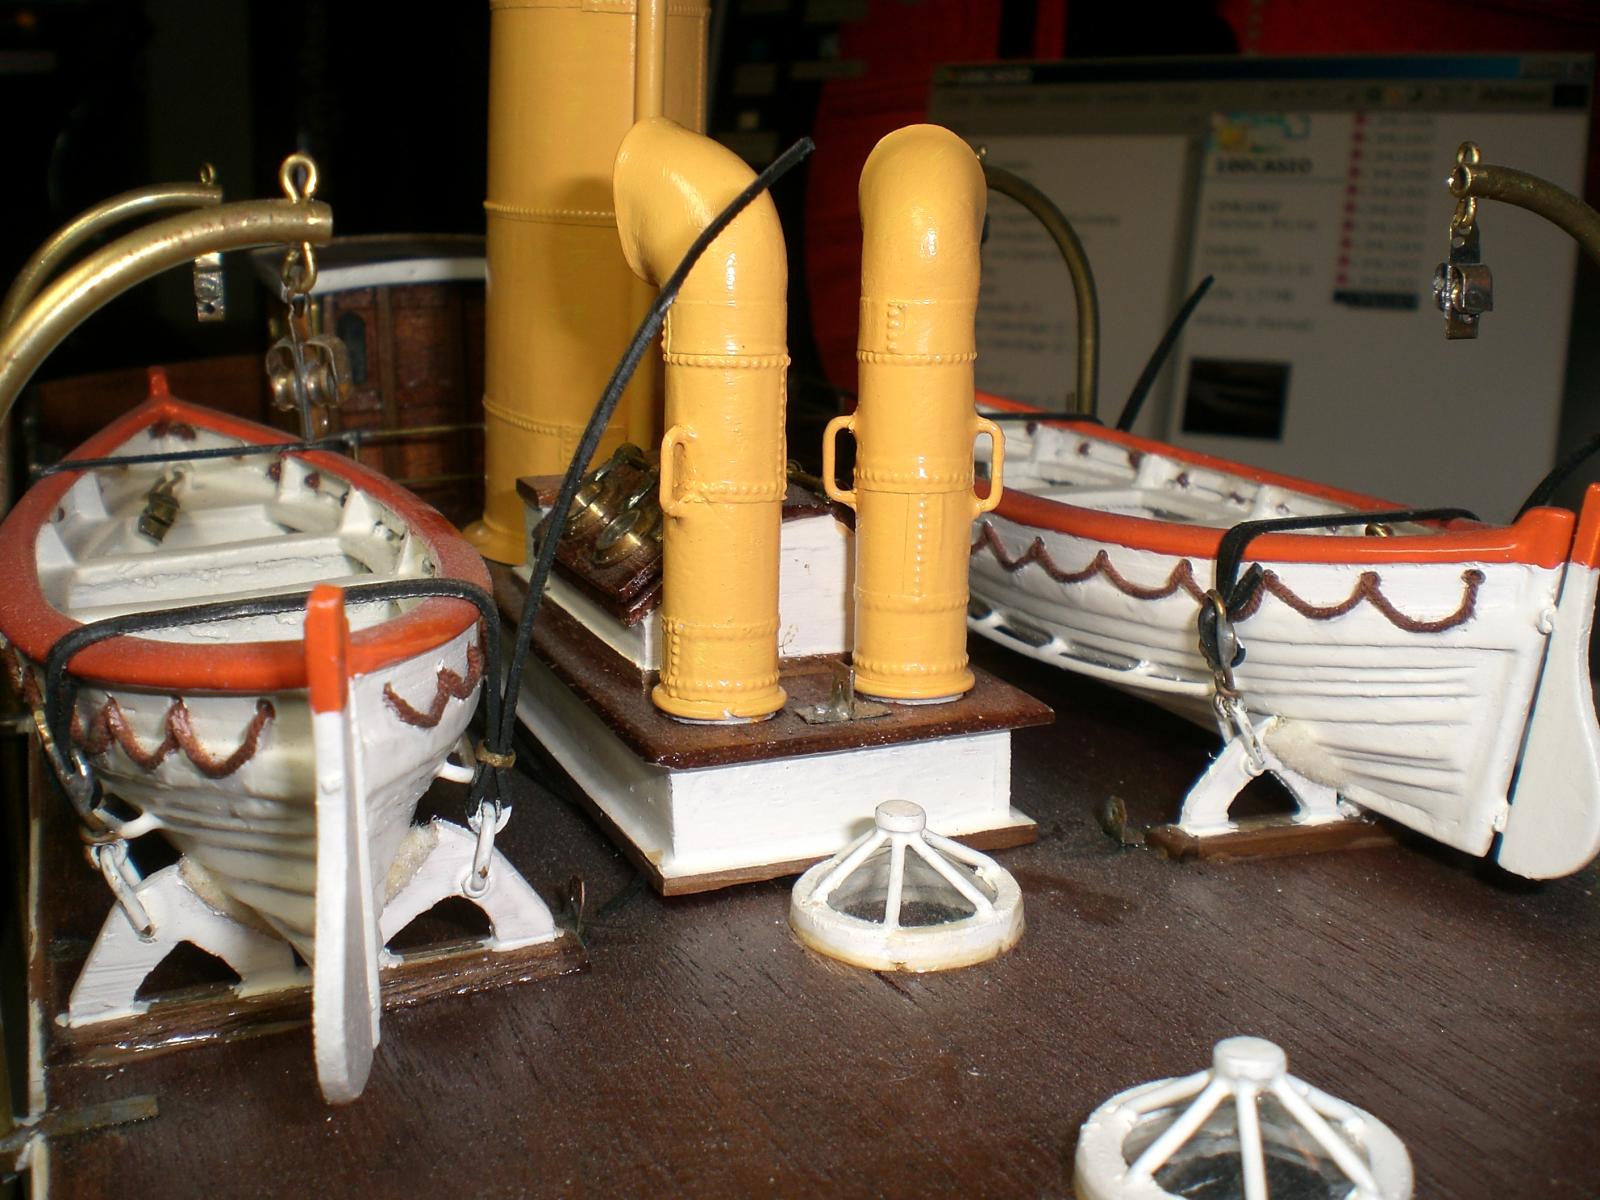
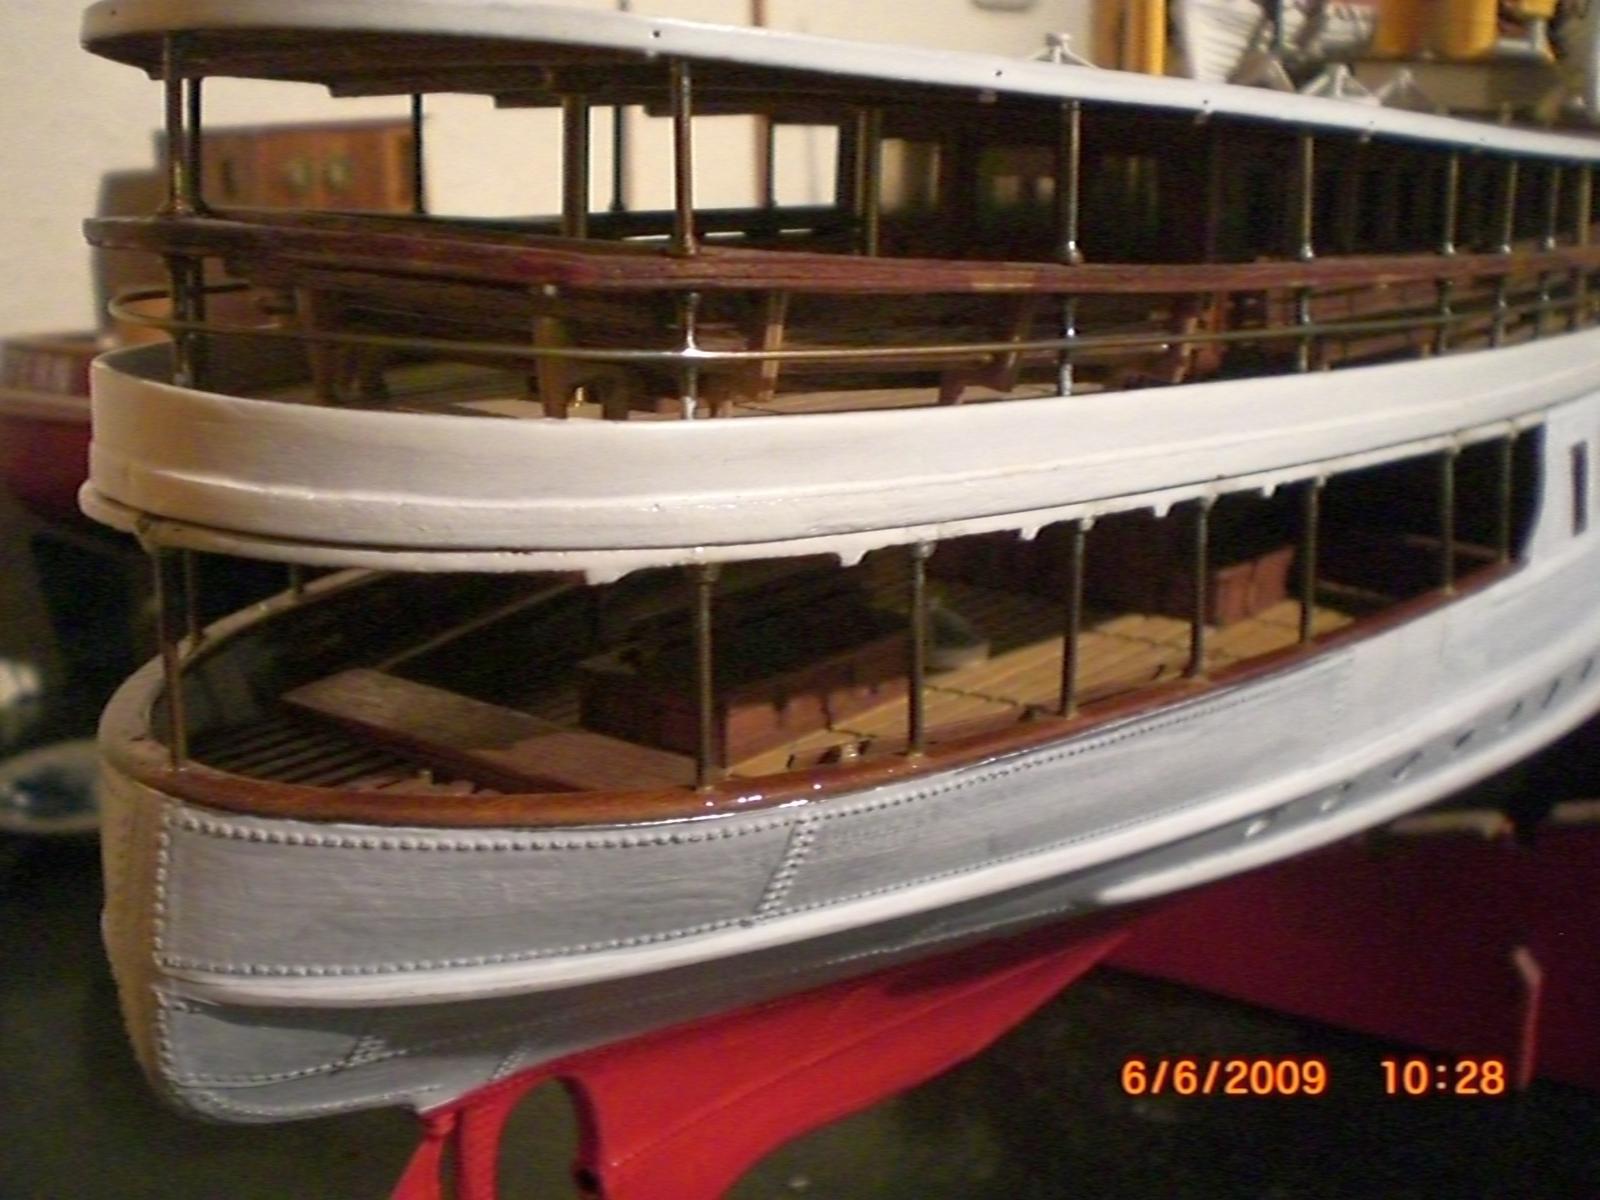
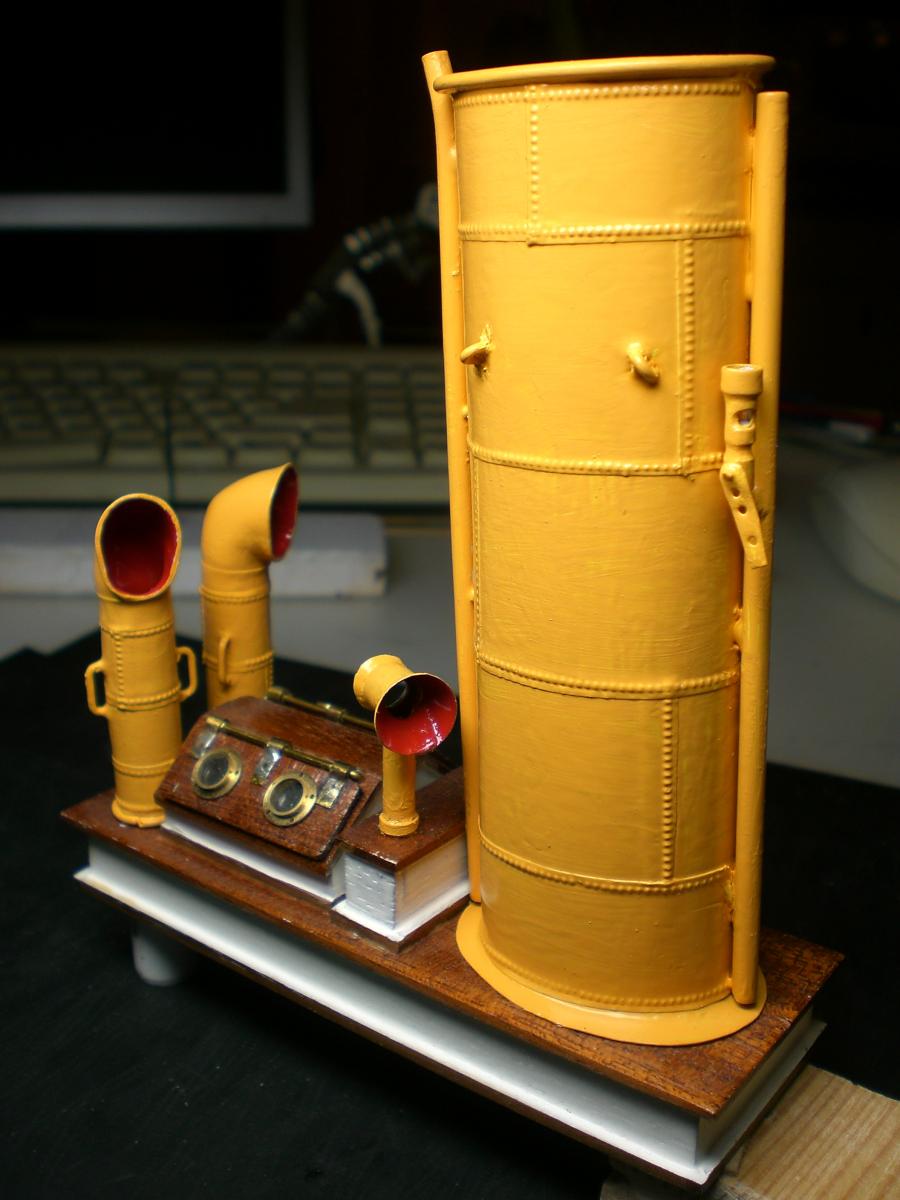
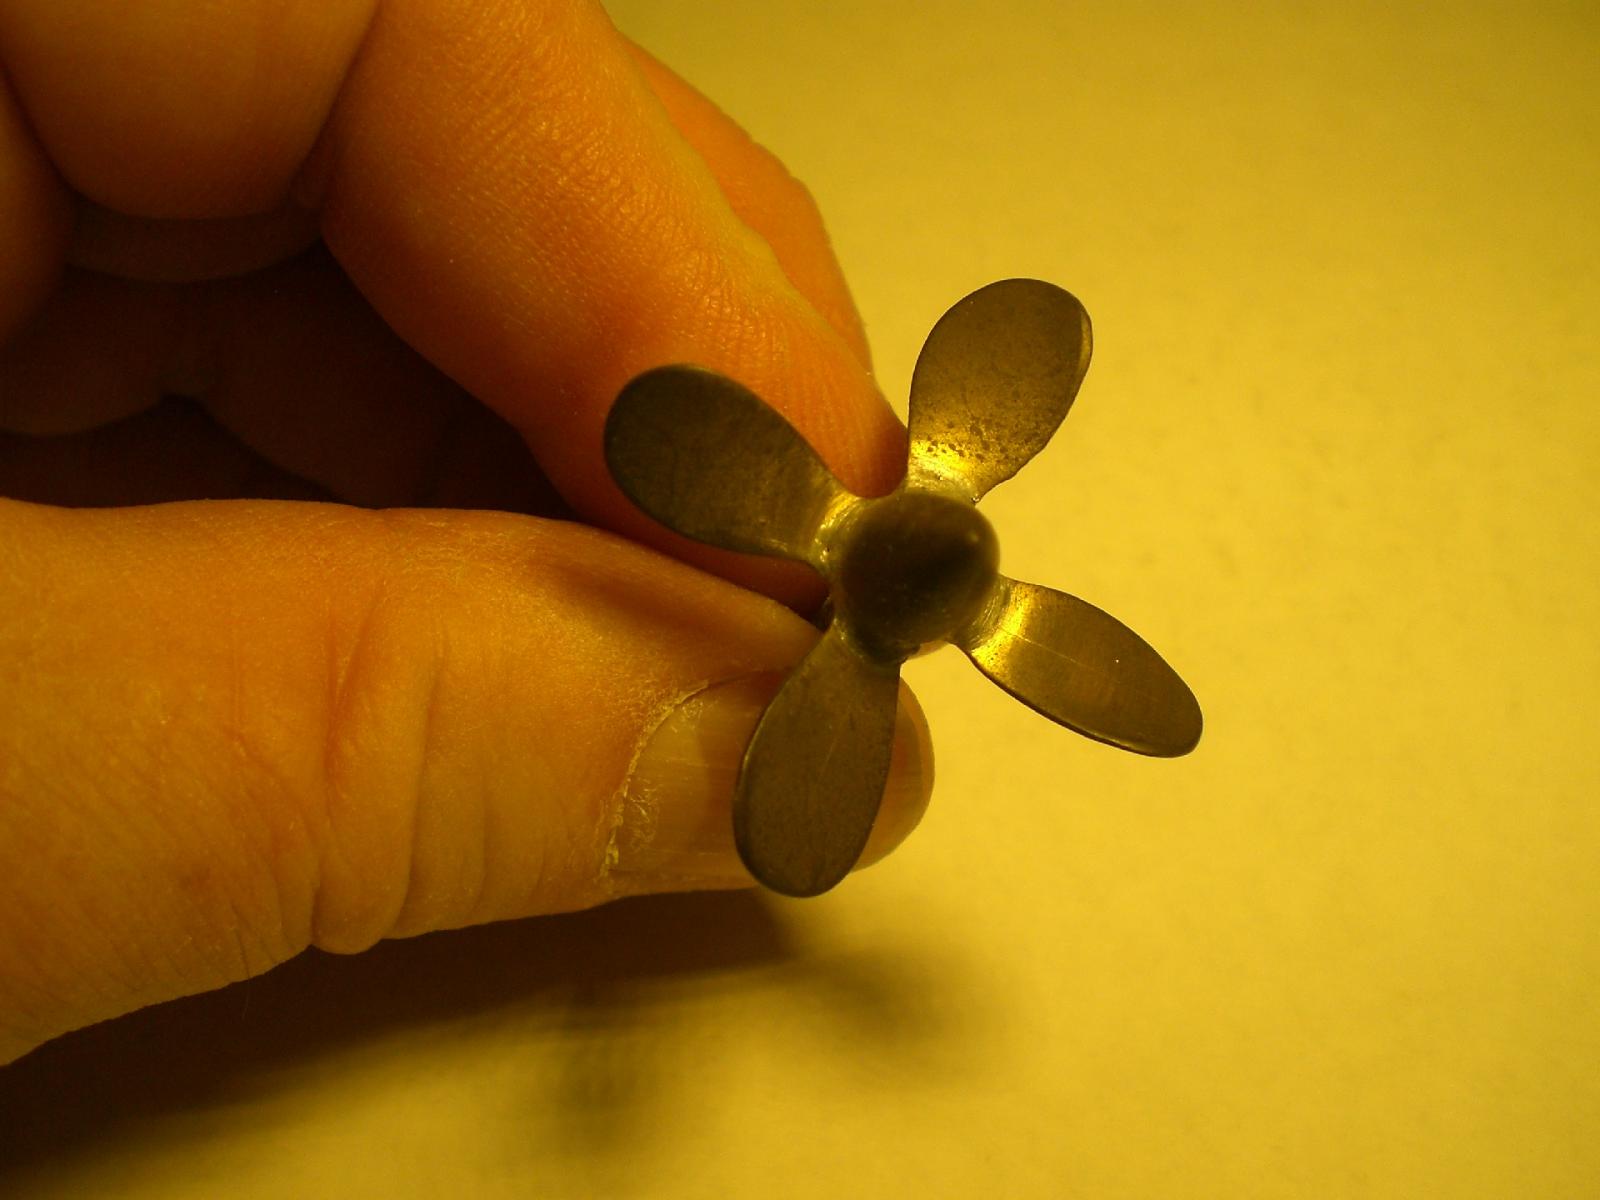
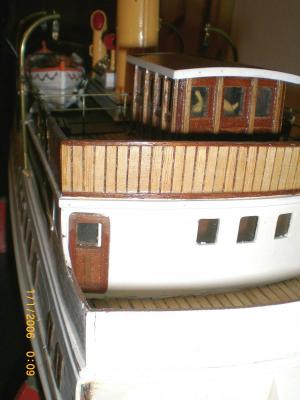
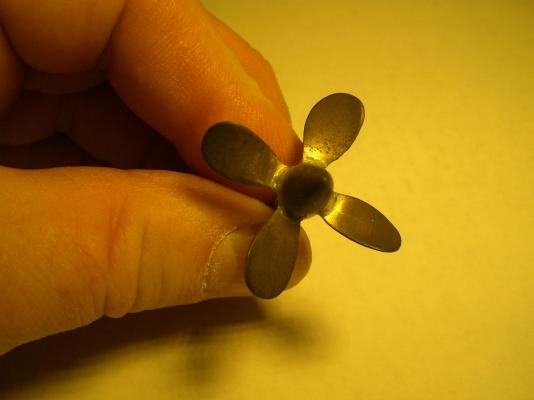
Build log part 2 This part is before I started to metal-plate the hull here still some of the dust up on and between the decks from the shelf-life can be seen funnel, vents, Davits in raw condition. selfmade White round skylights the first Propeller was of brass and soldered, selfmade (was full functional but did`nt look so nice) the stanchions and railing wires were self made. The old prop was replaced against a nice scale brass prop Little seating benches had to be built all around between bulwarks and passenger cabins area wooden Frames around the outer hull Windows, but no bulleyes fitted yet the two boats are set on cradles and strapped down through the glass of the wheelhouse the large wooden wheel can be seen Skylight with opening panels, vents, and plated funel with steam pipes and with steam whistle, eyelets for funnel stays Build log part 3 to follow.... Nils


- 70 replies
-
- 11
-
-
Thanks Nigel, I trust this Billings kit is so Long out of production already that the elder members may probably remember it. It was the time where also the beautiful out of production Billing Boat paddle Steamer "Hjejlen" was on the market. For the hairline crack Problem I see you are speaking of well experienced own practice. The way you do it is exactly as I do (did) with my older Sea-going RC models, although I don`nt intend to build further RC models (and no grand children there yet) BTW one of the great Advantages of using2-comp epoxy resin is that not the whole house will be smelling after the resin. Nils
-
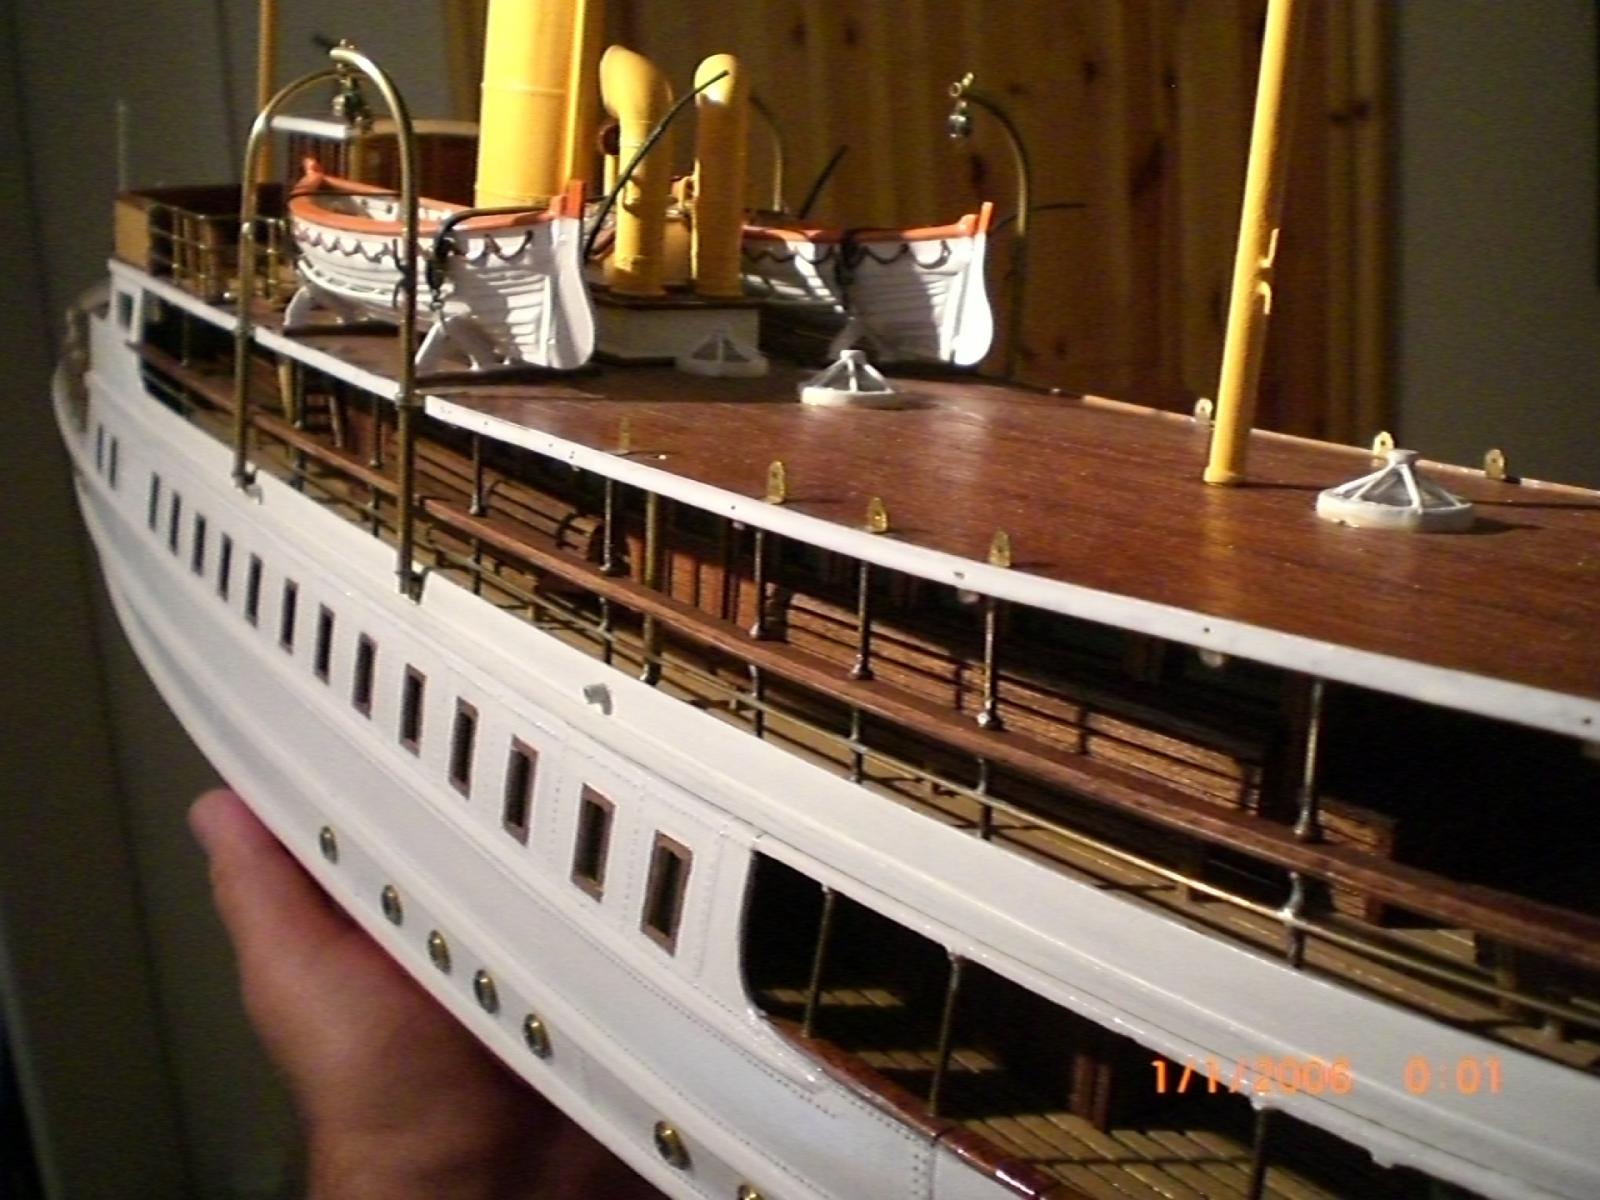
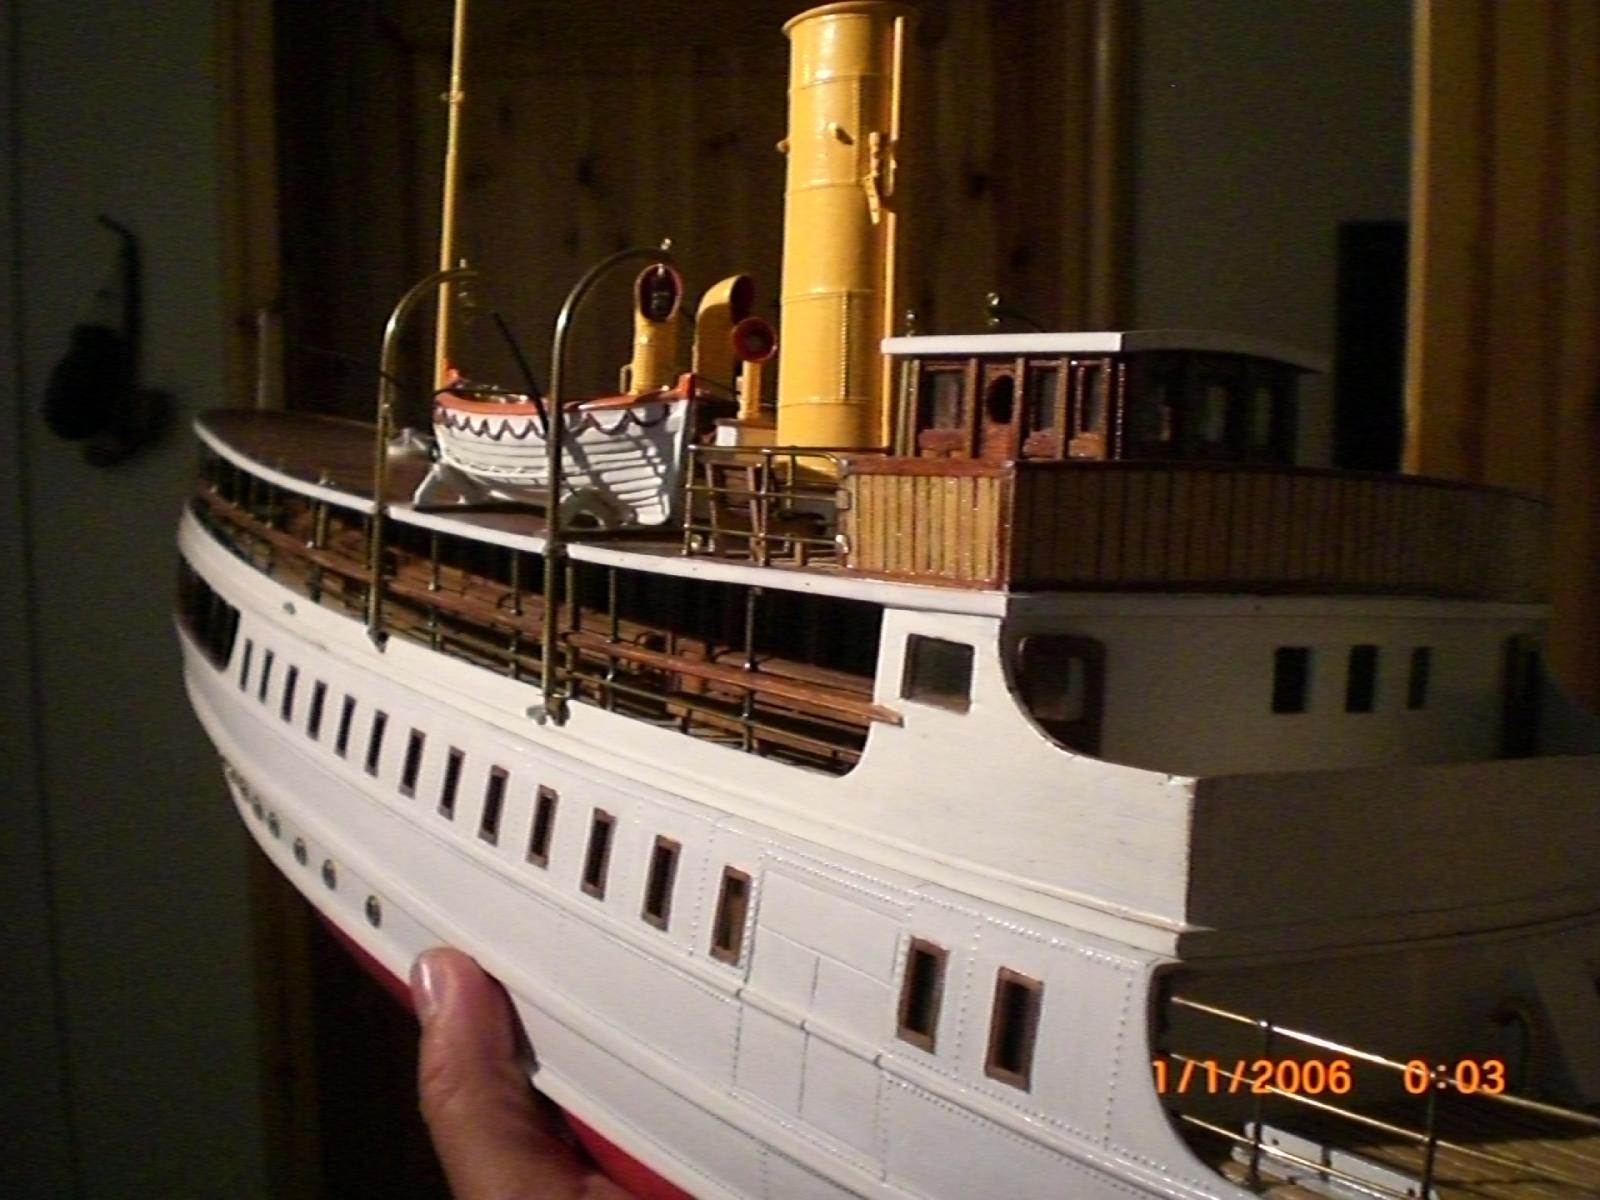
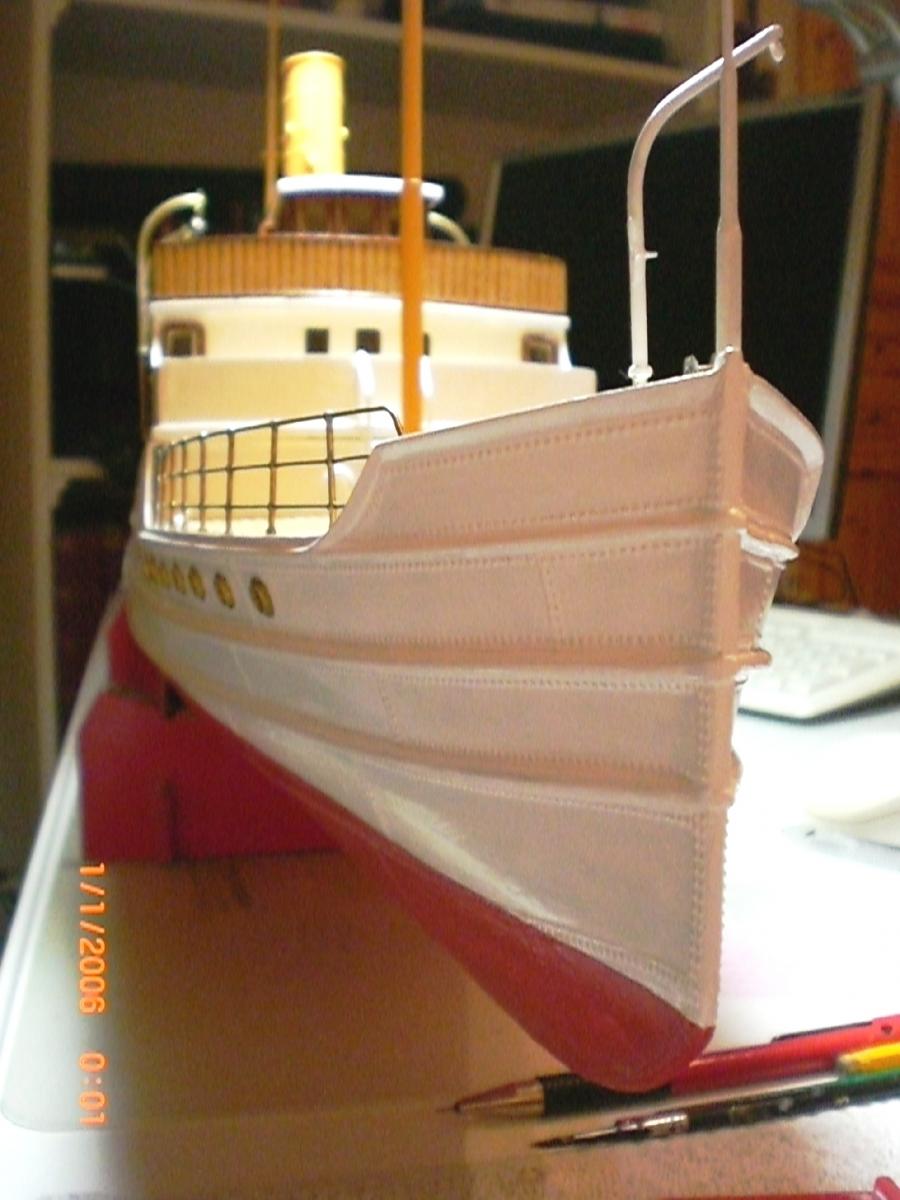
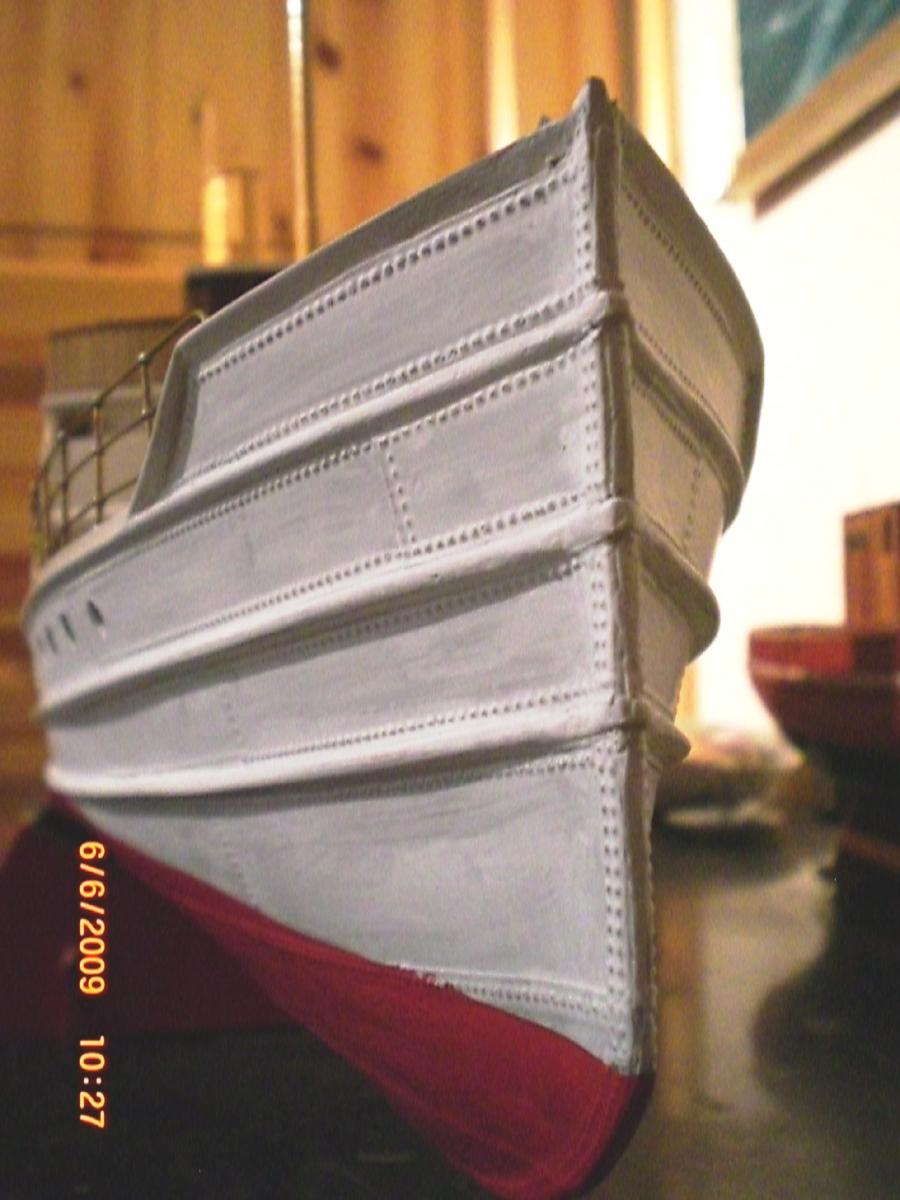
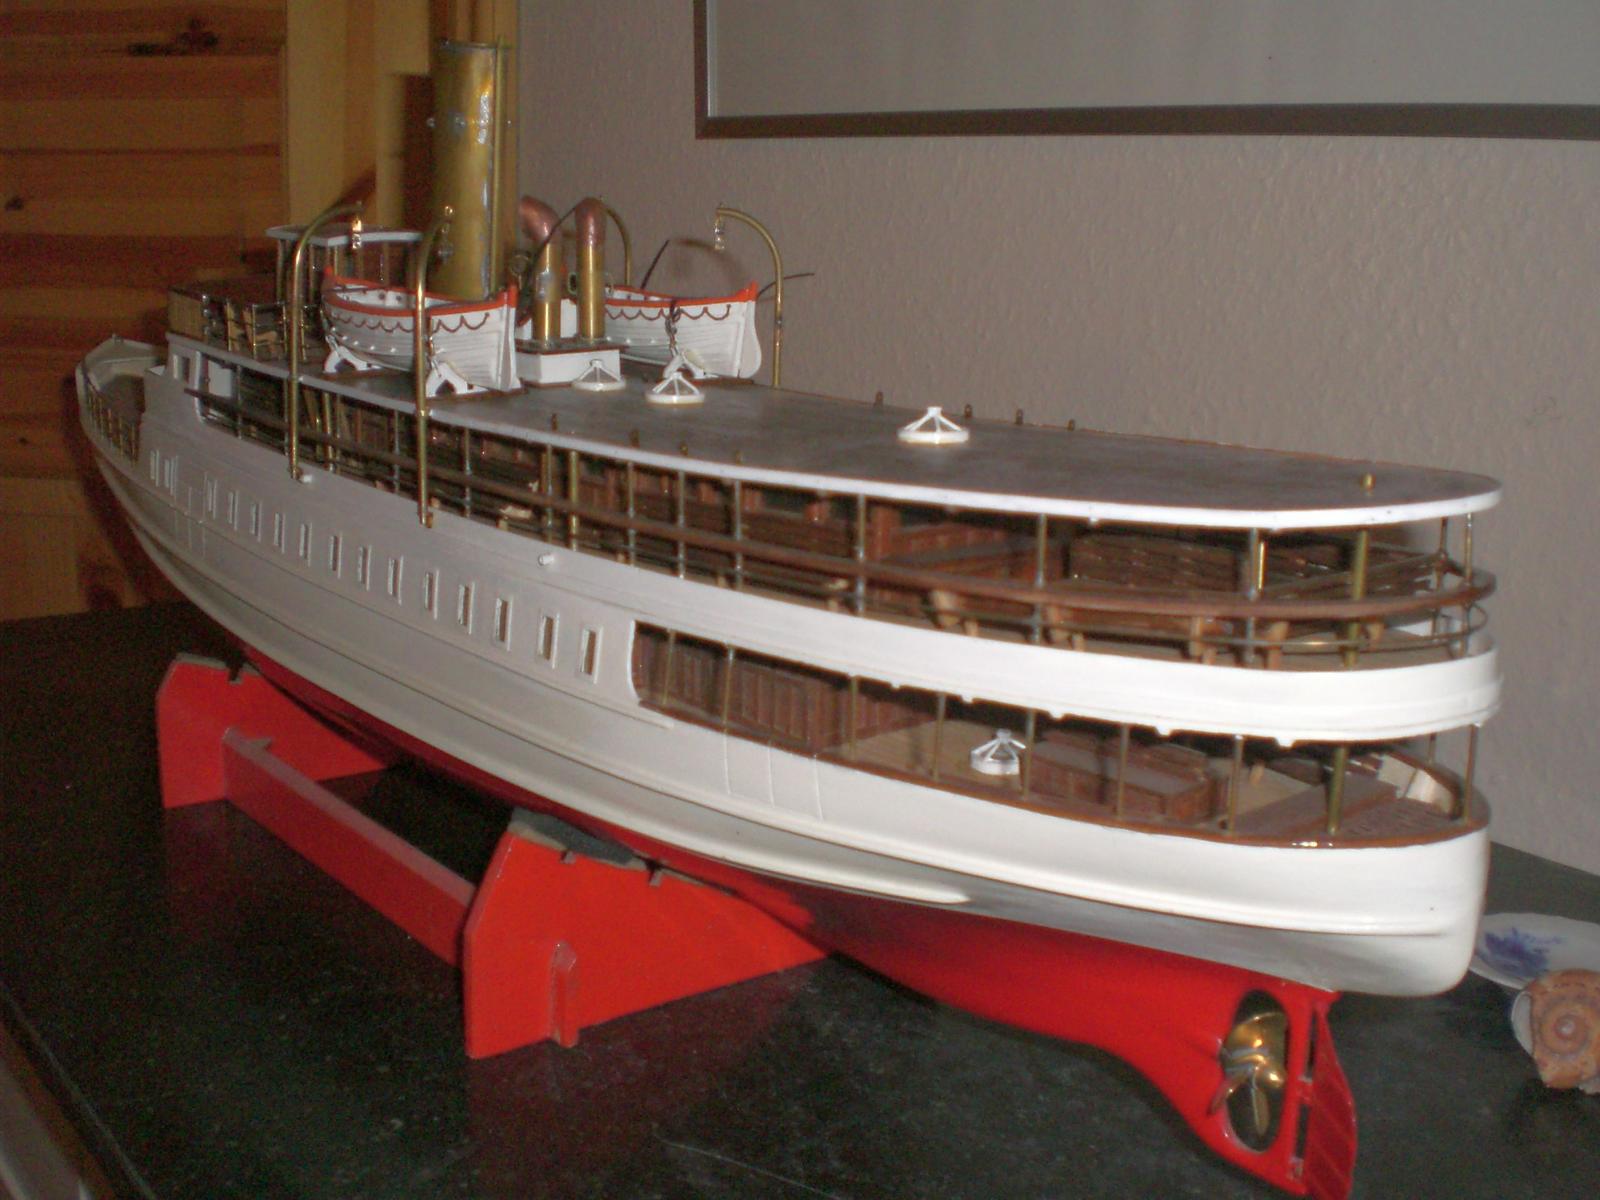
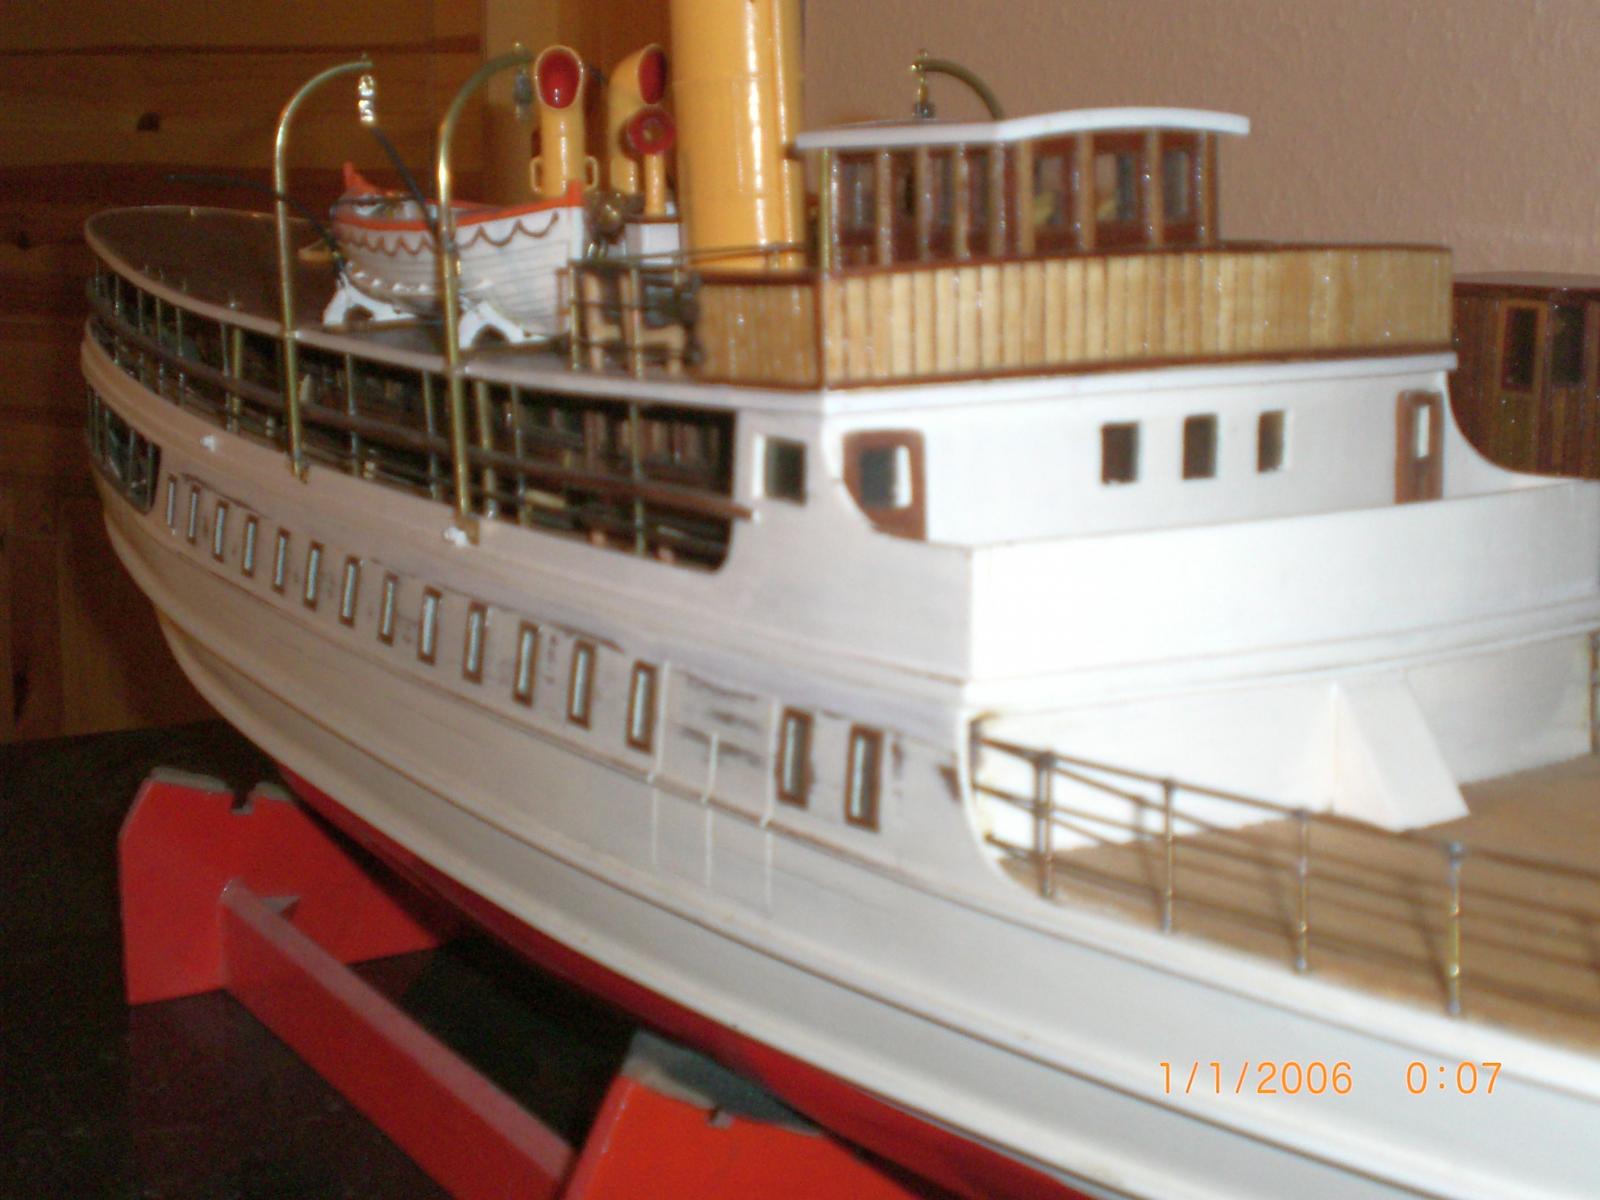
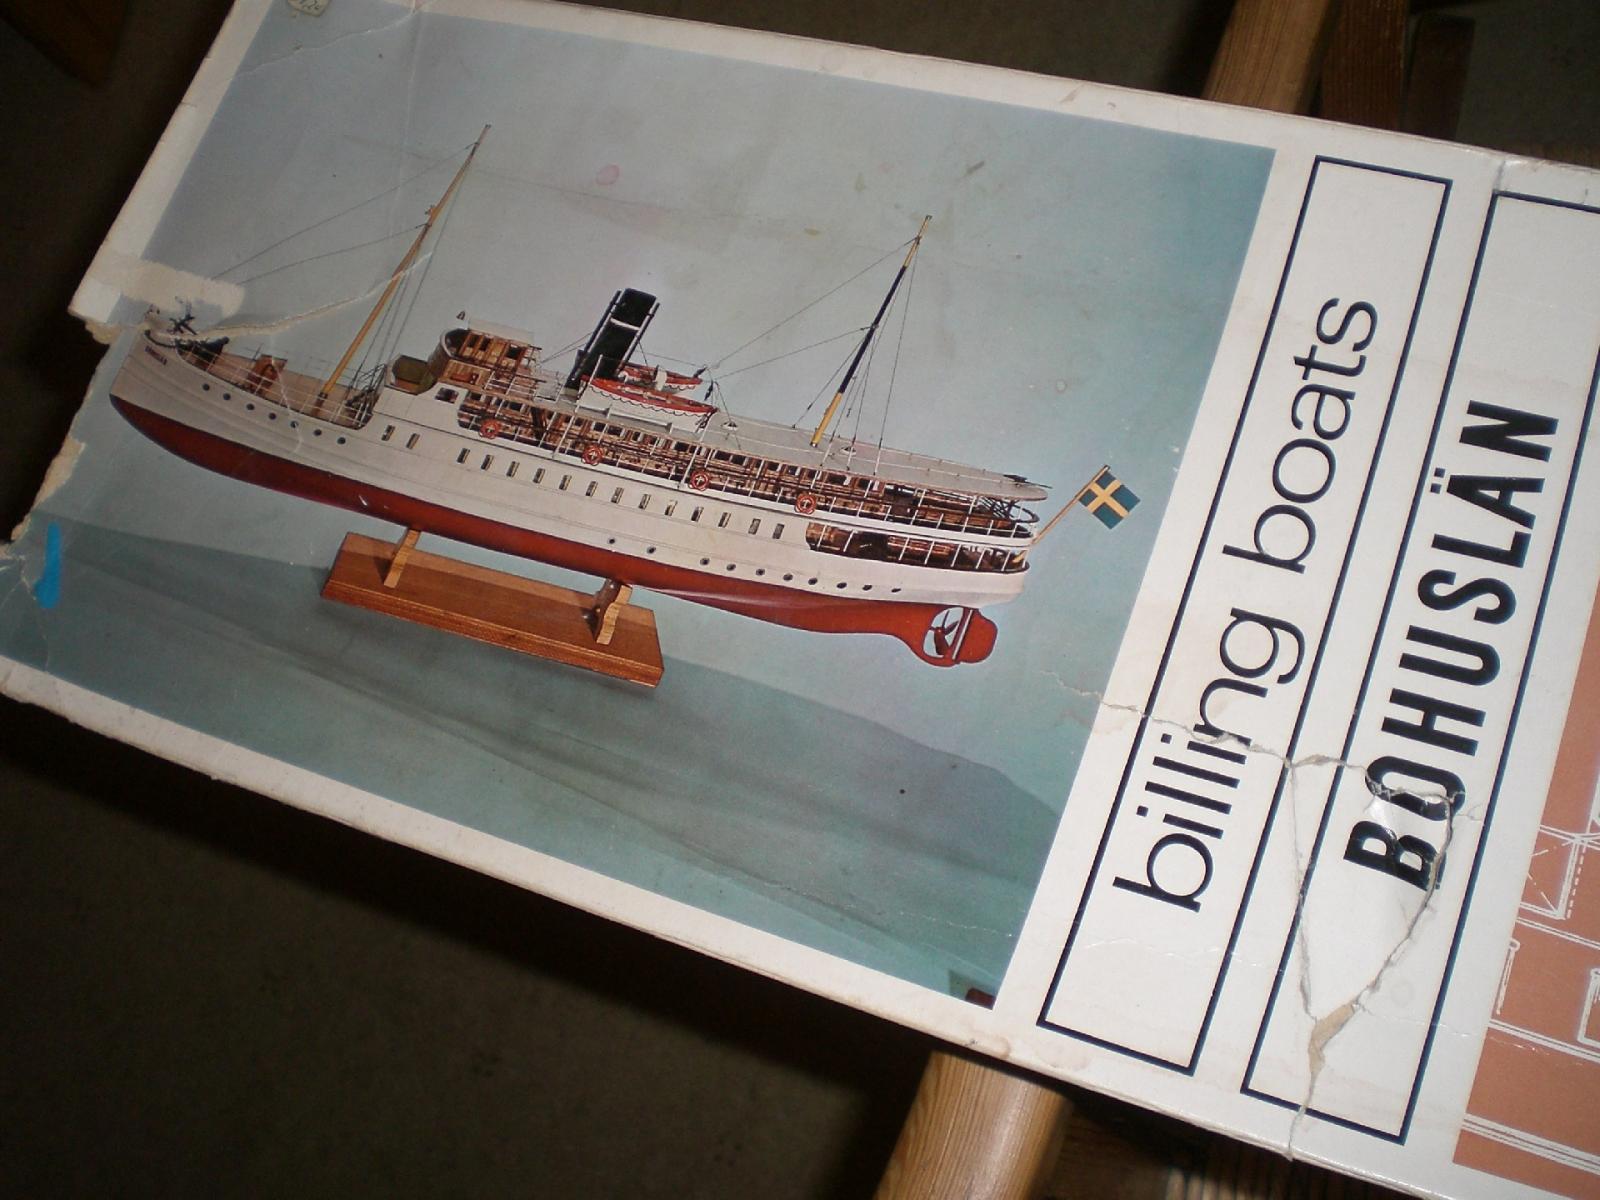
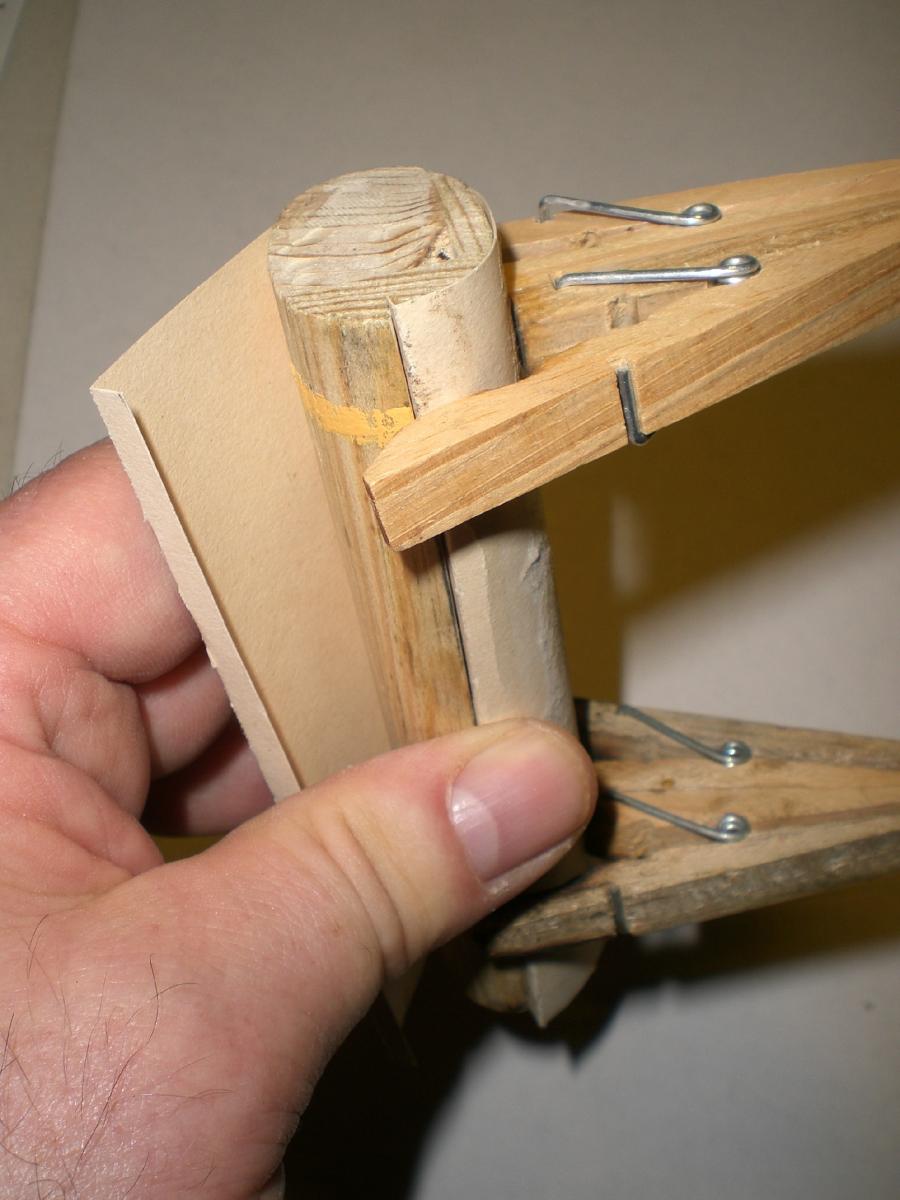
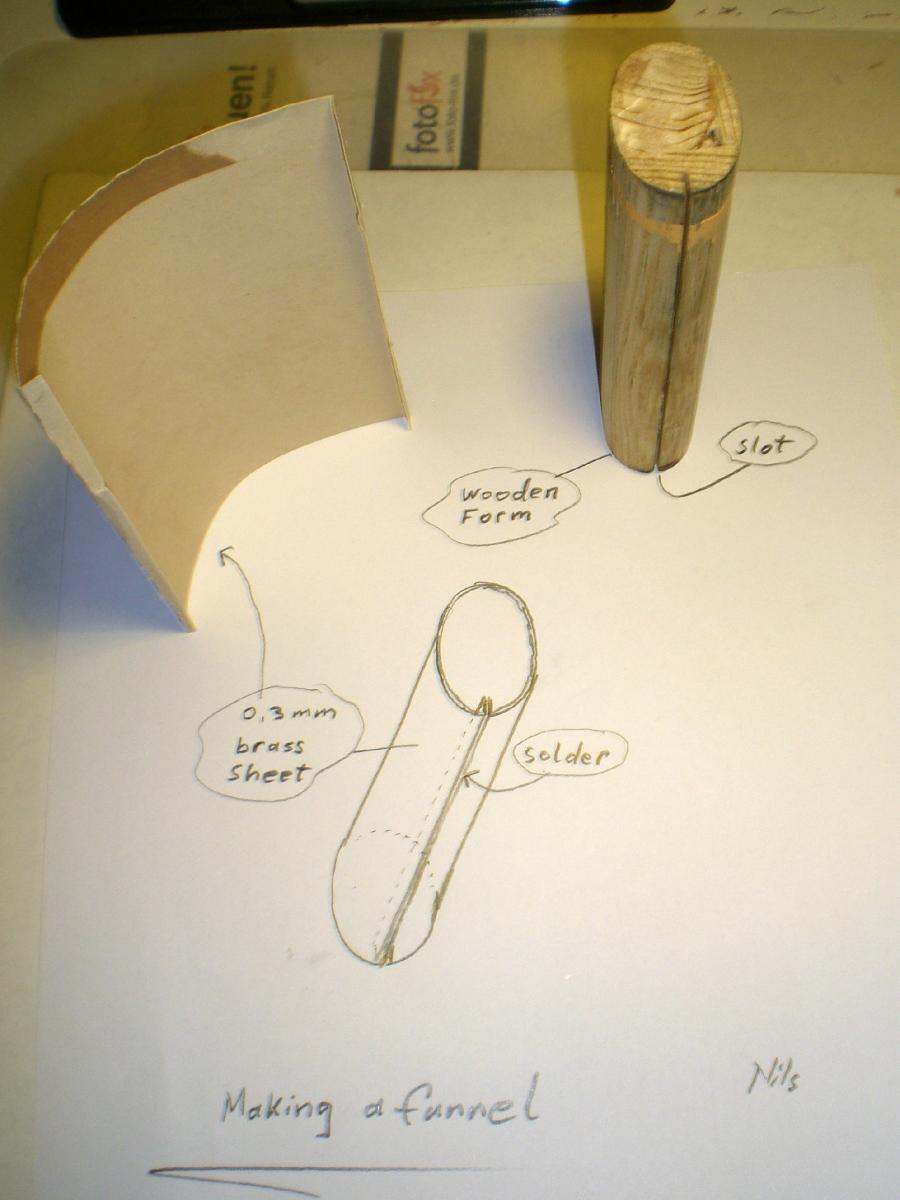
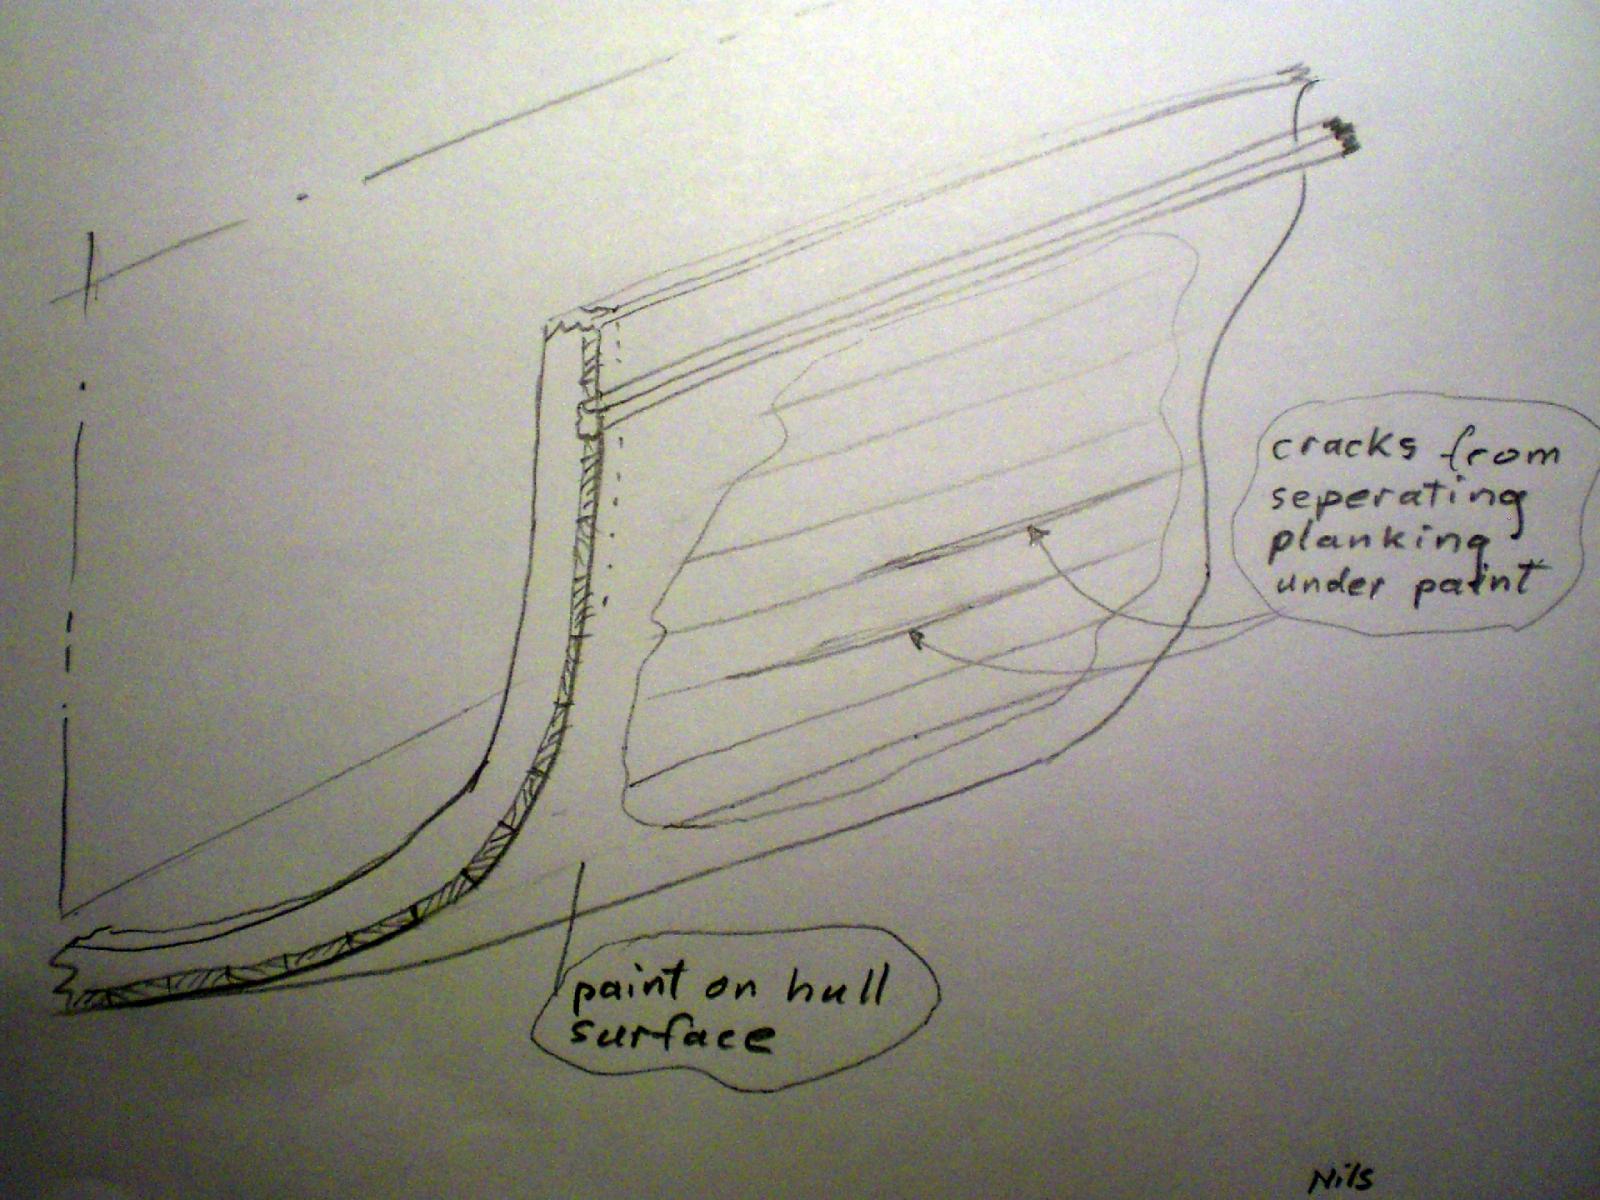
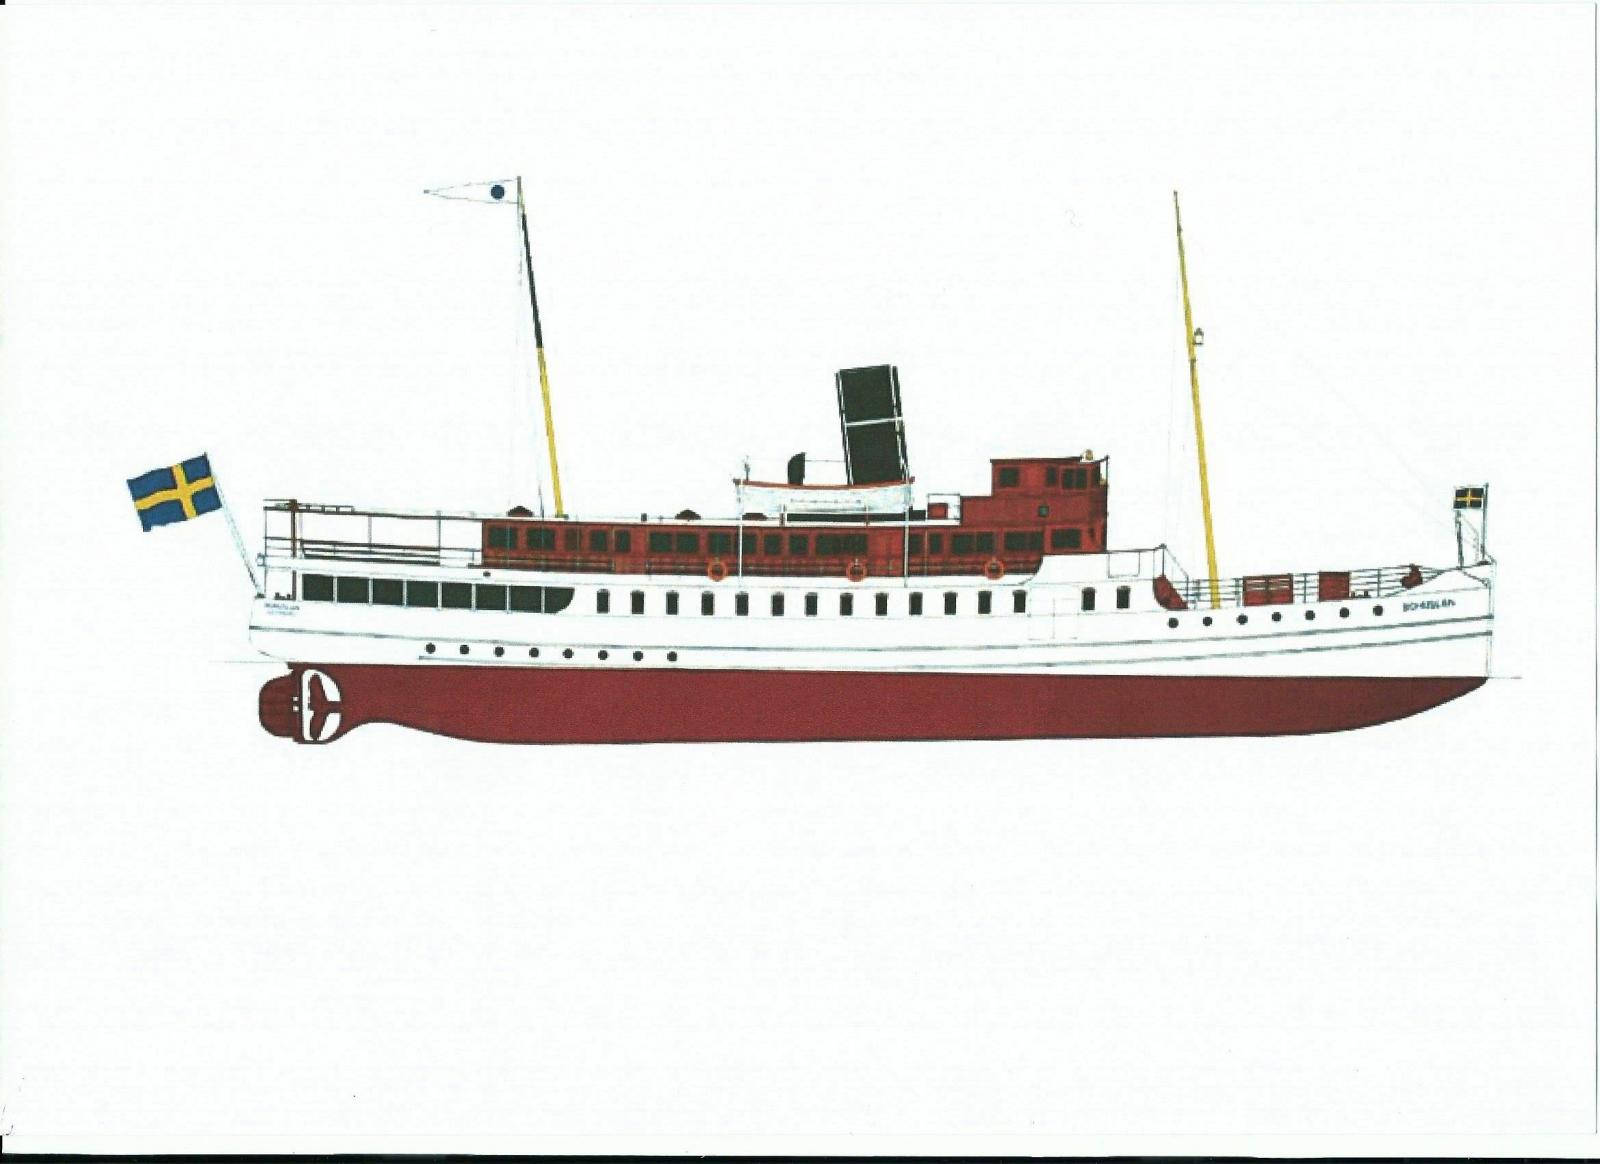
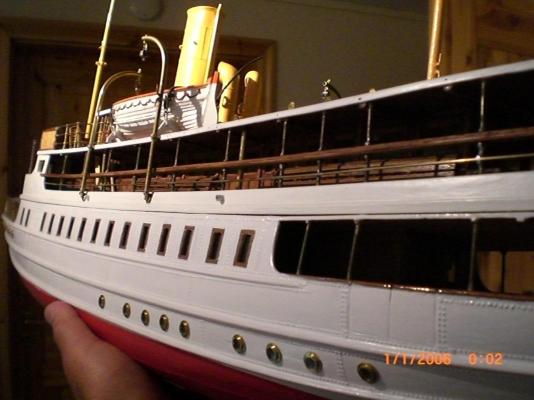
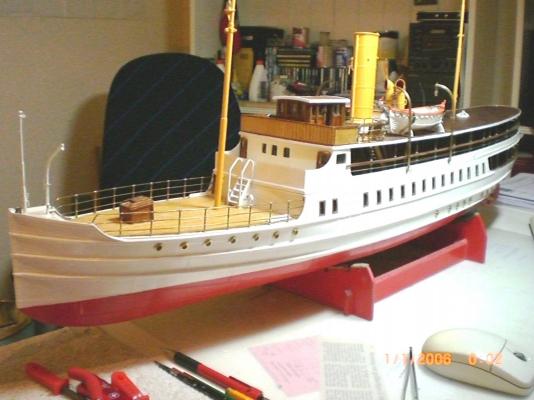
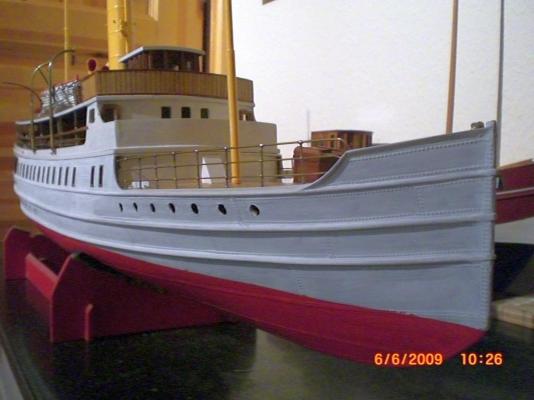
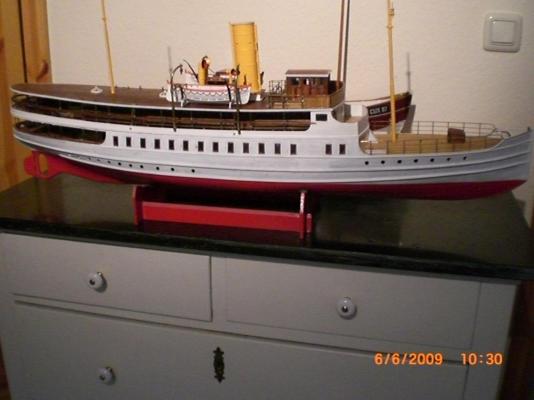
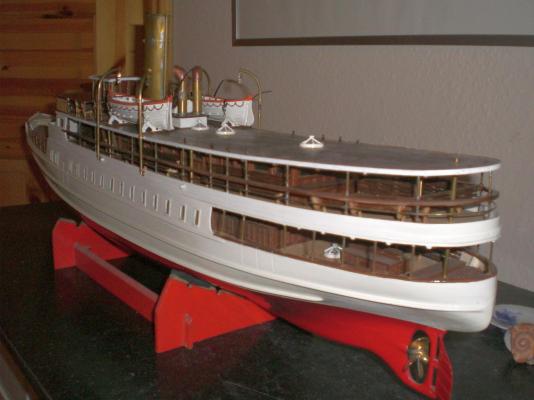
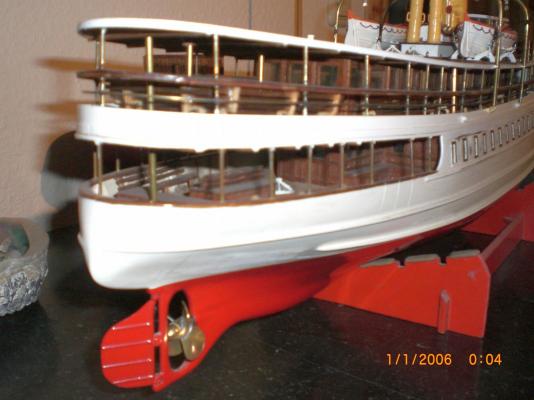
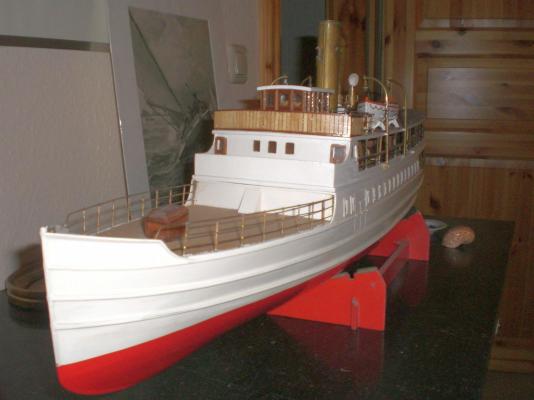
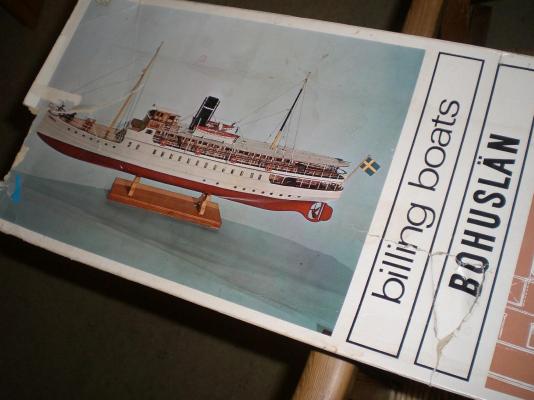
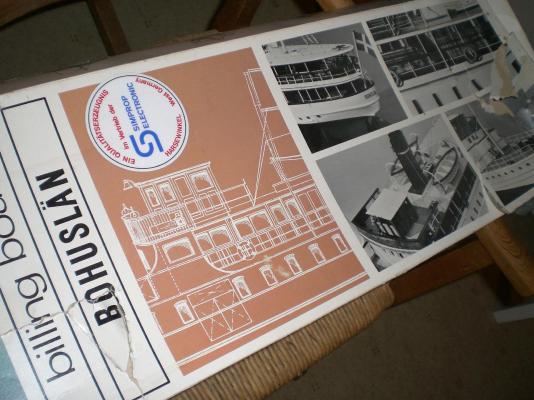
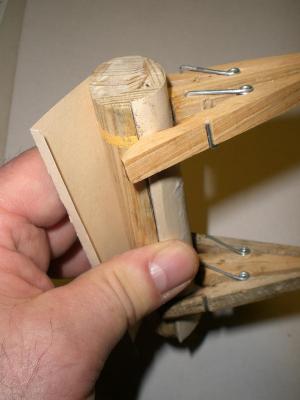
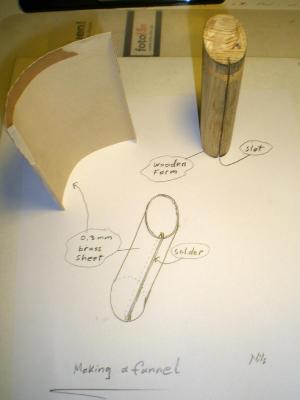
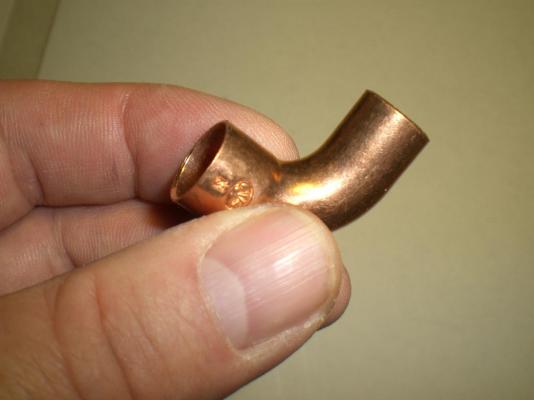
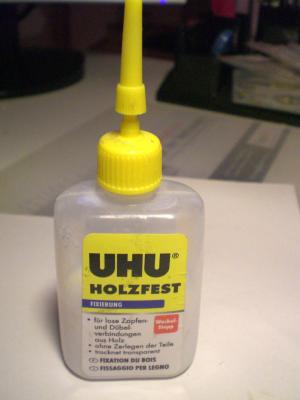
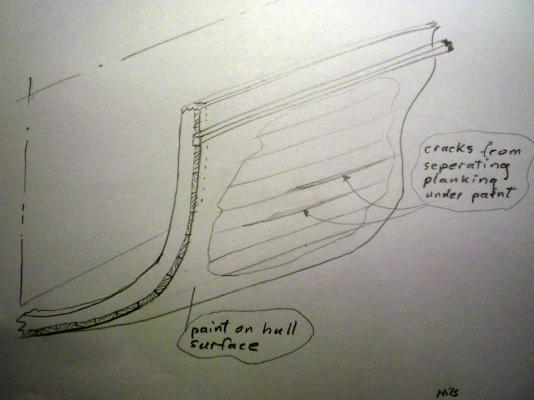
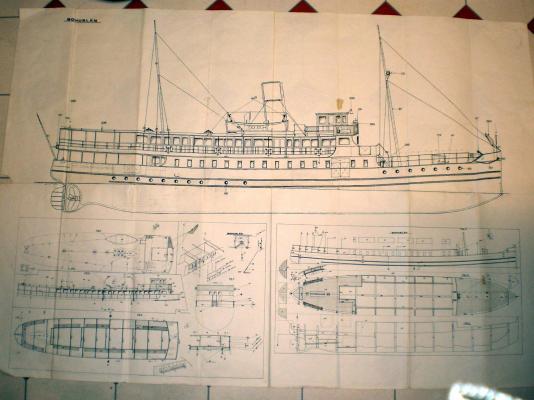
SS BOHUSLÄN swedish live museum steamer, scale 1:50 by Nils Langemann This model is already completed Introduction to this Build log This already completed model was built with many interruptions out of the (long time out of production) Billing Boats Kit, but without the separate available fittings kit. The still running actual steamer, homeport Gothenburg, is operated by the Historic Swedish Steamboat Society, and is proudly knifing her way through the many Swedish archipelaqgo waters of the Swedish Bohuslän-County of the westcoast in the sommer months of the year for passengers and all steamship enthusiasts. Some data: Built 1914 at Eriksberg Mekaniska Verkstad, build N°. 166, Gothenburg, Sweden as flagship for Marstrand Shipping Co, 12 knots, 304 tons Engine 3-fold steam expansion engine, 700 Psi, 3 oil fired boilers Fast coastal passenger steamer, since 1966 as actual and live operating museum ship The model The 87 cm long model in plank on frame make (single planking) and is representing the early look like provided by the kit, but also some kit-bashing features like metal plating of the hull, metal funnel, vents and masts. The whole top deck is removable allowing access to the inside, where I had fitted an electric motor, power supply and RC control devices. After launching and RC controlling it first time, the decision was made, to change it to a static model, after the fine mahagoni planking had suffered cracks under the paint due to being submerged in the waterand splashwater getting in. The model was initially built without metal plating in the beginning, but later on, and after the model was sitting a long time idle and forgotten taking on dust on a cupboard I needed a trial object to practice the intended plating procedure for another model, when the “Heinrich Kayser” steamer was under construction, so the Bohuslän was my very first prototype metal plated ship. At that time the models progress was revived to life again and finalized. In all it must have been two years building duration in total. Much to my regret I have no documented pictures of the building sequences before the pictures shown here start, simply because I had no digital camera at that time. The first pictures are showing the hull as it looked like without plating. Also the bowpost was fixed then for a more 1914 like straight down nostalgic look. The nice little clinker planked (on frames) lifeboats are actually small built models of their own. Enjoy the build log Nils Build log part 1 the White triangle flag with the blue ball is that of the Historical Swedish Steamboat Society This overview plan came with the kit I still have the old box (just for the Picture) the Billing Boat Bohuslän kit was distributed by Simprop Electronics of course I could`nt wait to Launch her to the near Pond for RC controlled maiden voyage, The complete top deck is removeable, no bulleyes fitted yet, and still it was not a good idea to get her in contact with the Ponds water. Thats when her build was set forth as a static model the funnel sheet was formed around a wooden template the Card sheet acted as a template for 0,3 mm brass sheet mini 90° elbows were used to make the vents from many portions of the Mahagoni planking started to crack apart beneath the painting (somehow moisture got into the Wood) after sanding those Areas, I used this thin viscosity creep-glue for the cracks. One could realy watch it creeping into the cracks and then curing out transparent and hard. After sanding over everything was fixed again. Build log part 2 to follow Nils

-
Crackers and David, Thanks to both of you for your words ..... I have in the past reactivated and built a nice Steamer model from a kit that is Long time out of production, that build was on hold for many years. Unfortunately the Picture documentation first sets in where the hull is nearly done in the first version. But I did some postbuild plating, and kit bashing, in fact it was my prototype Trial for doing the plating in the meanwhile known and well practiced way. This means, if I post the build log, it will be missing the the early sequences because I had no digital camera at that time. Nils Billing Boats kit "Bohuslän"

- 222 replies
-
- 3
-
-
- gorch fock
- barque
- (and 2 more)
-
Hi Don, nice to hear that you are also building the Gorch Fock, and I wish you good success. The one you are doing is from the Ocree kit if I`m right, and it will therefore differ a bit. Feel free to contact me any time if I can assist... The figures I used are from Amazon or from Ebay, there are at least two suppliers who do H0 scale (1:87) and the make is either Faller article 151062 ships Crew or Preiser article 14063 ships Crew I saw Amazon is currently offering both http://www.amazon.de/Preiser-PR14063-14063-Schiffsbesatzung/dp/B002NRWPDI/ref=pd_bxgy_toy_text_y Regards Nils
-
Very good looking section Cristikc, so many fine Details ! Nils
-
Very impressing work at that scale Bob, I would have guest it at 1/60 or larger, I dip my hat to your acuracy and precision Nils
-
Well thats a good way to see it Peter, shall bear this in mind and brings back my smile... Cheers Nils
-
Great Progress Mark, very good looking Wood joining work, also the Stern Windows look great Nils
-
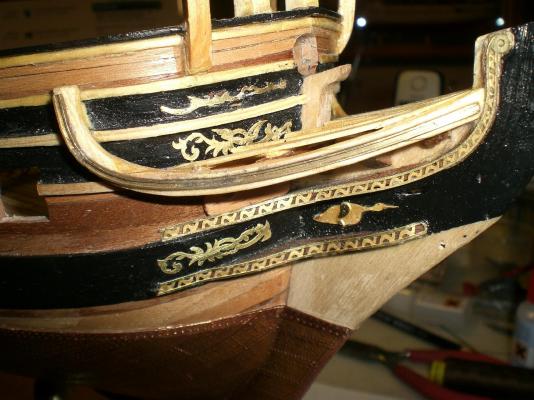
beautiful work Bob, I like your woodwork Fitting out on the cabin bulkheads, and also the very nice rigging and Tackling of the gun carriages. BTW in what scale is the Essex being built ? Nils
-
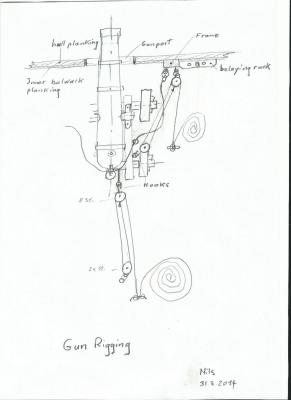
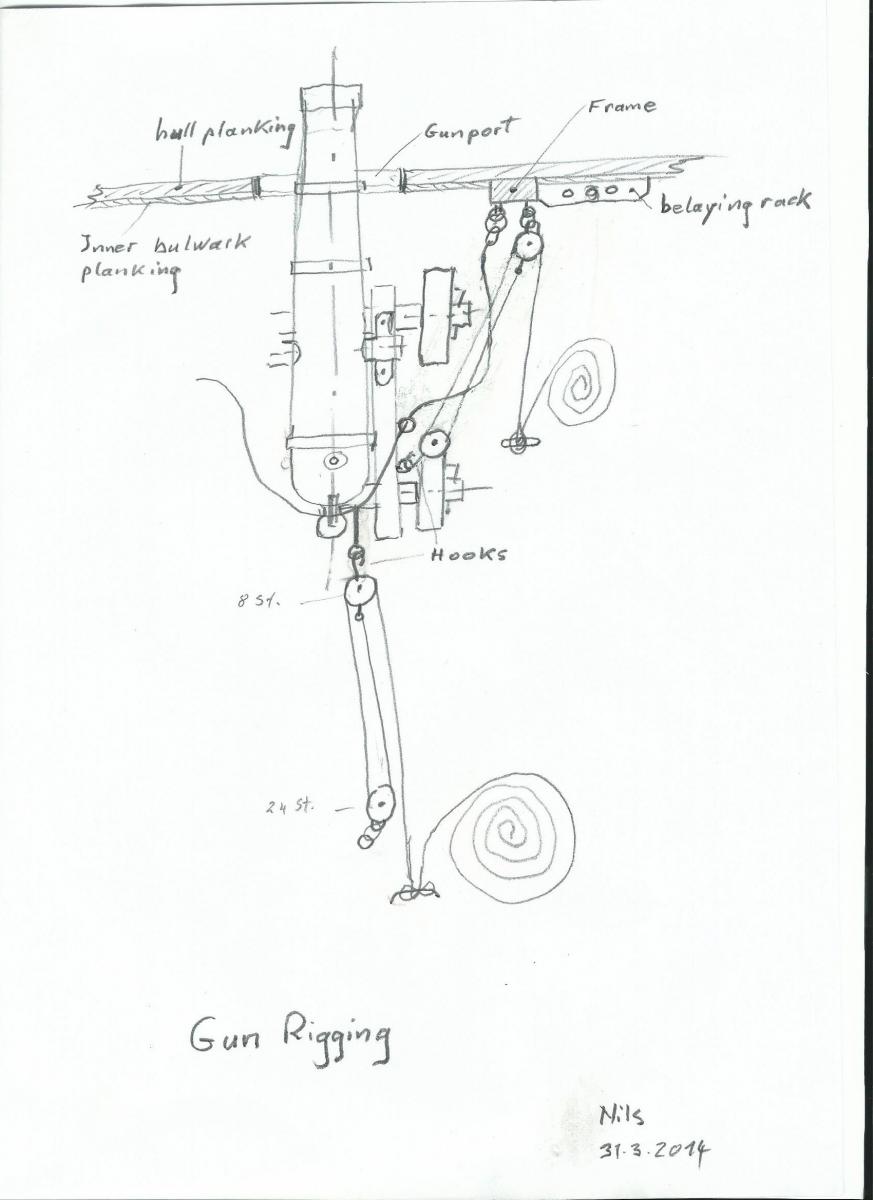
Thank you Peter, I was just searching the the web this afternoon for a suitable light tan Color "breaching rope". The black one used for the Little mock upwas the only I had at Hand in the moment, is good flexible and appr. 1mm Dia. I was looking for such one in natural hemp Color. I had some luck today in finding a supplier for smaller blocks, this enabling a better looking pulley tackle from bulwark to carriage, am quite happy because I to date had the Feeling that they would not be produced in smaller and in the way I wanted them to be. It would have been easy to use the ones Chuck supplies, but the together with the fastening harness even the small blocks would build up too Long in line. If I had`nt built that mock up I would`nt have recognized that before. I think you are right with the "lesser precision" but there Needs to be a compromize from my behalf, I trust I would not have the Patience and endurance to do all the Fitting and joining work in Wood like in all those fabulous 1:48 Swan Classes here in MSW Nils
-
ROYAL CAROLINE 1749 by Doris - 1:40 - CARD
Mirabell61 replied to DORIS's topic in - Build logs for subjects built 1501 - 1750
beautiful Details Doris, I enjoy looking at those lovely modeled and splendid painted figures of yours in their fine costumes Nils- 883 replies
-
- 1
-
-
- royal caroline
- ship of the line
- (and 1 more)
-
beautiful Fitting out Danny, very nice work and also composition of Wood tones Nils
-
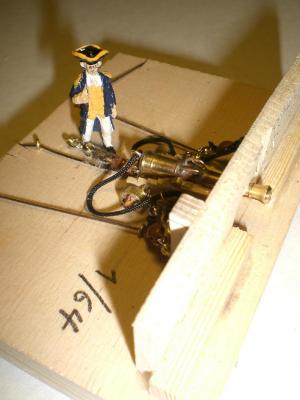
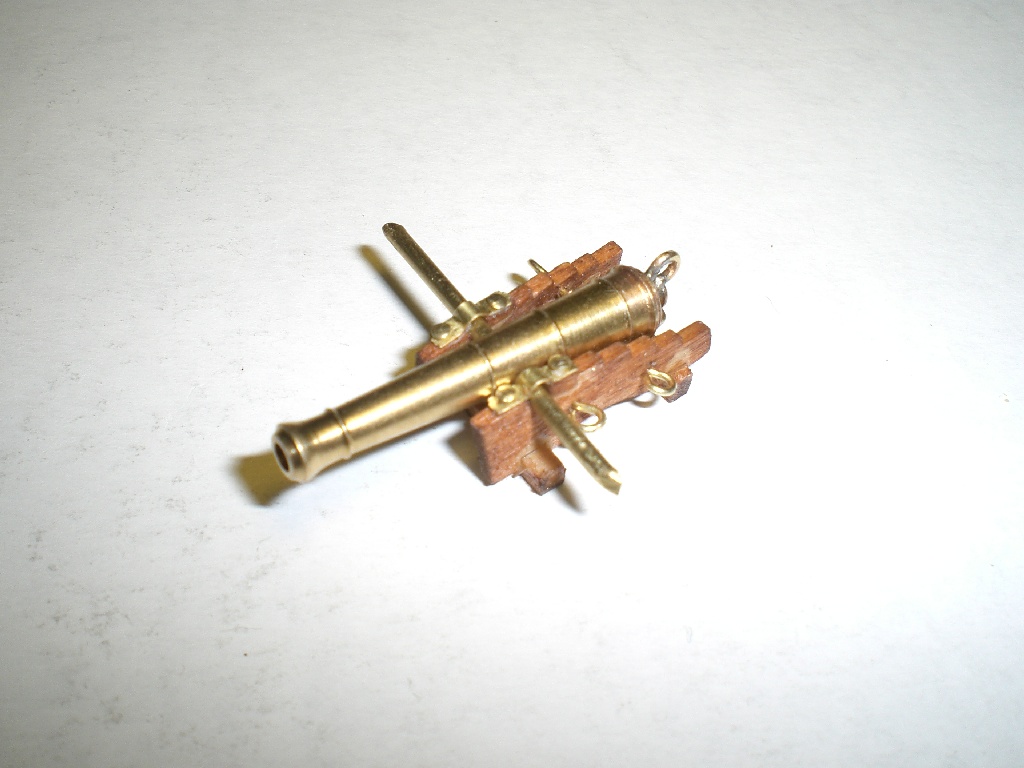
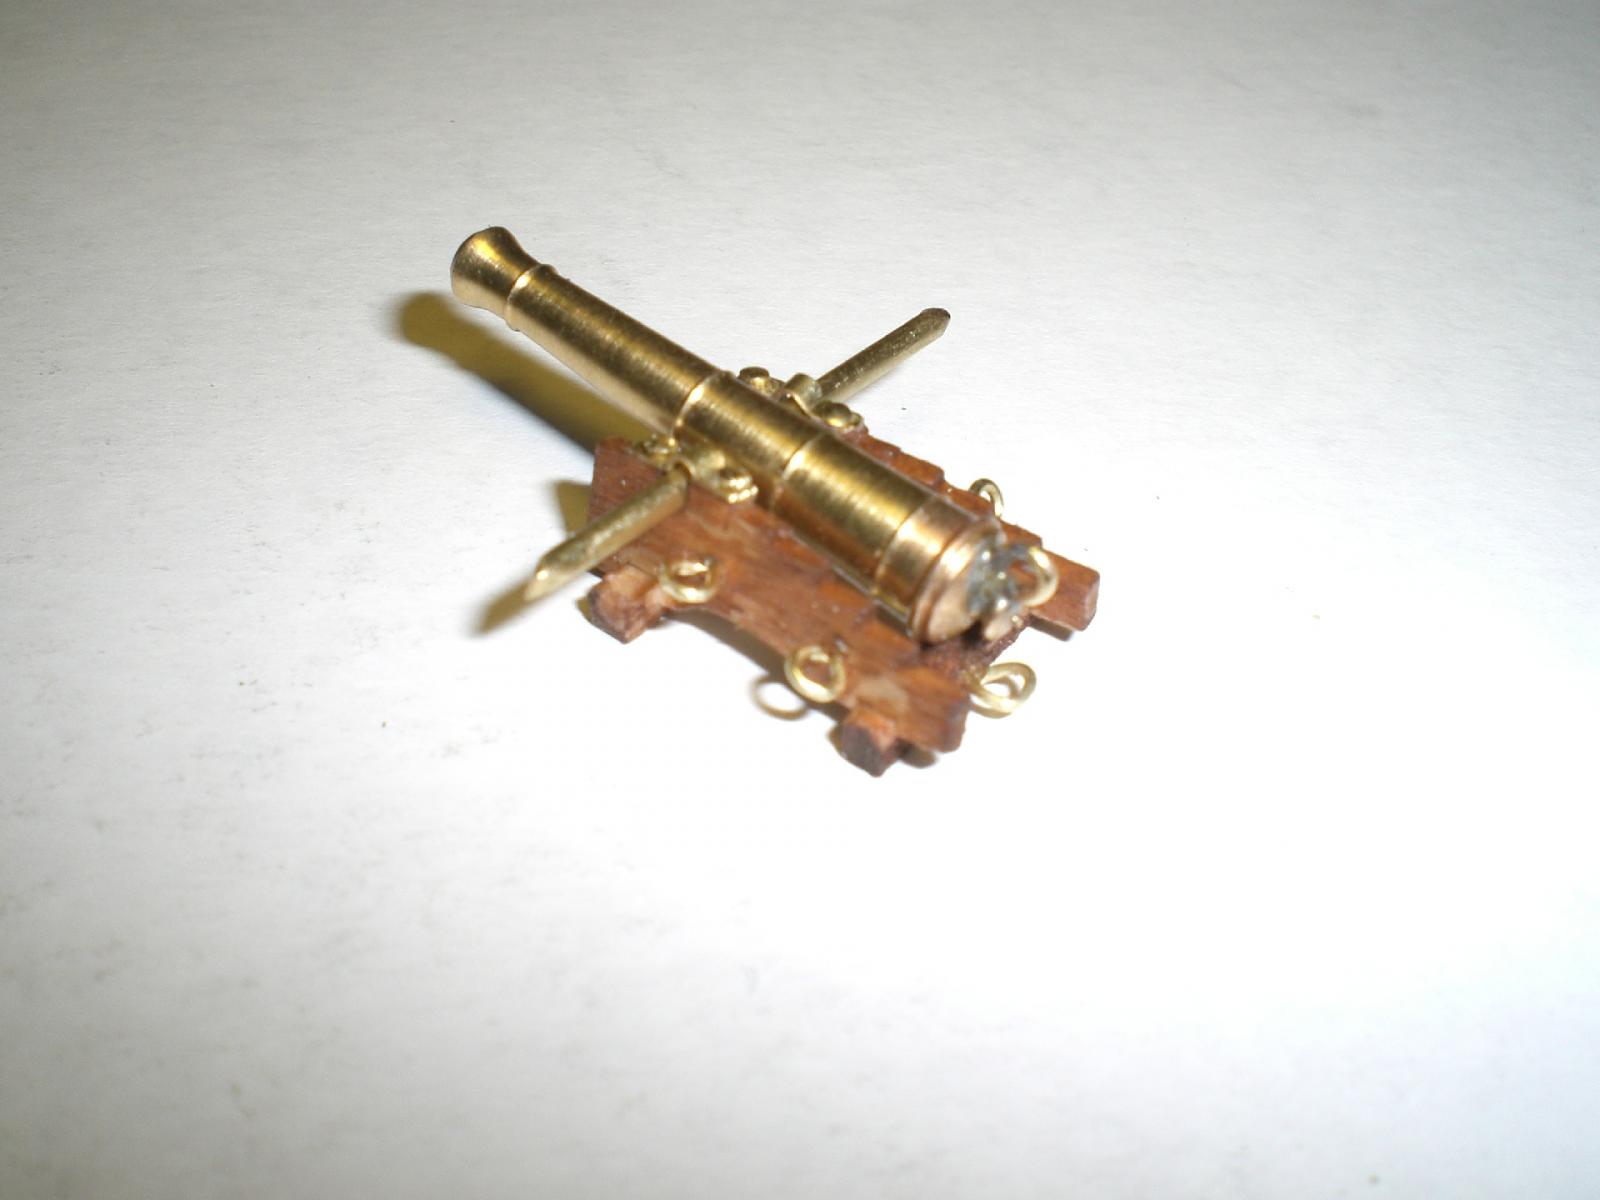
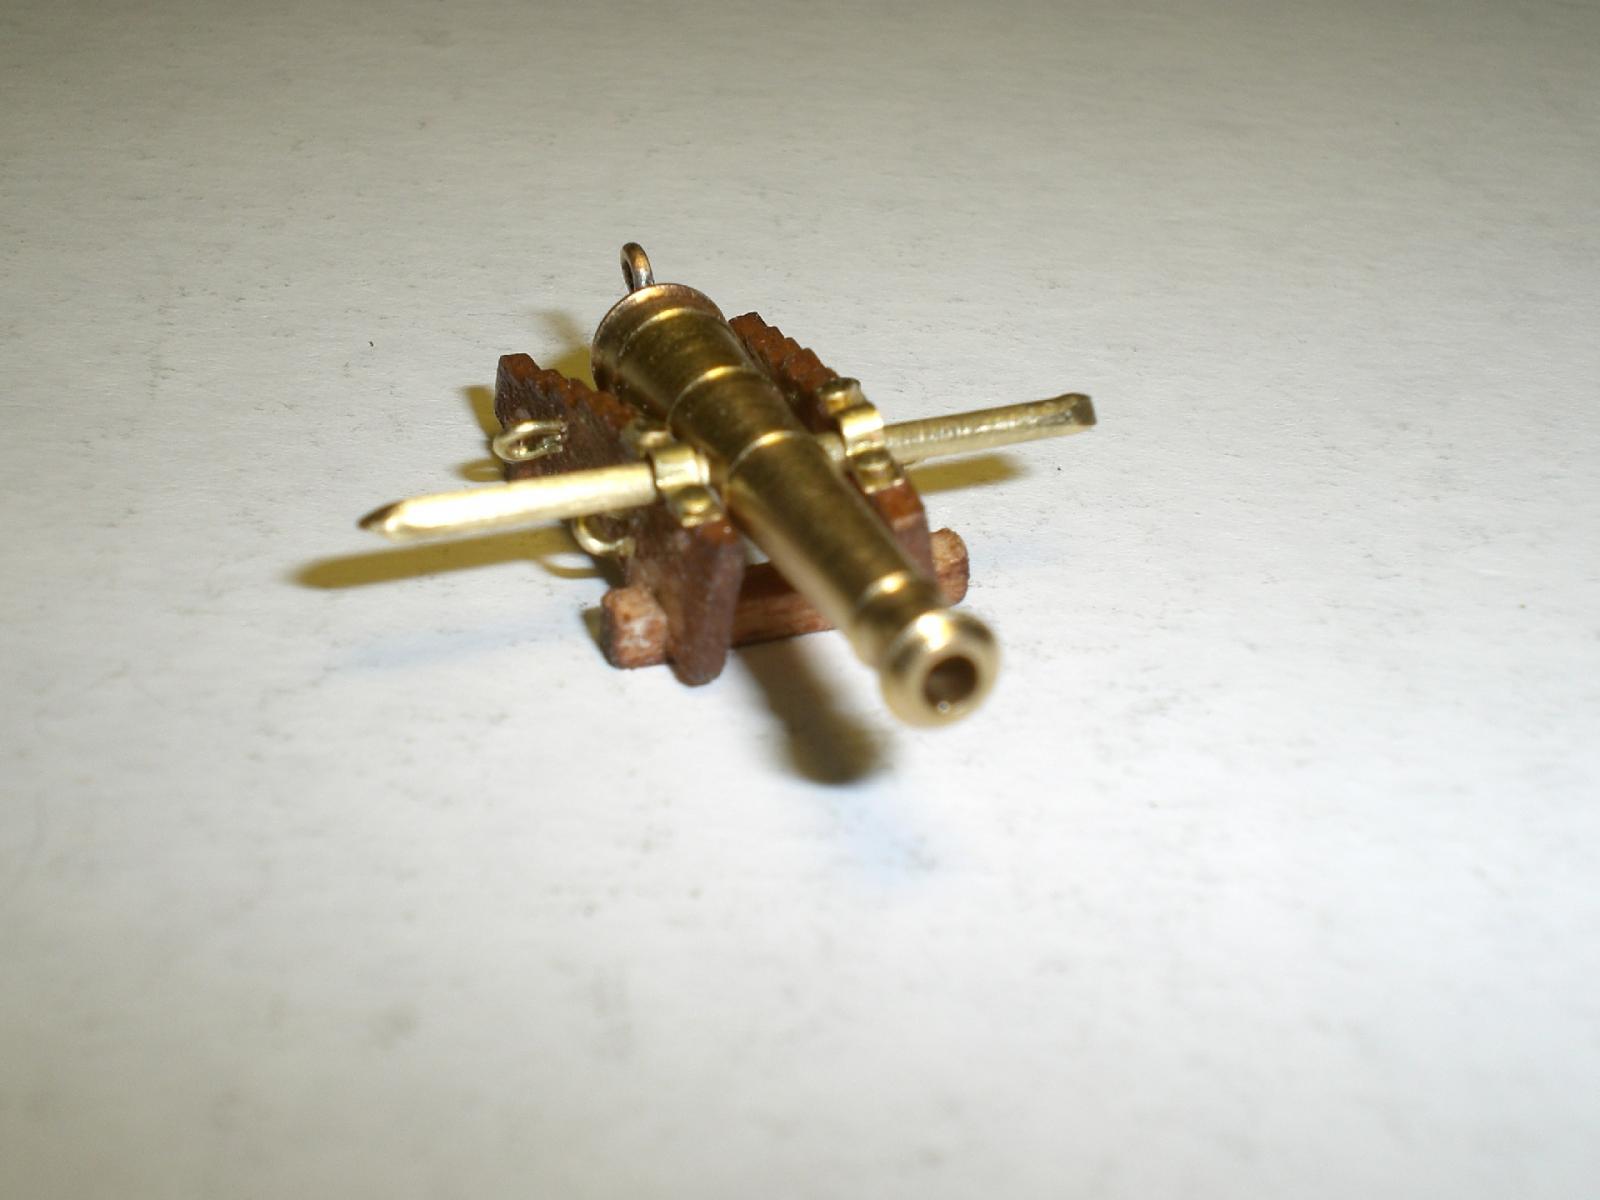
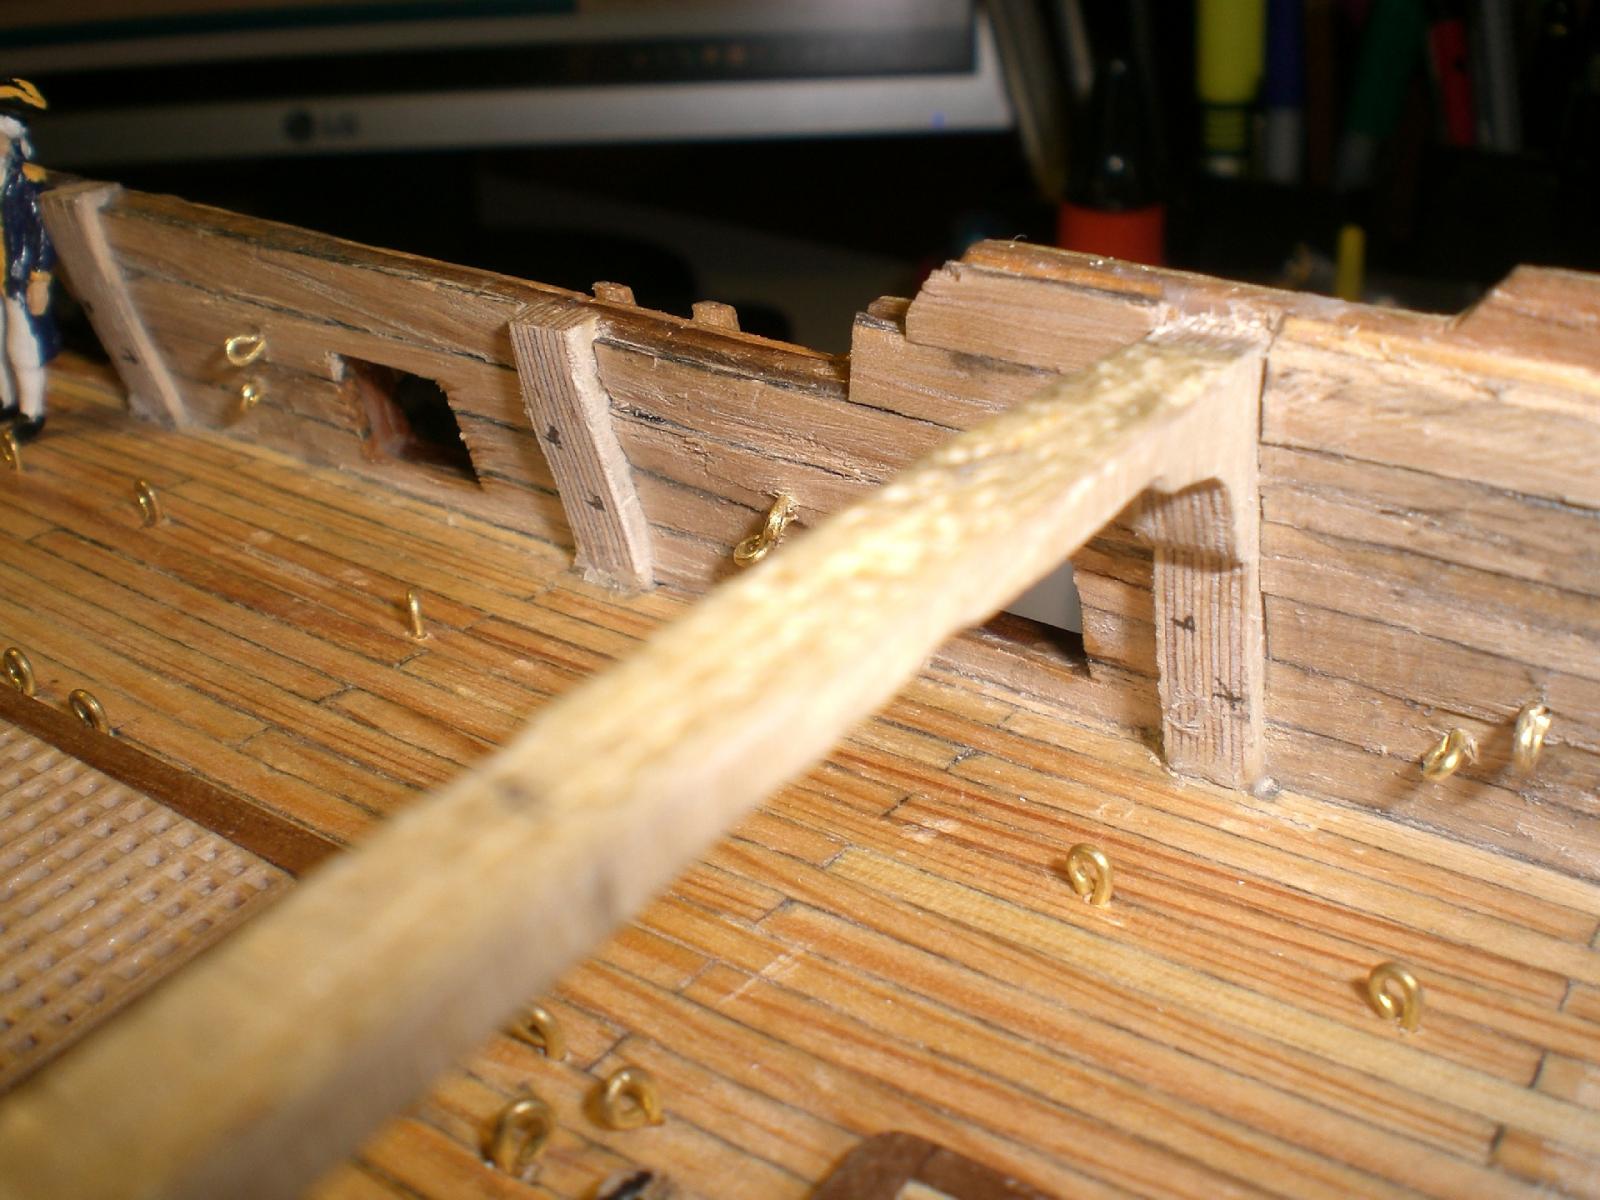
Thank you B.E. I remember in mind your comment on the dolphins you made at an earlier stage, thanks again, I shall scrap those Lifting devices when I do the regular guns and carriages. This Barrel is only and still the early Demonstrator one. What is surprizing to me, is the required length of the gun moving pulleys, in scale 1/64 whereby I always thought I had lots of spsce on deck, now I have to fight for every mm in saving length, and I am using the 32mm Long Barrels (6 pounder)together with raghter short carriages. It will take some more experiencing with small and short-building blocks inclusive their fastening harnisses. Nils
-
Bob, thanks for your good wishes... I feel my trapped nerve Problem is getting better now day by day Nigel, thank you for your words and for all the "likes", I see you had a look into my build log Popeye, thank you, I unfortunately did`nt an explaination for "hewn look", but asume that you mean the surface structure of the oak ( shaped with ship carpenters axe ? ) Many thanks Jason, I liked your comments, and hopefully I can give a bit more drive to it now, I`m realy lacking far behind others in the Moment Nils
-
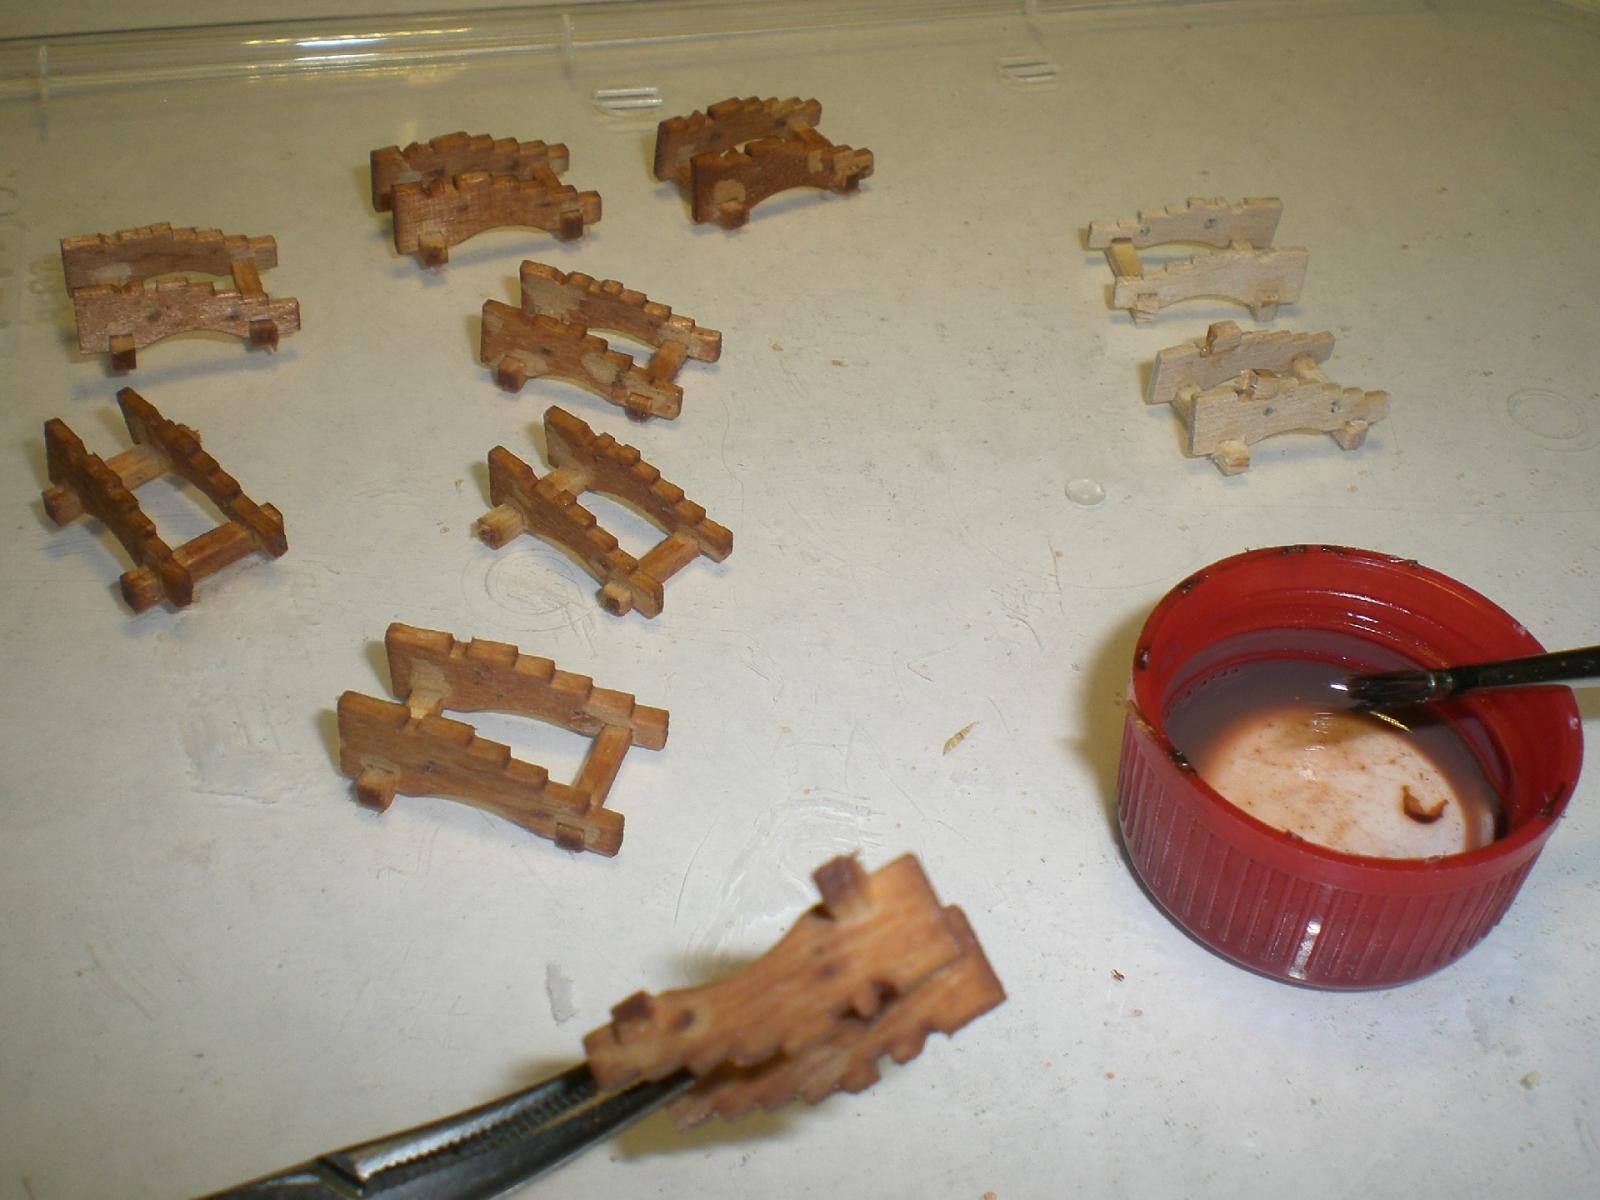
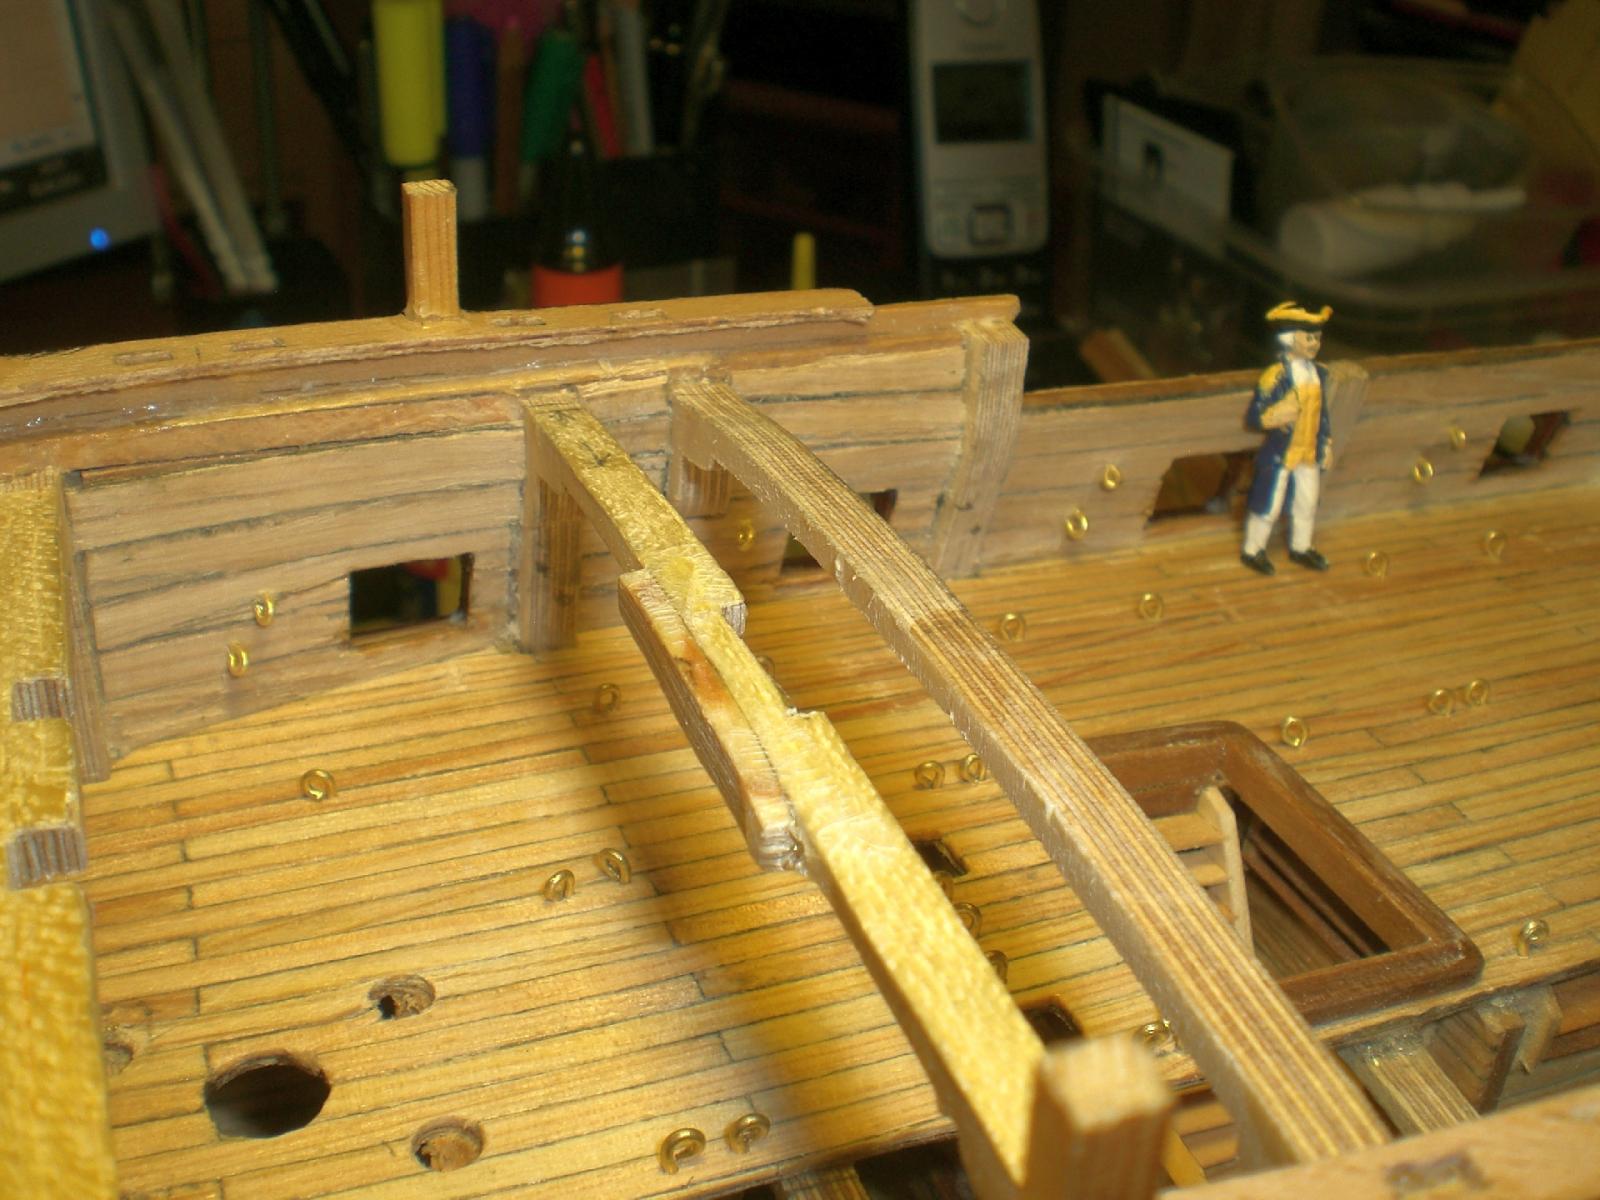
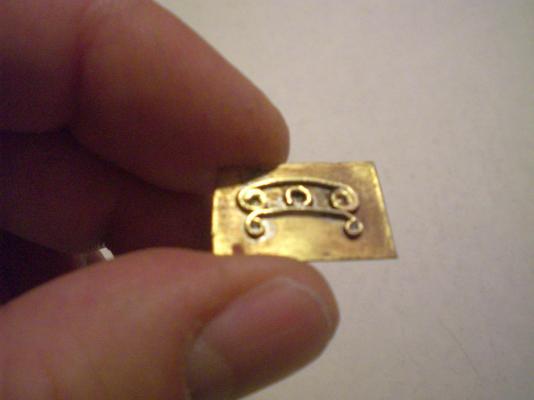
Today I could make a Little Progress, and started to put some profiled brass on to the bow eking rails, because I had no luck in Scratching or carving decors into it. I think I`ll do this with the main rails as well and then taper the front wooden portions a bit. One Thing I never recocnized up to now was the tricky tackle of the guns, it requires quite some space to get all the blocks in Arrangement lengthwise. A Little model was made to do some Trials. This is only for checking dimensions I still had some oak Planks 1 x 5 mm and used These for the inner bulwark. After Fixing These permanently the gunports had to be cut away.... I wish I had`nt taken oak, ist too brittle and started breaking in many places. Nils