HOLIDAY DONATION DRIVE - SUPPORT MSW - DO YOUR PART TO KEEP THIS GREAT FORUM GOING! (Only 24 donations so far out of 49,000 members - C'mon guys!)
×


Mirabell61
-
Posts
7,407 -
Joined
-
Last visited
Content Type
Profiles
Forums
Gallery
Events
Everything posted by Mirabell61
-
 Nigel, nice to see that you are challenging a beautiful 17 th century build, and all in scale 1/60. ! Together with your Initial introduction lines, giving the own set obligations, this is going to be a very ambitious Project but a wonderful repesentant of early shipbuilding art. I looked at your log to date up to page 5 and find it of highest interest for Close following... Nils
 -
Hello Klaus, I just had a look at your wonderfull reposted build log. What a challenge that hull in scale 1/64 ! I love the Framework and the joinings, it Looks great Well done ! Nils
-
A great ship Sherry, and a beautifull built model..., am curiously looking Forward to your next posted Progress, That is not an easy scale you have Chosen, but masterly managed it Well done ! Nils
-
Beautiful Work Geatan, its a pleasure to see every new Progress update... Nils
-
Toni, I love that Atalanta model of yours, especialy the neat and clean wooden joinings, there must be several hundreds of them by now..., and I like the Patience you have and in not becoming less less acurate in your Ambition in facing all the Details yet to come... Very well done ! Nils
-
Chris, I just had a look into your beautiful build`s Progress, and must say it realy gets me excited.... That is eyecandy all the way Well done ! Nils
-
Michael, the wooden tiller shapes in combination with the brass metal work Looks great, just like all the other Details you are providing Nils
-
HMS AGAMEMNON by PMG - Caldercraft
Mirabell61 replied to PMG's topic in - Kit build logs for subjects built from 1751 - 1800
Hi Pierre, I wish you all the best for enjoying your Special day, and for your new living year.. BTW your nicely built Agamemnon is well improving from sequence to sequence... Nils -
Thanks Popeye, yes I have seen the chiropractor already, but he is a bit afraid that it could be a prolapsed intervertebral disc, so nothing was done in that direction. But I am hoping that next weeks appointment with a good masseur shall bring relief. Nils
-
Wunderbar Alexander, a masterpiece of model art from keellaying onward on this Forum Thanks for sharing well done ! Nils
-
Thanks Danny, after there was no other help, that was my thought as well, I have 6 fixed apointments with such a masseur but no beginn terminated before first April week Nils
-
Batavia by *Hans* - FINISHED
Mirabell61 replied to *Hans*'s topic in - Build logs for subjects built 1501 - 1750
Hans, a lovely and good looking model you are building fine carving Details Nils -
Hi Crackers, thanks for all the "likes" when dropping into and exploring the Pegasus build log. I hope you like the scratch build from Amati plan. It was because of the lost Pictures in MSW that I replaced them with an update in the last days. Probably you overlooked that Anjas birthday greetings were from Oct. 2013, so it swam up with the replacement announcement today. Sorry to admit, I have`nt been busy with this build reasonably since then, but hope to reactivate it with more Progress soon Nils
-
Beautiful Michael, you are realy resembling your "actual dream cutter" in a splendid done model, I would wish to own such a boat in reality... Nils
-
Thanks for your wishes Dirk, Nils
-
Ist going to be a nice model... good looking lines of the hull and well placed Frame distances, also the rig Looks interesting, barque typical square sails on the first two masts only. The rather sharp bow area and the fine Stern lines must be a Little bit Clipper like You made me curious for more Progress to be shown here... Nils
-
Thank you B.E. Nils
-
B.E. I hope that soon a Little Progress can be achieved with my HMS Pegasus Swan Class. I am suffering now for for several weeks already from a painfull pinched nerve in neck, shoulder and arm area, and visiting the doctors did not bring help to date. But this gave me time to think about what sequences were to be done next with my build, at least in my mind Nils
-
Pictures vanished... To all who missed the the Pictures when dropping in to my HMS Pegasus Build log from part 1 to part 17 I discovered recently that most of the Pictures had disappeared, but they are now all replaced due to a backup I had fortunately made Nils
-
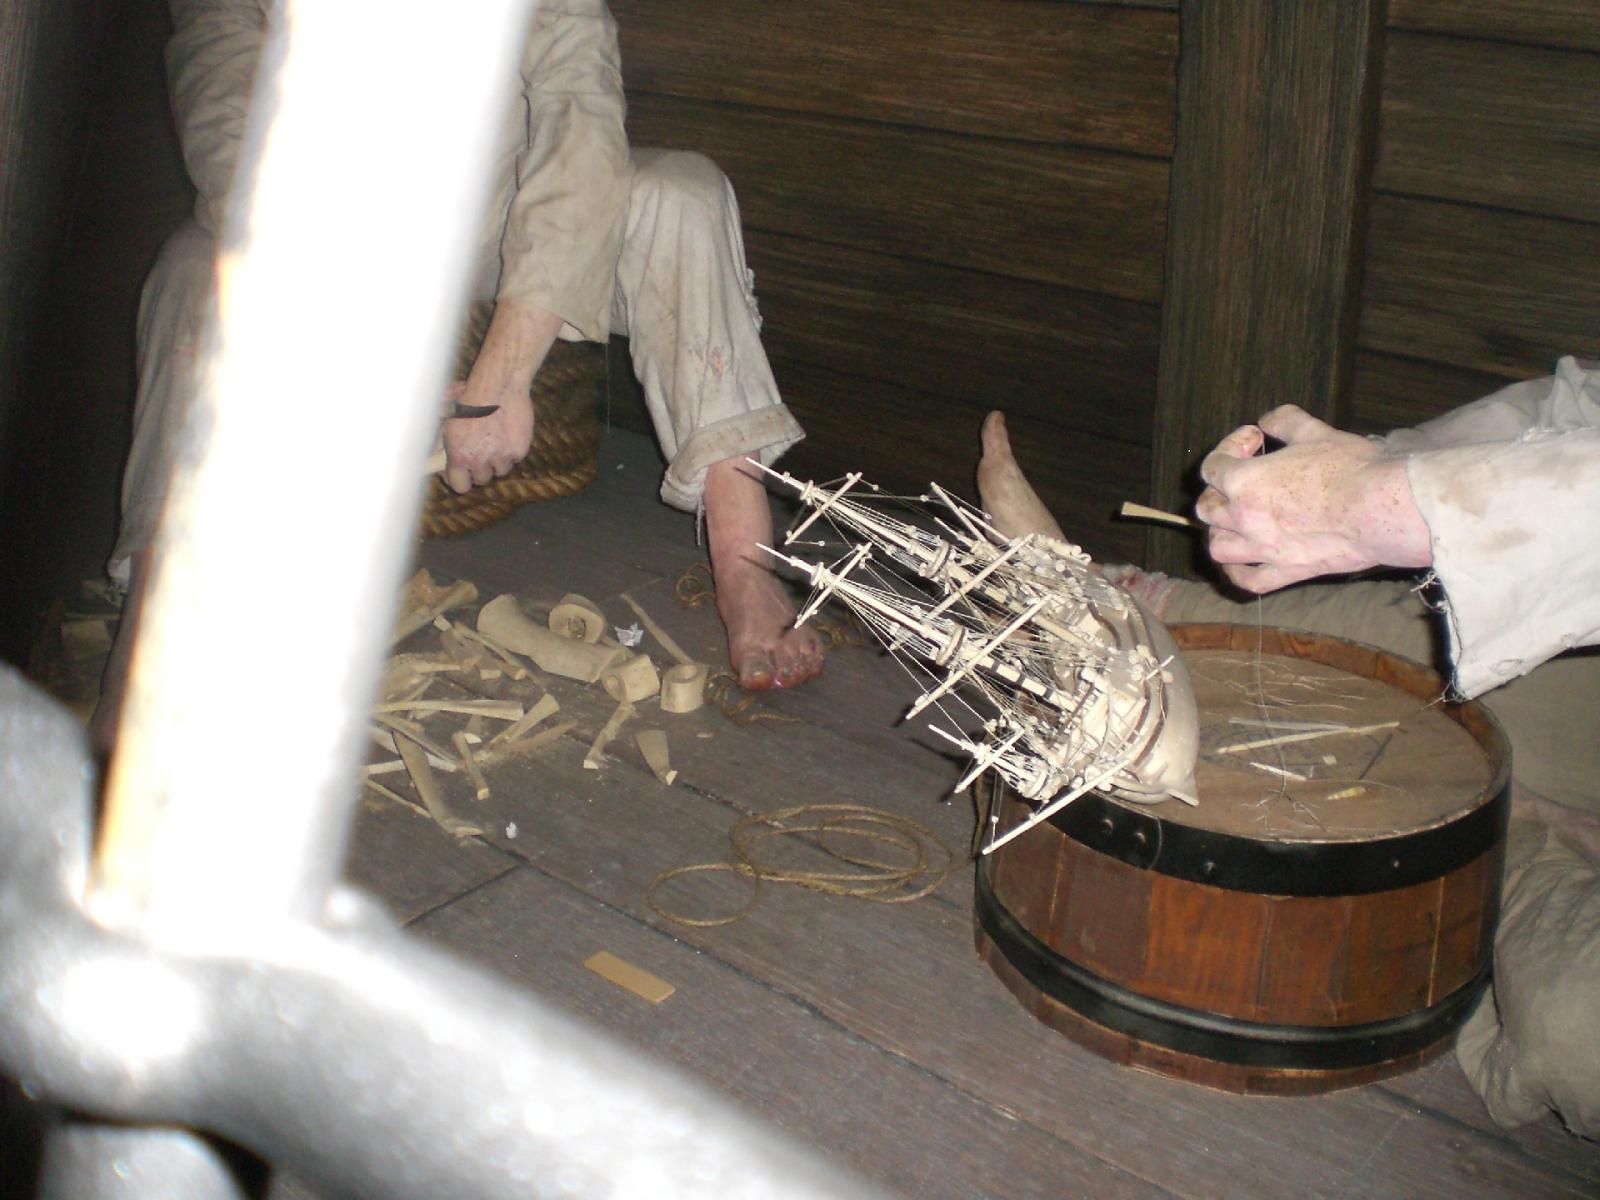
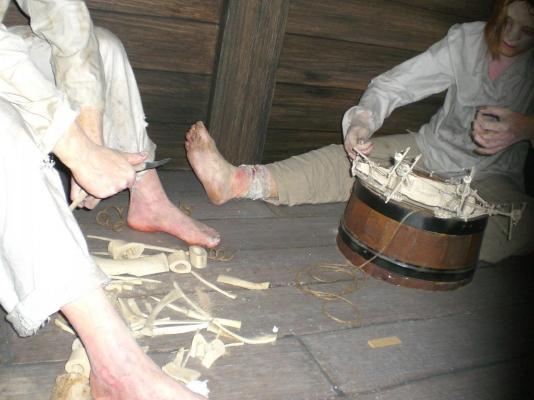
Robert, your work is fantastic, the bone-shipmodelling is such an admirable handcraft, and your skill in doing so is unbelievable Well done !! By the way I had a Chance to peep into the secret bone-ship building Hobby room of the Hamburg Maritime Museum recently, here two pics for you... Nils

- 241 replies
-
- 10
-

-
- royal caroline
- yacht
- (and 1 more)
-
Hi Nigel, great work on this model, very nice Details, the treenailed hull planking and the carved items look superb Some of the pics in the early log-pages probably went lost, trust you would have replaced them if you have had back ups, but that is no handicap for this fine build... Nils
-
very nice looking sails Mauro, ist a bit difficult to see from the pics, but did you sew a boltrope to the sails by Hand or by machine ? Nils
-
Beautiful metal work Micheal, I can imagine the fun you have in creating those lovely Fittings Well done ! Nils
-
It Looks great Bob, can`t wait to see the fixed rods when pollished in Close ups... Nils
-
Karl, thanks for sharing those fine Pictures of the modernized GF of 2013, shall save These to my Archive Nils