
HOLIDAY DONATION DRIVE - SUPPORT MSW - DO YOUR PART TO KEEP THIS GREAT FORUM GOING! (Only 72 donations so far out of 49,000 members - Can we at least get 100? C'mon guys!)
×


BANYAN
-
Posts
5,946 -
Joined
-
Last visited
Content Type
Profiles
Forums
Gallery
Events
Everything posted by BANYAN
-
 Good to hear the first one went well mate; best wishes for a successful second op. Watch out though, the improved clarity may show some things you would prefer not to see (like wrinkles etc) cheers Pat
 -
HMCSS Victoria 1855 by BANYAN - 1:72
BANYAN replied to BANYAN's topic in - Build logs for subjects built 1851 - 1900
Thanks Rob, much appreciated. Updates are slow as just as I was getting back into it I came down with Covid (first time) and now trying to catch up on all the spring chores before Christmas. I hope to be up to speed and back into the workshop after Christmas. cheers Pat- 1,013 replies
-
- 7
-

-
- gun dispatch vessel
- victoria
- (and 2 more)
-
Great progress Glen (wish I could report the same). Neat solution to connecting the hulls but still able to pass through the mouth of the bottle. cheers Pat
- 174 replies
-
- 4
-

-

-
- Waa Kaulua
- bottle
- (and 1 more)
-
Good luck with the eye surgery, as you say quite a routine thing these days. Hope the recovery is fast and brings the desired results. cheers Pat
-
A great, and very interesting, concept for this build Glen; another exciting project to follow. I'll be right up in the front stalls with my popcorn and will do my best not to spill any onto the project cheers Pat
- 174 replies
-
- 5
-
-

-
- Waa Kaulua
- bottle
- (and 1 more)
-
Astounding detail at that scale Eberhard, the additional detail you are fitting brings the model to life. cheers Pat
-
Some great progress Ian, and glad to hear you are enjoying this part of the build. I also like that idea for the eagle decoration; it would really set things off. Are your figures going to be articulated to allow movement with the oars? (sorry may have missed this) cheers Pat
- 536 replies
-
- 2
-
-
- Quadrireme
- radio
- (and 1 more)
-
HMCSS Victoria 1855 by BANYAN - 1:72
BANYAN replied to BANYAN's topic in - Build logs for subjects built 1851 - 1900
Thanks for looking in and kind comments Keith. You are right, with a little hindsight I agree that there are a couple of solutions for the bending jig. The biggest issue is being able to bend the full length of the lip in one effort. cheers Pat- 1,013 replies
-
- 5
-
-
- gun dispatch vessel
- victoria
- (and 2 more)
-
Nice job on that cannon mate, looks very good. cheers Pat
-
Not 100% sure, but that description sounds very much like the 4-jaw chuck for Sherline? Also, not sure if that is self-centering - I think they have both versions? Someone with a bit more knowledge of the technical attributes may be able to confirm or eliminate this as an option? cheers Pat
-
The rigging is coming along really nicely mate; good job! cheers Pat
-
That's great John, very nice to see the progress. As Druxey says, it will also be nice to see regular updates on the restoration project if it goes ahead. cheers Pat
-
Glad to hear that the machine worked well for you Keith. I did have plans to eventually fit limit (cut-out) switches but never got around to it. I must confess though, that the plans/schematics for this were provided by a club member and some of the metal work done with the assistance of mechanically gifted friend. For those interested, the server is designed to turn the rope to be served either CW or CCW depending on its lay. The server mechanism (head) can also be driven in either direction that best suits the task at hand. Both motors are also speed controlled such that once you find the sweet-spot for turning the rope and moving the head such that it lays up closely but does not override/over-wrap), it can just be left to its own devices. The head, especially the tensioning device, is still a little crude but I have plans for that :). Also, the lighting effect Keith has achieved looks absolutely brilliant in real life. Cheers Pat
-
HMCSS Victoria 1855 by BANYAN - 1:72
BANYAN replied to BANYAN's topic in - Build logs for subjects built 1851 - 1900
Thanks for the kind comments Keith. Hi Eberhard, actually the piece is dimpled (etched) but I think the guy who etched it left the item in too long and the holes do not serve as a guide as they are a little too large. The drill bit then wonders to one side or other of the dimple recess - that's why they are not aligned on the test piece. I mentioned it to him asking for a redo, but he said that at this size a part and with the thickness of brass stock, to etch completely through the required parts, he cannot control the dimple size. He said he deliberately made the unmasked hole in the template as small as possible but it still resulted in the larger than needed dimples. I do not do enough of this stuff to warrant learning how to, nor warrant buying the etchant chemicals, which would probably lose their shelf life before I used them again - so I will just have to adjust my technique. I have one of those PE folding devices but the fingers are all too small for the longer edge of the rim to be effective. I wish I had one that could be flipped around (long straight edge one side and a series of small fingers on the other). Thanks for the suggestions, you have pointed me to one other possibility. cheers Pat- 1,013 replies
-
- 4
-
-
- gun dispatch vessel
- victoria
- (and 2 more)
-
HMCSS Victoria 1855 by BANYAN - 1:72
BANYAN replied to BANYAN's topic in - Build logs for subjects built 1851 - 1900
Thanks Eberhard. Still a bit of improvement required though. As you can see the 0.6mm holes nearly slice the metal strip so I need to find a better way to drill these AND keep them aligned. One saving grace is that once the eyes are soldered in, they will be ground flat so the holes will sort of disappear, especially after blackening or painting (not sure which yet). That is why I haven't filed/ground the hole edges yet - will be done later. The issue I am grappling with is to find a way to work (bend) the metal to avoid all that crushing/marring you can see. The folded part is only 1mm and the metal fairly soft which is why it marks so easily. I have to use the flat long nose needle nose pliers to bed as rubber/nylon jaws will not grip properly or allow a bend under pressure. The other way I have tried is using a jeweler's bending block, but that required partial folding at a time rather than bending the whole edge at a time -results in a wavy bend. I'll keep experimenting to see if there is a better way to get a non-marring fold. I am hoping to find a way to use the jeweler's bending block but then use a form of some sort to bend the edge as a single effort. cheers Pat- 1,013 replies
-
- 3
-
-
- gun dispatch vessel
- victoria
- (and 2 more)
-
HMCSS Victoria 1855 by BANYAN - 1:72
BANYAN replied to BANYAN's topic in - Build logs for subjects built 1851 - 1900
Thanks Keith, with the 'shakes' getting slowly worse I am not sure I can keep doing this real small stuff. cheers Pat- 1,013 replies
-
- 3
-
-
-
- gun dispatch vessel
- victoria
- (and 2 more)
-
Great to see an update Matrim; frames are always time consuming. cheers Pat
-
The other way to overcome the 'leakage' issue (if it is a concern to you) is to use overpressure. That is a mask with a powered inflow that creates an overpressure which keeps any of the nasties getting in if the seal is not tight. I have a battery powered one (the battery container clips to your belt (or the like) and causes very little drain on the batteries. I got this pretty cheap (same price as paying for a good quality unpowered mask) a few years ago. cheers Pat
-
HMCSS Victoria 1855 by BANYAN - 1:72
BANYAN replied to BANYAN's topic in - Build logs for subjects built 1851 - 1900
Thanks Mark, not too bad for a test run, but hopefully I can do better yet. Keith, I drew up the parts in CAD to scale (including a test legend) and a railroad modeller who lives in the eastern parts of Melbourne etched them for me. I can pass on his details if you need them? cheers Pat- 1,013 replies
-
- 4
-
-
- gun dispatch vessel
- victoria
- (and 2 more)
-
HMCSS Victoria 1855 by BANYAN - 1:72
BANYAN replied to BANYAN's topic in - Build logs for subjects built 1851 - 1900
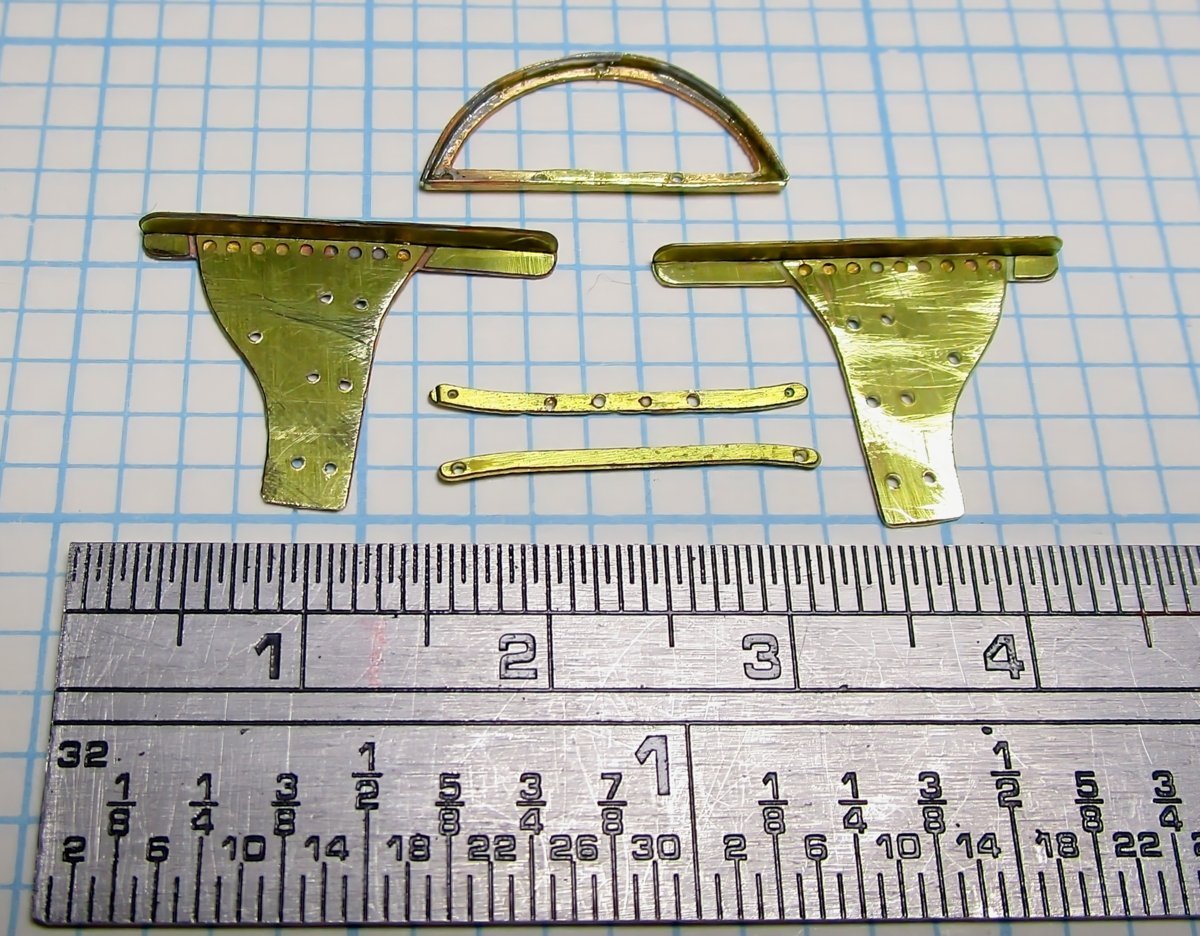
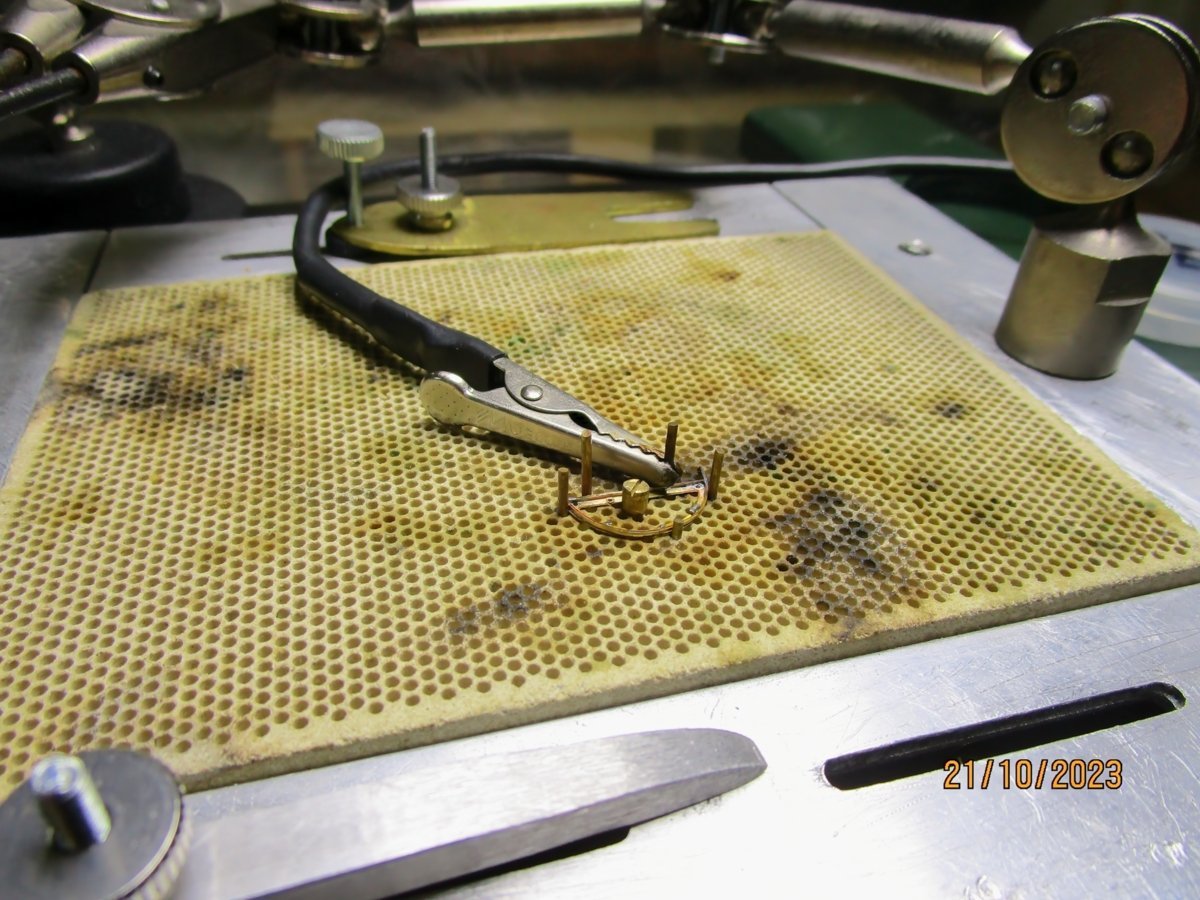
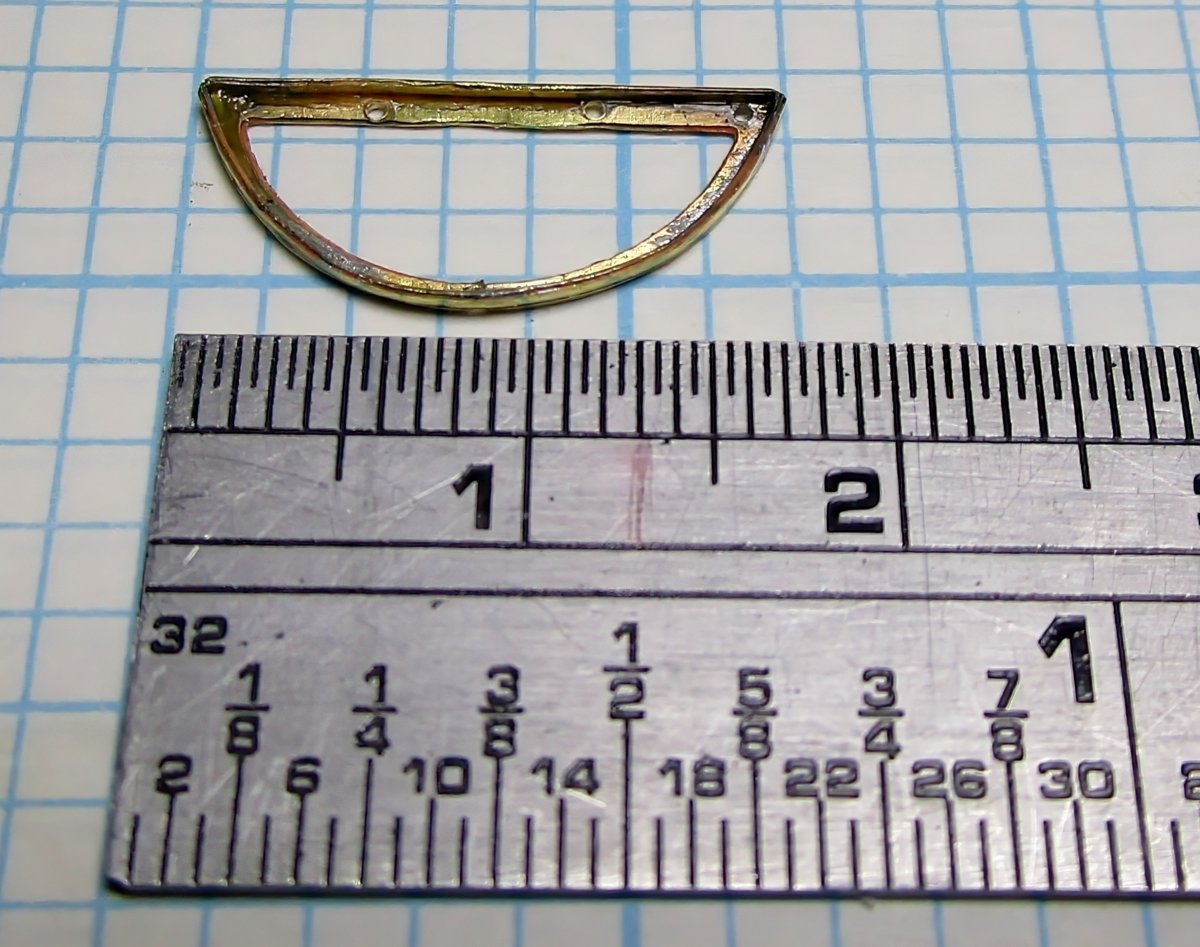
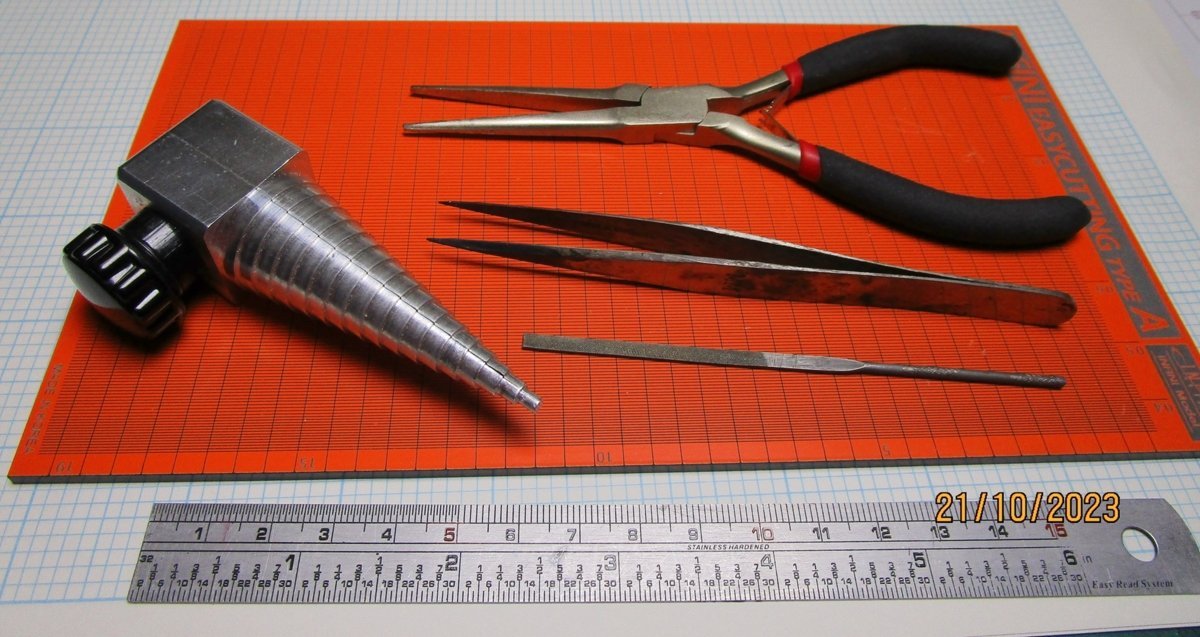
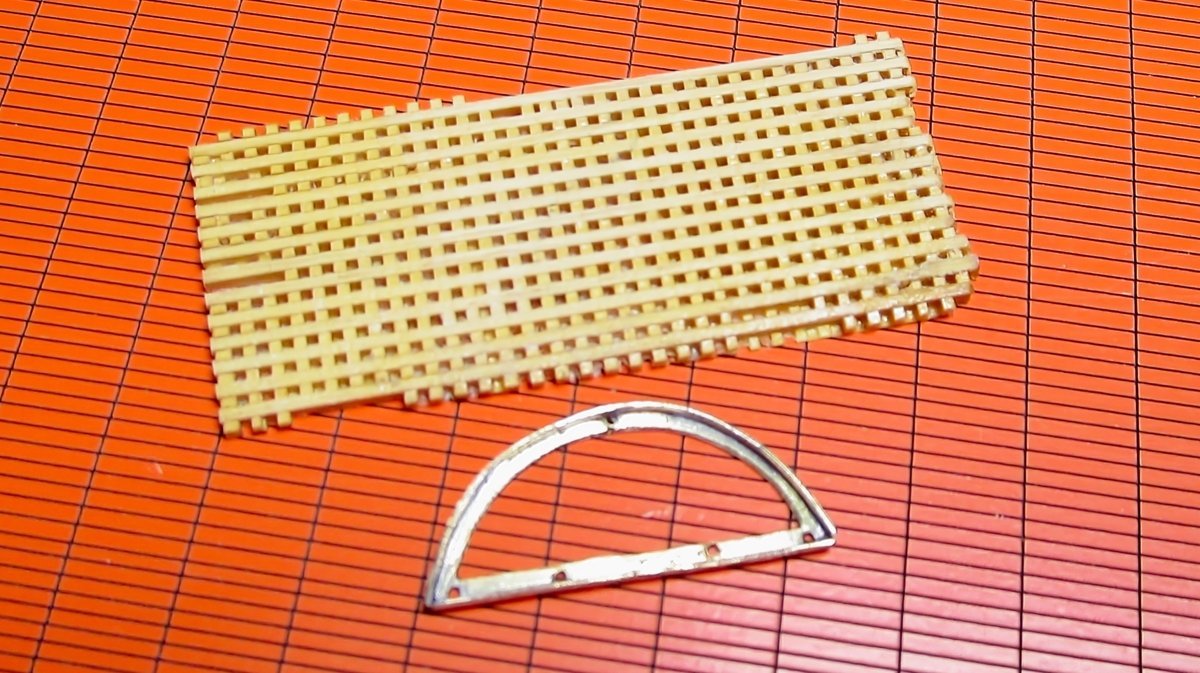
Hi again folks. Some small progress made; well, more experimentation and trials/tests than progress. The Victoria was fitted with skeletal iron tops which when reduced to 1:72 make for some very small and thin parts. My real concern (for the future) apart from blowing them apart when soldering, is that the arms of the cross-trees will bend. I have yet to attach the iron (brass) rod futtock staves which will give them some support (I hope). I drew up the parts and had them photoetched from 0.2mm brass as you can see from the photo. These tests are to see if I can actually solder them. The parts were first folded along fold lines/creases I had etched which sort of worked OK - you have to look closely to see the slights waves/rolls in the parts. I drilled the holes (0.6mm) where needed for the eyes which I will solder into place later. I then had to solder on the curved rim which I formed on the 'wrangler' which you can see in the tools photo - this part is only 1mm high by 0.2mm thick. I put it on my soldering station and held in place with some brass pins and an eccentric cam (thanks Eberhard for the idea and guidance) and soldered with y resistance soldering unit on its lowest setting - and it worked In one photo the part looks very distorted due to the aspect the photo is taken, but in others you can see it is reasonably formed. Next will come the true test, see if the heat sink/paste will work as I solder in the eyes. I'll show the results (hit or miss) in a future post. A club member (Al - AlPays avatar) made the grating for me. They are formed from about 0.6mm combs and staves - how he managed to make it still amazes me. I have yet to form the shape which has me a little bedeviled at the moment as I think shaping by any form of power tool will simply blow these apart. The next task, to solder in the eyes and the other parts together, is to make a wood jig that will hold the elements the right distances apart. cheers Pat PE Parts Parts pre-formed Soldering the rim in place The soldered part (before cleaning up) Tools used The grating (the rim/part looks distorted but is not in reality)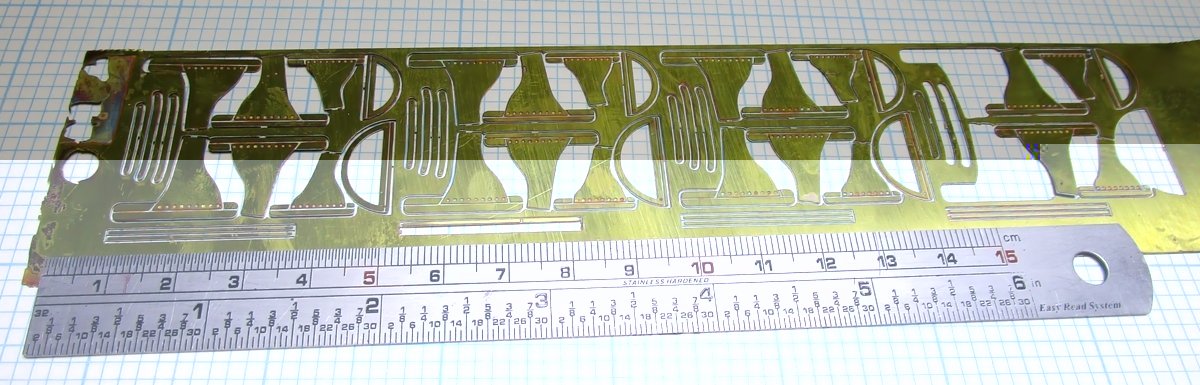
- 1,013 replies
-
- 12
-
-

-
- gun dispatch vessel
- victoria
- (and 2 more)
-
A great idea, and execution, for the lettering, I'll stow that in my kitbag of ideas. cheers Pat
-
Well for someone ho doesn't like planking you're doing a pretty decent job of it Steven cheers Pat
-
Your build of Speedwell is looking very good Chuck, I continue to be amazed (and jealous) with your skills in doing such clean joinery. I hope you don't me commenting with an unsolicited suggestion. I have had success with, and like, your 'paper' friezes that you have provided me in the past and they looked good when applied. If you are experimenting, have you thought about trying to find someone that prints 'embossed' card/paper? If the costs are acceptable, that may be an option for you that offers some 'relief' to the printed friezes. I have never had the need to have this done, but I have thought about using a business card printing service who offers embossed/raised lettering services. I considered this technique for the basic 'gingerbread' on the bows of the Victoria. However, as the detail was minimal, we ended up using cotton threads pasted to the headboards. Offered for your thoughts/comments only as it may also prove unpractical, and you may already have completed your experimenting. cheers Pat