BANYAN
-
Posts
5,966 -
Joined
-
Last visited
Content Type
Profiles
Forums
Gallery
Events
Everything posted by BANYAN
-
 Just found your build Ras; a very interesting build subject. You're making good progress with it and should look great when complete. I had to make the same pumps and suction plate for my build of HMCSS Victoria (1855), and used PE for the plates, but turned the pumps on my lathe - mine start at post #326 in my log Look forward to seeing your pumps. cheers Pat
 -
I agree with Wefalck's assessment in it being a rail. If it is britannia (wite/soft) metal I would replace it with a wood one. This would then need several roughtree (rising) timbers with the cap rail sitting on them. You're making good progress. cheers Pat
-
Wow, what an update Brian - some significant, and well executed, progress there. A very nicely detailed model; it is a joy to follow the build. cheers Pat
-
If your build is based on a kit and you are making changes (called 'kit bashing') put it in the kit builds. I did something similar with my Endeavour to learn the skills - I based it on the AL hull, but scratch built all the furniture, masts and rigging (bashed it :)). Not only is this a great way to improve your building skills, you end up with a far better model. That way, as has been suggested by the other members, you can get rid of the horrid soft (White/Britannia) metal and make it more scale appropriate. Apart from some model ship accessory/part suppliers, a couple of other sources to try for scaled timber (unless you have the tools/capacity to mill it yourself) are doll house suppliers and the railroad community. Good luck, and look forward to seeing your log. Pat
-
Keith, your metal smithing skills and clever solutions for making 'things' never cease to amaze. cheers Pat
-
Watch bill, Station Bill, and Routine, for a 50 gun Frigate, etc
BANYAN replied to bruce d's topic in Nautical/Naval History
Thanks for that document Bruce, quite pertinent to my build. I will have a thorough read of this as the Sail/Rigging section seems to have quite a bit of detail. cheers Pat- 1 reply
-
- 2
-

-
Not sure mate. I am about to step out, but I did take a long distance shot of the Bremen Cog recreation/replica - the Bremerhaven ship museum has been very helpful whenever I have contacted them - they may have some info? I will send the distant shot (which is probably not helpful) when I can lay my hands on it. cheers Pat
-
Lovely work Rob, I am really enjoying following this build. For my education, re the dental tools you show in a post on the previous page (laying on the deck houses) - are they rounded picks or scrapers? I had an excellent double ended scraper tool (probably not the right name - but had paddle ends rather than points and were angled and seemed to have a sharp and a dull edge), but it broke under my over enthusiastic use . It was an excellent tool and I have been unable to find a suitable replacement. cheers Pat
-
Great progress Steven, starting to look like a very nice vessel. Just for interest, would a cog style mast also be viable? cheers Pat
-
HMCSS Victoria 1855 by BANYAN - 1:72
BANYAN replied to BANYAN's topic in - Build logs for subjects built 1851 - 1900
Hi John, I think all of the halliards were made-up as single tackles (gun tackles plus whips) as ONLY single blocks (the 4 x 10" and 2 x 9") are listed which prevents the make-up of a luff etc. cheers Pat- 1,021 replies
-
- 2
-
-
- gun dispatch vessel
- victoria
- (and 2 more)
-
HMCSS Victoria 1855 by BANYAN - 1:72
BANYAN replied to BANYAN's topic in - Build logs for subjects built 1851 - 1900
Rob, I had a closer read of your suggestion also, and I think a 'split tail' chain tye may not been practical; however, your wording provided another suggestion to contemplate. I have been trying to determine whether a winch or the halliards were the only two options, but perhaps there was a third - the rigging arrangement used both? If the gin blocks are rigged as a 'Spanish burton', John's suggestion of a running halliard (similar to La Stag's running backstay arrangement) may have been a possibility. If the primary halliard made up with the 10" blocks (rigged in a conventional way) but with a runner whip) utilising the fourth 10" block in the working end (fall), then the 9" blocks would have formed the halliard runner being seized to the tail of the primary halliard's flying block with a short pendant or strop. One possible way of working this smaller halliard's working end of the fall is to take it to a winch rather than work it manually? While this is not how these winches were intended to be used (the winch replaced the tackle in the halliard) - it does utilise all fittings and rigging listed in the Rigging Warrant and the Specification - and would have allowed the topsail yard to be raised and lowered with very minimal numbers and effort due to the large mechanical advantage gained (noting that Victoria was minimum manned). Edit: This arrangement would have utilised the lighter halliard and winch when only a single watch was on deck, and both halliards when all hands were on deck. Using both halliards together would allow the yard to be hoisted or lowered much faster - although it should be remembered that in action, chain 'battle' slings' were fitted to the bunt of the fore topsail yard. However, in heavier/stormy weather, where controlling the yard more quickly was important, this additional speed will have been beneficial. Thoughts? cheers Pat- 1,021 replies
-
- 2
-
-
- gun dispatch vessel
- victoria
- (and 2 more)
-
HMCSS Victoria 1855 by BANYAN - 1:72
BANYAN replied to BANYAN's topic in - Build logs for subjects built 1851 - 1900
Thanks again John. You got me very excited there for a moment, but ... If I am interpreting the image correctly, it appears as if there are only 5 blocks used? That is, a conventional purchase (pendant with purchase), then a short pendant seized to the tail of the fly block and a smaller purchase rigged to that? Unfortunately, there were 6 blocks listed (4 x 10" and 2 x 9" (all single). I did consider a 'lead block', but then why would one purchase have a lead block and not the other? Otherwise, this arrangement would work Edit 1: Although, perhaps a runner (whip) attached to the fall of the primary halliard? Edit 2: Another idea is that a single light purchase with pendant, using the 9" blocks was the primary halliard (used if all hands are on deck) - that is with the gin blocks also rigged in a Spanish burton configuration. Then, if only one watch is on deck, two halliards, formed from the 10" blocks, would be hooked on and used instead (but no hooks are listed) ? This seems a little impractical though as the authors whom suggest this arrangement (a light and a heavy halliard), state that both halliards would be used together and that they were permanently rigged. cheers Pat- 1,021 replies
-
- 4
-
-
- gun dispatch vessel
- victoria
- (and 2 more)
-
Thanks Bob, another great idea - better than those 'contour' devices. cheers Pat
-
HMCSS Victoria 1855 by BANYAN - 1:72
BANYAN replied to BANYAN's topic in - Build logs for subjects built 1851 - 1900
John, having looked at your idea of a Spanish Burton, which I had not even considered, if all three blocks are used this would work if a 'purchase winch' was used. However, the Rigging Warrant lists 4 x 10" and 2 x 9" SINGLE blocks, which suggests two guntackle purchases, with perhaps each being tailed with a runner (whip)? Here is a workable configuration for a 'Spanish burton' arrangement for the gin blocks (which will have alternated between Port and Stbd for the fore and main masts). Still need to bite the bullet and go by the Rigging Warrant listing or by the Contract Specification - the correspondence is silent on this, and unfortunately the imagery does not show either configuration. The following (and previous post) is looking from the front. Thanks again John Pat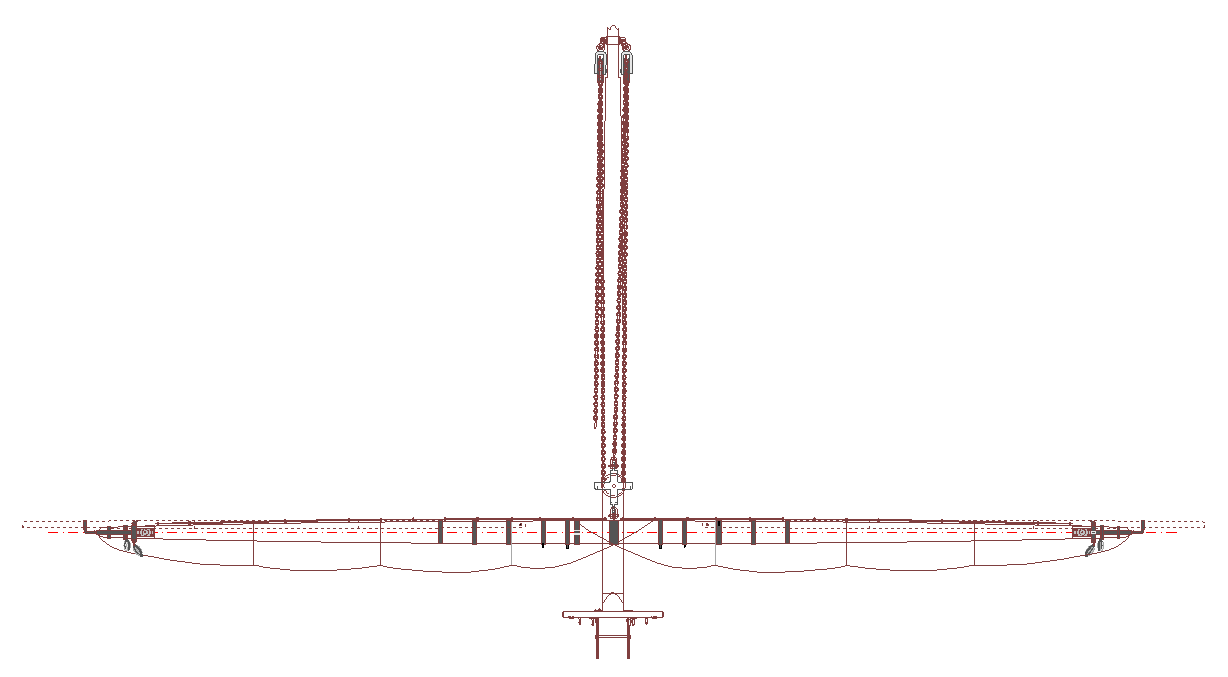
- 1,021 replies
-
- 5
-
-
- gun dispatch vessel
- victoria
- (and 2 more)
-
HMCSS Victoria 1855 by BANYAN - 1:72
BANYAN replied to BANYAN's topic in - Build logs for subjects built 1851 - 1900
All possibilities guys; thanks for looking in and the suggestions. This is the problem I am facing - with no description by any author that uses all of the listed (Rigging Warrant) items in a conventional arrangement, it is proving difficult to identify the rigging configuration. I am simply trying to find a practical way of setting it up. I will look into your idea of a Spanish burton John. Rob, that is a variation on what one of the authors offers where a luff was set-up to one side and a guntackle to the other so that when all hands were on deck, the guntackle could be used, and if only one watch on deck, then the luff was used - BUT, this required only a single gin block. I will relook at the variation you propose though. cheers Pat- 1,021 replies
-
- 2
-
-
- gun dispatch vessel
- victoria
- (and 2 more)
-
This model is coming along beautifully Rob, some lovely detail. cheers Pat
- 3,560 replies
-
- 1
-
-
- clipper
- hull model
- (and 2 more)
-
Thanks for sharing Mark; possibly one of the very few good things to come from a drought. Hopefully, someone will record it. cheers Pat
-
Thanks, I had seen this technique before and promptly had forgotten it. cheers Pat
-
HMCSS Victoria 1855 by BANYAN - 1:72
BANYAN replied to BANYAN's topic in - Build logs for subjects built 1851 - 1900
Thanks Tony, yep the 'purchases' or halliards as they were correctly termed are a separate problem. The listed blocks (4 x 10" and 2 x 9") are 'single' so the only arrangement can be for them to be made up as 'gun tackles' with a a runner (whip). As they are listed with 'travellers' (long strops attached to the fly block) which ran up-and-down the topmast backstay, they had to be set-up with the standing blocks in the channels. This meant they were not 'up-and down' tackles but oblique to the direction of effort - very unusual arrangement? I really would like to find another example of this arrangement described by a contemporary (Kipping, Nares, Luce etc) or more modern author (such as Underhill, Harland etc) - unfortunately they all describe permutations of the more common single 'pendant with purchase'; or double purchase (one as a luff, the other a gun tackle). cheers Pat- 1,021 replies
-
- 3
-
-
- gun dispatch vessel
- victoria
- (and 2 more)
-
HMCSS Victoria 1855 by BANYAN - 1:72
BANYAN replied to BANYAN's topic in - Build logs for subjects built 1851 - 1900
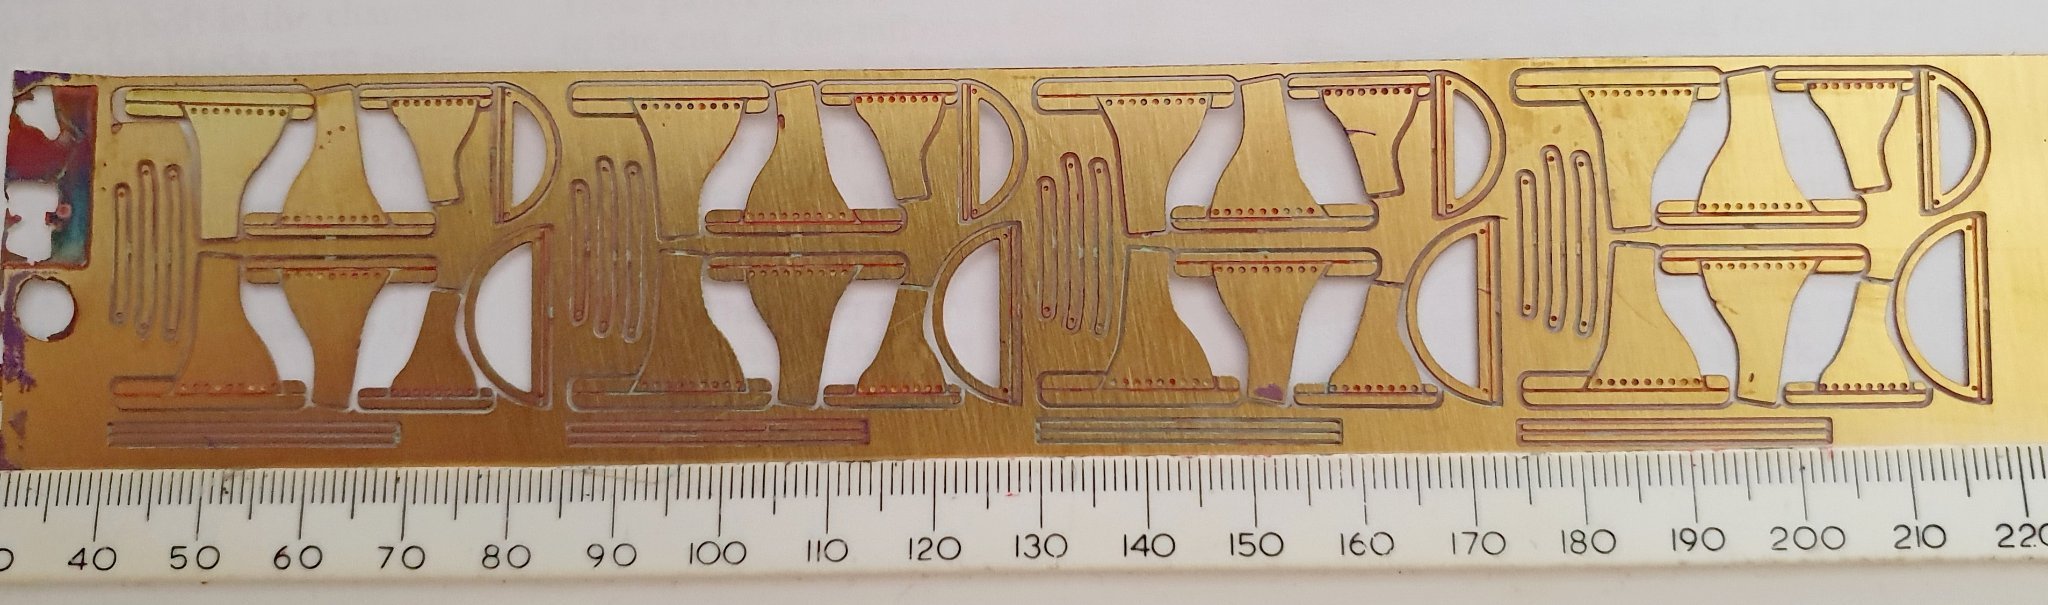
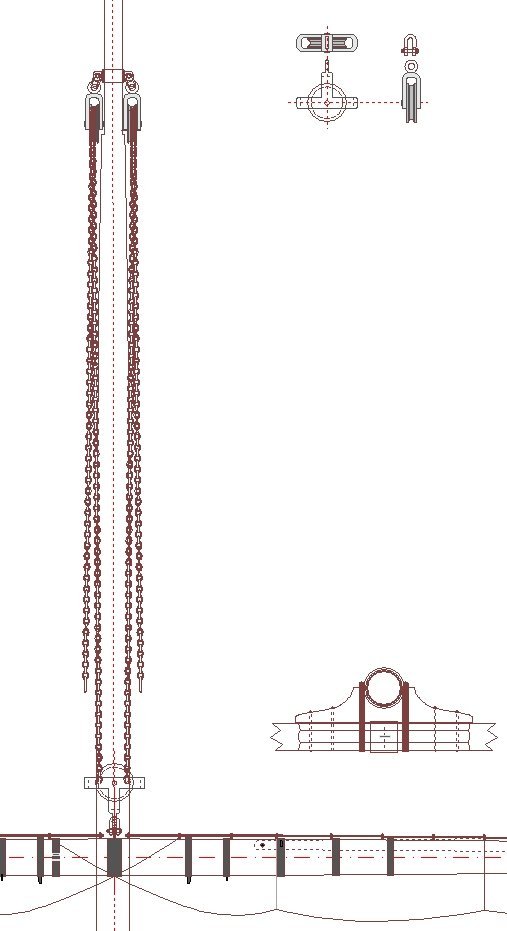
Hi guys, a small bit of progress - see below a piccy of the PE for the tops - the fold line will enable me to create the angle-iron trestrees and the after ends of the rim for the 'D" fore rims. I will need to attach the rest of the rim front, and drill out for the various eyebolts (start holes already etched). I am also back to the Tyes and Purchases/Halliards again. Having progressed to other things, I revisited this and realised I had got it all wrong and need to sort out the topsail tyes again. Here is the predicament - the Specification called for the fitting of Purchase winches for the topsail yard. The correspondence from the ship build superintendent (that I have been able to access so far) is silent on them. As this person was very detailed and informative in his very regular reports, it is unlikely he will have neglected to inform if these had been omitted. The Rigging Warrant does not mention them but does offer a very complex arrangement that does not align with the arrangements described by any of the contemporary or more modern authors consulted. The Rigging Warrant lists the tye for the fore topsail as 68’ of 9/16” chain with “Gin on Yard and 2 Hanging Gins Iron”. It also lists a halliard associated with the fore topsail tye, made up from 27 fathoms of 2½” hemp rope, associated with four 10”, and two 9” single blocks, and two travellers under the ‘Thimbles’ column. The only way such a list of items could be configured (as far as I can determine) is for the gins to set up as shown in the following image (I drew up in CAD). The tails of the chain have long links for the associated halliards. As two traveller thimbles + 4 by singles blocks suggests two separate halliards. Halliards were normally a pendant set-up to the port channel (for the foremast) and the purchase to starboard. The only arrangement I can determine here is that two separate up-and-down halliards with a runner (whip) was used? Any other ideas guys? cheers Pat
- 1,021 replies
-
- 7
-
-
- gun dispatch vessel
- victoria
- (and 2 more)
-
Couldn't agree more Tony, makes my build feel slower than snail pace; but Steven also maintains quality. cheers Pat
-
Great diorama Greg, love the 'dhoby' (laundry items) Some seriously nice work in this one. cheers Pat
-
Welcome Mark; look forward to seeing this build. As a 'starter' a cross-section that includes planking, at least one gun, a mast etc will help you develop the necessary skills. There are many fine examples of these in the forums. cheers Pat
-
Thanks for the offer Clipper, the photo is fine for my needs. I have to agree, keeping up with that pair is difficult cheers Pat
- 3,560 replies
-
- 1
-

-
- clipper
- hull model
- (and 2 more)