
HOLIDAY DONATION DRIVE - SUPPORT MSW - DO YOUR PART TO KEEP THIS GREAT FORUM GOING! (Only 36 donations so far out of 49,000 members - C'mon guys!)
×


Snug Harbor Johnny
-
Posts
1,466 -
Joined
-
Last visited
Content Type
Profiles
Forums
Gallery
Events
Everything posted by Snug Harbor Johnny
-
O ... M ... Gosh (concerning the straddling of yards)! There must have been a lot of chafing doing that ... and no Talcum powder. I noticed the pictures showing two-piece yards lashed together in the middle. Seeing images of crewmen standing on yardarms called to mind a 19th c. engraving of most of the crew standing on all the yards of a Navy ship entering port. (There was a term for that - mostly for 'show' and ostensibly to indicate they were not manning the guns.) More recently, the roofers working atop our home walked and carried on unworried about the height and risk of their profession. I guess it is all what one is used to.
-
 Hmmmm ... c. 1975
 -
Steven ... I saw on a post not too long ago (yeah, try and find something like that once its been gone a while) that early ships did NOT have foot ropes on the yards (and certainly no jack stays). This was implied for 17th century vessels and earlier. So when did foot ropes begin, and how did crewmen get out and work on the yards without foot ropes? Now my surmise is that on single mast/single sail early ships - like Viking craft and those seen on the Bayeux Tapestry (1066) - the yard was lowered to put on or take off a sail. When ships got larger and a top sail was added (as well as a second mast), one might think that the yards were still lowered via halyards to bend/unbend sail. With the advent of ratlines (still in the 'no foot rope' era), crew could climb the mast to put rigging (bunt lines, clews and the like) through blocks and let the line down to the deck while the yards were down to bend sails. So when such a yard-lowering practice ceased, the question arises (before the advent of foot ropes) ... how did they get out on the yards without falling off? Straddling the yard?
-
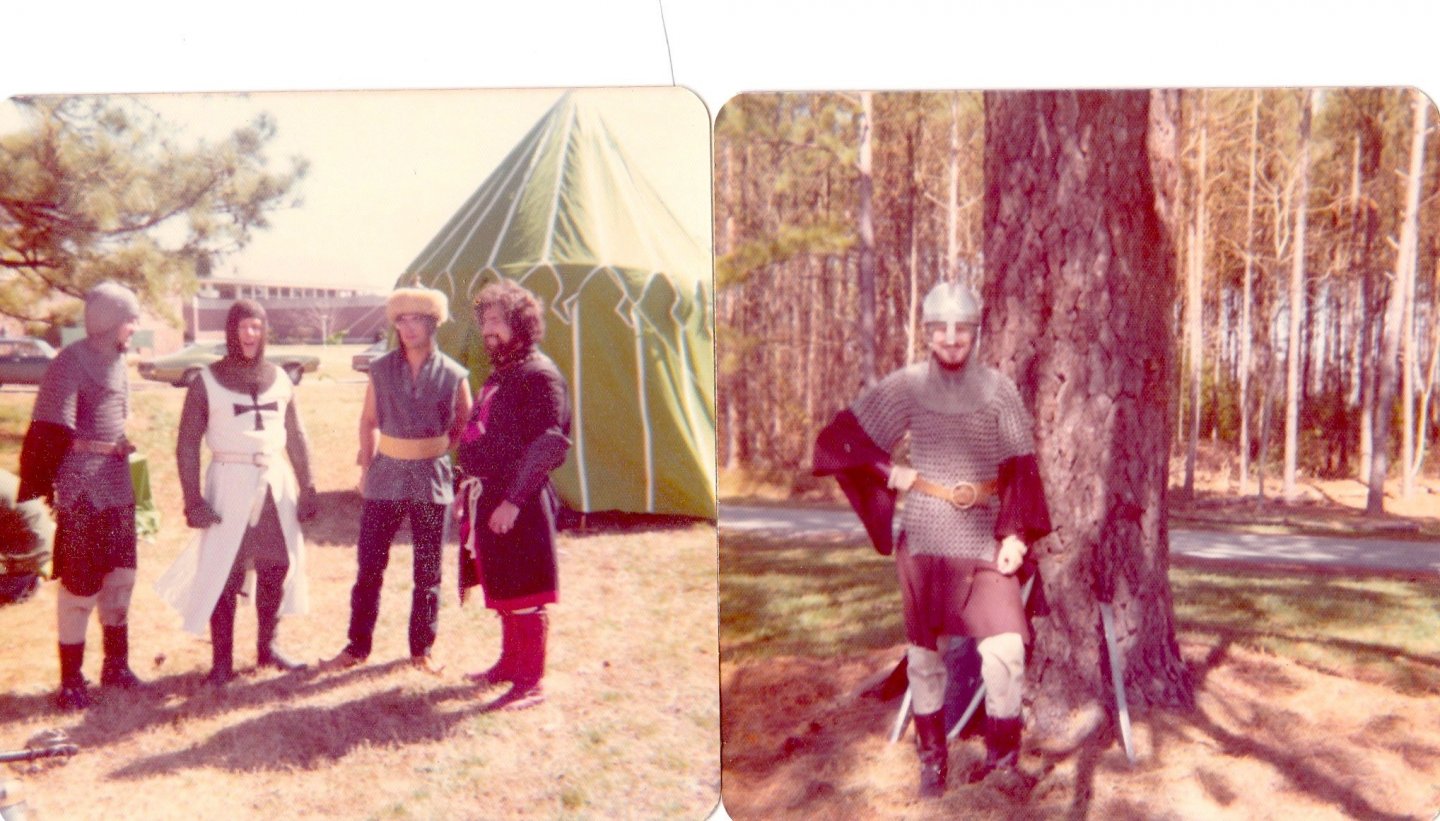
Since its 'on topic' in this thread, I'm including a couple photos from my younger days as a Saxon re-enactor. The pic on the right shows my hand-made chain mail shirt, and you can see the fine mail coif I made (took a long time since the rings were small) and helmet. Not shown are axe, sword and shield ... we used to do the battle of Hastings annually (I got to portray Harold Godwinson on two occasions ... yup, arrow in the eye - faked, of course) and Stamford Bridge against the 'other' Harold ... Harold Hardrata. The other photo shows me with other chaps from other periods and lands. Some fine times were had back then - and much feasting went on the evening after battles ... sort of like all the dead and wounded brought back whole to carry on in Valhalla.
-
Well done, mate ! You've 'tailored' techniques to provide a great looking result ... don't let the notion of doing the 1,300-odd rivets dampen your enthusiasm, since the final result will inspire awe from anyone examining the finished model. Cutting the copper tape to the size desired, piercing with an ordinary pin in the center (by eye) then using the pin to locate over the predrilled hole could largely eliminate the need to do a lot of trimming of the square washer after the copper nail is pushed through and trimmer with the cutter. (Nice touch using a cuticle cutter!) The scale of the Billing Oseberg ship in my 'stash' is a bit different, but there may be a way of adapting the method when I get around to that project. And since a deck will be installed, most of the rivets won't need washers anyway. BTW, I know what you mean about exposed plywood in current laser-cut Viking ship kits, and reproducing the shapes in the builder's wood-of-choice is a good way to get around that. Splitting of walnut or mahogany can be a problem, but I'm considering making my own 'plywood' out of layered cabinetry veneers where the grain crosses less severely than 90 degrees - so it will be flexible but resist nuisance cracking. The Oseberg deck will hide most of the interior, so the lower planks provided might need only a thin veneer applied to the exterior - while the the top planks would be made solely of layered hardwood bonded veneers. Your project is one where most everything will be visible, so the care you are taking at every stage will produce a fine model. Johnny
-
Your points are well made. Following the Glory of the Seas builds, the series of photos show that the ship was continually modified throughout its life. One builder noted the specific time he was aiming for - that is, a configuration appropriate to the time frame source pictures indicate. There is no "one" Glory - as there is no "one" Providence or most other ships (the Wasa sank one its maiden voyage, so I suppose that the restored original in Stockholm is the 'version' most modelers should choose). You have made an excellent model (also noted by my friend), and I doubt I could do as well ... maybe close. Fair sailing and a following breeze! Johnny
- 238 replies
-
- 2
-

-
- sloop
- providence
- (and 1 more)
-
I've been thinking further (yeah, lots of thinking and little building ... When I said 'I was thinking' the Admiral replied, "That's why I smelled wood burning."). Old ships were fairly complex machines where sailors were the 'motors' that pulled (hauled) on all the ropes, made fast or loosened, adjusted and repaired everything - and everything had a function. With so much to do, non value-added activities were to be avoided. So it is logical that most (if not all) of the running rigging would stay in place. The blocks for the bunt lines are on the small size ... what, a 4" block full size? That's about 100mm - so for a 1:96 model (I call it 1:100 for ease of calculations), I'd need a 1mm block to be in scale. Golly, I don't think I can work with one that small. So there is an advantage to working at around 1:50, since the same block is 2mm in scale. Then again , a clipper at 1:50 will be something like 6 feet long ... Thus for the 1:96 project one can consider 'compromising' by using 1mm brown beads tied to the yard as the buntline 'blocks'. The fairleads tied inside the shrouds could be 2mm deadeyes (with the three holes carefully enlarged a little, for ease of passing lines through). They would be a bit out of scale, but not obvious, being mounted on the inside of the shrouds. I suppose the bunt lines are something like 1/2" rope - let's round it to 15mm - so making one's own scale rope (0.15mm) using Chuck's ropewalk and experimenting with fine thread stock could yield something workable that would still resist breaking, and would be easier to thread through small holes than what is ordinarily supplied as rigging 'rope'. Looking at stock photos of the Sergal/Mantua Thermopylae in 1:124 scale shows that the blocks and deadeyes are all well out of scale (among other inaccuracies) and there are builds attesting to the difficulties of crafting a big ship at that scale. 'Guess you 'pick your poison'.
-
I bought Billing's Oseberg Viking ship (a future build - ergo a 'stash' kit) after seeing a fine build log and noting that the planks are laser cut. Not just the planks but a pretty good rendition of the fancy carving at the bow and stern - all done with laser ! They have an updated version of a ship (large boat?) from another that was unearthed - and I believe it has precut planks.
-
Someone I know believes there were 2 guns on the quarterdeck (probably smaller than those on the weather deck), giving the Providence 12 guns in all. I wouldn't know about that. He also mentioned there would have been a ship's boat carried. He references the Rhode Island repro. Providence in its present configuration for comparison, and said something I didn't quite understand about a slight projection of the quarterdeck. He does admire the detail and skill put into the model as a fine representation.
- 238 replies
-
- 2
-
-
- sloop
- providence
- (and 1 more)
-
So much to consider ... and learn about. I've seen clipper photos 'on deck' where the number of belayed lines are vast ... appearing to be a 'jungle' yet each line is routed to where it goes without crossing or rubbing on something (ideally). 'Learning the ropes' will take time, and what to include on any model - well, that may depend on the limit of skill, dexterity ... and sanity. Inevitably, compromises will occur.
-
I've pondered sails on models in general, perhaps focusing on clippers. The sails on some models are somewhat limp, although I've seen a couple where thin wire concealed where the perimeter folds over can be manipulated to give the sails a little shape as if the wind isn't too strong. A clipper laid up for some time might have the sails taken off (the 'no sails' option - meaning no running rigging except perhaps clew lines and sheets). Many have taken that approach. One forum member proposes to have only a few sails set (as seen in many period prints and engravings), with the others furled (a compromise approach). A sail to be shown furled might be only a third (vertically) of a full-size sail so with won't look "too bunched up" when furled. I suppose Clippers in port to unload cargo and take on other cargo would have sails furled, and they could have the 'look' seen also in many contemporary illustrations, where the sail material is somewhat "festooned" ... like bunting. The bunt lines are pulled enough to gather the sail in arcs - hanging a lower towards the middle. The reason being the relatively short time the ship would be in port. I suppose the upper 'split' topsail and topgallant yards might have no sail mounted at all, and could be in the lowered position where the lifts are taut - ergo no bunt lines needed for them. A couple of jibs could be down, with the others omitted. No stay sails either, so there would be a moderate amount of running rigging to mess with - and there would be a good view of all the deck detail. Adding scale figures would be nice. Just wondering how this all sounds ....
-
One could make a steel die set (does not have to be hardened since the workpiece is soft copper), where the base has a hole drilled in deep enough so the copper nail slides in not all the way - the flat head would be 'floating' slightly above the surface of the steel plate. A 'punch' of steel (could be cut off from round stock, say 3 or 4" long) would have a round divot in the end made by using a ball burr and a Dremel. This 'dink' would conform to the size you would want the head of the rivet to appear from the outside of the model. The the punch is tapped over the copper nail head to form it into a small dome. The bottom of the punch would 'stop' itself against the steel plate, so the rivet head can't be over-formed. The distance the unformed nail head is above the lower plate - and the size of the divot in the punch will determine the exact look of the copper "rivets" ... a little trial and error to get it just so. Then a similar divot would be made in the face of the crimping pliers previously shown to maintain the shape of the external head, while crimping the projecting end on the inside as you have already shown. Since the planks are laid one-by-one up from the keel, most of the rivets can be done with the pliers - except a few in very tight spaces fore and aft. For those, a little application of PVA or even epoxy could be made over the uncrimped end of a rivet in a tight space. Once dry, a dab of paint the color you want it to be should look fine. In fact, since the crimping process can produce some variation of how things look on the inside, I might be tempted to apply a dollop of adhesive everywhere and just paint. Either way should work. Johnny
-
Budgie, 'Forgot to mention that we have three cockatoos ... and they are like budgies ON STEROIDS. Bigger beaks, bigger bites (on occasion if they get emotional over something), LOUDER screams and cries, more dander and mess ... but we just love them (they are generally manageable, and often affectionate) and they have long lives. One we've had 42 years, another 29, and our 'rescue bird' (this year his owner passed away) is merely 21. This year we used all our 'stimulus money' to get a hot tub installed next to our deck on a pre-existing concrete pad. Late afternoon or evening dips are great muscle relaxers, and not having any formal swimwear - I go in in my boxer briefs. However, the Admiral would like to see me in a 'budgie smuggler' - as they say in Australia. G'day mate! Johnny
-
This is what it’s like to be a newbie
Snug Harbor Johnny replied to Laggard's topic in Masting, rigging and sails
I nearly have a plan to complete (to appear similar to the original ship now on display having just the first mast sections in place - as if still under construction) the 'old' (original late 1960s) Billings 1:100 Wasa - warts and all. The lines are wrong (with a lot of other things), and some major ripping/rebuilding has to be done to get a semblance of how it ought to be. Still, the hull size is 'not too big' and there ARE a lot of things I like about it. So it will be half compromise and half improvise (like many marriages) ... then I'll be able to go on to something else having learned a lot on the process. The idea is to please yourself and enjoy the projects you work on. Like old advice says, 'Do not compare yourself to others, for there will always be those greater or lesser than yourself.' Fair sailing ... Johnny -
'Looks to me like you could just apply filler where needed (and a couple applications in the 'deepest' voids would be needed if the material shrinks). Then just 'sand away' until the desired shape is had.
-
'Found the finest chain I've ever seen by chance at a local craft store (already made into a multi-strand long necklace, but long enough that cut strands are useable for sheet chain in 1:96 scale), then bought what they had. They are silver finish, but can be airbrushed dark with care. I've also scrounged blocks and fittings from incomplete or partially built kits occasionally found at flea markets, train shows and the like ... if the price is right these kits can be a good source of planking wood, etc. The idea is to always be on the lookout, never knowing when or where you might come across something usable. Now there's an idea ... if an old beat-up (perhaps broken) model has OK chainplate, stropped blocks, etc. and can be had at a low enough price - instead of trying to do a 'restoration', it could be 'mined' for usable parts.
-
Lead (or more likely tin/lead) fittings will be soft and bendable. If primed on all surfaces (not sure which primer works best for tin/lead - but what is sold for cast military figures and 'flats' is obviously suitable), then painted with enamel (not acrylic) - they can last a long time without oxidation, since oxygen won't go through the coatings. I found a painted CW tin/lead soldier I cast as a boy over 50 years ago, and it is in perfect condition. Antique figures can be so found, as long as the coatings don't get scratched or chipped. Any lead in these figures has been banned for some time, so tin based 'pewters' have been used. 95/5 tin/antimony is "out" these days because of the antimony. Something like 2% copper is alloyed with tin ( to make Britannia metal), since pure tin degrades under freezing temperatures. (Napoleon's soldiers buttons fell apart on the road back from Moscow.) One can see 'Britannia metal' (tin-copper) plate wear over 200 years old on display in museums in excellent condition, whereas the cheaper stuff with lead go dark grey and can oxidize in high humidity. Conclusion ... Britannia metal is fine without painting for centuries - now I'm not talking about buried in soil, which will ruin anything other than gold (or platinum). Some kits have zinc metal castings, since anything with lead these days is a no-no. Zinc can likely take the same primer, although zinc chromate is the best. Some early zinc cast toy locomotives had zinc with contaminants and suffered from an internal degradation that caused them to crumble from the inside in spite of coatings. I'm talking about stuff from the 1920s and 30s. Since then, there are no reports of 'bad' zinc. Johnny
-
When hull fairing is achieved (or that of other surfaces), have you considered using a scraper? Cabinetry scrapers are too large for most model making, but fashioning mini scrapers using short pieces of (de-toothed) hack saw blade can be used to have a finish largely free of 'fuzzines' (unless the wood is too soft on its own).
-
Vladimir, Have you thought of selling through eBay (auction)? The owner of HisModels (Czechoslovakia) sells some of his stock that way (although with a 'buy now' fixed price), and the rest of his shop is direct. For an eBay auction, your starting price would be the lowest you'd find acceptable - then it goes up from there when there are bidders. The money is handled by eBay. You have put in much work on the 1:72 model, and I think you should get what the international market will bring. Of course shipping is something major to consider, given the size of the hull. (Are the mast stub removable?) It would have to be completely bubble-wrapped and in one sturdy (reinforced) box, then that box is bubble wrapped and put into a larger shipping carton. Cost to ship overseas will be costly, so figure that in your minimum price. I was a clerk in a telescope store (a side line to supplement meager earnings as a Pharmacy technician) for 10 years, and we shipped fragile astronomy gear all over. The makers in China or Mexico put them in pre-formed styrofoam shells inside cartons, but loose items from out store (eyepieces, finders, binoculars) were packed by us using the two carton method. For a large, oblong box that the Glory would need, surrounding the inner box with plywood might be needed to prevent torquing, bending or crushing - the outer box can take some beating as there would be plenty of bubble wrap between the cartons. You have done an outstanding job, and an excellent collaborator with Rob and his 1:96 version. I wish you all the best! Johnny
-
Q: Why do I keep beating my head against the wall? A: It feels so good when I stop. 🙂 Johnny
- 756 replies
-
- 4
-

-
- galleon
- golden hind
- (and 2 more)
-
Rob, were there scuppers on extreme clippers? Also, did the 'doors' that resemble 'gun ports' along the bulwark simply open outward to discharge water from heavy seas that might spill over on the deck?
-
I'm a believer in needle files - and for greater flexibility set some that come 'curved', known as riffler files. The curved files enable you to work on parts of flat surfaces and hard-to-get places with just the end of the file (the curved part). I've done low-relief longrifle decorations with both minitaure carving tools AND a set of curved-end (and bent-end) files. Snug
-
My Dad was a retired dentist who modeled 1930s biplanes or WWI aircraft, and used an old-school dental rig like the one pictured. When he passed, my brother got dibs on the drill to work on his fossils ... so I ended up getting the HF flex shaft tool with foot control. It does leave some to be desired - but was cheap and locally available, and has proven adequate so far. But the right-angle head on the dentist's drill was clearly more useful overall.
-
Making sheaves for blocks and bitt pins
Snug Harbor Johnny replied to Kevin Kenny's topic in Masting, rigging and sails
I'm a big shellac fan, and Zinsser's is a convenience with a couple CAVEATS. Look at the date on the can! Pre-mixed shellac is good for 1 - 2 years, so if the date is OVER 2 years - look for another can. The issue is having it dry completely. If you dissolve your own shellac flakes, do not use "Everclear" or 'clear grain alcohol' sold in liquor stores because it is only 190 'proof' - meaning 5% water. I had trouble trying to use such a product and it 'clouded' the shellac. You need either 'Baker analyzed' pure chemists' ethanol (very expensive and not widely available), but you can use 'denatured' alcohol (methanol) sold in pure form in hardware stores. The flakes dissolve nearly as well as with ethanol, but because of the fumes - good ventilation is necessary is using a LOT of product (like for furniture 'French' polishing, or covering any large area). BTW, methanol is used in Zinsser's. Applying a little here and there (like for securing rigging) is generally not a problem. But inhaling too much methanol can be toxic. If you dissolve your own amber flakes, after a good bit of swirling until most of the flakes are dissolved, let the mixture sit undisturbed in a stoppered Erlenmeyer flask for at least a week. I got some flasks from Edmunds's Scientific Company some years ago - but 'science stores' may have some. The second choice is something tall - like a graduated cylinder, or even a tall glass flower vase. The top portion will be lighter in color and this can be taken off with a pipette, ling dropper (or even a glass turkey baster). This lighter color shellac is the best to use either on the wood or to fix knots, etc. If using Zinsser's, don't shake the can, handle it gently and let it sit for a couple of weeks after purchase to 'settle out'. Then draw off the top 'clearer' portion to use. Fair sailing ... Johnny -
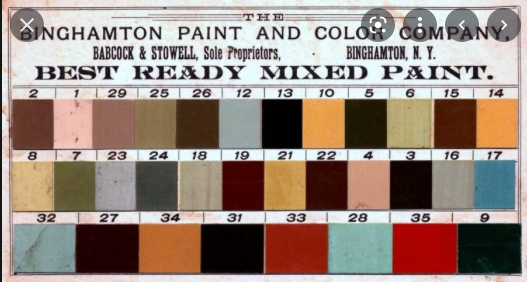
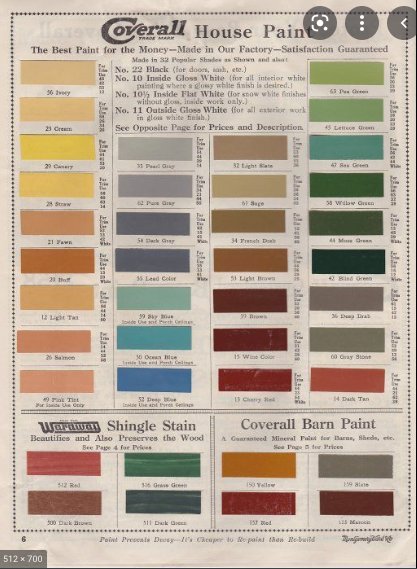
Rob, I'm with you on the light blue color choice for waterways and trim. From a recent book: The American Clipper Ship 1845 - 1920: A comprehensive History with a Listing go Builders and their Ships (p.54) "Aboard ship, most clipper deck houses were painted white, as were cabin interiors and bulwarks, while waterways were painted a variety of colors, including pearl, lead, light blue or buff color." I'm not a paint expert, but in the 19th century oil-based (linseed) were the best exterior paints, while interior work was often done with 'distemper' paint (water based) containing varying amounts of casein or hide glue. To get color, super-fine ground pigment had to be added. Less expensive pigments like carbon, red ochre and yellow ochre could be had - but blue (there were several types) cost a lot more, and it took a lot of added pigment to get a 'darker' paint of any color. Hence there prevalence of 'lighter' to mid-range blue paints used for architecture. I'm not talking artists colors for fine art, which had intense colors, but in much smaller quantities. These charts post date many mid-19th c. clipper builds, but you get the picture. Binghamton #17 or Coverall 'deep blue' might be the darkest shades when new, and would fade some with strong UV exposure. Bing. #32, #28, Coverall ocean blue or sky blue are more likely candidates based on the shades cited in the aforementioned book. I wondered what "lead" colored paint looked like, and you can see it on the Coverall chart as well as pearl (gray). Fair sailing ... Johnny
- 3,560 replies
-
- 2
-
-
- clipper
- hull model
- (and 2 more)

