HOLIDAY DONATION DRIVE - SUPPORT MSW - DO YOUR PART TO KEEP THIS GREAT FORUM GOING! (Only 36 donations so far out of 49,000 members - C'mon guys!)
×


Snug Harbor Johnny
-
Posts
1,466 -
Joined
-
Last visited
Content Type
Profiles
Forums
Gallery
Events
Everything posted by Snug Harbor Johnny
-

Where to buy blocks, hearts, line etc...
Snug Harbor Johnny replied to bobc622's topic in Masting, rigging and sails
Chuck makes excellent blocks sold through Syren Ships - check for current pricing. The scale rope is now done by another fellow trained by Chuck ... there's got to be a link somewhere, and that is properly laid rope done with a small scale rope-walk. Syren sells a product called the 'rope rocket' that you hook a drill to and can make your own scale rope - you should check it out. There is also a rope server for someone who wants to go that route. -
'Great progress, mate. The link to the Gazela manual is very appropriate for the Endurance, and something many Forum member can benefit from - myself included. Fair sailing ! Johnny
-
I found a laser-produced wood deck for Thermopylae (Cutty Sark also available) on Ebay, and the seller is HiSModel in Czechoslovakia. The standard shipping would have taken 4 - 6 weeks, so I paid extra for Fed Ex. I was in Ebay as a 'guest' (not having an account then - I do now) and paid by credit card. Then I saw the same seller's photo-etch and decal + flag set, and ordered that too (but with standard shipping). The seller (Radimir Beseda) contacted me through Ebay to clarify if I wanted the beech wood versus the oak deck, and if I wanted any thing else to go into the package. I specified then that the beech was lighter in color with a finer grain, so I wanted that - plus the photo etch thrown into the same box so they would both get to me sooner. To my surprise, I got the items in a mere 7 days! (the $23 up-charge was worth it). Fed Ex had slightly bent the box at some point, but the deck was not damaged and a slight creasing in part of the photo etch was smoothed with round handled metal tools - no worries. Radimir included a sample deadeye with a photo-etch surround and a sample CNC milled walnut block. They seem pretty good, and he has them available on his site - plus nice-looking 1:96 belaying pins long enough to properly function - It has been recommended to snap off the plastic pins from the Reveal Cutty/Thermoplylae pin rails and replace with scale brass pins. Since the deck of the prototypes was bare wood, I've never been able to paint a pre-formed (plastic) deck to look 'real enough'. The use of these thin (veneer) deck parts has to be considered right from the start of constructing either kit, and installing metal deck eyes right through the deck (after wood sheathing) was also recommended. Items from HiSModel appear less expensive if bought from the seller directly with PayPal. He seems to specialize in accessories to greatly improve popular plastic ships (e.g. U.S.S. Constitution 1:96). My late 50s Thermopylae (a lucky find) has excellent molded parts (and instructions - although the paper is coming apart), and I'm going to plan carefully how to go about the prospective build - using deadeyes and hand-knotted ratlines for example. Scale points to 3.5mm and 2.5mm deadeyes - pretty small to work with, so I might consider going just a little 'out of scale' with 5mm for the large deadeyes and 3mm for the small ... plenty of time to think about that. Some of the yards that were not painted as seen on several fine all-wood models, can be replaced by wood spars - the the fine build on this forum by Bruma. I'm stuck on whether to build as a Barkentine (early 1890s) or as a clipper. The idea of having a few sails is a great compromise. Fair sailing! Johnny
-
Louie, I've just seen the Papegjan (1627) build, and all my questions are answered ... she is a 'smaller Wasa', and the masting/rigging can be used - with the addition of diminutive top gallant yards. What a build, with setp-by-step pictures of how to rig ! Johnny
-
Your many rigging pictures are an answer to a prayer ... the rigging of this 'smaller Wasa' of 1627 can be a template for eventual finishing of my languishing 1:100 Billing Wasa (c.1970 kit). The mast p[roportions are great, and the Wasa only needs diminutive top gallants above the topsail yards. Sure, the Anderson book (and others) have good information, but your build shows step-by-step how its done - with every rope having a purpose. Kudos, and a toast to you ! Johnny
-
My Dad used to fly RC model planes in the 'old days', and many of the ads for sale of model airplane kits had pictures of pretty women holding a finished model ... sort of like how car commercials often have a gal showing the car. Love it. Johnny
-
You're doing great! My Dad also built a clipper (looked to be around 1:120 scale) and it was in a glass display case. When my Dad passed, one of my brothers had 'dibs' on the model, which was rigged with whatever sewing thread happened to be handy and black seed beads were used as pulleys. There were a number of thread lines that had simply deteriorated and broken, and the model looked a little sad - but still clean since it was always cased. He planked the deck in flat match sticks - which was an exercise in patience, and the cabin detail looked pretty good. Perhaps I'll offer to re-rig the ship for my brother sometime - but he lives far away and has become an aging bachelor-hoarder. I have bought some items from Cornwall, and they have been generally good. I know what you mean about the belaying pin geometry - and I may resort to turning my own on the miniature (Unimat) lathe my Dad gave me some time ago. I've used the lathe for a wide variety of projects, and although it is underpowered it turns brass and aluminum pretty good with light cuts. I'll have to make a form tool foe the pin profile I want, then cut them off one-by-one after forming. Johnny
-
Louie, I've checked out your link to images of carracks (and also have poured through artwork of ships in the 1520 - 1620 range) - and a very common (by a large majority) depict a relatively tall first part of the mainmast having a relatively large main sail ... then a much shorter second section with a MUCH smaller topsail, and either a short third pole to fly a pennant from (sometimes only on the main mast) or a diminutive top gallant on the pennant pole (so small compared to the main sail that it is quite puny). All these artists were seeing much the same thing, and trying to depict it in 2-D. Now there are varying degrees of 'artistic license' as well as scale issues, but the 'preponderance of the evidence' is that ships in that era DID look much like that. The small hight of the masting above the large main sail may well be related to the evolution of rigging methods to enable the eventual increase of mast height and sail size by 1650. In deciding how I'm to mast my version of the (dated) 1:100 Billing Wasa model (as sold circa 1970 - so I have to make substantial modifications to based on current knowledge). Their elevation drawing has masting that appears entirely too tall relative to the hull. I took a picture to put on my build log - and due to the camera angle, the image 'foreshortens' the masting quite a bit ... but seeing that makes it appear much like the aforementioned contemporary artwork. Now the picture I took is perhaps a little too foreshortened, but the 'lightbulb' went on that I could 'scale back' on the masting above the mainsail, as the 1628 Wasa can be considered a 'transitional' ship ... the order came after the keel was laid and construction started to lengthen the ship by about 30 feet (and add a lot more guns) - so the builders had to do what they could to comply - and we know the outcome. As has been said, the masting and spars are 'the first things to go' on a wreck - and that may be one reason (apart from housing concerns) that the restored original in Sweden only has the first mast sections. One could also just model that to be 'safe', but without a time machine (or time portal that one could look through without having to go there) who can say just how the upper masting was configured? Johnny
-
The second window seems blocked by a man in the upper picture. Cabins most often have a symmetry in the design, and the lower photo share seems to show a second window on the port side. A second door is not as clear, but would not be unreasonable in a balanced layout.
-
I like 'true' Honduran mahogany - but it is harder to find these days and pricy at that. One can obtain a plank by picking through what may be offered at 'Woodworkers' Supply' stores (they all have different, uncatalogued stuff in odd lots). Then one can re-saw into planking stock of the desired thickness, with the desired grain orientation. If used for ships that did not have painted hulls, no stain is needed. Johnny
-
Well done, mate! She looks impressive, and I'm happy your method with the flat stanchions worked ... also the fray stop (fray check is a name of another brand) on the lines is something I'll have to remember - using clear nail polish instead of CA .. another great idea. 'Bet the fray stop will also work on the line used as chainplate - to tighten-up and stiffen. The steering gear you rigged is an added bonus. This build can be a REAL help to modelers building the Endurance in future, and a great supplement to the picture and video instructions OcCre provides. Nothing beats a good account of 'thinking things out' (sometimes in a different order than kit instructions) and showing pictures of the results. Yeah, I pondered (too late) on the tight situation for mainmast rigging into the deck eyes way down between the walkways on wither side. The same problem would exist if one wanted to put a circular pin rails around the masts as on the prototype instead of the deck eyes. Now it occurs to me that one could tie rigging lines to the deck eyes there in advance - making sure that there was a generous amount of line to work with later, and coil each line up (and kept neat with a couple small keep ties) leaving a few inches of line between the coil and the attachment point on the deck. The coils could be pulled up between the walkways (dog runs) and just left on the deck somewhere until needed later. You can still do this (aided by long tweezers) before things get too much farther along. Then later when rigging, instead of running lines down to the attachment points - the lines would be pre-attached and you would run the lines UP to wherever needed. Nes pas? I'll be following along (as many are) as you go, and I'm sure you'll do her proud. Johnny
-
'Just love they way you've used scale second planking, as it 'telegraphs' nicely through the paint - just like on the prototype. I think it is a very nice look, and it doesn't matter if it get 'weathered' or not - it will look great either way ! Johnny
-
'Love your build of a classic kit I did myself as a lad (model long gone, though). I've obtained a Revell Thermie kit (cloned from the Cutty), and I'm thinking to make it in the barkentine mode - an option provided for in the kit to represent her time in the timber trade in the Northwest. She was painted white then, and there are some good photos to model her as she was in that roughly 5 year period. Of course there were some compromises Revell made, as the ship has the same lines as the Cutty. The bow below the water line can be shaped to the 'Aberdeen' curve easily enough, but the stern profile represents a challenge - and the transition from the aft deck to the main deck is somewhat different than on the prototype. The decision to be made (eventually) will be to either cut away the plastic above the prominent lower shear strake and plank in wood upwards from there (but leaving the forecastle alone) to increase accuracy (a harder way to go), or built her as provided - thus 'respecting' the classic kit. I can pare away the intermediate rub rail between the shear and the gunwale, as well as adjust the bow to the Aberdeen profile. No rush, mates - as there is much to do in the meantime. A stash of a mere 6 kits for what is hoped to be a 20 year retirement is hardly an excess. Just thinking and planning how to build (or bash) is for me as enjoyable as actually building. And it is a pleasure to review the many fine builds available on the forum like yours. Fair sailing ! Johnny
-
'Thought of a way to work out unevenness of 2nd planking ... a mini scraper ! I've done furniture with the normal shapes available in cabinet scrapers, but a model ship would need something smaller and more flexible. So a piece cut from a hacksaw blade (with a Dremel cutoff disc) would do. Then after grinding off the kerf and teeth points to spare fingertips, the back edge of the blade section could be held in a vise have a small burr rolled just like a full-sized scraper . There are You-tube videos (among other sources) to show how it's done on a regular scraper. Then one can flex the mini scraper around most of the ship lines (concave and convex) and pare away uneven plank joins or high spots without leaving abrasive marks like sandpaper. Working with the grain, small shavings come off nicely with a scraper. Special purpose shapes can be ground into a scraper for beading and moldings - like is done for flintlock long rifles (been there, done that). A former manager of mine advised not to point out a problem unless one has at least one good idea of a fix to offer at the same time. I should have remembered his advice sooner. Fair sailing, Johnny
-
Ahoy mates! Anyone wanting to see more details of one method Rob has previously used for lower deadeye mounting and chainplate installation should see his fabulous build log of the Great Republic ... Sure it may seem a long log (as is the current one), but it is chock full of many nitty-grittys very helpful to those who aspire to approach the beauty and detail of his models - without having to resort to so-called 'purist' methods that require virtually re-building every darn thing from the ribs up. Rob's ingenious method for producing the best (and most practical) simulation of a copper bottom is thoroughly detailed in the Great Republic log - including how the method evolved ... and that has put a hand-cranked clothes wringer on my shopping list next time I visit this-and-that shops in the Lancaster PA area. Many orders (ordnung) of Mennonite and Amish still use such implements, so I imagine they may be available in new or near new condition where the rollers are not 'dried-out' or cracked with age the way some antique wringers are. Hmmm, may one can Google such an item. Now (please don't hate me) in the two photos (above) of the newly mounted deadeyes with chainplate, I think one can see the 'ghost' of a small area on the hull above the coppering that was corrected with a little filler after the final planking. When the light is just right viewed at an angle, there is a slight difference in albedo (surface reflectivity) and texture of the area smoothed by underlying filler. Most likely this will not be noticeable under normal viewing conditions and distance (the photo is substantially enlarged - like looking at one's complexion in a 'magnifying' bathroom auxiliary mirror). One can safely apply any amount of filler over 'first planking' to get the desired lines, as that gets planked-over. And second planking that will be covered by coppering can also be filled with abandon if needed. Maybe the answer for final touch-ups on a surface to be painted and a low spot is found (which can create a 'shadow' after painting) is to leave just a little texture after filling - perhaps with 600 grit paper? Just a guess, but I'll have to think about it before doing anything where wood gets painted. OK, I'll go and stone the deck now - and swab it for good measure. Johnny.
- 3,560 replies
-
- 1
-

-
- clipper
- hull model
- (and 2 more)
-
Great job HakeZou on what is shaping-up to be an fine build. I'm learning along with you, as I'll eventually build my own Endurance. The steering gear is well thought-out, and you plan ahead e.g., securing the deck eyes with bends beneath the decking to assure no pull-outs when rigging - and not gluing the stacks from (presumably) coal stoves so you can remove them when doing the railings. Now I suspect the railings will be a challenge, as the vertical stanchions are flat laser-cut brass that may be susceptible to bending or leaning. The small 'spikes' at the base of those posts doesn't give much to sink into the perimeter rails, and per the instructions - rope will constitute the horizontal rails for everywhere. In some places on the original there was rope, and many other places it is some sort of piping. Perhaps a 'fillet' of epoxy (a dab on either side) at the base might stabilize the flat stanchions. My solution was to order 3D stanchions from Cornwall, while I'll keep in reserve until needed. Whatever you do, trying an experimental piece to test the approach could be very helpful before forging ahead on the model. Fair sailing. Johnny
-
I've inherited an old Mamoli Golden Hind kit (about 30 years old ?, new in box), and although there are no nice videos like OcCre provides - there are a number of detailed printed sheets with a lot of instructions and illustrations, and also a full scale draft of the model. The frame member are meticulously die cut and fully separated (packed in small plastic bags) - the kit quality exceeds many supplied today in the $150 - $250 range. I do note that this version also has guns on the weather deck ... not on a gun deck below the weather deck as many scholars conclude (and also jive with contemporary art work of this type of ship). The lines of the hull may be OK, although some widening of a few of the bulkheads amidships might be considered. It may have been influenced by the first Golden Hind (ex Pelican) full-sized reconstruction. Also the second repro. had to have 'bulges' added at the waterline amidships to make it stable in the water. The planking is of good quality, and many of the provided materials are appropriate. Yet the kit would have to be 'busted' a bit in a number of ways. The nicely silk-screened multicolor side-wood would have to be separated into planks ... or simply not used if thought too 'gaudy'. Loads of modifications would turn it into a more advanced level project. So my tendency would be to use it as a source of materials for other projects. Of course despite being on display at a London area war for decades (the first 'museum ship' as ordered by Elizabeth the first) no one thought to make a sketch of the original ship. Once can take stuff from other artwork, but in the end all is conjecture, no?
-
Help from German speaking readers needed…
Snug Harbor Johnny replied to Waldemar's topic in Nautical/Naval History
I remember from a German class (many decades ago) a sentence was written on the chalkboard: Hirs heisst der Man am Ecke. ('Hirs' refers to a man's name.) The German sentence translates: 'Hirs' (is the) name (of) the man on the corner. The instructor said to try and say the sentence quickly ... and then it sounded like I said, Hir shiest der Man am Ecke. (Here poops the man on the corner.) A slight change in diction or pronunciation can radically change the meaning in many languages. When John F. Kennedy made his famous Berlin speech (in English) , he ended by saying in German, "Ich bin ein Berliner." - meaning "I am a Berliner". Unfortunately, his Boston accent sounded to the crowd as if he said, "Ich bin ein Bellina." Now a Bellina is a popular confection much like our jelly doughnut, so the hushed silence from the crowd was because many thought he just said, "I am a jelly doughnut." They quickly 'got it' and arrived at the correct meaning, then applauded. -
Model work has been suspended for the summer (2021) since the Admiral tasked me with a couple 'good weather' projects for her ; 1.) Build a raised flower bed in back of the house, bring in quality garden soil and plant with manuals and perennials for color through the summer, 2.) Get a permit and have a hot tub installed on a concrete slab and have an electrician do the wiring, 3.) Get a permit for a pavilion over the spa, do proper footings and have the pavilion built; 4.) Keep the yard in order (naturally) all summer, lawn cut and weeded and get a power washer to clean the exterior of the house. I also have many 'per diem' work days at a local hospital as a Pharmacy Technician - as well as some piece work for a supplier of Rev War re-enacting accoutrements. Add basic chores like food shopping, cooking, cleaning (yup, I've been well-trained since the Admiral has some mobility issues) and my plate has been full at present. This coming winter will bring some time to get back to the Wasa ... so I hope build log seekers will understand. I DO want to get to a 'compromise' state of finish - partly because I'd like to build the OcOce Endurance kit I've obtained (plus some enhancements to bring that model closer to the original - better sails, better rails, corrected lines, circular pin rails near the mast bases instead of deck-mounted eyes ... among other details). I've some some preliminary planning that can be seen in the 'kit review' of the Endurance by OcCre (its own log). Johnny
-
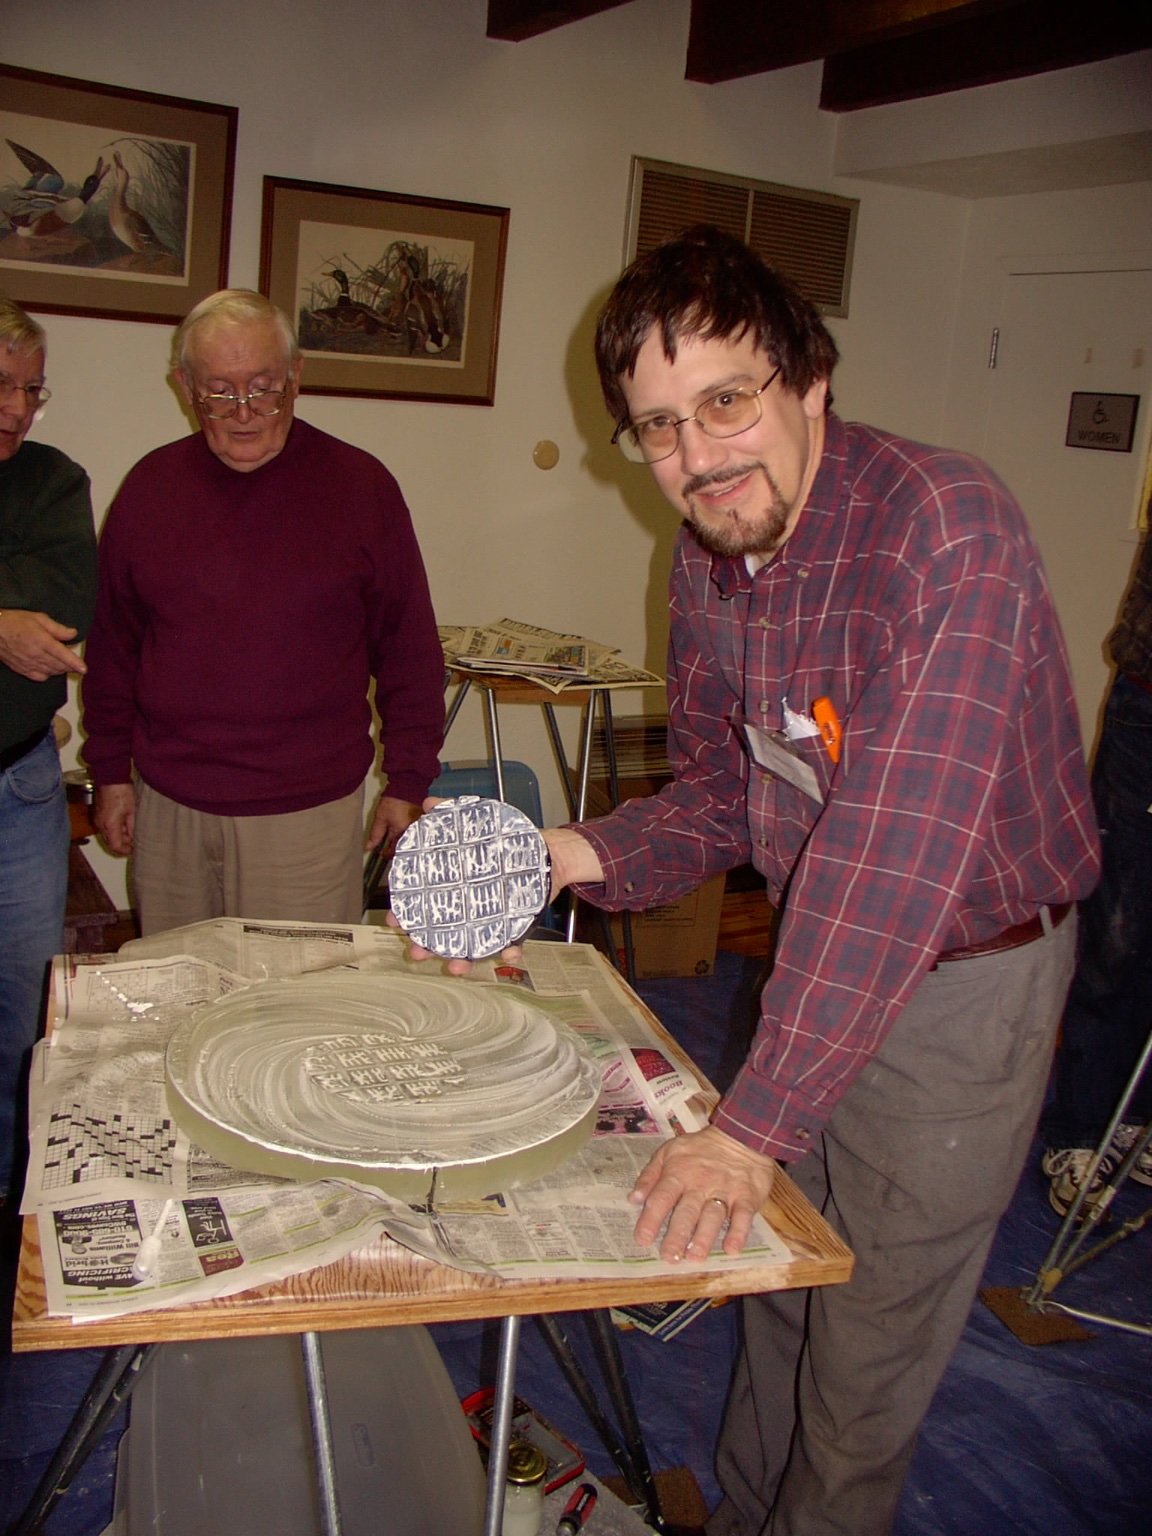
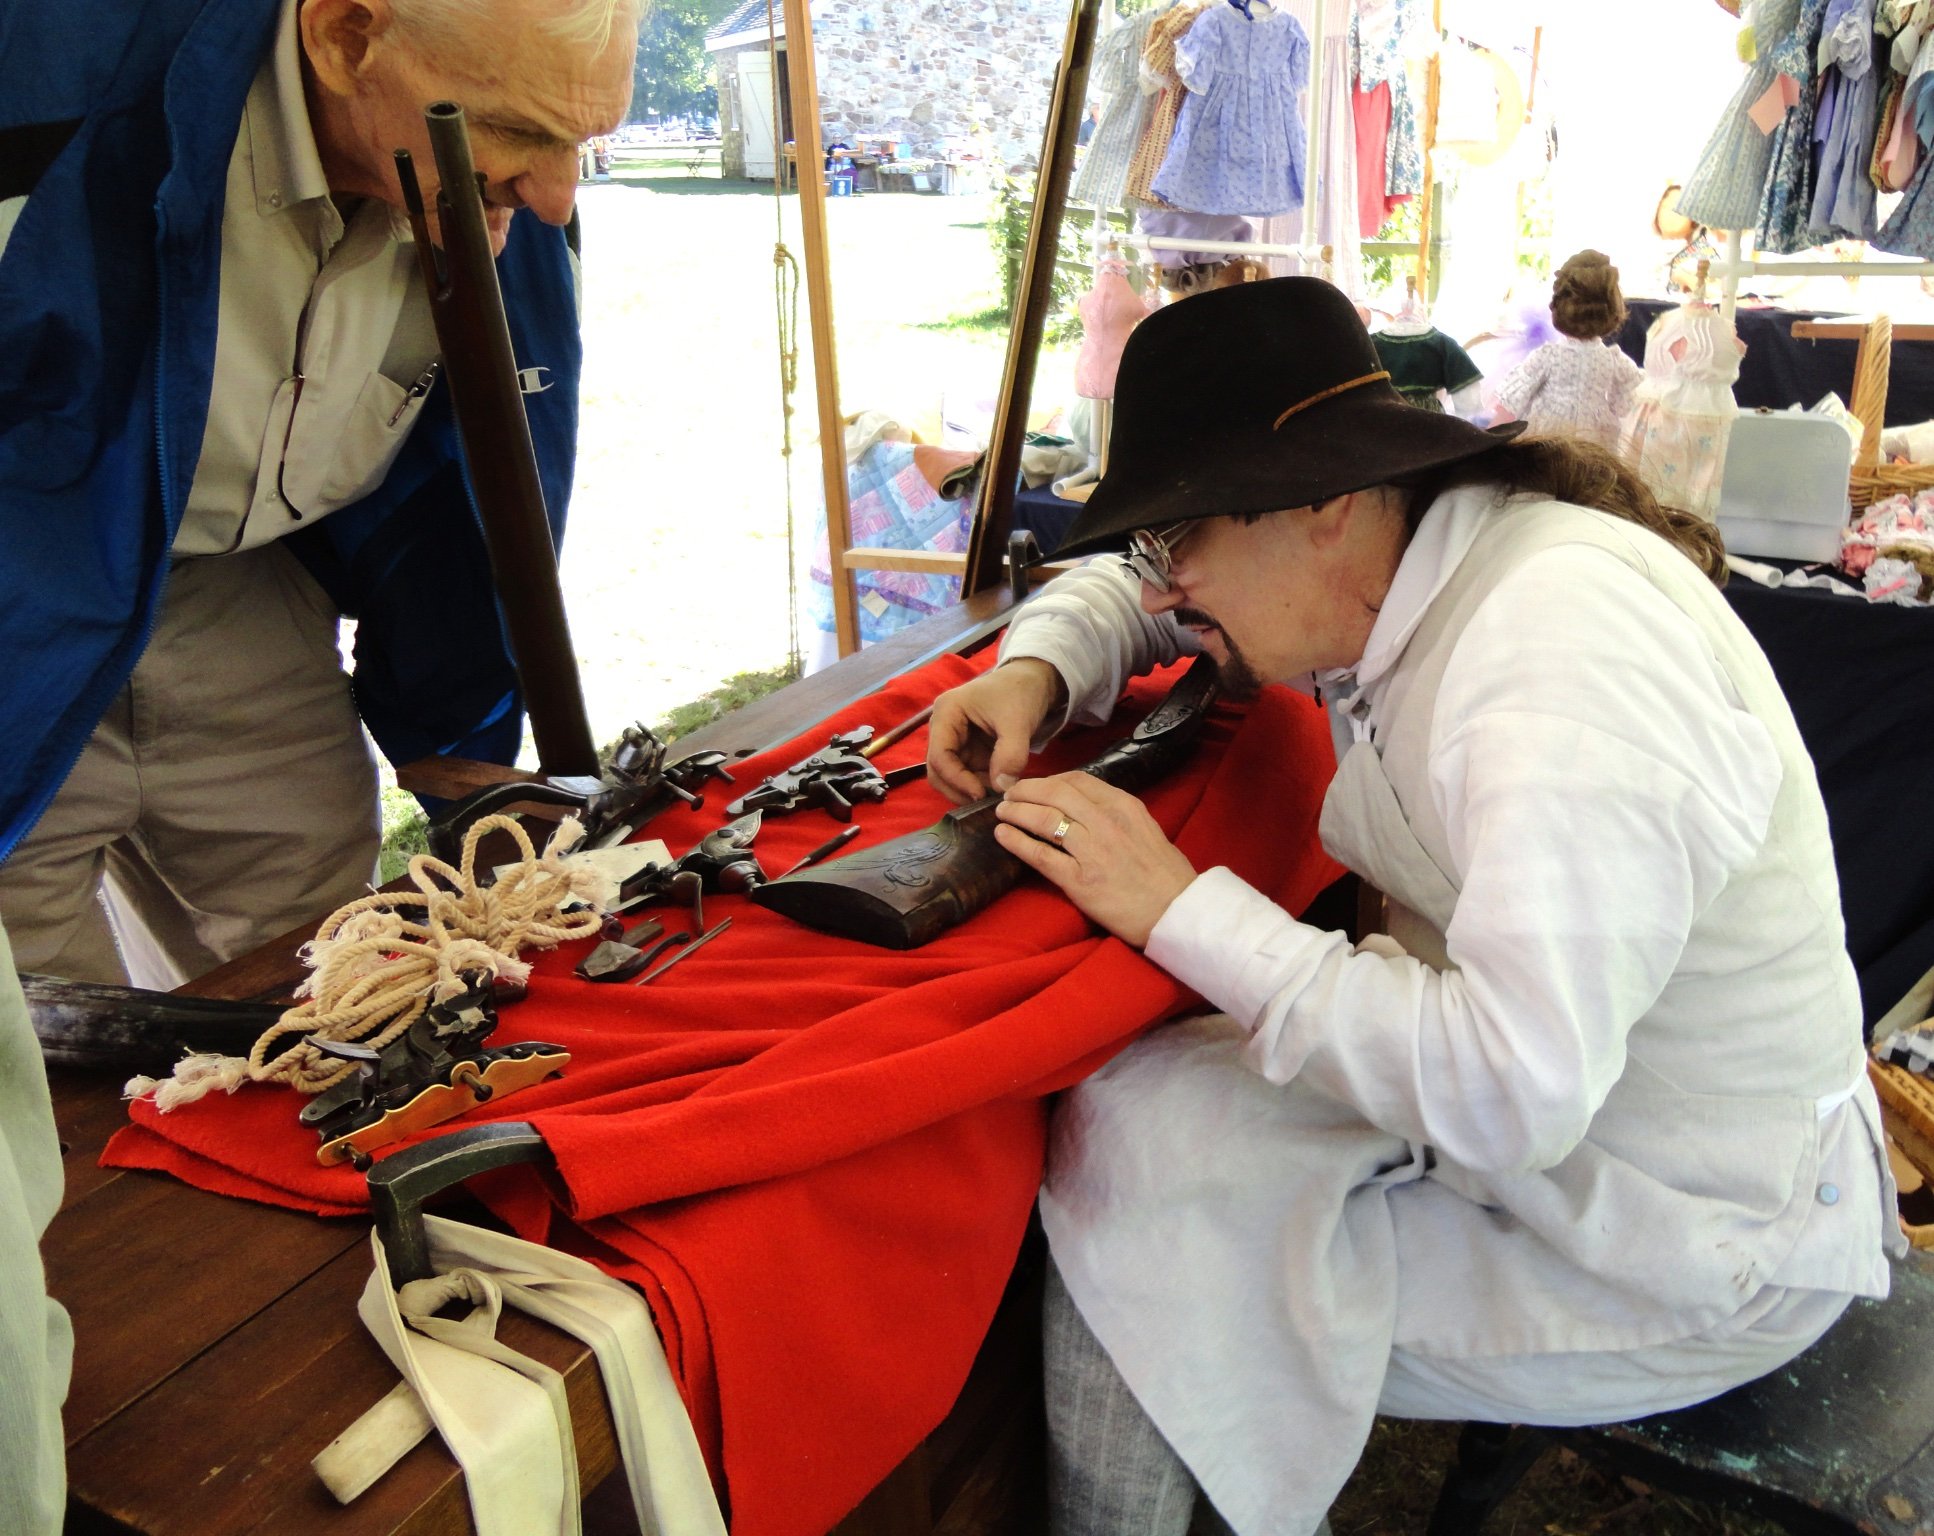
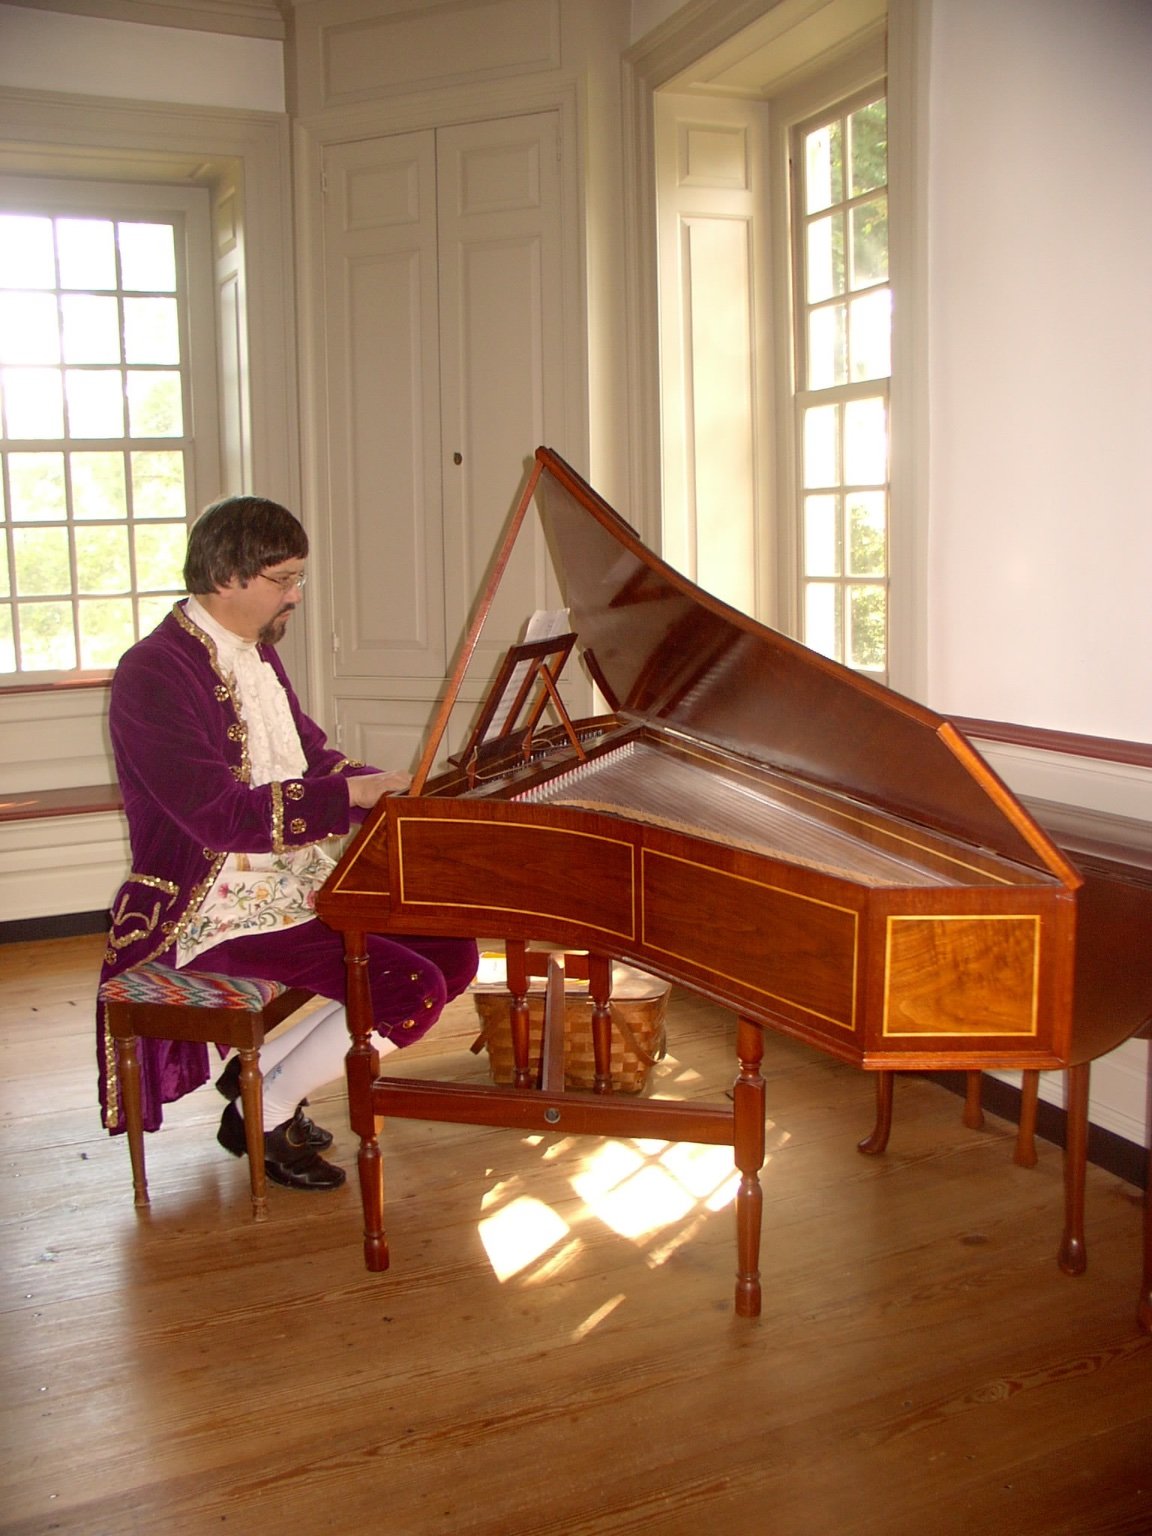
Astronomy ... I was 'into it' for a long time, but ever increasing 'light pollution' made local observing unsatisfying. Trips to 'dark skies' were far enough away to either require overnight camping or driving home in the wee hours. Medical conditions take camping remotely off the table, and driving back after midnight is now too risky (too many near accidents and getting stopped for drowsy driving was an epiphany). Some astro gear was sold, but the best was donated for the club auction. U.S. Civil War re-enacting is also in my 'rear view mirror', but we still do occasional Colonial craft demos that include old-time gunsmithing, rope making, music and dance (the Admiral does ladies garments and accessories). The pics below shows me figuring a first-prize winning 16" mirror, and the completed telescope ... it became too heavy for my aging back to handle. Two others show me working on a long rifle, and playing a spinet harpsichord I built myself ('busted' a kit to make it better) ... the Admiral made my costume. It has been said, "Young men dream, old men have visions." May your dreams bear fruit and may your visions be pleasant. Johnny


- 3,560 replies
-
- 4
-
-
- clipper
- hull model
- (and 2 more)
-
Rob, you made telescope mirrors? That is something I used to do, and count it a great achievement to have placed first at Stellafane with a 6" f5.4 and later moved up to a 16" f4.5 With mirrors one is polishing to within a fraction of a wavelength of light, and my winners (I won't mention the others that didn't 'measure up') tested at about 1/12.5 wavefront ... about as good as one can get and is the limit of accuracy with the Foucalt test. Model building seems more forgiving by comparison. Johnny
- 3,560 replies
-
- 1
-
-
- clipper
- hull model
- (and 2 more)
-
OMGosh, the rudder post (vertical axle) situation was 'hiding in plain sight' all along. Granted some photos don't show it well, but those that do reveal a long descending spar that would have been visible to anyone at the time - as the beam goes below the waterline (into the Muntz metal zone). OK, the model is not so far along that you can't make a correction and then touch up the black paint and repair the applied metal as needed. Sometimes models require 'adjustments' as one goes along in light of better information, and I'd hardly call the proposed correction 'butchering' any more that applying filler and re-sanding at an earlier stage - its all part of the process. You've gone to such great lengths to gain accuracy from the start on this endeavor that I'm betting you won't let this opportunity to be true to the Glory pass by. BTW, I went through your Great Republic build (initially to review your strip metal forming process shown there) and I was astonished to see the quality of a complicated scratch build. Three cheers to you, sir! Johnny
-
If you need to remove gummy excess, use lint-free cloth (medium weight linen is good if you have it) and use a sparing amount of either mineral oil or what I like is 'odorless' paint thinner ... the kind Bob Ross (and Bill Alexander) used for their paint brushes when making masterpieces (let's put in a happy little cloud right here ... it's your world, and you can do anything you want). The moistened cloth should 'pull' off the excess with just a little pressure moving the cloth in one direction. Now that I better grasp your situation (in that you did not initially wipe away excess), I would not wait any longer since that can make delayed removing the excess more difficult (e.g. more passes with fresh cloths). Each time what is removed will discolor the surface of the cloth as the fibers 'collect' unwanted pigments - just like sandpaper gets 'loaded'. So a fresh surface is needed after a couple of passes for the most effective removal. Don't use turpentine (or other solvents like naphtha) since they do throw vapors and there is the potential of spontaneous combustion if spent rags are bunched together. After using mineral oil or 'odorless' paint thinner, I put the spent material loose in a bucket and move that to a porch or just outside the house (if it is not raining) to de-vapor. When dry they can go out with the trash. By using the solvent sparingly, it should have no effect on any wood or composite wood substrate. If there is an inside corner you need to reach, a small stick of wood or thin tool can push the solvent cloth where needed on the model. Johnny
-
'Don't know how old your stain was, but a 'rule of thumb' is not to use anything that has sat around for years. Dating cans when bought is a thought. But I've added two or three drops of 'Japan dryer' to oil or mineral-based stains and mixed well before use (also for alkyd paints) - that will often 'revitalize' old stain. Once tin of Japan dryer is all anyone needs for a 'lifetime', since it is used sparingly. The effect is to promote polymerization and cross-linkage of the stain or paint, thus promote drying. Also, doing a 'test piece' before coloring anything 'important' is recommended. BTW, my experience with Minwax has been that it is slow to dry-out, and furniture so treated will have the 'Minwax smell' for several days. Wiping away any excess is important for most stains, and being patient by waiting 3 or 4 days may do the trick. Note also that 'today's Minwax' has been significantly re-formulated from the Minwax of old in order to reduce the VOC content ... something that has happened nation-wide (and is actually 'green' as they say). The product affected the most is deck stains. The 'good old' penetrating stain/preservative (like redwood deck stain) is no more, and the reformulated replacements 'clean-up' with water ... not like the turpentine or other solvent needed in years gone by. Also, many of the solvents you can buy now have been re-formulated ... like MEK 'substitute'. And Thompson's Water Seal sin't what it used to be either. Hang-on, mate and do a few other things ... after all, SOMEWHERE the sun is over the yardarm! Johnny
-
'So very fascinating, I tip my hat. Is copper tape stock available in places like Hobby Lobby? Did you use a fine watch gear to make the tiny dimpling?