

Gregory
-
Posts
2,742 -
Joined
-
Last visited
Content Type
Profiles
Forums
Gallery
Events
Posts posted by Gregory
-
-
I would be interested in seeing any kit that showed the main stay collar with the detail of your drawing from Lees.
The closest you will come is in some of the scratch build logs. Chuck' s Cheerful monograph and build log show very detailed rigging steps that could be used for a full rigged ship, but would be missing some of the elements like the main stay collar.
Here are the instructions in the Model Shipways USS Constitution for a yard sling.
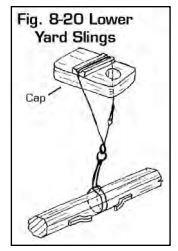
There are no instructions for making the sling other than the image.
This post in the Cheerful log has detailed images as well as precise instructions such as:
QuoteThe sling for the lower yard is served its entire length. I used .035 dark brown rope. It has a thimble seized to it with a hook made of 22 gauge wire and eyes formed on each loose end. After determining the length for the loose ends I formed the eyes and you can see how the eyes close up the sling by being inter-twined.
-
-
20 hours ago, Genesi said:
Wish I had found this topic sooner.
Its not to late to put the Soleil Royale on the shelf and build a couple of simpler kits just to get a feel for the craft..
- Ryland Craze, Genesi, Chuck Seiler and 1 other
-
 4
4
-
Do you make sure you are signed in?
-
I've bought several kits on eBay and pretty much got what i expected for what I paid.
I once bought a kit from someone who was up front about not knowing what should be in the kit.
Once I received it, it turned out to be severely lacking in some respects. I contacted the seller, and they took my word for the depreciated value and gave me a partial refund with no argument.
-
-
Quote
Are there any other books on cutters you would recommend? The Goodwin one is almost impossible to get now unless you want to pay a small fortune for it.
You can look at the many Cheerful logs as well as Chuck's prototype build..
The monograph chapters are also available at the Syren Ship Model store..
For rigging , the book Rigging Period Fore-and-Aft Craft can be a lot of help..
-
Chuck, is there a post somewhere about how the template is used?
- mtaylor, Canute and thibaultron
-
3
-
While I share the concern with the fading of printer inks, on the other hand, if they fade over the years, the effect may not be all that undesirable in the context of an antique model ship..
- mtaylor, thibaultron and allanyed
-
3
-
Excellent helper!
- FrankWouts, Jorge Diaz O and bdgiantman2
-
1
-
 2
2
-
Great start! I look forward to your progress..
Do you have plans for sourcing the figurehead and carvings at 1:35, or will you be carving it all yourself?
- FrankWouts and Jorge Diaz O
-
2
-
2 minutes ago, Roger Pellett said:
You asked me what the advantage of my method is relative to iron on transfers.
The OP has the necessary tools to do the iron on transfers.
You suggested a different method that required different tools and a different skill set..
I was just curious as to what would be the advantage in adapting your method.
- mtaylor, modeller_masa and thibaultron
-
3
-
-
Allan, I can't be sure what the thread count is/was, but as I said, I gave gone to a ' thrift shop' and found a shirt or blouse that was made of very fine material where the weave was very difficult to discern. I'll try to find a scrap and see if it is as fine as my memory thinks it is.
It may well have been 750 or less.. It may have been silk. I got past the "expensive" part by shopping at Goodwill, etc..
As fine as the material is, the look will not hold up at most popular scales, with any sewing, as you and others have pointed out.
I am not much for making sails due to many of the concerns voiced by yourself and others..
I am of the opinion that " if you must do it, try this or this and do the best you can "..
I think the OP has come up with a good idea that I will have to try myself.
-
49 minutes ago, DaveBaxt said:
I have always wondered how do you know what angles to make the edges of the bulkheads when fairing them ie how much material to remove before assembling them.
I realize this wont work all the way to the rabbet, but a good start is to follow the contour of the deck..
-
I think the longevity may depend on the ink rather than the medium..
If you have photo quality ink that has UV protection, it should last as long as a good quality color photo.
You might also add a light coat of something like Scotchguard or other UV blocker..
- mtaylor, allanyed, thibaultron and 1 other
-
4
-
What would be the advantage of your method over the iron on transfer?
The OP wants these features:
QuoteIn my case, I'll print red cross, hole marks, sewing marks, reefing lines, and even shadows and dirty dusts.
I have used the iron on transfer for other projects and the final result is a very fine film. The details are only limited by the original artwork and the resolution of the printer..
- modeller_masa, mtaylor and thibaultron
-
3
-
I think modeller_masa has come up with a great idea to have sails that resemble the box art without using the form sails provided in the kit.
I would suggest the importance of real looking, scale appropriate sails may not be a realistic or desirable goal in this case.
What kind of printer would you need for printing on a non-rigid material like silkspan?
I have printed on tissue paper by taping it to card stock, but it still has a tendency to gather and tear if it is not perfectly flat.
Do they have clothing re-sale shops in the EU?
I have found some very fine, high thread count materials in fine men's shirt or women's dresses in these stores.
A lot of possible sail material at a very low cost.
- modeller_masa, thibaultron and mtaylor
-
3
-
Great idea. I would look for very fine cloth for the base..
- modeller_masa, thibaultron and mtaylor
-
2
-
 1
1
-
-
-
5 hours ago, Jasseji said:
Edit: Should i taper the planks on both ends ?
Actually, with this hull form, the planking fans out at the stern for several planks..
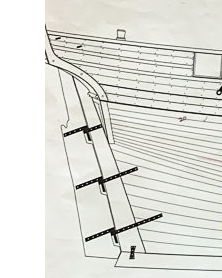
This is a snip from the Cheerful plans drawn by Chuck..
Without wider planking stock this is not possible.
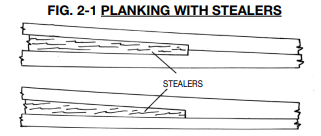
Your plans may show what are called stealers that are used to fill in gaps that
would develop if the uniform planking strips are used..
-
The Mariner's Mirror is the international journal of the Society for Nautical Research.
- GrandpaPhil and mtaylor
-
2
-
Does the ship just rest in those pedestals, or are they fastened in some manner?
- mtaylor and FrankWouts
-
2
when to rig the shrouds to the deadeyes.
in Masting, rigging and sails
Posted
I have heard once or twice about rigging the deadeyes before setting the shrouds, but I don't think I have seen it demonstrated.
If it works for you, perhaps you could share your method.
The shrouds are seized in pairs, alternating port and starboard, so if you have already attached them to the deadeyes you would have to allow for some slack to be taken up. The shrouds are not actually attached to the mast.
Actual practice is done in a certain way for reasons that work. For the most part actual practice works best on the model.
Lay the shrouds then set the deadeyes with a lanyard. Using a spacer to set the lanyards may be helpful. It is easier to attain equal
spacing on a full size rig without a spacer than it is on a model..
I borrowed some images from Glenn Barlow's Cheerful for good examples..
When you ask for help, the best we can do is show you how it is usually done. When you choose to use a different method, it is harder to provide guidance after the fact.