


Thukydides
-
Posts
1,270 -
Joined
-
Last visited
Content Type
Profiles
Forums
Gallery
Events
Posts posted by Thukydides
-
-
Looking good.
I have also been experimenting with tin foil for the water though in my case I am going to be using it directly on the base. I have found at least so far it really helps in getting a dynamic base working.
-
-
You essentially have two options.
1) You can carefully remove the offending planks and replace them. This is the option I would go with. Note this is the only real option if you are planning on leaving the hull unpainted. If you used super glue to attach the planks then careful use of acetone can help with removal. For wood glue isopropyl works well.
2) you can leave as is, maybe add some more filler just making sure the shape is smooth and right. If you are painting it white then it shouldn't be that noticable.
Good luck.
-
They do look really nice.
Harpy is also looking good.
- Ryland Craze, hollowneck and Blue Ensign
-
 2
2
-
 1
1
-
Great job Glen, I think you made the right choice.
Just a little bit of green adds a nice bit of colour. It is a fantastic model with a great presentation.
- Paul Le Wol, Glen McGuire, Keith Black and 2 others
-
4
-
1
-
Great work on the bottle. It looks fantastic.
-
Congrats on a great build. You have taken the kit and made it your own. I appreciate all the little details you have added.
- Desertanimal and Keith Black
-
1
-
1
-
2 minutes ago, JacquesCousteau said:
Excellent work and great catch on the errant bulkhead! The model’s really coming along well.
Very interesting statistic about how quickly the royal navy coppered its ships. That's a lot of copper, and as I was under the impression (possibly incorrectly) that coppering was expensive, I wonder how they financed it.
Thanks Jacques,
Oh it was expensive, in many cases it cost almost as much as it cost to build the ship in the first place. For example Perseus was built by contract for a cost of £4,507, but her coppering cost £4,310. That said there were certainly some significant benefits. Many of the refits that you see documented often cost 50% of the ships original cost to complete. One document I have just finished transcribing is an analysis of the impact of coppering and he has this to say:
QuoteTheir Lordships will be pleased to observe, that the ships, on which the experiment has been tried, were run up hastily in time of war, and that the sheathing of all the three was put on by task, and yet that their whole defects, after three years unremitting service, were found to be not of so considerable or alarming a nature, as to have prevented their going on foreign service, had the continuance of the war made it necessary.
...when we look back and consider new ships, under wooden sheathing, after eighteen months service in the W. Indies, obliged to have every plank stripped and shifted in a six month repair, and two of these very ships here examined ordered to be stored for the East Indies about the time hostilities ceased, after three years constant service without being refitted.
-
Log #24: Structural Supports & Fixing Mistakes
Thanks to everyone who has stopped by to take a look at the log. I do find your comments and likes motivate me to keep pushing forward.
Since my last log entry I have continued to work on the structure of the model. I will discuss that in more detail below, but I have also in the background been continuing my work on research. My current focus is on the coppering of Perseus. She was one of the first ships in the RN to be coppered and though I am not planning on coppering her, I am planning some aesthetic choices which will allude to the coppering.
The handwriting of the documents I am currently looking at is not as good as some of the stuff I have previously looked at so it is slow going with the transcriptions at the moment. But I thought I would share an interesting tidbit I found.
QuoteShips coppered between 79 + 1781 inclusive
Ships of the line 82
Of 50 guns 14
Frigates 115
[???] & Cutters 102
313It is interesting to see how quickly the RN went from very few ships coppered to coppering a huge share of the fleet. You can see in the above transcription that from 1779 to 1781, 313 vessels were coppered.
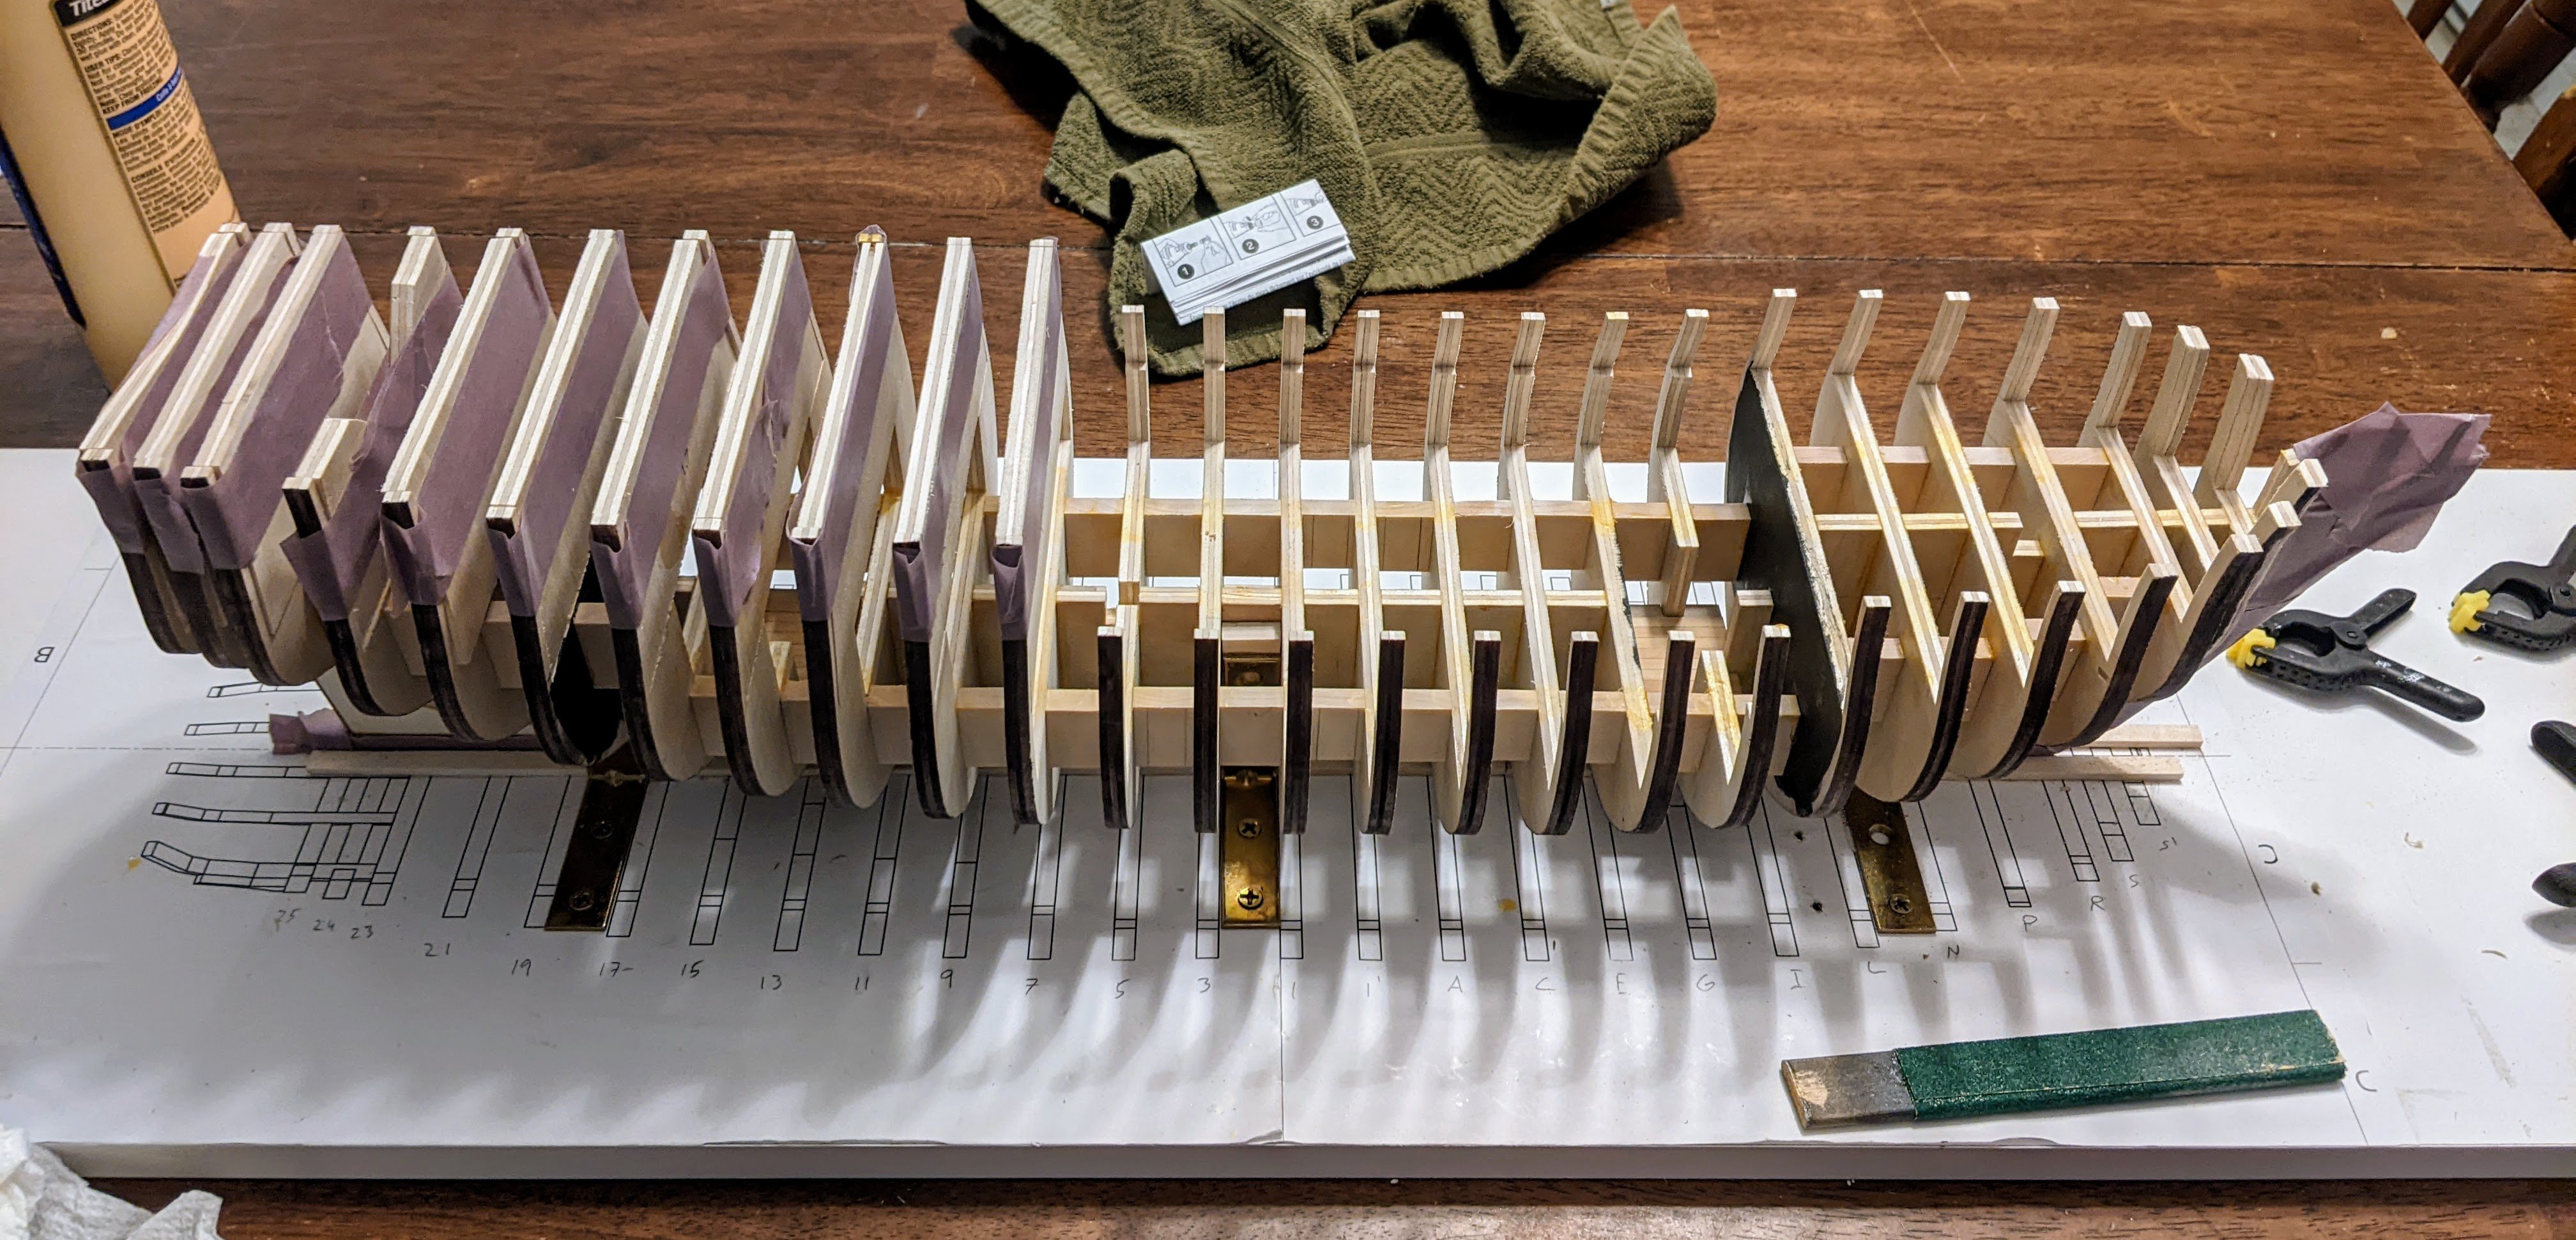
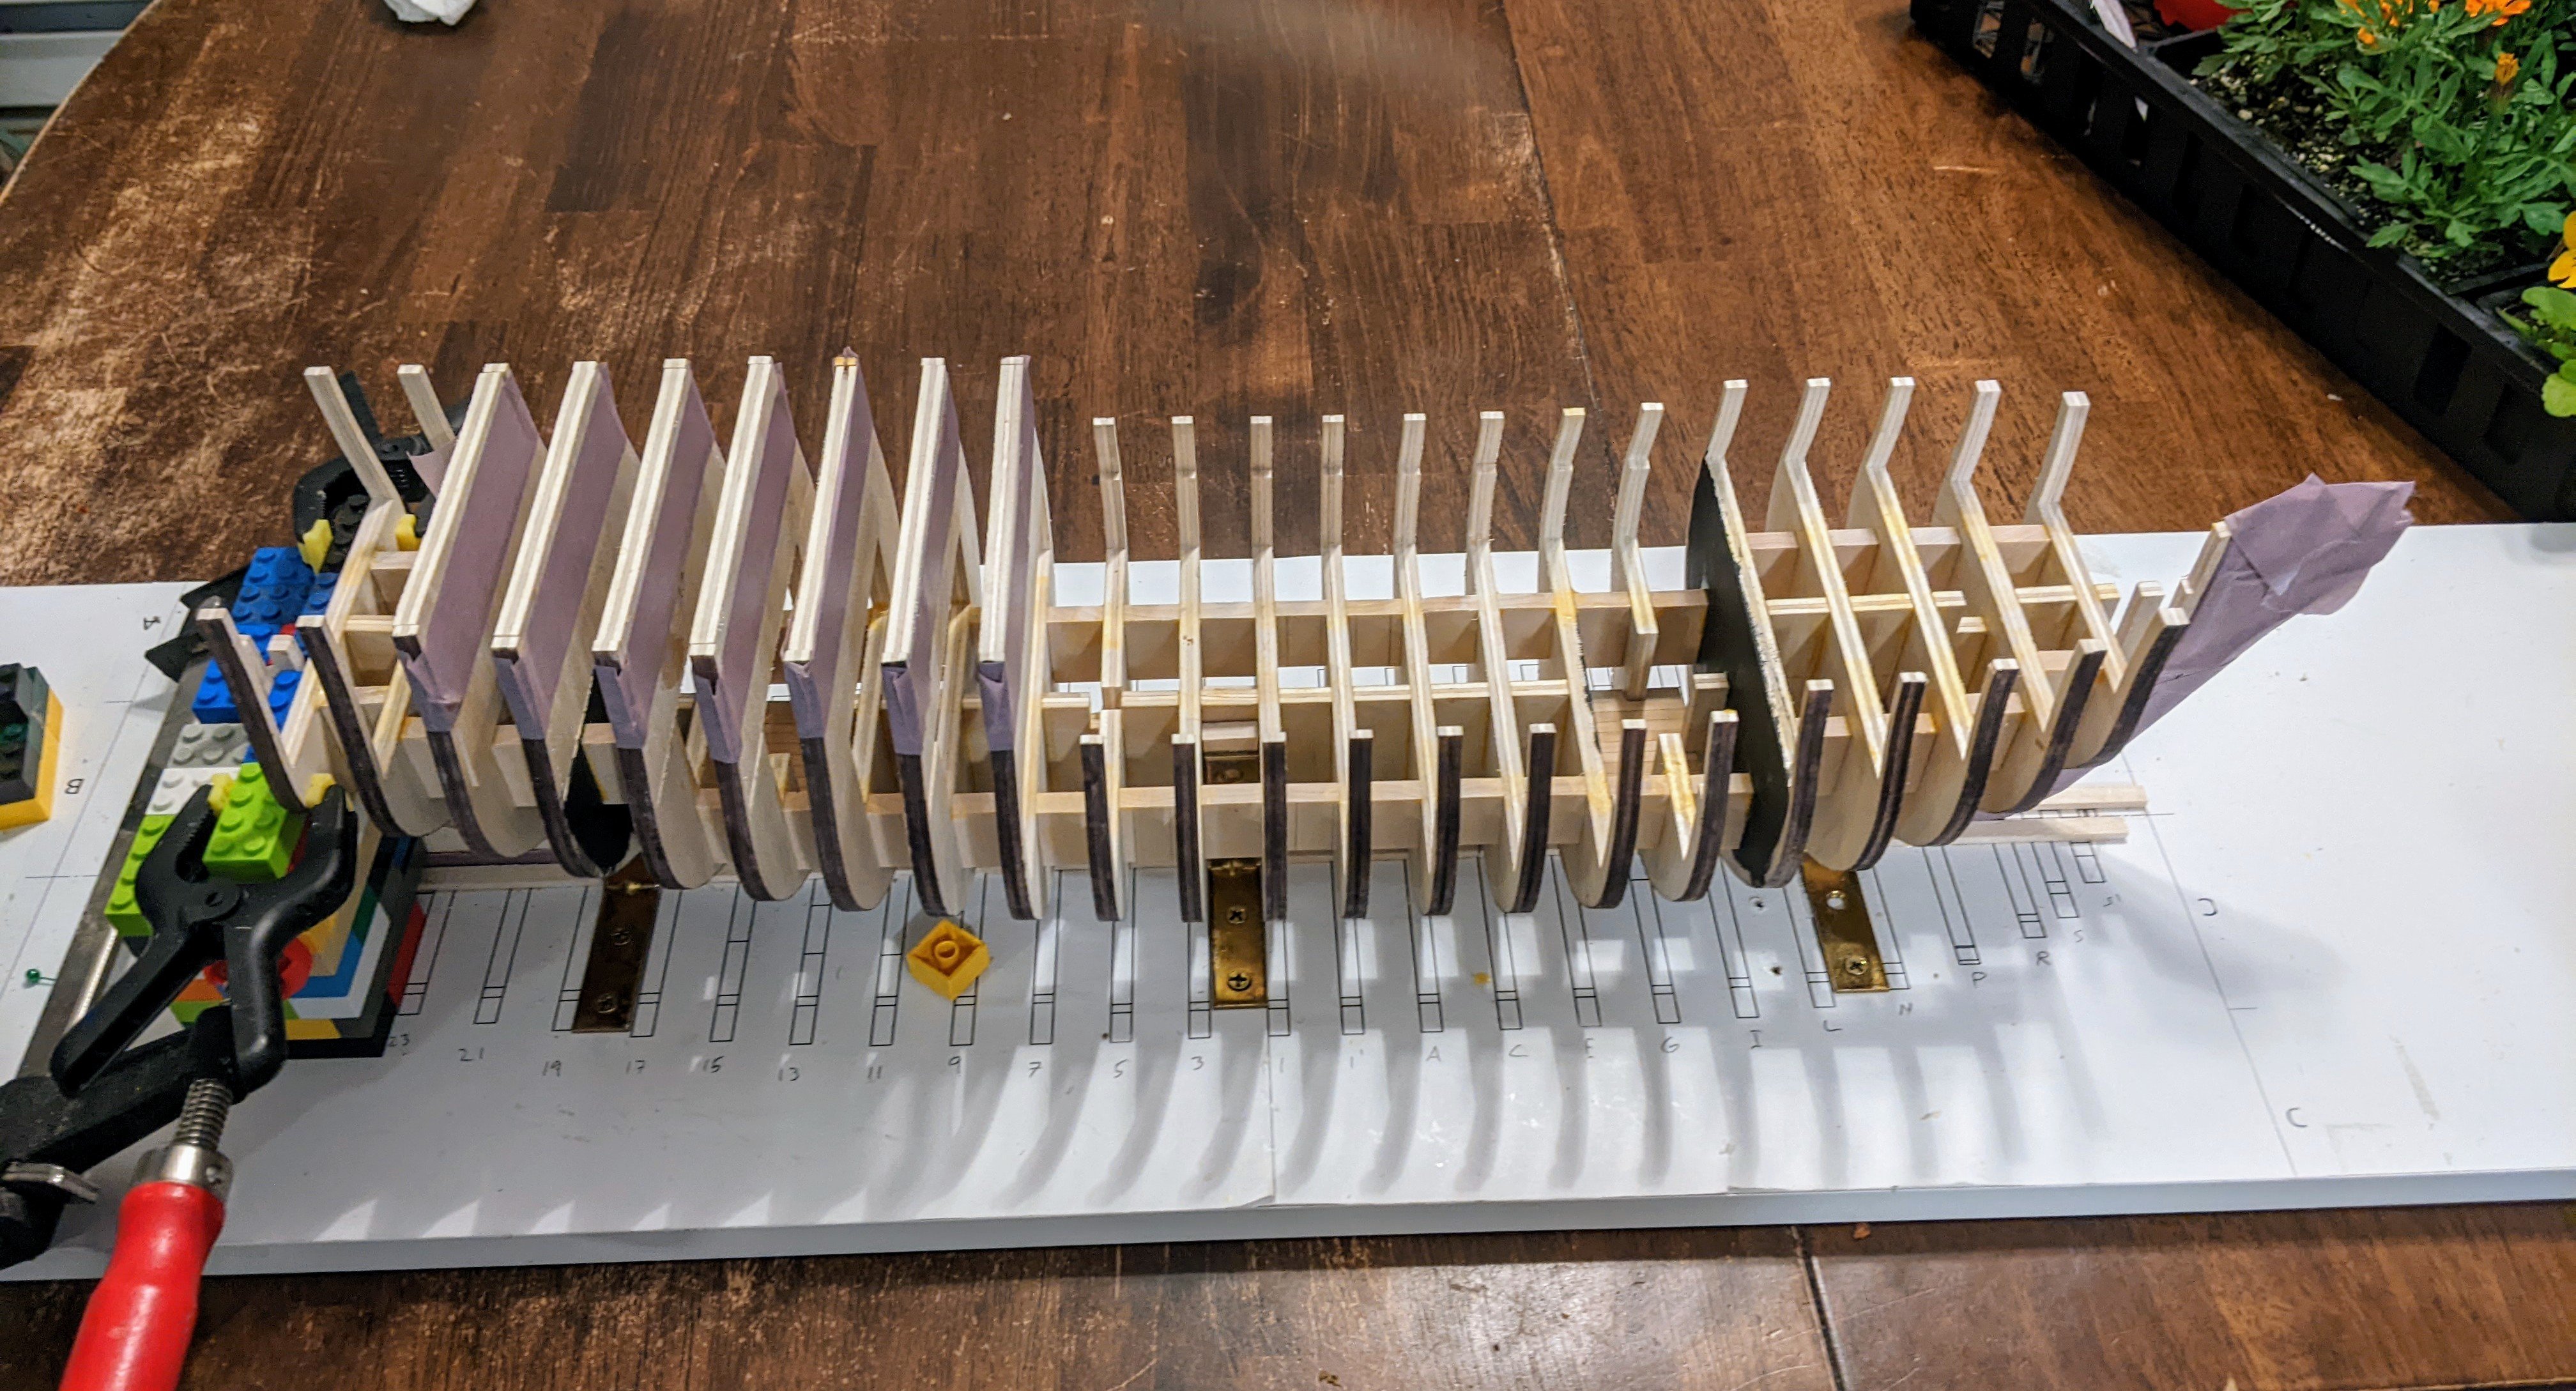
On the model itself, I have now got all the bulkheads in place. You will notice that the front two and stern two bulkheads do not have any bracing pieces as they are closer together.

The reason for the omission is that I am planning on filling in these sections fully with filler blocks. First I cut the bow filler pieces and glued them in place.

Then once that was dry I slid pieces of basswood which I had thinned to the appropriate thickness into the gaps between the bulkheads and marked off with pencil the approximate size they needed to be before cutting them out on the scroll saw. There is no need to be particularly accurate here so I have erred on making them oversized as this will all be sanded in the faring process. The most important part of this was making sure the bulkheads remained square through this process.

However, it was around this point that I realized I had made a mistake with one of the bulkheads. Essentially the slot was not deep enough and so it was not far down enough on the center bulkhead. It was only off by about a mm, but this is enough to throw off the lines of the ship. So I had to break out the isopropyl and slowly work it free with a knives and solvent. It was particularly unfortunate that the offending bulkhead was at just about the worst possible location (the stern platform also had to be removed). However after a few hours of working slowly and carefully on it, I managed to get it out.

Then I sanded and dry fitted it back in place, making extra sure of the positioning this time :).
Finally, I have also been starting the outer structural supports. This is a line of bracing pieces which run along the upper deck line. These serve three purposes:
- To allow me to correct for any warped bulkheads which might be square at the base, but are not square at the upper deck bulwarks.
- To strengthen the overall structure.
- To allow me to better see the line of the main deck to determine if I need to make any adjustments.
These pieces are inserted square to the bulkheads, but at an angle such that they follow the sheer of the deck. I will then use a combination of planes and sanding to trim them back in line with the frames.

Getting the sheer of the main deck right is crucial as it will determine the height of the gun ports.
It feels like this structural work is taking a really long time, but I am trying to avoid future problems by making sure I am constantly checking to make sure everything looks good now while it is easier to fix.
-
Great job Chris.
The buoys are well done.
-
I think that looks much better than your previous versions. Great jobQ
If you would like some suggestions to make it really pop, I would still go up a little higher in value on the highest highlights of the red. Maybe mix a bit of orange in with your red to get that highest highlight.
On the gold I would use pure white or maybe white with a little yellow in it and try and pick out the upper edges of the monogram and any sharp upper edge points such as the tips of the cannons. This would be really small dots/lines, but it will push that contrast just that bit higher.
-
I agree with the others that the second is probably the better option.
What I would suggest is there is a bit too much of a hard transition from the bonsai to the rock. To alleviate this you could add some moss around the base of the bonsai to allow for a transition to the rock. Not much, just a little to make it less of a hard line between the two.
-
Great job on the anchor. It does look like rusty metal.
-
-
Great job on some very finicky work.
- Keith Black, Knocklouder and Desertanimal
-
2
-
1
-
I don't have a tonne of progress to show, but as it has been about a week since I last posted I figured I would give a short update.
I continue to work away at the bulkheads and am now nearing the end. The only bulkheads left to put in place are the final two at either end. I have left these till last as the stern ones are the most fragile and the bow ones need some pre-fairing before I glue them in place.

Still lots of structural work to go, but she is starting to take shape now.
-
4 hours ago, Desertanimal said:
You want the planks to sit in position without having to push or pull the hold them in position. Once the dry fit looks good use a few drops of medium CA glue and you’re off to the races!!
I would say to look at several build logs to get what I mean.This is what you want to do.
If you have to force the planks into place they are not shaped right. The best advice I can give you it to treat every single plank as its own project. The planking is one of the more consequential parts of the model in terms of determining its look. So it pays to take your time with it.
- Zvr, Dan Poirier and palmerit
-
3
-
Great job, both the research and the execution.
- The Bitter End and Unegawahya
-
1
-
1
-
Time for a minor update. I continue to add bulkheads and am getting close to the bow at this point. You may notice some of the bulkheads have been painted black. The reason for this is I am as of yet unsure how much of the main deck I will open up to being visible and so on the off chance that these parts are seen I want them to fade into the blackness of the lower deck. They represent areas that would actually have been open and so we need to create the illusion of space.

One thing I don’t think I appreciated fully until now is how much minor errors or slight alignment issues can have significant impacts on a model when it comes to the main structure. I ran into one issue (though I was able to correct it) and since have been much more careful about checking everything in all 3 dimensions. This all makes me very thankful that the Vanguard Models kit I used for my first model was so precise. Really I took the structure of the model for granted. It is much harder when you have to cut and align everything yourself and even parts being a millimetre off can make a significant difference.
Thanks to everyone who is following along for all your encouragement.
-
-
Great job.
I like the top one the best. It just needs a bit more, it feels like it has the most depth. The issue is the mid tones need to be brighter so you need to extend what you have for highlights down over more of the surface and go for even higher values on the highlights.
In general it is better to make too much contrast as opposed to too little. You can smooth it all together with a thin glaze of your mid-tone once you are done if you think you went too bright. If you do this be careful that you don't let it pool in the recesses. It will have the consistency of a wash, but you don't want to use it like one.
Glazing over the transitions using the darker colour pulling from light to dark will also help with smoothing out the transitions if you are concerned about them.
-
-
On 5/17/2025 at 10:10 PM, Dan Poirier said:
Well, I'm getting a wee bit frustrated. My seizings on my shrouds keep coming undone after I trim the loose ends. I'm tying a square knot and soaking it well with dilute white glue, then giving it a day or more to dry, so I'm not sure what I might be doing wrong.
Maybe it's my dilute white glue? I keep reading "dilute white glue" but nobody actually says how dilute it should be - 50-50? 90-10 glue? 90-10 water?
Or maybe something else. It tempts me to reach for the CA glue, but I'm trying to avoid that if I can.
I used a combination of matt acrylic varnish and CA glue (not together).
If your rope is natural fibre then diluted white glue will work well. However if using polyester rope I found that white glue just did not hold. I used CA when I needed it to be strong and varnish when I needed it to just help a bit. You have to be really careful with the CA as you want to use only the tiniest amounts. As much as possible use non glue methods to secure things (the actual knotts that were used, running thread through other ropes to secure it etc…).
I discussed some of the specific solutions I used in my Alert log. Just note I was learning as I went along so I would recommend my later techniques over my earlier ones.
-
Welcome, a cutter is a great choice for a first wooden model.
Good luck.
- mtaylor, Kovalus, Ryland Craze and 1 other
-
4


Lancha Chilota by JacquesCousteau – Scale 1:32 – Chilean Coasting Sloop
in - Build logs for subjects built 1901 - Present Day
Posted
Great progress jaques. The sails are looking really nice.