allanyed
-
Posts
8,149 -
Joined
-
Last visited
Content Type
Profiles
Forums
Gallery
Events
Everything posted by allanyed
-
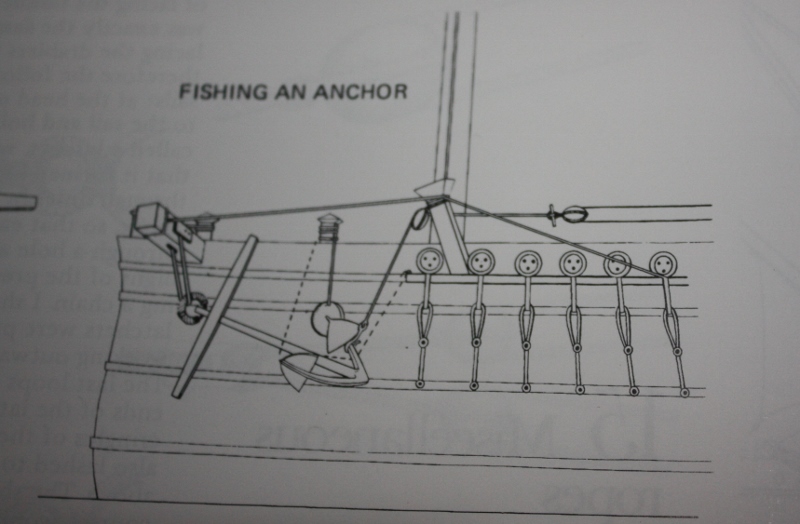
 Daniel, You can get a copy of Darcy Lever's The Young Sea Officer's Sheet Anchor on Amazon for about $10-$15 and it explains a lot. The following is from Lees book on rigging that had this picture from TYSOSA. Allan
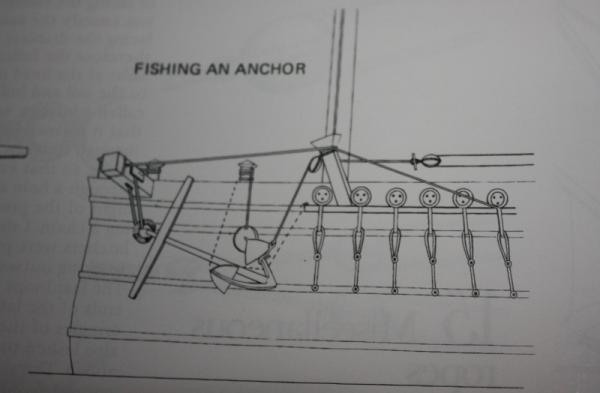
-
Thank you Pat, your comment is very much appreciated. One more BIG thank you is to Bob Friedman of Seawatch Books. Getting this book in print was loaded with visits from Murphy, but he made sure it got done when others would have said stop, it is not worth the grief or costs. Allan
-
Magnificent Ed, Getting the planking to fit so tightly takes well cut planks to start and some pretty ingenious clamping and wedging methods. As great as it she is, you are making it look too easy! Any fine tuning you have encountered and care to share as you are progressing would be welcome. Allan
-
I received an email that made some very nice comments and noted that I gave credit in the book to several people whose help was critical in getting the book as close to right as possible. I would like to give them the credit due them here as well. They all provided information that was of immense help. David Antscherl, Gary Bishop, Richard Endsor, and Wayne Kempson all had a strong hand in helping me get it done for which I am immensely grateful. Allan
-
Monello, I assume you know of all the plans available at NMM, many of which can be found on their web site. Details abound! http://collections.rmg.co.uk/collections/objects/79916.html is but one example from 1765. Now, start making some saw dust! Allan
-
Monello, One does not have to start small, nor with a kit. I believe you can do it. About 1976-1982 I built Victory and actually sold it, then built it again. Both were scratch and my first completed models so I know you can do it. (They were NOT as big your model will be) I look forward to following your build log. Allan
-
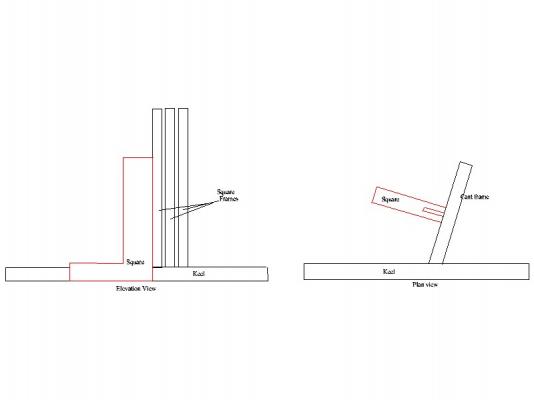
Michael, Assuming the keel is horizontal and not a tail dragger, if you put a square on the "ground" and the blade vertical and against the fore or aft side of the cant frame, or any frame for that matter, it should be flat against the blade, that is, 90 degrees to the ground. If this is not clear, let me know and I will post a photo this evening. The cant frames are canted fore or aft, but are still vertical. The following sketch may help. Allan
-
Bravo on what is the best cross section build I have seen in a long long time. Allan
- 662 replies
-
- 1
-

-
- bonhomme richard
- frigate
- (and 1 more)
-
Newton, No worries, we are all here to help one another in any small way that we can. Allan
-
Clearways The stations are round so I don't think etching would work. Some brass rod of various diameters and a bit of silver soldering is all that is needed to make them. They are painted white based on the photo posted by Nenad so no blackening of the brass is required. Just a bit of cleaning before painting. If you are not experienced in silver soldering, fear not ! The thought of silver soldering was rather intimidating to me before I gave it a try. Once I made a few soldered joints I was hooked and never again used CA, soft solder or epoxy for joining brass. Allan
-
Danny While the very very high quality of your work is obvious, your step by step series of photos is terrific and a great help to anyone that has not yet put together a bow from scratch. Making and fitting these parts is truly a challenge, but you have shown in a very clear way that it is a matter of patience more than anything else. Allan
-
Yam(?) My first visit to your build. Lovely. In reading the posts, I did not see the scale for this model. Is it 1/4? Thanx for sharing. Allan
-
Rob, The Janka Scale hardness for Tulep is 540 where as the poplar that we commonly see in the US is 500 and bass is 380 for a comparison. English box is 2840 and Holly is 1080. Best way to find out if it can be used is to try a few pieces and see how you like working with it. Allan
-
Ben, A glossary is a good idea. I should have thought about this a bit more and maybe could have squeezed one in, but we were right on the edge for the number of pages to get a low cost book. I hope the drawings will answer a lot of the questions though. Worse comes to worst, if there is a term that needs an explanation, please post it and I am sure it will be answered quickly by some member if I don't respond. Great find Don, thanks for posting it. Allan
-
Hamilton, What scale is your Fair Rosamund? Trennals (trunnels, treenails, trenails, tomato, tomahto) for the deck planks were relatively small. In addition, they were often seated below the surface of the deck planks then capped with a wooden cover piece so the end grain of the trennal was not exposed. If you are at 1/4 scale and you want to use and show treenails, go for it. They were probably no more than an inch diameter or less. The smallest hole on my Byrnes draw plate is needed to get this small. Not an easy task, even using bamboo. If I was building at 1/8 scale, I would not show them as I have no way of making them small enough. 3/16 is a close call but doable (look at Ed Tosti's Naiad build log for evidence.) IMHO, out of scale trunnels and hatch gratings are the easiest way to ruin the look of an otherwise fine model. Allan
-
For small boats at 1/4 scale I plank with holly and work from the keel up. On the hull of the ships themselves I start with the wales then add the thick stuff strakes above and below the wales. I then add the garboard as it can be tricky then do the planking in between the lower thickstuff and garboard strakes. Last, I do the planking above the thickstuff which lies above the main wales. Just the way I have gotten used to, not necessarily THE way to do it. Allan
-
Thanks Jay and Pat. I am sorry I was not the only one having trouble with the font size in Steel. I am glad to know that increasing the size is a help to at least one more set of eyes out there. I agree that a flat surface like a desk or bench is easier for using the book. Hard cover costs would have doubled the cost of the book and we really wanted this to be affordable. The binding used though does make the left and right page of each folio align better than Steel or the Repository. Allan
-
ancre Le Fleuron by cabrapente - FINISHED
allanyed replied to cabrapente's topic in - Build logs for subjects built 1501 - 1750
VERY VERY Nice work. Love the blocks and also the use of the milling set up. Allan -
The attached is Folio 1 from the Steel and SR tables. Note that the SR does not have the 80 gun ship. The anonymous author had some rather disparaging remarks about the sailing qualities of the 80 gun ships and purposely left the dimensions out. Why the 50 gun was not included, I have no idea. Allan Sample 1.pdf
-
Ben, Yep, for the SR and Steel tables, I used Steel as the default because the scantlings follow the order of construction to great extent whereas SR, well, not so much. Added to the challenge and a lot of time to "coordinate" them. Thanks Joss, I hope you will find it to be useful. Allan
-
Joss, Further to my last post, keep in mind that Steel has a lot of sizes/rates in his tables, but it does not include some sizes found in the other tables. For example he does not have any information on 100, 90, or 60 gun ships. It all comes down to the size and year of the ship you want to model. I use Steel a lot, but the next model I am contemplating building will be from much earlier in the 18th century, so Steel will be of very little help, if any. Allan
-
Thank you Joss, your point is quite valid and well taken. Steel was published in 1805. The Shipbuilder's Repository was published in 1788. The Establishments are as noted, 1719 1745 and 1750. This covers nearly 100 years of shipbuilding versus a more narrow time frame with Steel alone. I will post the first folios of each later today so you can see the differences for at least some of the principal dimensions. The dimensional differences carry through the entire sets of tables. They are often close, sometimes, the same, but there are definitely differences throughout. Thanks again for bringing this up, I appreciate the comment. Allan
-
Bob at Seawatch Publishing posted the news that the book of scantlings is now available to anyone interested. The Seawatch website gives a good bit of detail but I thought it would be a good idea to let anyone interested know a little bit about the book. This is not a novel. If you have trouble getting to sleep at night, it will work better than most drugs to fix that problem. BUT, if you are a model builder, especially scratch builders and kit bashers, there is information all in one place that required a rather extensive and expensive library up until now. Over 200 pages of the book are tables of British Naval ship scantlings and dimensions, including: A.) 1719 and 1745 Establishments and the 1750 modifications to the 1745 Establishment. B.) 1788 Shipbuilder's Repository and Steel's Elements and Practices of Naval Architecture scantlings for ships from 110 guns down to 10 gun brigantine. Merchant vessel scantlings were not included because there just was not enough room. C.) Boat scantlings from Steel D.) Anchor scantlings from Steel E.) Drawings showing many of the items listed in the scantlings. I hope this will turn out to be a helpful source to many of you. Allan
-
Ian, The names were painted on the ships, some plain, some not so plain. Printing them as described above, on THIN paper stock that is the same color as the counter is a good idea, but you can also make a thin paper template, paint it the same color as the counter, then paint the name. After drying, glue onto the counter. David Antscherl goes into great detail on how to do this in TFFM. Allan
-
Black Strake
allanyed replied to Chuck Seiler's topic in Building, Framing, Planking and plating a ships hull and deck
Chuck, I have used thinned acrylics and I do like the results, but I prefer using several coats of India ink. There are no brush marks, it penetrates well and maintains a consistent matte finish. Allan