


Rustyj
-
Posts
2,449 -
Joined
-
Last visited
Content Type
Profiles
Forums
Gallery
Events
Posts posted by Rustyj
-
-
-
Hi Mark,
I've just had the pleasure of going over your build log and catching up from my busy season. Great work my friend!
I loved watching your progression and how you worked through each portion of the framing. So very well done!
An inspiration to us all. Also consider the like button pounded until it wore out.

Best of luck on the stern, but then I don't think wishing you luck will be needed at all!

-
Hi Chuck,
I found this log a couple of days ago and read through it and love what you are doing. But that's a given anyways.
If you keep this up I'm gonna have to sell the couple of kits I still have on the shelf.

- WackoWolf, Chuck and SawdustDave
-
 3
3
-
Hi Elia,
It's was great to hear from you and thank you!
No pictures to post but I wanted to let you know that I am working along. Slow but sure. I've almost completed
the second belt of planking but work will halt for a couple of weeks as I have to take the Admiral on a vacation.
It's one of those good/bad things. Vacations are great but I hate missing the shop time.
See ya all in two weeks.
-
-
She looks wonderful Chris.
I like your thoughts and it would be a shame not to finish her. Go for it!
-
-
Thanks Druxey, I'm onto the second belt and with each plank cut out gets easier or I should say more comfortable.
Thanks Bob, Fun but slow.
Hi Alistair, Follow Chucks directions and you'll not have a problem.
Thanks Sjors.
Thanks everyone for all your likes too.
I'm heading back to planking now!
-
Hi All,
When starting the planking I wondered about the waste, or maybe better put, the amount of wood needed
to plank the hull in this manner. I started with a 2" x 18" piece of wood and I was able to cut all the spilied
planks for both sides and still had wood left over. I was very pleased with this.
Now onto my impression of this style of planking a hull. In the words of my sweet granddaughter
.......OMG........ though time consuming it was soooooo much easier to lay the planks. No twisting and
bending and forcing them into place.
Here are pictures of both side rough sanded. Once the entire hull has been planked I will progressively
sand it down to 400 grit and then seal with wipe on poly.

On to the second belts!
-
-
-
Hi Ben,
I just had an enjoyable read catching up on your build. Your workmanship and
dedication to "getting it right" are outstanding!
Great work my friend.
- Trussben and billocrates
-
2
-
Hi Joe, Good to hear from you!
Sjors, Look as close as you would like. Just watch out for splinters.
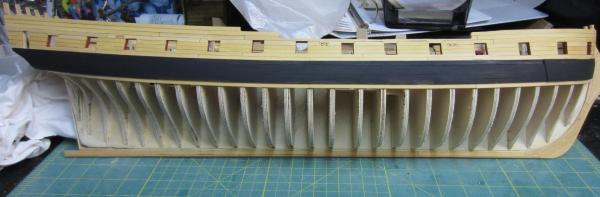
Some planks had been placed, trashed and broken but progress has been made. At the bow I have fit and glued
the first 7 rows which is the first belt. I am working my way to the stern and will finish up the entire belt before
I move onward.
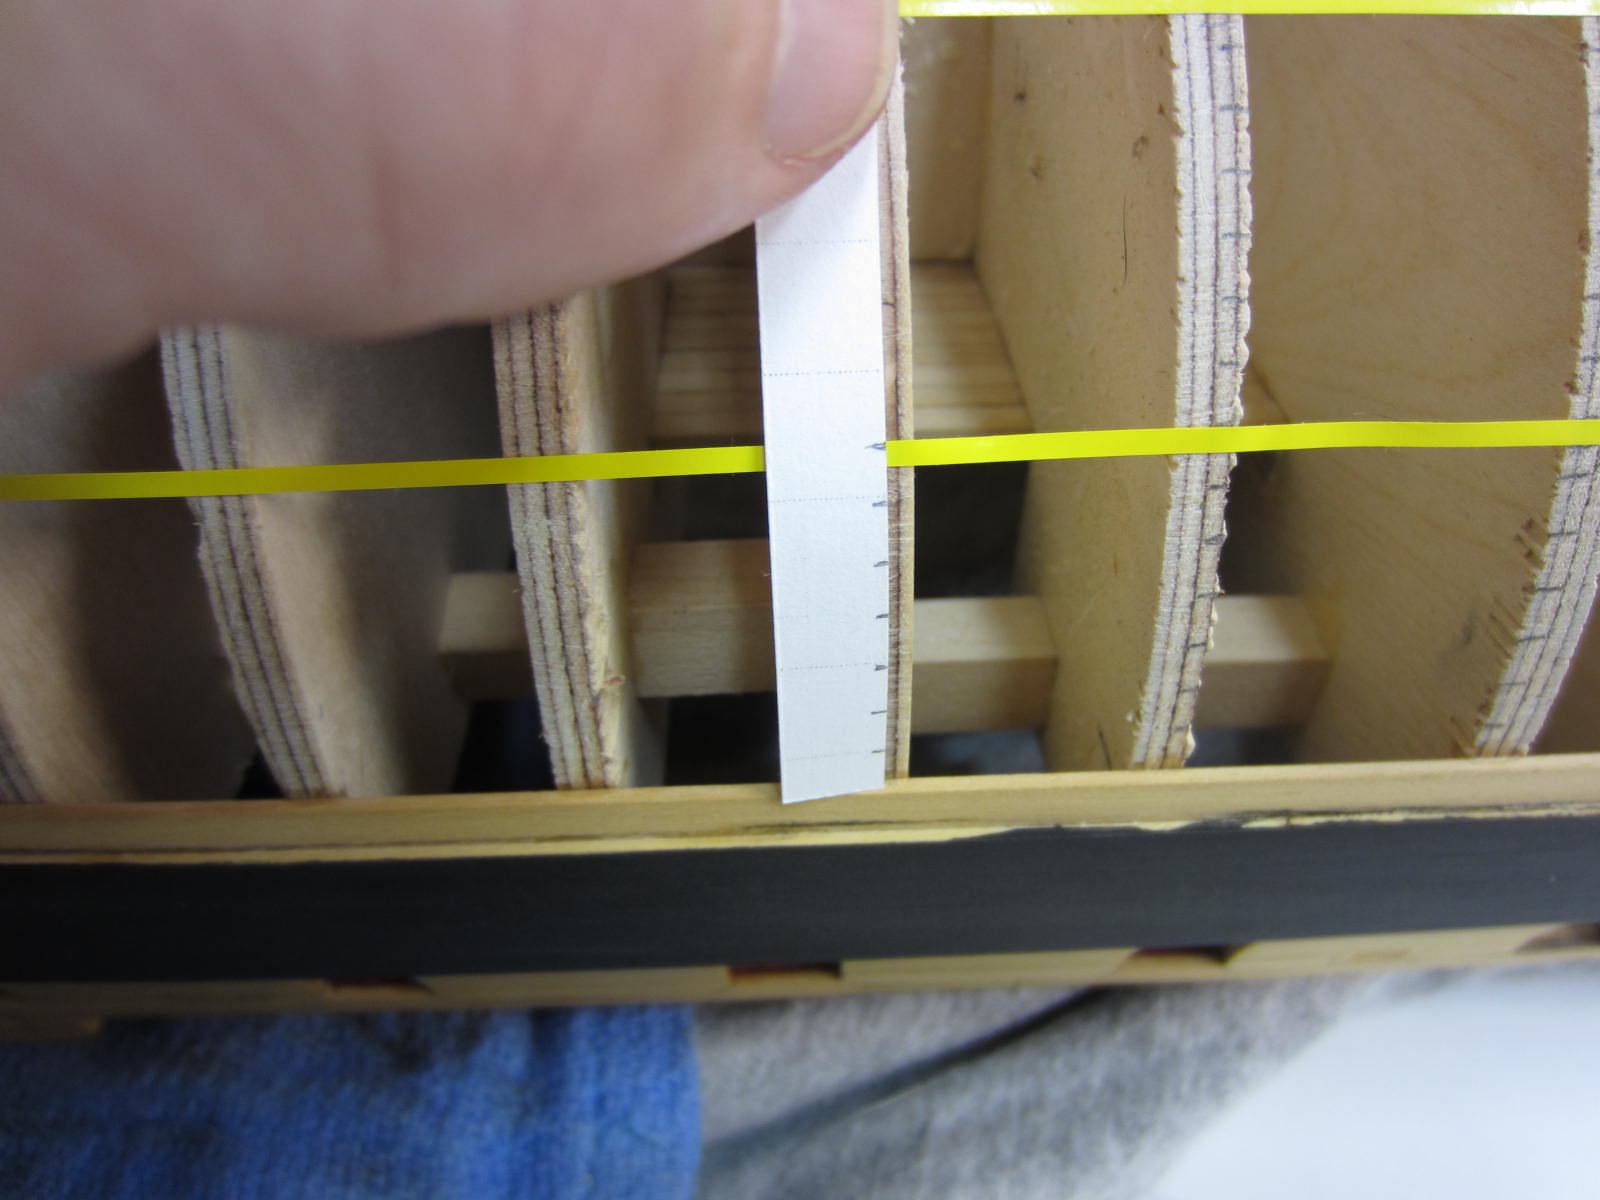
Here is a demonstration picture of marking off the plank to be cut. The tape is placed on the hull and then using a
pencil you mark the edge of the plank where it meets the existing plank. Then I marked the bulkheads. At each
bulkhead I then mark the height that was already placed on the bulkhead. The tape is taken off and placed on the
wood to be cut out and using a French curve the top marks are connected giving you the shape of the plank. Because
the pencil lines are hard to see on the camera I traced over them with a sharpie so you can see them better.

I won't use this piece as my tracing was a little to inaccurate.
For a much better description follow check's link above!
- Sjors, WackoWolf, Ryland Craze and 19 others
-
22
-
Thanks to all for stopping by and all the likes,
Hi Chuck, I am enjoying it. It's a little different to cut out but they lay down sooooo nice!

Thanks Jason.
Hi Ben, It' s good old boxwood. I've got to stop by and see how you are doing on the Pegasus.
Hi Pat, Good to be back, We'll see what kinda groove I get into here!

Hi Grant. Time will tell.
Hi Bob, I hope so and I've got to catch up with you as well as everyone else too!
-
Hi All,
Well in case you didn't notice I've been AWOL for a while now. August and the first week of September is really busy at work. 80 hours work weeks with no days off blah, blah blah. Boy that was no fun. I used to be able to do it no problem but now it kicks my butt. So it was work, sleep, dream of working on the Winnie and then back to work. Once that was over it was another week or so to catch up around the house with all the things that needed my attention.
So I've now looked at MSW and found 11 unread pages in the Kit Build Logs and 4 pages in the Scratch Build Logs. Not to mention, oops I just did, all the other topics!
So to all my friends out there I'm sorry I missed posting to your logs for the past 6 weeks and it may take another 6 weeks just to catch up.
Now that I've got my whining out of the way here is where I'm at.
I have not completed marking all of the bulkheads with the plank locations. That was over 1400 little pencil marks. I'm seeing little dashes in my sleep know.
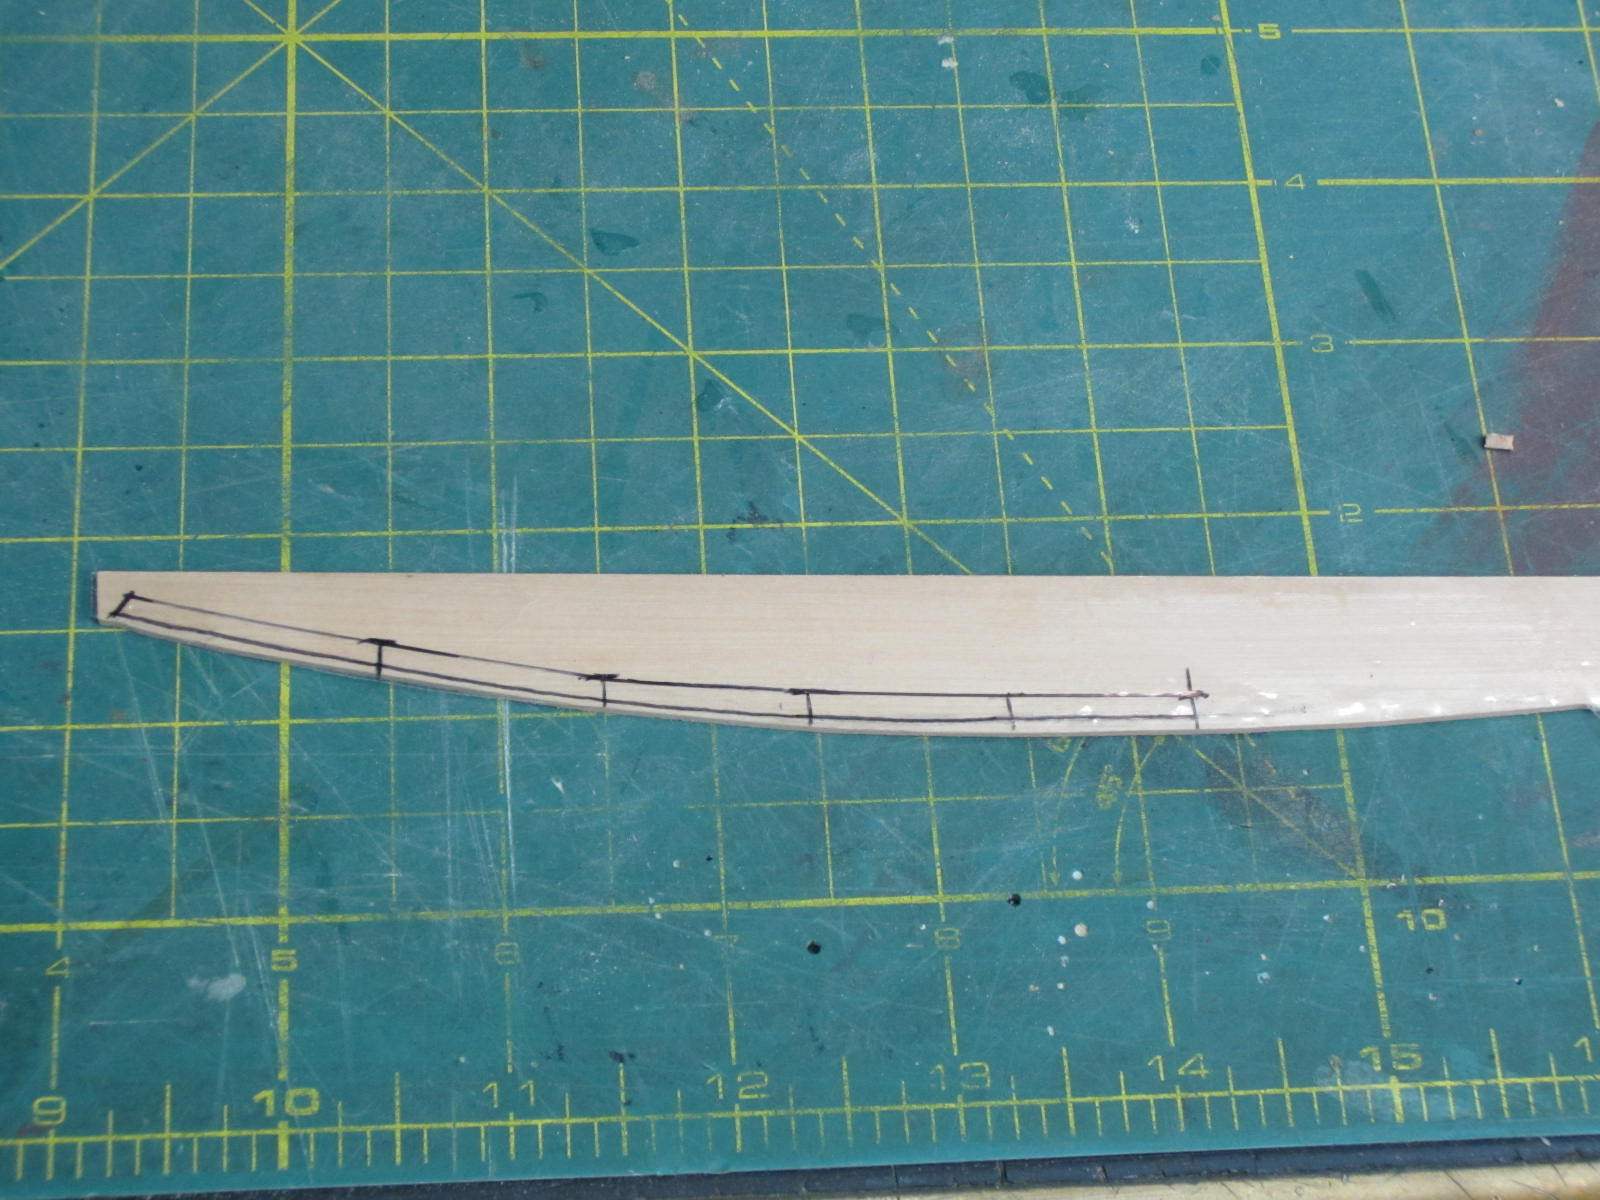
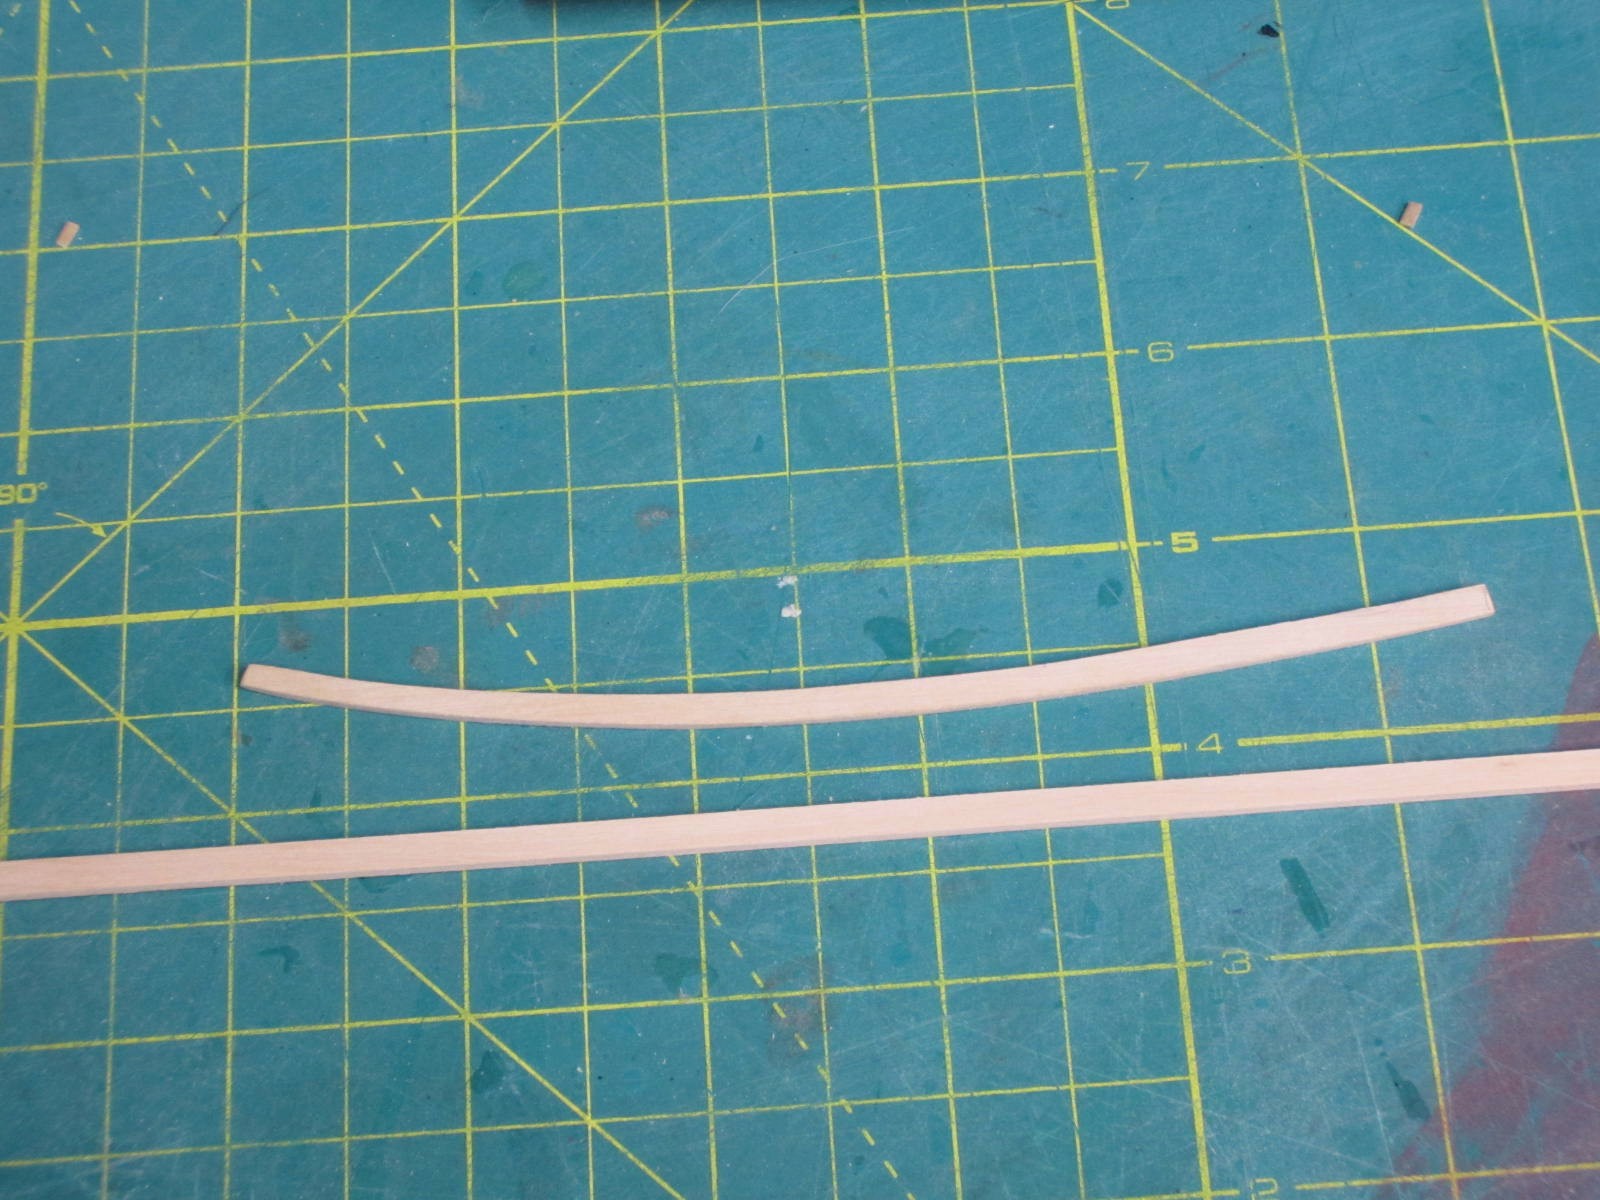
I've now started on the planking and here you see my first attempt at spiling a plank. You can see the curve compared to a piece of strip wood.
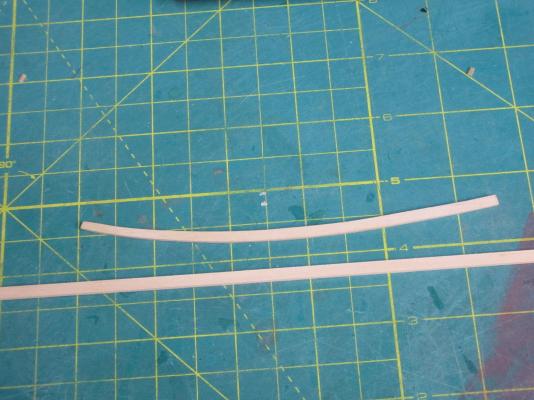
Well I've now started the planking and will let you know how it goes.
- BANYAN, Chuck, realworkingsailor and 20 others
-
23
-
-
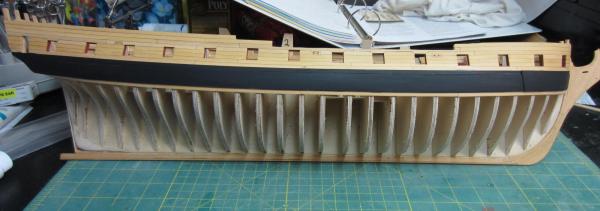
Thanks Ben and Sjors. Only two coats of paint and when viewed up close you can see the differences
in the coverage. Several more will be needed.
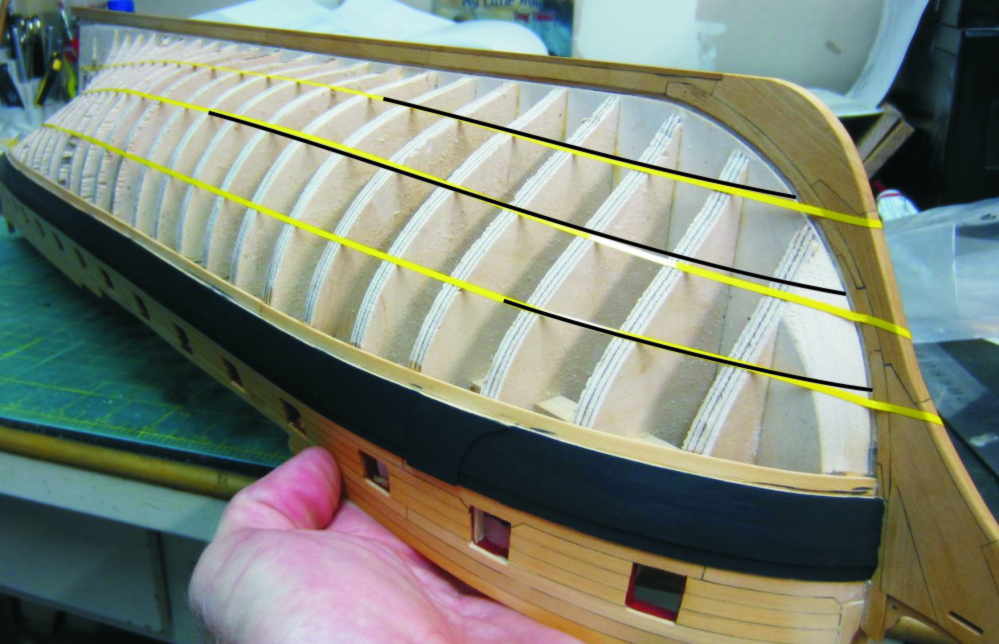
Well this is the start of Chapter 5, planking the hull below the wales.
Chuck describes how to plank the hull with no drop planks at the bow and no stealers at the stern.
This is something I have never been able to accomplish. The description is very detailed and I'm
hoping to duplicate it.
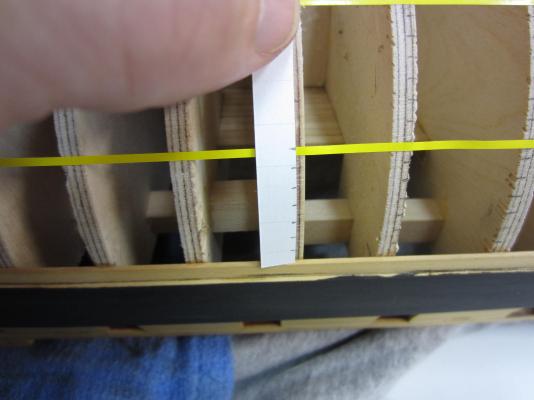
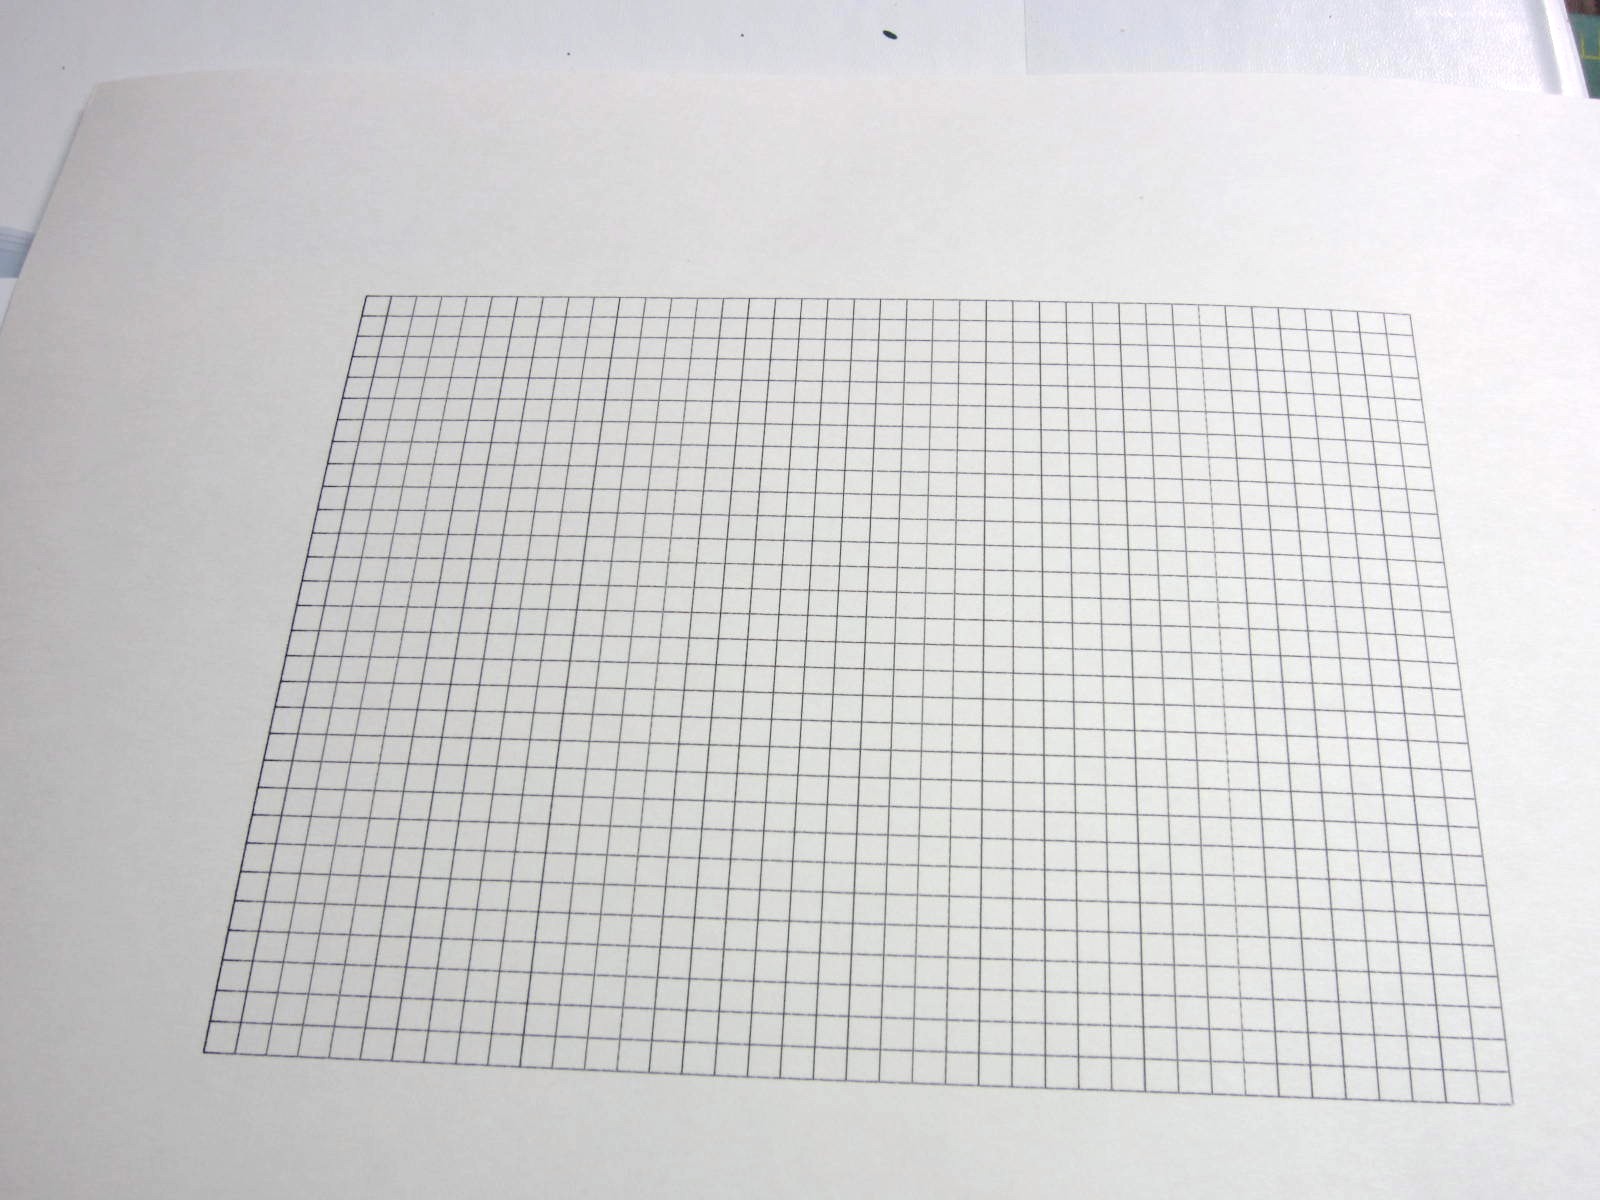
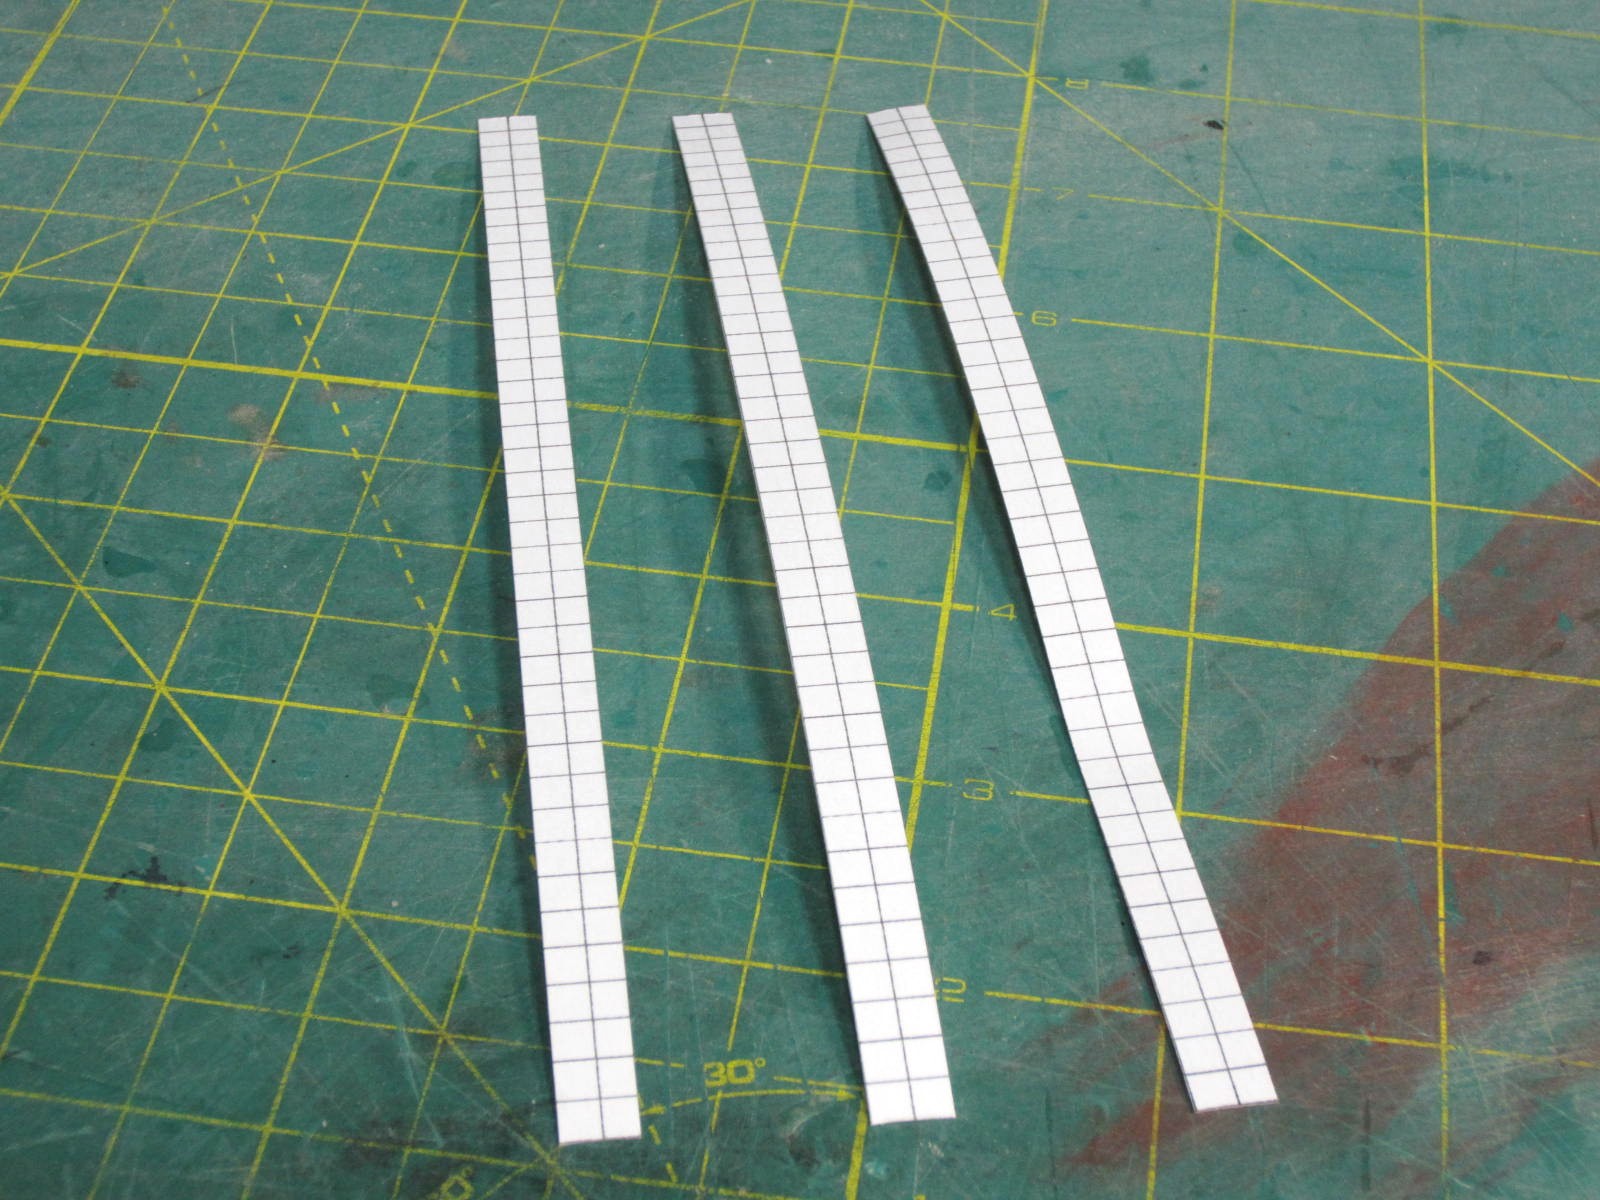
First a paper tick strip was to be made and divide it into 5/32” increments. To keep as many errors
out of this process as possible I made my tick strip from 5/32" graph paper printed on card stock
instead of using a ruler and pencil and transferring the marks to card stock.
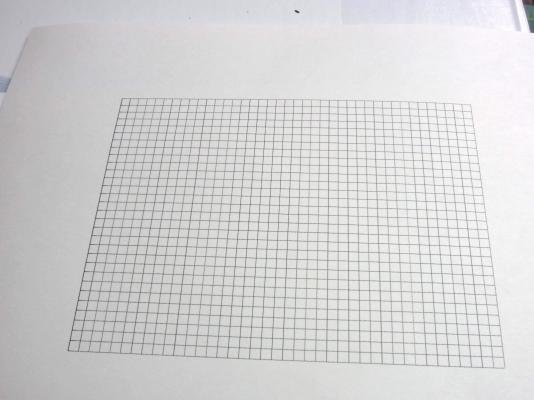
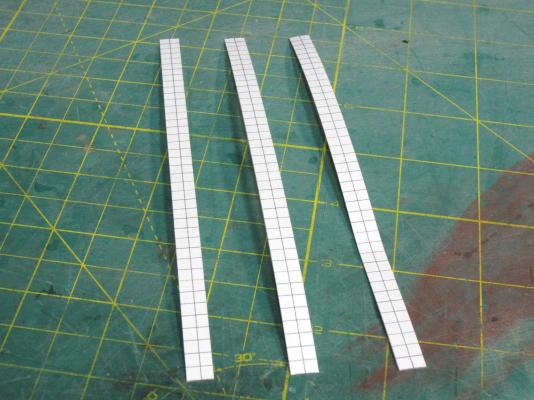
Next I positioned the strip along bulkheads “1” and “A” and marked the increments. There are a
total of 24 planks so there will be 4 "belts" of 7 planks each.
Chuck wrote;
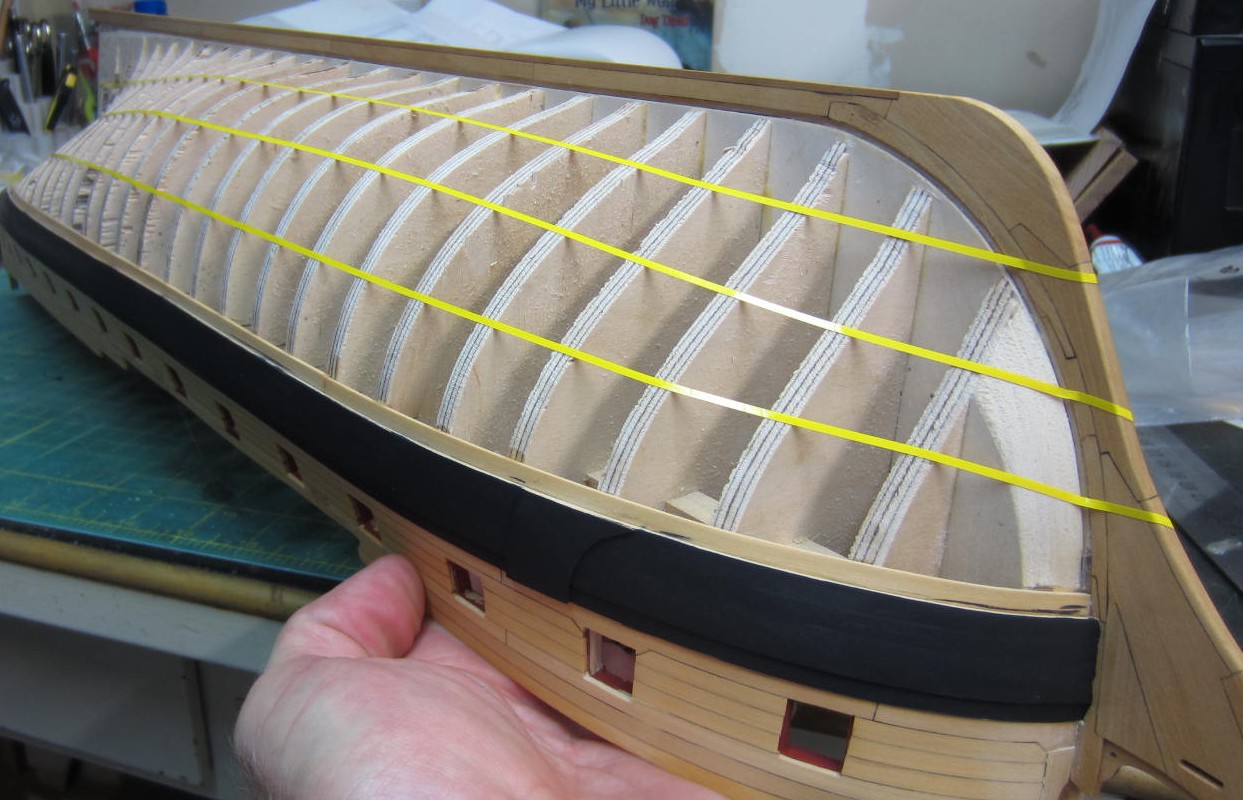
"We will have to determine the exact width of each strake at each bulkhead. To do this, the hull is
lined off with graphic art tape into the four belts first."
I had some yellow pinstripe tape so I used that to mark off the hull belts. After applying the tape and
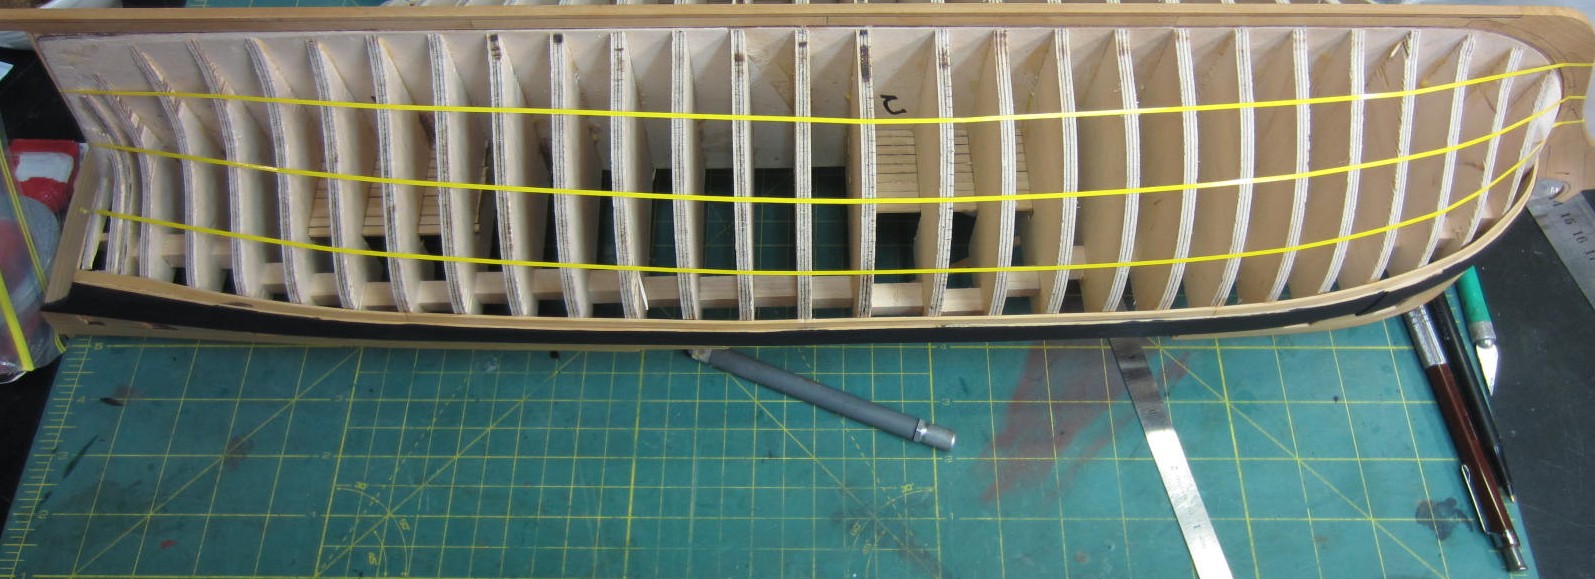
tweaking to get a smooth even run I sent these pictures to Chuck.
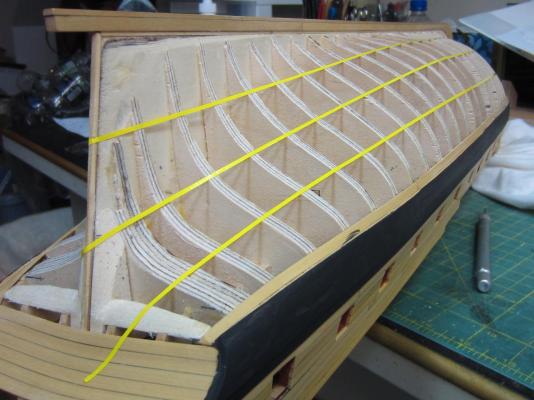

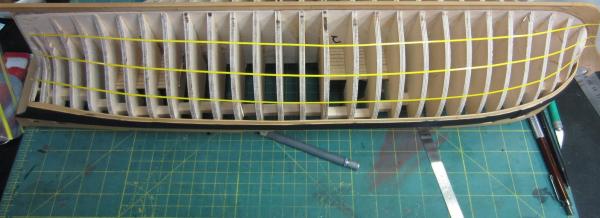
His sharp eye caught some runs that weren't the best and sent this back which I used to adjust
the belts run.
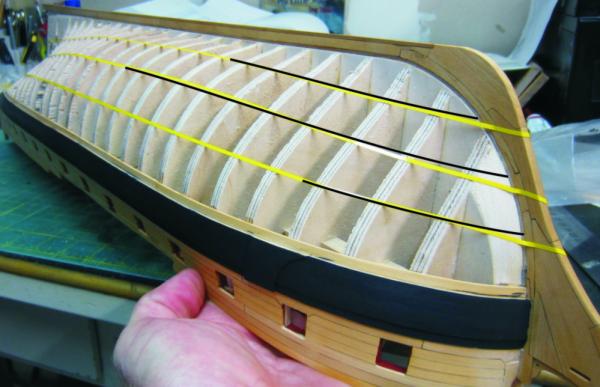
Now I'm off to do the starboard side.
-
I'm also glad to see you're back at it. I see the time off hasn't hurt your work either. Very well done!
-
Thanks for all your help Chuck!
Hi Bob, Thank you, you're too kind.
Thank you Greg.
Hi Augie, Still waiting for your address though they may be a bit stall by the time the post office gets them there.
Thanks Dirk.
Hi Floyd. So far just 2 coats though there will be many more before she's done. I use acrylic paint and thin it
about 50/50 with water. I'll eventually switch to artists paints in the tube like Chuck uses but I still have this black
paint left and I like it's matt finish.
Also thank you all for all the likes. It's very much appreciated.
-
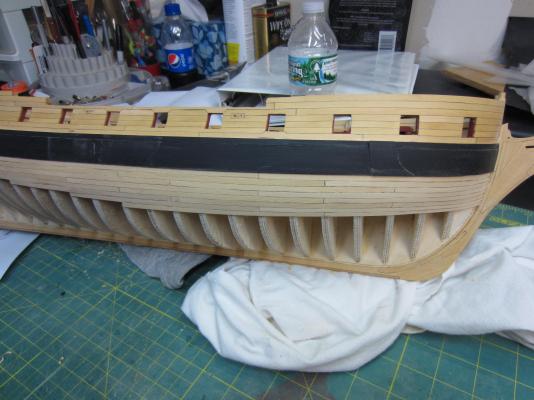
OK I've been continuing my work on the wales and black strake. The first picture you
will see one coat of black paint applied.
I then went over the wales sanding some and taking care of a couple of joints that weren't
as tight as I thought they were. Just put a dab of glue on the crack and sanded it.
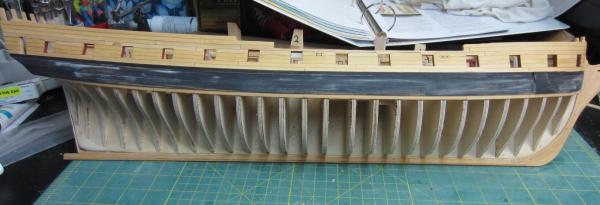
And here you see it with a second "wafer thin" coat of paint. So far that is it!

I'll be spending the next few days trying to lay out the run of the planks and not bugging
Chuck to much while doing it.

- fatih79, harvey1847, UdoK and 18 others
-
21
-
Hi Chris,
I'd really be interested in something like this too. It looks like a really nice mind clearer and as you said
can produce a great looking model. If you do decide to do it I'll be glad to follow along!
-
Hi Chris, I'm asked why I have 2 or 3 builds going on at once. It helps me from getting "tired" of a build especially a
long term (3+ years) scratch build like the Confederacy. Mix it up, get the plans, have fun with the kids, do what makes
you happy! She'll be patient and wait until you are ready to finish her. Nothing worse than forcing yourself to finish a
model. Especially one that you have done such great work on.
-
Ah Bob it's so nice to stop by and view your work.
Love It! -


HMS Winchelsea 1764 by Rustyj - 1/64 - POB - 32-Gun Frigate
in - Build logs for subjects built 1751 - 1800
Posted
Hi all,
Well I'm back and glad to be back in the shop and it feels sooooooo good. The first thing I did was
to clean up a bit. Mind you it had nothing to do with running out of room to work.
One of the things I did was solve the issue I had with my vacuum hose being the same diameter as the
outlet for my Byrnes tools. I broke out my handy dandy lathe and took a 1 1/4" PVC coupling milled the
inside diameter to match the outside diameter of the hose and bingo I had a quick coupling.
The next thing I wanted to do was cut some sanding paper for my thickness sander. Normally there are
two 3" strips of sand paper on the drum. Sometimes though I sand wood that is 3" or wider. Now you can
put two strips of sandpaper side by side but that tends to leave a little grove in the wood from where they
meet. So I got some 6" wide sanding belts and cut strips that cover the whole drum so now, if needed, I
can sand wood up to 6" wide now in one pass.
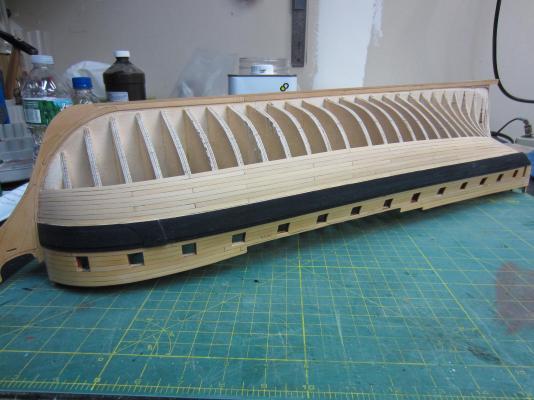
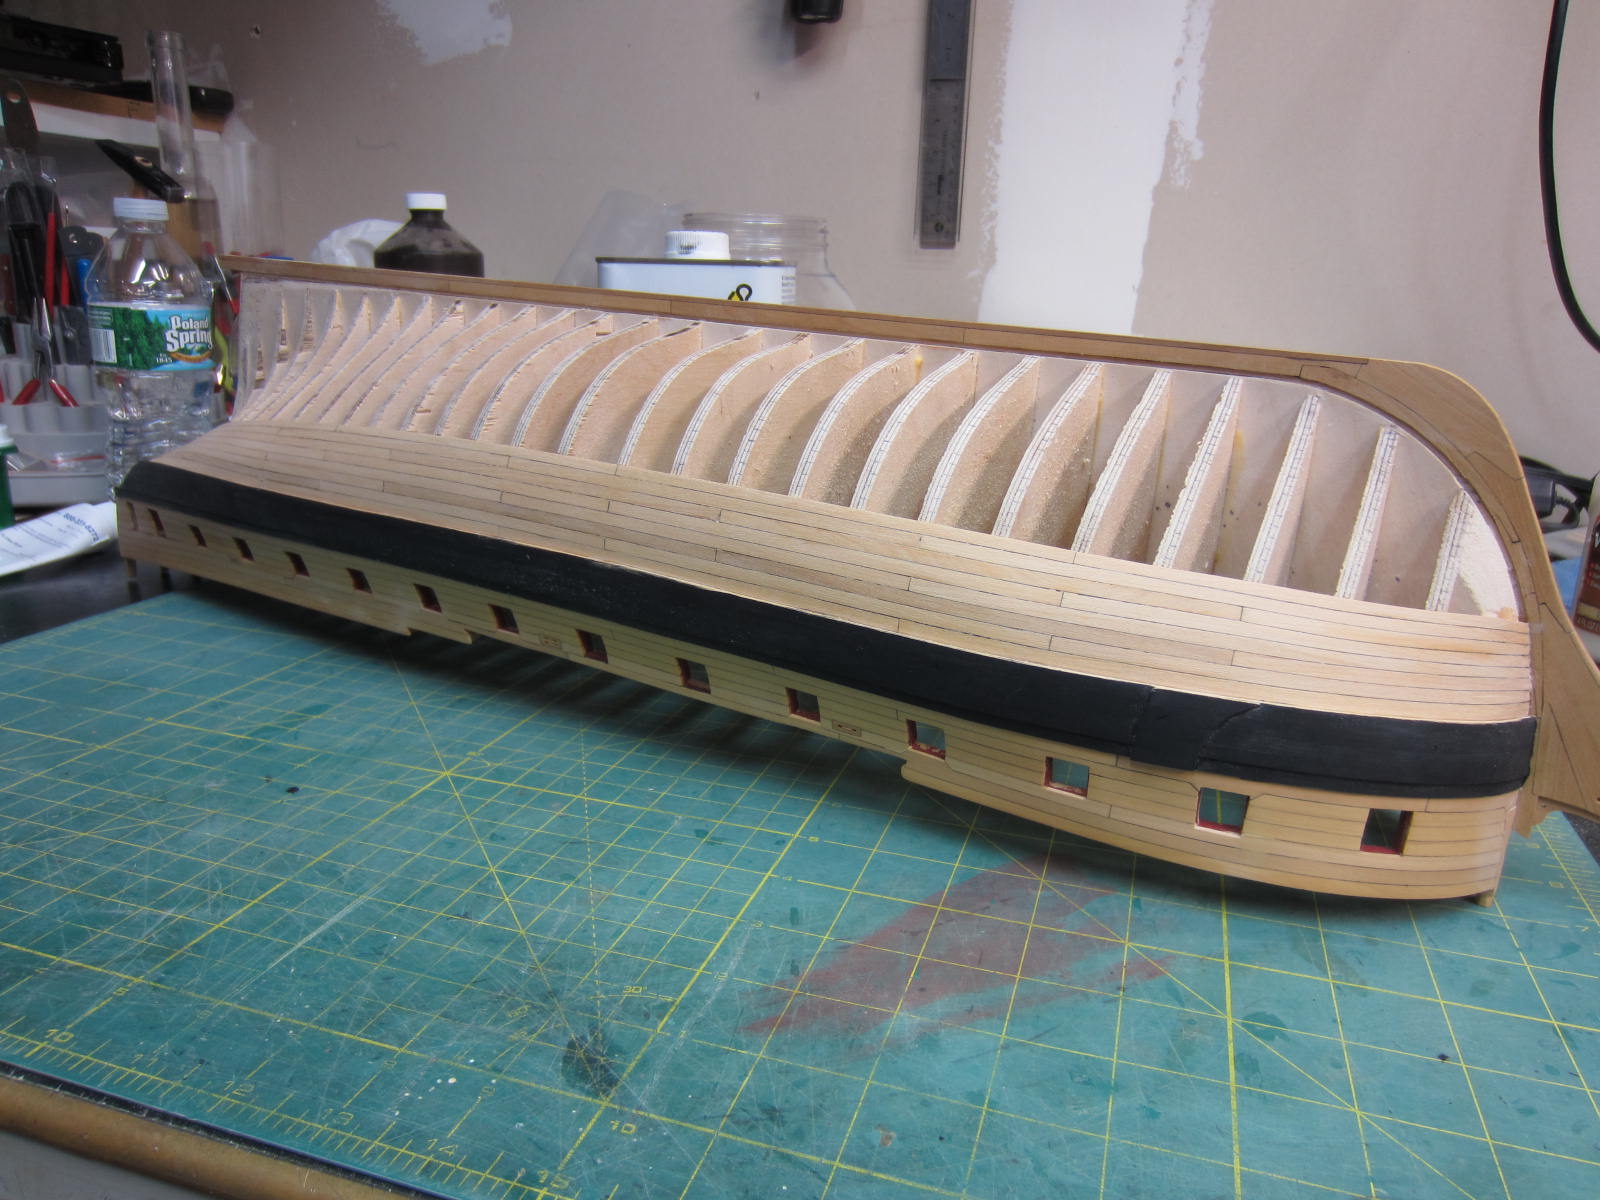
Ok back to actual modeling here. I have now completed planking the first two belts on both sides of the hull.
So far so good. Not stealers or drop planks. And as I said before it is slower but the planking is much easier.
Everything has been sanded with 120 grit paper. Once the whole side is planked I'll finish sanding it
and apply a couple coats of wipe on poly. Now it's not a pristine as Chucks but I'm happy.