HOLIDAY DONATION DRIVE - SUPPORT MSW - DO YOUR PART TO KEEP THIS GREAT FORUM GOING! (Only 24 donations so far out of 49,000 members - C'mon guys!)
×
Javelin
-
Posts
624 -
Joined
-
Last visited
Content Type
Profiles
Forums
Gallery
Events
Everything posted by Javelin
-
 Good decision Great job on that pile driver, great weathering, looks very real!
 -
I'm with Rick. Many thanks for that explanation about the panels (and sponsons). Great results on both. She'll look awesome.
-
I've following for a while as well, just being very slow in showing myself. Been pondering about ways to make that whirlpool... Really can't come up with any ideas. I'm really curious how you'll do that!
- 185 replies
-
- 8
-

-
- Flying Dutchman
- Black pearl
- (and 2 more)
-
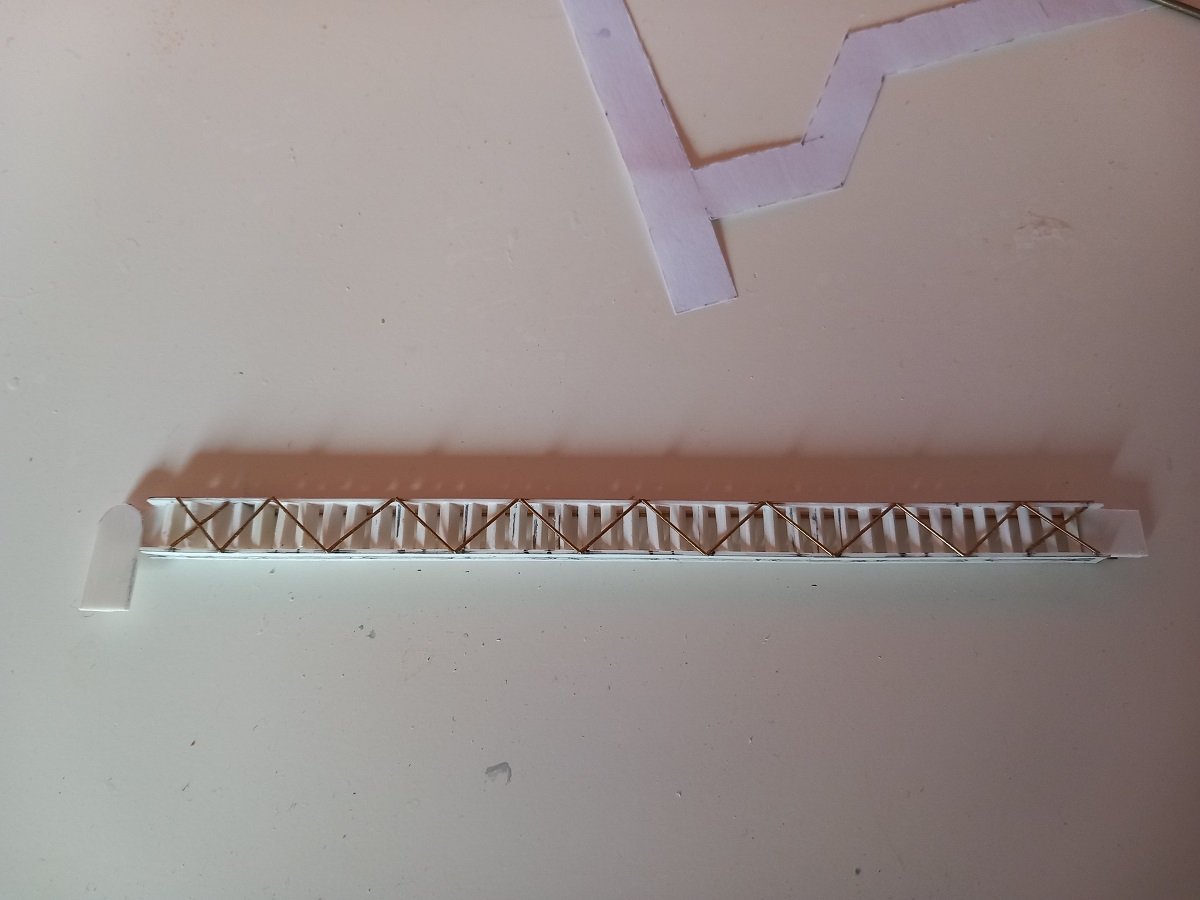
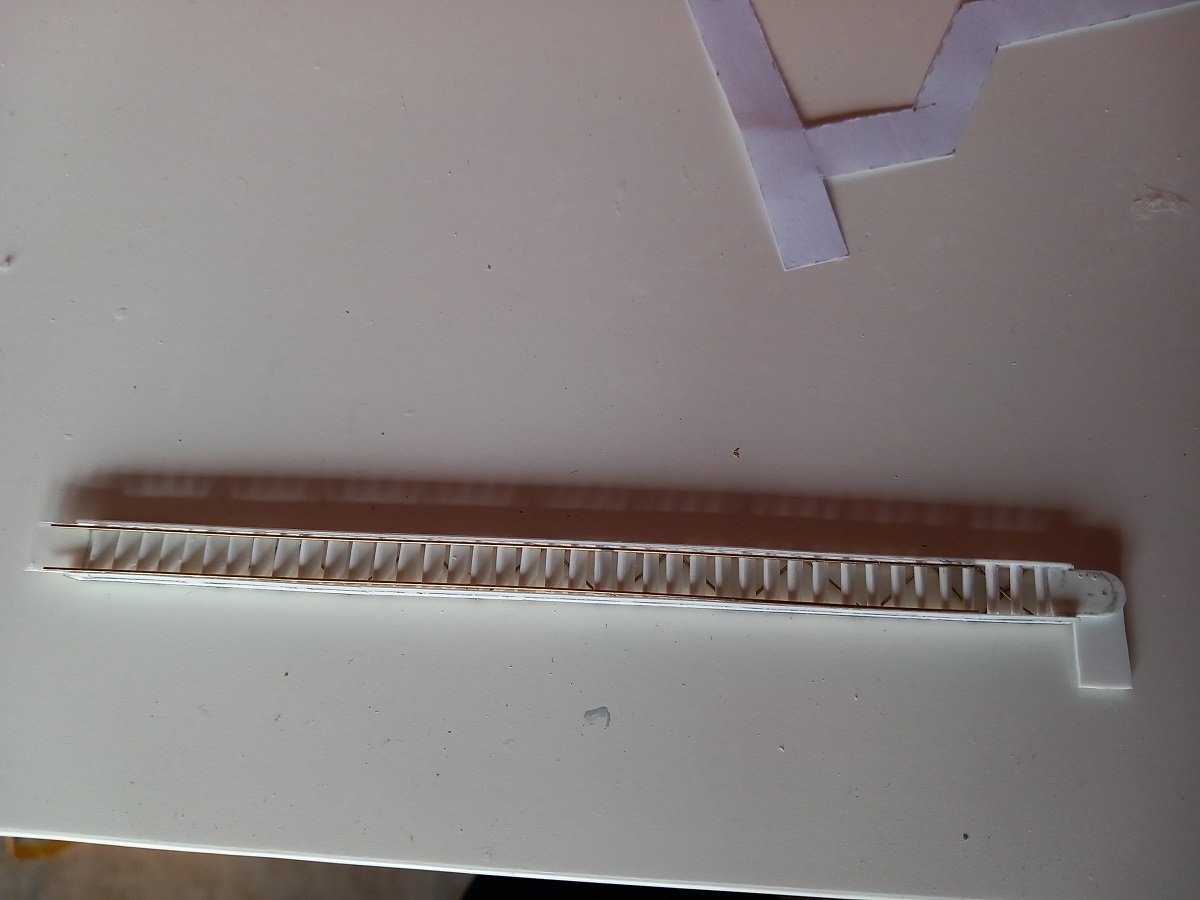
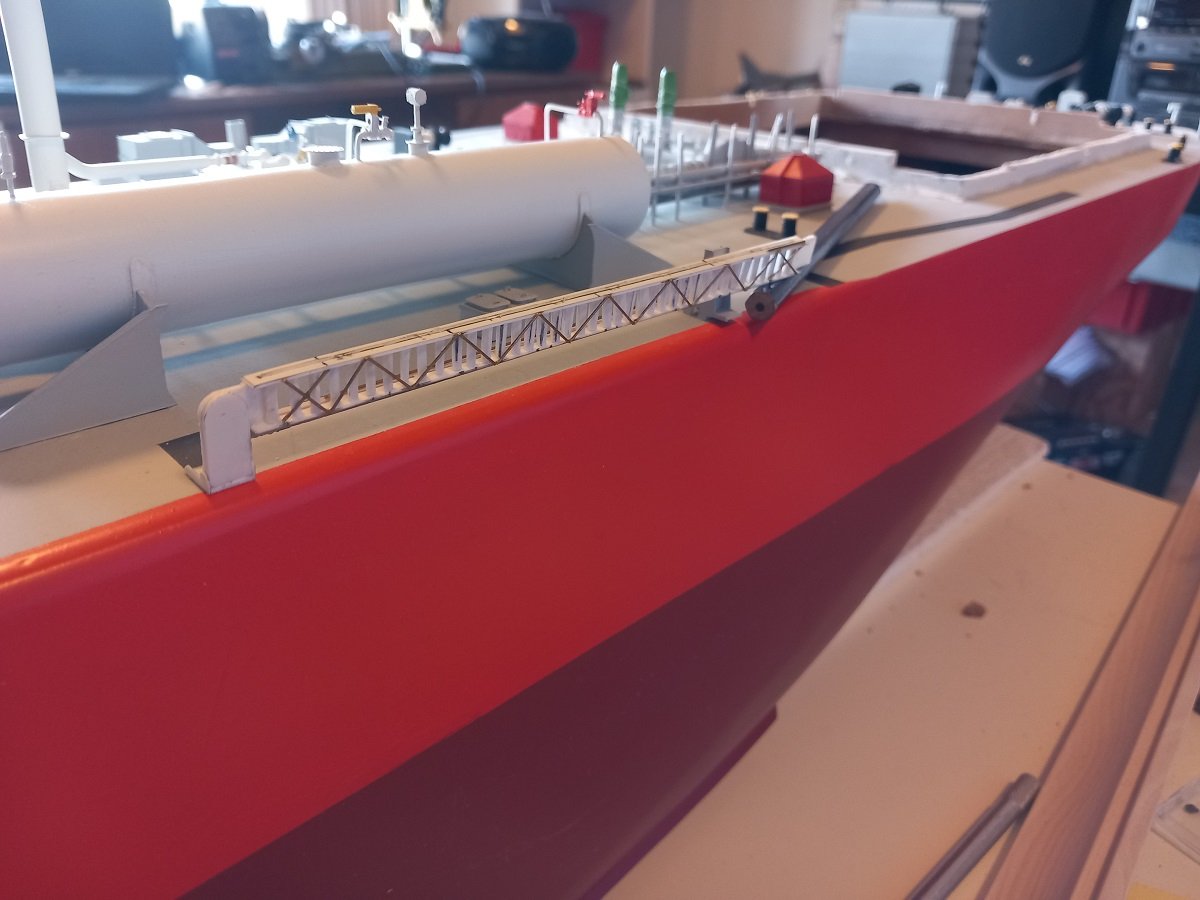
Thanks for all the likes and comments. Despite having started a small project (Harry DeWolf), my main focus is still very much on Chaconia. Thought not to bore you with endless detailing, so here is the first gangway. It's not entirely finished yet and I'm thinking of keeping it off the ship until I put the railing inboard of it, if that's possible. Knowing myself, I need to start the second gangway soon in order to keep the momentum and not forget how I built the first one! There is fixed gangway at each side. It hinges outward and downward. The steps are triangular in shape with a rounded part. This allows it to be used under different angles. In most cases it can be used for pilot embarkation as well, sometimes a combination with a pilot ladder is requested (mostly when in ballast). On larger ships you'll see a white-red marking called a 9-meter mark. The separation between the white and red part of the rectangle marks the height at which there is 9m of freeboard. If that's visible that means you need to make a combination of a pilot ladder and a gangway (sort of compulsory, but still subject to pilot requirement). The pilot ladder will then be used to get from just above the water surface to the 9m mark and there the pilot can switch to the gangway to get to the deck. Nowadays with the really, really large ships, there is often a door in the side of the vessel so he doesn't need to climb that high on the side of the vessel anymore. The inboard part with the collapsed railings. And a dry fit in position. 4 supports are required on the inside for stowage, but I decided to line it up first between the fore and aft parts and then add the supports in order to get the height of the supports correct.
-
Hi Ian, I'll be following your upgrade project. Immensely handsome ships. Can't really help with any detailing though. I'll keep my eyes open if something pops up about the Splendid Cats. I do know HMS Iron Duke had the catwalk around the stern as well, so I wouldn't be surprised if Lion had it at some point. I do agree it was a bit outdated and rare by that period.
-
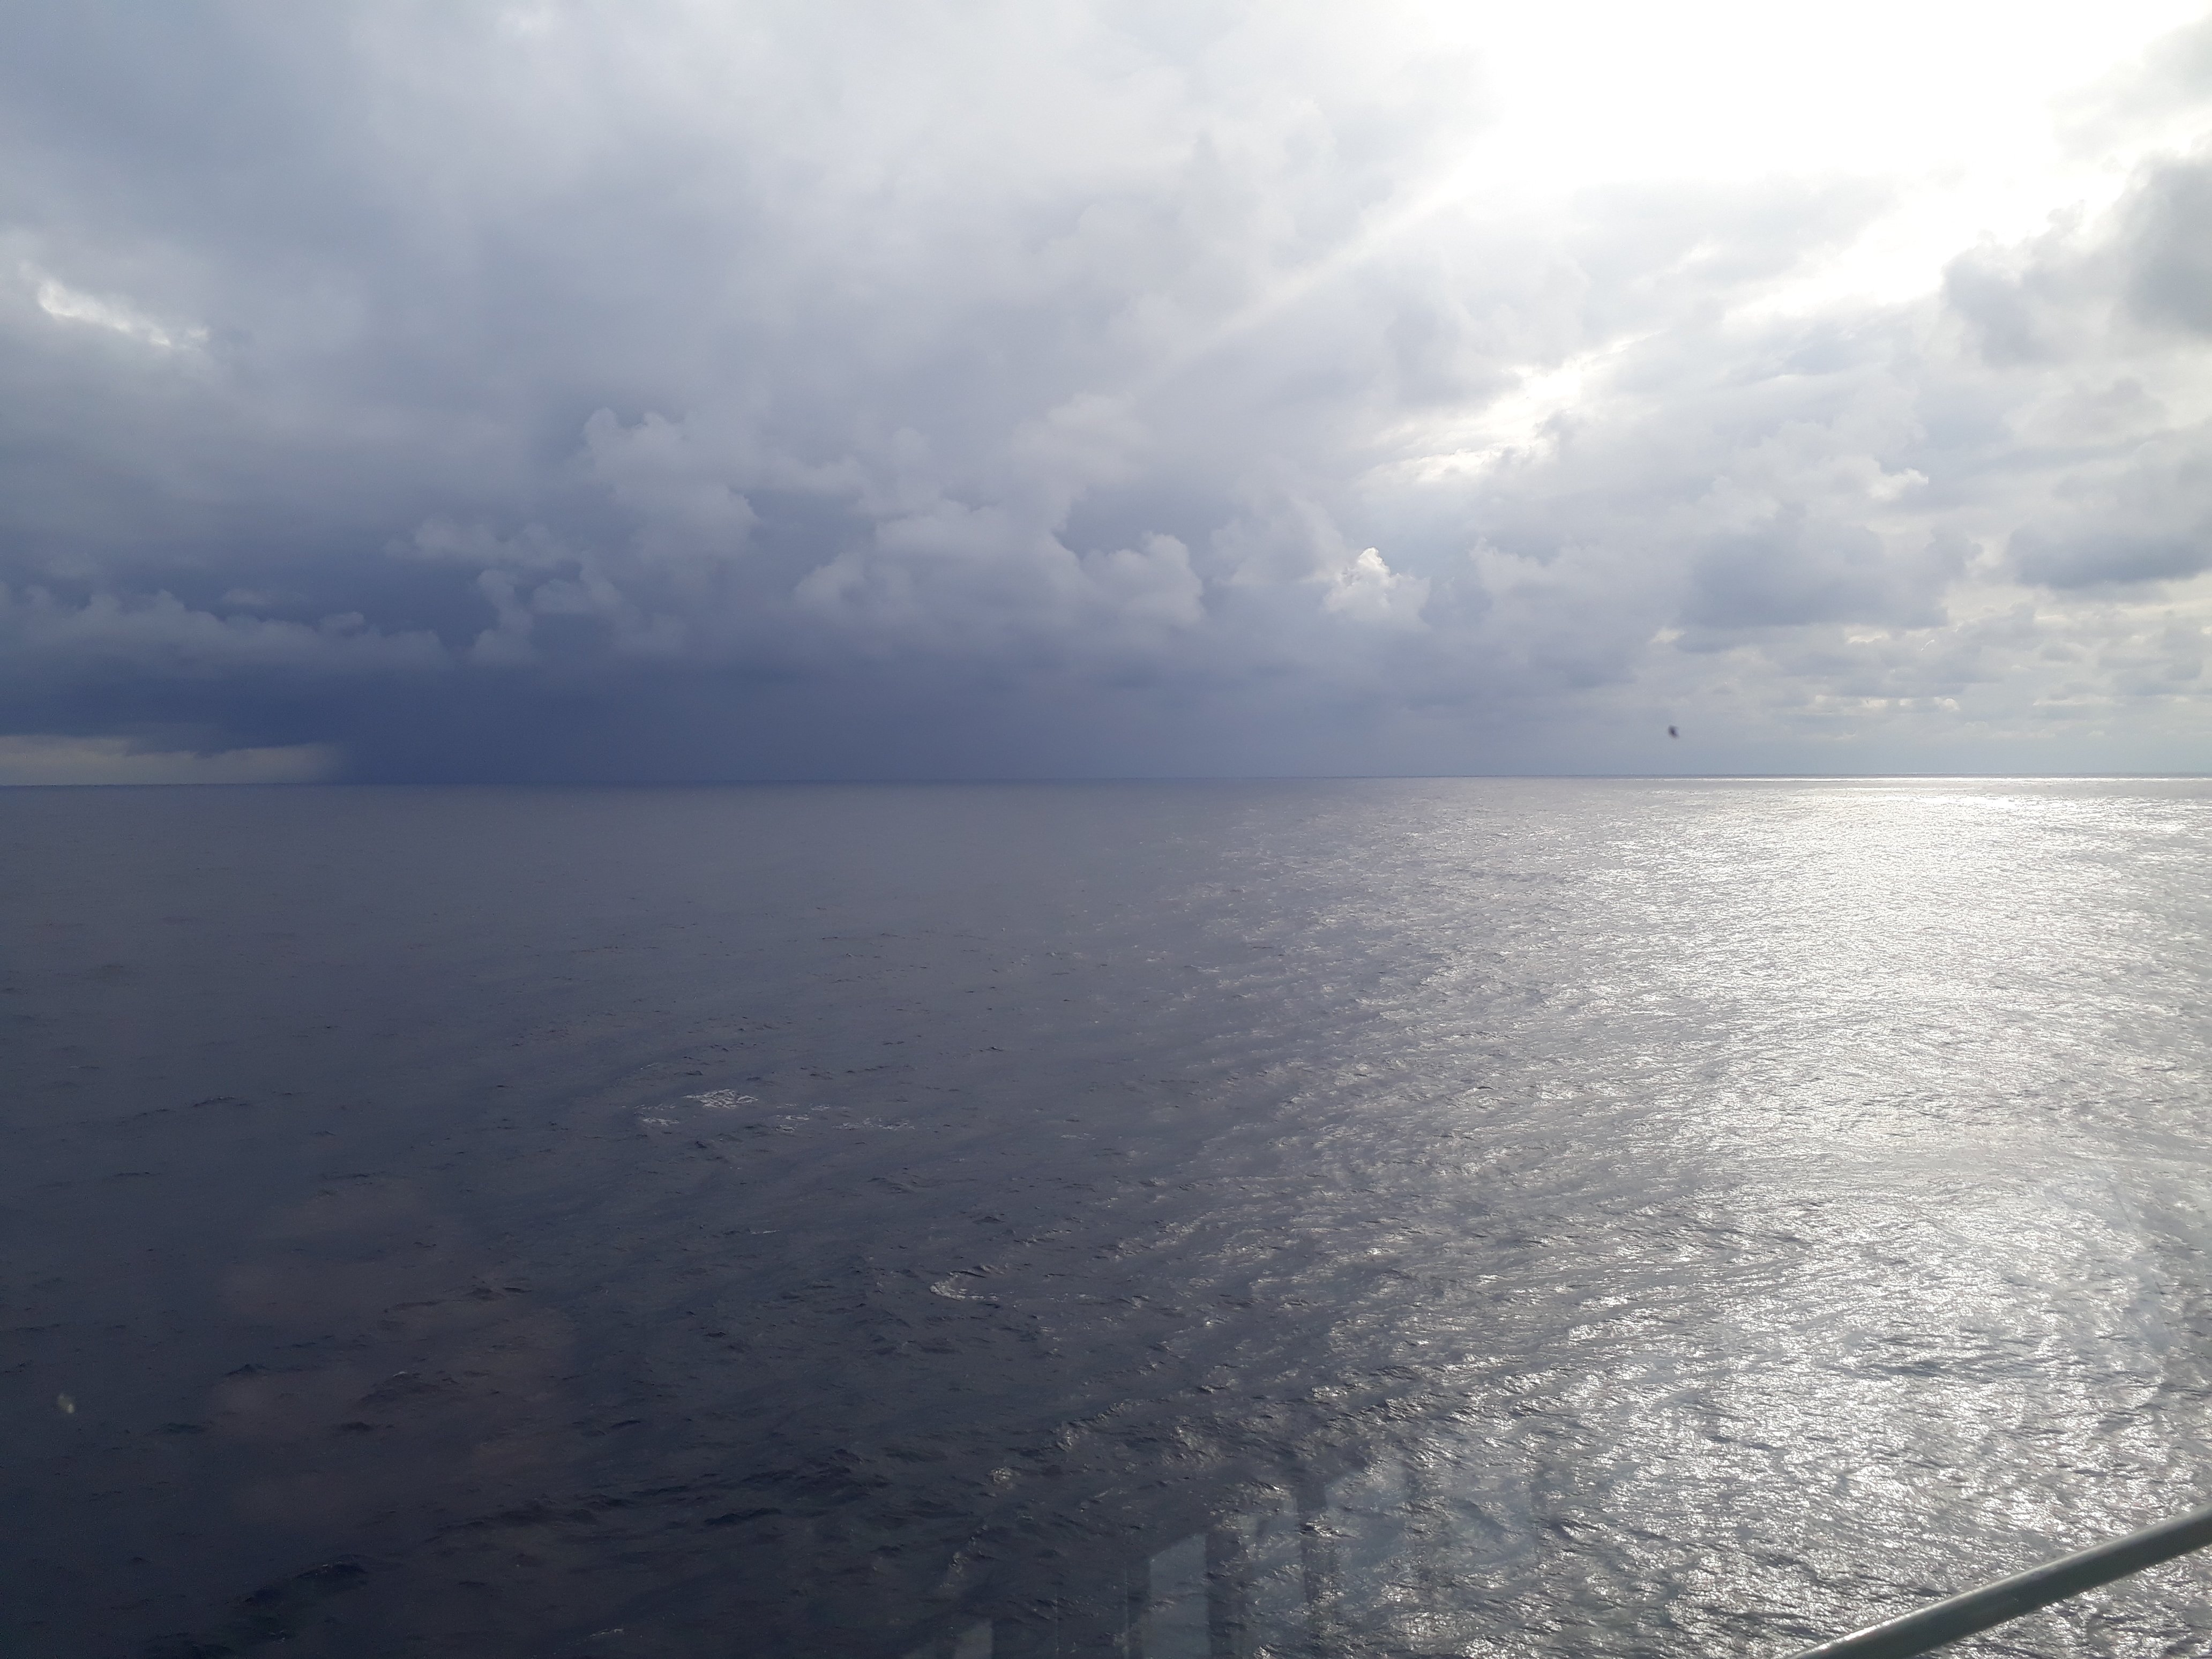
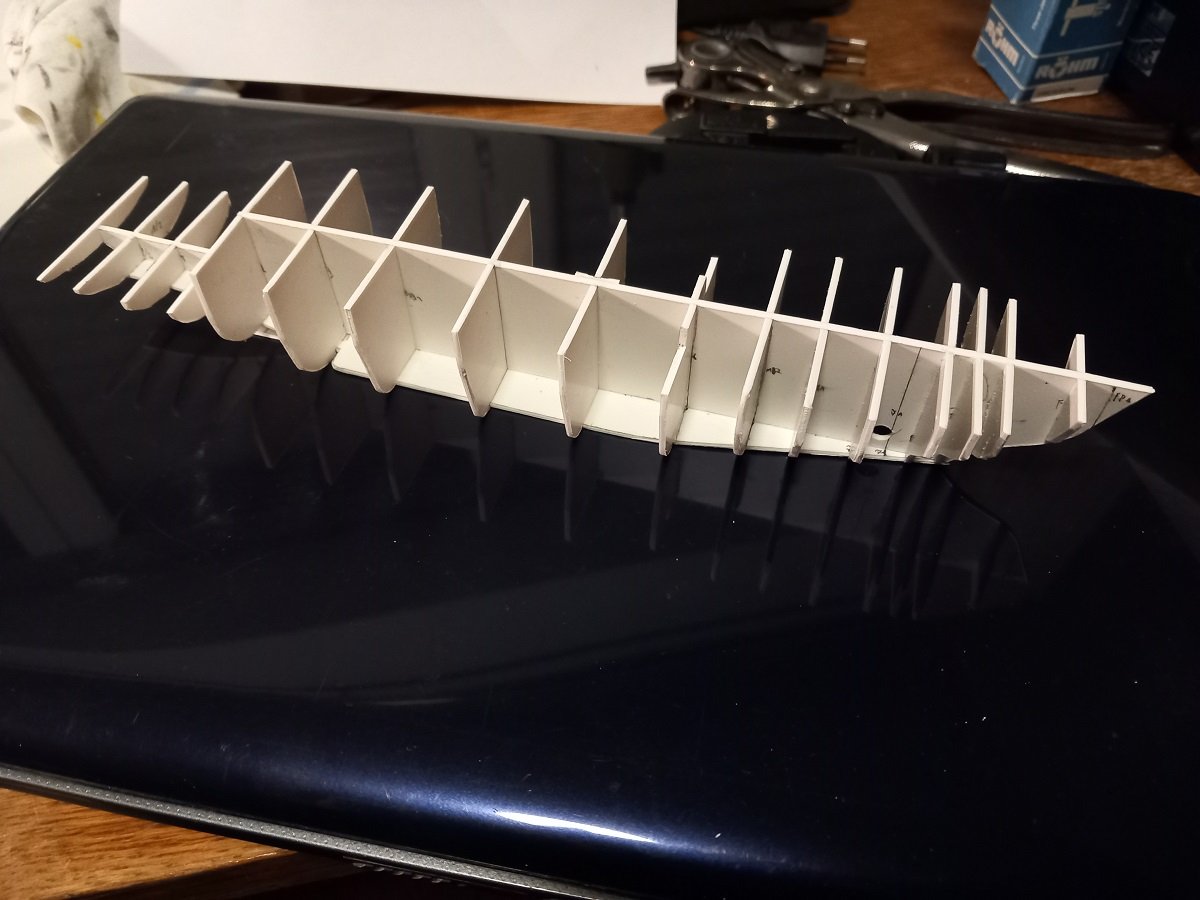
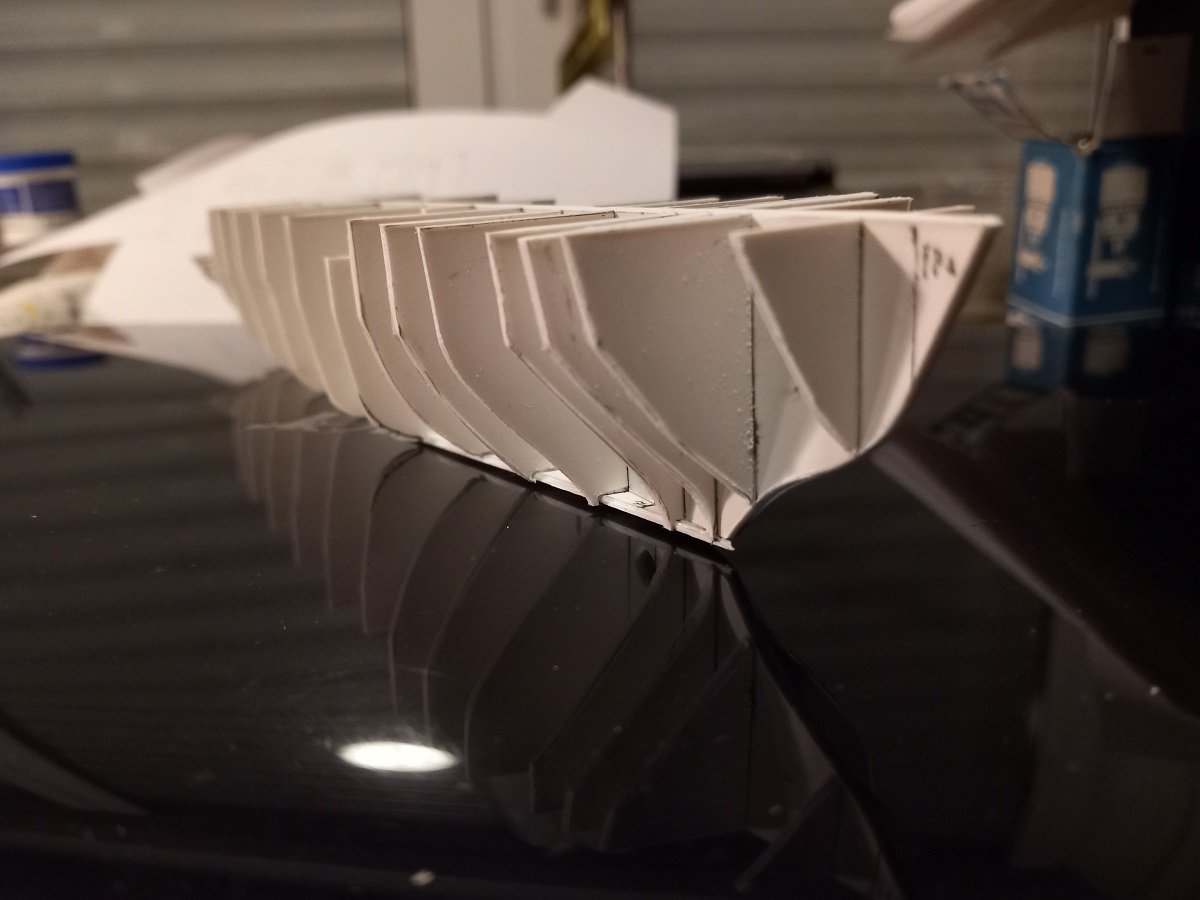
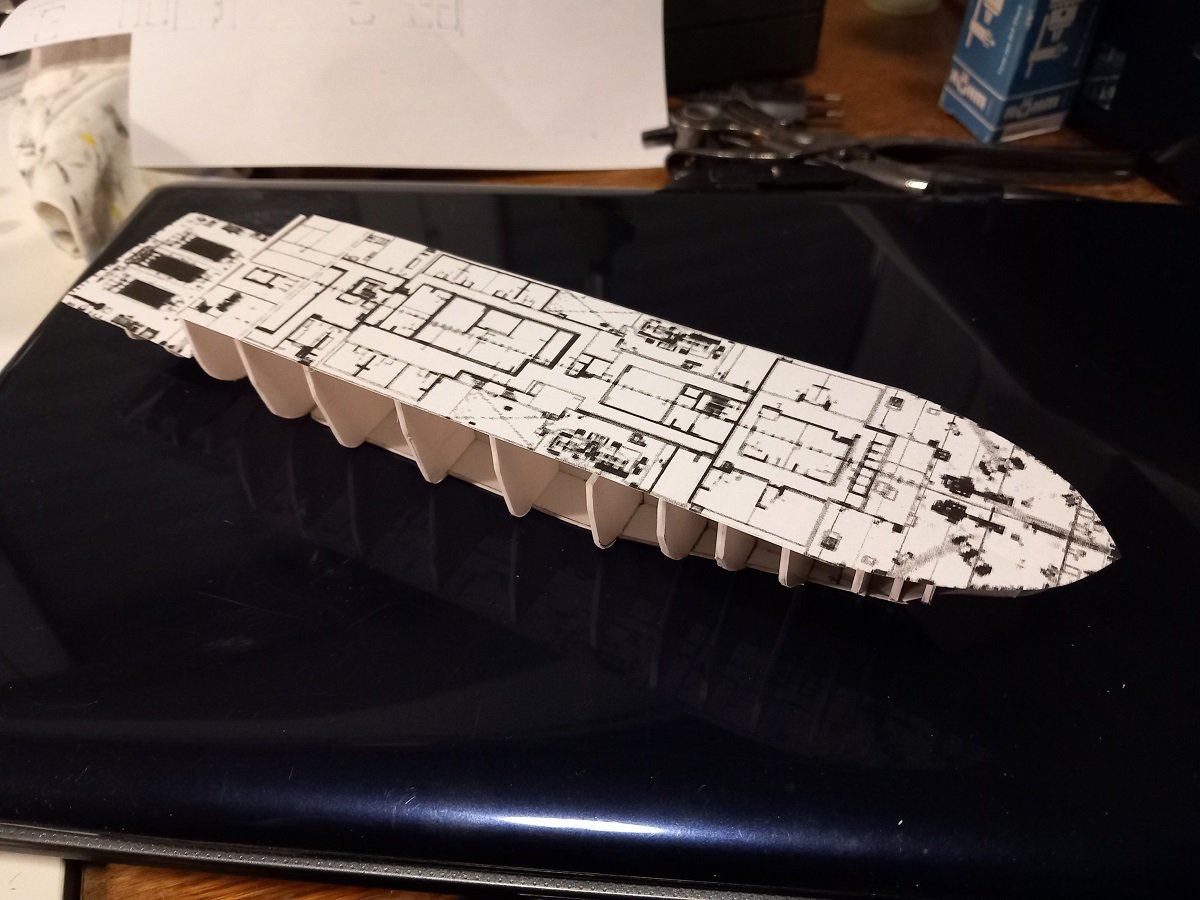
Going out at sea brings a lot of crazy ideas. This is one of them. It all started with my last trial of LPG Chaconia in my home pond. After rebuilding the pond, she seems to be short of space in order to fully turn around. That meant that either I needed a bigger pond, or a different boat to sail. A bigger pond (again!) was not an option, so I decided for a smaller RC ship. Having learned some lessons from Chaconia, mainly that a heavy ship is not very handy for RC sailing (getting it in and out of the pond is quite a task). Additionally for fun of sailing, a single prop ship without bow thruster is quite boring and limited in things you can do with it on the water. In parallel to this, it should be known that I've been collecting any icebreaker plans that I could get my hands on in the past 15 years, having a myriad of ideas with them, but never quite using them. All of this led to the latest Canadian Arctic Offshore Patrol Ship, named Harry DeWolf. Most recent icebreakers use azipods or Z-drive propulsion, which isn't very practical for RC, and although conceived with such a propulsion, Harry DeWolf was eventually built with a regular twin rudder - twin prop configuration (with a bow thruster). Given her length of about 104m and wide 19m beam, she'd make for an ideal RC ship for my pond in 1/100 scale (in which I already have 2 ships). Not sure where this will go. Might be Harry DeWolf itself, might end up being one of the other units (or none at all). The disadvantage of the vessel? Well she's relatively new, which means no real plans are available. However, if you look well, you can find parts of plans. In addition, they've been very open about its construction, proudly showing a lot of pictures of their block/megablock construction in the process. Add to the mixture of plans and picture some common sense and shipbuilding knowledge, and off I went making my own plans. During my last stay at sea, I made a lineplan, drawn in 1/100, but decided to make a prototype in 1/400 to validate the frame shapes. I was pondering finishing the 1/400 model, but to save me some time I think I'll just do the lower hull to see if that shape is plausible. The prototype will be quick-and-dirty, with an eventual decent finish on that lower hull, adjusting frames where required. It won't be 100% accurate, given the lack of actual plans, but I can live with that. She is quite a sleek shape with relatively few small exposed details, so the large version shouldn't take too much time to build neither. I've been working on this for 2 days now. The prototype is also giving me some additional insights into the future construction method/approach of the big version. We'll see where it all goes, considering I'm still working on Chaconia as well. 2 gangways with 44 steps each to build... First lesson I learned was that I had forgotten to draw a frame. Marked it on the longitudinal drawing, but forgot to set out its shape... Corrected that by now. Additionally you can see on the frame with the cut-out that the shape is off. It won't form a smooth line with the frame in front of it. I corrected its shape a bit, but not sure if it will be sufficient. You can see the black marking near its bottom. This is the correction. I'll file it down to that black line and see if it's credible. The idea is to fill and sand the lower hull shape and see which frames are good and which ones need correcting on the plan. When the plan is then corrected, I can go forward with planning for the real sized model.
- 5 replies
-
- 7
-
-
- Harry DeWolf
- AOPS
- (and 1 more)
-
Good is an understatement, she's looking gorgeous! The original ship has of course pleasing lines, but your model is of excellent quality, love the choice of colors and level of detail.
-
It looks better than the props I buy for RC ships from a professional company. I do indeed wonder what you'd completely be satisfied with?!
-
Definitely true, what a gorgeous model this is! Love the shape of the vessel as well as your wood tones (call it "choice of colours", if you want)
-
Not entirely so. Normal regulations (SOLAS) for cargo ships dictate 100% capacity in lifeboats on each side (if it capsizes, one side is unavailable), however on passenger vessels, some of that capacity is offset by liferafts rather than only lifeboats. Cargo ships do have liferafts as well. I assume the Navy has its own regulations as they do not have to follow SOLAS. That said, love your build Brad. Good to see some paint, the red will really make a big difference too, for me it always takes a build to the next step!
-
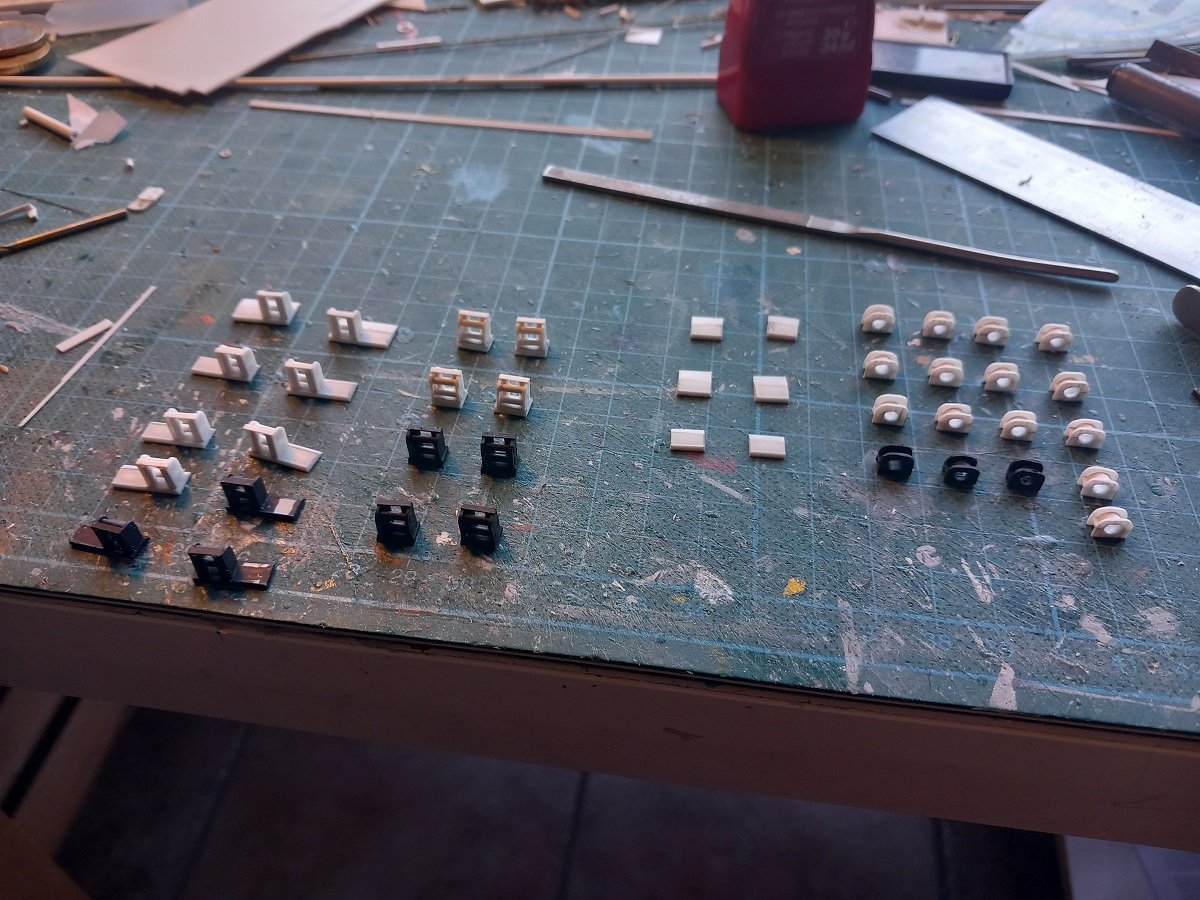
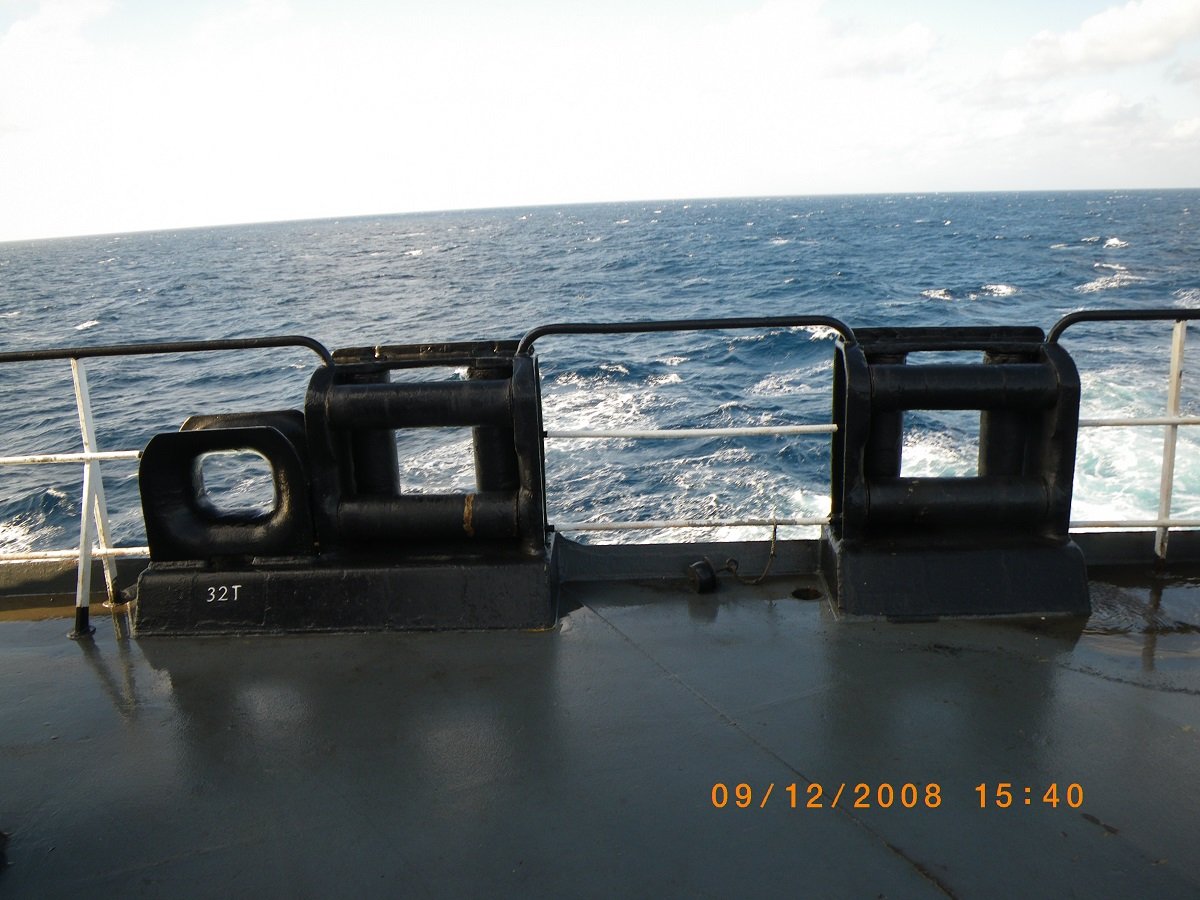
Thanks Keith, So, after determining the way to build those fairleads, it was off to mass production. Finished all of them by now. As you can see there are left and right combinations of rollers and closed fairleads. The seperate plates in the midle of the picture are for single closed fairleads. On the main deck the sloped side of the base plate is much longer than on the combinations or single roller fairleads, while next to the accommodation block it's somewhere in between the two. I assume this has to do with the reinforcements under deck. And finally an overview picture with the fairleads dry fitted in place. It's the first time I actually put the accommodation block in place since I continued building her. I assume her overall appearance will not really change that much with the catwalk on. Largest items that are still missing are the large gangways on the deck edges on both sides.
-
Depends what you call a gooseneck I guess. You have regular ones for accommodation spaces etc. which are indeed just bent pipes, but then there are also types used for tanks etc. which are located on deck. The latter require a sort of non return system that lets air or gas out, but blocks water from coming in. Most of the time this is done using a ball that lays down. Air is then escaping from the top down around the ball. When water comes over deck, the ball floats up, blocking the pipe and keeps the water from entering in the tank. Generally those devices are looking rather big and clumsy. I'm assuming the ones on Cangarda are an effort to create a better looking one. I believe there is a floater in the small cylinder that blocks the connection between the two pipes when it floats up to the top plate I may of course be mistaken...
-
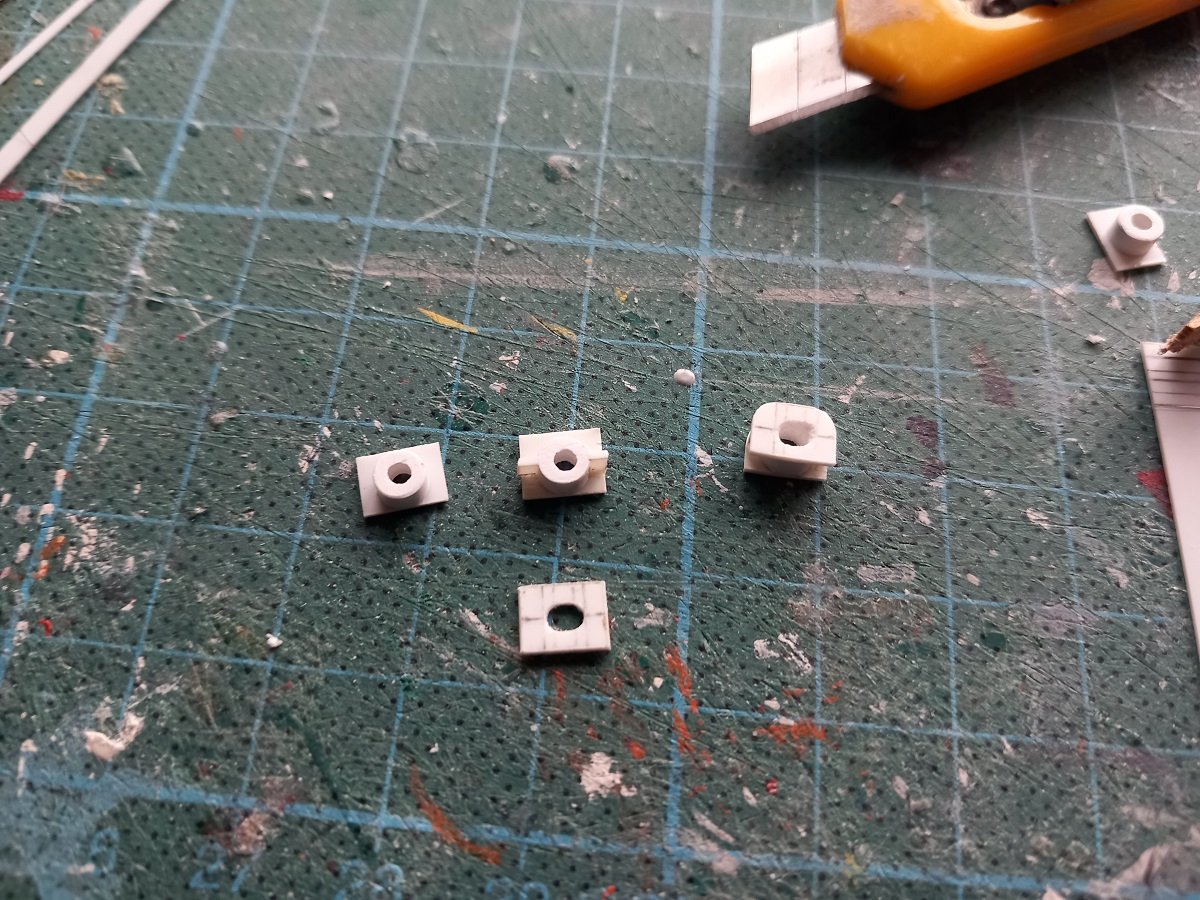
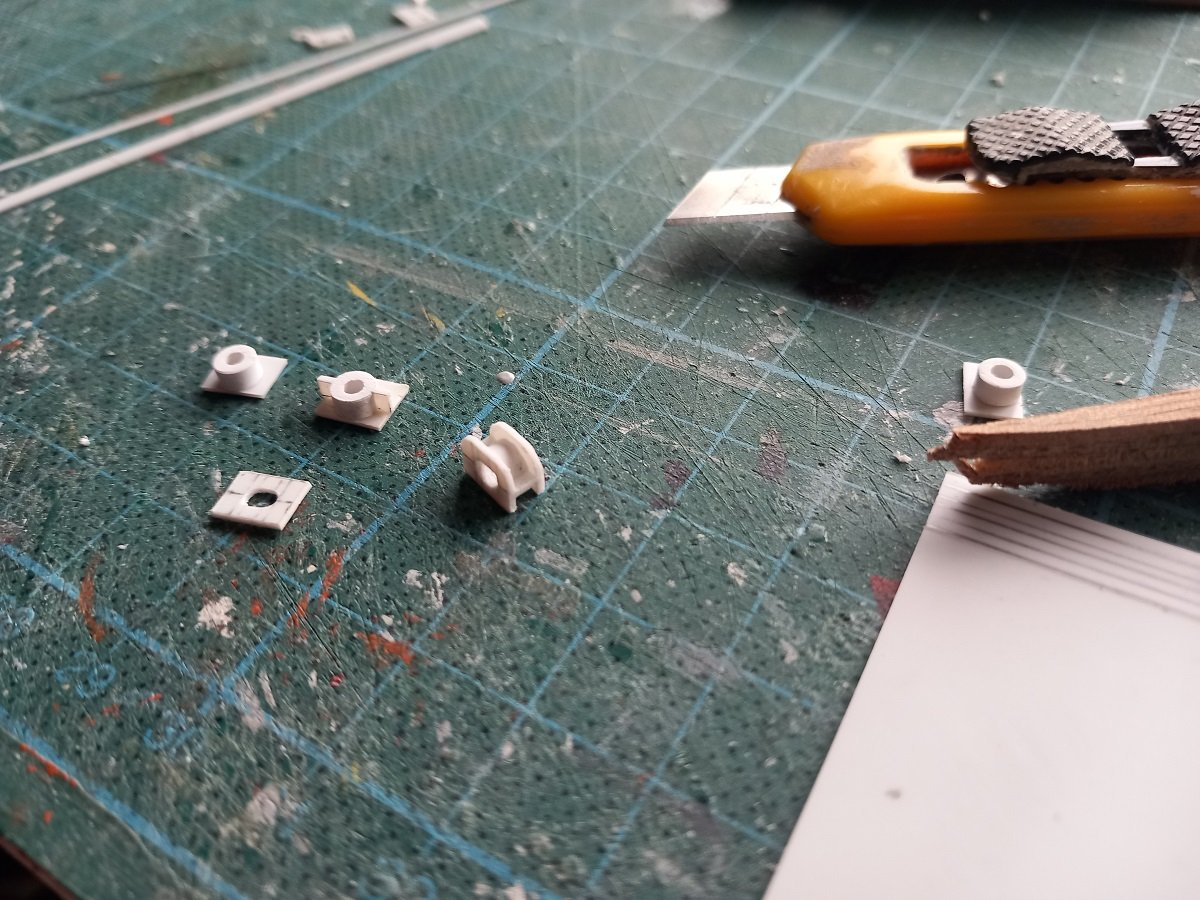
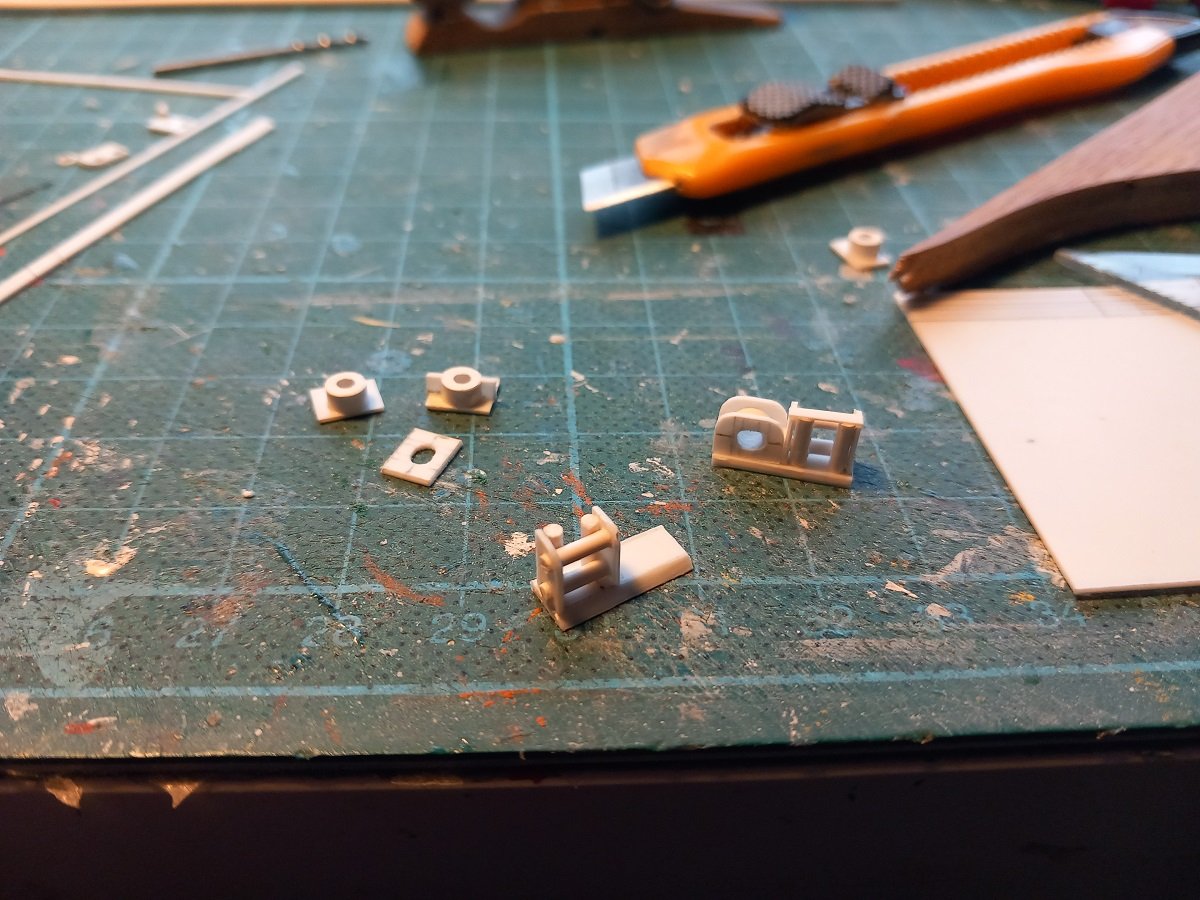
Hi Phil, During dredging we do 12 hour shifts, so 12 hours on, 12 hours off. In our case we work from Noon to midnight or from Midnight to Noon. On other dredging vessels they often do from 0700 till 1900 and 1900 to 0700, so there you effectively have a day and night shift. They then change somewhere in the middle of their rotation so the dayshift does the night and opposite (with a transition of 2 backbreaking 18 hour shifts). Due our Noon to Midnight shifts we don't have a need to change and just do the whole trip, the same shift. For sailing it depends, if it's a short trip of just a couple of days or a week we generally stay in our 12 hour shifts, navigating instead of dredging. When it's a longer trip, it depends on what we agree on. Normally we'd then go to 3 8-hour shifts with some overtime adjacent to that. This creates one long break for relaxation. Dredging business is essentially a part of construction business and not really related to transportation business. It therefore works a lot less strict and without much hierarchy compared to the merchant marine/navy. In the merchant we kept the normal 4-hour watches with overtime in between, but this breaks your time off in several small breaks, not allowing for any normal 8-hour sleep. With current regulations regarding MLC (Maritime Labour Convention), the merchant sort of creates their own problem. With the dredging system it's a lot easier to follow those rules and their multitude of requirements (maximum 14 hours of work in any 24-hour period, maximum of 3 breaks of which one needs to be at least 6 hours etc. etc.) On to the closed chocks/fairleads. First things first, I'm in favor of roller fairleads. A lot of ship owners are going for the much cheaper closed fairleads nowadays, but in my opinion that's often a mistake. Rollers allow your mooring rope to move in all directions without really damaging the rope (they do require more greasing and maintenance). This is particularly important in ports where you are exposed to a lot waves/swell and during ship-to-ship transfers (which are done very frequently nowadays. As an owner you may think you're not going to do such things, but very often a few years later they end up doing it anyway. Closed fairleads often chafe the mooring ropes/wires with resulting breakage and in some cases unwanted break-away. This is one of the arrangements on Chaconia. The reason for the closed fairlead is for tugboats. You don't want to put a tug line through a roller fairlead, as forces are much higher when using a tug than when in any normal moored situation. Tugs can also exceed their normal maximum pull forces by pulling sideways, in this case the winch will not render the rope, even when set at a certain maximum. For the time being I settled on following method to make the closed fairleads. First I make the front and back plate with the oval holes as shown in last post. Then I insert a 2mm thick piece of styrene tube. I put this one quite off center, with its side at the bottom of the fairlead. I then add small pieces of strip on each side of that tube to mimic the plates on the real one. And lastly I sand/file the strips flush with the edge of the tube and add the front/backplate. Later on I file/sand the whole thing to shape and hollow out the hole in the central tube to match the front and backplate. It's not a perfect copy as it's not rounded between the front and backplate, but I don't feel like adding filler and sanding on each one of those. The shape of the hole is also not quite as squared as the real thing, but I'll see if I adjust my oval hole later on. Here you see the fairlead standing up under an angle, looks fine for the time being. Here is one of those combination rollers-closed leads. The roller is built the same way as explained above, the base plate is just bigger to accommodate for the closed fairlead. That's it for now. On to mass production again. I need 16 closed fairleads (10 of which are mounted in a combination with a roller fairlead).
-
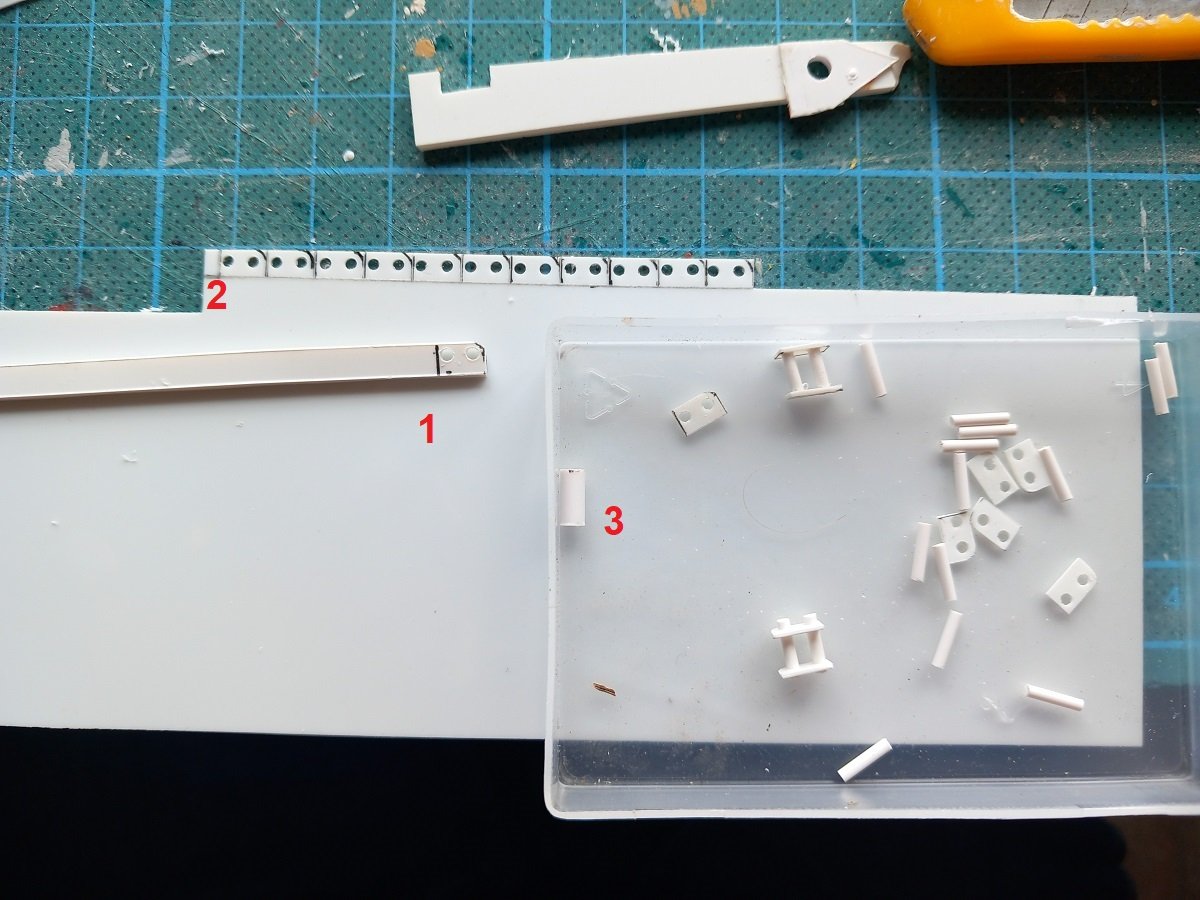
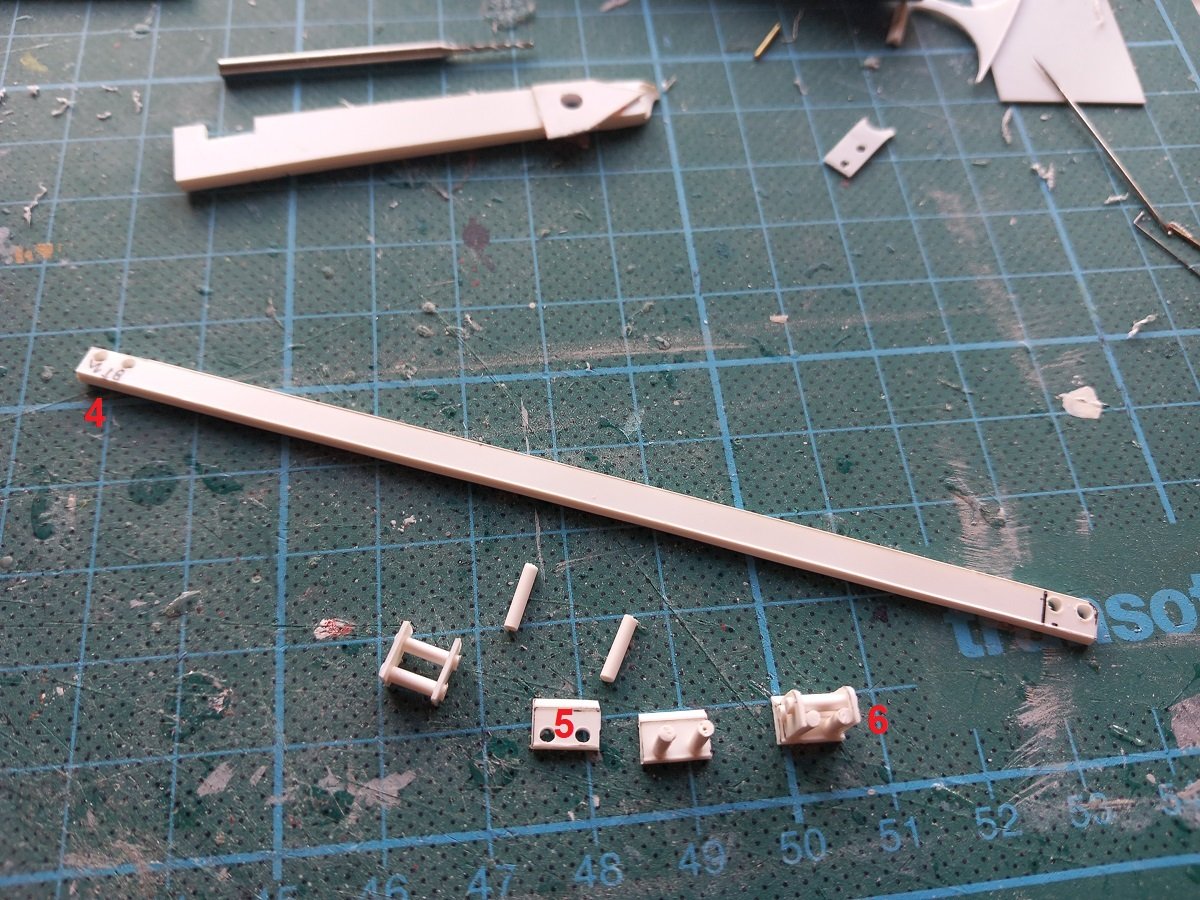
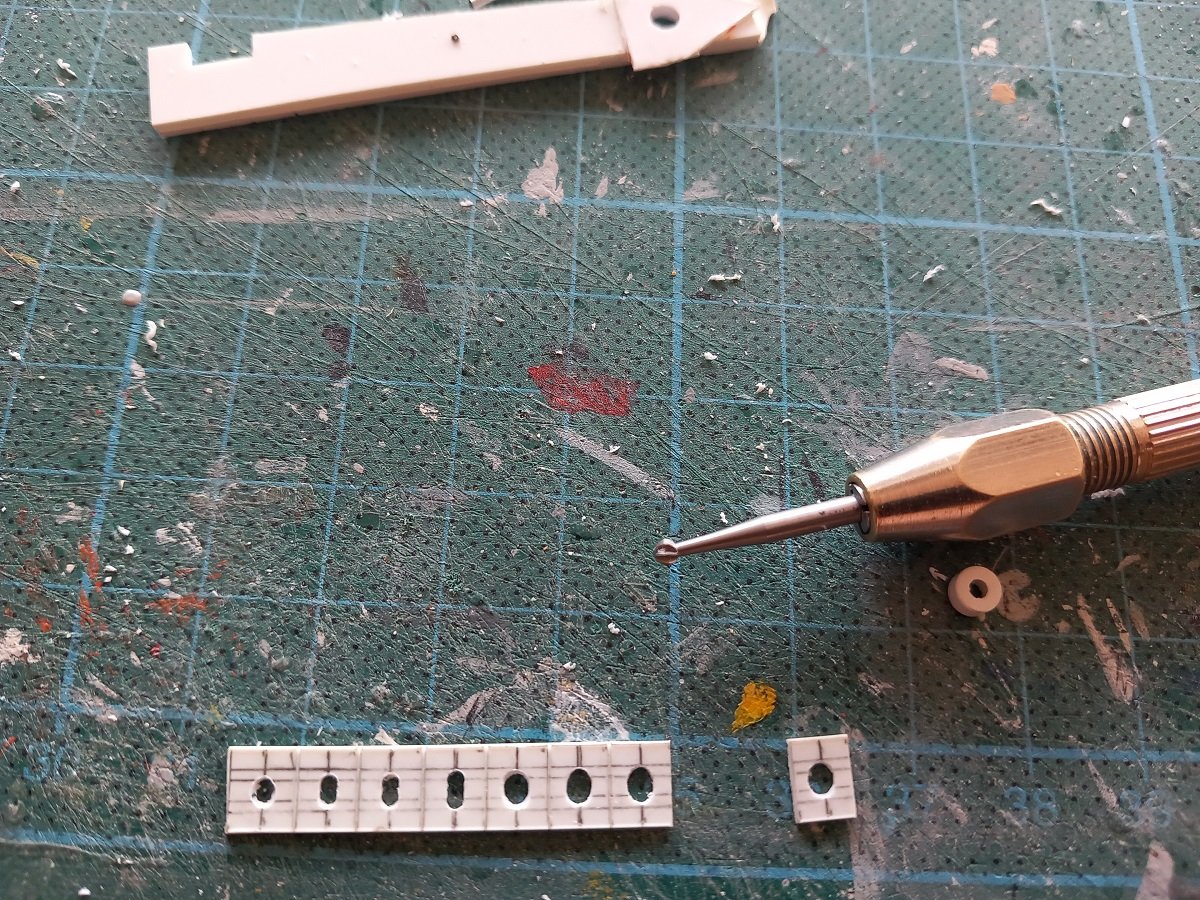
Thanks a lot guys for all the comments and likes. It's probably because of your active feedback that I have the drive to actually get this thing finished. Probably wouldn't have continued construction after the long hiatus if I hadn't found this board with its great members! Currently all cargo pumps are installed, but the wiring was proving difficult. I'll give that another go when I get back from sea with a fresh mind. Being at sea is like a short prison sentence. You're very limited in your choices. Each day you work the prescribed hours (and/or more as required), but you have to eat whatever they give you (and during several weeks you get to see a lot of things a lot of times...) and you're also limited in the things you can do during your free time, so you end up in a certain routine for weeks. I can follow build logs over here since we do have internet, but it only makes you want to create something yourself even more... So whenever I do get home, I really have a drive to get on with it. So last things I want to finish before I go were the rollers and chocks (if not finished, at least I wanted to get a working procedure and jigs to create them). First were the single rollers, I needed 8 of those. Afterwards there are another 10 of them that are combined with closed fairleads/chocks and then there are still 8 closed single fairleads remaining to be made. On top of that there is another emergency towing chock in the back, which is a bit larger and stronger than the others. So for the rollers, each consisting of 4 rollers, a base plate, side cheeks and a top plate, I decided to go for drilling rather than just gluing. It's still a sailing model, so I want those things to have at least some strength. First I made a jig for the two horizontal rollers to fit in the side cheeks. That's Number 1 in following picture. Then I scribed a line at the width of the cheeks, but kept it connected to the plastic plate for easier handling (Number 2 in the picture). Then I put my drilling jig on top of that strip and drilled the 2 holes. Then I marked and again scribed a line. Then came the next holes etc. The cheeks are rounded at the top, so I maked that curve (shape of the jig) to file them rounded later on. Last but not least, Number 3 is just a larger diameter tube with a 1.5mm hole in the center, it has the length of the rollers. So I just put a 1.5mm rod inside of it, push it flat on my desk and then cut it off. Later on I punch out the roller with a 1mm drill. Like this I had to create 4 rollers for each roller fairlead, so 72 of them. I then cut off the cheeks by following the scribed lines and filed the rounded top edge. Afterwards I made another "jig" (Number 4 in below pic), at the other side of the cheek jig for the vertical rollers. I then used the same method of scribing a strip and drilling the holes. The inside of the base plate is also beveled. (Number 5 in below pic). Then I glued the vertical rollers in place. And afterwards the horizontal ones in the cheeks. While the glue is still wet I then mounted it against the vertical rollers to make everything square and fit (Number 6 in above pic) Last action, not visible in the pictures yet, is filling the top of the vertical rollers and the cheeks flat and level at the top and add a tiny plate on top. The methodology is basically the same as with the piping, leave an end open that you can adjust. In this case it's that top of the vertical rollers as well as the sides of the cheeks. I can file those flat and level, which allows me to have slight offsets in length or even slightly angled cuts on those styrene rods. This in turn makes the process go quite fast, mainly being limited by the drying time of the glue. Next came the double rollers, where I made a small mistake by scribing the strip for the base plate too narrow. This resulted in the cheeks being too wide to fit on top. Luckily I could recover the rollers themselves and I only had to remake the base plates. After that came the closed chocks. I'm still somewhat looking for a good method, but I did discover that I can put a mill in my hand drill and actually use it to make the shape of the holes nice. For now it looks like the method will be to drill the holes like in the picture. Then mill out the hole to a nicer oval shape. The strip and the first holes were actually drilled some 10 years ago. I still remember where I wanted to get with that, but I didn't see the way to that target back then. We'll see where we get. I won't be installing those anytime soon though, they are integrated in the railing, so I'll be drilling holes to insert the railing in these later on, when I get to the stage of railing.
-
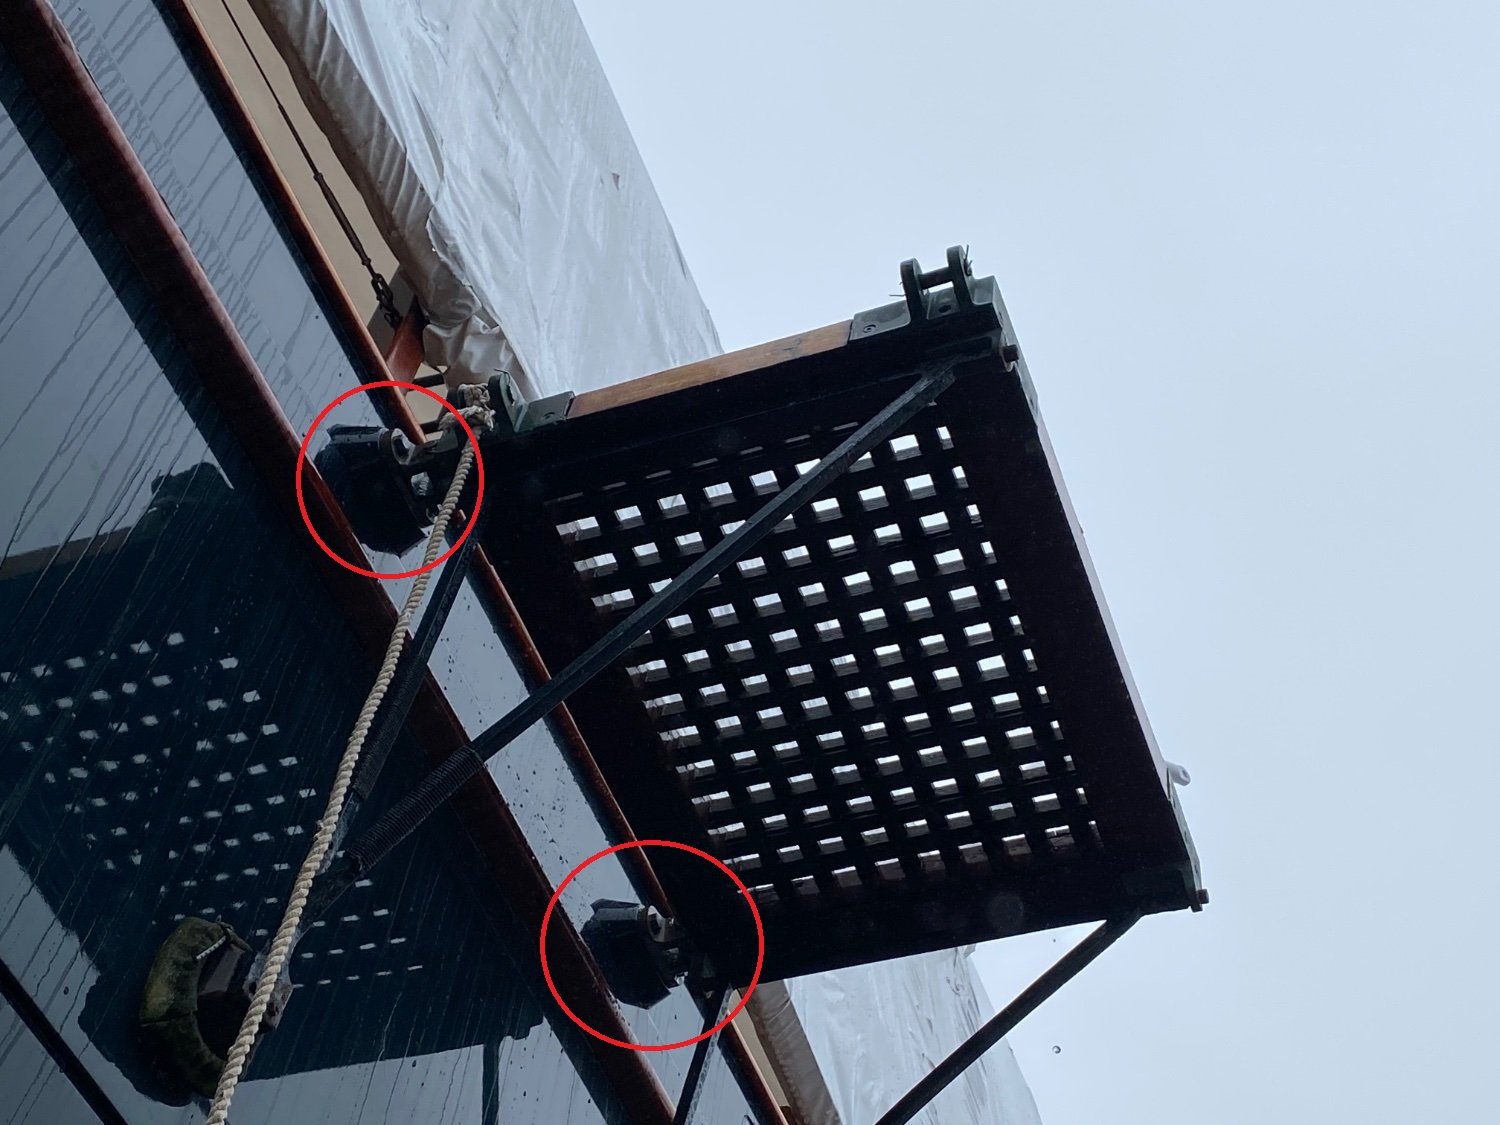
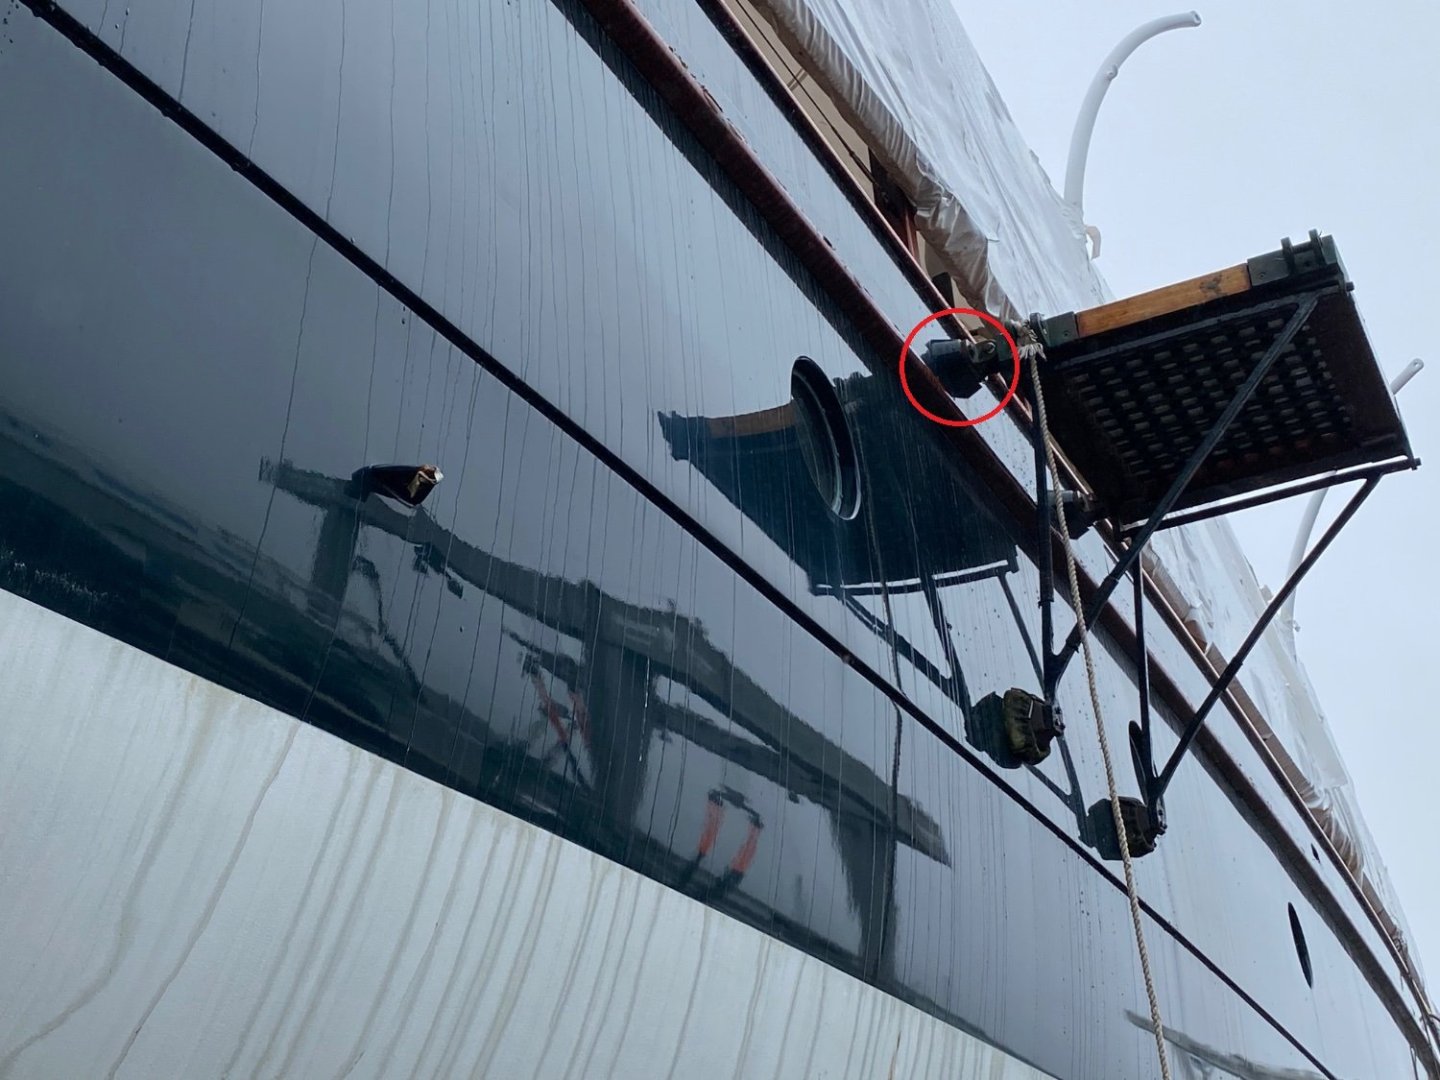
Well here is the grating I meant. Found it back on SB side just behind the lifeboat davit. If you remove the gratings side of the hinge, I bet the hull part of the hinge looks familiar... The boom you now show is indeed for boats/launches. Battleships of that age also had such booms to embark boats. They even hung rope ladders on them to board the boats from that boom. It's possible that in Cangarda's case it's only used to hold boat in place? In your picture you can also see a white rope going to that forward feature on SB bow (shown in detail in the pics you posted on page 1), that holds the boom in open position. I assume it's removable since I don't see it in collapsed/closed position in any of the other pictures (but you might find it in other pictures you have). Those battleships did fold it in, like the booms for the torpedo nets.

-
Hi Keith, seems to be a fixture of some kind. You have a better view in some of the pictures in page 1 of this log. Additionally, it seems very similar to the fixtures of a horizontal grating that hangs overboard (as pictured in page 1, but not sure where that grating is located). In any case this extention looks a lot like the hinges of that grating, except that the grating has 2 such points and in your location there is only 1...
-
Sorry Phil, but considering my own collection of colourful and rarely modelled ships, you had to know I was going to love it! Awesome refers to the ship as a model subject of the ship, not the ship itself 😁 Are you going to display it simply on a stand, or are you going to put some crew ( including yourself???) on or even deploy some of the sweeping gear?
- 438 replies
-
- 3
-
-
- minesweeper
- Cape
- (and 1 more)
-
Awesome subject Phil. Always a fan of the less modelled subjects. Love the story behind it as well. I'll be following this one!
- 438 replies
-
- 3
-
-
- minesweeper
- Cape
- (and 1 more)
-
And the subject of the build as well. I've never seen a paddlesteamer in a bottle before. It's true that the sharpness of the background is just beautiful, and the contrast of straight lines in surroundings with the flowing lines of the bottle make an interesting display! A masterpiece once again. I do however miss the penguins in the final result. Are they hiding under the jetty somewhere?
- 235 replies
-
- 6
-
-

-
- Banshee II
- Bottle
- (and 1 more)
-
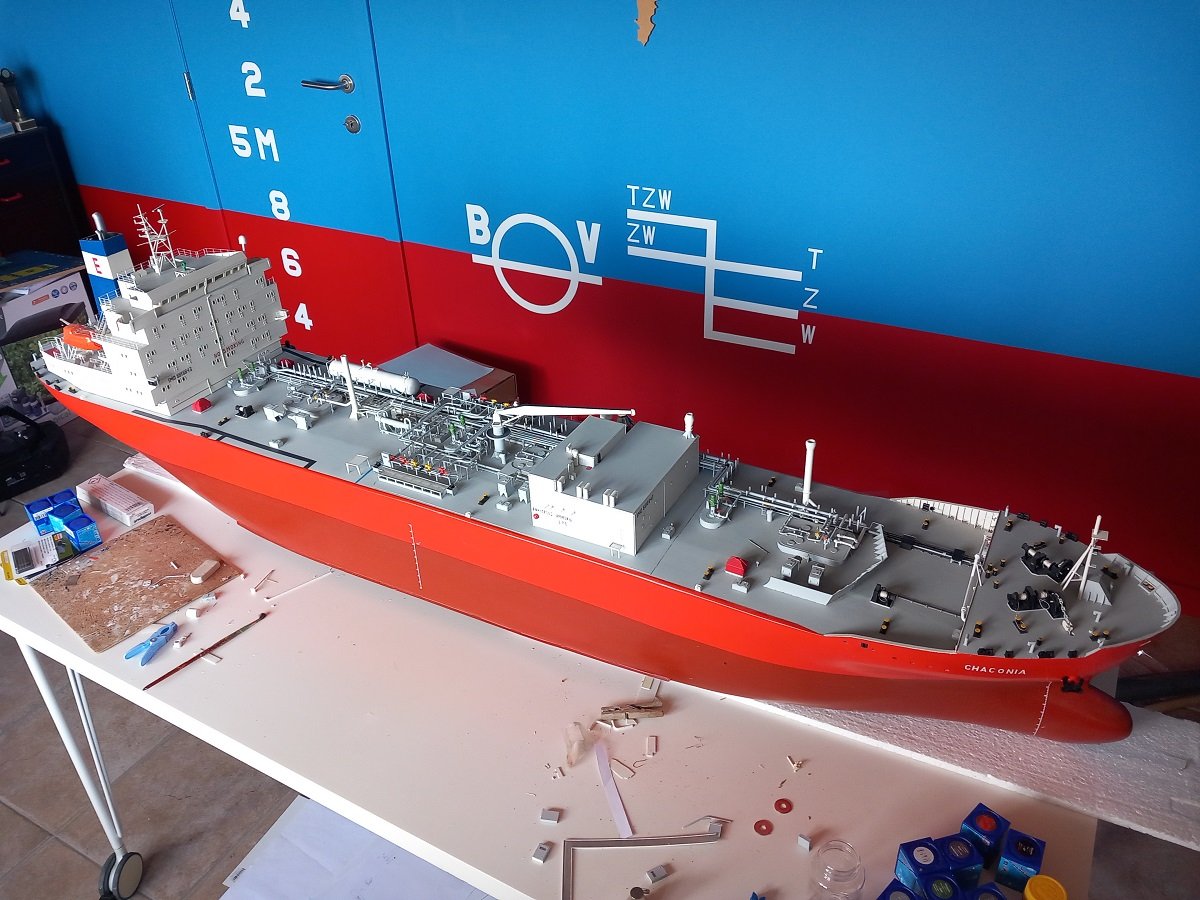
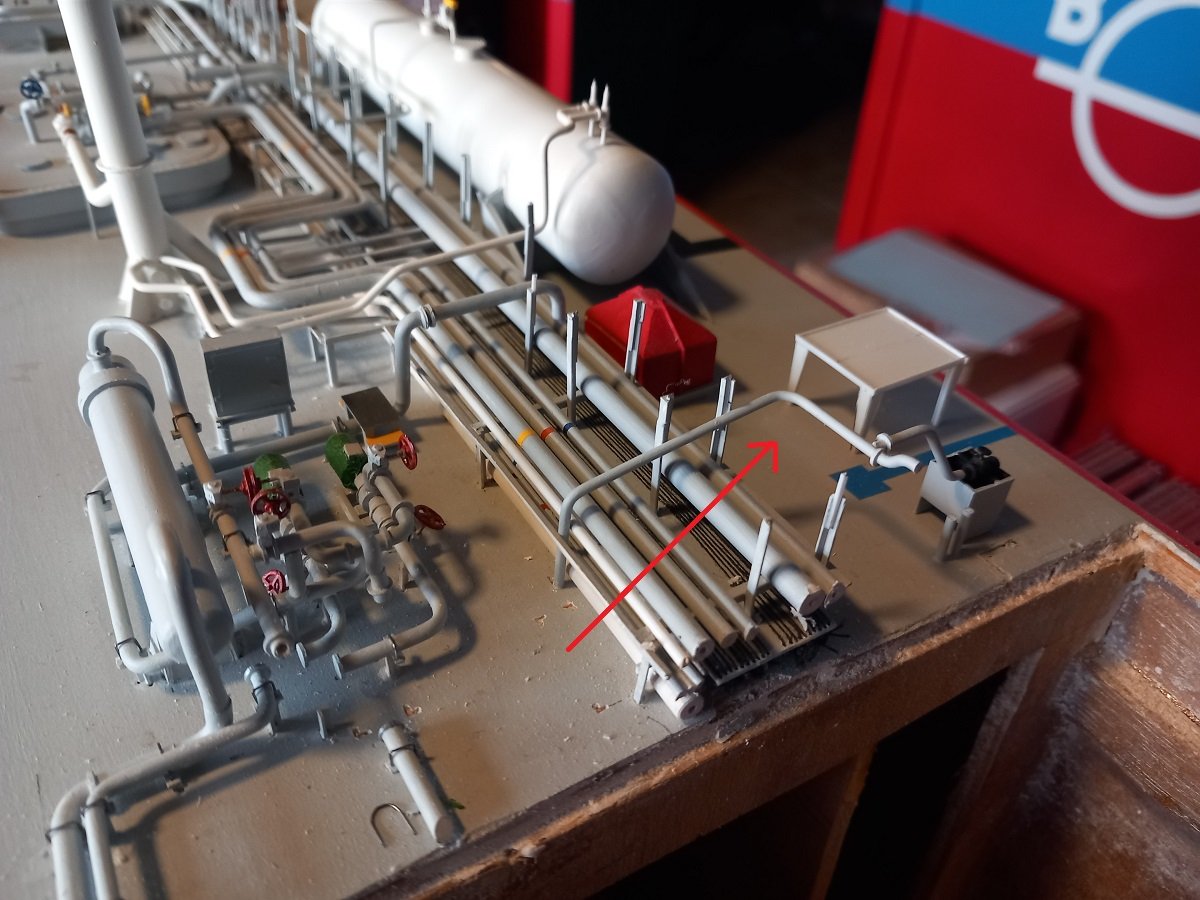
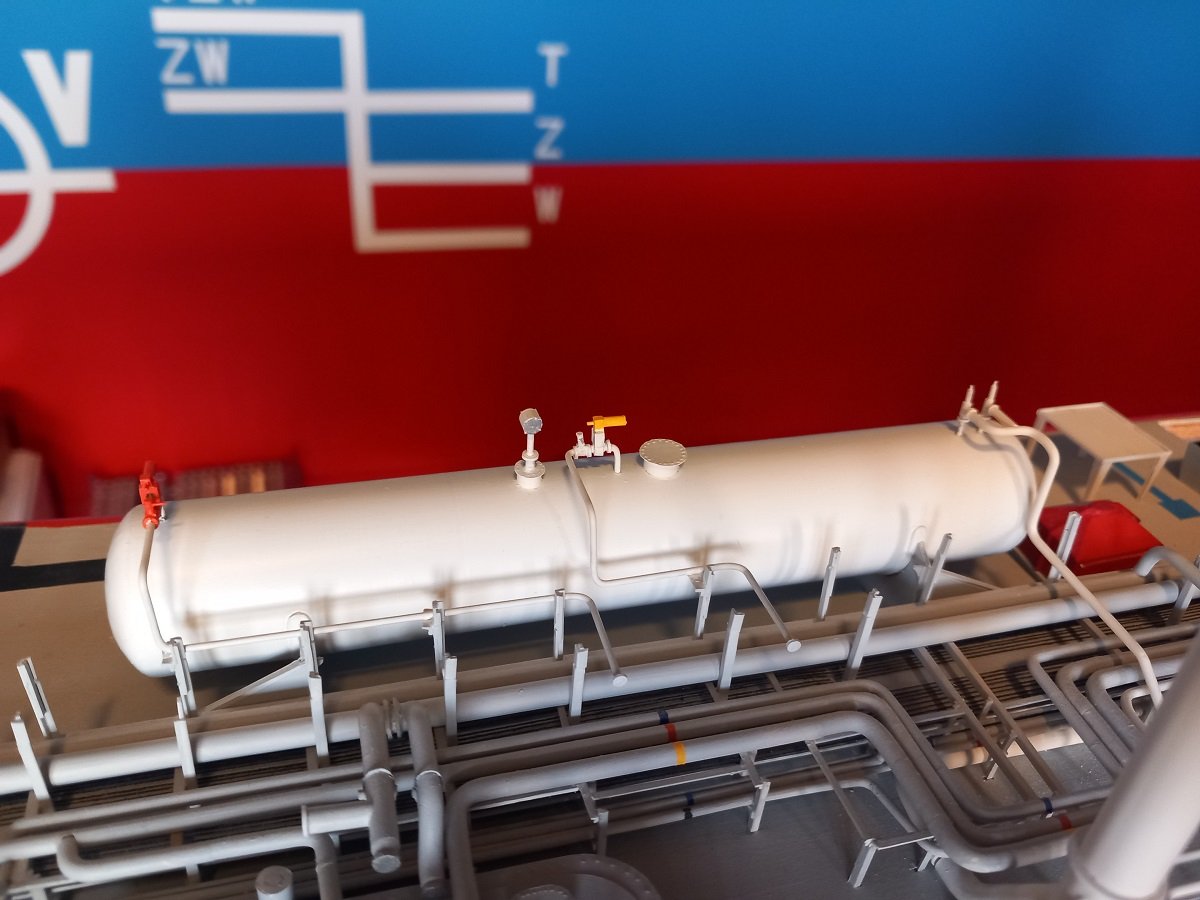
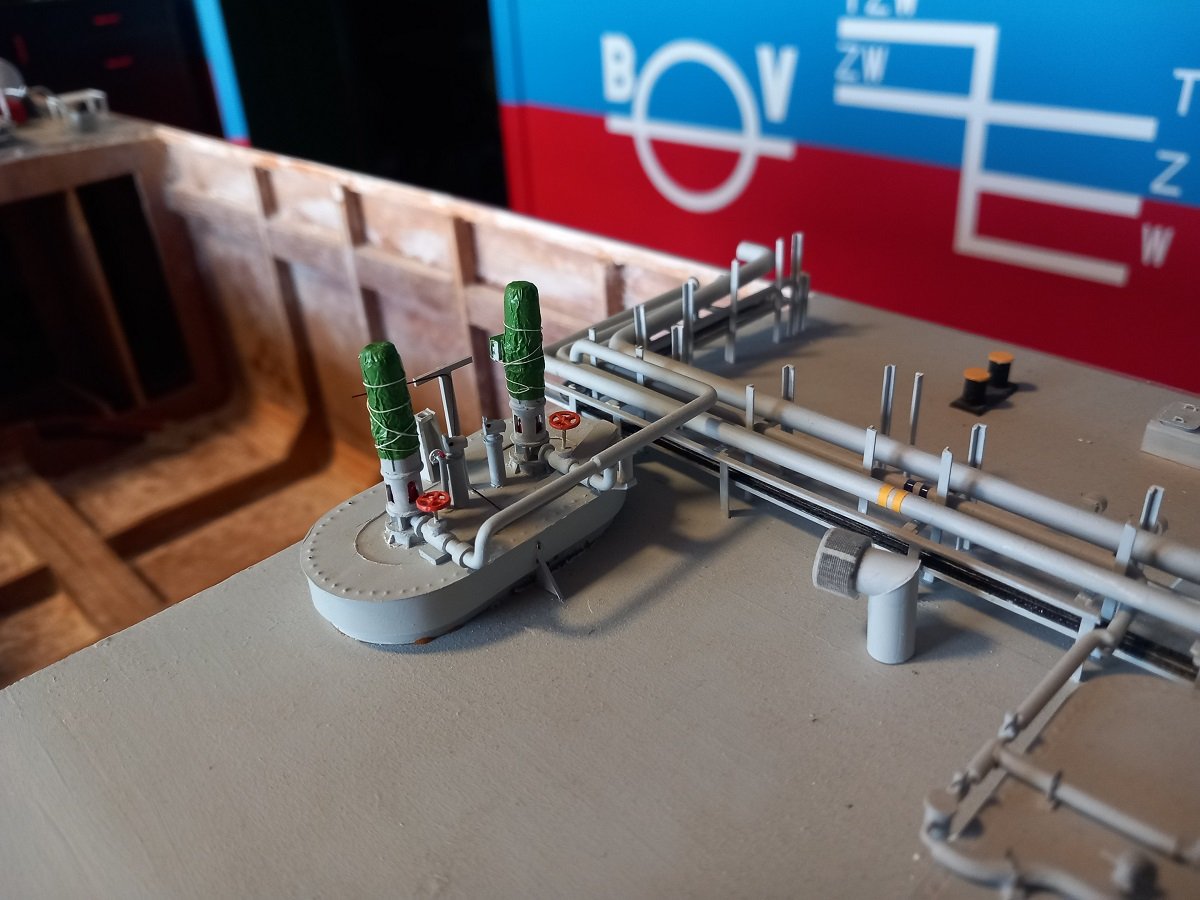
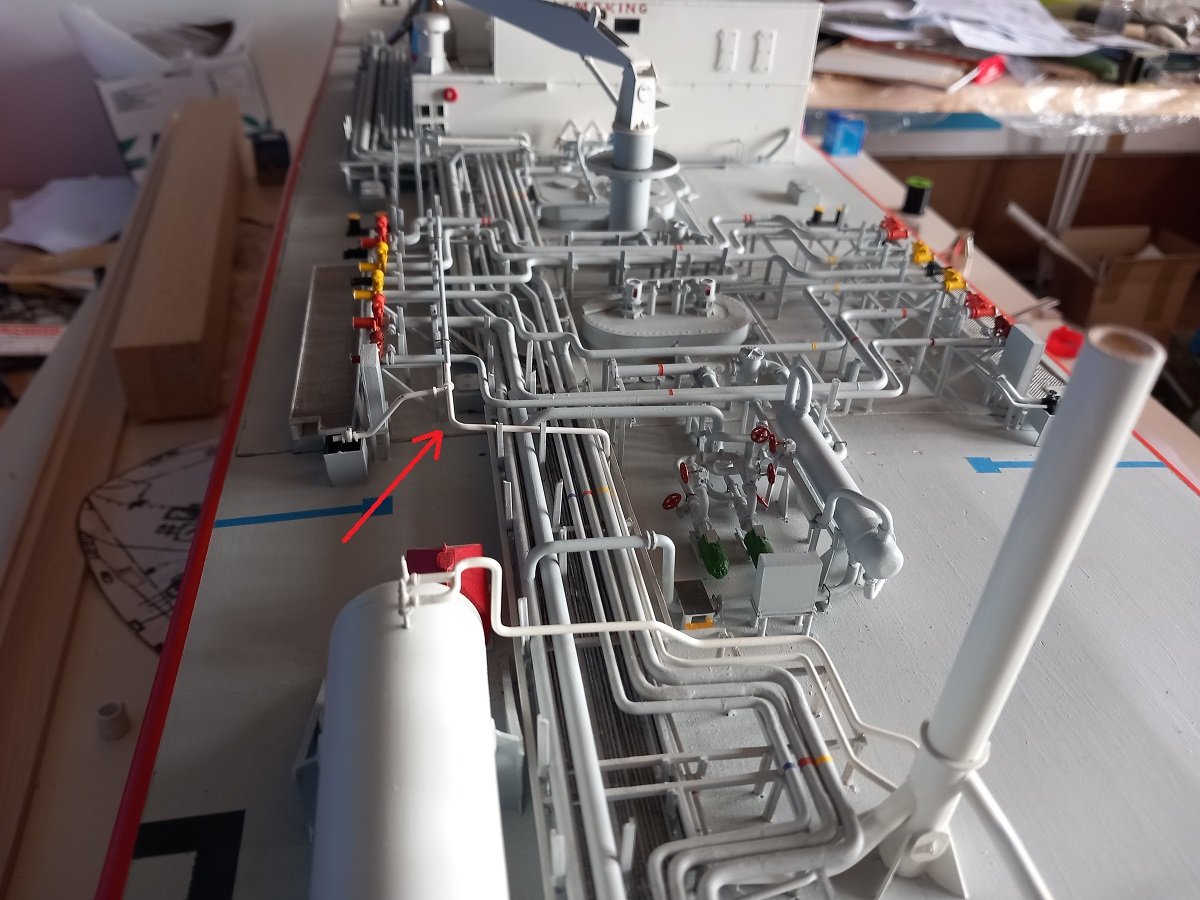
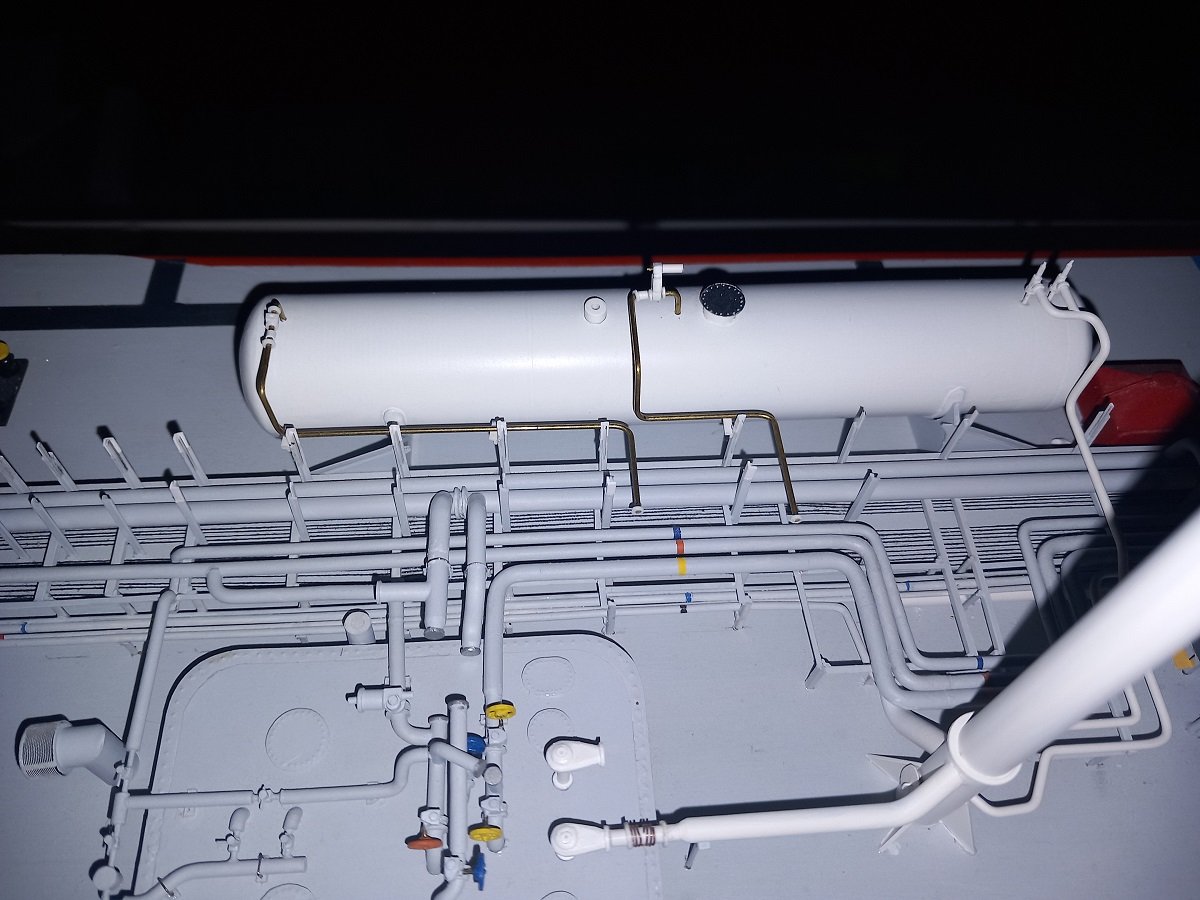
As promised, another small update. As you've probably become aware of my previous ramblings, I'm not building very straight forward anymore. It's more cluttered and all around the place now. So first I'll show the deck tank area. Lines are finally painted and installed (last light grey paint used now). I had also finished that aft PS bunker line. Here is a view with the hatch removed. Don't look at the dirt laying around, I just used my Proxxon with a cutting disk to reduce the piping on the pipe rack to avoid clashing with the piping on the hatch. I'll clean it up when I'm happy with the result. I also do need to fix this bunker pipe with some brackets to the stanchions behind it. You can also see a recent addition. The ship has 2 big dry powder guns (fire fighting) aft of the manifold on elevated platforms, one on each side. I've built the platforms now, but they'll need to be painted grey and would in any case be in the way if I'd install them now. I'll also fully detail them with railing etc. before installing them. And last but not least, I nearly finished pump dome 1. Both pump motors (covered by canvas) are installed and the support for the cabling is also installed between them. I had not planned to do the cabling when I started this build, yet without the cabling and support, something seemed missing from the cluttered pump dome, so I decided to add it as well. The cabling will be done with 0.2mm-ish copper wire. It's quite easy to cut and bend and the cables don't need to be as straight as the piping, so this should be ok. The plan is now to continue on the remaining pump domes. I'll also further adjust the piping around the hatch to finally solve this nagging issue. Additionally I'm now looking at constructing the remaining mooring fittings (roller fairleads and closed chocks and finalizing the chain stoppers for the anchor chains). All of those items are not grey so I should be able to finish those. And here is a picture of the real thing again. So the deck tank still needs the walkway on top and over the piping. That will be quite a difficult one, considering the round surface of the tank. And you can also see the dry powder gun platforms (red arrows).

-
Great planking job Ronald. Good decision to leave the lower part natural. Pitty on the slipped pin pusher, but I'm sure you will fix that! Keep this coming, as one of my superiors once said: "I love your perfectionist mindset, eventhough you don't achieve perfect results, at least you get closer than any of us"
-
Fantastic build. I personally regret not seeing it masted and rigged, but I also understand the amount of work involved in that. Love the finish and scale people. Congratulations on finishing it!
-
A marathon it is, a bit boring for you guys, but I guess this topic would be awesomely quiet if I'd wait with an update until I finished that piping completely. I need to tie up some loose ends, but at least the end is near. I did notice that making these unique items takes a lot of time for hardly any visible progress on the vessel. Tedious repeating jobs do give faster visual progress. Hadn't heard of Fandabadosey before 😂 Nice try Mr McGuire, you did pull that piece of sentence out of context. English may not be my mother tongue, I do believe "nor" in front of a piece of sentence means "neither" or "I did not" 😁. If I start something new, rest assured I'll make a build log for it. A couple of projects are taking form, most of them involving bottles, but none are truly 100% balanced at this point. Mostly issues with scale and bottle sizes and shapes. Thanks for all the likes and comments everybody. A real update will follow soon.
-
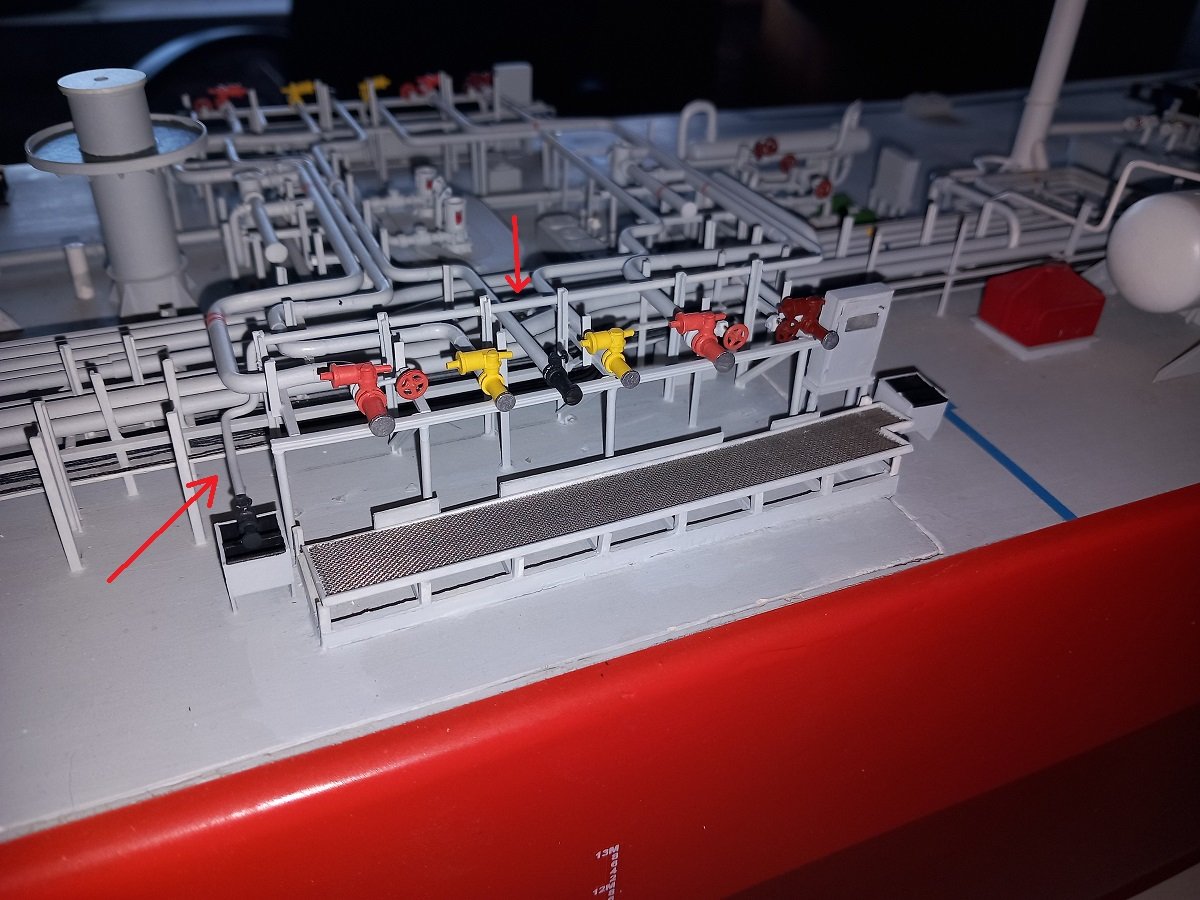
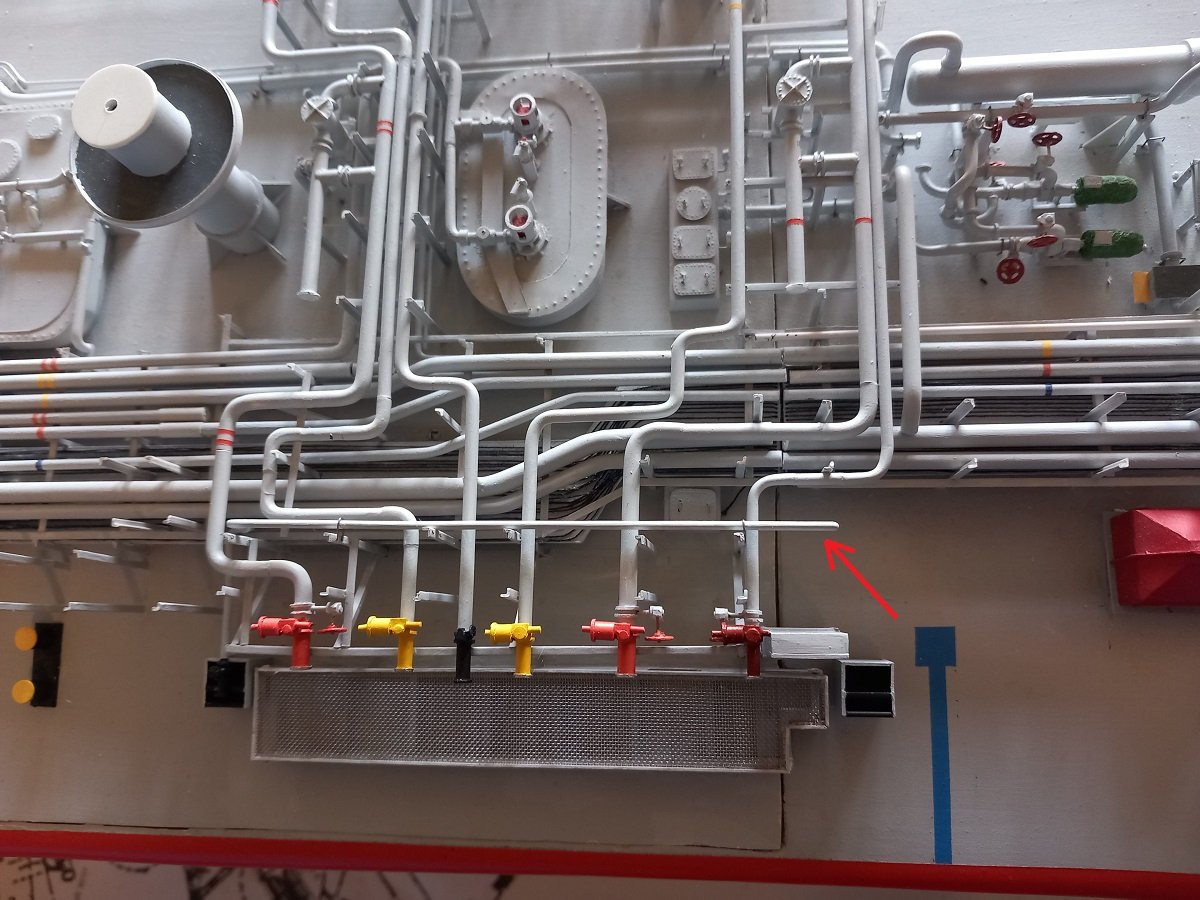
Just a sailor @yvesvidal, no plumber (although I do admit it has crossed my mind to change trade and go work ashore as a plumber in the past). So prodding on. Kind of forgot where I left off here. in the meanwhile the PS bunkerline has been installed. I marked its position in following picture. Then came the last part of that bunker line, since it's on the hatch, and the aft part is quite complicated, I decided to separate front from aft. Aft part can be seen in next picture. This was the second or third attempt I believe. In the foreground you can also see the finished safety valves installed on the deck tank and the line running from them to the vent mast. After extending the supports, my original liquid and vapour line from the deck tank were not correct anymore. I had to make them again and that took me quite a few attempts. However, currently they are ready and in primer. You can also see the extensions on the supports, nearly all of them are done in this area. On the right you can see a different view of the safety valves. The odd run of that line to the vent mast is of course there due to very fast cooling. The pipe is normally at ambient temperature, but if/when those safety valves open, it cools down very fast, so the turns in that line allow it to bend and shrink without tearing apart. Below picture also illustrates why I normally work bottom up. The vent mast on the right really is in my way when I'm working near that deck tank area, however I don't think I had another option at this point. The only major piping left is the connections from that deck tank going forwards where they connect to the other lines, passing over all other pipes, that's the final layer of piping. I did however notice I ran out of 1mm brass rod, so either I try to make it from 1mm styrene rod or continue building something else until I make another order at the model shop. The reason I'd use brass in this case is that those pipes also have 2 U-shapes and brass allows you to bend back and extend a bend a bit. 1mm styrene rod really looks odd when you bend it back and will also easily tear apart when bending again. I also finished 1 cargo pump with rope around the canvas etc. but no pictures yet. My shore leave is running out again, so I have to pick my fights. The grey mixed paint is also pretty much finished and I don't think I'll be mixing a new batch before I leave again. I'm currently not making my 2-part quotum, but at least the build isn't stalled nor did I start a new project in the meantime, so I'm ok with it.
-
The question is, does the veering off course happed due to wind or simply due to minute differences in the oars? If it is the latter, you might add a longitudinal skeg on the bottom, the length of the keel. This would make her more "course stable", however it will make her less manoevrable as well. I don't really expect a real issue when really turning on the oars though. The rudders will have even less effect if you do this. It could however reduce the veering off-course. On the other hand, if she just gets blown sideways, this will not help too much. If it's of any comfort at all, I'm also having issues with the wind on Chaconia, I really need a big calm pond to sail it as she doesn't have a bow thruster and the turning with the wind gives a very large turning radius.
- 536 replies
-
- 3
-
-

-
- Quadrireme
- radio
- (and 1 more)