HOLIDAY DONATION DRIVE - SUPPORT MSW - DO YOUR PART TO KEEP THIS GREAT FORUM GOING! (89 donations so far out of 49,000 members - C'mon guys!)
×


SJSoane
-
Posts
1,649 -
Joined
-
Last visited
Content Type
Profiles
Forums
Gallery
Events
Everything posted by SJSoane
-
 Thanks, Ed, that it explains it well. It is a treat to watch these again! Mark
 -
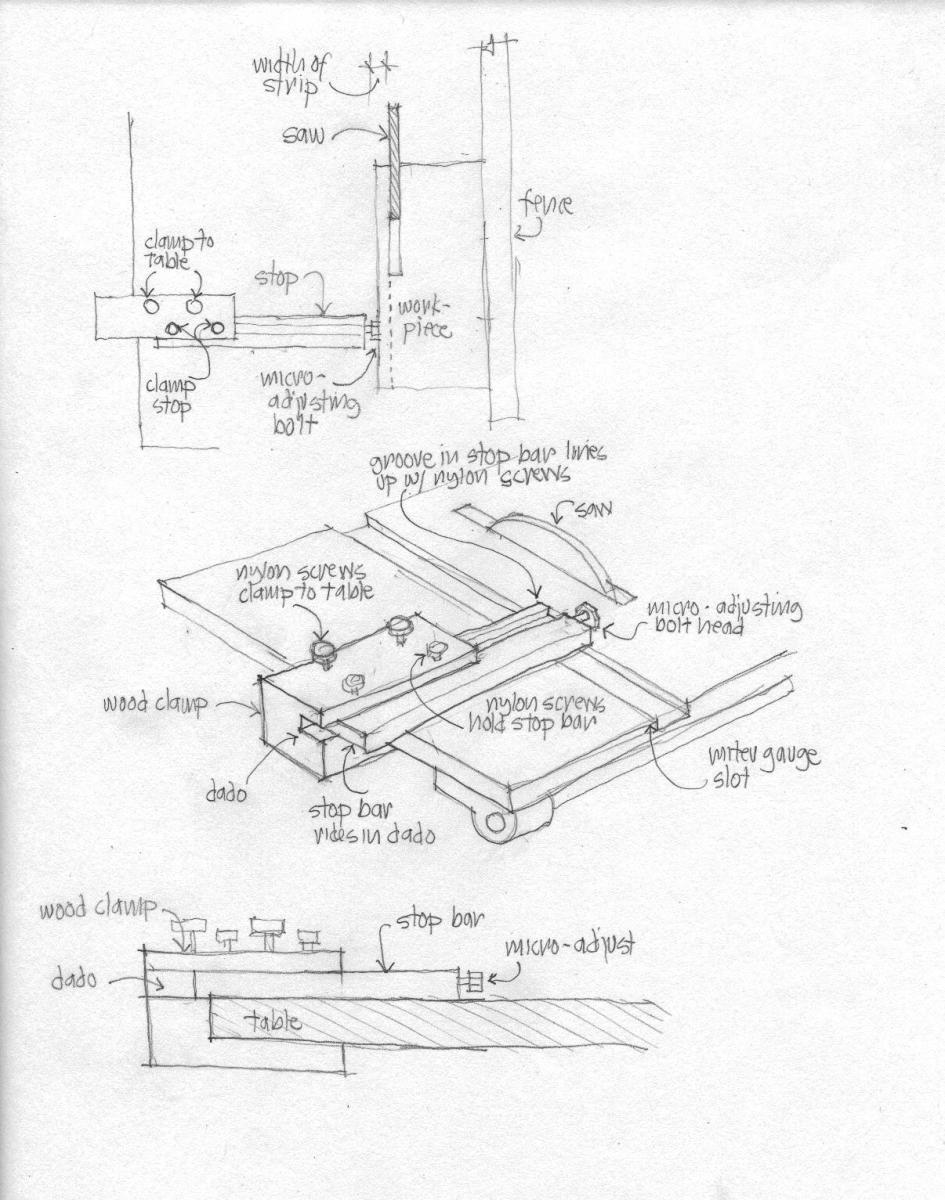
Hi Michael, Here is the saw stop I was thinking about making, inspired by your inventions. It indexes cuts on the side opposite the fence, with a micro-adjuster. I'll bet there is a more elegant way of doing this. Any thoughts? Mark

-
Remco, Perfection! I have a question about your mast wedge and partners. Since the mainmast angles aft, and the deck slopes, did you bore your hole through the partners at an angle? Or does the wedge make up the difference? Mark
-
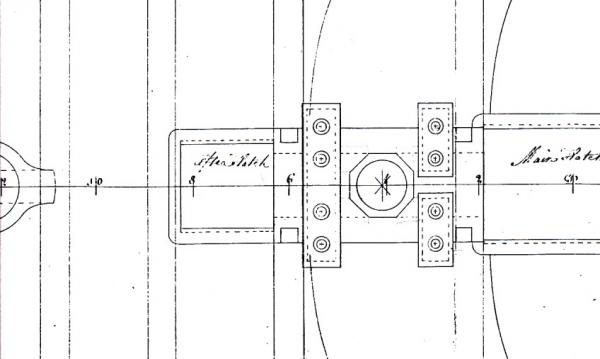
Hi druxey, The more I read about this, the more interesting it gets. Please correct me if I haven't got anything right in what I am about to say... Putting aside the mechanics inside, the first question for outward appearance is whether the tubes are square, octagonal or round. The pump with the most documentation that I can see is the Cole pump, which has square tubes. But this was first tested in 1768, almost a decade later than the Bellona of 1760, so my pump is earlier. Could my pump also have had square tubes, inherited later by the Cole pump? The deck plan of the Bellona suggests round. And Falconer in his 1769 Dictionary shows pumps in his deck plan with round tubes just like the Bellona. But Falconer's detailed drawing of the pumps in elevation is described by Dodds and Moore (Building the Wooden Fighting Ship, p. 100) as a Cole pump. The elevation drawing does not reveal the cross section of the tubes. If this were a Cole pump, and Falconer shows his deck with round tubes like the Bellona, perhaps the circles in the plan show an inner tube, not the outer casing? David Antscherl, vol. 1. and 2 gives great detail on the pump, and describes his reconstruction as predating the Cole. I am inclined to follow this. But he shows octagonal tubes, bored like the dale tubes. And he points out that dale tubes were earlier rounded after they left the cistern. Could the Bellona be showing rounded pump tubes, like the earlier dale tubes, as described by Antscherl? Mark
-
Thanks, John, I could learn from the captains! While pondering the next steps after the gratings, I have been looking at the pumps around the mainmast. My drawing from the Admiralty, ca. 1760, shows pumps tubes that are circular in plan. The later Coles-Bentinck pump of 1770s show rectangular tubes. Is there any reason to believe that mine are not circular? Would they have been continuous hollowed trunks like the dales, or made in sections for removal and cleaning? I have looked in Lavery's Arming and Fitting, which shows the drawing from Falconer ca. 1760 on page 71, with what appear to be continuous tubes of unknown cross-section.... Best wishes, Mark
-
ROYAL CAROLINE 1749 by Doris - 1:40 - CARD
SJSoane replied to DORIS's topic in - Build logs for subjects built 1501 - 1750
Doris, Perfection. One could never imagine what this is made of, and it rivals the 18th century model makers. Mark- 883 replies
-
- 2
-

-
- royal caroline
- ship of the line
- (and 1 more)
-
ancre Le Fleuron 1729 by rekon54 - 1:24
SJSoane replied to rekon54's topic in - Build logs for subjects built 1501 - 1750
Absolutely gorgeous work. Perfection! Mark -
Alexandru, It is great to see this again. Beautiful work! Mark
-
Hi Ed, Your reposting was very timely for me. I have been pondering how to color the wales and possibly spirketting, and I have been playing with shoe polish. But like your ink, it is very runny and does not cut up to a masking line without following the grain under the mask. Did you color the wales before installing? Or did you figure out a way to keep it where you put it? Scoring the edge? Best wishes, Mark
-
Hi Michael, Did you post the details of the serving machine elsewhere? I am very curious to see the details. I'll try to do a drawing of the jig I have in mind for the Byrnes saw, in the next day or so. Your inventions have got me thinking.....;-) Mark
-
Making gratings
SJSoane replied to marius's topic in Discussion for a Ship's Deck Furniture, Guns, boats and other Fittings
I just posted some images of building gratings on a mill, at my Bellona scratch build site. Very interesting challenges, these gratings! Mark -
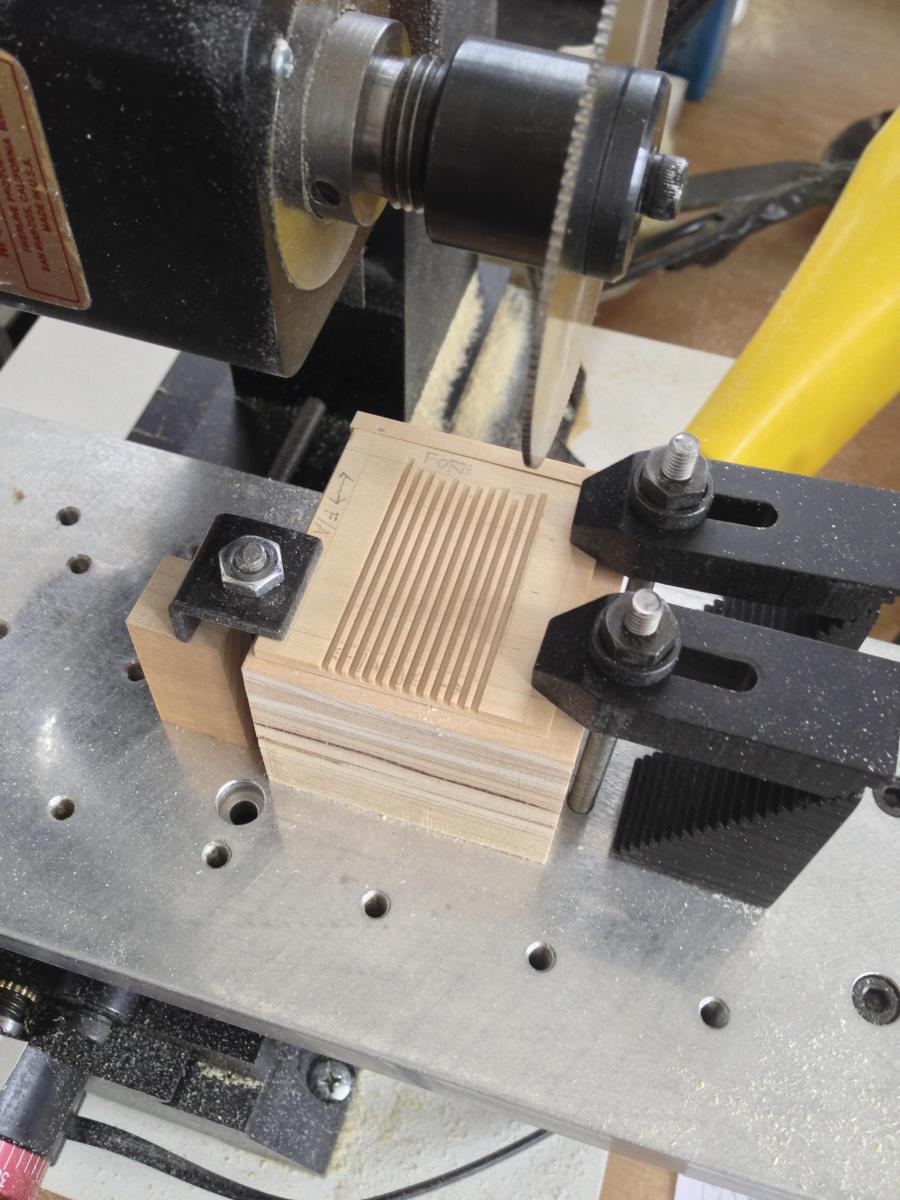
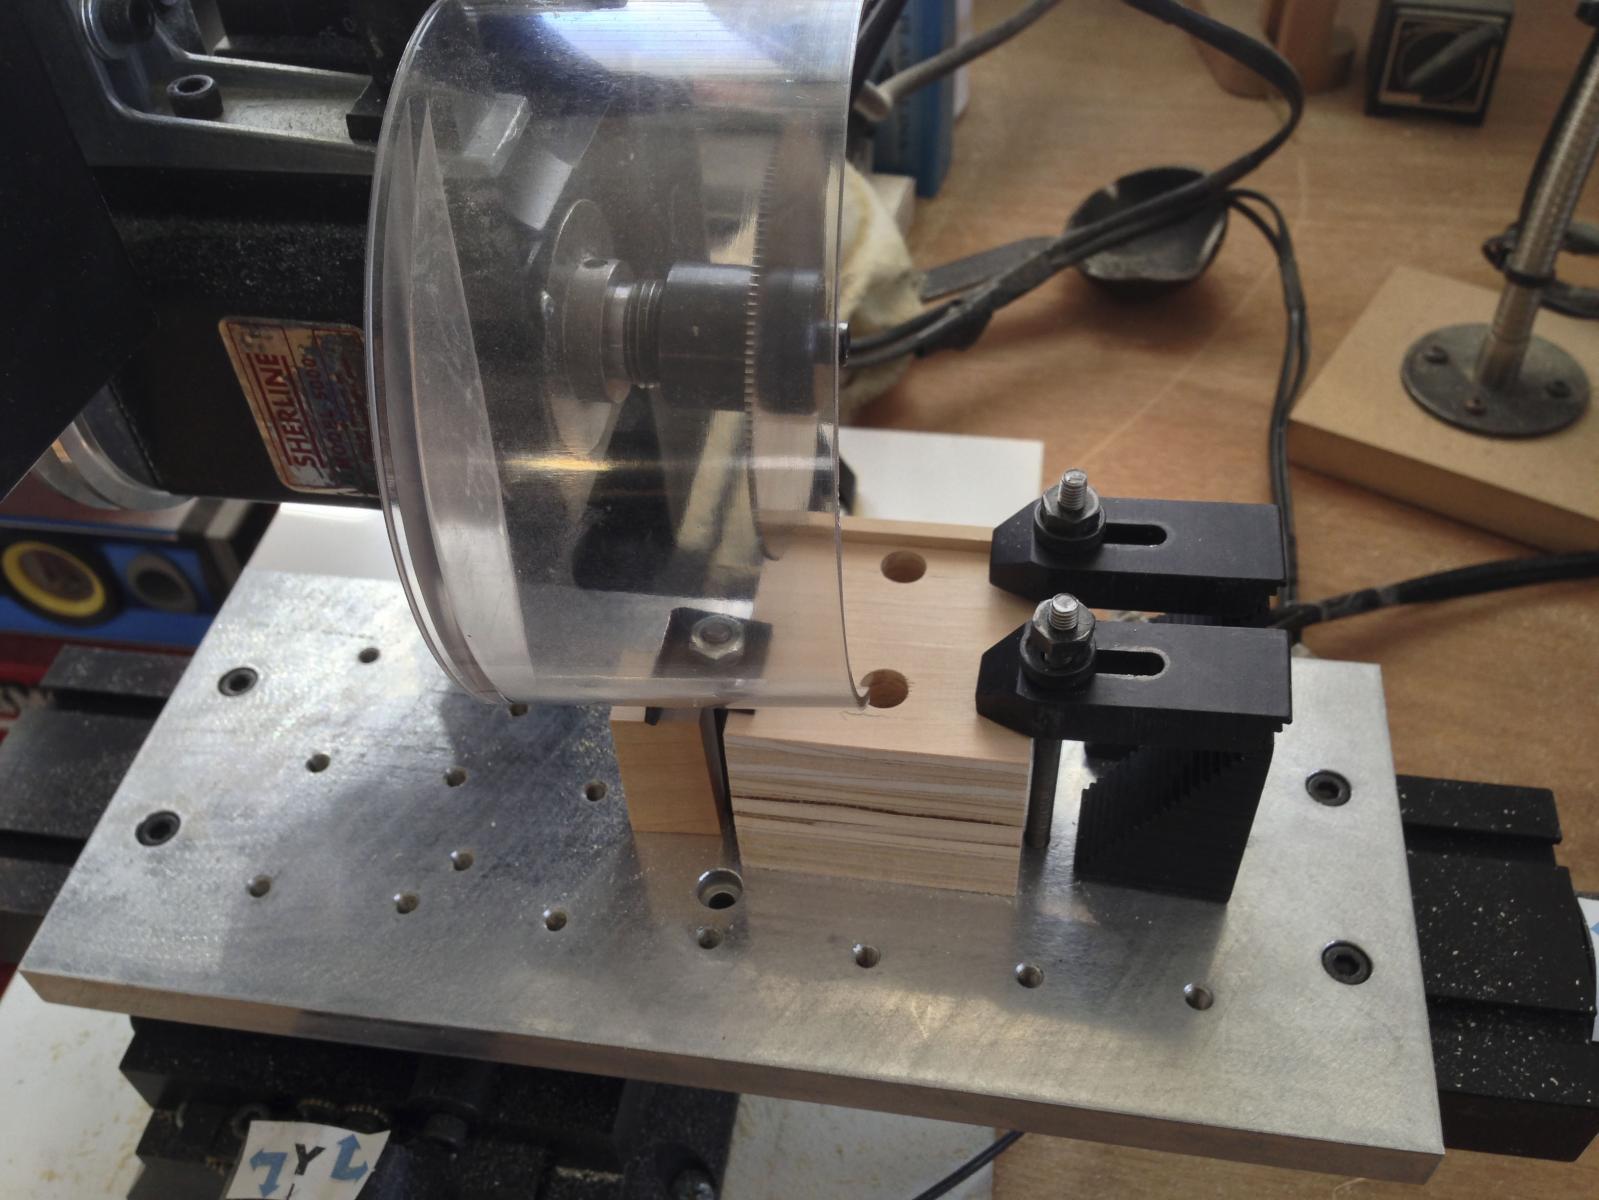
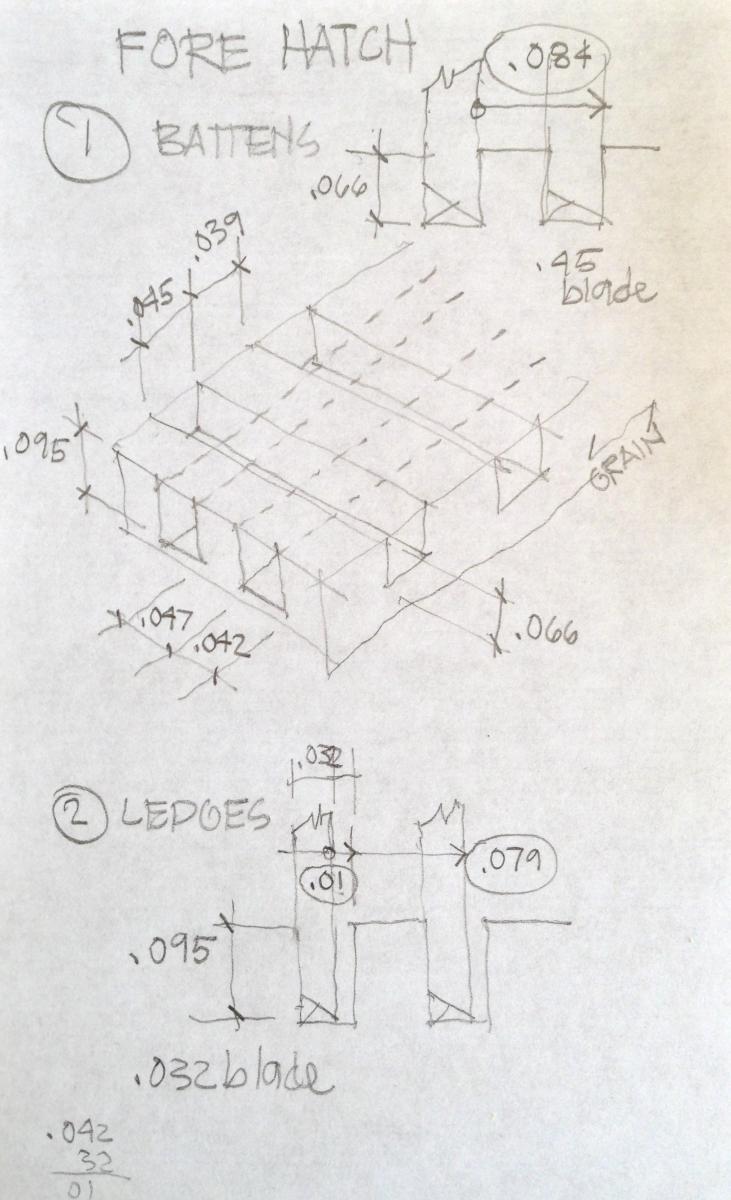
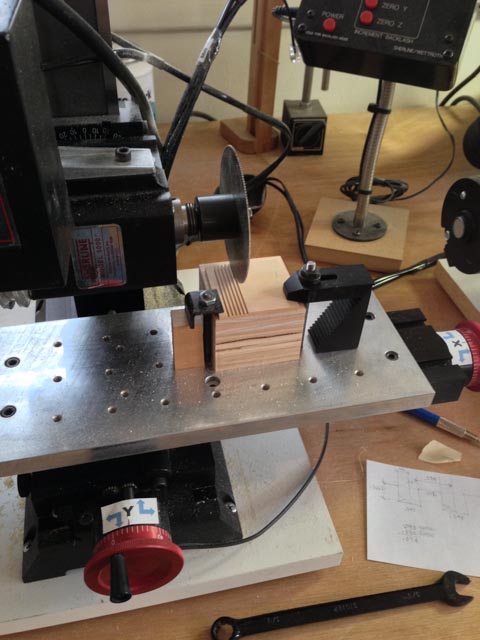
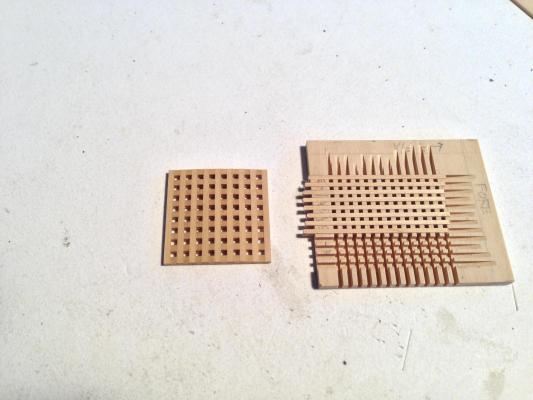
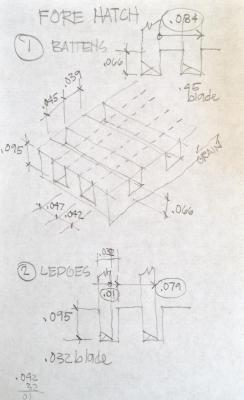
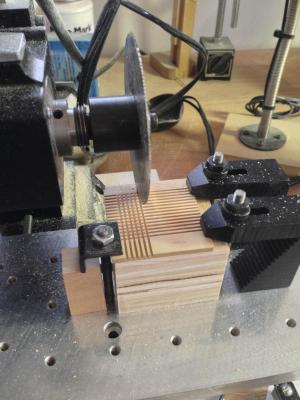
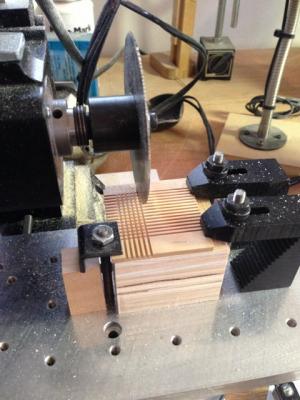
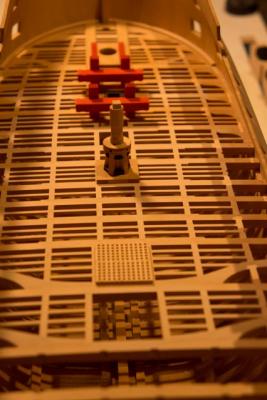
Hi everyone, Scary is right. The little birdie on my shoulder was talking to me, and I wasn't quite listening. But you all reminded me. I put much additional safety into the setup by taking my Sherline guard from the lathe and putting it on the mill. Much, much better. I took a great deal of time today, setting up a spreadsheet of the sizes of everything so they fit the openings of the coamings. I also worked out the menu for dialing in moves on the mill. I have shown an example for the fore hatch, which summarizes dimensions and dialing moves. I also arranged to screw the wooden block down to the plate on the table. With a little fence on it, it allows me to repeat locations of workpieces so as to make sure I have enough leeway to make the full cuts. The Sherline is very restrictive in the length of cuts set up like this. And the clamps sometimes get in the way. I need to keep working on this idea for the future. I have also shown the first effort at putting battens in; nothing glued or sanded, obviously. But I am also showing next to it the original grating, which in hindsight I realize had big enough holes in the gratings to trap the captain's heel just as he would have been running to something important. Good thing I caught the mistake....;-) I have run out of time today, to finish gluing battens, and then to see how sanding away the bottom will reveal the ledges or not. But I do like the self-jigging of this process; last time I really struggled with spacers between ledges moving around while gluing battens. The bottom below the ledges is paper thin and I can see light through it. We'll see tomorrow. Greg, thanks I knew I had seen the idea of sanding away the bottom somewhere; Clay Feldman! Mark


-
Beautiful, Alexandru!
-
Backstays, Breast Backstays, and Running Backstays
SJSoane replied to SJSoane's topic in Masting, rigging and sails
Thanks Frankie, I have Harland's book, and I will look that up. I keep meaning to read that cover to cover, to learn more about how they really used all of the equipment we build, in all sailing situations. My personal knowledge of sailing is limited to small dinghies in the lakes at the base of the Rocky Mountains a number of years ago. It takes a lot of imagination to scale that up to a 74 gun ship...;-) Mark -
Hi Jeff, Other than burning starting, which is always nice to avoid, how do you decide when a blade is dull and time to change? And how long does a sharp blade last you before changing? Mark
-
Michael, Nice serving device. Along with that micro adjusting table saw fence you showed in another forum, you are the maestro jig maker! I have an idea for an adjustable stop for cutting small strips on the Byrnes table saw I might try out on you and see if you have ideas.... Great work. Looks fantastic. Mark
-
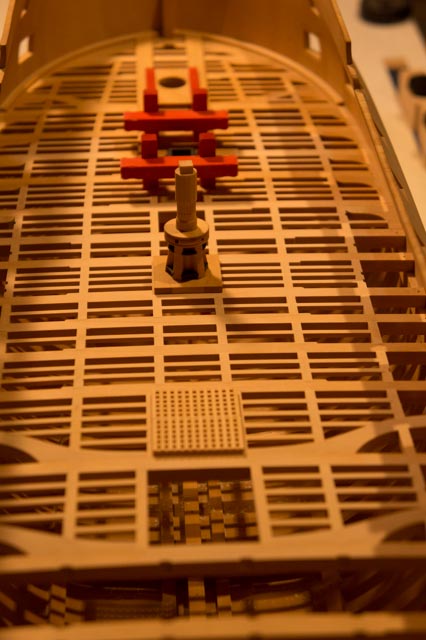
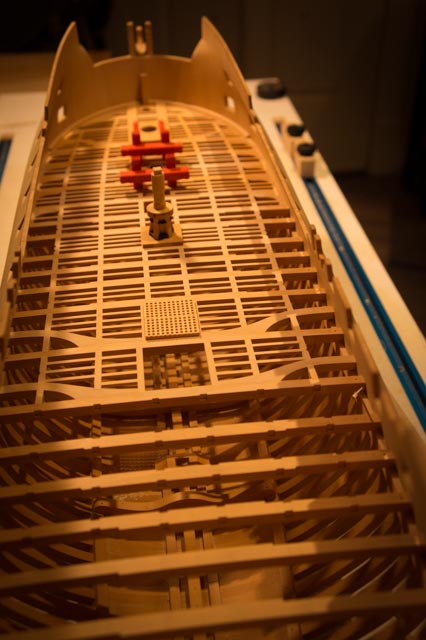
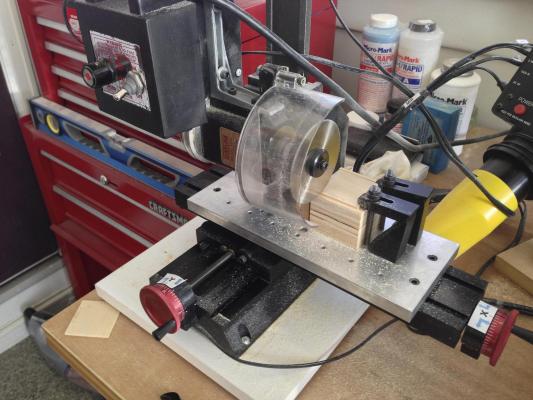
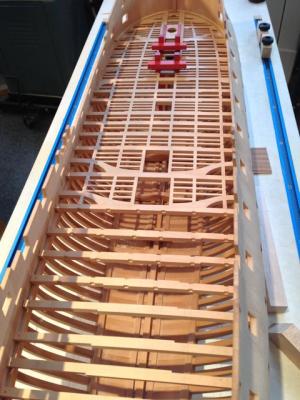
Hi everyone, Remco, you are so right. The rush is definitely to get into the shop! Last night's photos weren't great. Here is one in the daylight. (my photos seem to be smaller than usual; I'll look into that.) In setting up for the mainmast partners, I discovered that my original hatches and gratings were not sized correctly. So in the spirit of re-doing, I am working on a more systematic way of doing gratings. Each one needs to be adjusted just ever so slightly in the spacing both ways in order to fit exactly in the correct coaming size. So rather than the usual method of cutting on the table saw, which does not easily allow minute adjustment for each grating, I decided to try it on the mill. Here is my first experiment. The spacing came out perfectly in the test. It is fairly scary turning that big sawblade on the mill without any kind of saw guard. But I needed the diameter to clear the housing of the motor when it indexes over. And I needed to build up a block to get the work at a height that the mill can reach when the Z dimension is cranked all the way down. I wear a big face mask, and stand well to the side... The idea is to cut the spaces between the ledges so that the ledges do not quite fall off the blank. Then I can glue in the battens with the ledges already automatically spaced. Once dry, I will sand the bottom of the grating until the ledges reveal themselves, and then the grating is opened up. At least in principle.... We'll see tomorrow if I can make this work. Mark

-
Hi Guy, I would be interested if you don't mind looking into it. And thank you Runner63, I appreciate your comment. I spend a day putting in more carlings and ledges. I had to re-do one space between beams, because I originally put in two rows of ledges and they were too close together to match the texture of the rest of the deck. So out they came, and a single row went in. Good thing I am in no rush.... Best wishes, Mark

-
"In the next picture a #0 flat silversmith’s riffler is being used to level out the strakes." Ed, I missed this the first time around. That looks like a very handy riffler. Do you remember where you got it? Mark
-
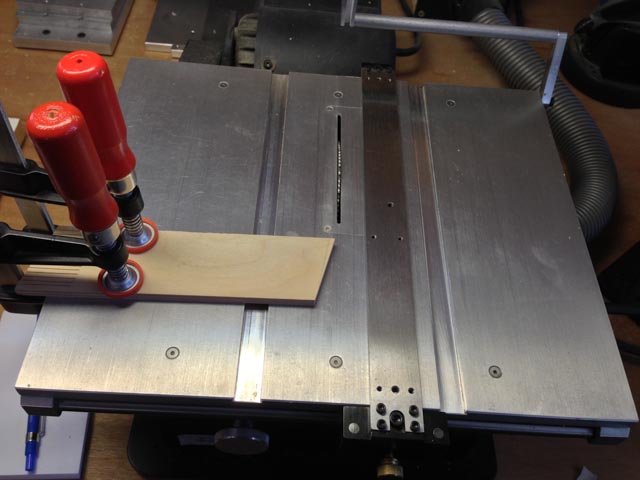
Hi Jeff, these are exceptionally helpful comments. Would you mind posting a photo of the block you use for holding the wood down? I have discovered that keeping the leading edge of the wood flat on the table really helps stabilize things. Your block sounds like just the thing. It also helps, I have discovered, to cut off the strips on the side of the blade opposite the fence. But the trick is how to make a repeatable cut when the fence has to be moved in every time. I use a basic jig shown here, which clamps a stop in the right spot. Then just move the fence and wood up to the stop and cut again. It works, but it is fiddly for mounting and adjusting. I am thinking about better jig that can clamp onto the table, and have a sliding arm to accommodate different wides of cutoffs. And a little micro-adjuster in the end would allow perfect sneaking up the exact right dimension. Has anyone built something like this? Best wishes, Mark
-
. But I am still not 'scared' and will react cautiously if something is not quite right. This is really important advice. I remember reading many years ago in Fine Woodworking Magazine some advice that I have always tried to heed. When the little birdie on your shoulder says "this doesn't feel right", always, always listen to it. Before I read that, the few times I got impatient and thought just this time I'll risk it, it will be OK, my intuition had turned out to be right. It wasn't OK. Nothing irreparable, but close. Mark
-
Michael, Words escape me. The metal work is exquisite, and it is exceptionally helpful to see how you did it. Are you using a small jeweler's torch? Mark
-
Hi Gaetan, As usual for your exceptional work, the photos look like real ships. You are an inspiration. Mark
-
ROYAL CAROLINE 1749 by Doris - 1:40 - CARD
SJSoane replied to DORIS's topic in - Build logs for subjects built 1501 - 1750
Hi Doris, I just came across your build. Fabulous work! I see in your pictures how you built this from card, but it looks exactly like a wooden model in the end. Exceptional craftsmanship. Mark- 883 replies
-
- 1
-
-
- royal caroline
- ship of the line
- (and 1 more)
-
Michael, Beautiful work! Can I borrow your scaled down shipwright? ;-) The metalwork is exquisite. Can you say a little more about how you are fabricating those pieces? Best wishes, Mark