


wefalck
-
Posts
6,652 -
Joined
-
Last visited
Content Type
Profiles
Forums
Gallery
Events
Everything posted by wefalck
-
 When building models of steel or iron ships, I would rather go for some man-made sheet material. It is much easier to produce a convincing surface with these. If one does not like styrene for some reason, there are various alternatives, such as acrylic glass (down to 1 mm thickness), bakelite paper (down to 0.2 mm thickness), ABS (similar to styrene ...), PVC, and others. At some stage in the 1980s it seems to have been fashionable among RC-boat builders, where top-weight is of concern, to reinforce balsa-wood by laminating on thin paper. This increases its impact resistance and the tensile strength. Also it seems to make it easier to cut clean edges on thin material.
 -
Help with rigging a 1920s pond racer
wefalck replied to Dobro23's topic in Masting, rigging and sails
Apart what Bob said about 'restoration', there are couple of (European) books around on pond-yachts. One late 19th century one would be: Walton, J.E. (1880): Model Yachts and Model Yacht Sailing: How to Build, Rig, and Sail a Self-acting Model Yacht.- 101 p. (Griffith and Farran), https://books.google.fr/books?id=qrQ3AQAAIAAJ&printsec=frontcover&hl=de&source=gbs_ge_summary_r&cad=0#v=onepage&q&f=false There has also been already a thread on this subject: -
Manning the capstan
wefalck replied to dafi's topic in Discussion for a Ship's Deck Furniture, Guns, boats and other Fittings
The power one excert with the chest would be greater than that with stretched-out arms. In the latter case the power would be limited by the muscular strength of the arms and the capability to keep them stretched out. In addition, when the men's arms would give in, the bars would have a chance to accelerate over a distance of half a metre or so, hitting the men's chest or head very hard. When you touch the bar and there is a kick-back, it would push you off your feet backward, but you can hang onto the bar without being injured. -
Trying to understand white balance
wefalck replied to Gaetan Bordeleau's topic in Photographing your work. How to do this.
Talking about spectroscopy: I didn't look into this, but it should be possible to calibrate the camera sensors against the visible spectrum using e.g. emitters with discrete spectral lines, such as Na. I am intrigued by this colour vision difference between the eyes and have to set up a test in which the illumination of the object is such that it is exactly the same for looking with one or the other eye. So far I did not notice a real difference ... -
Black paint was quite cheap to make and basically consisted of soot mixed with lineseed oil and some turpentine to improve the flow. However, the quality of the paint depends very much on the quality of the soot. Lamp-black and that from charring bones makes the best qualities, I believe, but any other soot can be used. Hence, the war-time black paint could be quite rough and not so covering, particularly, if not soot, but rather charcoal was used. A common practice for walked-on surface was also to add some quartz sand to the paint to give a better foothold. Cheaply made black oil-paint or such paint with (coal-)tar added is likely to attain a colour after a few weeks/months akin to that of an asphalt road, so a (very) dark grey. The decks of my current project were treated as mentioned above and I painted them in 'Panzergrau RAL 7021' (Vallejo ModelAir 71.056). Still a bit light, but I will tone down the less walked-on areas with black pastels. You might lighten up your black armour etc. with some dark-grey pastels. Today, most white paints are based either on titanium or zinc oxide, while the traditional lead-white has been phased out due to the (eco)toxicity of lead compounds. The lead-white may have been inherently less brilliant white than the modern pigments. Some paint manufacturers offer off-white, bone-white, or parchment-white shades, but these may be actually too yellow or too beige for the purpose. You could tone down the white with a very light oil- or acrylic wash with yellow ochre. On the colourised historic films that pop-up on e.g. YouTube: while they sort of give an impression of how things might have looked like in the old days, they are often outright wrong, particularly, when the AI is not supported by research and intelligence on the subject matter. For instance, I watched some early 19th century footage taken in Vienna and the trams were colourised in blue, while they always had been painted red to my knowledge ...
-
To me it looks like what the navies called 'buff' or in French 'chamois'. This seems to have been a popular colour also in merchant shipping around the middle of the 19th century. It's easy to mix up with lead-white and some yellow ochre as pigment. However, everyone's perception of the hue will be different and even, if you have a recipe that says take so and so many pounds of this and so and so many pounds of that and mix with so many gallons of lineseed oil etc. Incidentically, there is an interesting article published in 2020 or 2019 in the Mariner's Mirror I think on the paints sampled from HMS VICTORY. They discovered that there was a surplus of red pigment in the ships' allocation after the Admiralty decided to switch from red internal painting to white that the ships used up their red ochre by mixing it into yellow ochre, which resulted in the pinkish colour in which the ships appeared apparently during the Battle of Trafalgar - so much for regulations vs. practicalities
-
Would you have any references for those "ante-bellum Navy specifications" ? I am actually wondering whether "Web-sites dealing with antique paint colours" would know what is meant by "straw colour" ? For another (German) project I have tried to establish what the 'yellow' could have been with which ships' masts, funnels, etc. where supposed to be painted and found that no reliable recipe for the composition could be established, given the variability of the main incredient, namely ochre. That is is likely to be the case for the 'straw' colour as well. "Lead" colour presumably refers to 'white lead' the most common good quality white pigment of the time.
-
Proxxon compound table KT 70
wefalck replied to Dziadeczek's topic in Modeling tools and Workshop Equipment
Well, this is a challenge also experienced machinists face constantly. One could put together a whole thread on this subject, but this has little to do with the question of the original poster. Personally, I can resort to a wide range of workholding tooling for my watchmakers lathes/milling machines and in addition I used the machine tools to make more work-holding options. -
Trying to understand white balance
wefalck replied to Gaetan Bordeleau's topic in Photographing your work. How to do this.
Interesting observation that the two eyes see different colours. Somehow I would have thought that the brain kind of processes the physically different information into a homogeneous impression - as our brain processes optical impressions to conform with a certain expected reality (when you get new cylindrical or progressive glasses your brain has to adapt to the new optical signals, for instance ...). When I was 18 I intended to join the navy for a three-year course as trainee officer and as my father was severely colour blind, he sent me to take an exam, which I passed with flying colours so to speak. I remember one task was to put about twenty purples and blues into the right spectral order in addition to the classical Ishihara-plates. And, well, my wife asks me for my advice when it comes to mixing and matching colours Started photography in earnest in 1972 and actually read textbooks at the time on the 'technical' aspects of photography, but soon realised that I had a certain 'image' in my mind that I wanted to take - which is completely independent of any 'correct' colour. There were neutral grey cards and a colour meter in the parental household, but I never had a real need in practice to use them for my kind of photography. -
The German regulations actually stated that the floor-boards were to be painted 'stone-grey', whatever that means in reality. The leather parts would be a tan colour, which includes the leather fenders. I think this adds a bit of colour detail, because otherwise the navies at the time had the habit to slap (white) paint on almost everything (there was an old sailor's wisdom: what moves is being saluted, what doesn't move is being painted ...). BTW, are you aware of this building log: It's a New York-built naval cutter acquire by the Italian navy prior to 1861 to replace a storm-loss. The original is preserved in the naval museum in Venice.
-
Making Brass Masts for 1/700 warships
wefalck replied to dcicero's topic in Metal Work, Soldering and Metal Fittings
With a (Sherline) lathe, I wouldn't bother with telescoped tubing, but would turn it from a steel rod. The point is to have a fixed or moving steady to keep the rod in place. Sherline does sell both types of steadies, but one can also improvise steadies. Old-time mechanics fixed pieces of wood or even thick card-board to the lathe bed with appropriate holes at centre-height. Of course, one can take very light cuts only, preferably with a very sharp HSS-tool. Here I am turning a 2 mm diameter boom, which is about 60 mm long, between centres. I used the flexing of the steel rod to get the curvature of the boom. With a steady, on can turn straight sections.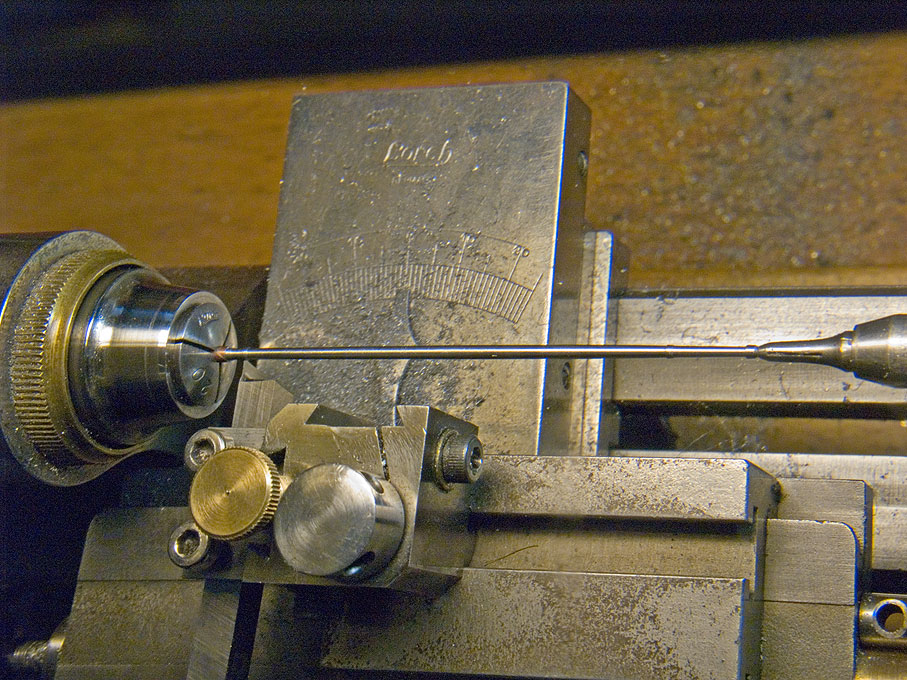
-
Trying to understand white balance
wefalck replied to Gaetan Bordeleau's topic in Photographing your work. How to do this.
"The standards say that if done correctly, you really shouldn't be doing any "correction" after the fact." Most of us non- (or not so) technical people with make-shift photographic set-ups have limitations to do things 'correctly'. For these people mainly post-processing is meant (or for working with it creatively, as I do). I am guilty of using 'wrong' and mixed lighting, simply because I am lacking the space to set up a proper photographing facility and have to make do with what I have. -
Trying to understand white balance
wefalck replied to Gaetan Bordeleau's topic in Photographing your work. How to do this.
That was exactly my point ... -
Trying to understand white balance
wefalck replied to Gaetan Bordeleau's topic in Photographing your work. How to do this.
It is also useful to distinguish between the technical and aesthetic aspects of lighting and colour. There is a lot of psychology involved in both colour and lighting. Something that is technically correct, may not fulfill an individual's aesthetic requirements and vice versa. Most 'white' paints are not necessarily of a 'neutral' white colour in a technical sense, but are slightly yellowish due to the materials used or the way they have been adjusted by the manufacturers. Correcting their appearance to a 'neutral' white using e.g. the colour correction feature in Photoshop may lead to displeasing or confusing results. Some modellers go at great length to kit out their workshop with 'day-light' (5500 K) lighting in order to get the colours 'right' on their models. On the other hand, models are typically viewed under a variety of artificial light sources and not under daylight. So, a model painted under 5500 K would look different from what it should look like. My point basically was that colour 'correction' is a very subjective process, unless it is done for a specific technical purpose. -
Making Brass Masts for 1/700 warships
wefalck replied to dcicero's topic in Metal Work, Soldering and Metal Fittings
The technique to use depends on the technology available to you. Personally, I would use steel, but then I have a watchmakers lathe and made fixed steadies for use with them. If you don't have a lathe, you could use a small rotary tool, place the material onto a piece of flat wood into which you cut a shallow groove to keep the material from whipping. You can work on it with fine files or sanding sticks. Using steel would make the mast stiffer, but it may be difficult to work it with such tools. Brass might be an easier option in such case. Scale doesn't matter, but the absolute length of the part and in particular its diameter ... -
Proxxon compound table KT 70
wefalck replied to Dziadeczek's topic in Modeling tools and Workshop Equipment
Personally, I would prefer so-called tool-makers insert vices. They are also sold as EDM-vices and come in different jaw widths starting from 1" = 25 mm and with different capacities. Here is a random picture from the Internet: They have also notches on the top to clamp thin materials. Their jaws are pulled down while tightening them, so that there is no uplift of the moving jaw.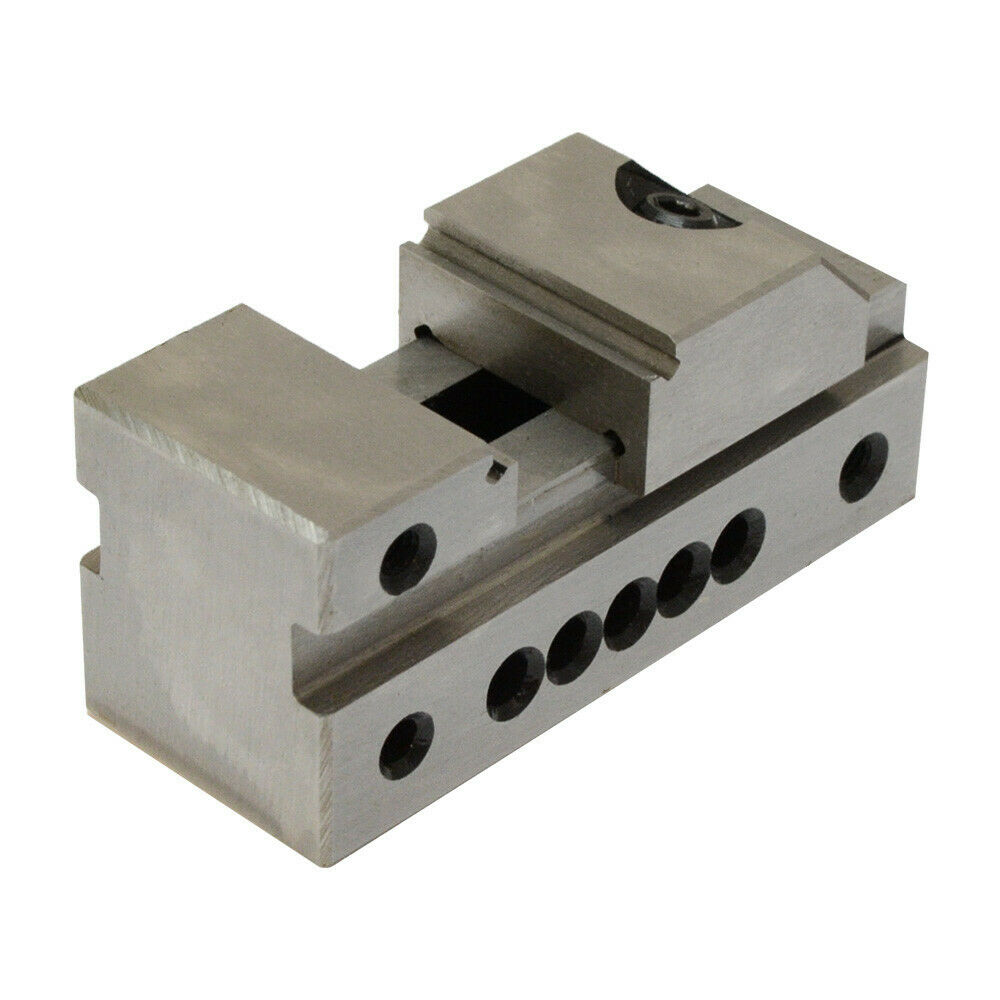
-
There is a good deal of fashion of the day and tradition involved in how ships and boats were painted, but also practical considerations. I have not searched for this for other navies, but I suspect that instructions were published in official (navy) gazettes or similar government circulars on how to paint the ships and boats. In this way we are, for instance, quite well informed on how boats of the Prussian/Imperial German Navy were supposed to be painted from the late 1860s on. Many ship's boats were painted white or a cream colour inside. The main reason is to protect the wood from the exposure to the sun-light and salt-spray, when stowed uncouvered. The rowing benches usually were only scraped and left bare, so that the men would not slip on them while rowing. The outside was usually painted either white or black. The white is presumably due to the fact that the superstructures of (naval) ships at the time were painted white and black boats would have stuck out too much. The black may have been chosen for practical reasons, because from the 1850s on harbour waters became increasing polluted by oil, coal-tar residues and soot coming from the steam-ships and domestic/industrial effluents - white boats would have been difficult to keep so. Oars could have been painted, but often were just scraped and oiled. There would bee leather sleeve in the area of the row-lock, which would be kept well-greased to keep it from cracking. The handles were normally kept scraped and bare to provide a good grip. The round thingies dangling from the sides of the boat in the picture above are indeed boat-fenders. They were made from leather and stuffed with sea-grass or horse-hair.
-
Yes.
-
Painting White/Pot Metal.
wefalck replied to JohnB40's topic in Painting, finishing and weathering products and techniques
On simulating wood: it is actually quite possible to apply a coat of shellac on a part that has been painted with acrylics. Just make sure that the acrylics have had time to thoroughly dry, say a week or so. Otherwise, there is a risk that the alcohol in the shellac solution damages the acrylics. The idea is got a surface sheen similar to a 'French polish'. It is also possible to slightly matt the polish to a satin sheen by lightly rubbing the surface with pumice powder. This has to be done very cautiously e.g. with a humid cotton-stick or a finger tip in order not rub through to the paint, which happens very easily at corners or raised parts. -
The 3D-printing files have to be set-up for each scale separately, so these sites only offer printing at set scales. In principle, something along these lines is useful: https://www.heroforge.com.
-
Does not exist. The closest is 1:60, but commercially there are only the classical flat tin-soldiers as far as I am aware. I know this, as I built a couple of models in that scale and was never able to crew them - my sculpting capabilities are not that good. Until some 25 years ago there was a Swedish company Rose Miniatures that also made 30 mm 3D-figures. Some of the 'war-gaming' figures might work, but they are nominally 25 mm. I think the figures of Perry Miniatures (https://www.perry-miniatures.com) are nominally 28 mm, which translates to 5" in a 1:54 scale - still a bit on the small side. One has to scan their range to see, whether any figures for conversion into marine civilians would be available. Personally, I am not very fond of the war-gaming figures, as for some reason they are always chubby, almost cartoon-like representations with too big hands and feet.
-
Well, these tours de force in brass-work are never boring ! Perhaps the horizontal hinge for the fore-boom is to allow it being topped-up ? I admire the resistance of you Brits - with 10°C only my workshop would have closed already for hibernation ... 🥶 ... We whimpish continentals were brought up in heated schools and with long trousers.
-
For a ship at sea there are an awful lot more variables to consider: the constant rolling, heeling and pitching changes the aspect the sail presents to the wind, the wind itself changes direction not only in the horizontal, but also in the vertical, the wind speed constantly changes slightly, due to the ship's movement and the movement of the waves the wetted surface constantly changes, the length of the waves and hence their interaction with the ship-generated waves constantly changes, etc. etc. Some of these variables can be simulated numerically and generated randomly, but that requires a huge amount of computer-power. In principle it is easier for the water part, because water is not compressible. This is why in many cases experiments in wind-tunnels and/or wave-troughs etc. with scale-models are still needed.
-
Painting White/Pot Metal.
wefalck replied to JohnB40's topic in Painting, finishing and weathering products and techniques
As previous contributors already noted, figureheads on real ships were always painted and at some times at rather garish colours - sea-folks were not necessarily aethetically refined For wood effects I begin with a light tan (e.g. Vallejo 'wood') sprayed on. This gives a good key for the following washes applied by brush. These washes depend on the wood species I try to simulate. Colours may include other tans/beiges, burnt umber and sepia/caput mortuum. Vallejo also has mahagony in their range. The Vallejo 'wood' and 'mahagony' also come in 'transparent' versions that facilitate washes. Another useful colour is their 'transparent orange'. I use their 'model air' range a lot because I don't need to bother too much with diluting, but just put a drop onto my glass palette and further dilute with water as needed. These days I prefer acrylics over oils for this as one can work much faster. Building up layers of oil washes can take days or even weeks, as each wash has to properly oxidise ('dry') or you risk to wash it off with your next wash of heavily diluted oil-paint. Acrylics dry within in minutes and after 10 to 15 mins the latest it is safe to apply the next wash. Depending on the effect I try to achieve, I may be using round or flat hair-brushes or bristle brushes for a more streaky appearance to simulate wood-grain. 'Wood-graining' used to be a craft in itself and some artisanal painters used to specialise in it. It was popular from around the middle of the 19th century to the 1920s or so, when many metal artefacts were decorated to look like wood. Sometimes also cheap woods were made to look like more expensive ones. Today, hobbyist still use the technique and there are guidebooks for it on the DIY book market. I myself and I gather other (plastic) modellers learned from such books.

