Mike Y
-
Posts
1,557 -
Joined
-
Last visited
Content Type
Profiles
Forums
Gallery
Events
Everything posted by Mike Y
-
Ok, now I feel it is a right place to ask I have a Veritas low angle block plane, and looking for something to flatten small boards. There are two options: 1) buy an optional tote and a knob for the block plane (such thing exists! See http://www.leevalley.com/us/wood/page.aspx?p=41715&cat=1,41182,48942 ) 2) Buy a veritas low angle jack plane and an additional 38 degree blade (for smoothing). Keep in mind it is a bevel up blade, so angles sum up. Second option is quite expensive though.. Block plane path is cheaper, but it only has 25deg blade. I can do scraping for smoothing, though. Ok the other hand, my boards are typically as long as the jack plane, or even shorter - so the jack could be be too large for my purposes. But could be used for jointing due to its length... So far using a block plane and a shooting board for jointing. Would appreciate some thoughts from a more experienced craftsman here!
-
 Grant, Carl, Brian - thank you! Oops, I made a typo in the link. Corrected it, now it should work.
 -
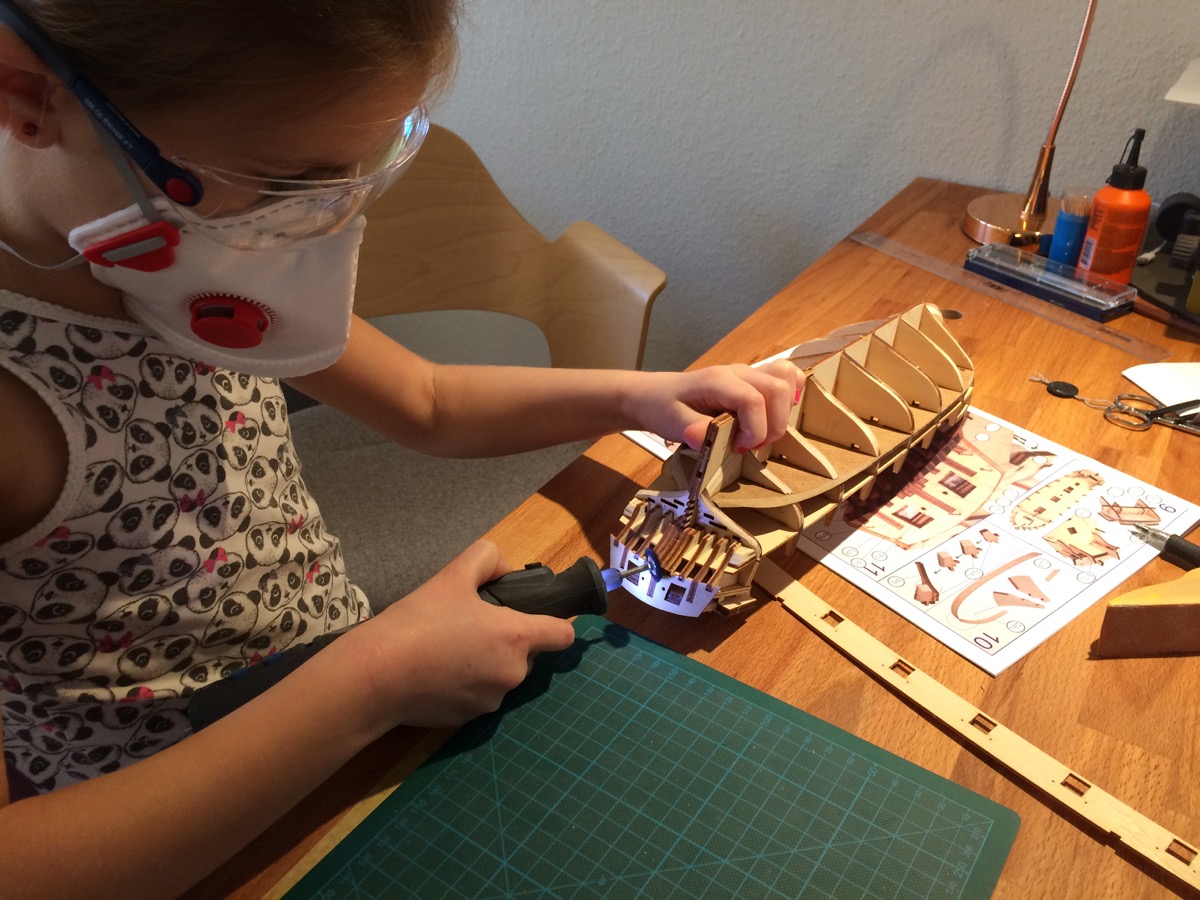
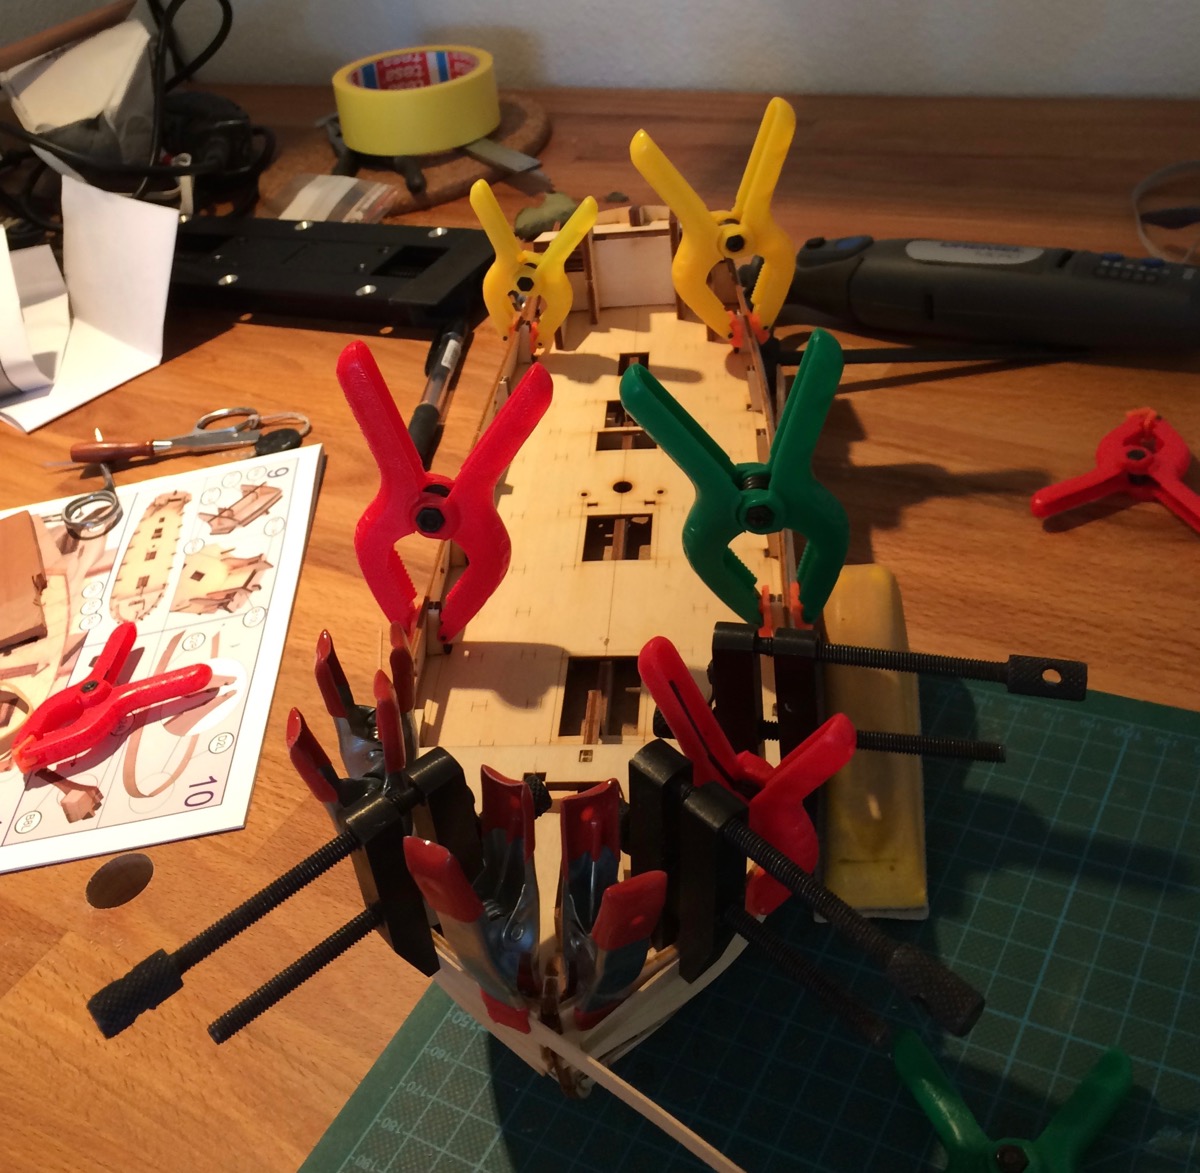
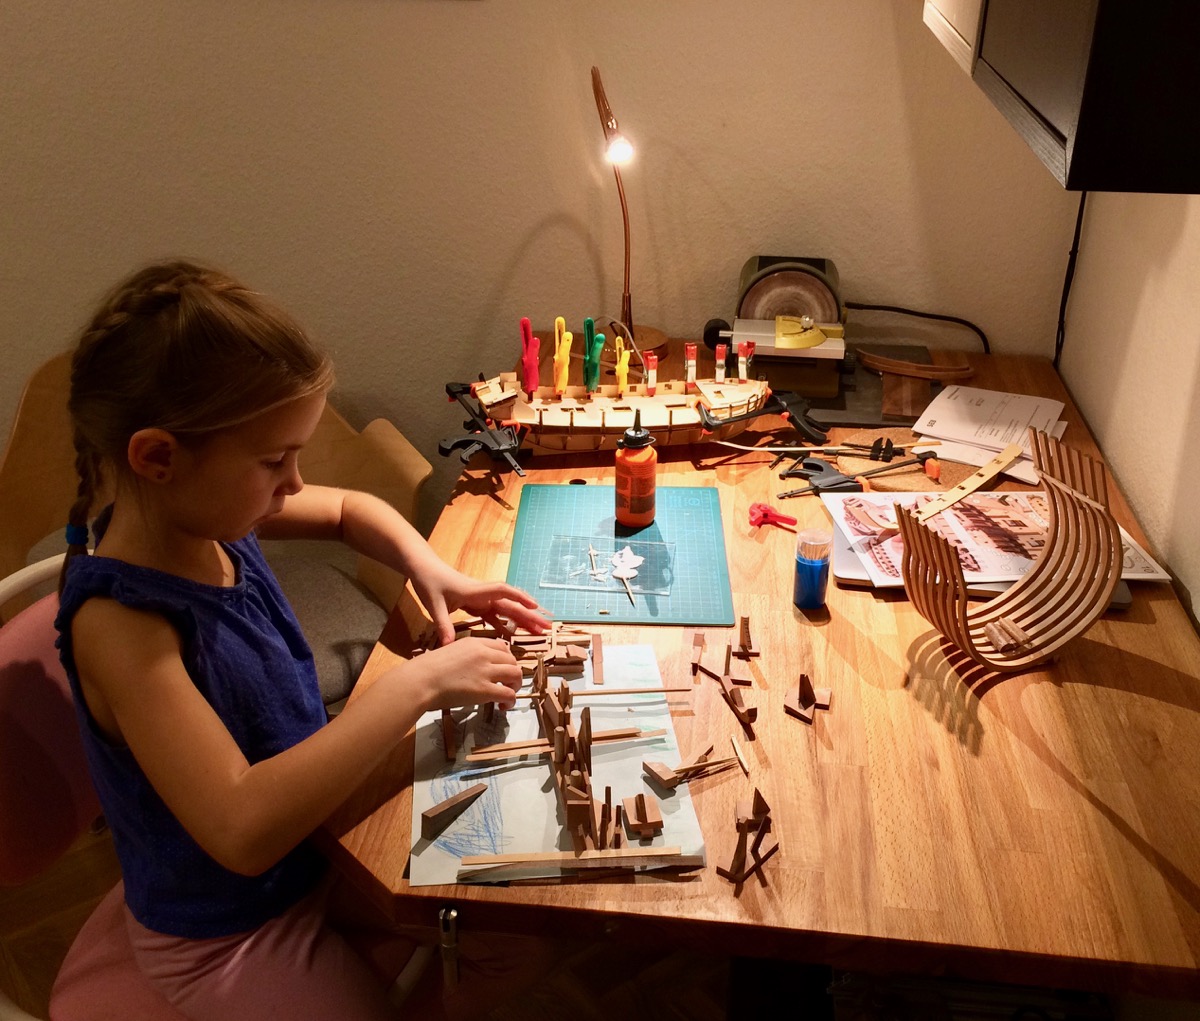
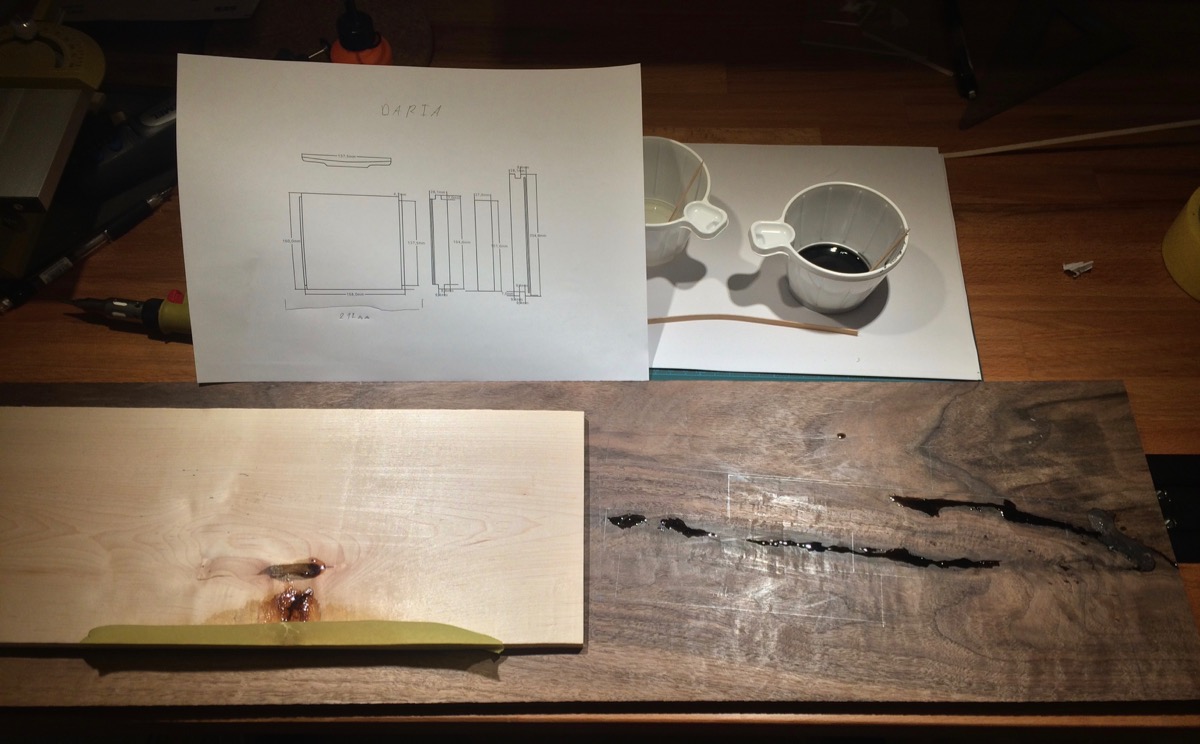
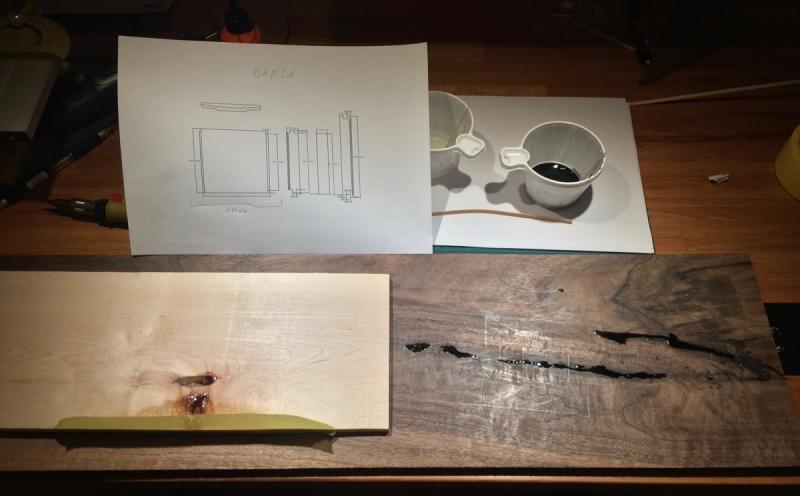
Thanks for the encouragement! We are reading all comments together, and it really makes her surprised that some People From All Over The World are watching her progress Progress was really slow, but for a good reason - we were busy with lots of other activities. From now on, most of the photos are described by Daria, and I am my few cents where necessary: Daria: here I am cleaning up the glue with dremel, so we will be able to glue some other parts on it My comment: making sure that using proper safety gear is a habit and not something "weird". That was easy, since at the moment she wants to be like a dad, and if dad wears safety glasses and respirator - then she will do it as well Of course the fit is not good, the respirator is basically useless if it does not fit the face properly, so I am not doing any dusty work when she is around. Daria: we steamed the hull sides with boiling water so they could be bent. We do everything without mistakes (trying to) Daria: I am building a city here, myself, without any help. My dad gave me a lot of small wood pieces. There is a man in this city, a kite, and one butterfly. This city is imaginary. It also has a trampoline, airport and few small ships. That ships sail by themselves, they know where to go. Daria: here we are gluing the right side of the hull and then we clamp it. Clamping was very tricky! Daria: we will build a box, I will help as well. I already used a hand plane to smoothen the wood plank! I selected the most interesting parts of the planks - one looked like butterfly, one like sun, and another one like a squirrel tail! My comment: I was really pleased that she got the idea of a wood figure, and prefers some interesting parts ("sun", "butterfly" and "squirrel") instead of just a smooth part of the plank without any figure. My previous epoxy fill was not very good, lots of bubbles, so I am redoing it properly this time, using torch to quickly get rid of all bubbles. So there would be a delay again - this time to make a jewellery box, exactly like I did for my wife (photos are here: http://imgur.com/a/7fNCc ), but smaller. I promised, now need to deliver


-
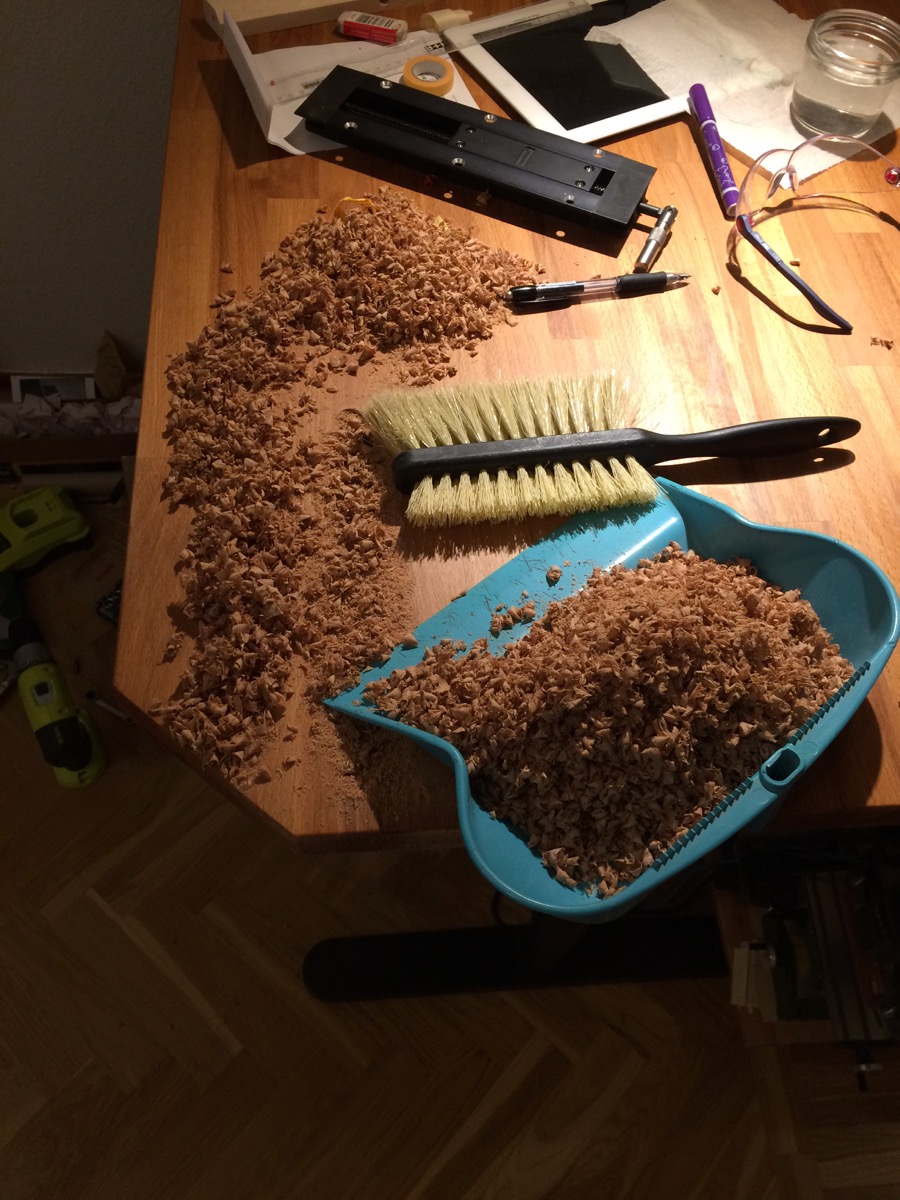
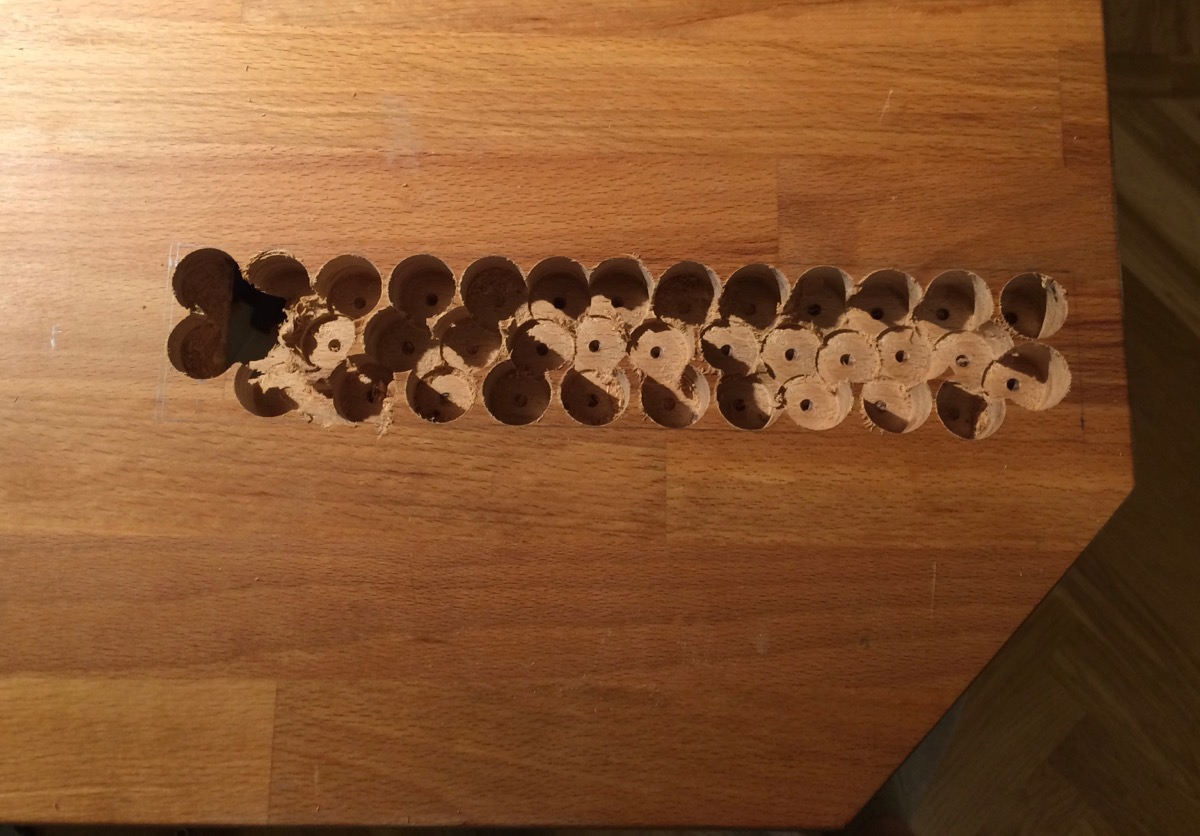
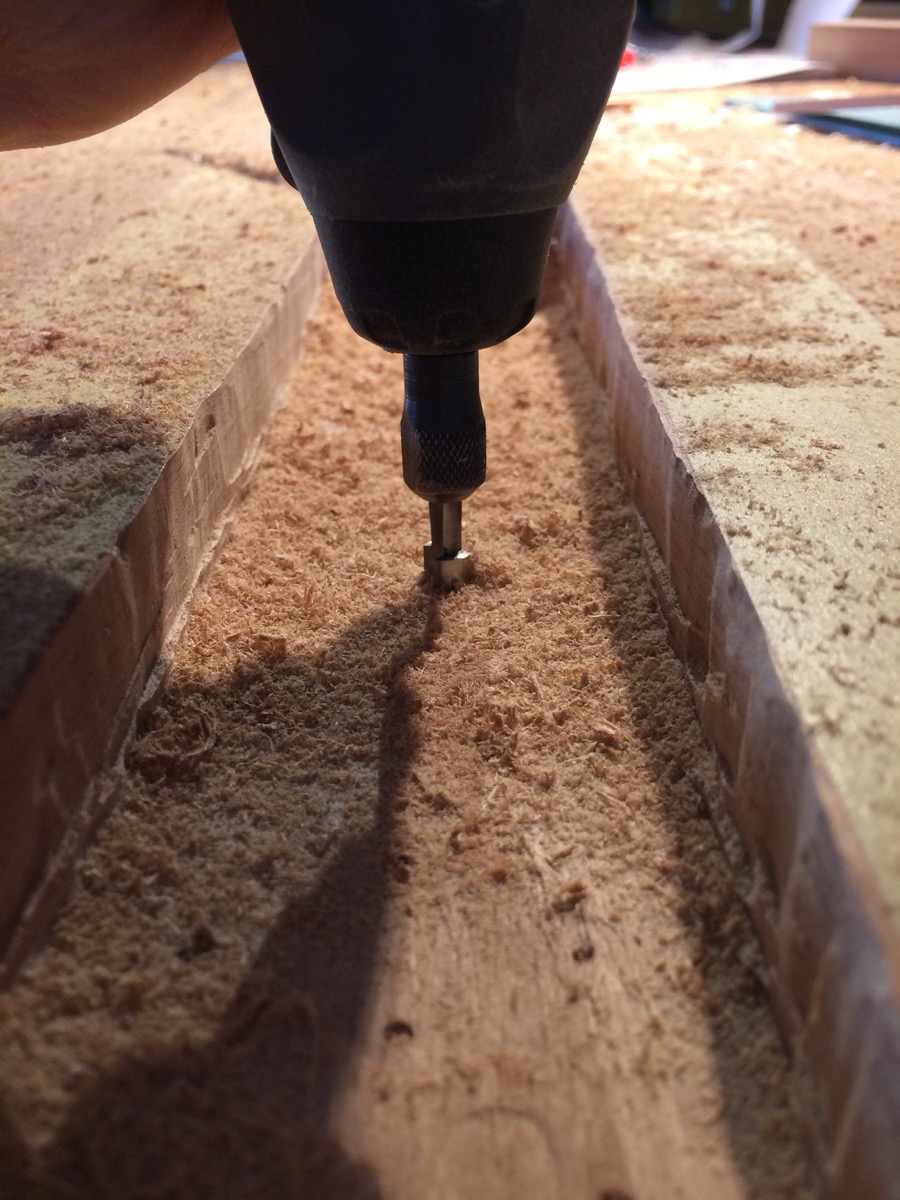
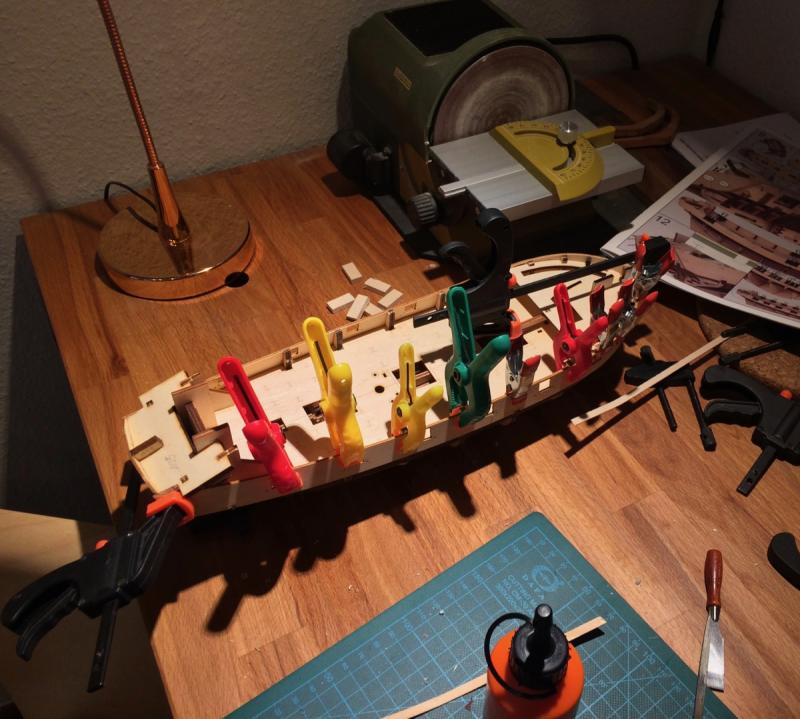
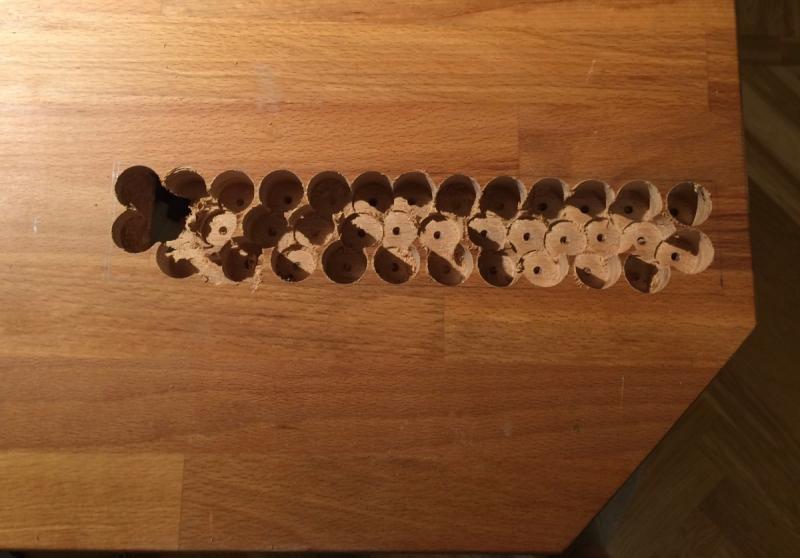
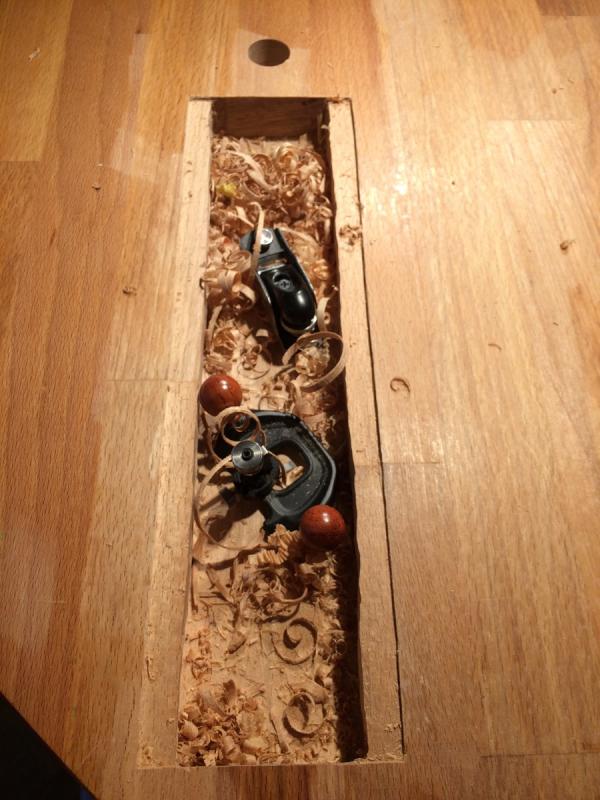
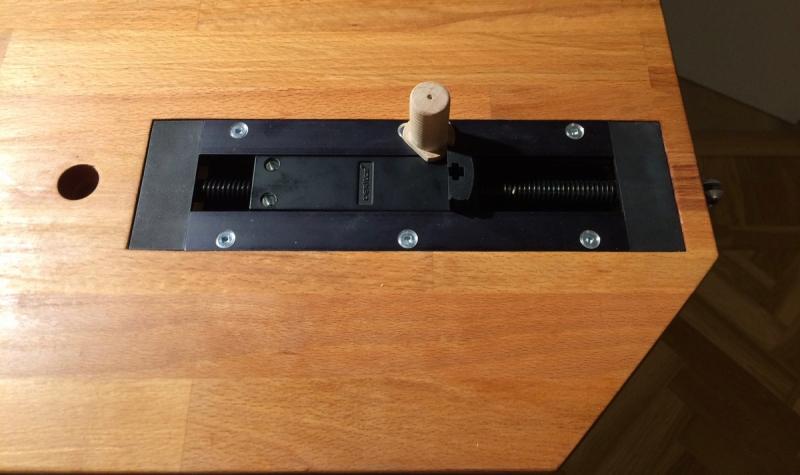
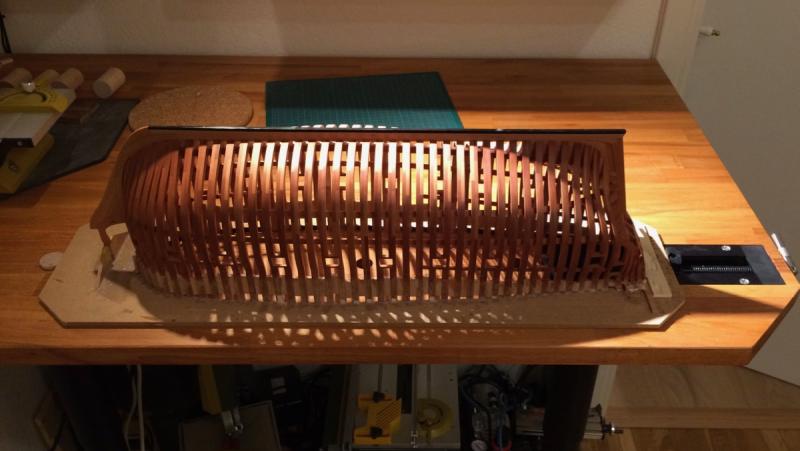
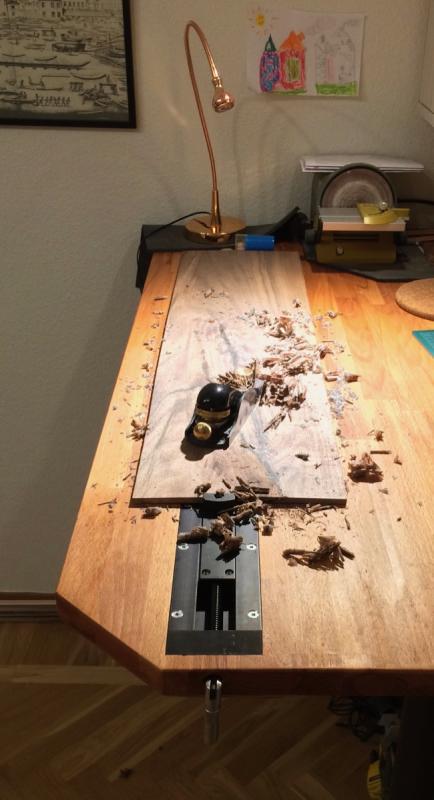
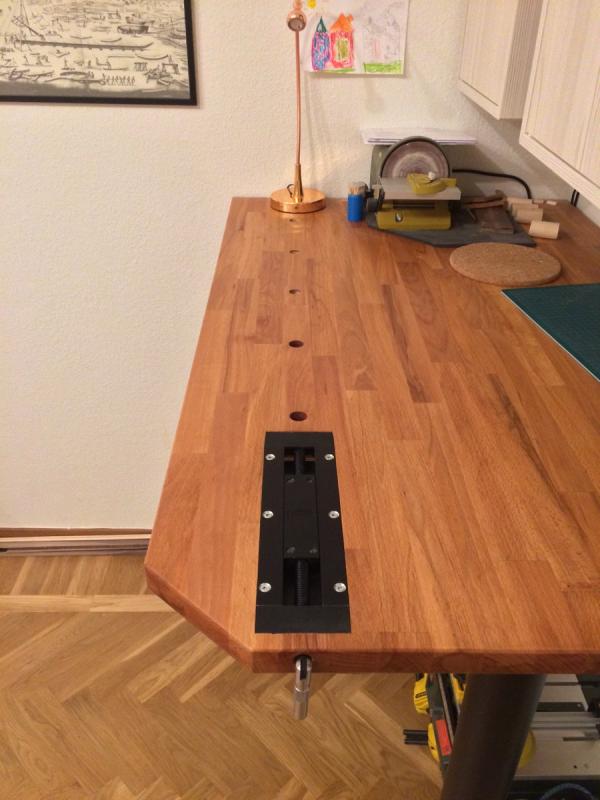
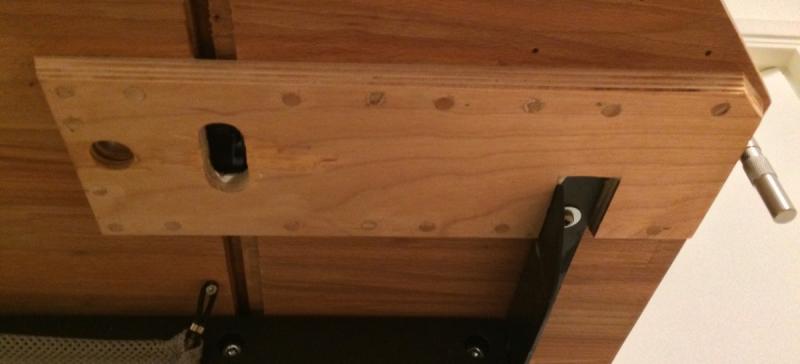
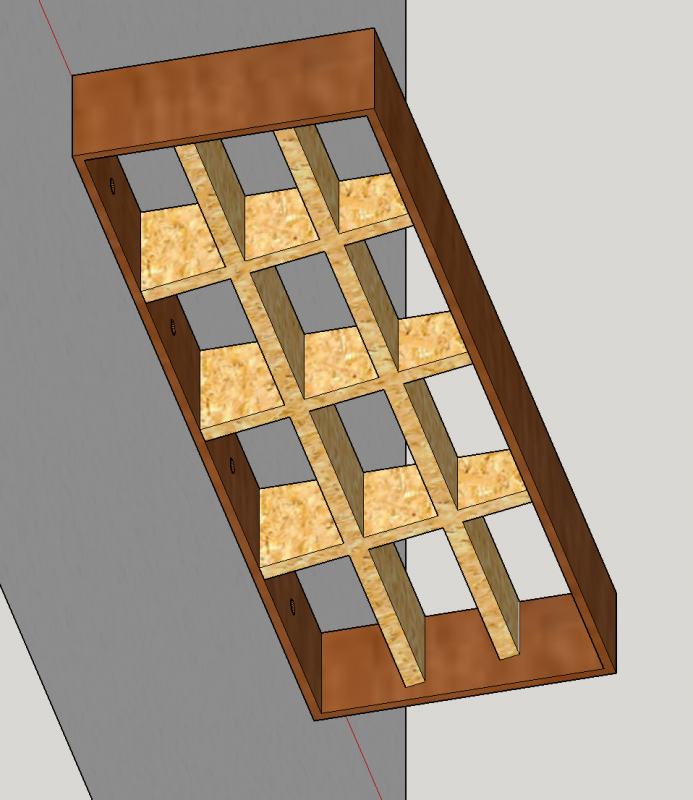
Spent the last few weekends procrastinating, working on a workbench improvements. It all started with a problem of fixing wooden boards to the table. Clamps are not really good enough, especially if you start planing. But any sort of bench vice is too ugly for the living room, and there is a door to the kid room right next to the table - so it is not convenient to have a large handle. And then I discovered Veritas inset vice. Yes, that was perfect for the purpose! Nice, elegant, small handle. To install it, a large mortise needs to be made in the table top. Started with drilling away most of the material. The rest was removed with a router bit and dremel. Routing freehand is super scary! But works: Then a small "frame" was made with a miniature router plane and a block plane: I severely underestimated the efforts required to make a mortise with the tools I have. It took too many hours and too much dust Since my table top is not thick enough (not enough wood left under the mortise) I reinforced it with thick plywood located under the vice, fixed to the table top with glue and lots of thick dowels: Done! It is flush with the surface (I even made it 1mm below the surface), and the handle is unlikely to be a problem even on a way to the kid room: When used, bench dog (hand made) is inserted into a hole, and a small jaw is inserted into the vice: Uses are many. Starting from fixing the model in a jig (very little pressure is required, so I do not think the jig or hull will deform): Ending with planing the wood. This beautiful walnut board with epoxy-filled cracks was waiting for the vice to be planed. Finally done!


- 969 replies
-
- 29
-

-
- hahn
- oliver cromwell
- (and 1 more)
-
Precision router base for Dremel 4000 etc.
Mike Y replied to vossiewulf's topic in Modeling tools and Workshop Equipment
Thanks for the tip! Read it a bit too late, just finished routing freehand, which is terrbile Will buy one soon, nice tool! -
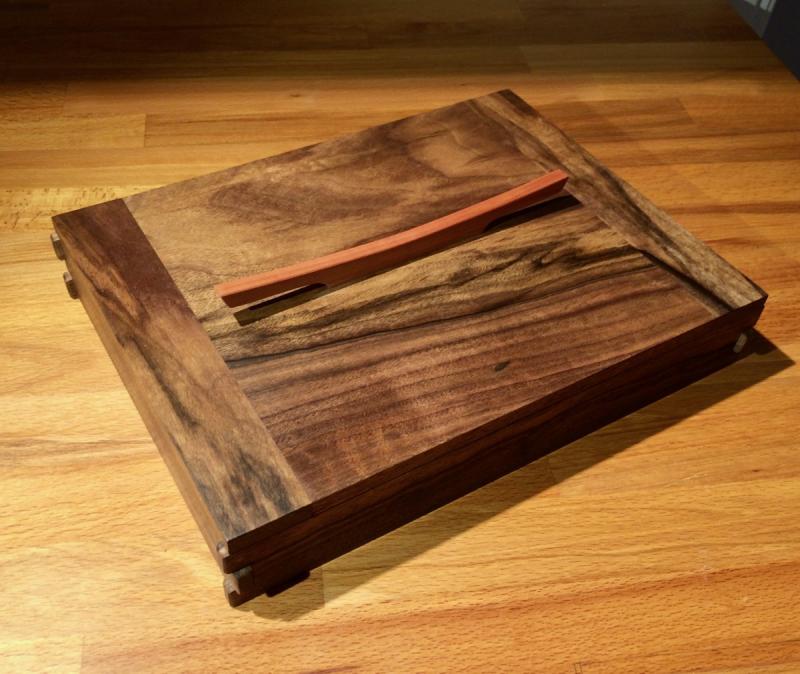
Semi-offtopic. Finished the jewelry box, the build log is here if somebody is interested: http://imgur.com/a/7fNCc That was an interesting practice, took longer than expected. Totally new skill of turning a non-square non-flat warped piece of wood and making it square, flat and parallel on all sides. Jointing and planing, something not frequently used in the ship modelling! Also, my standard way of "cutting an oversized part and sanding it to shape later on" does not work on that scale, so there were much more careful calculations and cutting to final dimensions from the first attempt. Well, maybe shaving 0.5mm from some risky pieces with the block plane.. First time I used OSMO Polyx (http://www.osmouk.com/sitechapter.cfm?chapter=82&page=247) as a wood finish. It is surprisingly good - dries fast, easy to apply, the end result is really strong. Will test it on a small scale, might be a good finish for the model. Anybody has an experience with OSMO as a ship modelling finish?

- 969 replies
-
- 21
-
-
- hahn
- oliver cromwell
- (and 1 more)
-
Black paper to accentuate the frame joints is an interesting idea. Looks very sharp! Was it hard to align all the frame pieces with paper in the middle?
-
Great precision work!
-
When I had similar issues in my build (humidity drop during the winter), some spacers cracked and some frames twisted - the fix was to unglue the spacers on every 4th frame. So every 8th might not be enough?
-
It may comfort you that the builders of a full-size replica of the same period (see http://modelshipworld.com/index.php/topic/12395-replica-poltava-1712-russian-ship-of-the-line ) also used lamination for the internal planking in the bow, where curves are steep. And some outside curves as well. So it is definitely not cheating!
- 1,215 replies
-
- 6
-
-
- sloop
- kingfisher
- (and 1 more)
-
It is a Model Shipways Pinnace kit, designed by Chuck. The build log is in the signature, here: http://modelshipworld.com/index.php?/topic/4954-21ft-english-pinnace-by-mike-y-model-shipways-124/ Incidentally, this is the only finished model I have so far After the Pinnace, I started a longboat out of boxwood (the link is in the signature as well), and the hull planking is mostly ready (1-2 strakes left), but the build is on hold because I started the Oliver Cromwell build
- 969 replies
-
- 4
-
-
- hahn
- oliver cromwell
- (and 1 more)
-
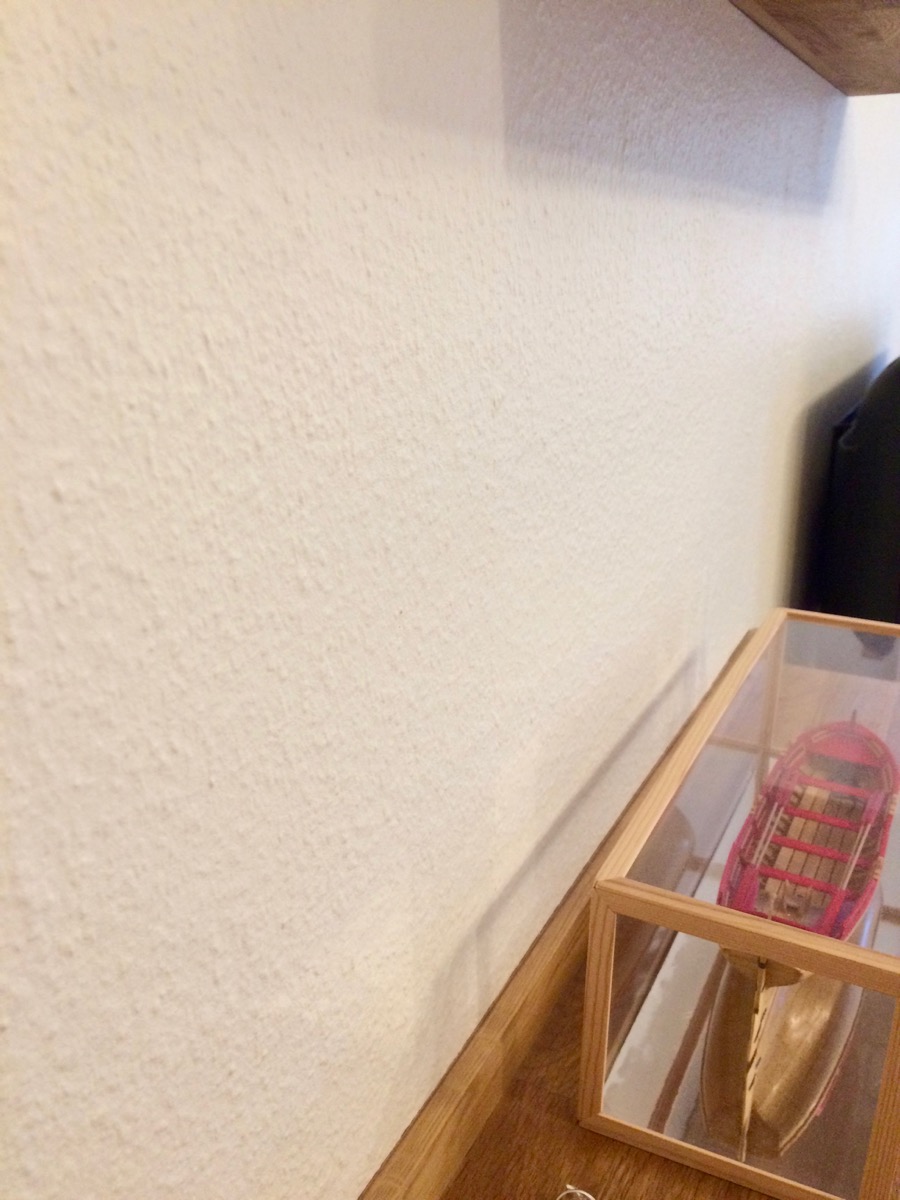
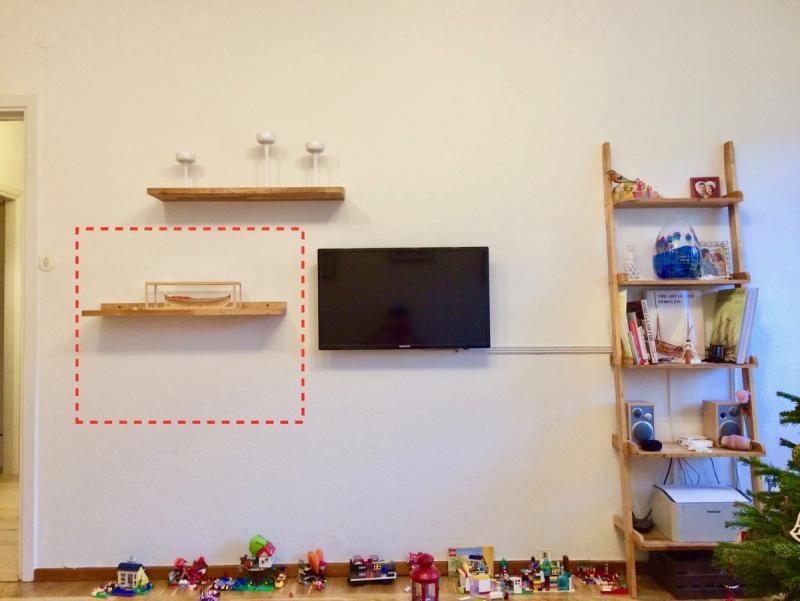
Alan, John, Druxey, Patrick, Christian - thanks for the feedback! And a happy New Year everybody! Yes, haven't really planned the dust protection yet - some felt-like material will be used between the wall (the wall has a rough texture) and the back side of the case. As for the base - underside of the base would be left unfinished simply due to economical reasons - it is a lot of wood needed to cover it, and nobody will bend that low anyway. And kids who will see it - will appreciate the view on the internal structure and some electrical wires Yes, was thinking about it, but it is so hard to decide what that back-surface should be. I was thinking about a milky-opaque plexiglas, some plywood with veneer on top of it, mirror, etc. Ended up with just a bare wall, it should look nicer and also provide more volume. Due to the location of the case, I can't make it wide (people will bump into it), so it is fairly "flat", so the visual volume matters. And if these estimates would be wrong - it should be easy to retrofit any sort of the back material later (just sticking the correctly sized rectangle to the wall behind the case). For the background, here is the wall where the display case would be mounted. It will replace the floating shelf with the pinnace model, so here is the dashed line of the estimated location: The wall close-up (it is a simple painted wallpaper): Since this is a super common wall colour (already known as "Stockholm white"), I am quite certain that even if we move to another apartment - the wall texture and colour would be the same

- 969 replies
-
- 7
-
-
- hahn
- oliver cromwell
- (and 1 more)
-
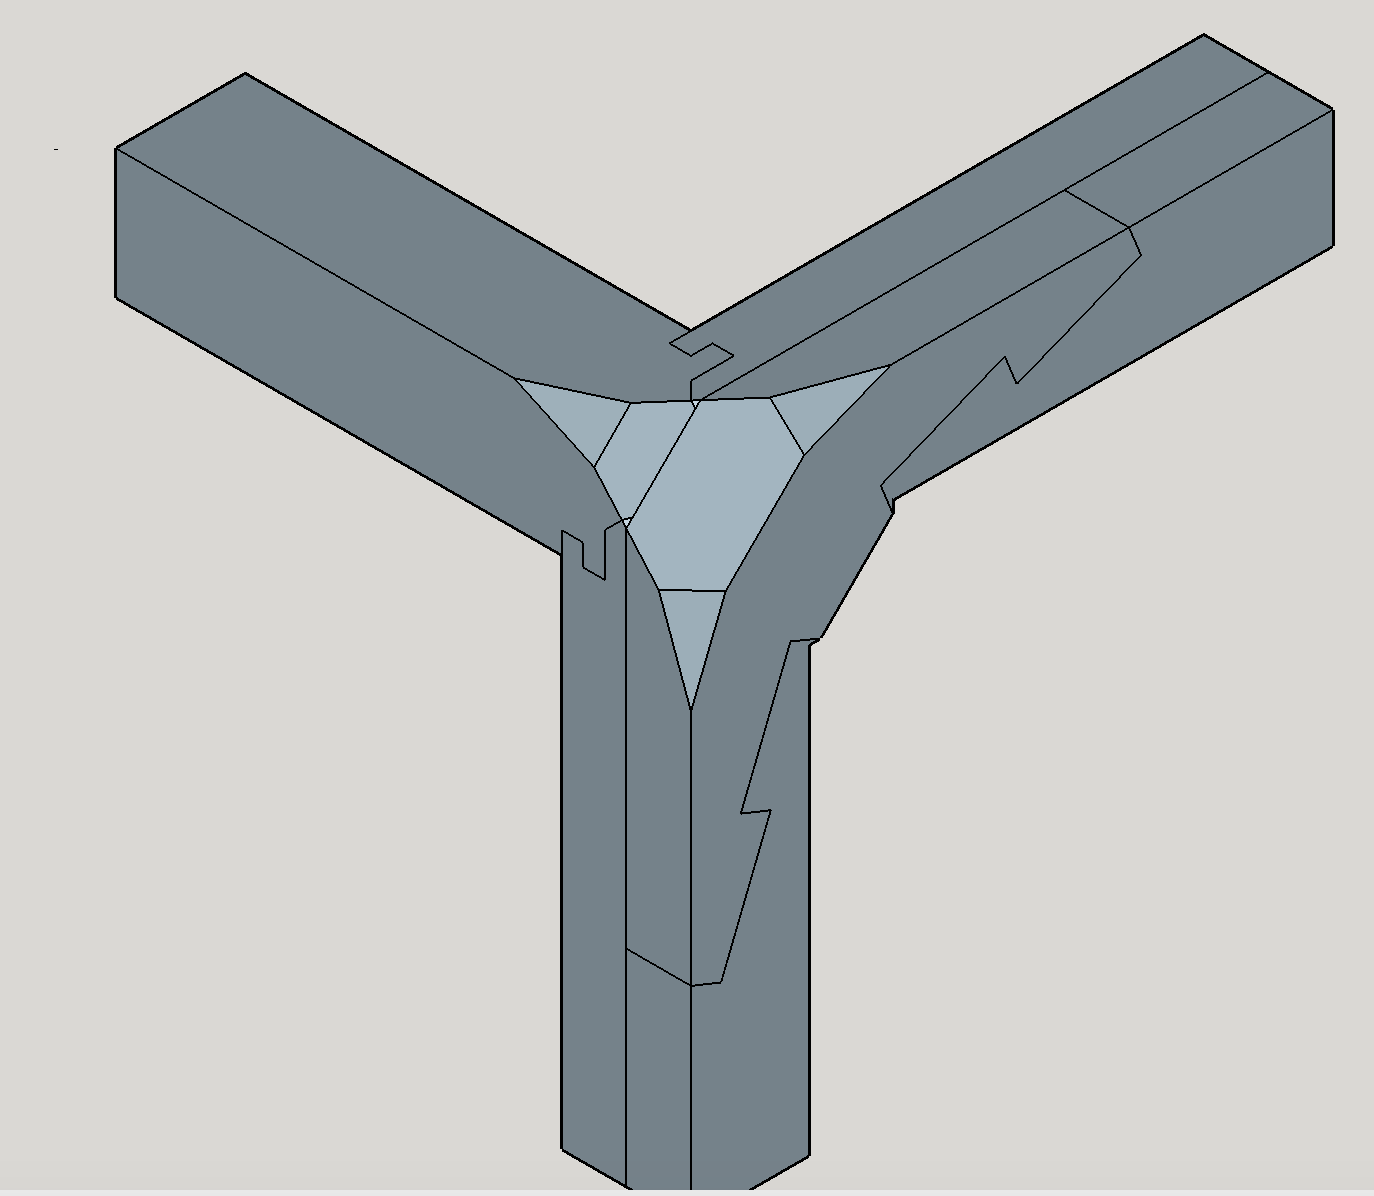
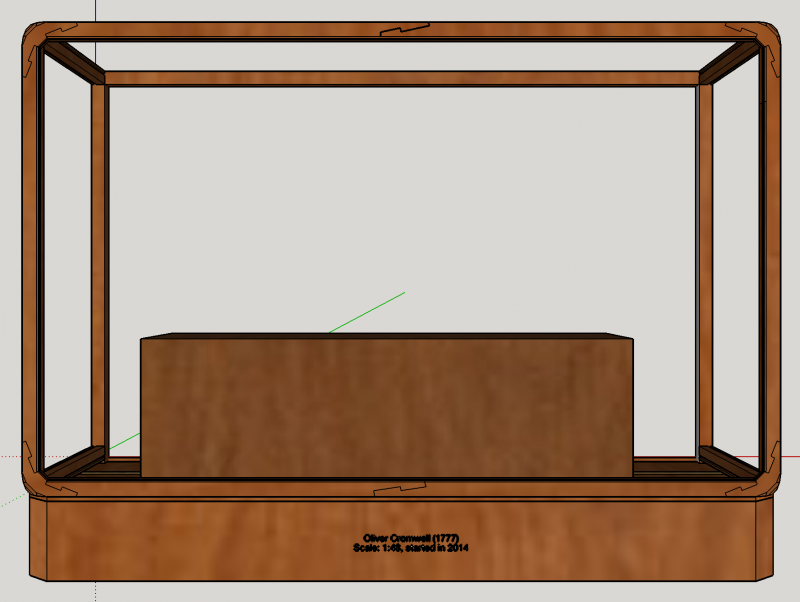
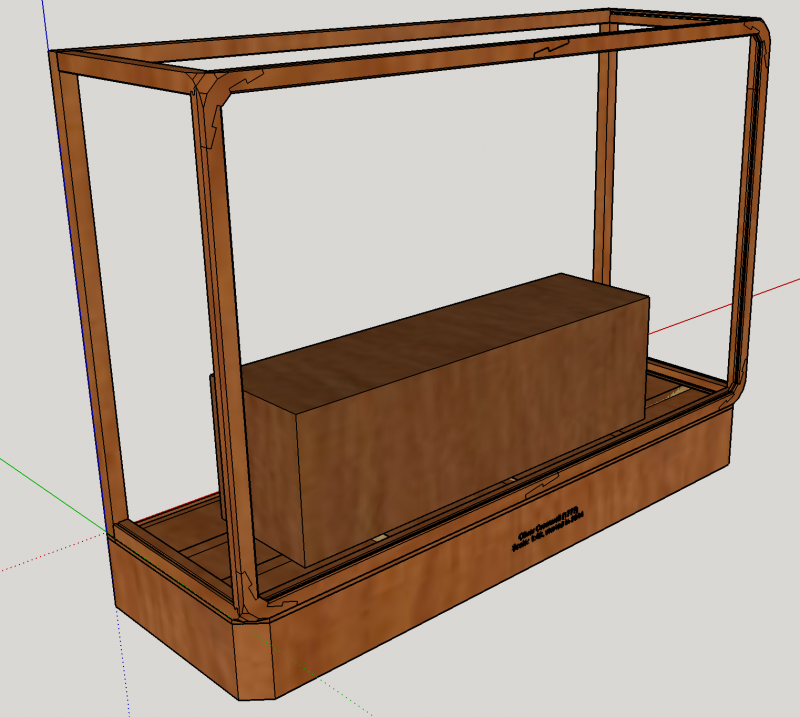
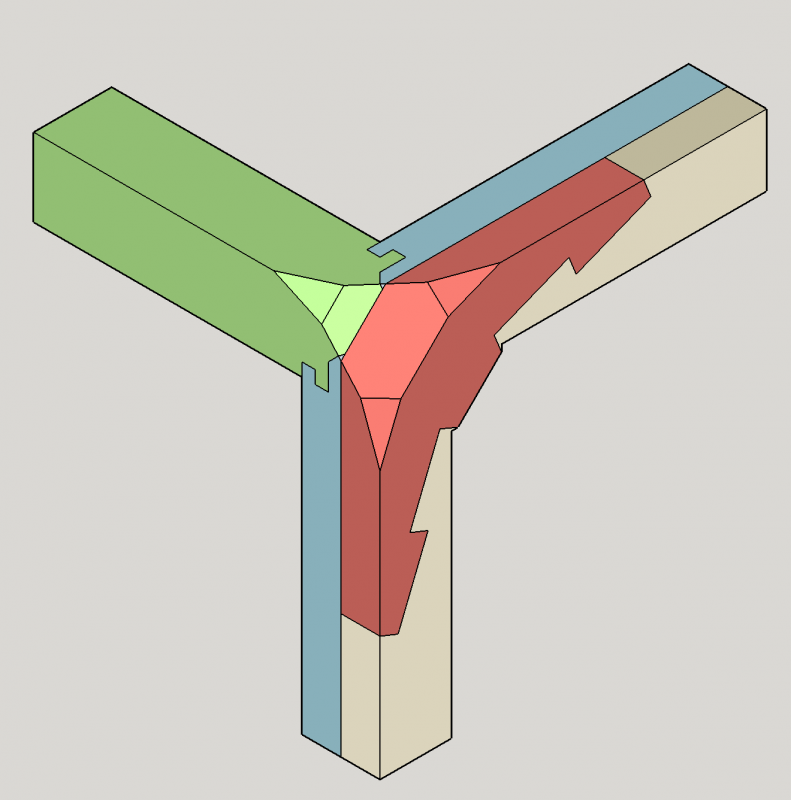
Thanks for the nice comments and likes! Finished a draft version of the display case sketch. Would appreciate the critics, it would be cheaper to correct the design issues now than later! Basic characteristics: 100cm wide, 80cm high and 30cm deep (40' wide, 31' high, 12' deep). Plexiglas (3mm thick) would be used instead of glass (for safety and weight reasons). No glass on the back side, it would be mounted to the wall and the background would be a white wall. Made out of the same swiss pear as the model. The frame would be made out of square pear stock 2x2cm (13/16'). Here is the overview first: Front: (yes, I love scarf joints ) Isometric: (Please ignore the joints in the back, I had no energy to draw them properly, but they be a mirrored copy of the front joints). The load bearing part is hidden by the "skirt", and is made out of thick plywood bolted to the wall with Big Strong Bolts. Any sort of electrical stuff would be hidden in that cavities as well. Plywood is covered by the pear "skirt" with a model description carved on it (or inlayed). The top part of the case would be attached to the wall as well, with hidden screws, but will not take any weight. Tricky part is the the way it would be opened. Since I will keep model in it and get it out every time I want to work on it, the opening mechanism should be easy to use (multiple times per week). Also, due to asymmetrical nature of the model, I want guests to be able to get it out easily to see the other side. So the front window is detachable and is held by strong magnets. That means that front frame is split into two parts - one is 1cm thick and hold everything together, and another is also 1cm thick and holds the front glass. Front frame joints look like this (a bit complicated, but it is a sort of decorative joint, I want it to look nice) Or a multi-colored version of the same joint, each color is a different wood piece: There would be a groove inside front part of the front frame, to provide an additional support for the top glass and its frame, since otherwise it would be only supported from sides and will sag over time. Would appreciate corrections if I forgot to over-think something in this design! Is the plexiglas thick enough? I accounted for the wood movement, grooves for the glass are deeper to allow wood to shrink and breathe a bit. Is the base construction strong enough?

- 969 replies
-
- 22
-
-
- hahn
- oliver cromwell
- (and 1 more)
-
A Lorch Micro-Mill that never was ...
Mike Y replied to wefalck's topic in Modeling tools and Workshop Equipment
A-ha! Now it fits together Any action shots planned? -
Thank you for sharing your very clever jigs!
-
Finally the sawdust has been made! Your model gave me a lot of the inspiration, very happy to see it taking shape again! Might deserve to be renamed to "Phoenix"? Should be in line with the Swan naming convention! The building board is great! What do you use to fix the model when working upside down?
-
Yes, I draw a boxwood nails. Requires a nice straight grained piece to cut the strips from, but works fine after some practice. Also works as a reliable mood measurement tool. One must be totally calm when using it - otherwise the piece will snap somewhere in the small hole
-
Appreciate the note, but I use Lumberyard jig and plans, however replacing all wood with the one from Arkowood. See my whining in the first few pages of the log (page 2 and 3), there are clear photos, the conclusion is up to you. Lumberyard has a good inventory, but when ordering - please be super pedantic about what you need. Things like 1) Allowed amount and severity of defects in the wood you get 2) Finishing sanding grit. That was a bummer for me - I ordered a milled wood and got something so rough that needed thickness planer / sander or a lot of time wasted on tedious sanding. With a totally different thickness in the end 3) Wood type. I wanted "swiss pear and boxwood" - got a non-swiss (not kiln dried) pear for the frames, which has a different colour. Not saying this is better or worse, but it is definitely not something that I expected So, I guess, with all that precautions they could be used. However, there are many new suppliers - the famous one is Crown Timberyard that provides a dramatically different quality and no need for sanding / re-milling. Stuff is just perfect out of the box and looks exactly like you expect. Lumberyard have a much better selection of woods though, so if you have a tools to mill your own wood (or, at least, to thickness it) - they could be used for less popular woods bought in some rough form (sheets, billets). Sorry for getting that dirty laundry out, but with the lack of a proper "rating" system and such a limited amount of wood suppliers, guess it is better to share.
-
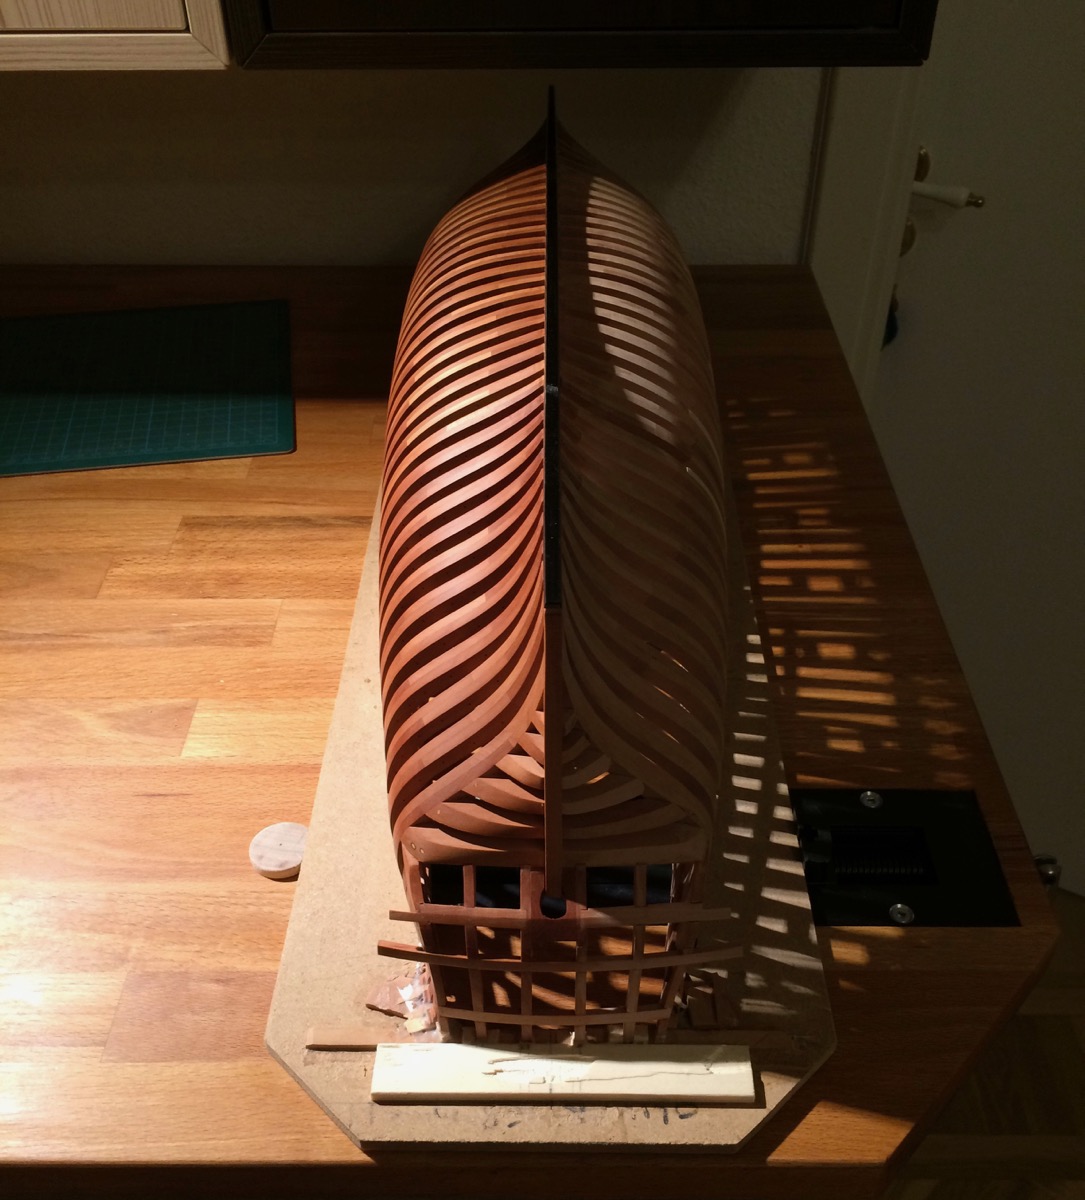
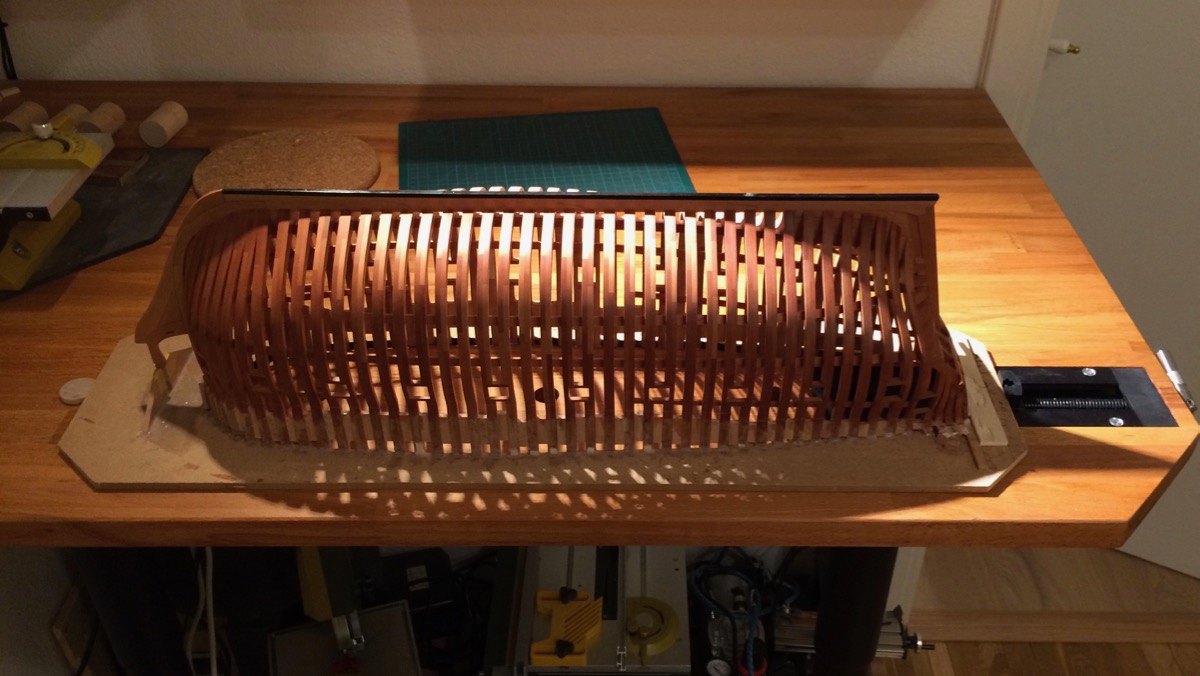
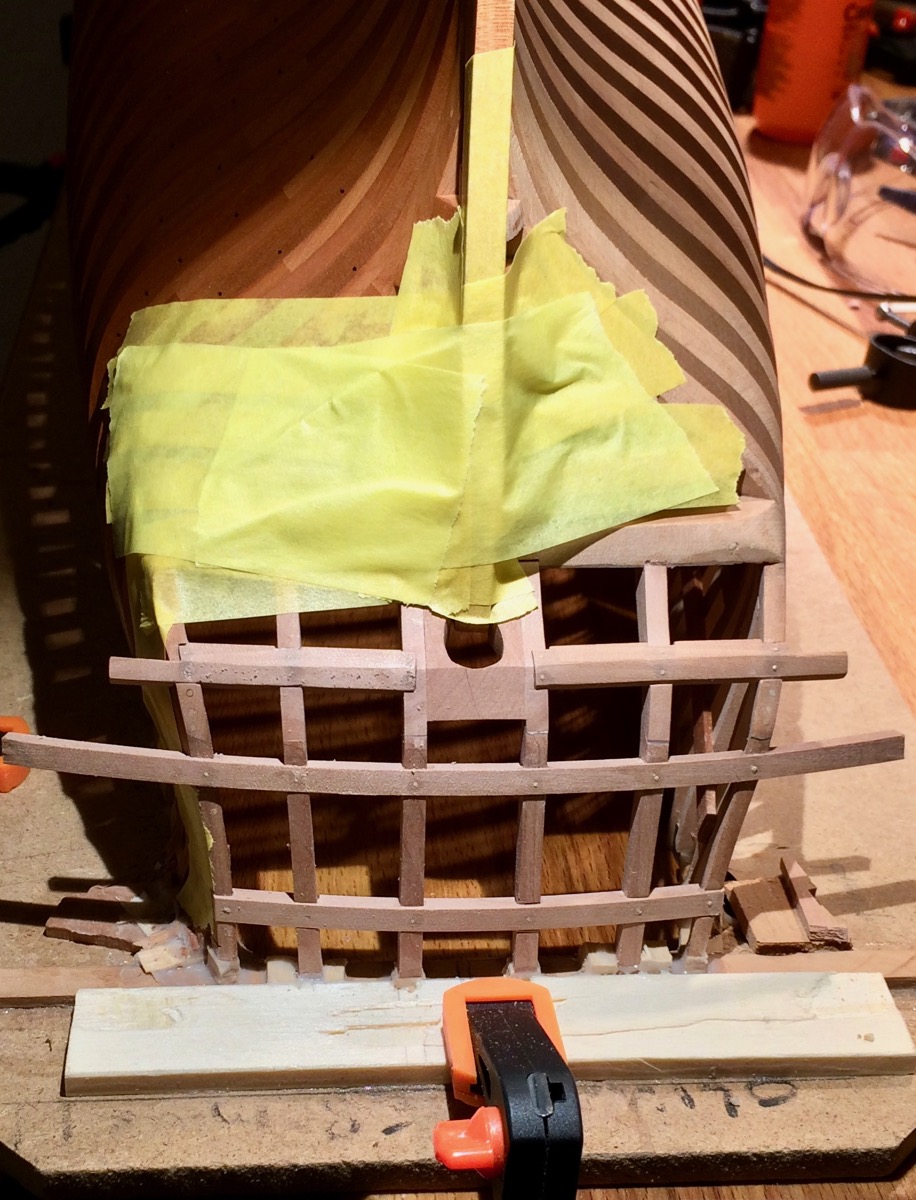
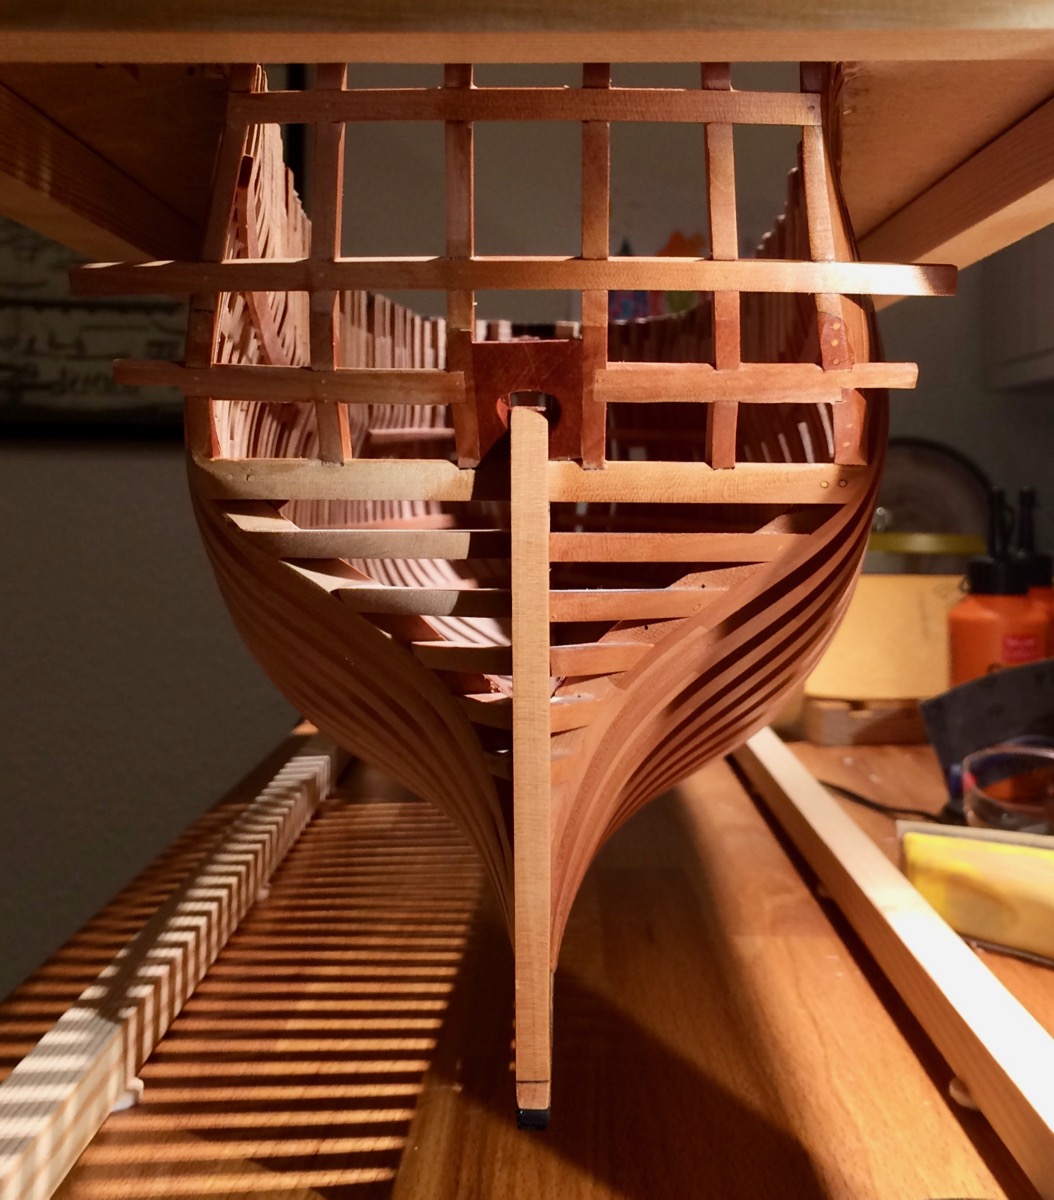
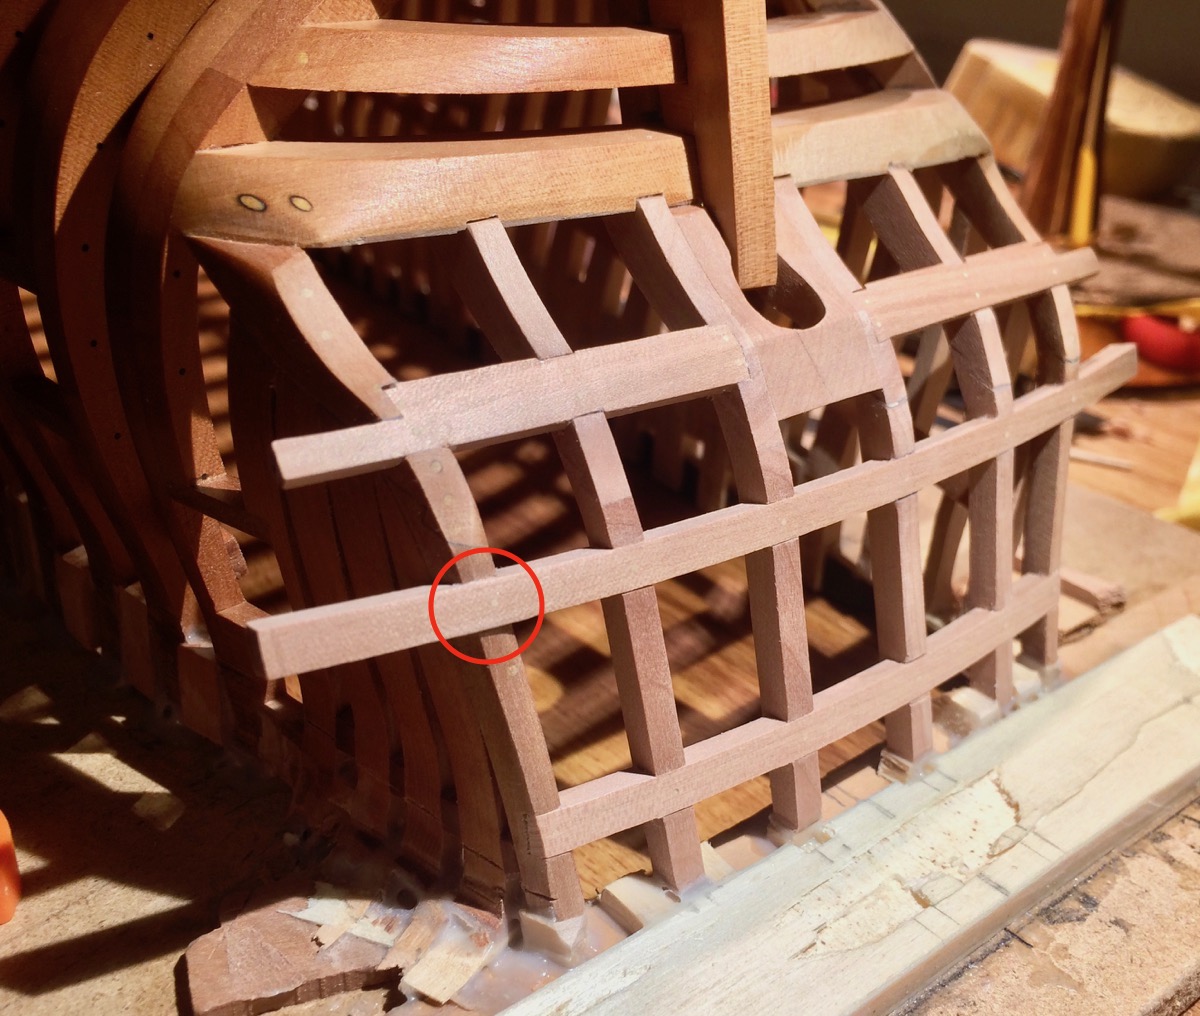
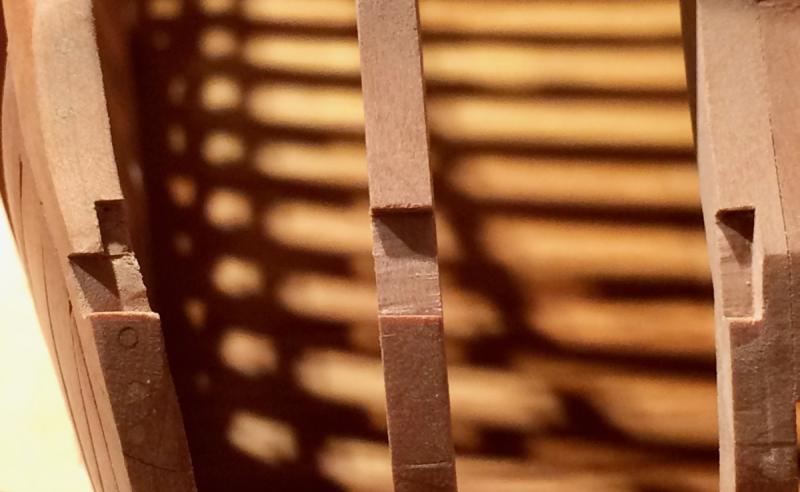
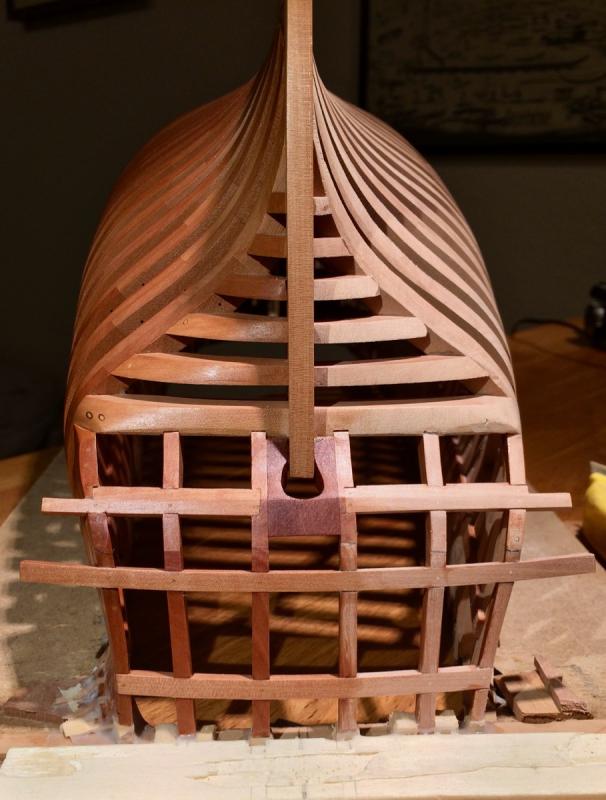
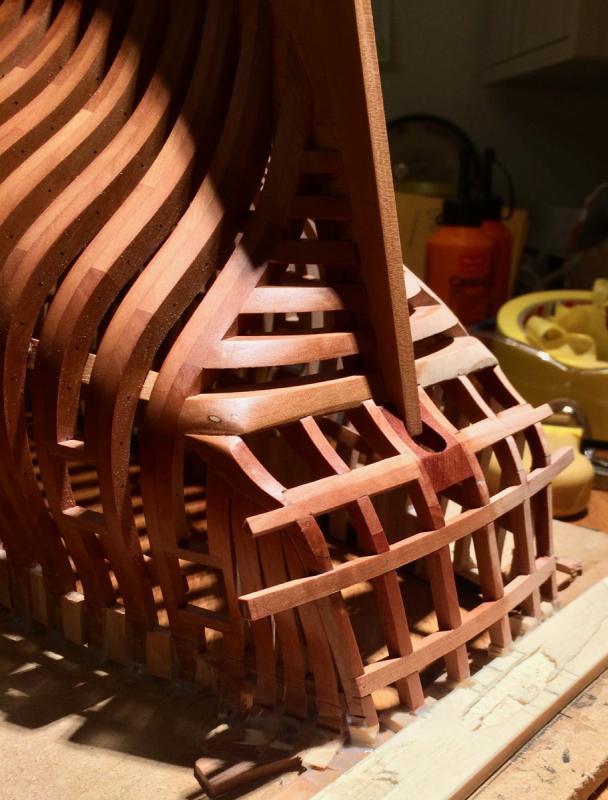
Finally finished the transom. Last set of notches (aka "macro is brutal") Horizontal piece also got some of them, on a weird angles: Glued in, treenailed and masked for fairing: Fairing was easy, because the smooth curve of the transom allowed to use the plane: Faired. I made one mistake, one joint is too shallow, so can't fair this junction properly - the wood is too thin and will fall off Too late and painful to fix, decided to leave it as is. Eventually this will become a part of the quarter gallery, so it will be less visible: Put the oil on it (that was fun, so many surfaces to carefully oil and so many are crossing each other). Can't wait for it to dry, sorry for reflexes due to wet oil! Note that due to a different grain orientation, oil resulted in different colours for different groups of timbers. Light "along the grain", medium dark "diagonal grain" and very dark "cross grain". It is all made literally made of the same piece of wood, I promise! Wood is magic Not everything aligned as it should, but I started with a not very symmetrical transom, at least haven't made it worse. Will pay much more attention to the proper alignment in the next build! Now I am taking a short break - will shift attention to the jewellery box I promised to admiral, and then will come back to this log with a display case for the model. The model is far from being complete, but it does not stop from displaying it properly, and will definitely help to keep the dust off.


- 969 replies
-
- 39
-
-
- hahn
- oliver cromwell
- (and 1 more)
-
Small note on treenails: I use the same method as you, and after some practice it works fairly ok. But it is more efficient to use a long strip of wood instead of a short ones - you spend roughly the same time per strip, but get much longer treenail material in the end Great log, thanks for posting!
-
The progress photos are very interesting! Thanks for taking your time to start the log, it is very educating.
-
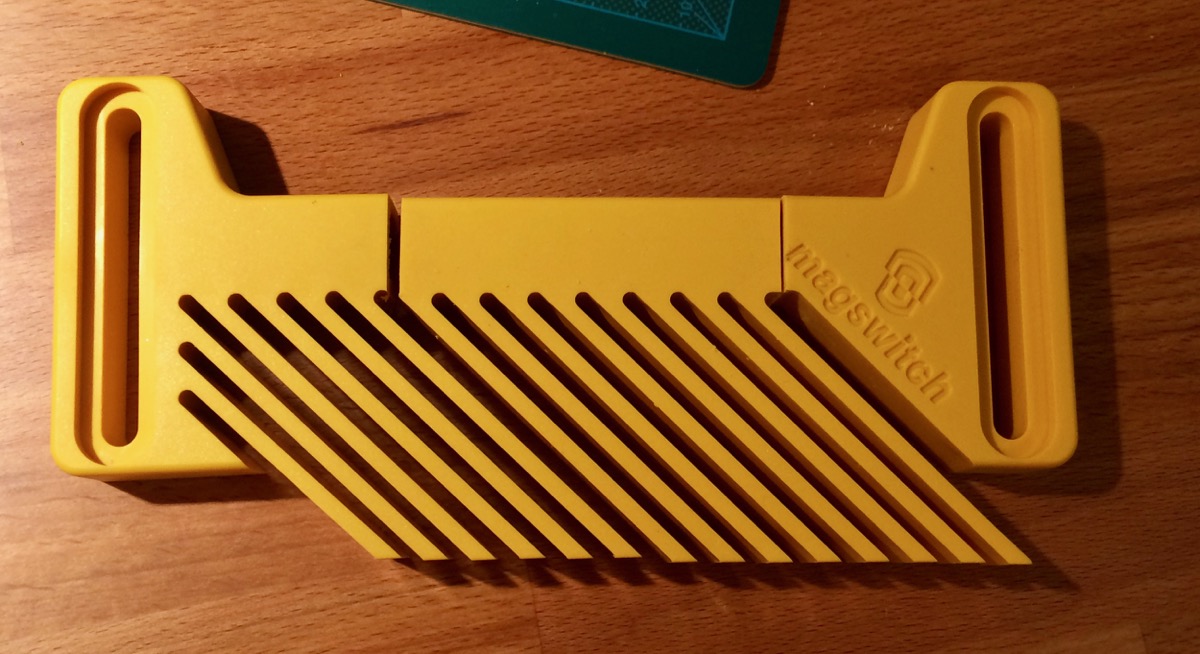
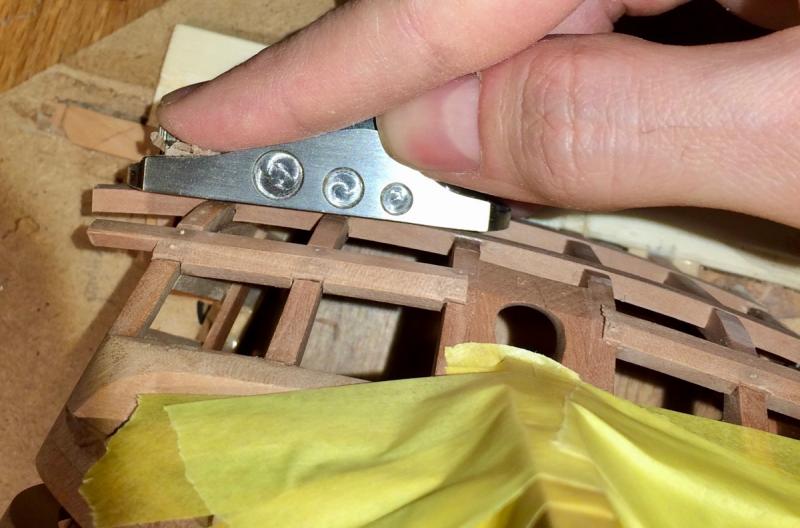
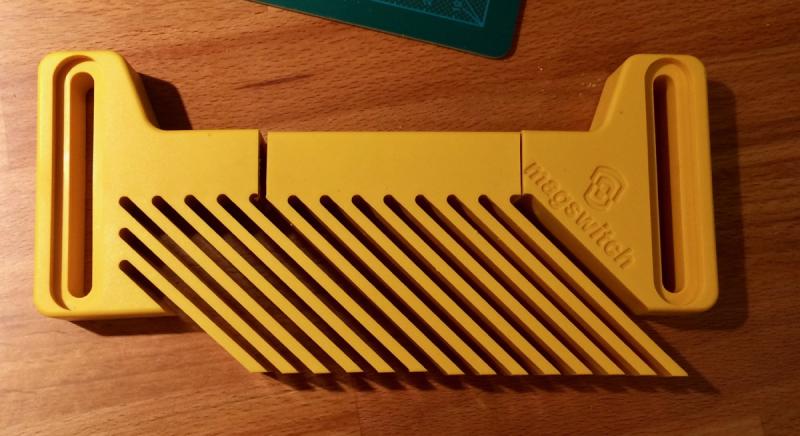
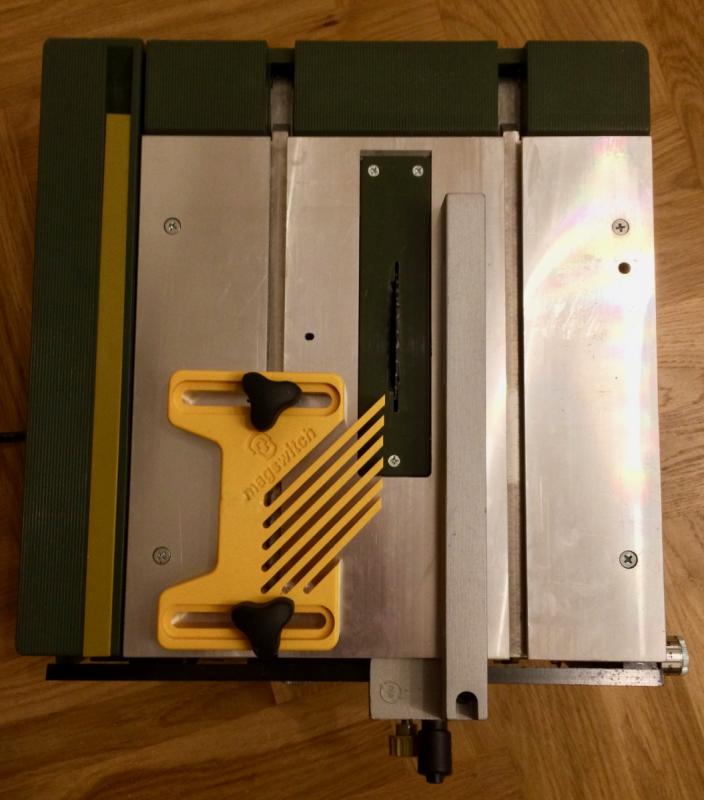
Wanted a featherboard for the table saw. Magswitch looked really good: https://www.amazon.com/Magswitch-Table-Feather-Universal-Model/dp/B001DSZ7EC But I forgot that my table top is aluminum, not iron. So magnets are not working on it So I bought this attachment, because I really liked the material (and it also includes all the hardware, bolts and knobs) https://www.amazon.com/Magswitch-Vertical-Featherboard-Attachment/dp/B006SJH0SW It was, obviously, too large for my saw, so I shortened it a bit, cutting off a long middle section and gluing the remaining parts with epoxy, reinforced with a wooden block inside the featherboard: After squaring and shortening the bolts, it was a perfect fit and it works like a charm:
- 969 replies
-
- 17
-
-
- hahn
- oliver cromwell
- (and 1 more)
-
How do you use the spokeshaves in this hobby, if not a secret? They are designed to make some round and curved shapes, right? But I can hardly find parts in the model where a spokeshave can be used.. Or I totally miss the idea?