augie
-
Posts
4,669 -
Joined
-
Last visited
Content Type
Profiles
Forums
Gallery
Events
Everything posted by augie
-
 Sure Mike. Blacken-it is a commercially available product. I've seen it in some hobby stores but it is also available through Micro Mark : http://www.micromark.com/SearchResult.aspx?deptIdFilter=0&searchPhrase=blacken+it I've had good luck using it mixed 50/50 with water, after the pre-treatment I listed. But it's the kind of thing you need to play with depending on the metal you're using so always test on some scrap before you commit your prized parts.
 -
Check out the photos on Ben and Rusty's logs. Notice that all of the outer hull planks will need to contact the rudder post so you need to leave room. Similarly, the fillers will support the planks under the counter so you need a little room. I found it was something you have to play with. Keep in mind that the total thickness of the planking from both sides, combined with the thickness of the bulkhead former, will need to be same as that of the finished rudder at the leading edge of the rudder.
-
Be interested to see how that 'pre-shading' turns out. Those last photos look like one of my paint jobs ----- after it's DONE!
-
I have to agree Robbyn. Small as they are, they just keep piling up until one day you sit back and a smile finds its' way to your face. You'll see on Syren once you get the deck down and start working on the fittings and rigging. What you think is leading toward chaos and confusion is suddenly all done and you'll find yourself saying 'I wish there were more to add'. Sounds impossible but it's true.
- 2,191 replies
-
- 7
-

-
- confederacy
- Model Shipways
- (and 1 more)
-
She's as big as a ........ house! GREAT JOB on that airbrush of the bottom paint. My smile for the day!
-
Thanks Jim. Truly hope all is well on your end.
-
Look at the bright side ...... practice makes perfect!
- 1,873 replies
-
- 1
-
-
- occre
- san ildefonso
- (and 1 more)
-
I have no idea what you're doing ---- but it looks fantastic!
-
That was pretty standard back in the day. They may have been just open 'seats of ease' or perhaps enclosed 'in roundhouses' up on the bow. For the officers, they were mostly in the quarter galleries in the stern.
- 1,756 replies
-
- 1
-
-
- constitution
- constructo
- (and 1 more)
-
Thanks to all for the comments and likes. Dr. Per ---- sent you a PM on wood. Chris ---- that will work out but you're on your own for the photos that disappeared from MSW. Didn't keep them over here but I'm sure I used either the 'Make Planking Look Good' lens or the 'Creative Angle to Make Things Look Straight' setting. Today was first day in 8 months without shop time ---- I MISS her already!
- 2,191 replies
-
- 6
-
-
- confederacy
- Model Shipways
- (and 1 more)
-
Looks like the moisture to me. Longer clamping will definitely help. I might also consider switching to 1 or 2 hour epoxy if the surface area you need to glue is not tremendous.
-
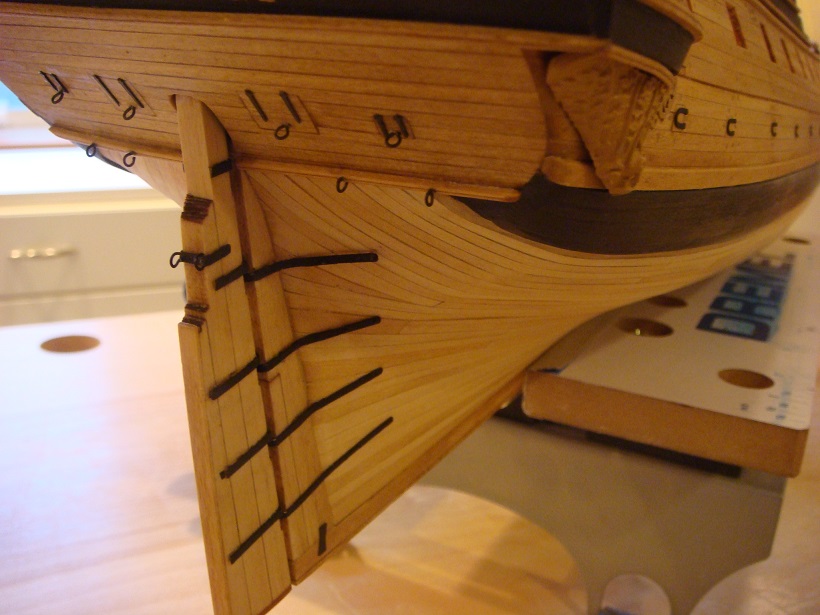
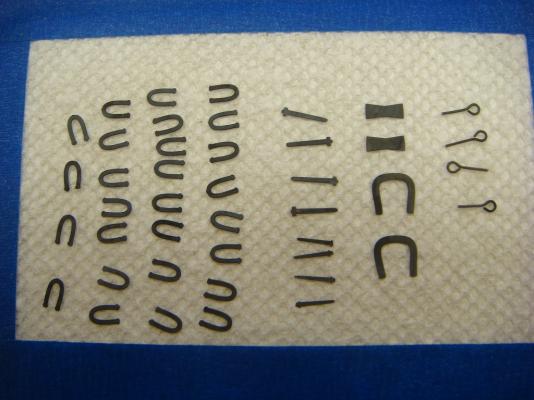
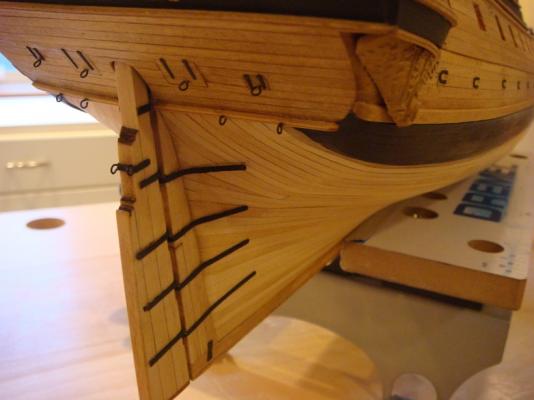
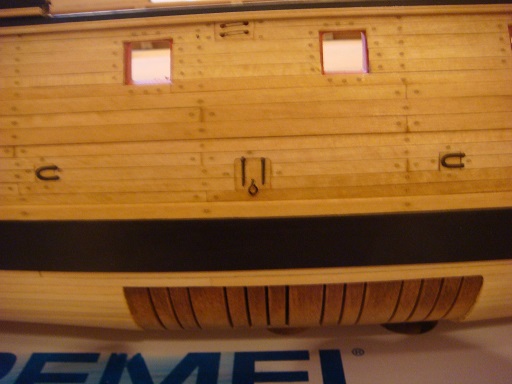
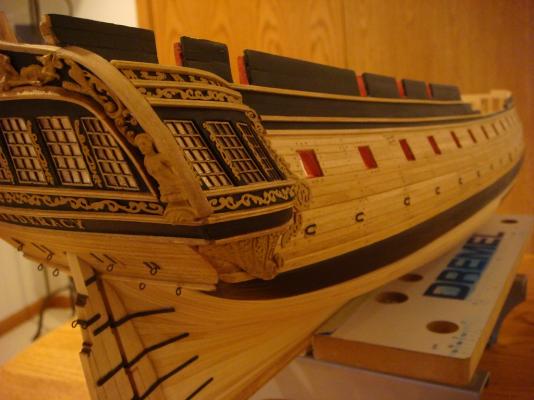
Having just logged the 500th hour in the build log, it's time for a small update. A portion of the photoetched parts for the outer hull have been added. The first photo shows them blackened and ready to deploy: For the blackening, I use the process described throughout MSW. Specifically, the trimmed parts are degreased by bathing in acetone for about 10 minutes followed by an 'etching' in a household vinegar bath for about the same time. They are then soaked in a bath of 50% 'Blacken-it' for 5-15 minutes, rinsed thoroughly then dried. Before gluing (using either CA or epoxy), the surface to be glued is roughened with a 150 grit sanding block. After the part is applied to the ship, a coat of Testors Flat Acrylic lacquer is applied. This protects the coating and (I think) gives a nice appearance. Stern gun port hinges and rings, keel fastener: Bilge port and sweep port hinges: Bridle port and forward keel fastener: Finally, just an overview of where she stands: It is now time to bid a fond farewell to the outer hull for the time being. There is still much to be done but we will now turn our attention to the innermost details of the ship. But first, a short break in the shipyard to acknowledge the arrival of good weather, tend to the garden and (long delayed) Spring cleaning. Everyone stay the course and be well!

- 2,191 replies
-
- 32
-
-
- confederacy
- Model Shipways
- (and 1 more)
-
Wow.... asymmetrical bulkheads? That to me is inexcusable on the plans. While fairing will certainly have an impact, an inconsistency before you even start can be formidable to overcome. Your time is being well spent.
-
This confuses me as well. I consider length overall as bowsprit tip to spanker boom end. But then there's the length on deck and the mysterious length between perpendiculars. Length at the waterline adds still more to ponder. Measure up the plans, do the math and figure out what size case you need and where you're going to display her. Have we 'officially' decided that this is the 1818 US Alert?
-
Yes, pinning is the answer for the channels. I use thin wire, depending on the thickness of the channel. Something like 28 gauge. Mount them in the channel then position it to define the holes in the hull. They make a tremendous difference in strength. You don't need many and they need not be very long.
- 1,756 replies
-
- 2
-
-
- constitution
- constructo
- (and 1 more)
-
Just had the opportunity to read your log. I must say, you're doing a real bang up job. Haven't had a chance to follow an ME Constitution from the keel up --- looks like fun!
-
Zirconium nitride #11 blades?
augie replied to ccoyle's topic in Modeling tools and Workshop Equipment
That's great Chris. I'm sure there will be a lot of interest. I'll be looking forward to your evaluation as a real modeler. -
Perhaps the masts will stick up through the sunroof. Post a lookout !
-
what is the ideal modelling table?
augie replied to AON's topic in Modeling tools and Workshop Equipment
On the seating, I picked up an adjustable stool that works like a screw jack. Can go up and down about 8" but it needs to be sturdy. -
Zirconium nitride #11 blades?
augie replied to ccoyle's topic in Modeling tools and Workshop Equipment
I think we'd all like to hear of how this coating performs. I've heard of it's use on drill bits. Let us know if the blades are gold in color. This is worth a review!! -
Thanks to all for the comments. Always a shot in the arm for me. Very glad to be moving away from the stern for a while. We'll hold off on the rudder pendants until I get her back on the building cradle.