HOLIDAY DONATION DRIVE - SUPPORT MSW - DO YOUR PART TO KEEP THIS GREAT FORUM GOING! (Only 20 donations so far - C'mon guys!)
×


augie
-
Posts
4,669 -
Joined
-
Last visited
Content Type
Profiles
Forums
Gallery
Events
Everything posted by augie
-
 Shaking head here ---- and looking for asbestos suit.
 -
Looks to me like this struggle really paid off!
- 1,756 replies
-
- 1
-

-
- constitution
- constructo
- (and 1 more)
-
Good point, Wayne. That should take at least 256 blocks, 512 eyebolts and a boatload of rope coils (not counting the breech lines). Good fun
- 1,616 replies
-
- 3
-
-
- caldercraft
- agamemnon
- (and 1 more)
-
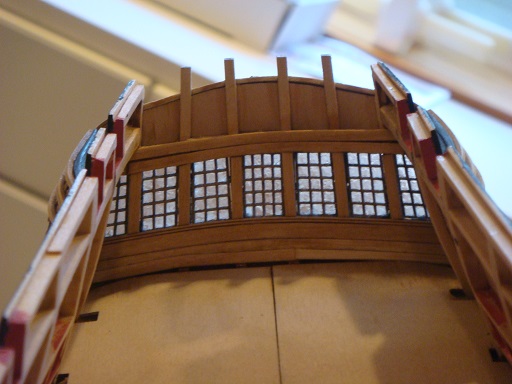
Roundhouses look good! And 3 gun ports done. She's a 64, right??????
-
It's great to have all the light you need in the shop. Just watch your colors --- they can appear very different depending on the light your using versus the area you intend to display the finished ship in. I can't speak for halogens but I know that natural, fluorescent and incandescent all give you different appearances.
- 1,756 replies
-
- 2
-
-
- constitution
- constructo
- (and 1 more)
-
Um......absolutely speechless over here. Great forethought, excellent execution.
-
Yes, that's the process as I remember it. I actually learned it from Julia Child. You take a whole turkey, cut it into 22 pieces, cook it then patch it back together with toothpicks so it looks nice before you slice it. Same with aeromodeling......screw/glue 850 odd pieces into one big one then put it in a flat spin for the 're-kitting' operation. Press on, mate......it's getting interesting
-
That is really one spectacular piece of work. You deserve to be very proud. WELL DONE, MATE!
- 421 replies
-
- 1
-
-
- granado
- bomb ketch
- (and 2 more)
-
It's the inner hull planking between the gun ports and the waterways. In the case of Confed, it's both a thicker and wider plank than those used for the rest of the inner hull planking. It needs to fit exactly between the false deck and the top of the gun port sill. Since it just happened to come out that way, I consider it a miracle (considering Ben's comment).
- 2,191 replies
-
- 4
-
-
- confederacy
- Model Shipways
- (and 1 more)
-
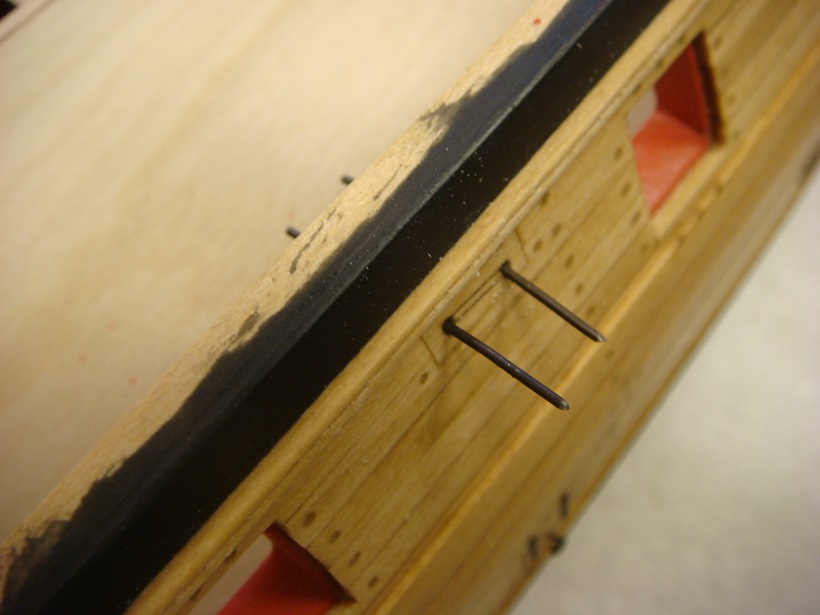
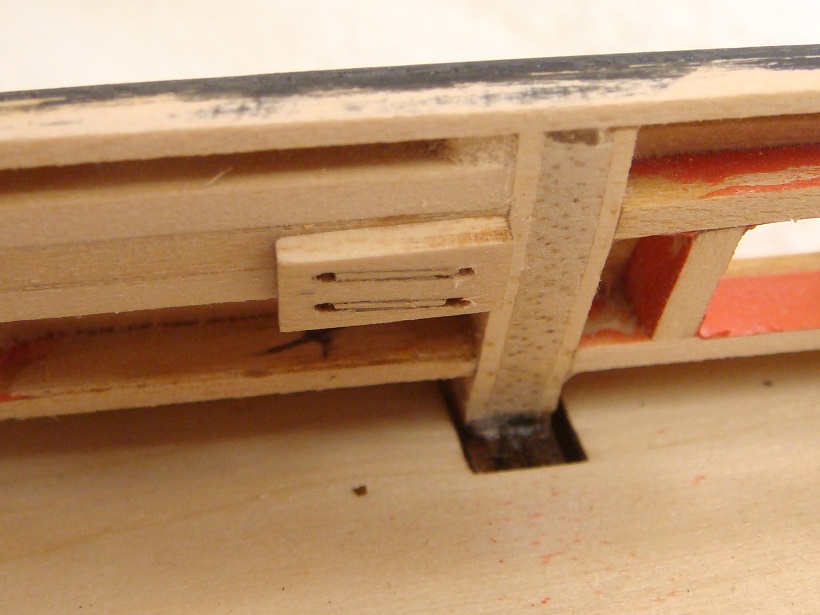
Aye,aye Bob. The 50mph winds (day after day) are a good incentive for shop time. Speaking of which....... Some necessary fillers, to accommodate the inner hull planking, have been installed and faired at the bow, stern and at the sheave positions. You may recall the simulated sheaves we installed in the outer hull a long ways back. Now it was time to install the inner portions. Here we see lining up the holes between the inner and outer halves simply using several pieces of wire: And here's a close up of one of the inner hull sheaves. It will be flush with the inner planking: Now it's time to get to planking the inner hull in earnest. Might take some time so I urge you-know-who to be patient. By some miracle, the spirketting that runs under the gun ports is going to fit perfectly!


- 2,191 replies
-
- 20
-
-
- confederacy
- Model Shipways
- (and 1 more)
-
I keep looking at your photos Frank. Is there any chance that your bulkhead former is dead straight along the keel but bowed a bit up at deck level? Assuming that both the deck and bulkheads were cut right, that might offset the alignment. It sounds like Mark is 'trusting' the deck while Alistair is trusting the bulkheads. I think you need to draw a line in the sand and pick one. Sorry if all I added was confusion. Personally, I'd trust the bulkheads assuming that BF is dead straight all the way up. I feel for you my friend.
-
Thanks for the 'welcome home' and comments, everyone. BEN- Yes, the bulkhead thinning has been done.....just have to add those few 'fillers' and fair them in. Thanks for the tip on the QG floor. Still a ways off. Now on the spirkiting, you KNOW I already eyeballed it . It's going to be close but I'm sure just enough off to create some angst. We'll know soon enough!
-
After 10 days of doing hand to hand combat with the great outdoors, the shipyard is once again open (on the summer schedule). I've begun on the planking of the inner bulwarks starting in the stern. Still need to do some prep work (fillers, sheaves etc.) before we start on the actual bulwarks. Here's the stern. The majority of it will be invisible once the upper deck, beams and side planking are in place: Good to be back on the job.
- 2,191 replies
-
- 28
-
-
- confederacy
- Model Shipways
- (and 1 more)
-
Being an American, it may sound unusual but HMS Victory is my favorite sailing man-o'-war. But building her really well would be like building the Empire State Building on top of Everest (at least for me).
- 1,756 replies
-
- 1
-
-
- constitution
- constructo
- (and 1 more)
-
You've done a great job on the QG. Sorry about the setback on the stern lights but, knowing you, you'll get them. Don't be discouraged.
- 1,756 replies
-
- 1
-
-
- constitution
- constructo
- (and 1 more)
-
Have a great trip!
-
I've had good success with Testor's Model Master Flat Clear acrylic. It comes as a brush on but I hear it's also available as a spray on. Sometimes goes by the name of 'Dullcoat'.
-
Good to have you 'home'. Hope the job is going well and that the dust is settling from the move.
-
Nice, neat work on that counter. Have a good conference!
-
I usually get the top one in the right place. Then drop a vertical line on the left side with artist's tape (masking tape would do). Then use a custom made horizontal spacer to set the rest. Keep your magnifiers on and be really careful with the glue. I use the smallest possible dab of thick CA as it gives me a few seconds to position.
- 1,756 replies
-
- 2
-
-
- constitution
- constructo
- (and 1 more)
-
Only one word comes to mind ---- Masterpiece. Spectacular workmanship, professional photos.......simply beautiful all around. Great effort on those hull sheaves. I've included them myself on my latest but never thought to use the brass rod. Serious note to self . I'll be more than (patiently) looking forward to the finishing touches. It's been a true privilege following this project down the home stretch and I look forward to your future work. Well done, mate !!!!!