HOLIDAY DONATION DRIVE - SUPPORT MSW - DO YOUR PART TO KEEP THIS GREAT FORUM GOING! (Only 13 donations so far - C'mon guys!)
×


popeye the sailor
-
Posts
16,007 -
Joined
-
Last visited
Content Type
Profiles
Forums
Gallery
Events
Everything posted by popeye the sailor
-
 thank you russ. the kit does have it's problems. I find it very handy that I know about them thank you to you Bob as well it's really not that confusing......as long as you don't look at my other tables I have a TV tray next to my desk, so all the parts are separated from the rest of the herd. I wasn't going to go nutz with this one, considering the problems it has........but the worst of it is now over and the rest of the build should go together fairly well. I also know that the mast will line up.....something else I made sure of. so far, I'm going to do two mods on it......I may find more I can do. thanks for the good word thanks to all who hit the like button
- 140 replies
-
- 2
-

-
- jolly roger
- lindberg
- (and 1 more)
-
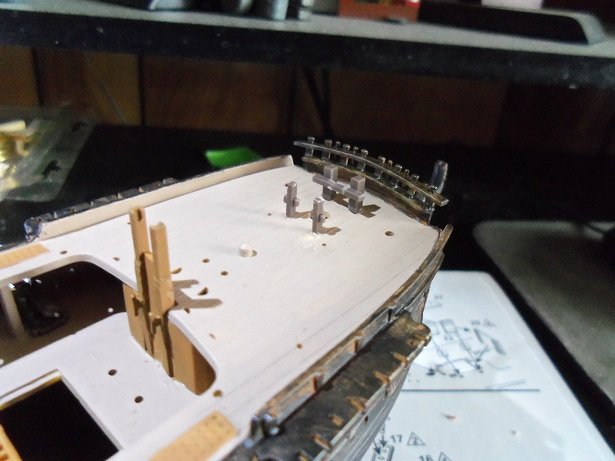
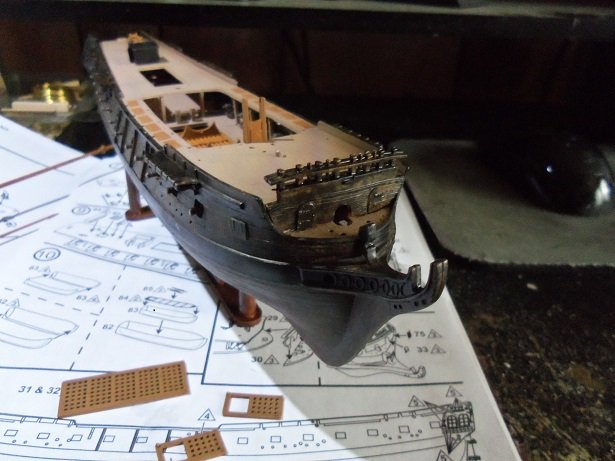
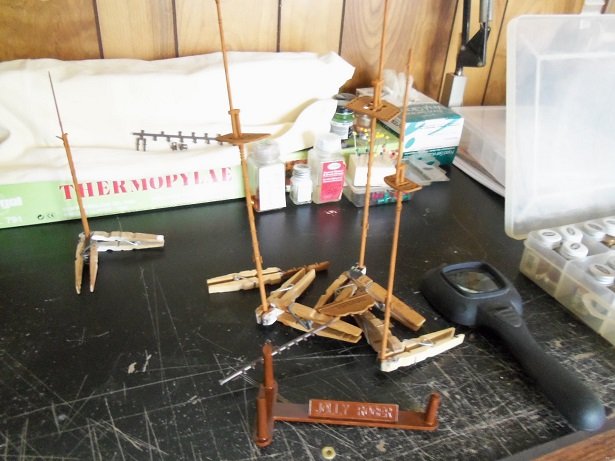
Friday, I did get a little further with the Jolly Rogers........the rails fore and aft of the deck opening were cemented in place. the gun port lids, along with a couple other parts, got the flat black wash treatment. the exterior of the ship's boats still need to be done. I took the day off today.....nice that I have an extra day to play. as with any kit, any modifications made to it can turn out to be a hazardous move. models are built with such close parameters, that there might be a problem with the fit of other parts. sometimes you gotta pick and choose which mod to do. here is the first modification of the build.....an idea that I came up with. there are two stair wells that lead to the lower deck...orlop, I would think. railings around these two openings will be added......but first, holes must be drilled. following the same lead as what I did on the Thermopylae {but a bit different procedure}, more wire was cut to serve as the stanchions. eight short pieces were cut from them and cemented in place. using the jig that I had used on the Thermopylae railings, they were cut down to 4 mm. using the thin wire, it was wrapped around the stanchions, leaving the front open. the special tweezers were used again to position the wire, but instead of being straightened out, they were given a sagging appearance. the first one was touched up with paint, and the second one was done....in the same manner. the ladders still need to be added. at this time, a couple more parts were added near the capstan. along the sides of the deck opening, railings were added there as well. these were a bit of a pain.......they are really fragile and fitting was kinda messy {glue wise}. I had forgotten what a pain it was to deal with 'angel hair'...the thin hair like stuff you get, when dealing with thicker glue. I use the tubes quite a bit.........I have the Testor's cement in the bottle, but I rarely use it. touch ups to follow should have more to show later on

- 140 replies
-
- 14
-
-
- jolly roger
- lindberg
- (and 1 more)
-
thanks Piet.......just keep in mind that there are a few problems with the kit. this ship can be modified to create other known ships. the Le Flore.......the Wappen Von Hamberg....these are just a couple that can be modeled with little trouble. Revell and Monogram have a few kits that are aimed at the younger crowd, and they are easier to assemble. to venture into these lesser known companies, can get a little dicey. color choices can be gauged by the color of the plastic used. welcome aboard and I will try and highlight all the idiosyncrasies with the kit, so to eliminate the aggravation of running into them yea.......you gotta read with me sometimes EJ.......I love playing in the text as well no, the Thermopylae is not done yet.....although I think it became clear why I brought this model out of the closet. I wanted cannons for 'ole Thermie......these presented themselves to be adequate for the task, but I haven't gotten back to that build to find out yet. I wish I could jump into something and come out of it with a quick build ........but it usually works out that I come up with ideas, and the quick build turns into a full blown project. but I do enjoy the challenge.....even though I have active projects all around me.....I have four on the tables as we speak continuing the conversation........... no Zoltan........no playing......this is how I roll. I am very lucky to have the admiral I have.....she doesn't complain about the clutter of active projects. although she does get confused when I mention I have to get something for one that is not on the table. she has asked me about the trawler a few times though.....probably because for the most part, it looks finished and should be off the table. there are benefits for my madness.....especially when it comes to the transfer of ideas from one project to the next.
- 140 replies
-
- 6
-
-
- jolly roger
- lindberg
- (and 1 more)
-
nice progress Dan......she's really coming along nicely. your touches really add to the detail of the model
- 193 replies
-
- 3
-
-
- cerberus
- paper shipwright
- (and 1 more)
-
back to the archive pen you showed. i use the same pen for my simulated calking. if your going to use it on a large scale, I would suggest buying a bottle of India Ink, and do a wipe on process. it's the same ink that is in the pens
- 714 replies
-
- 2
-
-
- lady nelson
- victory models
- (and 1 more)
-
a lot of times, I will use cotton thread {I have quite a bit of it}, pour some steel or silver paint on a rag, and wipe the thread in one direction. this will mat down the fuzzies and produce some fine cable. this can also be done with any flat paint, to create standing and running rigging....tan/green, tan/brown, and black. keen to see what you've come up with.
-
the different wood color banding is nice...adds a decorative flare to the planking looks nice Bob!
- 682 replies
-
- 2
-
-
- halifax
- lumberyard
- (and 1 more)
-
well thanks Gerhard........I did a little more on Friday.......sadly no pictures yet thanks Robert I'm hoping that this is a quick one........every time I think it is, some thing I get in my head complicates it more soon gents
- 140 replies
-
- 4
-
-
- jolly roger
- lindberg
- (and 1 more)
-
I sense a second hull coming........... this one looks too good to try and alter
-
no chance of that.......your build shows too much effort! you're doing a great job just follow the contours.....the hull will shape itself
-
great looking crane........well done! all this PE stuff is so awesome to see
- 151 replies
-
- 5
-
-
- duke of york
- tamiya
- (and 2 more)
-
thanks Gerhard.....it's not that fast really.........I've only been working on her for a week or so I'm glad you like her. thanks again!
- 140 replies
-
- 5
-
-
- jolly roger
- lindberg
- (and 1 more)
-
in the very last picture.......you see that snowman and dog on the floor. Hallmark sold them a couple of years ago.....the one we had broke. our son Kevin found that one on one of the local flea market sites. it plays Rudolf the red nosed reindeer and the little dog howls to the music........Gibbs howls along too......almost perfectly in time
-
he is an American Eskimo.....rather small for his breed. our first one maxed out at around 35 - 38LBS.....he about 25LBS. I kid the admiral, 'cuz when I come home from work, he practically knocks me over......I tell her he's happier to see me than she is. he's nothing like our first one though.......Happy was one of a kind. when I pulled all nighters working on my models, he'd lay near the table, and wouldn't go to 'bed' until I did. I work nights for a couple of years.......he'd lay in bed with me......wouldn't usually leave until I got up. I even wrote something of a book about him......it's not complete.......haven't had the heart to finish it. we did some crazy things though....the admiral though we were both stupid. but I enjoy Gibbs just as much......he's seven....or maybe eight {I forget}. I like both dogs and cats, but I'm more partial to dogs don't wait too long...to get one of your own
-
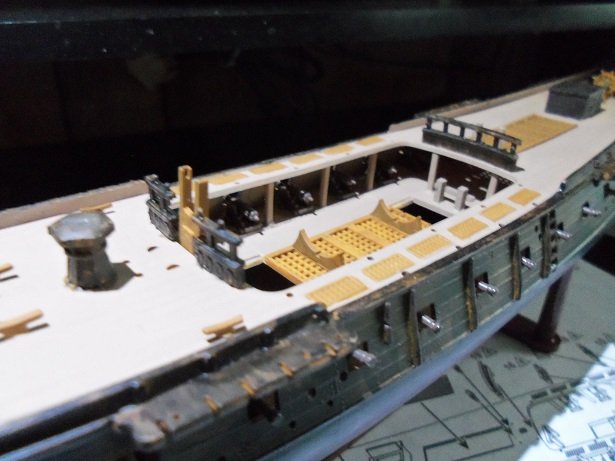
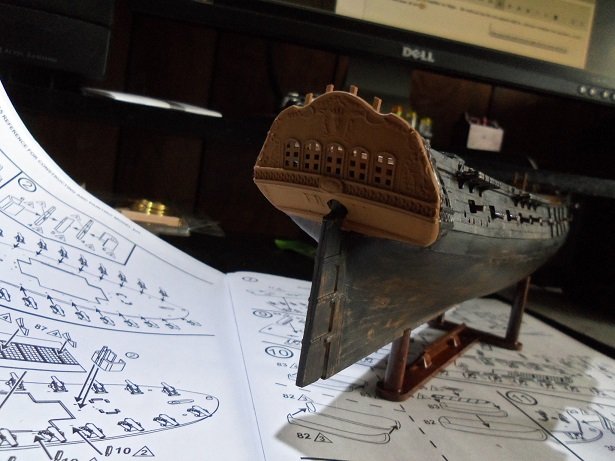
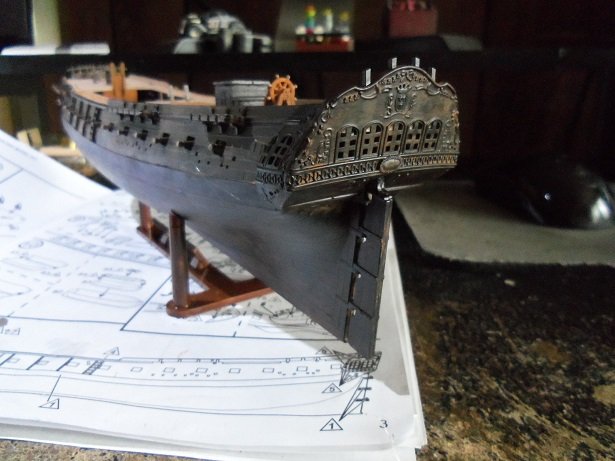
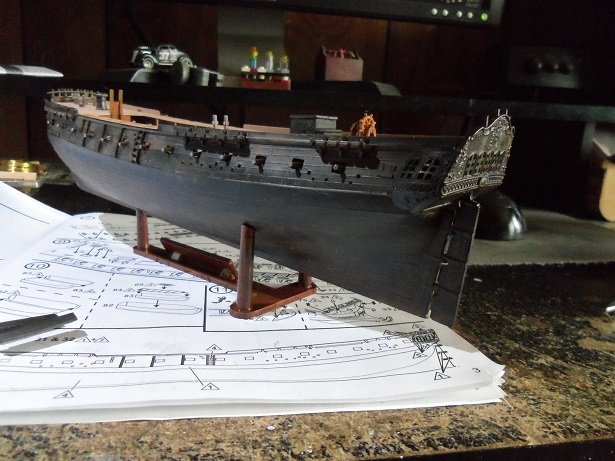
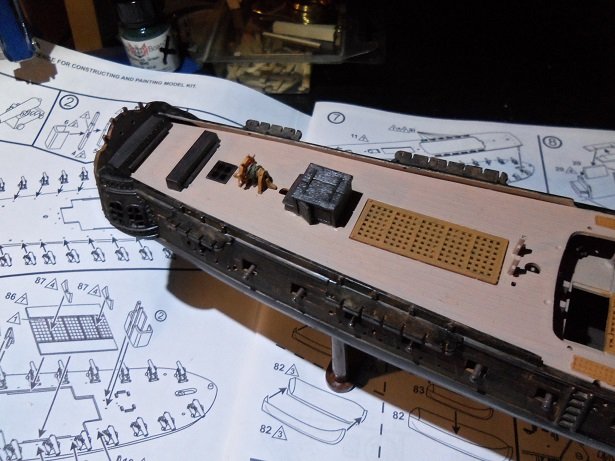
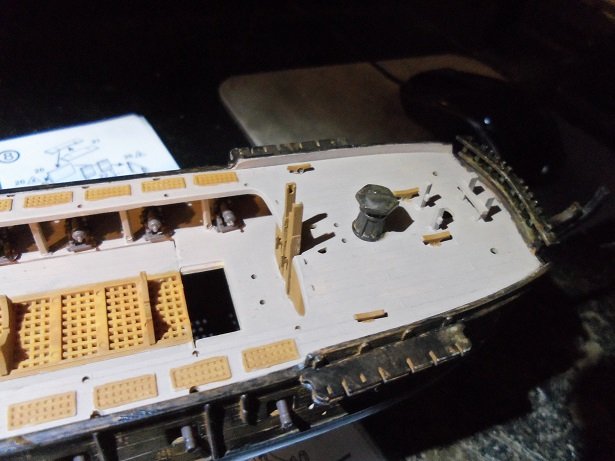
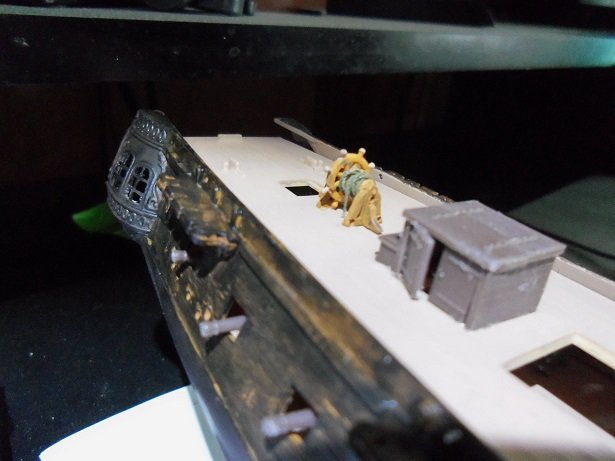
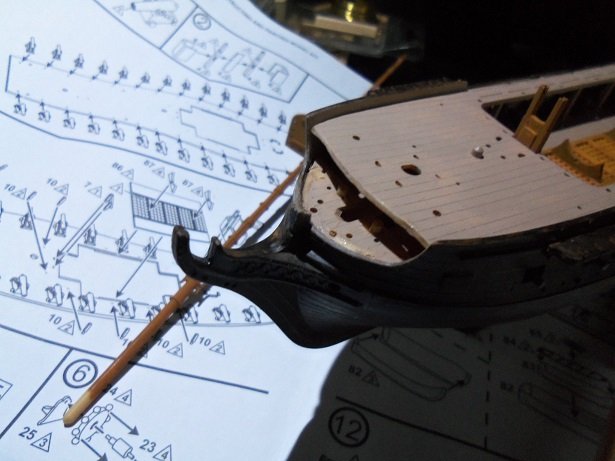
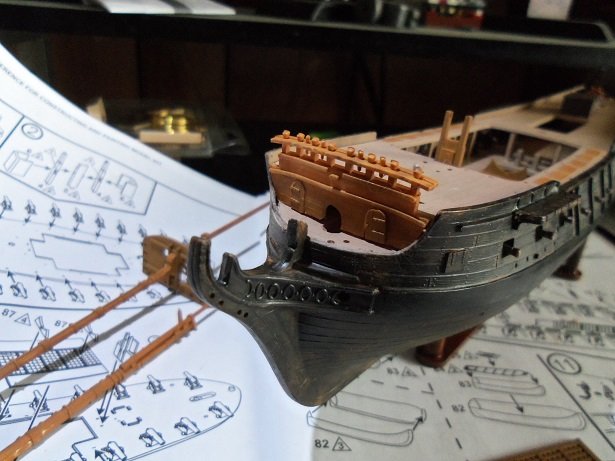
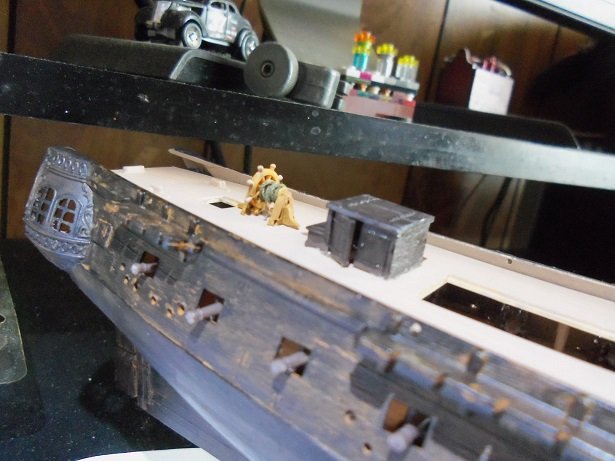
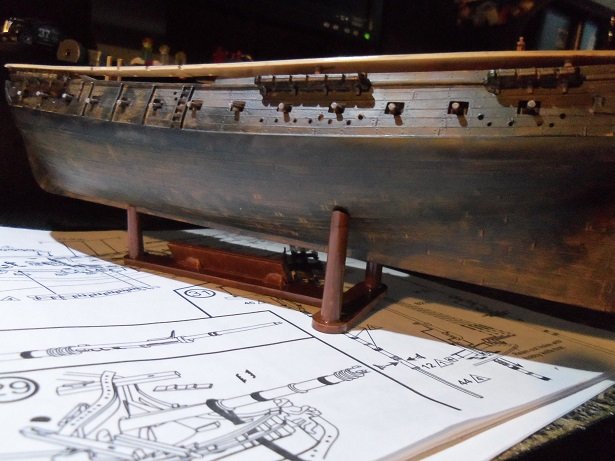
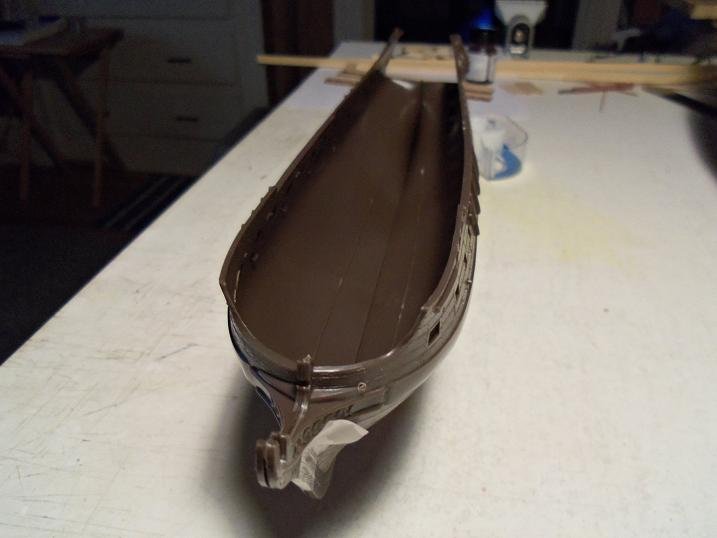
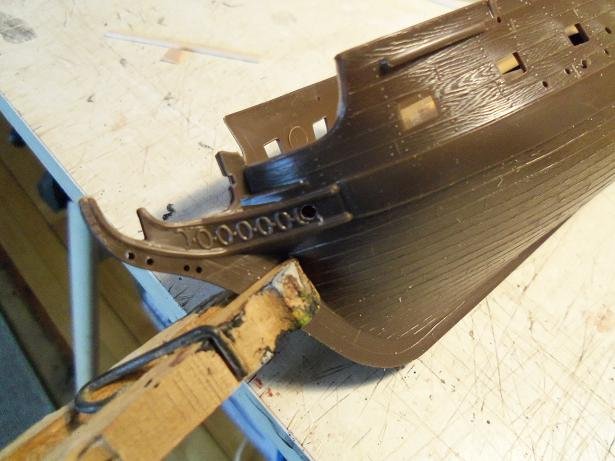
this should catch the build up to the present. the transom was my second folly, but not as serious as the bow. I had cemented the rudder in place before I painted the flat black wash. now to swing the transom in place was very tight. adding cement to the mix, it was wrestled into place. all is good. a fife rail and posts were added to the bow deck. the transom was washed with the flat black. more parts added to the stern of the ship........lockers of sorts. and more parts were added to the bow end.....cleats and the capstan. this is it............today came and the day was spent setting up computers. errand day tomorrow......but I'll try to get a little more done.
- 140 replies
-
- 13
-
-
- jolly roger
- lindberg
- (and 1 more)
-
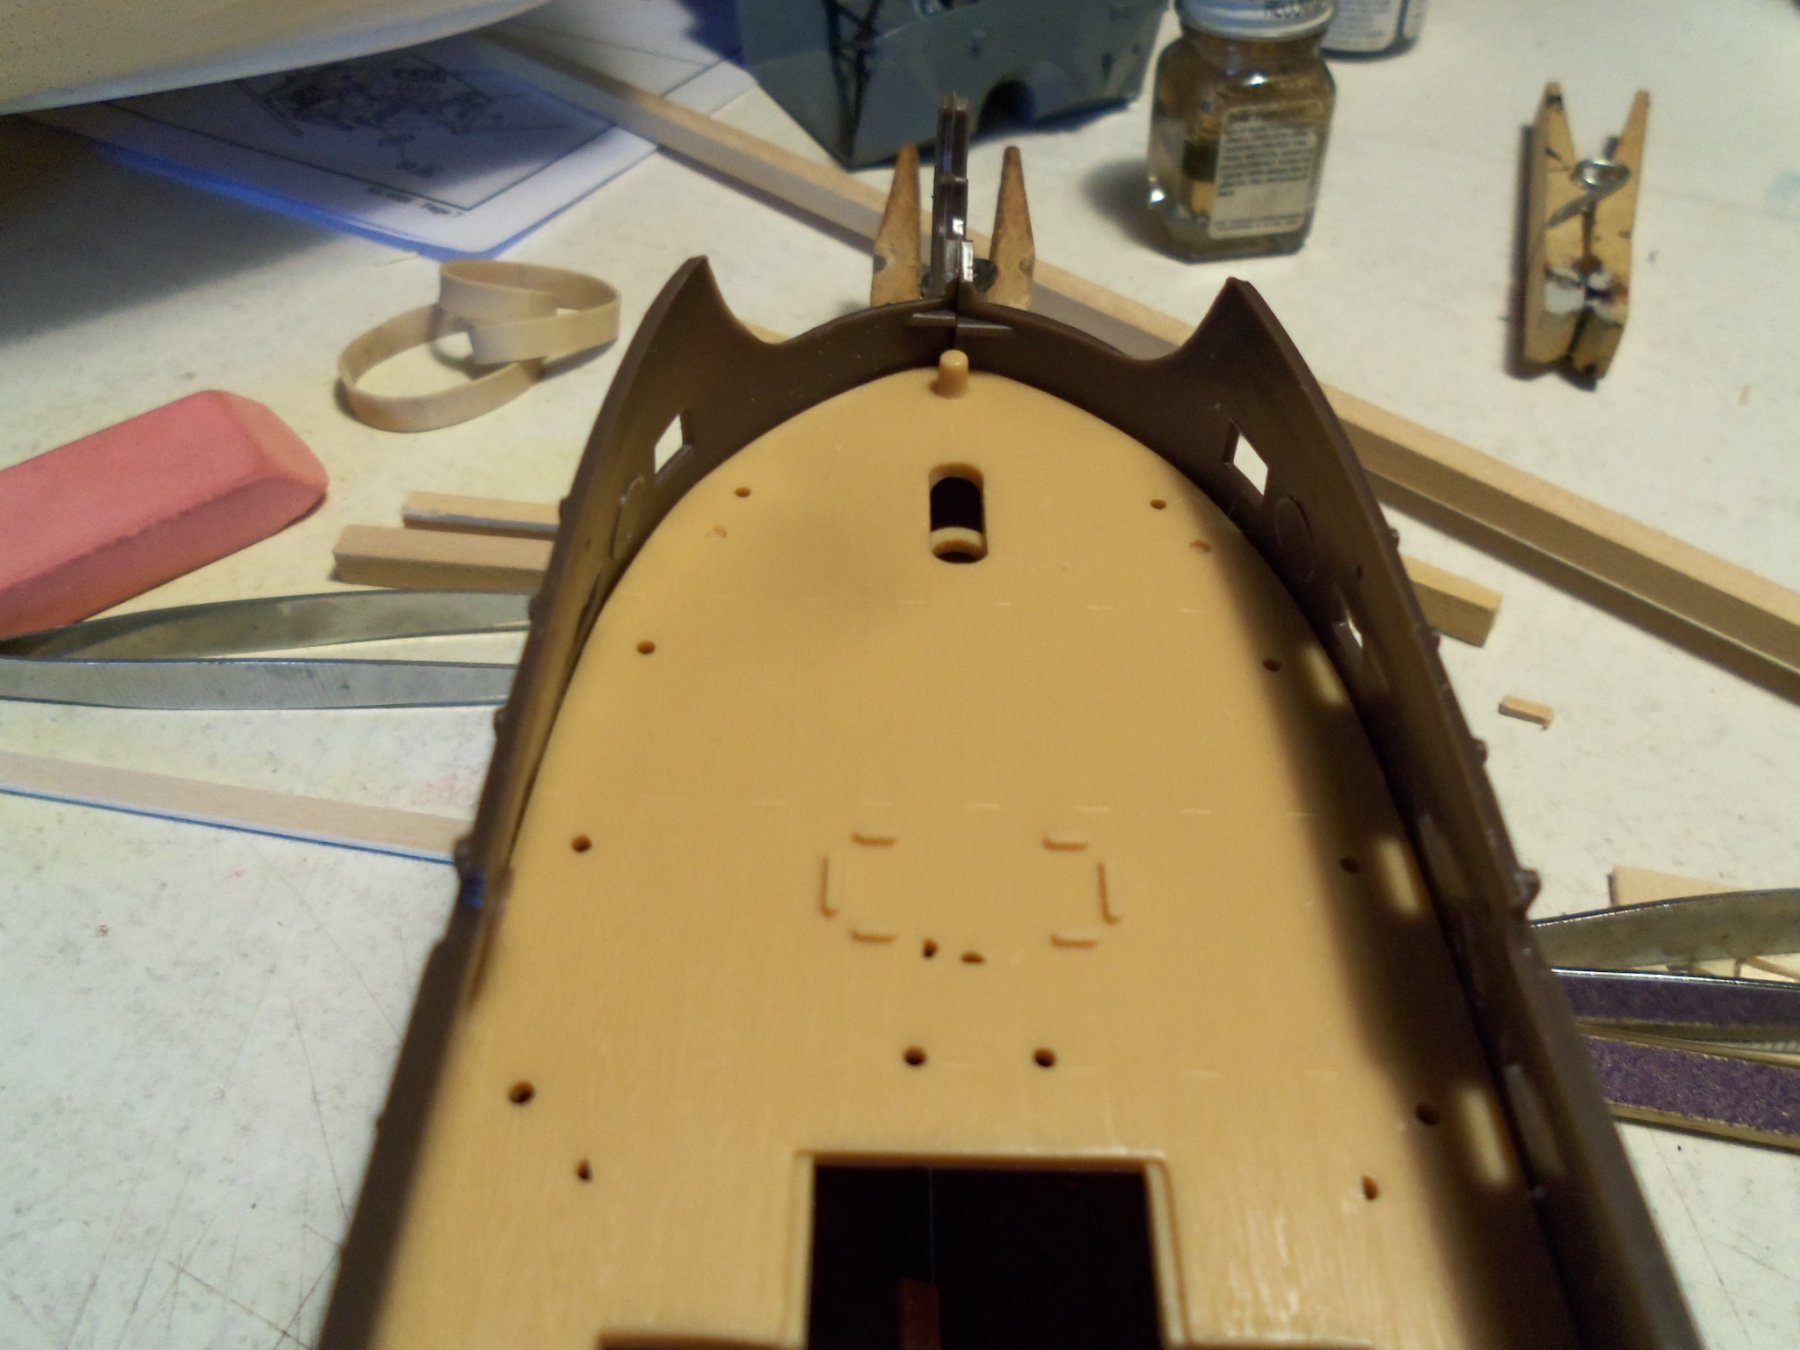
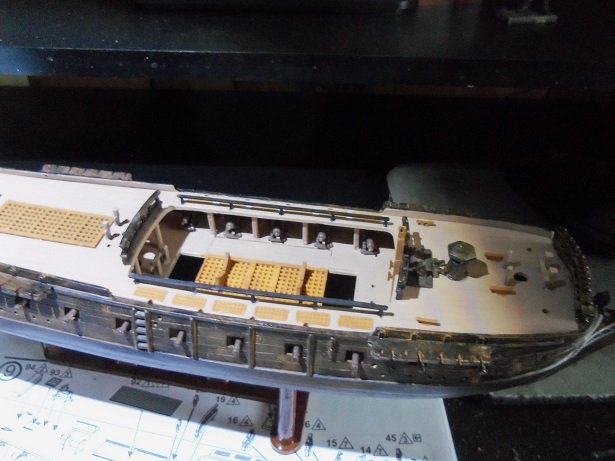
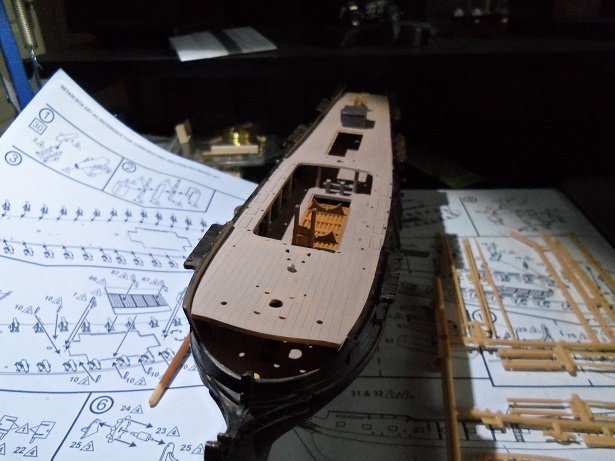
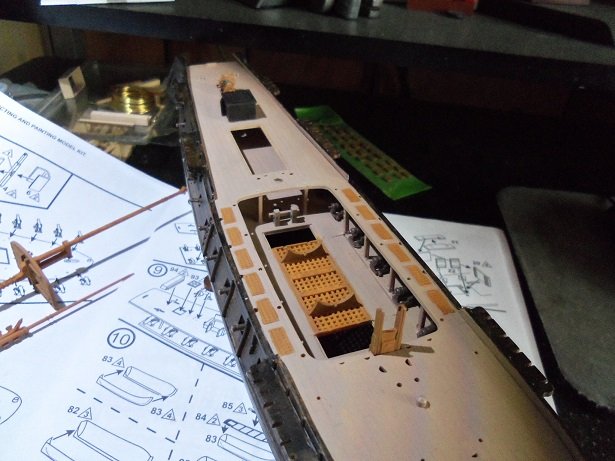
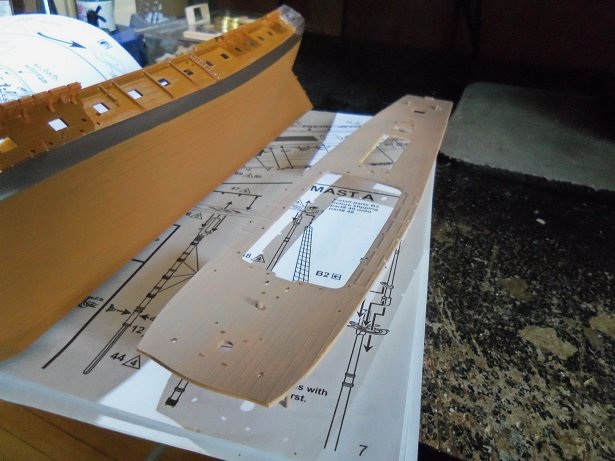
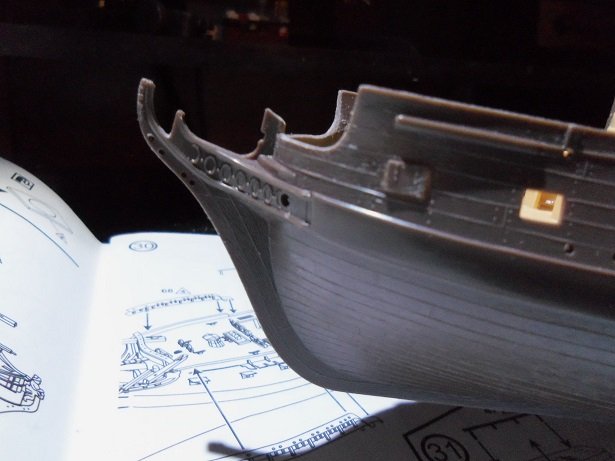
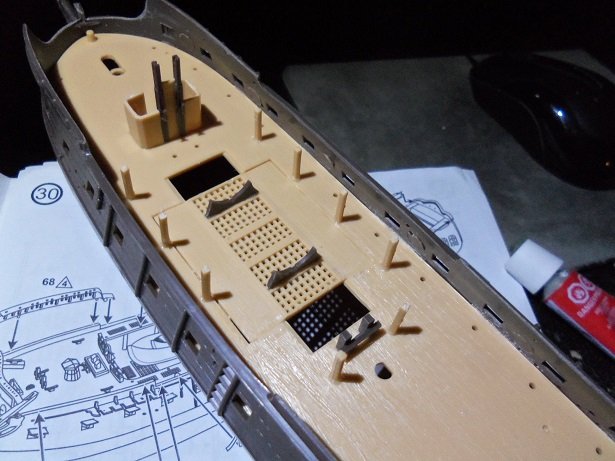
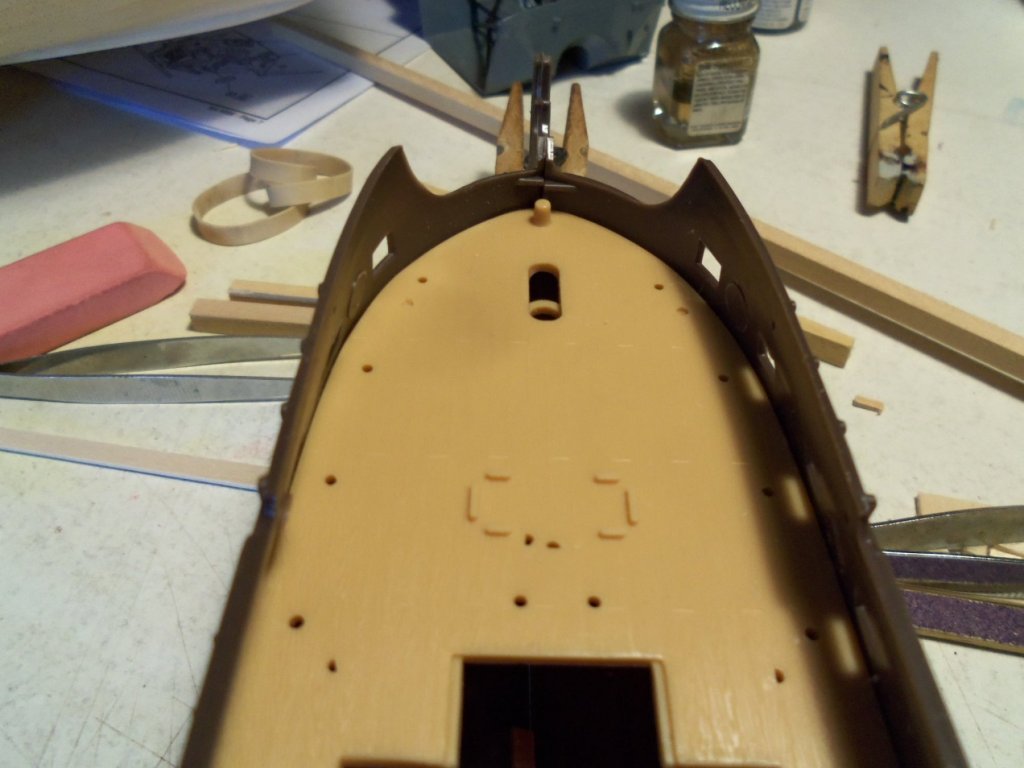
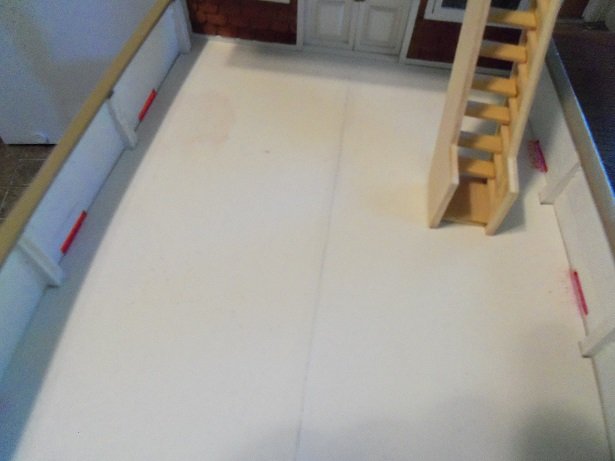
the upper deck is cemented in place........had to fudge how it lined up with the gun deck. this was to be my first folly with this model. before doing that, the ships wheel was cemented in place and white thread was wiped with olive drab paint and wound on the wheel's spool. it was fastened under neath the deck. the hatch was added, later to be washed with the flat black. now came the folly........"OK.....smart guy........now, how do you suppose your going to install the bow deck? it wasn't easy........and a little messy........I had to figure the height of the deck, so the bow bulkhead would line up. the painted deck helped a little, but I still had to clean up some excess glue. after a little touch up, the bow bulkhead was cemented in place. some trimming was needed to line up the bow spirit hole. this will now get the flat black treatment. another plus........the masts line up with the well holes! the grates along the mid ship was painted wood brown.....and the aft hatch was washed in flat black. it gave it a blackened quality. I gotta trim the galley badge windows a little more
- 140 replies
-
- 11
-
-
- jolly roger
- lindberg
- (and 1 more)
-
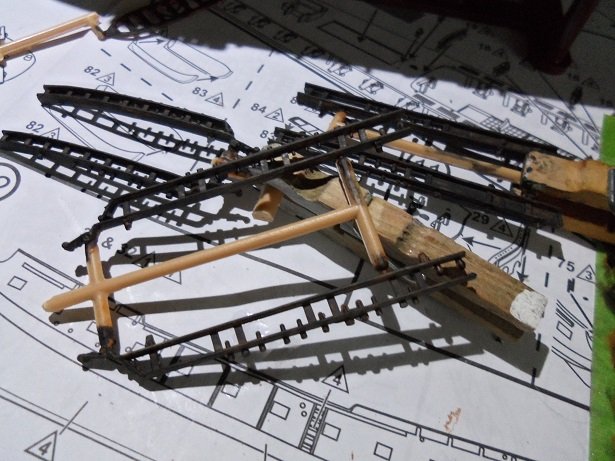
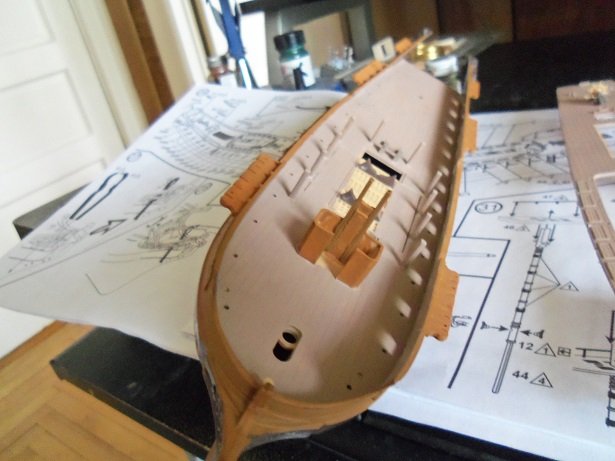
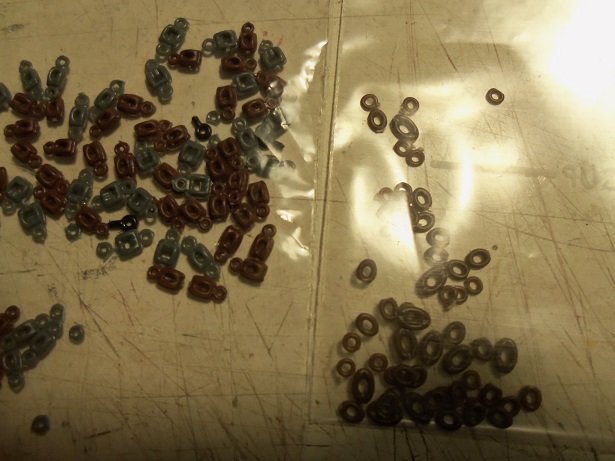
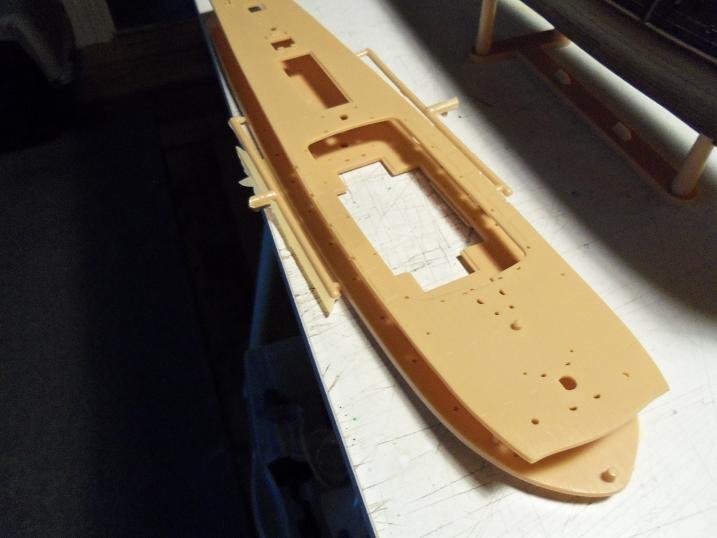
the channels had been added and painted.......some of the deck accents were painted with the wood brown at this time. this was done on the 26th of May. you can see that the ill fated post is there to help support the mid ship. with a semi stiff diagonal brush, the entire outer hull was gone over.....even the wales. they will be the third color texture.......the brown of the plastic combined with the flat black. well.......I just had a bit of confusion here. I had taken a few other pictures, in conjunction to something else I want to do with this model..and I couldn't find them. I was getting the pictures from my memory stick. when I took all the important stuff out of my old computer, they went along with it and ended up on this computer. I'll have to update the log files in the stick I was looking over the instructions...and what they supply for the rigging is really horrible......three different size rings. I have some rigging blocks from past Revell 1:96 kits. the gray ones come from the C.S.S. Alabama........the brown ones either come from the first United States build, or one of the Cuttys {I built two of them}. comparing them with the rings.....there really isn't much of a size difference. then again......2 or 3 mm wood blocks may be too large. the gray blocks are over twenty years old.....I built the Alabama around the mid 90's {that put me in my mid to late 30's}. I've had them that long! I got some A blocks, some B blocks, C blocks, and D blocks.......for those who built a Revell kit, you probably remember how they list out. I'll see how they look

- 140 replies
-
- 11
-
-
- jolly roger
- lindberg
- (and 1 more)
-
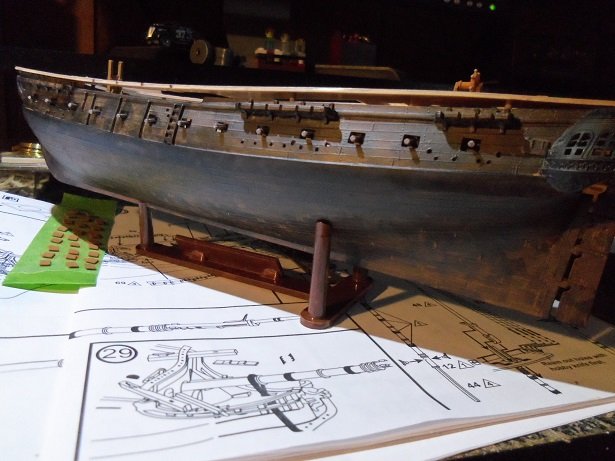
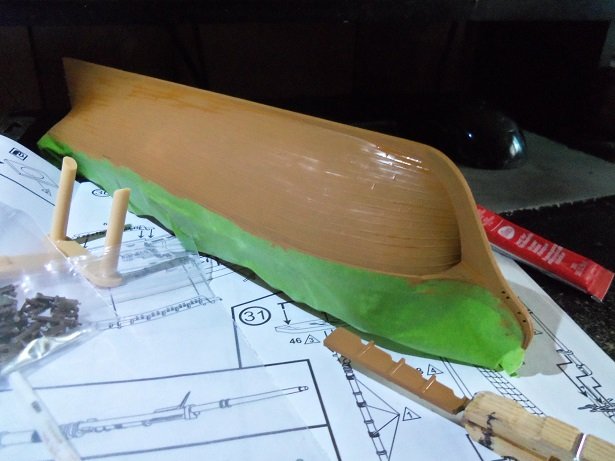
one thing I hate is glue marks........'at's all I Kin stand... so I started to paint the hull......and I started to think about the bottle of diluted flat black I had kick'in 'round. hmmmmmmm... I did a wood brown for the bottom........mask off the wales.........and do the upper part of the hull. then go over it with the diluted flat black. I'm a hack when it comes to weathering and such......I'll give it a try. this is the perfect practice.....victim! {Yea, I'll call'em the way I see'um}. top and bottom are done.........says nothing about painting below the waterline, so it saves me a step. the decks are being painted a light deck tan, with accents of the wood brown and the flat black treatment. the masts, the rudder, and the transom was painted in wood brown. let dry completely. the stand was painted a darker brown......the only gloss that will be used.

- 140 replies
-
- 11
-
-
- jolly roger
- lindberg
- (and 1 more)
-
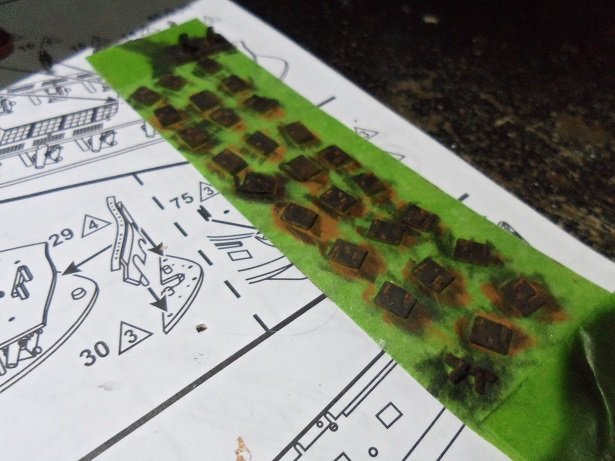
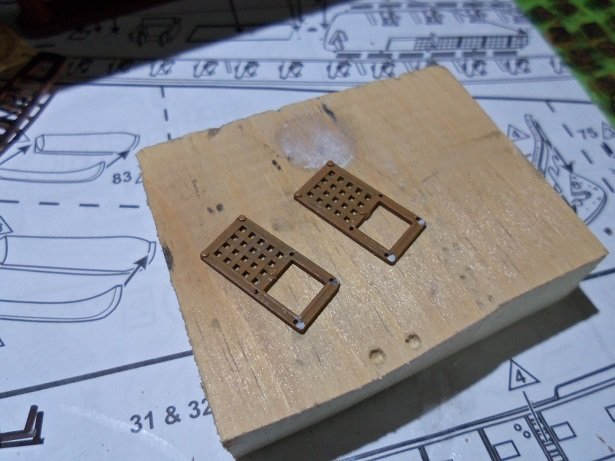
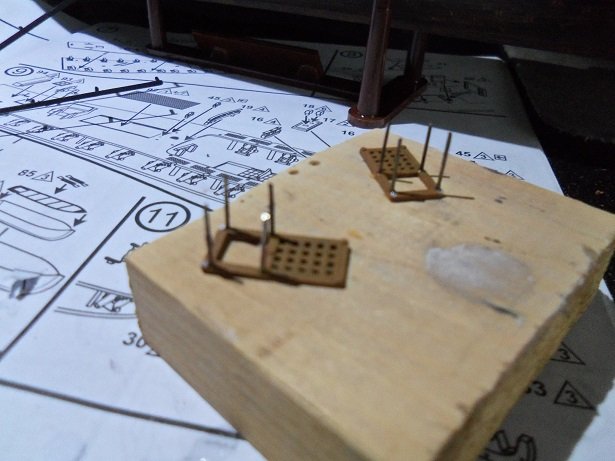
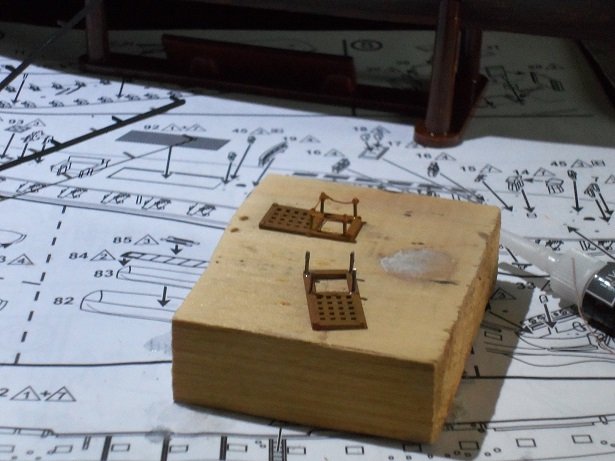
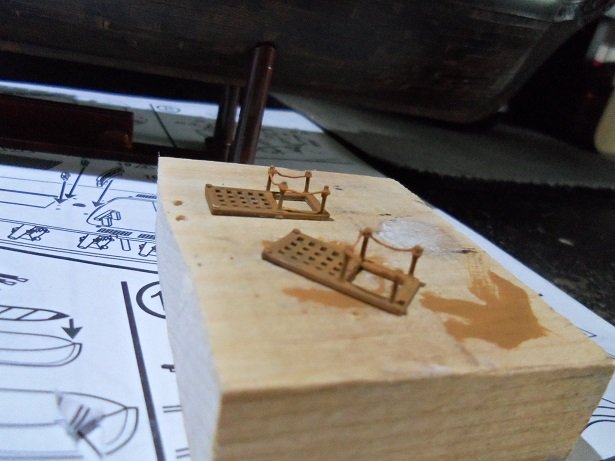
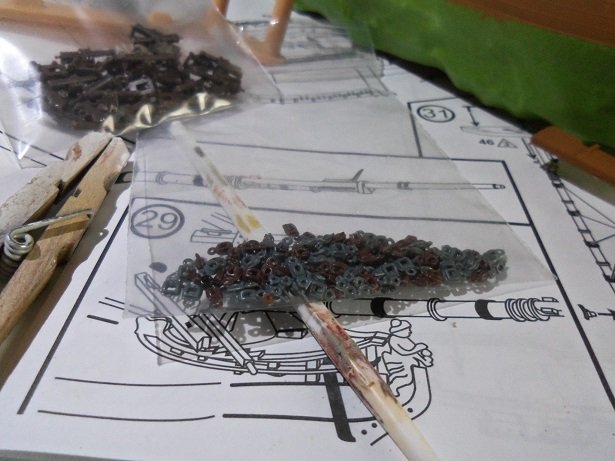
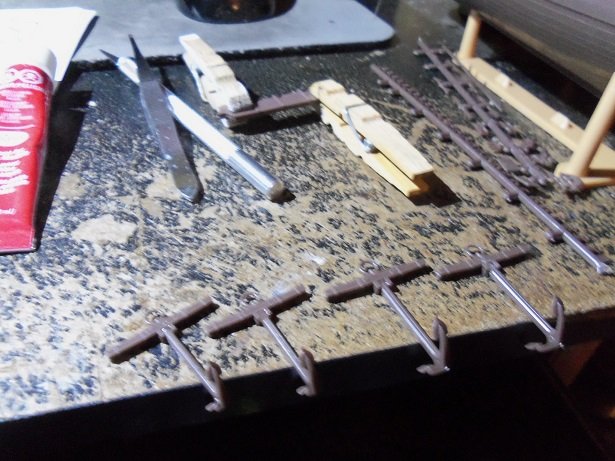
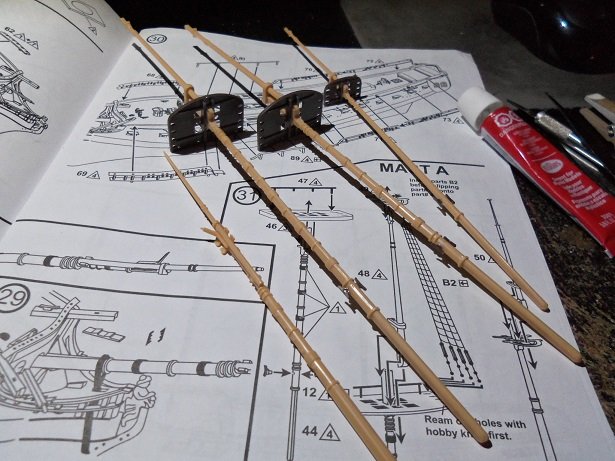
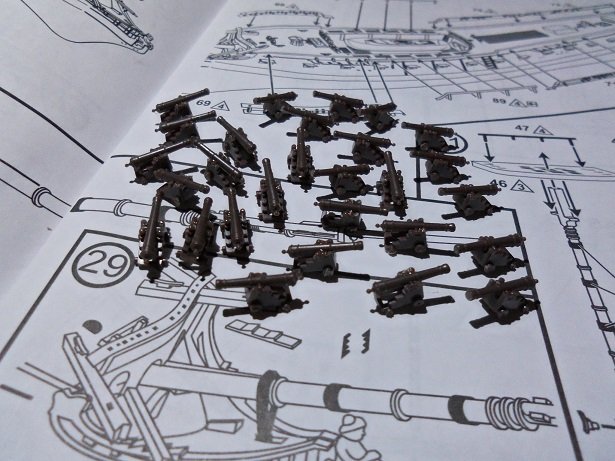
so to start things off, I thought to put together parts that are sub assemblies. I decided that I'd do a little painting on her, so the assemblies are narrowed down to what would be the same color, or as a unit. the anchors were assembled....and the rudder. the masts were assembled up to a point. to assemble the cross trees, the shrouds need to be set in place, and it slips over them. I found that one of the cross trees was broken and badly deformed........NO! I didn't do it..I tell ya! so I had to fix it and set it aside.....it'll be alright >icky mae< I also closed up the bridle ports....which gave me an idea. this kit is 1:130 scale........the Thermopylae is 1:124 scale. these two loose cannon could be important....and that's no laughing matter, those cannons. I was wanting to have cannons on the Thermopylae.......Cyril has them on his. I set the two aside...I'll size them up when I get back to her. I also thought to change up how the deck process is done.....I though I could line up the cannon locator holes better. that was a fool's errand. it can be seen well in this picture. here a few parts are added.......notice the posts?!?! there's one missing. the part number is #10......and there should be.......and for all intent of purpose, ten of them. there are ten of them......except they are two different numbers, and a locator hole is missing. marking where it should be, I added the missing one. for the cannons.....guess I'll be cutting off the locator pins.
- 140 replies
-
- 11
-
-
- jolly roger
- lindberg
- (and 1 more)
-
last Tuesday.......I was suffering from work lag. it was a nasty week.....way too many trailer brake jobs! I didn't have the urge to do anything with the wood projects. Wednesday came with not much change, and I knew I had to do something. ........something I could just throw together, without much fuss. since the Jolly rogers was a kit with many problems, I figured.....what the heck, if I have to hack it up, who cares not like I was going to do a log on it, or anything I would forego a lot of painting....no need to be fancy. a few folks here has built it and experienced problems.....from decks not fitting properly......to masts not lining up in the deck wells........poor fitting parts......just a beginning. I noticed that the cannons don't line up in the ports too good. I did this when one particular build was in progress. there were no hawse holes for the anchors either. I had shown a gent where he could locate them, given how far into the build he was........I know that they should be under the trail boards, but I drilled mine out to show 'em. I'm going to go this route......at least they'll be close. I had packed her up and put her away.......and now I bring her out again. we had gone to Hobby Lobby......and saw three different kits. the admiral was puzzled.......I was looking at a large scale B24 Libby, but she said no.........ha-rumph! so I picked up some black beading thread, a roll of small chain, and I hope some stuff to do the bow and stern decorations on the Thermopylae. after we left, I remembered that I needed thinner to paint the boats {next week......I got Monday off}. so here's my try with the Jolly Rogers

- 140 replies
-
- 10
-
-
- jolly roger
- lindberg
- (and 1 more)
-
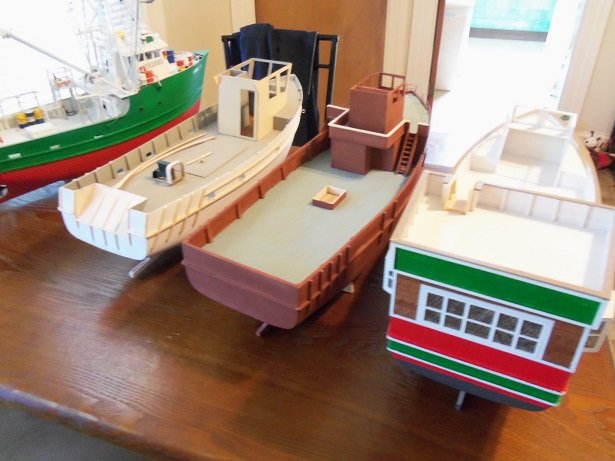
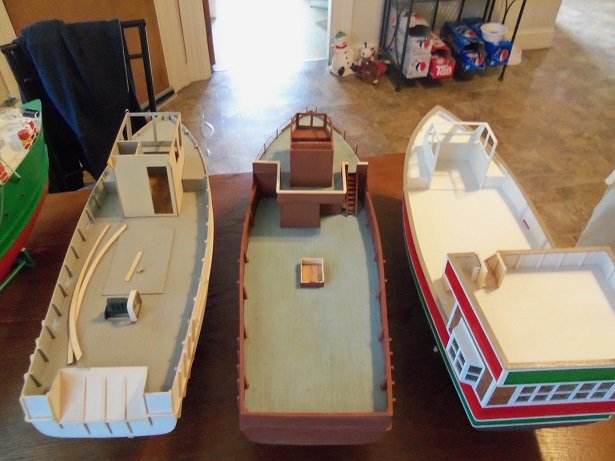
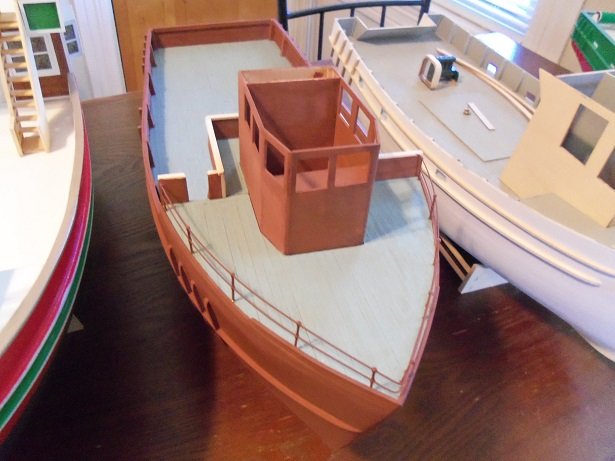
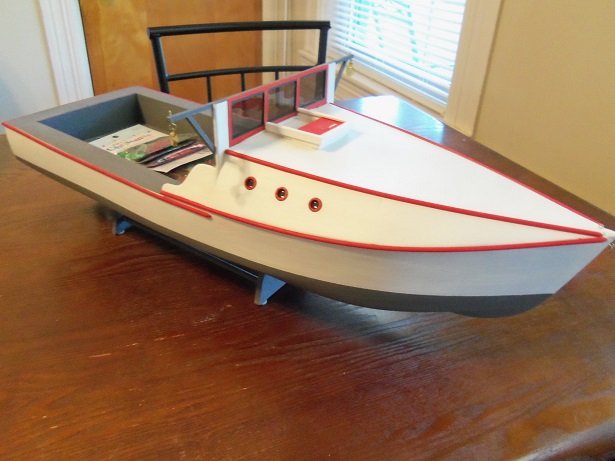
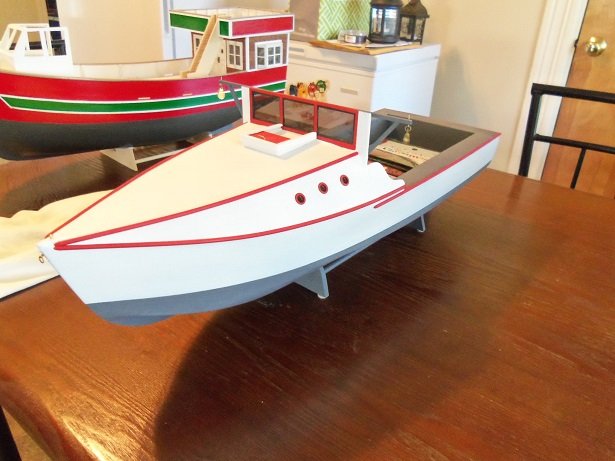
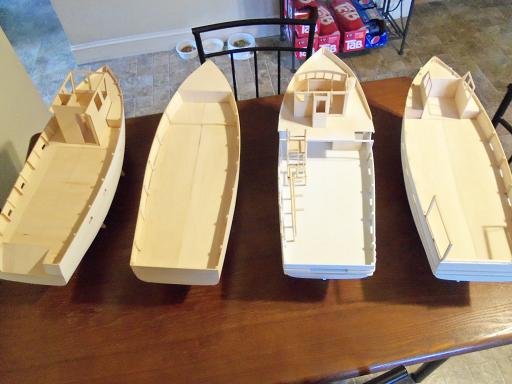
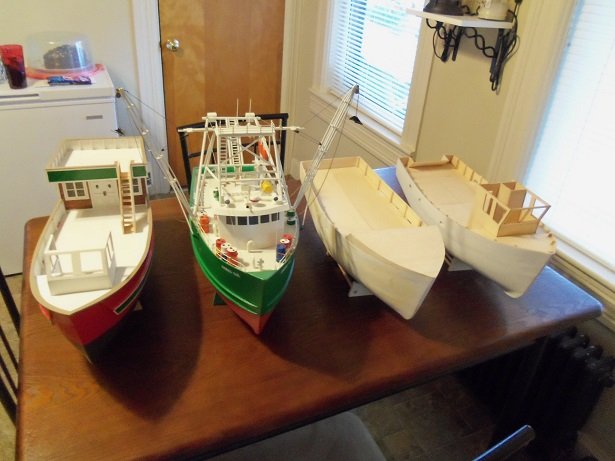
thank you CDW.......that would be my 'lil buddy Gibbs. sticks to me like glue right now he's a little bummed out........usually we're have our TV time. I have more to go......and I'm getting used to a new operating system to boot! thanks for the good word thanks Steve........all of the hulls, with the exception of the last one {cloned from the Maine Lobster Boat - Midwest}, are clones of the Boulogne etaples. the basic hull......with some modifications, can be altered to create other vessels. my mistake with this group, was that they are too much geared towards the work boat. I did a similar project with the Maine Lobster boat, where I have the work boat, and a pleasure boat. there is a log on these two....most likely in the kit forum. I'm glad you like them...thanks for the kind word.
-
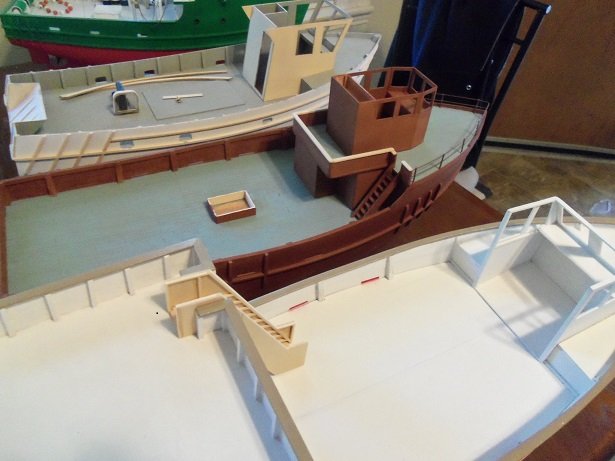
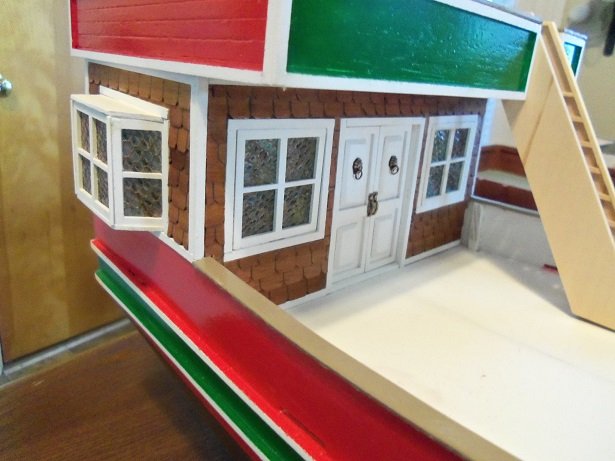
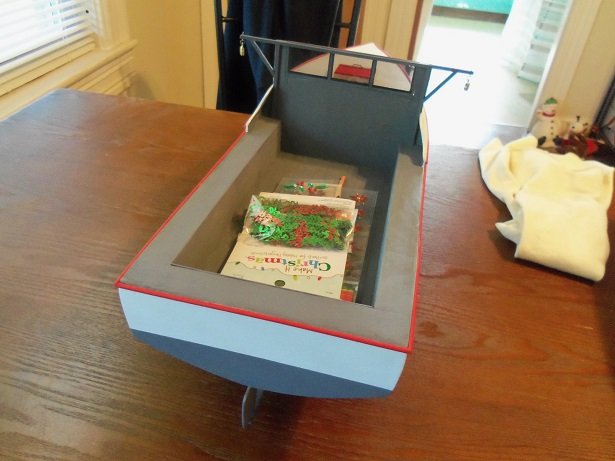
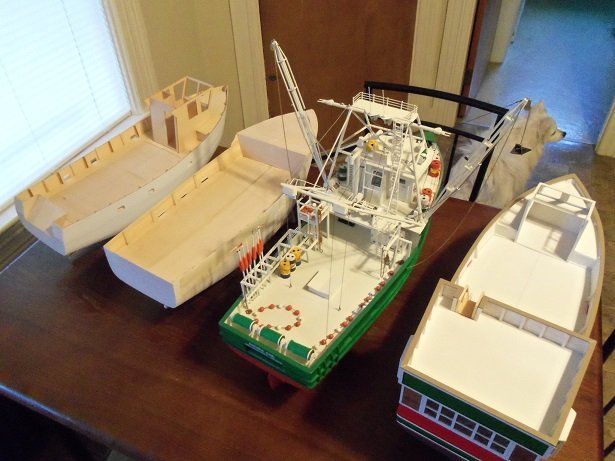
2017 brought progress not only to the rogue hull......but to the boulogne as well. the rogue had defined herself quite well as another fishing vessel....bless 'er heart! stopping where she was at the moment.....the internet will be searched, for a ship that fits her resemblance. I hadn't done it before.....{not that I'd seen it either}, but I took a fancy to planking and painting the deck, with the idea of perhaps a little added detail to the deck. it came out well { I think so}, so the idea was done on the Boulogne deck as well. the rub rail work was done on both vessels, which enhanced the outer hulls. The Boulogne rails were done per the instructions......the rogue vessel, done in a design that I had seen during an earlier search. the rogue vessel {I still don't have a name for her} was given her own distinct pilot house set up.......the fore deck though is reminiscent of the A.G. the A.G. still hold the honor of being the first one finished. I'm still up in the air concerning the deck of the Jingle Belle........painting the outer hull left over spray...I forgot the scuppers were still open. the windows are still holding up fairly well I might give 'er the same treatment.......still have plenty of those thin strips. as discussed, there will be a separate log done on the rogue vessel, when I get 'round to 'er. With this one taking a powder on the fleet, a requisition was submitted for another vessel to be built. the foreman was looking at the pictures of what should be looking like the Christmas tree boat about now. through all the sputtering, all we could make out, was something about a sow's ear! turning the plans right side up......he tapped a finger on the table, muttering....."this is what it should look like!" I know it looks nothing like the siblings, but this ugly duckling deserves an honorable mention in the report. it's now part of the fleet........think of it as a second cousin, on it's father's side some of the decorations can be seen.......it's keen to know that Hobby Lobby has this stuff out all year 'round now. we were there yesterday I found something for the Thermopylae. this concludes the report of 2017.......I want to thank you all for viewing. I know it's a bit on the crazy side......but hey......look whose build'in 'em for you especially Patrick!

-
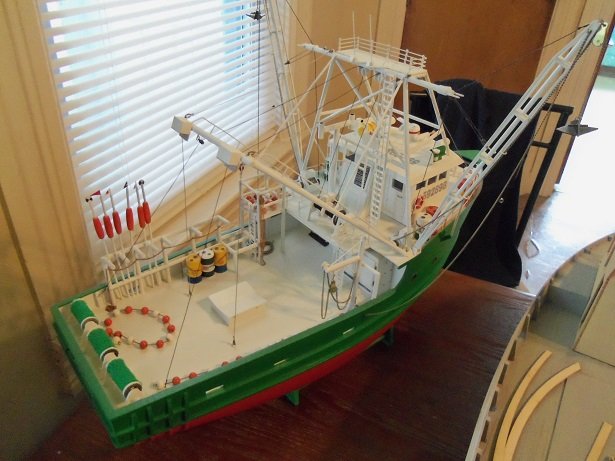
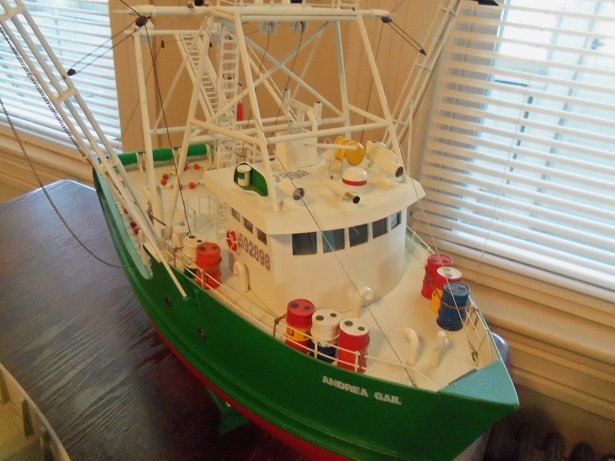
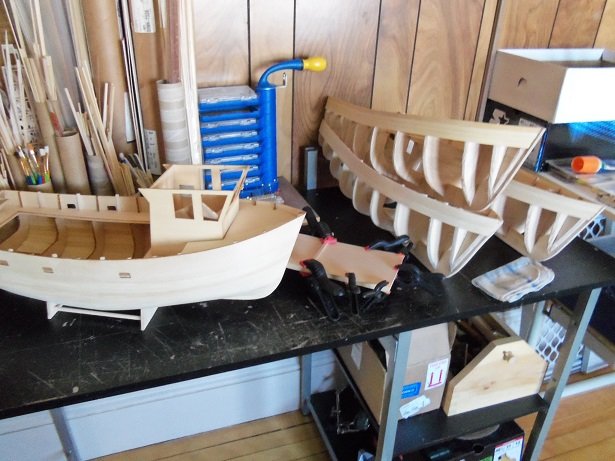
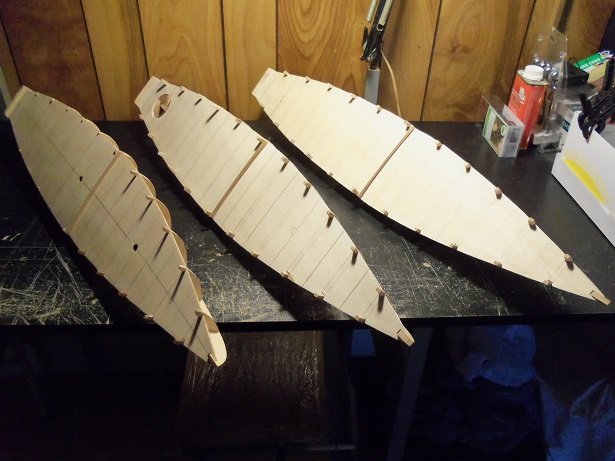
well......I started to post something here, but the admiral mistakenly unplugged the modem.....I bought her a new all in one computer. I am now using her old one......the Sony Vaio is no more. no more noise, like a c-130, taking off in the computer room! ahhhh....the sweet sound of silence! long story as to why.......just don't use a large air compressor to blow the dust out of your computers, I speak from experience! my desk is also clean as a whistle, as a result. we looked for a new one, but nothing caught my fancy at this time.....so we'll look further. anyway.......what I wanted to share with you, though it is a bit off the beaten path, is centered on the Boulogne. Since she is the mother ship, I figured this would be the best place to put this....the fleet progression report. since 2013, I have done these periodic reports. I thought this would be a good time, since last week, I have been on an impasse in adding to the wood projects. I settled on a plastic project to pass the time.......time to post the progress of that one too 2013 was when the three frames were cloned from the Boulogne's parts panels a lot of progress was made by the time the 2014 report came out. The Holiday Harbor Fleet was established, and everything was going well. but there was some growing concerns in the group, that one of them was not feeling good in their own skin. when the Boulogne's hull frame was being assembled, there was always that gut feeling that the hull would well in emulating the Andrea Gail. and so it was decided that the rogue hull would become the Andrea Gail. 2015.....there was no report. a good portion of the year was spent cloning two other hull frames from a Billing's Bluenose. yes...there's a story behind it........the frames are wrapped up in the closet. they will stay there for the time being, as will the story...there's just too much work involved to get into them now. I will show you one picture though......one of many that leads up to where they are at now. 2016 brought more progress to the fleet. the Andrea Gail is complete.....and another of the hulls has taken a separate road of it's own. it was still in the planning stage at this time. The Jingle Belle made quite a bit of progress, along with the A.G. the Boulogne's deck had been covered over.....the removable decking that I had made for her was terrible, and I didn't use it. by this time, it had begun to ripple...the result of the wrong grain direction, and poor support to keep it flush. this needs to be corrected......part of the solution was found while working on the rogue hull.
-
very interesting project Slog......I like tanks...
-
awesome looking coach Dan,,,the accents are very cool!