
MORE HANDBOOKS ARE ON THEIR WAY! We will let you know when they get here.
×


popeye the sailor
-
Posts
16,007 -
Joined
-
Last visited
Content Type
Profiles
Forums
Gallery
Events
Everything posted by popeye the sailor
-
 sails look very nice Frank! really fills out the model
 -
I just looked through her again.......I was looking for the rooms that were to be the his/her bathrooms . then I realized I was on the wrong floor! with all the sofas and love seats you have in there.....the local furniture store must LOVE you!~
-
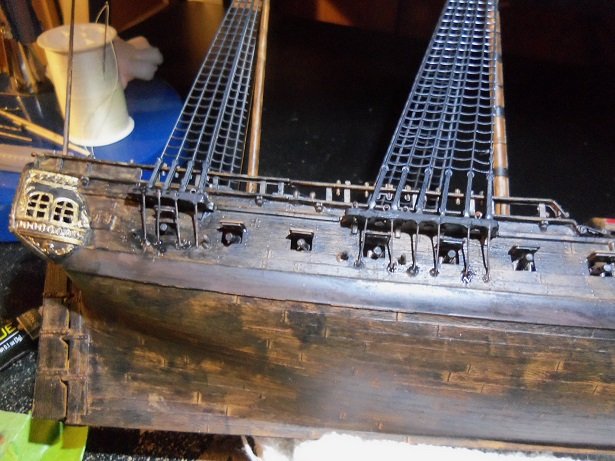
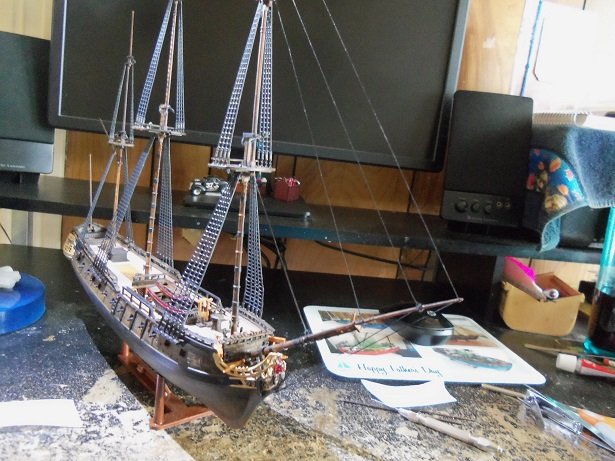
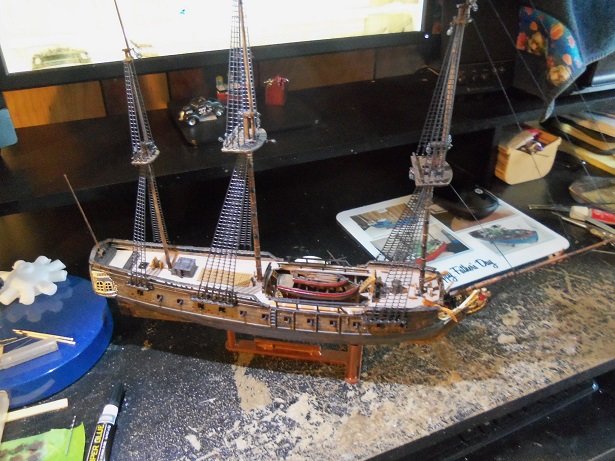
thanks Daniel..........I feel it already I went to all the trouble to make the stand.......and what do I do......use the stand from the Thermopylae. I needed to be able to put her at a pretty drastic slant. I did the chains, the gun port lids, and the pegs for the tack lines. I was going to call it an evening, and that's when I thought about using Thermie's stand. I did the starboard side first, installing everything, and then touched it all up at once. I have plenty of that super soft wire, found in many Billing kits. it was easy to cut and shape. then I did the port side. here I am complaining about this small crane light..........I got better pictures at my desk, than at my table go figure. now I can proceed with the rigging without having to worry about doing that other crap! thanks for look'in in......and thanks to all who hit the like button Happy camper signing off
- 140 replies
-
- 15
-

-
- jolly roger
- lindberg
- (and 1 more)
-
it's sturdy.......I have the J.R. on it now this isn't a remedy for all .......definitely won't fit the bigger hulls. when I get back to it, the first order of business will be to get the spanker gaff back on. I'll likely need to do the running rigging for it, to support it. odd.......I just looked under the stand.......there is what looks like the Lindberg line logo, but the field inside is etched out. I wonder why? thanks Russ!
- 140 replies
-
- 6
-
-
- jolly roger
- lindberg
- (and 1 more)
-
very nice process so far Michael......look'in very good. hat's off to the seamstress..........does she make it to the Northeast at all?
-
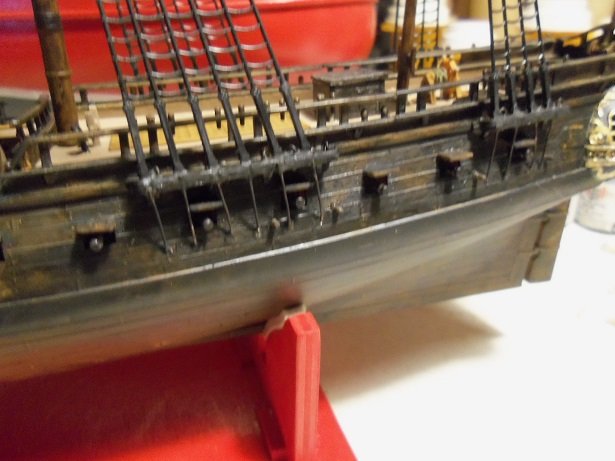
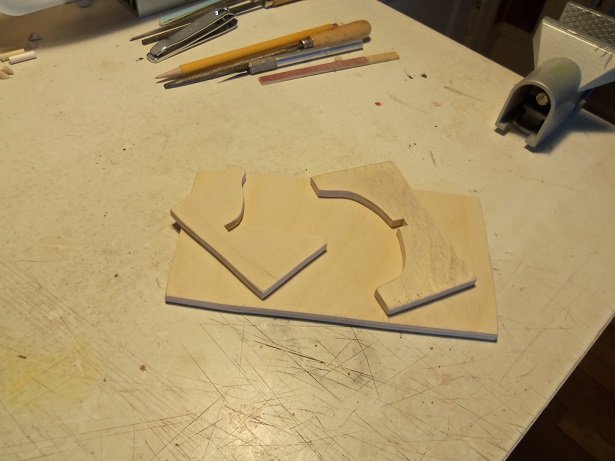
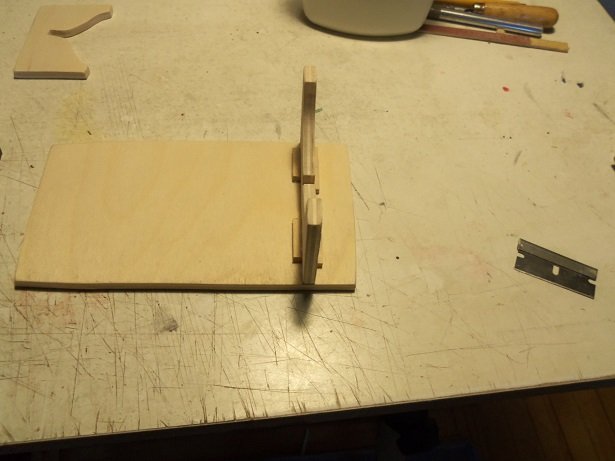
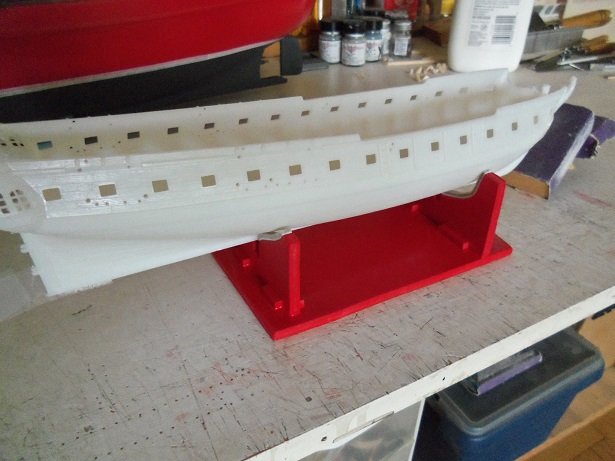
you do make a valid point though Russ......I've become too complacent relying on the supplied stands. I'll do something for this one.......but I'll look towards ramping things up a notch for this......I'll need a volunteer. you sir.........I like the cut of YOUR jib! you look like a perfect 36! step right up here.......... >the flying Dutchman comes to the table< look! he' laugh'in so hard his sides split! com'on my good man...pull yourself together.....here's some tape! nyuck.....nyuck.....nyuck! let's take a look here........stick out yer tongue!.....you got a coat on it......put on a pair of pants and take it for a walk! >where's my cigar< anyway......you look to be this.....this.....and this icky Mae. hold on wilst we go to the wood shed >lucky man....we're gonna make you your very own seats of ease! there we are! I didn't measure anything either........cut the base and the cradle parts! cemented the front cradle part to the base, and reinforced it with short lengths of square stuff. when the Dutchie could climb on board.......the other cradle part was marked off and then added to the base. I spared no expense with the xtra pieces of wood after it was dry........there were a couple of adjustments to be made.....totally cosmedic {cosmetic} {pick which one ya want I assure you....both of them gets under my skin}. Ok....climb right up there Dutchie and have a seat.......newspaper is extra not bad.....but a little more off the sides. I'll make that adjustment.....then it's out to the wood shed for a paint job. then it can get these nice cushions........a little cush for the tush >a paint job and an oil change later...............< WHOA........BABY!!!!!!! look'in good! if this is what the best dressed boat models are wearing today........ I am like soooooo enthused! now maybe I can get some rigging done........in peace
- 140 replies
-
- 14
-
-
- jolly roger
- lindberg
- (and 1 more)
-
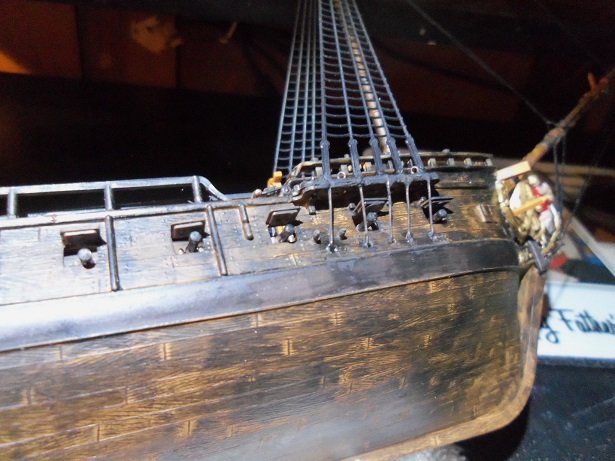
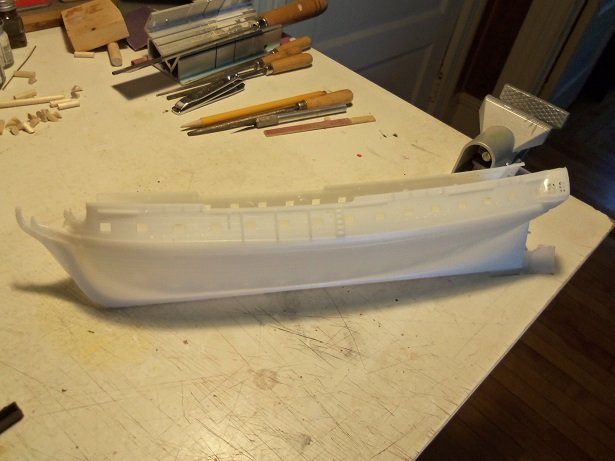
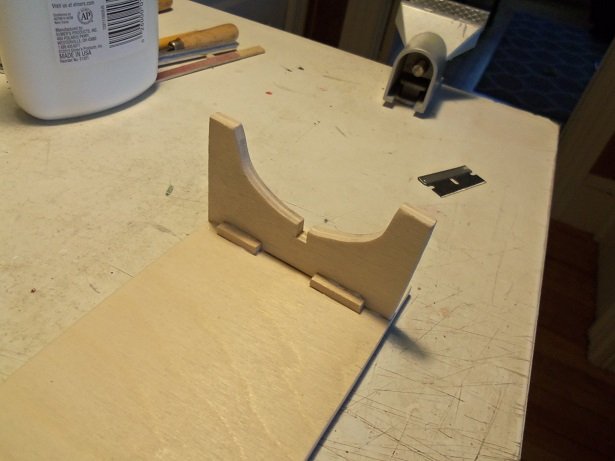
anyway.....yesterday, I began to rig the bow. I am going to use the sails ......I sewed one of the spirit sails to it's yard. that went pretty good this was met with little resistance.......but the further I went, the more it rocked the boat. I'm using a thicker black thread......it's working out OK. I sewed the sail at this time.......while I was doing that, the boat flipped on her side, and the spanker gaff broke off! at this point....everything stopped. I will make a stand to keep her steady. more on this when I get back.......the admiral announced that she's hungry! she who should be obeyed.

- 140 replies
-
- 13
-
-
- jolly roger
- lindberg
- (and 1 more)
-
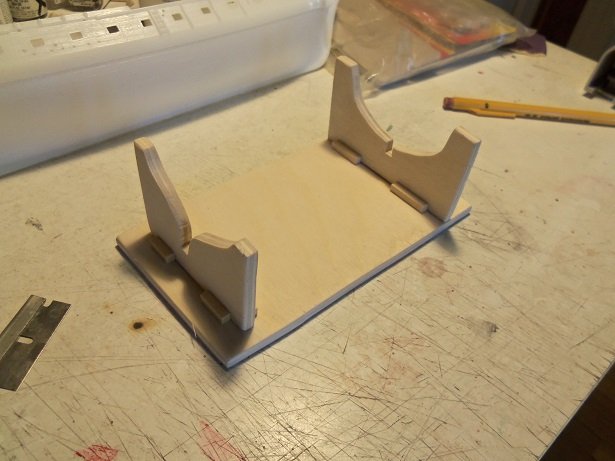
I've seen them.......I may either buy one or make one in the future. I've seen quite few logs that use them. I usually do my models right on the cradle supplied in the kit. I had made an extra one when I first did the Nordkap......the trawler has it now. since I have three of these little buggers in my possession now, I'll make a stand that'll work for all of them, and use their supplied stands when they are finished. perhaps that will make for a nice Christmas present too....I'm starting to pine for power tools thanks for the suggestion Russ......I'm really starting to think about how to make my life easier thanks for the good word
- 140 replies
-
- 6
-
-
- jolly roger
- lindberg
- (and 1 more)
-
I dunno.......I just look at it.......yup, that's white black 'n white photos make it hard though. but take into consideration though that it may now be a light gray color due to aging and weathering. {my glass is always half full}
- 2,625 replies
-
- 6
-
-
- kaiser wilhelm der grosse
- passenger steamer
- (and 1 more)
-
oh....I get it........stealth mode! hey, I know what you mean. I'm on here regular enough.....but I've gotten to the point where I've got so many logs that I watch, I get trapped in either one! I really need to bounce around....a few here......a few there......I miss so much if I don't do something like that. you've made plenty of progress.....don't kid yourself.....she looks awesome! cripe! all the levels are starting to get cramped now! amazing how much you've added to her!
-
I'm sure there's some sanding to be done.....that will smooth her skin some. you've made some very nice progress there. I see you opened those doors in the aft bulkhead too. gonna look very nice when fully planked.
-
Cutty Sark by NenadM
popeye the sailor replied to NenadM's topic in - Build logs for subjects built 1851 - 1900
Nenad....it's great to have you back! your right back at it.......hollowed out that boat in ship shape fashion stay healthy my friend!- 4,152 replies
-
- 3
-
-
- cutty sark
- tehnodidakta
- (and 1 more)
-
every time I come in lately, I get stuck in the kit forum........I've finally gotten the chance to see what going on in here today. I missed a lot Frank......catching up was fun though man, you made a lot of progress.....the inner nad outer hull is looking great! outer planking superbly done.......really very nice!
-
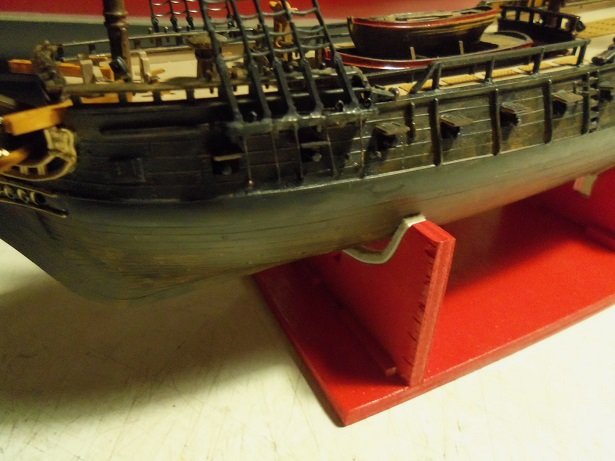
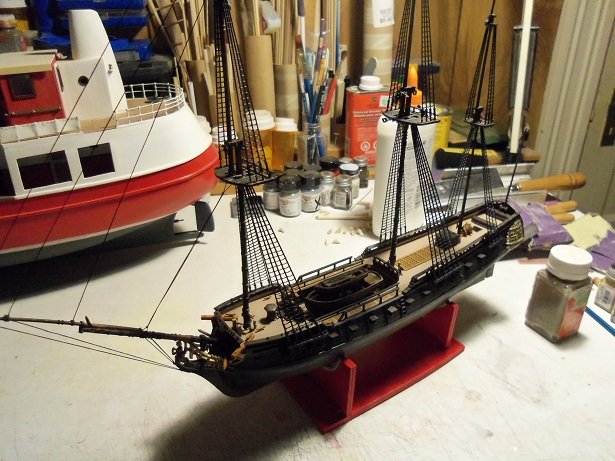
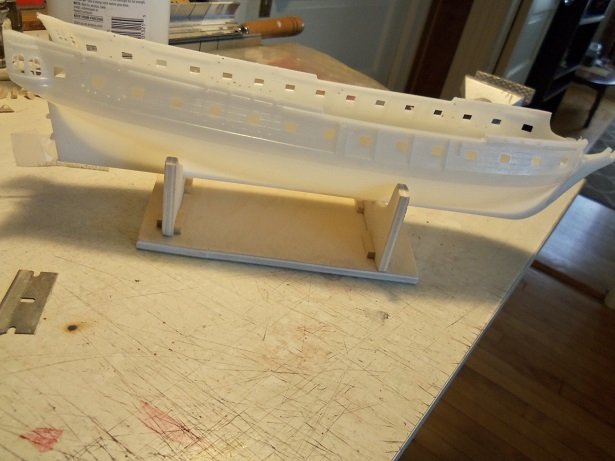
OK....that's it!!! >scowling at this god forsaken model< using this stand is for the birds! tying lines or tinkering with her causes her to tilt and list back and fourth, sometimes forcing her to lay on the desk! it's sooooo unstable! I'm going to make a stand for her........a build stand rather, seeing that there are other ships that will require the benefits of something a bit more stable. the bow is almost rigged........but going any further is fruitless, because as soon as I went a bit further ..........she laid down and the spanker gaff got broken off by the crane light! we'll see what I come up with..............
- 140 replies
-
- 5
-
-
- jolly roger
- lindberg
- (and 1 more)
-
the mizzen is complete.......and jibs are in place how tough is it going to be doing the second step shrouds? she's look'in awesome though......so nice to see her again
-
an honor and a great day...can't even beat that.......although getting to meet John {Jim Ladd} and his admiral was mine. it's a great achievement winning a medal.....a testament to your ability my friend
-
sorry to hear Jesse.....condolences to you and your family
- 1,306 replies
-
- 6
-
-
- syren
- model shipways
- (and 1 more)
-
thanks Tom......I'm glad I remembered as much as I have I'm doing some of the standing rigging at the moment. thanks for the good word
- 140 replies
-
- 4
-
-
- jolly roger
- lindberg
- (and 1 more)
-
that's to be expected, since your not going to anticipate all the mistakes that were made. if you did that, you might as well do the total reno! I don't get some things done correctly either.....but I try...and that's the most important thing. your doing alright........correcting some mistakes and making the adjustments for others. you'll get her done soon enough, and your efforts will shine through.
-
super progress Danny.......great fixes on the frame and a good start on the skin!
- 295 replies
-
- 7
-
-
- amatsukaze
- halinski
- (and 2 more)