
HOLIDAY DONATION DRIVE - SUPPORT MSW - DO YOUR PART TO KEEP THIS GREAT FORUM GOING! (89 donations so far out of 49,000 members - C'mon guys!)
×


popeye the sailor
-
Posts
16,007 -
Joined
-
Last visited
Content Type
Profiles
Forums
Gallery
Events
Everything posted by popeye the sailor
-
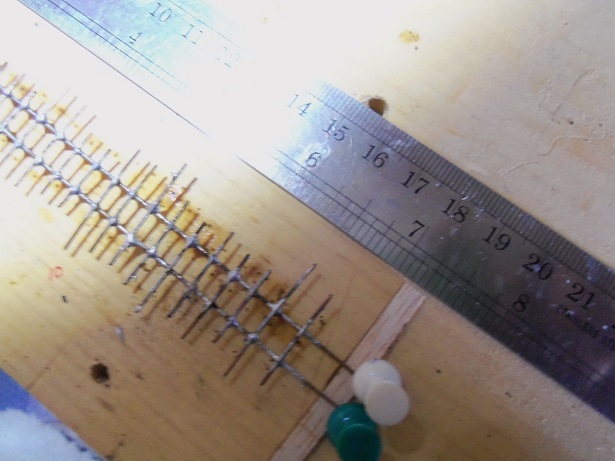
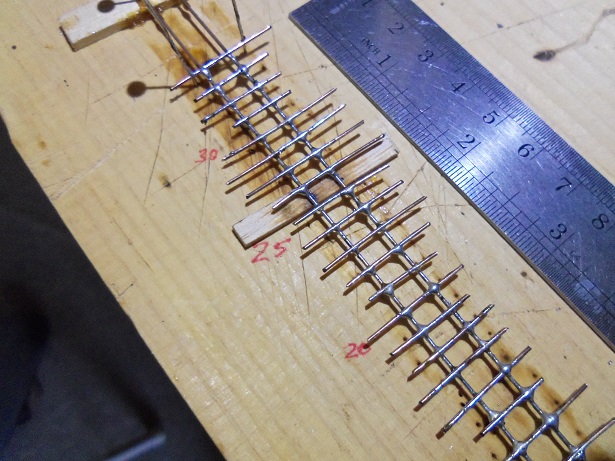
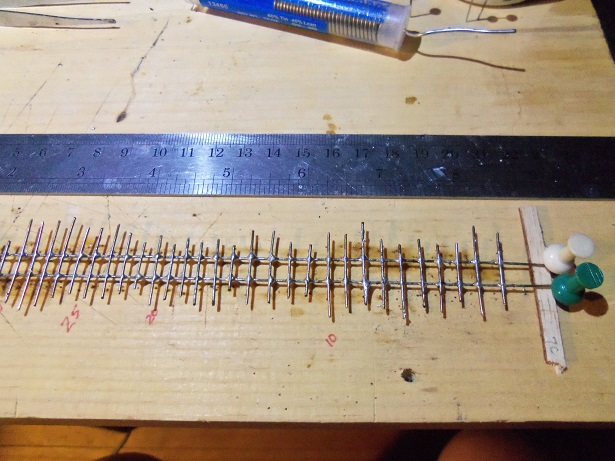
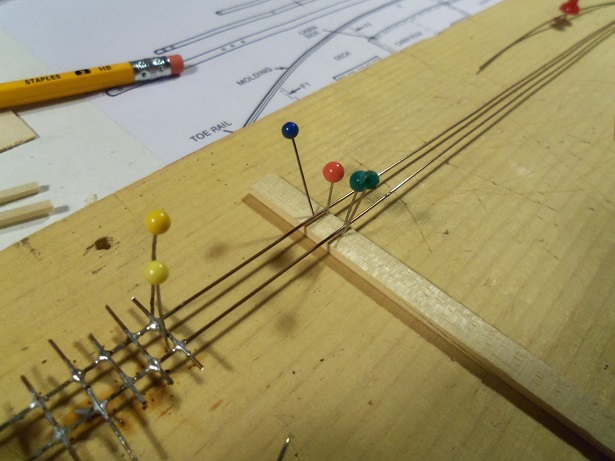
 as mentioned earlier........good suggestion about the flux, in the event that the welding wire has some sort of coating on it. I used a Q-tip to swab the wire with flux. I believe the wire changed hue a little bit there. it may have been the case, because it went a bit better after that. I still had some trouble with the heat transfer loosening up the closest rung....I had to keep going back over them. it turned out to be a good thing though, since it picked some of the excess solder along the way. at this point, I measured it with the ruler... 6 3/4........getting close to the 8 inch mark. I counted the rungs......I was curious. it felt like more than that. is this one of those thankless repetitive tasks I hear tell about? the solderings are getting better..........with a little filing, it should look OK. finally.........I made it! I even gave it a little more....just in case might be hard to see.........8 1/2! not for the sizing and clean up!
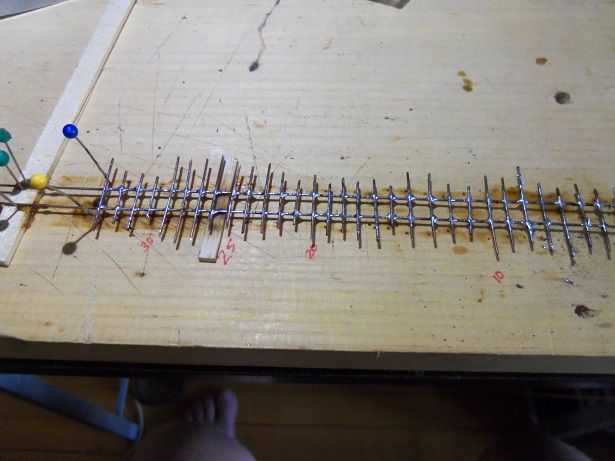
- 747 replies
-
- 10
-

-
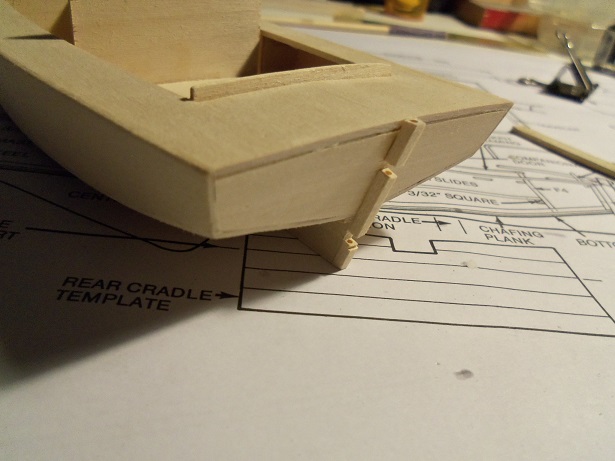
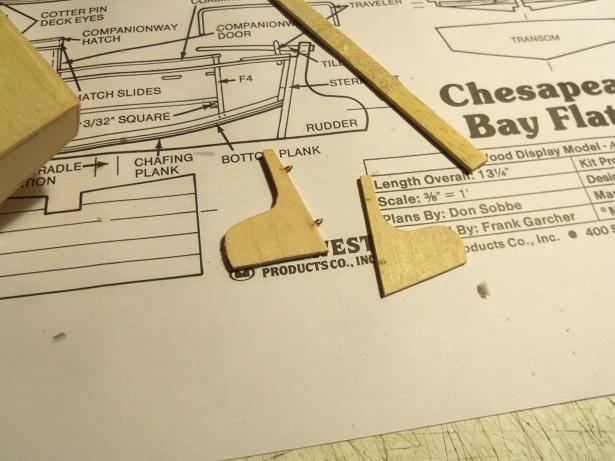
I want to thank every one for the nice comments, and those who hit the like button. I've dealt with the work week and gave it a solid raspberry for over half of it........I took two days of it off. for the last couple of days, it's been spotty, finding time at the table. but I did manage it though. the ladder took up most of it {not for this build, another one}. of course, I got to tinker with this build as well. sanding that chunk 'o timber I glued onto the bow was a tough one, but I got the job done. it looks pretty good I know that I said that this was to be a quick little build.........I summed it up as I did in my Word Press log..... " Now…….I had devilish plans for this kit. The centerboard, which acts the same as a Leeboard, could be detailed out {I saw pictures of it while I was looking for color ideas}, as well as a few other aspects, that could be modified to embellish the looks of the model. In trying to deal with the funk I was in, I am to toss out any thoughts of doing a multi build of this kit, and just build the darn thing! Nothing fancy…….don’t get cheeky or cute…..and don’t get too complex with it……just do it! Remember…….it’s supposed to be a therapeutic build to cheer me up. But…….how therapeutic can it be…..if you don’t let me get necromantic? Com’on…….it’s like eating Cheerios without milk! " Well.....there are some things I just can't let go. I really can't do the center board, since in doing it, I should have modified the keel first off in the build. it's too late for that. so I'll settle for the little things.......like the rudder for a start. being a level 1 kit, they instruct to simply glue it to the stern post. marking off an upper and lower contact point, two slots were cut out of the stern post. it was then drilled from the bottom, past the gap, and into the center piece. this will enable me to insert pins in them to hold the rudder in place. where I had marked the supplied rudder, I tried to drill the two holes I needed to make........but the rudder was simply too thin. so I made a new rudder from some 1/8 thick flat stock that was lying around {the rudder from the kit is 3/16}. with the added thickness, I was able to drill the holes and insert two eye bolts to act as the Pintles. making the change in rudders kinda threw my measurements off for some reason, so I will need to make some adjustments. when they are made, I'll cap it off with some brass. when the rudder is in place and the pins installed.......they should come out look'in like a pair of Gungeon. I still need to round off the rudder edges with some sanding......and then I can make a tiller for it.
-
super pictures Nils.........love those shots from the side nice !
- 2,625 replies
-
- 5
-
-
- kaiser wilhelm der grosse
- passenger steamer
- (and 1 more)
-
Cutty Sark by NenadM
popeye the sailor replied to NenadM's topic in - Build logs for subjects built 1851 - 1900
you've been busy since I last looked in ....some really great progress here! fore and main masts are almost identical......main is a bit taller. mizzen will be a size smaller. each step will be smaller.......but I'm sure you know that good fix at the aft deck.....and sizing of the chicken coops. I'm working on a set of stairs that are the largest I've ever done.........a couple of tests, and I'm sure you'll arrive at what your thinking of super job Nenad!- 4,152 replies
-
- 4
-
-
- cutty sark
- tehnodidakta
- (and 1 more)
-
amazing Patrick! pitch and rotation was never a thought in my mind..........to pull a pair of them off, would be a great feat indeed! .......and here they are! splendid work Patrick..........truly! must have taken a lot of patience!
-
thanks Pat.......I know it took a few days to reply......I was still wrestling with the work week. I've taken two days off.......so I got a couple more days to finish this. I didn't mean my admiral........second floor we go out on our porch sometimes and the smell from up there makes us wonder what the heck they're burning up there...........besides weed thanks Jesse.......I'm sure it's the same principle. I did think of that though......this welding wire might have some kind of coating on it. might be good to rough it up some Don't tell me that Bob...........that means I'd better do 16 inches! I used to do my own plumbing back when we owned our home.....that was a lifetime ago though. I will try the new solder iron and see if there is a difference. thanks for the good word.
-
she's gonna look great with the deck laid out getting the hull to where it is now {to me, anyway}, is the toughest part. it's like a mad dash to get to the point where fittings can be put on.....which I think is the fun part she looks awesome so far Jerry........but yes, getting the cap rails painted would really finish the hull off....and out a nice contrast to the deck kind of olive to ask AK-k-k-k-k-k-k-k! finally reaching a good place with the Holiday build, I'm gonna move on to some of my other builds, and try to get at least one of them done. I did hit kind of a doldrums of late......but I revived it by working on a smaller kit that I had in the closet. almost ready for paint on that one I read a few posts back that Olive might do a log for her Santa Maria {the kit she got....right?}.........well....I hope it's true. she did a super job with the Bounty, and I'm sure she'll do the same with this build. I for one, am looking forward in seeing her log. sending my best regards as well......here's hoping the school year leaves you with just a little more free time
-
I had somewhat the same problem with my United States decks, but my problem was I left them stagnate for too long, and they warped. another problem was which way I had the grain going. what I've done with the new decks, was to clamp them to the plastic decking before putting them in the closet. it's been some time since the model has come to the table, but I do check on them periodically...they still look good. I also changed the direction of the grain so they would bend more easily. I planked the decks and sprayed them with semi gloss lacquer........I kept getting the 'white'. temp + humidity ÷ by the drying time between the temp and thinner saturation. perhaps you added too much thinner to the paint? it appears grainy, like the paint is drying as it's coming from the nozzle. it's also true that heat can play a part in it...cracking due to shrinkage.
-
really nice bit of progress Sjors.........your not coppering....right? I like the way you worked around the gun ports too......it would look better with the lids somewhat embedded, rather that simply laying on top great job!
-
my two grandsons got me a snap together model of the Black Diamond for Christmas {Revell}. I built it......adding rigging, since it didn't come with any. my son told me it was their idea.......their choice. they love to come over and look at my boats.....I sometimes take any one they question off the shelf, to a lower table, and we talk about it. on one of my outings to the hobby store, I picked up two snap together cars for them to try. times and schedules being as hectic as they are, we kept missing one another.......that is until a day came where we were asked to do a bit of babysitting. it was the younger one's birthday {or as close as can be}....so he had presents from us as well. we had fun building the cars.......they even got to roll them around on the floor...fun time! Tripp's presents was these two large lego sets.......we had even more fun putting those together it was my pleasure to follow your grand daughter's build. the youth today are very creative.........and if one can bring it out......then you are to be commended for introducing them to crafting { I was going to say at the beginning, that there are many different type of wood working, but I didn't want to douse the flame}. kudos to you.
- 35 replies
-
- 5
-
-
- pirate ship
- pirateology
- (and 1 more)
-
planking is the biggest question, besides rigging. there are many ways to accomplish it........there are also many great tutorials out there too. I'm not an expert at it....if I had seen your question then, I could have been more timely. no matter though.......you seemed to have taken care of it well enough. your ship came out great.....and that's all that matters
- 32 replies
-
- 2
-
-
- billing boats
- norden
- (and 2 more)
-
I just found your build.........very nice indeed! the sails look great......nice straight stitching.....and freehand no less. you have some good skills here..it would be a shame if you didn't continue I have built many Billing's kits........I've never done anything like that to shape the stern. for the bow though, I would suggest that you trim the bow end of the planks at an angle {to the angle of the bow stem}, and bevel the plank so it will lay on the stem flush. keep them all in line, and you'll get a perfect bow....with little filler work. anything else........comes with experience........so I'll look forward in seeing that Bluenose kit when you get 'round to building her
- 32 replies
-
- 1
-
-
- billing boats
- norden
- (and 2 more)
-
thanks for the good word JP. these kits are a fun build...glad to have you following along.
-
that's the modeling medium in a nut shell......it has it's ups and downs, but the finished model makes it all worth it. great looking model Isabella
- 35 replies
-
- 4
-
-
- pirate ship
- pirateology
- (and 1 more)
-
very nice paint job Jerry...........as with your progress. I've seen those sprayers before.....never used one myself. if it had a attachable air delivery supply to it.......maybe. I guessing that the body of the sprayer is a canister of compressed air.....likely not enough there for a larger job. control of the spray would be another issue........the sweep of the pass you'd make, would depend on how thick the paint goes on. glad you found out early she's look'in good Jerry......
-
I say..........feed 'em to the squirrels! awesome job! will there be other pirates on board? Imagination is the key!
- 35 replies
-
- 3
-
-
- pirate ship
- pirateology
- (and 1 more)
-
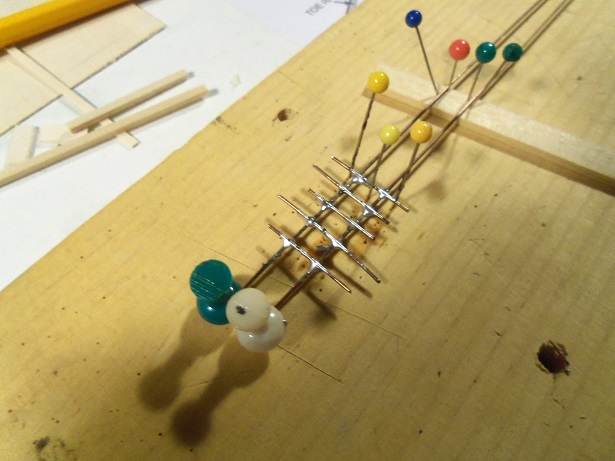
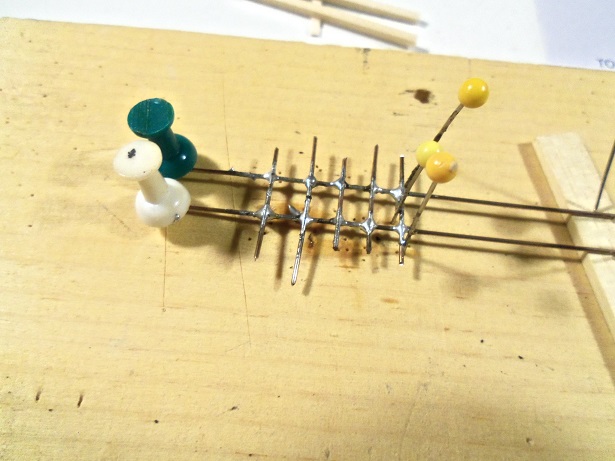
OK........I did say I'd try and show you what I'm doing for this ladder. the welding wire is stretched out on the board, the spreader is set up with pins, to keep the width of the wire even all the way down. I need the ladder to be around 8 inches long.....the longest ladder I've ever done. I liked some of the results from my experiments.....but there is one method I haven't tried yet....solder. I take that back.........I did try it and I failed........I will attempt it again. so I've soldered around five or six rungs at this time...........seems every time I start, something comes up......GRRRRRR?!?!?!?! looks kind of gaudy to me....which is what I encountered the last time I tried this. here is the spreader......set up and doing the job.......I may have to adjust it from time to time. I have both means to solder.....this one allows me to do this in the house. the other one will no doubt set off the fire alarms....he..he {second floor does it all the time.....she's a bad cook!}. I've had this soldering iron for quite some time.....I should try out the new one I found.......yepper.....found I'm using light electronics solder to do this.........I'm wondering if a flame would lessen the amount of solder. I'm trying to use as little as I can. should I also sort of paint the wire with the flux before soldering, instead of just dipping the tip of the iron in it? there is a rosen core in the soldering wire, but probably not enough for the application i'm using it for.

-
hello Nils yepper! try'in to spark some life back into one of my other builds more to come.......and something you might be interested in.....perhaps even a suggestion or two, given your metal prowess thanks for the good word hey there Patrick........yea, cat's out of the bag........got a small project going on. trying to get multiple things moving, and stop look'in like a one armed paper hanger. I still have a little more to go on the mast.......and then, there's the ladder...a very long ladder thanks for the good word!
-
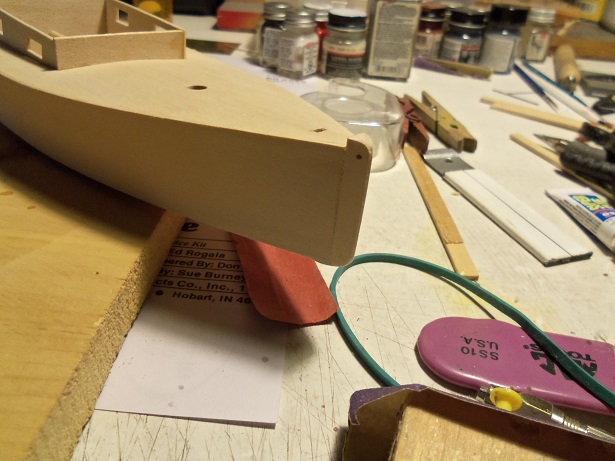
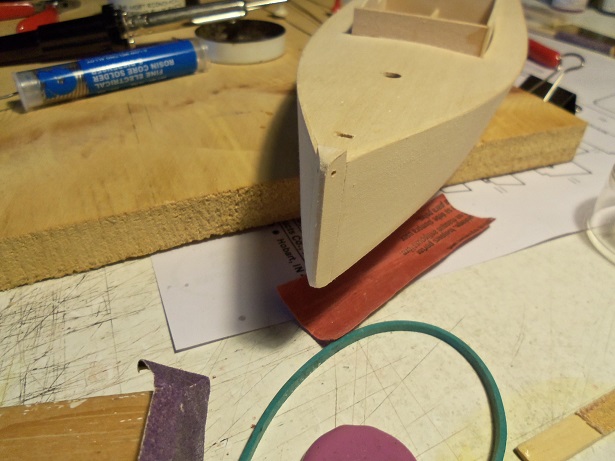
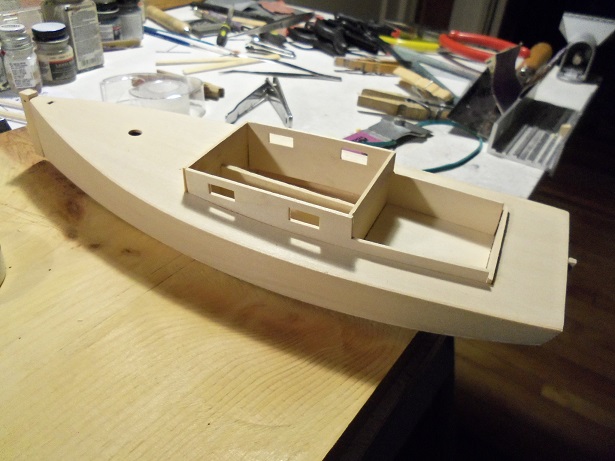
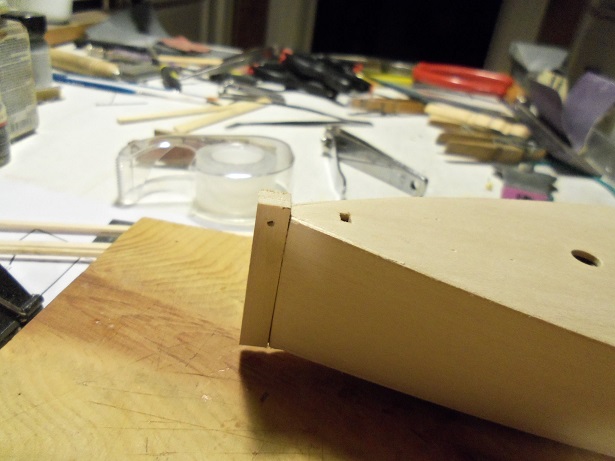
the Lobster Boat was also done with these hull panels.........I failed miserably with that build. but I succeeded here....I feel real good about that the cabin sides were put back in...they still are not cemented in. I want to paint them first...I'll use some of that tint cello for the window glass. I probably should make the stand for her too.......might dress it up too. the bow is very blunt, as you might have noticed.... ....layers of the keel, the bow stiffeners, and the panels. a square piece of wood fits on it.......awaiting to be sanded to a point. I pre-drilled the hole they say to put through it. .......might take a day to sand it....... I do have to ask though.......am I right in calling the keel fin, the skeg?
-
hello Jack........and welcome yes.....another one. didn't anyone ever tell you........."crazy people can't count!" I'm getting close towards putt'in some paint on her........enjoy I really didn't get a chance to plot out any real mods for this one Bob.........so any sort of bash work will have to happen later to do any mods, I'd have to start at the keel........re-positioning the cabin to some degree....the center board. oh well........I can always do something later, I still have the plans. that's one thing about the Midwest kits....the plans are 1:1 and they are very good after all.......I was able to scratch build the Lobster boat and create the Tree boat from the M.L.B. plans I'm actually a little afraid to do too much to this little morsel.........it's a work boat. you were the one who informed me that I had put the last nail in the coffin of the lobster boat. I thank you for being honest..........for that, the remedy I chose produced the Phylly C. , which showed how versatile that particular boat is. this hull design is no different really...I'm sure there were modifications done to suit one's needs and taste. I won't stray too far from the plans........perhaps some of the hardware.......maybe add in a prop or two, as I'm not going to put a lot of time into her ......I say that now................. enjoy Bob.......always a pleasure having you look'in in
-
I heard Marc.....very sad indeed. good of you to post his obit.......it has grown a lot
- 525 replies
-
- 1
-
-
- cutty sark
- mantua
- (and 2 more)
-
are you unable to locate the missing part? perhaps there is a fellow modeler that might have an extra kick'in around.......or order the part from the model company? wish I could help you out there.....sounds like your making some good recovery progress. for what it's worth........I'd put some feelers out there and continue working. folks will only be looking at the upper part of the ship you might get lucky.