


glbarlow
-
Posts
4,129 -
Joined
-
Last visited
Content Type
Profiles
Forums
Gallery
Events
Everything posted by glbarlow
-
 So that’s what dividers are for😁. I’m just about at the margin planks stage on Cheerful, this just showed me an excellent technique. Thanks Rusty!
- 642 replies
-
- 3
-

-
- winchelsea
- Syren Ship Model Company
- (and 1 more)
-
Nice work, often times scratch built turns out better. Seems it did here.
- 436 replies
-
- 3
-
-
- vanguard models
- alert
- (and 1 more)
-
I don't mean to fail to mention this: I appreciate all the likes as well as the comments. Thank you for taking a look.
- 778 replies
-
- 4
-
-
- cheerful
- Syren Ship Model Company
- (and 1 more)
-
Excellent tutorial there Derek. Thanks!
-
Yes, you can definitely edge bend the second planking. Both my Nelson and Cheerful build log describe how I do it using Chuck’s method. Absolutely no soaking, water,steam, or special heat tools required. I used it on Walnut as easily as on Alaskan Yellow Cedar with nothing more than a travel iron.
-
I have a different way of doing this but yours is much better. I'm going to have to read it a couple of times more when I get to this point on Cheerful. I'm not exactly clear on how you finally closed "the circle" (right photo two up from bottom) on the bowsprit once you have the four deadeyes seized. As usual, very nice work. I see the quad hands is working out well - glad I have one now. Beats the old beat up third hands thing I've had for years.
- 725 replies
-
- 3
-
-
- vanguard models
- speedy
- (and 1 more)
-
Sorry Bob, hope things get better soon.
-
Amazing work, well beyond anything I’d ever try. My patience is tested enough as it is with my models. Nicely done!
- 221 replies
-
- 3
-
-
- queen anne barge
- Syren Ship Model Company
- (and 1 more)
-
Thanks, that I think is a tribute to the extra time spent on fairing at the very beginning I wish I had a good answer other than good tweezers, 2.0 yellow tinted (improves contrast) reading glasses, and two bright Daylight lights on the bench. I fiddled and fumbled about dropping and losing little wire hinges and 1mm brass tubing quite a bit. I like how it turned out, but glad it’s done.
- 778 replies
-
- 4
-
-
- cheerful
- Syren Ship Model Company
- (and 1 more)
-
The HMS Surprise prototype has been shown on their website as coming soon for over 5 years. They’ve not made a single update to that website in all that time. Years ago I sent an inquiry and got a similar response. I will be surprised if the Surprise is ever released, but we can all hope.
-
Thanks BE and Derek, I appreciate your comments! I was only able to enjoy ship building in short increments over the last several weeks. Water is a tough thing to deal with when it doesn't go where it's supposed to go.
- 778 replies
-
- 2
-
-
- cheerful
- Syren Ship Model Company
- (and 1 more)
-
The kitchen was a pain, but we did use the opportunity to update it so at least there is the one upside. I thought about adapting some of the Clear Alder used in our cabinets in the model, but its way to hard and too much grain for ship building, but it would have been funny to do.
- 778 replies
-
- 3
-
-
- cheerful
- Syren Ship Model Company
- (and 1 more)
-
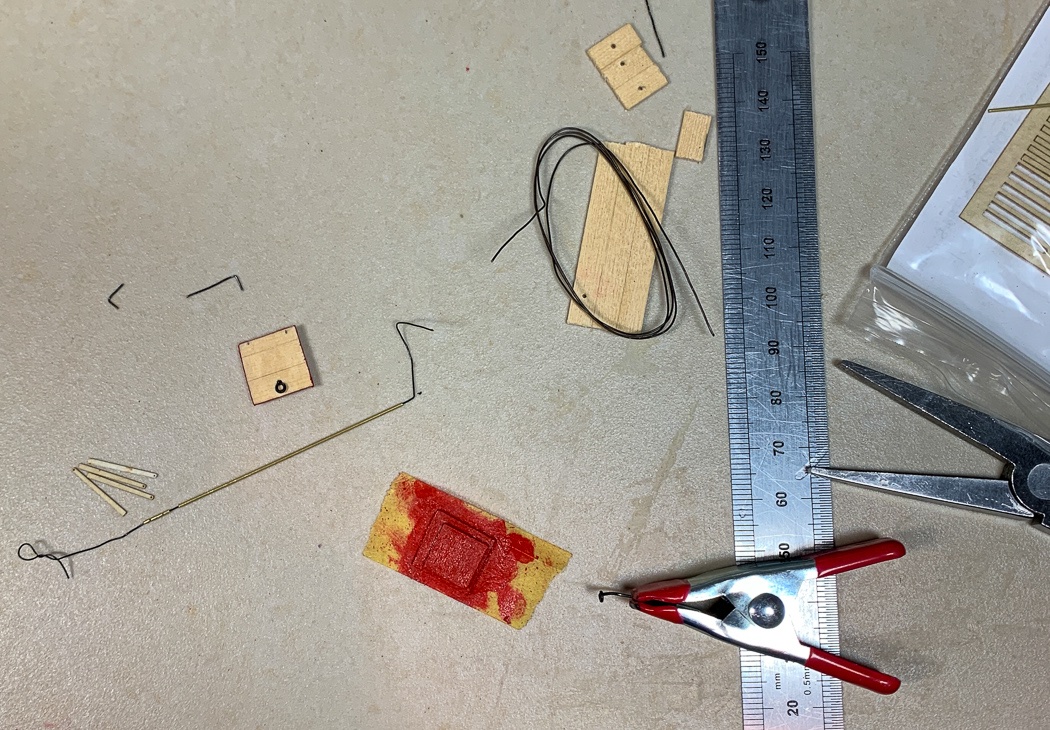
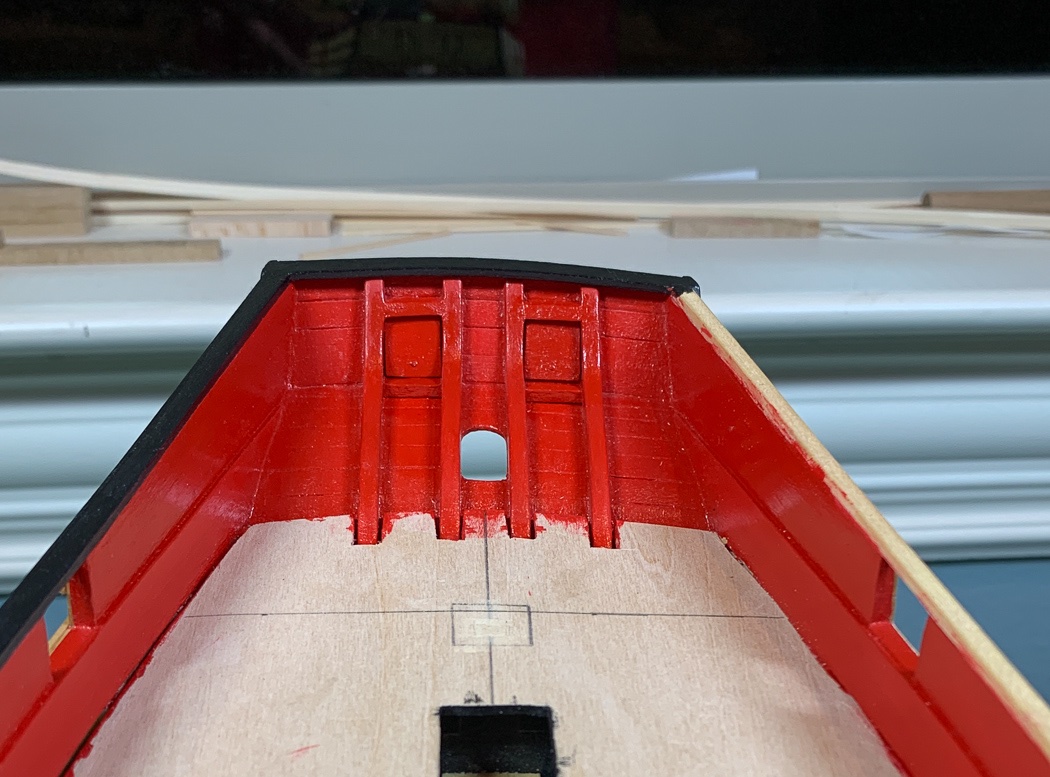
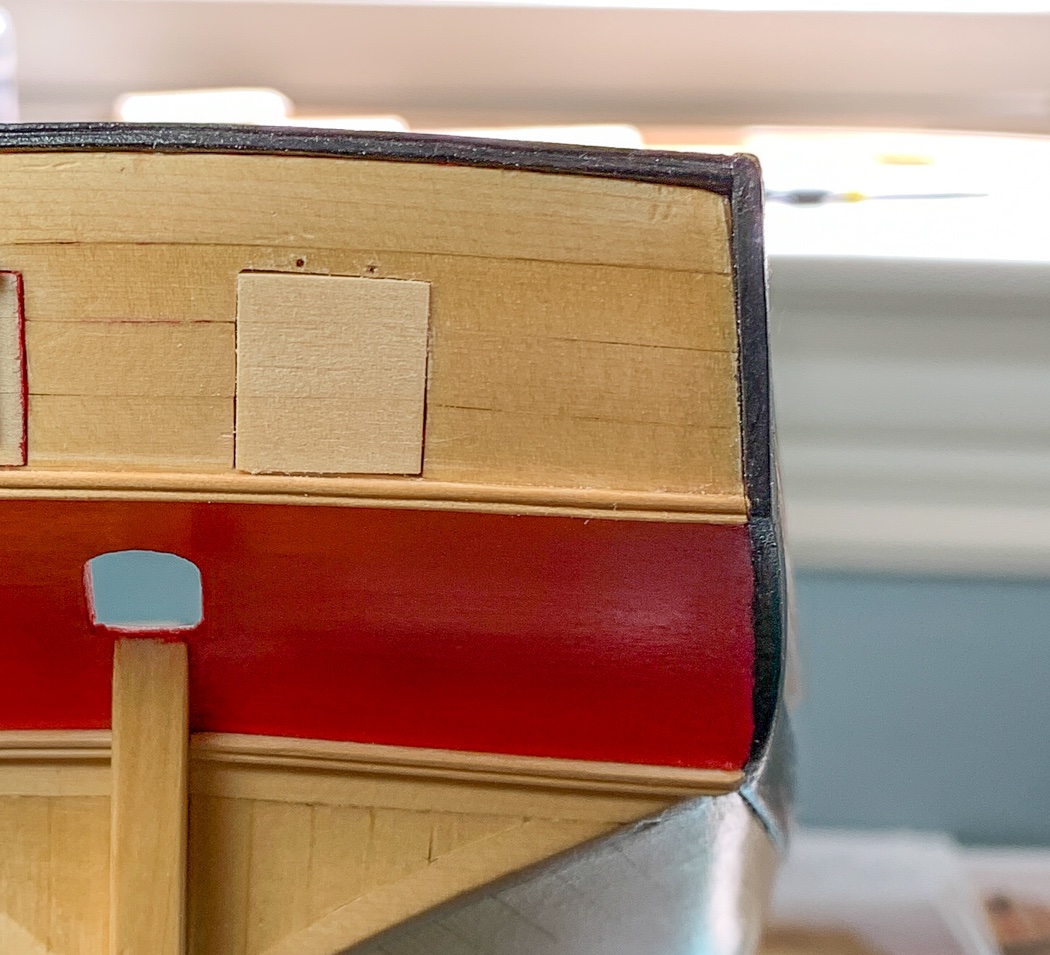
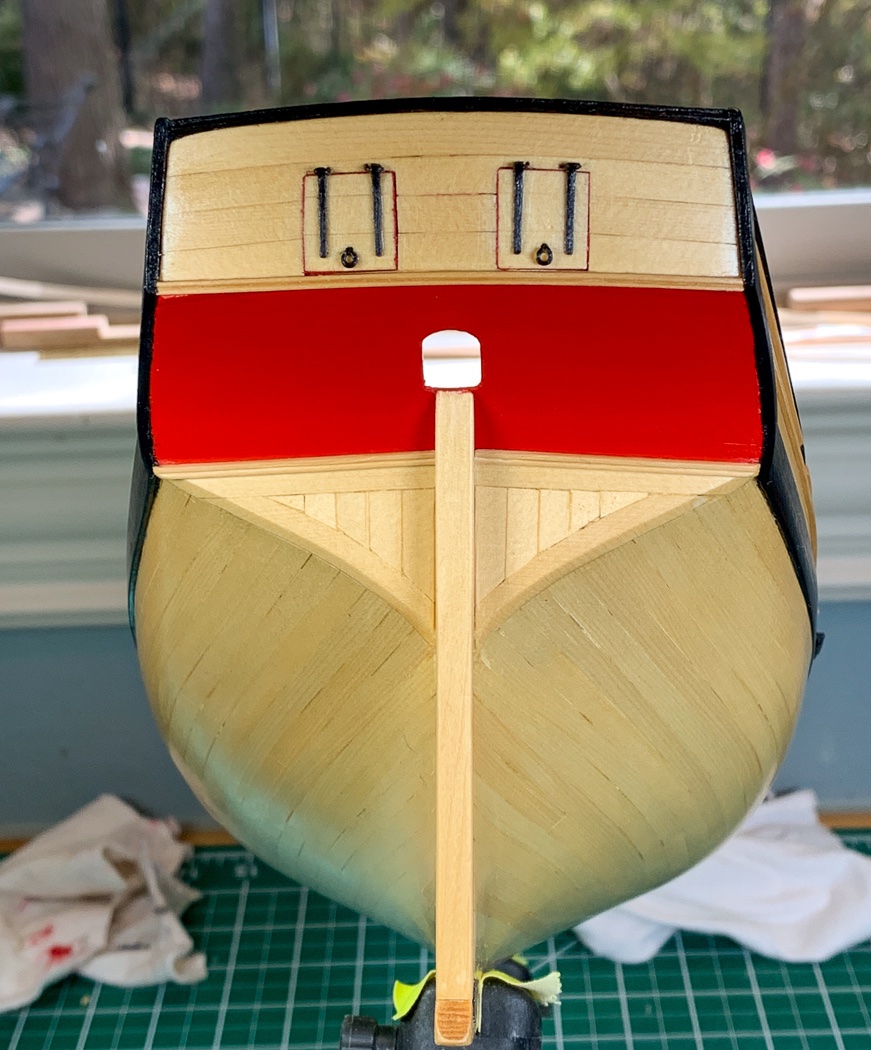
I elected to take what I thought was a short diversion, and at the same time had a larger diversion thrust upon me. The large one was a long undetected leak in our dishwasher drain resulted in a six week demolition and reconstruction of our kitchen. Not fun, lots of contractors, noise and dust to deal with every day and not much ship time at all. But enough of that. What I though was going to be a short diversion while all the above was going on, was completing the stern port lids. I used Chuck’s hinge mini-kit with the instructions printed from his website. It all seems pretty straight forward, but as our British friends say there is a lot of fiddling to get all the tiny pieces to come together. First I glued three strips of planking together, long enough to cut more than two lids. I measured, cut, and gently sanded to get those planks to fit flush to the opening (the WOP will bring out the seams as its done on the rest of the planking, they show up faint here). Once that was done I measured, cut and glued and painted red a smaller set of planks to to fit within the interior of the port (the difference of the 1/64th rabbit), shown here inboard with a photo also designed to display the most possible dust particles (I cut the bowsprit hole earlier today, more on that later). I created the lid lift ring by wrapping 24 gauge black anodized wire around the right size drill bit and with a little snipping, shaping, and bending, pulled it through the lid. So far, easy and fun. The fiddling comes not in following the instructions to paint, mount and install the hinge plates or cutting 1mm lengths of tiny brass tubing for the hinges along with very short pieces of 28 gauge wire, it’s getting it all fitted together and mounted. Nothing difficult in concept, just working with tiny pieces and tiny holes. Between dealing with contractors in the kitchen I managed to get it done over a longer period than I had anticipated. Anyway…patience tested and passed. Every stern on every model I’ve build has been an adventure. It seems on many kits it’s an afterthought, just that thing at the end of the ship. At least in my case it was always an adventure in adapting and overcoming little challenges to get everything to fit and call it a stern. None of that’s true with @Chuck Cheerful. It is a well guided process from the initial base, to adding the counter, completing the planking as it rises up then finishing it off with a fun to make square tuck. Then there’s the fit of the transom to the counter and the addition of rail and moulding strips. There’s my choice to follow Chuck with a RED painted counter with me adding black to the fashion pieces either side meeting the transom rail and the contrast of my choice of a natural stern post, and of course those fiddlely port lids. It all works, it looks like a stern should look in my humble opinion. I’m kind of pleased with the final finished stern of my Cheerful (still one more coat of WOP to go). I hope you like it and decide to build one of your own. The contractors are gone, now I’ll do the port side moulding.
- 778 replies
-
- 16
-
-
- cheerful
- Syren Ship Model Company
- (and 1 more)
-
Very sharp looking deck, very crisp work. I don’t see any reason to leave the swivel guns free. You won’t move them once the model is complete and on the shelf. I don’t even install them on the mounts until almost done with the final rigging, they get in the way and become great at snagging lines. It’s usually one of my last steps.
- 436 replies
-
- 2
-
-
- vanguard models
- alert
- (and 1 more)
-
1:64 figures
glbarlow replied to tonyplante's topic in Discussion for a Ship's Deck Furniture, Guns, boats and other Fittings
Shapeways.com. Lots of people in multiple scales. I have a mini-me. -
I have always been inspired by your work, all the way back to the Confederacy. Now I need to go back and improve the sills on my gunports after adding the spirketting
- 642 replies
-
- 2
-
-
- winchelsea
- Syren Ship Model Company
- (and 1 more)
-
Do you have the masts already installed on the hull? That would make adding block challenging, but seems like you’re solving the problems as you come to them. I also thing it’s always good practice to drill out the blocks before installing them, if nothing more to give the rope a smooth passage as it’s being run. I’ve also been away from the bench due to having to reconstruct and renovate our kitchen due to a major water leak. Not fun.
-
Gluing on these long thin strips is such fun... You made nice work of it.
- 261 replies
-
- 2
-
-
- muirneag
- vanguard models
- (and 2 more)
-
Sometimes this is the best judge regardless of specs. “In my mind’s eye” is a valid measurement in my book.
- 261 replies
-
- 2
-
-
- muirneag
- vanguard models
- (and 2 more)
-
As I have recently learned with Cheerful , moulding can be easily scraped from strip wood and a piece of filed brass. No need to increase kit costs. Even not scraped as a plain strip it can serve the purpose.
-
Thanks BE, your Cheerful log is one I frequently visit for ‘how-to’ as I move to the next step. So much about Chuck’s design just works right, it’s made my dive into semi-scratch building so much more fun. The mini-me is kinda fun, plus I like it for the sense of scale.
- 778 replies
-
- 2
-
-
- cheerful
- Syren Ship Model Company
- (and 1 more)
-
I don’t really know yet, it isn’t something I’ll use often and it’s a moderately priced unit. It does have variable speed, does both pin and painless blades, has a light and a blower. Those are about all The features I was looking for. I have a jewelers saw which was quite handy reducing the stern frames as I described here in my log. The scroll saw was quite smooth cutting out the bow portion of the cap rail. I don’t think it will be a big part of my modeling, I’m fine with my hand tools, but it will be handy when I need it.
- 778 replies
-
- 2
-
-
- cheerful
- Syren Ship Model Company
- (and 1 more)
-
That is kinda what I wear everyday - the valet is always furious.
- 778 replies
-
- 2
-
-

-
- cheerful
- Syren Ship Model Company
- (and 1 more)
-
The things I don’t know...thanks Derek. So what are the grits of your sandpaper row? So you put honing fluid on sandpaper? That guy has a lot of chisels and planes on his shelves, now I feel like I’ve neglected my tools. For the record I have a number of high end knives, and they are all kept sharp. I’m not a complete poser.
- 778 replies
-
- 3
-
-
- cheerful
- Syren Ship Model Company
- (and 1 more)