


glbarlow
-
Posts
4,127 -
Joined
-
Last visited
Content Type
Profiles
Forums
Gallery
Events
Everything posted by glbarlow
-
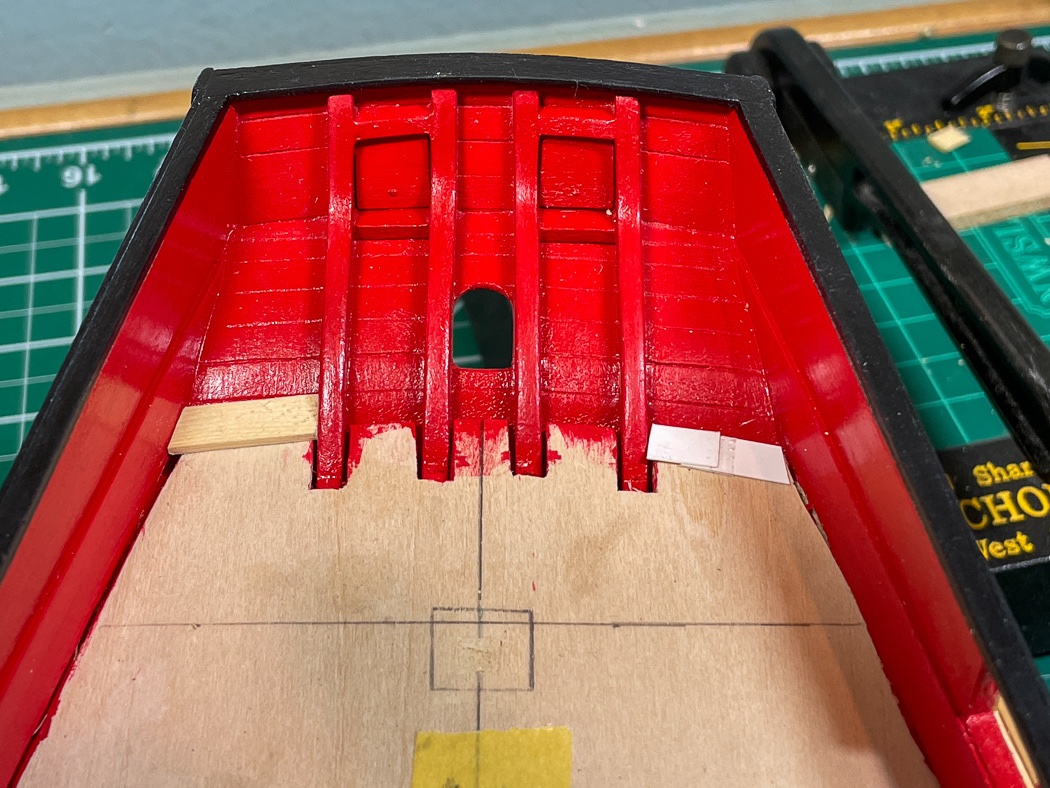
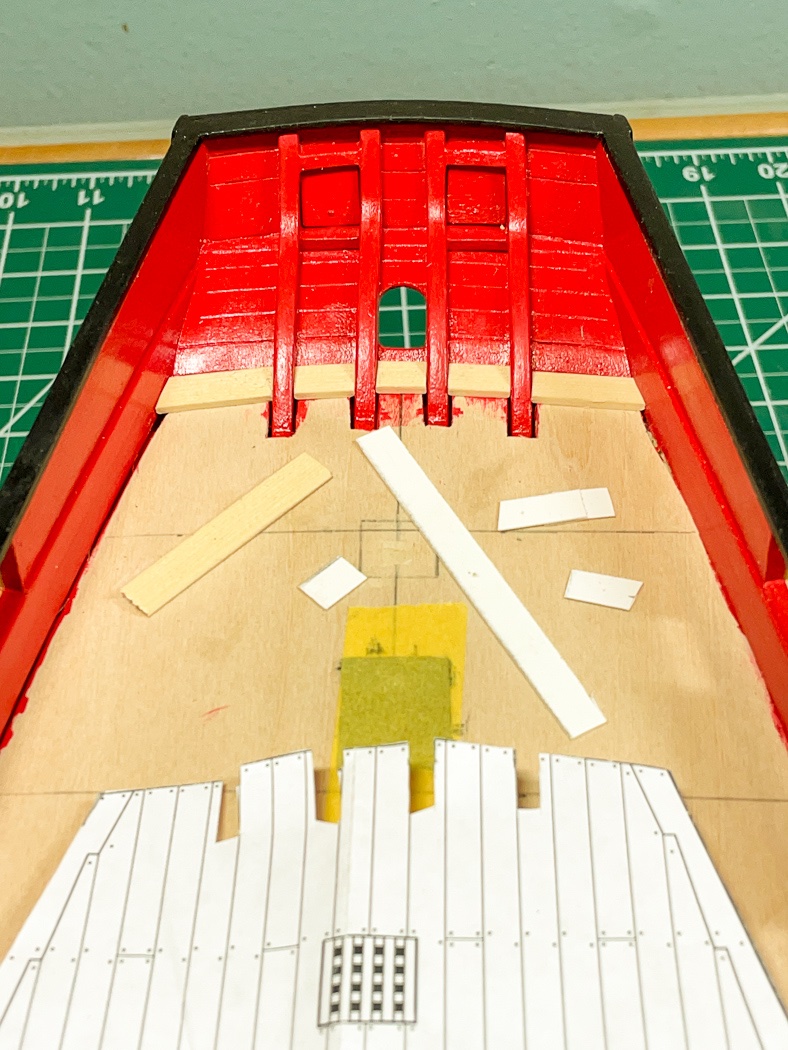
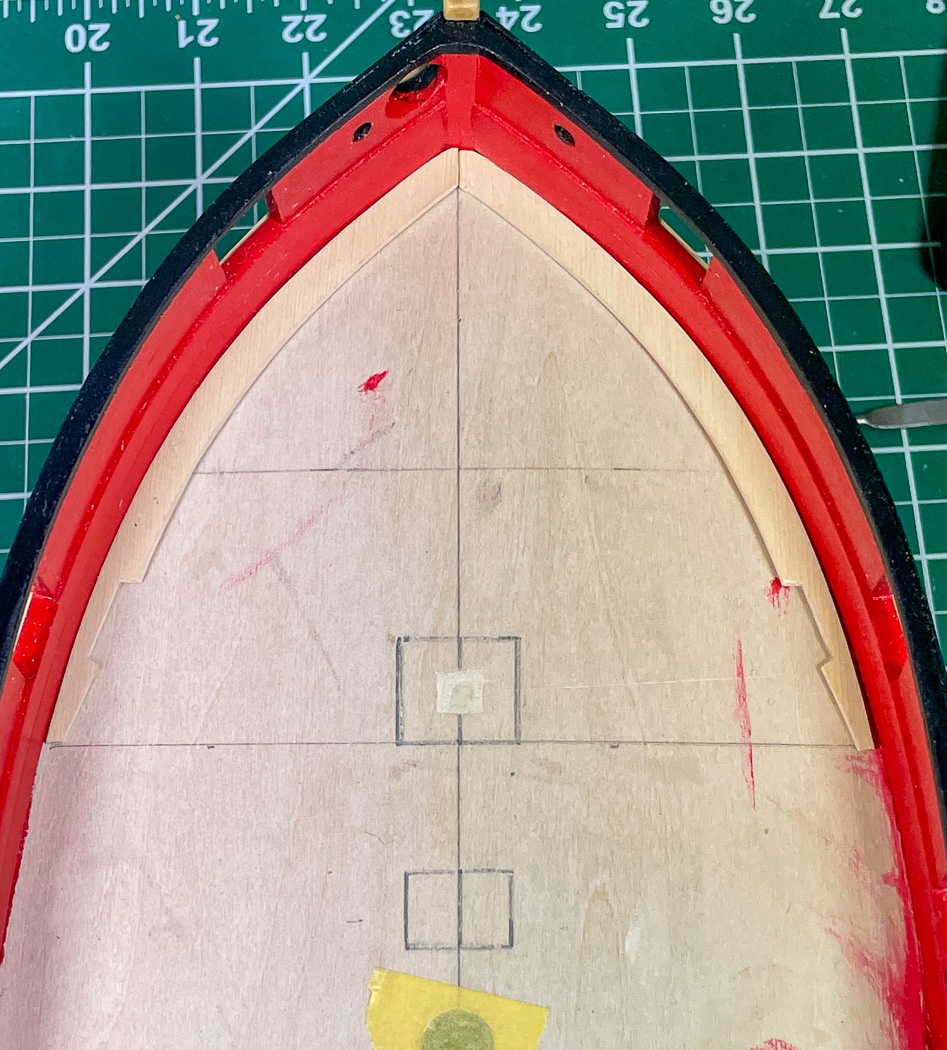
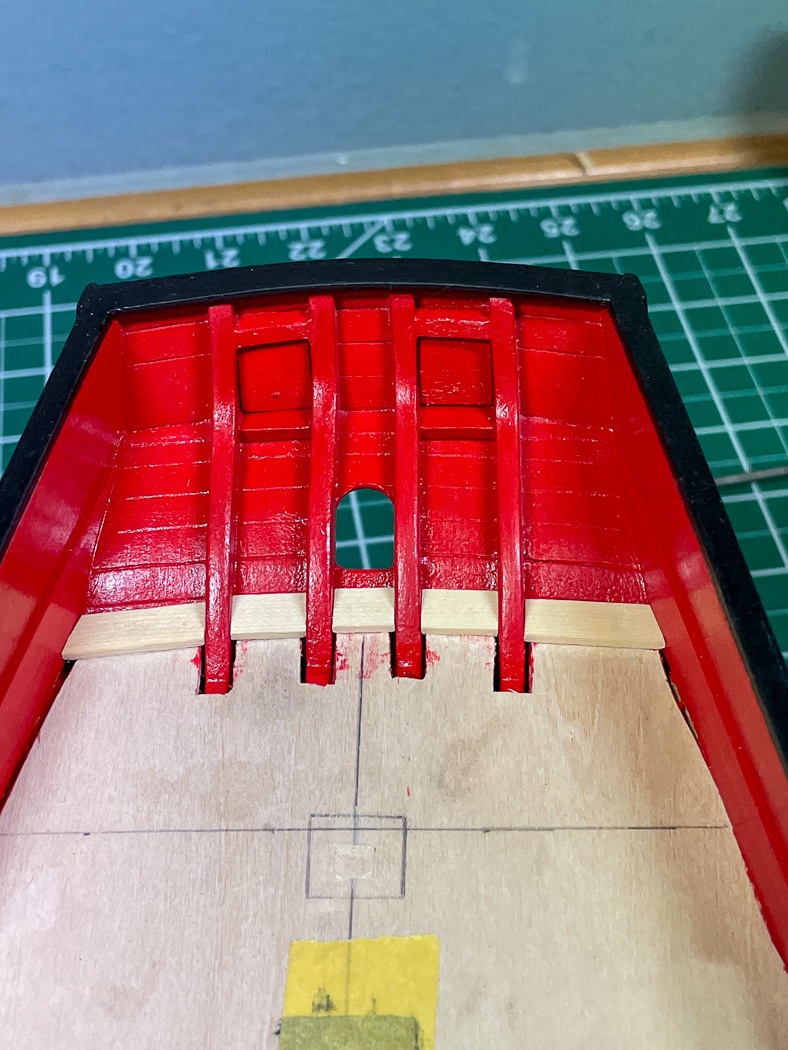
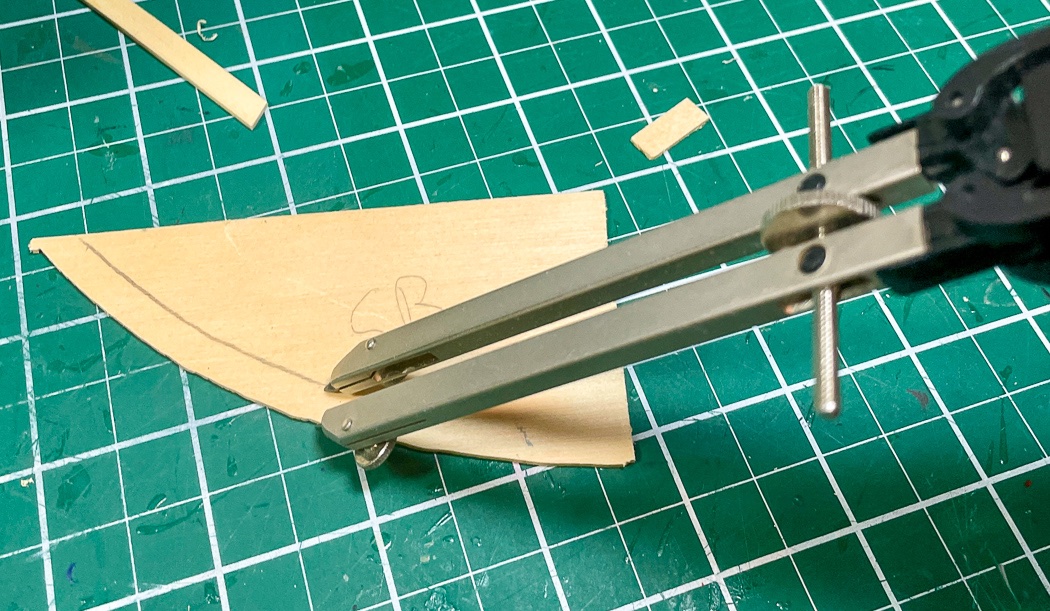
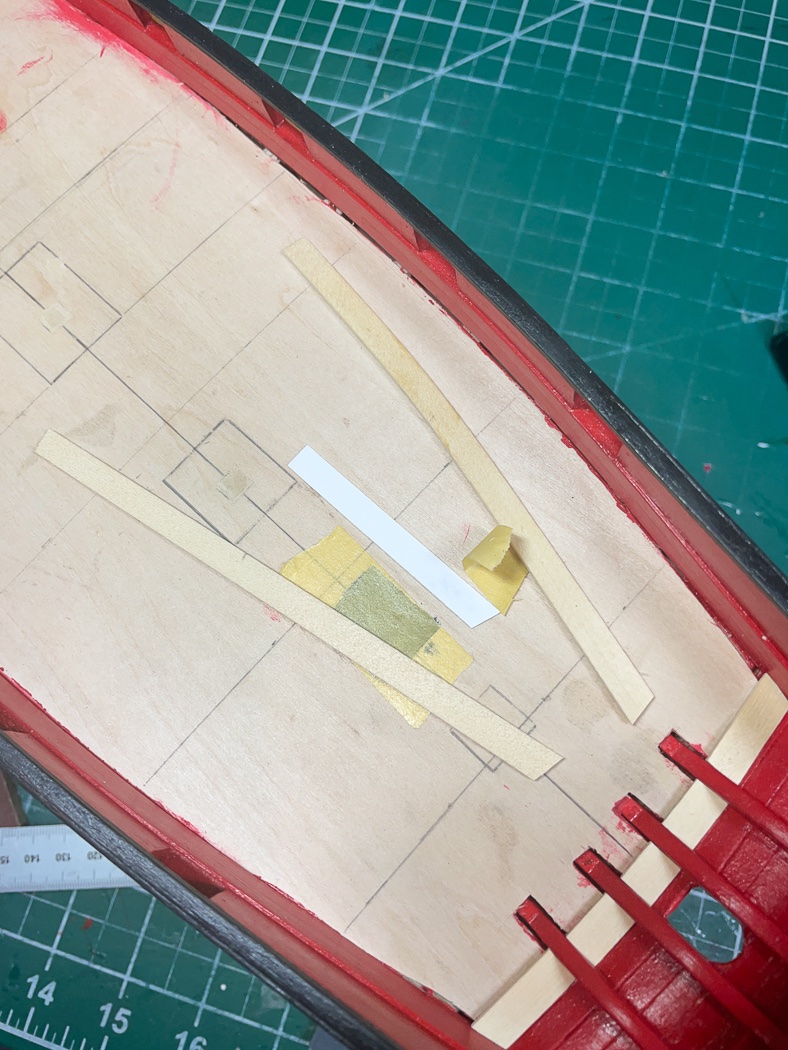
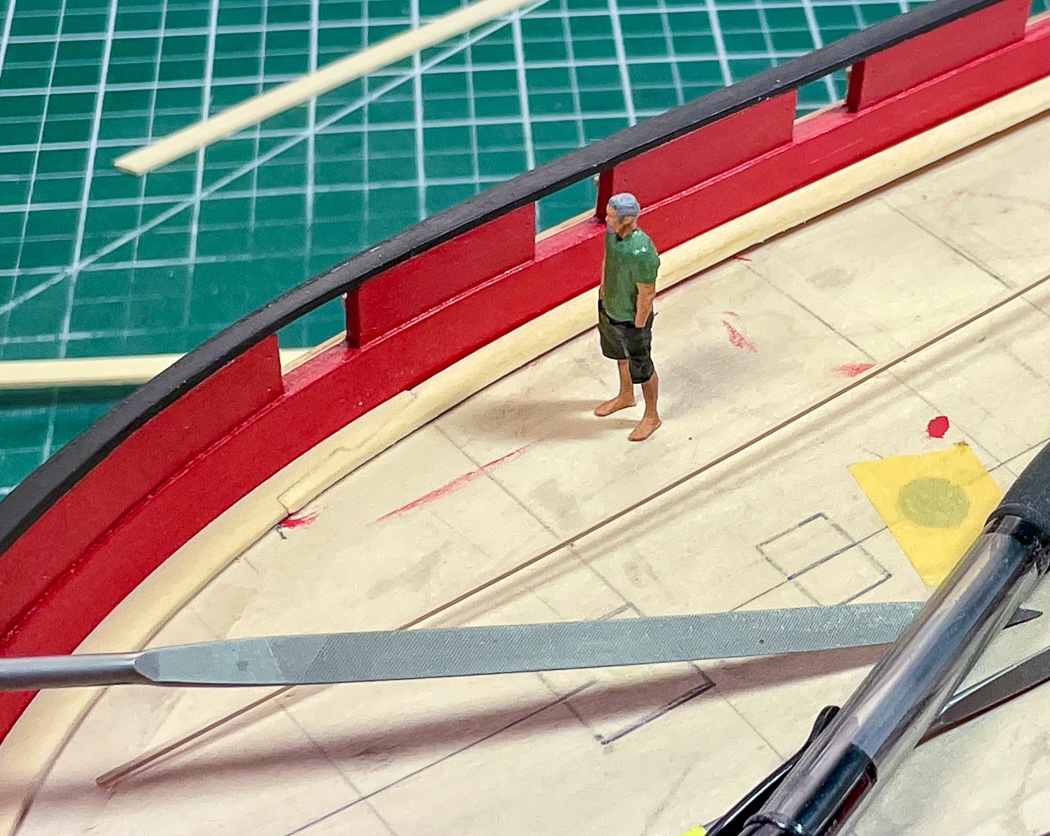
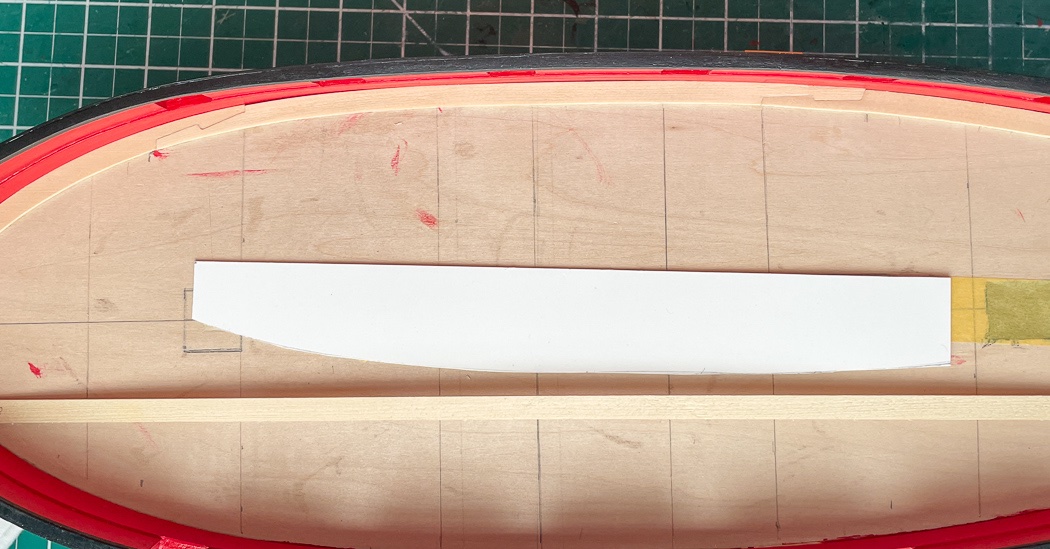
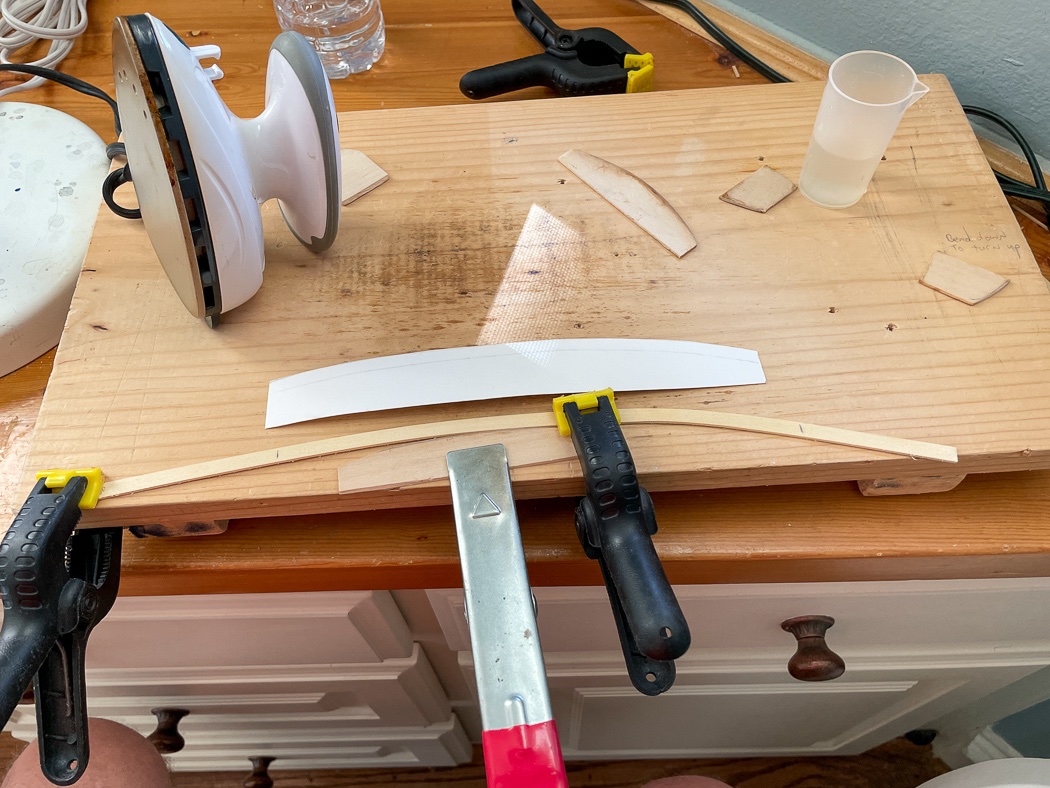
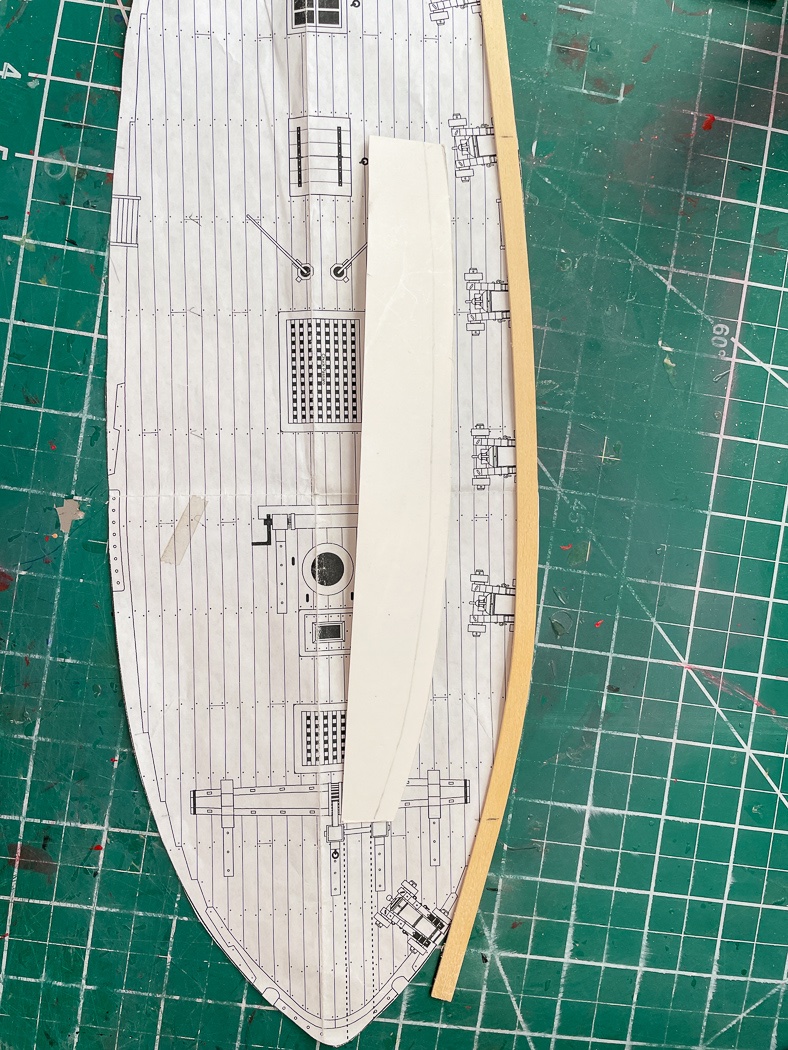
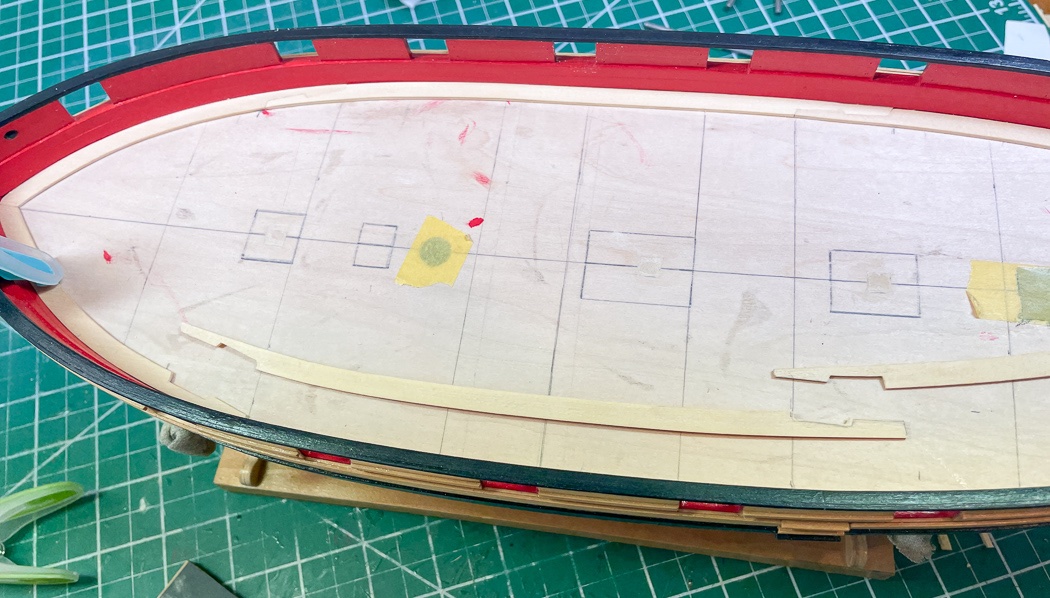
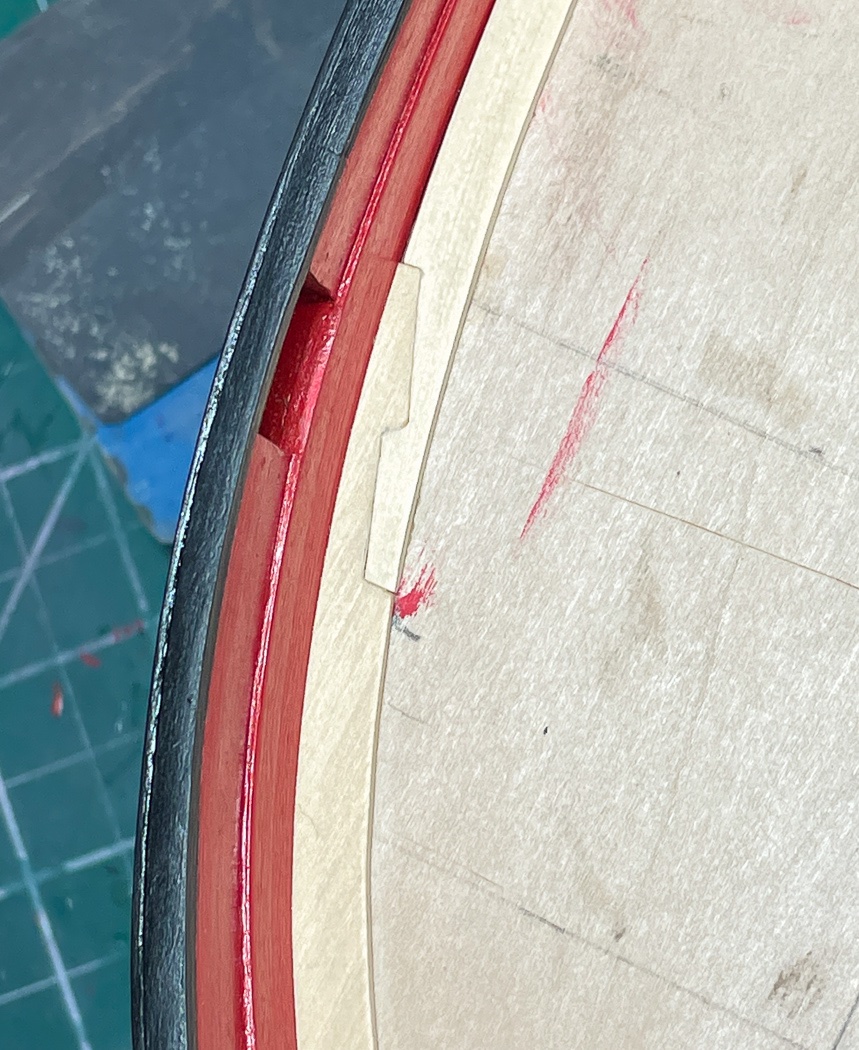
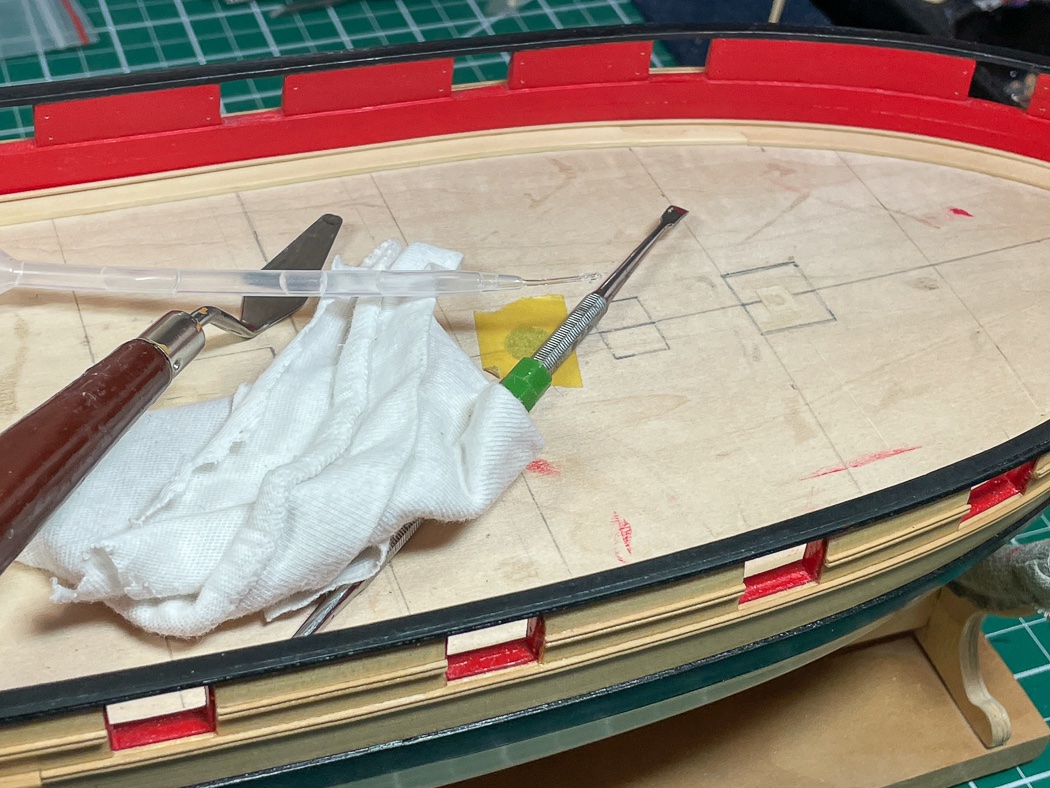
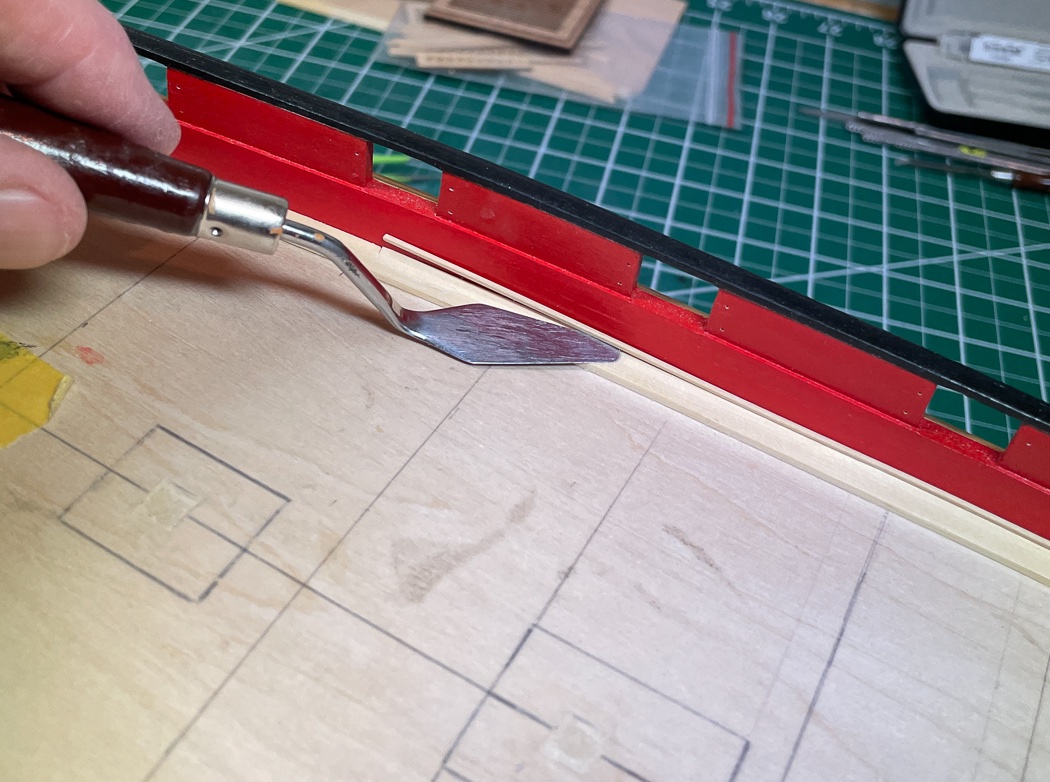
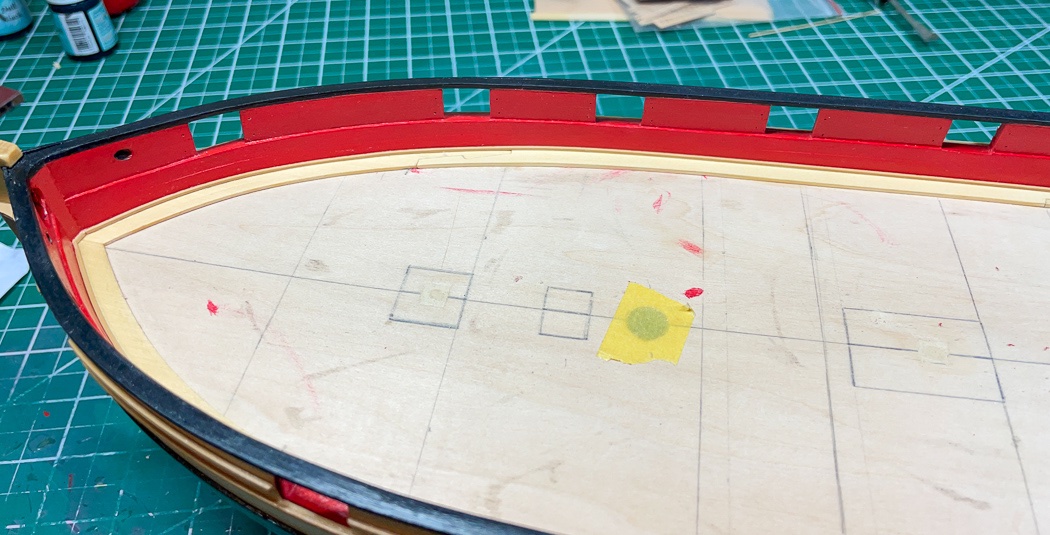
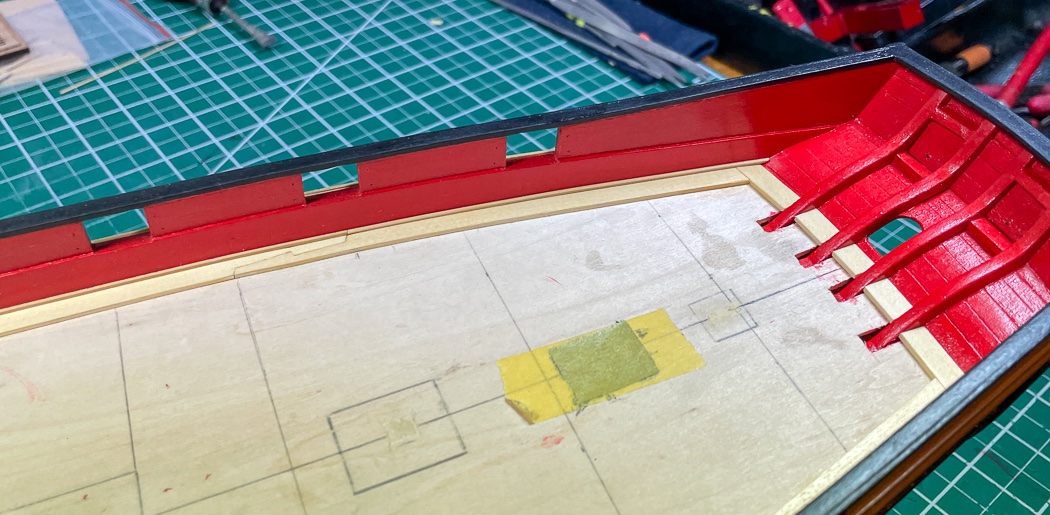
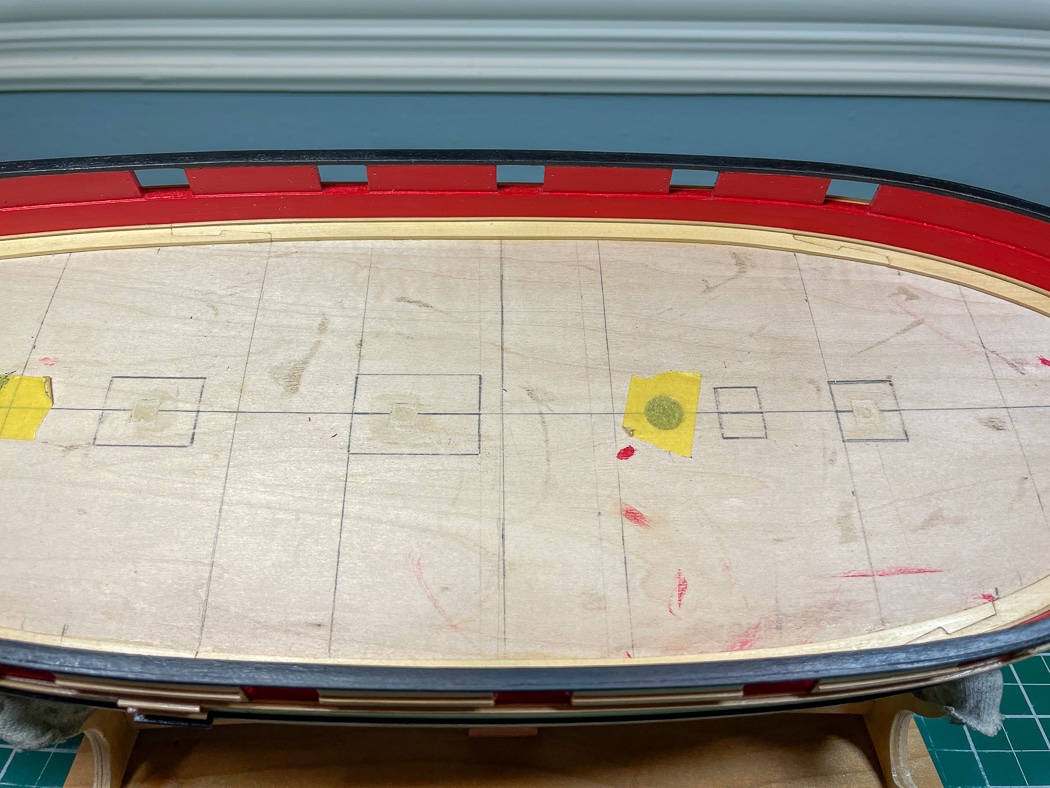
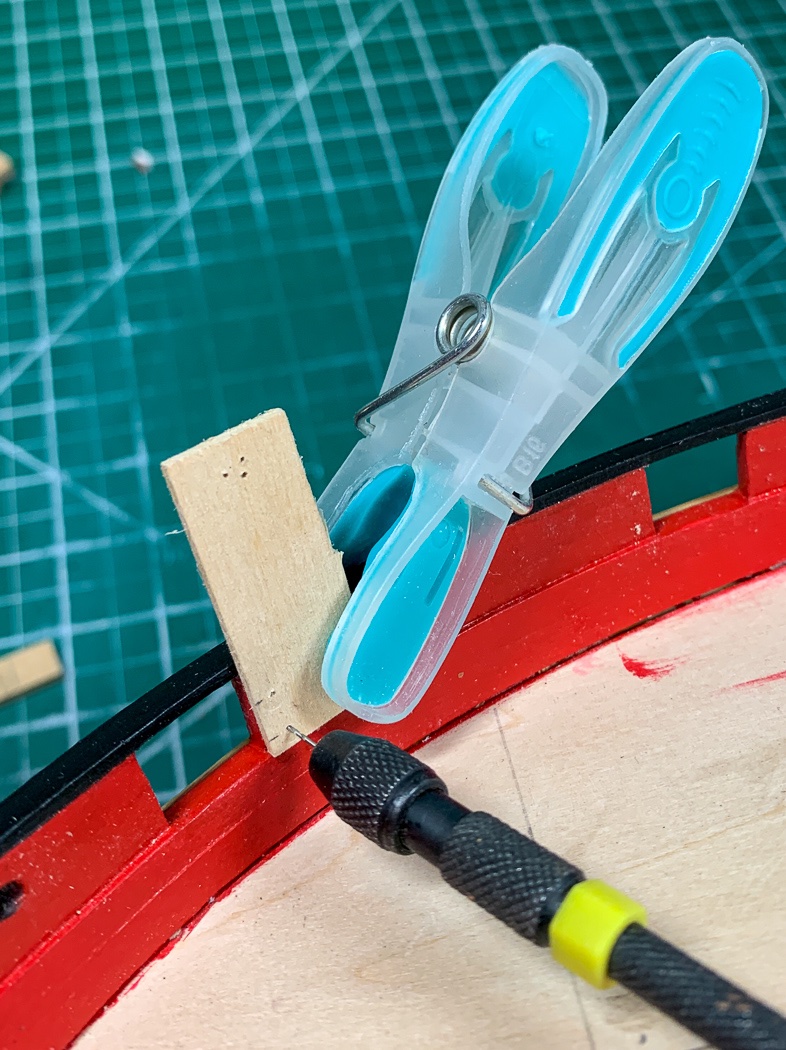
 The margin planks and waterway - this small step is no small thing. I had no idea how to even begin despite reviewing multiple logs and reading the monograph multiple times. The finished product is just a ¼” strip of wood that runs along the outside perimeter of the deck. Making the six separate pieces along the bulwarks and five more small ones for the stern was an interesting adventure, and once again a first for me. It doesn’t look like much seeing the final result, but a lot of time goes into fitting everything together properly. I elected to start with what I considered the hardest step first, cutting margin planks to fit the bow area. I decided to place the first scarph joint near the second port, consistent with photos in the monograph but a little different than shown on the plans. This basically divided the hull into thirds. I started with a cut out of the deck from the plans, used that to cut card stock to get the curve, then further modified that on the model to get an accurate curve. I transferred that to 3/64 sheet and then off to my new scroll saw. I smoothed the resulting edge on my Byrnes Sander then used dividers to measure the ¼ width, which I also cut out on the scroll saw. Once sanded smooth (this inner curve by hand, I know some would take a Dremel to it but I'd rather go slow, there's a lot of time in it by this point) I copied a model of the scarph cut from the plans on a piece of scrap, penciled that onto my new bow piece then cut it out with my #11 bade with an assist from my freshly sharpened chisels. I did it all over again for the other side and smiled with relief I’d figured all this out. My scroll saw skills are improving and while in theory I could have cut it without one, it sure comes in handy, it's a basic model but that's all I need. All this may sound quick and simple but it wasn’t - I did each step slowly it was important to get exactly ¼ width to match up to the planks I ripped from ¼ wood for the mid and stern sections. Slow sanding and constant checking made sure I got it right. Next up, the stern. I started by sanding a 15 degree bevel with my Byrnes sander into a 6 inch strip of ¼ cedar to match up flush to the counter, then used the plans and card stock to get the proper width and angles. I created a little expander cutting one piece short of the width, putting double sided tape on that and sliding another short piece to fit snuggly. Using the card stock saved a lot of wasted wood and using the cut out of the plan got the card stock close to the shapes needed, I have have plenty of card stock. The stern portion of the margin planks were pretty straight forward. I got my plank bending station out and was able to fairly quickly get both sides shaped, then with my scarph pattern penciled on I cut the scarph joint. Again card stock along with some tape made it easy to get the proper angle on the stern end of the margin plank. I thought I was almost home, I wasn't. I followed the same plans, card stock, process to get the needed curve for the mid-section. It wasn’t until I used an extra long plank (the pencil marks in the photo signify the needed length) and completed multiple heating sessions with different curve patterns on my plank bending station was I able to get the curve for the middle section of the margin plank. It’s a shallow curve with a strong bend at the bow end, it took some time to bend the ¼ cedar into the proper shape, matching it to the card stock pattern also helped. My first attempt with a plank cut to the proper length wouldn’t allow me enough torque to clamp the hard curve at the end. Once again I’ll say Chuck’s heat plank bending method works. Without soaking (using the steam setting on the iron did appear to help this time) I was able to shape, reshape, and reshape again to get a flush fit. These two planks both basically took a day’s work to get right. The cedar held up fine to multiple trips under the iron. To get the proper scraph cut penciled on I put the freshly curved mid plank under the bow piece and held them in place with plastic clothes pins (these have soft tips and not much pressure to avoid marking up the hull), traced and cut the joint. Once it was done I did the same for the stern, doing one at a time is essential to ensure the right length. I cut the joint too big based on the penciled guide then slowly filed and sanded all the angles and cuts into a relatively smooth fit. It comes as no surprise that while the pattern I cut worked for the stern and bow sections, the final curves create a different angle to match - something the first version, which I’ll politely call prototype now that its in the waste pile, proved. I was too in the zone and forgot to get photos of this step. I know it just looks like a few curved sticks of wood, on a kit these would be provided as laser cut parts if they were provided at all. Making them myself was something I wasn’t sure I could sort out, it’s pretty rewarding having done so. I’m happy with the result. The last step is to use 1/32 square strip with one corner rounded off to form the waterway (when you want something fun to do take a piece of 1/32 square and round off just one corner). As Chuck notes on the real ship these and the margin planks where actually one solid piece, this simulated approach works just fine. I was able to use boxwood strips Chuck kindly provided. I love the cedar but it doesn’t cut down to 1/32 square very well, it just kind of shreds. I have some tools that are versatile and multi-use, this very thin spatula is one. I put a dab of CA on the tip, ran it under the waterway a few inches at a time, then fit it tight with a soft cloth and using my trusty dental scraper. Once I settled into this approach it went quickly. Here is the finished product with a light coat of WOP to protect it a bit, I’ll wait until the rest of the deck is in before sanding it. As I noted I’m happy with the result and having had the experience, but I’m glad to have this step behind me. It was one of those that I really had no clue how to do when I first read at the monograph. It seems things I didn’t know how to do is becoming a pretty long list as I’ve noted throughout the log. I do know how to make cargo hatches and that’s next. PS: I feel like this post has a lot of photos of sticks…
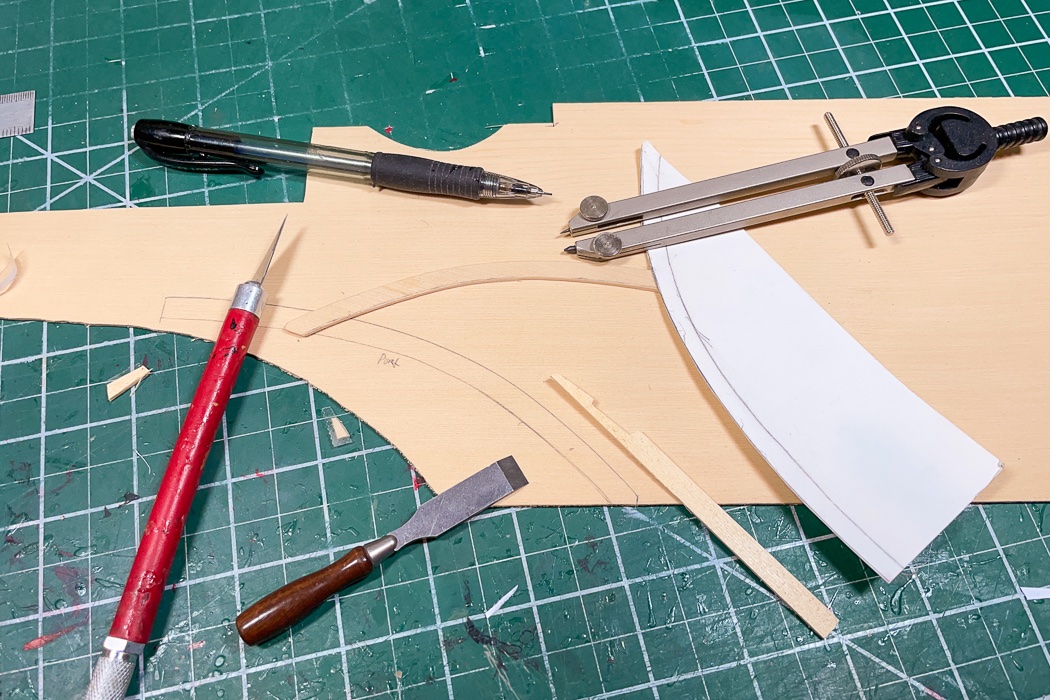
- 778 replies
-
- 18
-

-
- cheerful
- Syren Ship Model Company
- (and 1 more)
-
There’s no need for primer. The first layer is just the base for the second layer. Use all the wood filler you want and sand away as long as you don’t sand through it you’re fine. Take into account the second layer to the stern post but remember you’ll want to sand that layer smooth too First and foremost don’t over think it. Have fun.
- 164 replies
-
- 1
-
-
- fly
- Victory Models
- (and 4 more)
-
I for one trust your judgement. Pearwood is a beautiful wood.
-
I remember every step of this build. It was so much more fun after getting all the copper plating finished.
-
Well, aren’t we special😳😂
-
It’s linked in my post above, it’s a .pdf, not a video
-
I hate when that happens, but it seems to happen a lot to me too...🤣
-
A cutter most likely would have a windless and not a capstan, so good choice. Your deck is looking good, nice work. I like your moulding, and your macro photo. Probably interesting to drop down to this size from the huge Winnie.
-
I’ve always appreciated how you present the rigging, I note the double lines and appreciate the detail blow out as you place it, on the same sheet and near where it goes. I like seeing the full picture all at once so I can visualize how that detail fits in the bigger scheme. In other words, please continue as is. It’s worth it at least to me and I’m sure others. I wasn’t entirely kidding about works of art. I’ve reached the stage with kits I rely far more on the plans than the instructions.
-
Clearly plans are works of art, suggest to her having them all framed 😆
-
Such great detail that must be in that number of plan sheets, amazing!
-
Yikes 3 boats. The 4 on Vanguard took me forever, but I’m sure it will look great on the final product.
-
Nice to see another Cheerful underway. I can see you're in great shape for the square tuck
-
Congratulations on this next release - I hope it sells well and helps fund Sphinx's development 😄
-
Like Derek I almost always drill out the hole in every block, use just the tiniest bit of CA and twist it a tiny bit while the CA is still wet. I pull all my line thru a block of bees wax before rigging it. Nothing wrong with any of those things. I rig as many as possible of the blocks on the masts and yards before mounting them and mount blocks on the hull before it gets to crowded and I work inside out first with standing then running rigging. My best rigging tool is a large needle with the threading end about 1/4th cut off leaving a nice Y that I can maneuver lines in tight places with the pointed end glued into a six inch long 4mm dowel, in fact I have two of these. Aside from ratlines, I enjoy rigging. It’s a fun puzzle to weave together and really makes a model. I researched my Pegasus to get every rope it would have carried onboard and in the right place, it’s a nest that I’m not now sure how I pulled off, but it looks great. I hope you come to enjoy this part and go back to finish rigging your Speedy.
- 725 replies
-
- 2
-
-
- vanguard models
- speedy
- (and 1 more)
-
Wow, I knew it was a hard life, but that’s devastating. I’m always amazed at your metalwork. I’ve never done any of that, but am going to have to try doing something. Your deck details are impressive. So much into one small (relative to our usual fare) craft.
- 261 replies
-
- 1
-
-
- muirneag
- vanguard models
- (and 2 more)
-
Thanks guys. I definitely recommend both the weathering powder and the soft brushes to apply it - it's a subtle affect as you note but a very good one in making the guns look more realistic (but I'm not using the algae green on the water line of the hull just to be clear - its a metal only application for me.
- 778 replies
-
- 2
-
-
- cheerful
- Syren Ship Model Company
- (and 1 more)
-
It's supposed to be relaxing, not creating anxiety. I'd encourage you to check my two logs after you watch Chuck's videos and tutorials to see how I practically implemented them. As I said, I've built 9 models, but converting to Chuck's methods made a huge difference for me. I could have never single planked Cheerful as well as I did without having used it. It's not that hard once you get the hang of it, and it doesn't take that long to get the hang of it....
-
I had a very detailed Pegasus log that was lost in the great crash. Pegasus is my favorite build, in fact that’s it in my little signature bubble. I highly recommend you do two things, review and learn Chucks method of lining the hull and planking from the link Mugje provided and locate Blue Ensigns Pegasus build log since mine was lost). I converted to Chuck’s method and in my opinion there is no better way to learn how to plank a ship. Both my Nelson and Cheerful logs linked i. My signature line describe how I put it to work. Measurements and tapering planks are an essential part of planking, but every hull even of the same model are different. Chuck’s method ensure the measurements you get are for your hull, not what someone else got. The most important recommendation I have is not to overthink it and not get lost in details and too many sources of advice and tutorials. Pick one that works for you and make sawdust. Have fun!
- 164 replies
-
- 2
-

-
- fly
- Victory Models
- (and 4 more)
-
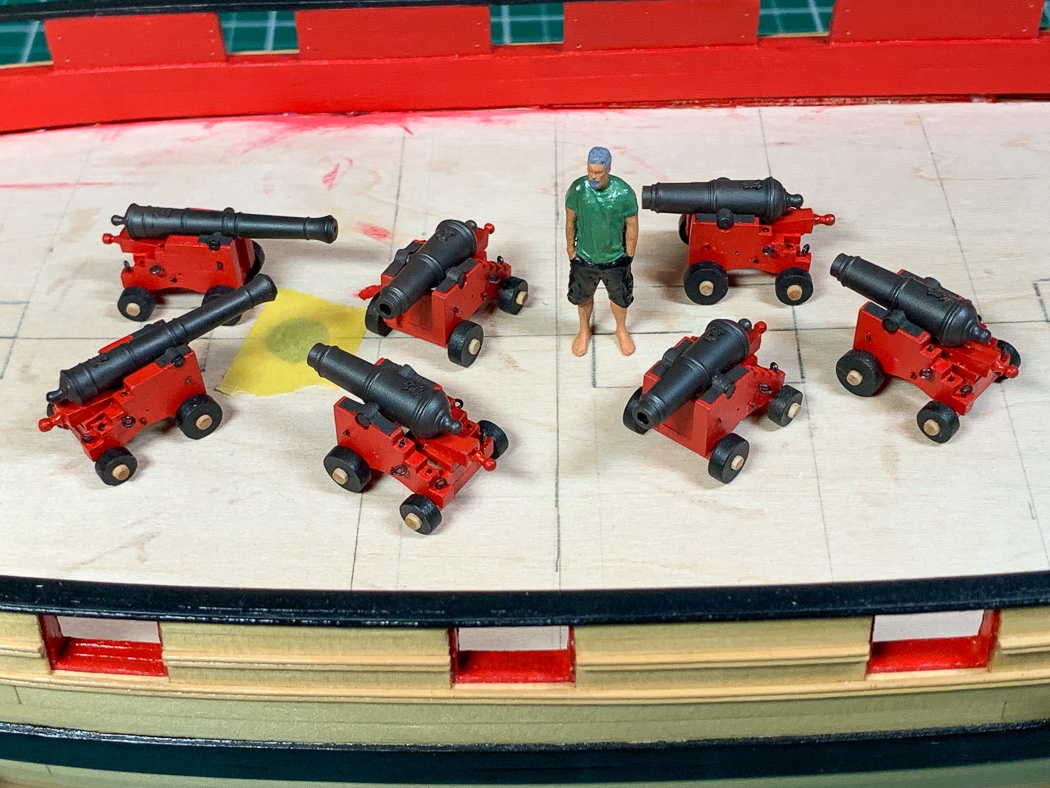
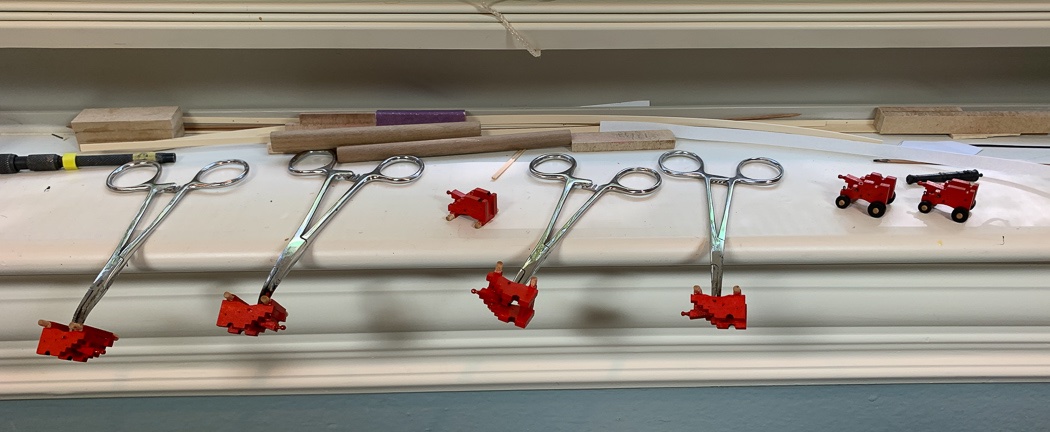
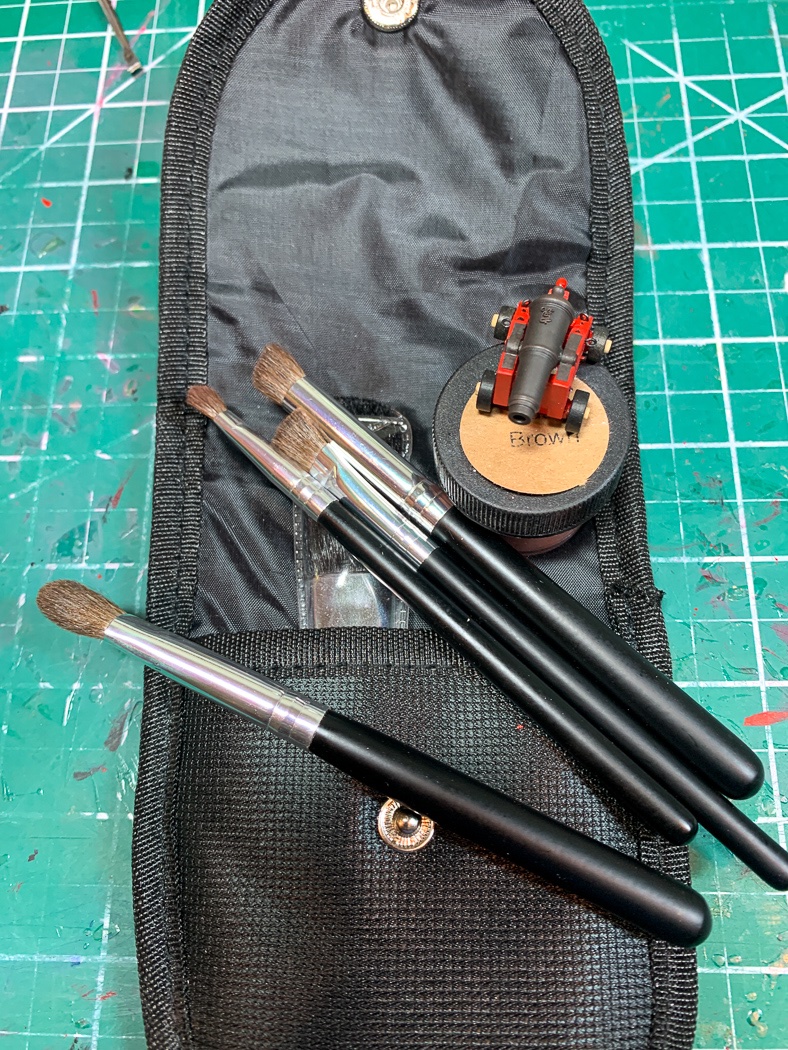
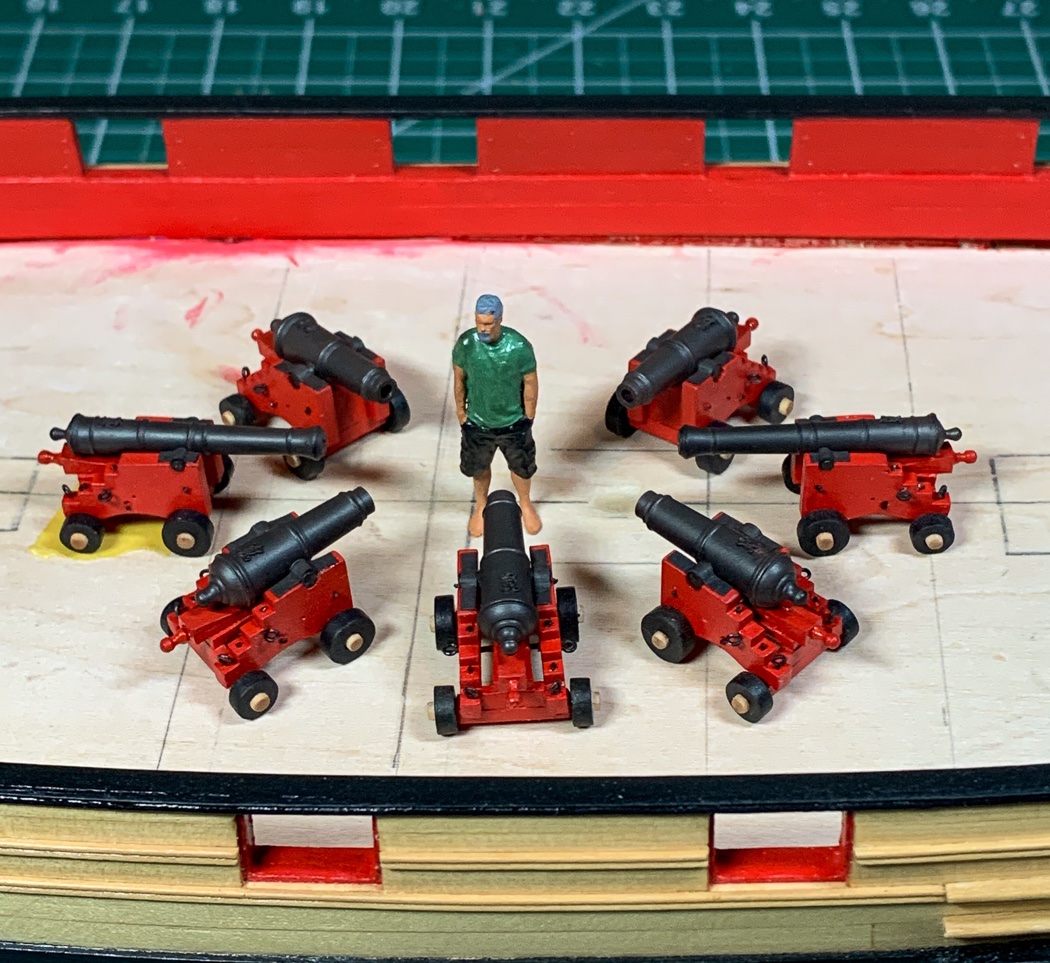
As I posted earlier I took a break from the hull to put together some cannon, turns out it wasn’t much of a break - it’s a process to assemble these guns. I thought I’d take a step back and show some of how they came about. Likely nothing novel, most of us have made plenty of ship’s guns. Before I left the hull I took the time to make a little jig to drill the holes for the gun eyelet’s and ring bolts at each port. I won’t add them until later, but it was easier to drill the holes with an empty deck. Next up was giving the brass guns an acetone bath as painting prep and then testing my eyes and fingers to put the tiny emblems on each barrel. I almost gave up, it does take some effort. It’s a good thing Chuck’s mini-kit provides plenty of extra’s, a lot died during the process. The secret is putting glue on a pin to apply it. Once you have as little glue as possible, then put less than that on the emblem. Fine point tweezers are essential. I’m not big on using an airbrush, I have a very basic propellent can model I rarely use. My thought is the ships of the time weren’t painted with spray guns so… (plus it seems more trouble than its worth, but to each their own, it looks good well done). It’s different with metal cannons, so airbrushed they are. I used a different primer paint this time as I noted in my earlier post. The mini-kits for the guns include everything needed to build the carriages from laser cut parts, so after making the first one it was time for a production line. As many have noted before, a jig is essential to aligning the axels to the sides. Cleaning off the laser char from all the small pieces is a chore but the red paint would show through if I hadn’t, so time well spent. Rounding off the axels is also a process, there are no extra axels in the kit so it’s a process done slowly. I suppose maybe I could have made my own quoin handles but my patience was already tested enough with small part assembly. Fortunately I had 5mm brass belaying pins that fit the bill. Then it’s hand painting each carriage and mounting the trucks. Someone said to paint them anything but black, I’m not in on that so mine are in fact black. Just to be different and because I like the look I left the axels natural (though I may not stay with that choice, we’ll see later). Added to my 'never done before' list is the use of weathering powder, I was skeptical but I have to say it made all the frustration of applying the emblems worthwhile. The Doc O-Brien’s Rusty Brown gave life to the barrels and really makes the emblems stand out. I went all in and bought this weathering brush set from MicroMart, I’m sure any brush would work but using one to apply, one to even out and the large very soft brush as a final buff really is worth the expense. No surprise, the key is minimalism - it takes very little power to make it work. I was pretty basic on the cap square, cut from black card paper, I may add a hinge later when I make the next five. I did use the weathering powder on the card strip, it’s just too black next to the barrel otherwise. So after a lot more time than I thought it would take I have the two long guns and five of the ten carronades finished. There are ring bolts that go on the sides of all the carriages (and the hull) but that comes later by making the breech ropes as a single unit off the ship, the holes for them are drilled and ready. The previous post actually show the barrels better than these photos, they have more of a rusty tinge to them than the blue black they appear here. Maybe I'll get better photos when my iPhone 12 Pro arrives later this week. I enjoyed making the guns, among other things it put off figuring out scarph joints for a while. There were times though when I felt like mini-me here and was ready to blow things up. I still have five more to do the next time I need a break from the deck work. Off to the deck I go - maybe to never be heard from again.
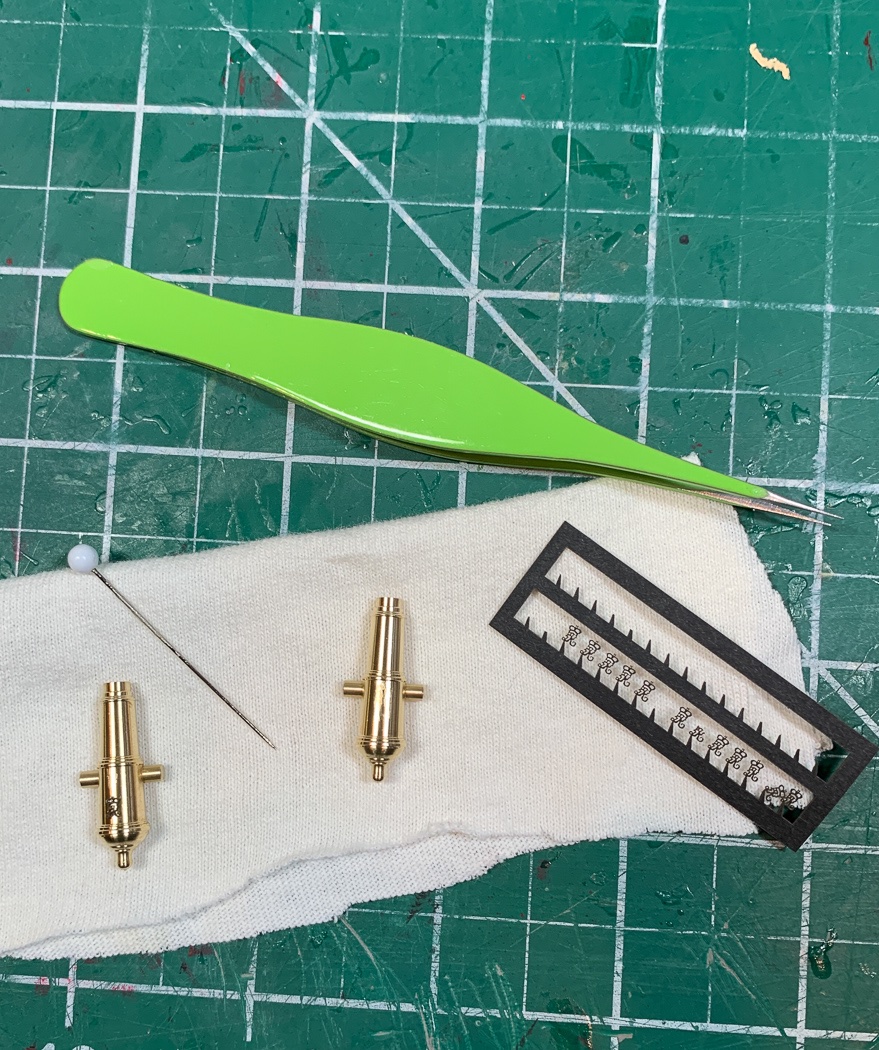
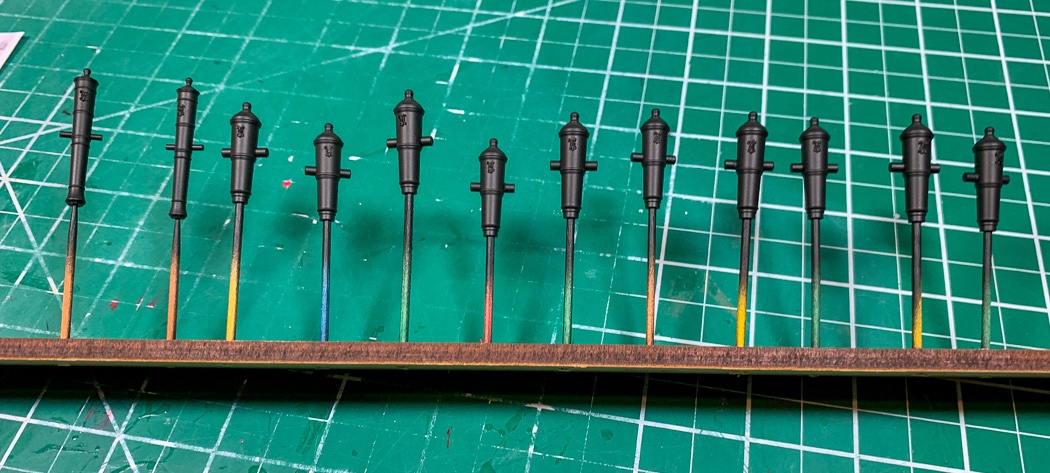
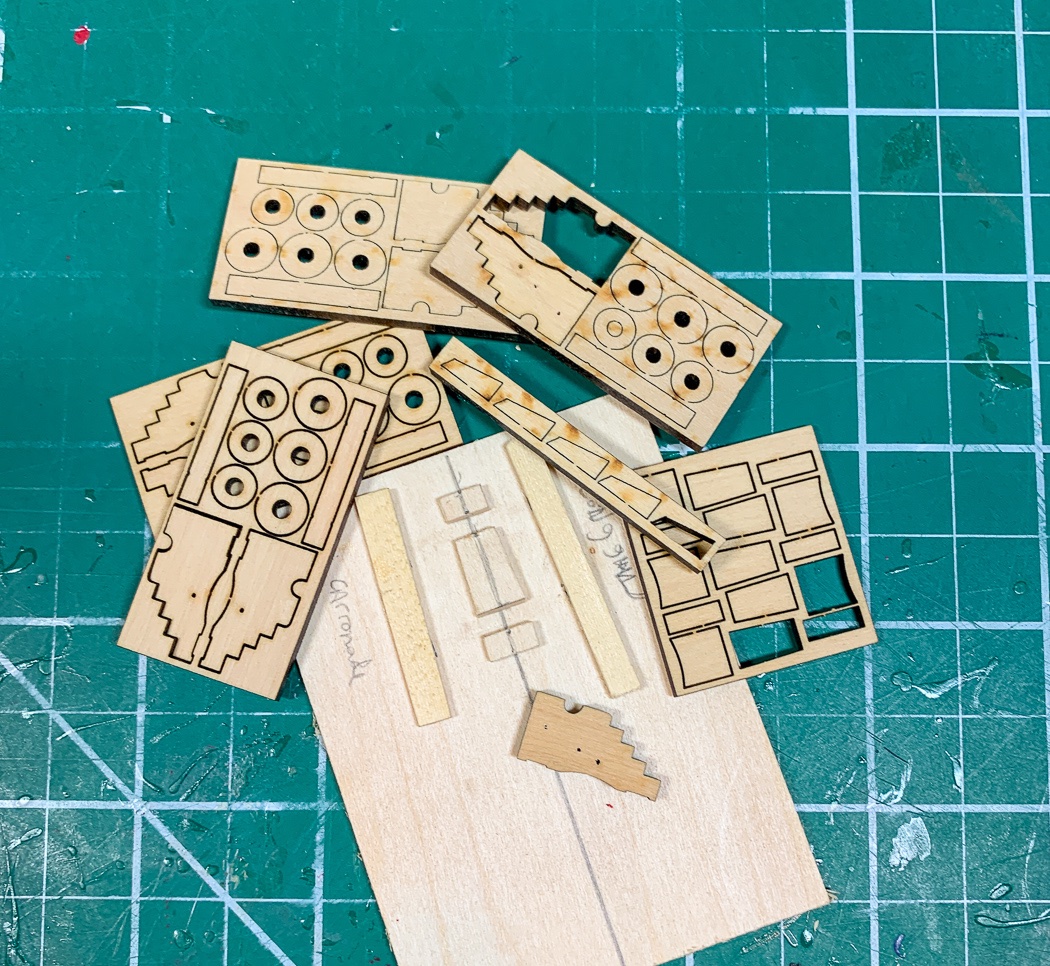
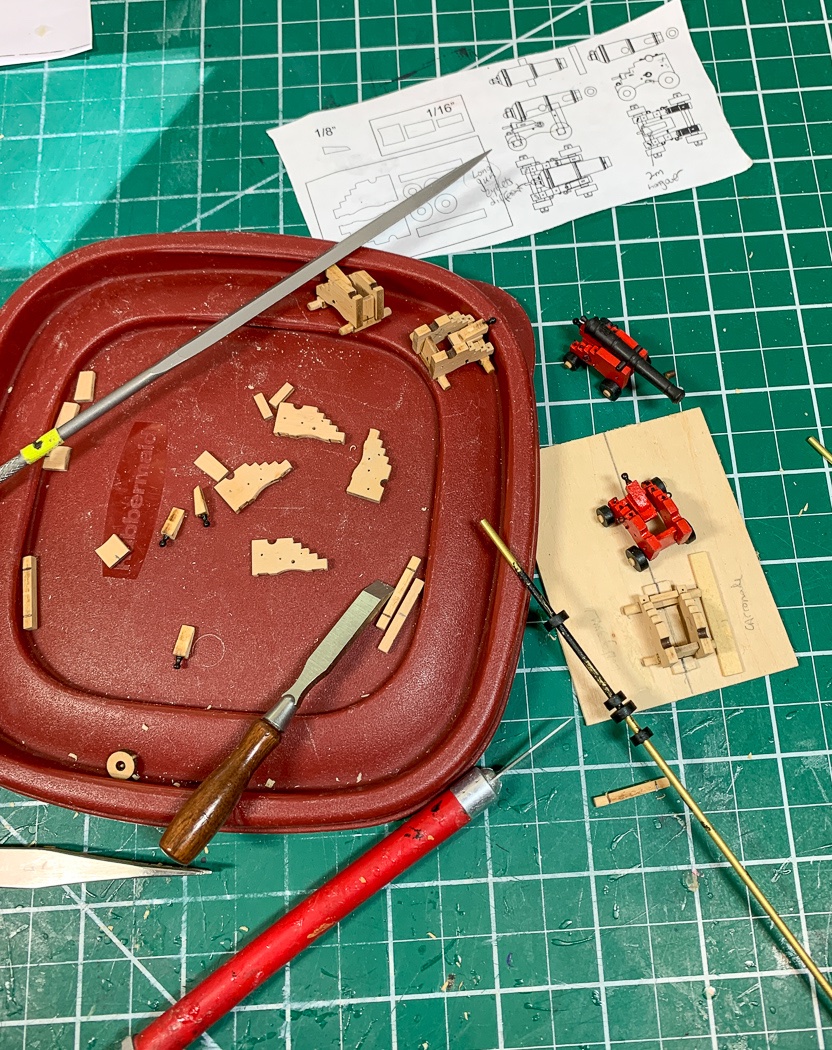
- 778 replies
-
- 14
-
-
- cheerful
- Syren Ship Model Company
- (and 1 more)
-
Amongst the many interesting aspects of this vessel, I wonder about the mundane fact of how many fishermen fell overboard in rough seas with so little to keep them from doing so.🥶
- 261 replies
-
- 2
-
-
- muirneag
- vanguard models
- (and 2 more)
