


glbarlow
-
Posts
4,127 -
Joined
-
Last visited
Content Type
Profiles
Forums
Gallery
Events
Everything posted by glbarlow
-
 I wrote that on the “other” forum and got frustrated that no one engaged, so by the time I got to the rigging I just posted photos because I didn’t want to just abandon it. I copied it over to MSW since I didn’t plan visiting that forum again, so sorry it won’t be much help on rigging.
- 436 replies
-
- 2
-

-
- vanguard models
- alert
- (and 1 more)
-
Try an immediate half hitch to keep the tension, couple of winds, another half hitch, or clove hitch. Your not alone this can be a frustrating process getting them right and done. At the end you stare at the shrouds and loudly declare “I won!” 🤣
- 436 replies
-
- 1
-
-
- vanguard models
- alert
- (and 1 more)
-
May I suggest tying off the lanyard so that the half hitch is in board, as it likely was anyway, but for the model the cleaner look of the rope turns are facing to the more visible outward side. Ive already decided I will never do copper plates again, you’re. Welcome Vanguard. However the thing I dislike most in my model building you have coming up soon, tying ratlines. Of course not so bad on a cutter as a three masted frigate,, but still on so not fun. Can you say clove hitch... Your dead eyes look great. Did you use a stiff wire jig in each one to establish a consistent height?
- 436 replies
-
- 2
-
-
- vanguard models
- alert
- (and 1 more)
-
Compound Plank Bending
glbarlow replied to Neil10's topic in Building, Framing, Planking and plating a ships hull and deck
Being a Pegasus builder I know the challenge of gun port patterns. I used the plans to cut a profile of the hull out of a 1x3 inch board then cut various notches as clamp points on the remaining straight side of the board. No fear of damaging bulkheads and it took as long as it took to get the right shape, which then laid perfectly onto the frame. I did this for Vanguard which worked great with its buff bow. I am a believer in Chuck’s dry heat, no water method for bending planks, I use a travel iron. It is dramatic the difference this method makes for me. I easily can do compound bends, like the in and down curve of the bow and the twist needed at the stern. It worked like a charm for me on Cheerful and has a quick learning curve, it takes little time before your visualizing marking where to start the bend. No better way in my humble opinion, not that every one agrees with me. Do what works best for your style. -
I use CA for all planking and lots of other places, it just makes sense to me. Don’t edge glue planks, it doesn’t take a lot of CA to hold them. I use white PVA glue for things I need to position before it sets, Titebond wood glue for structural strength like for the frame, epoxy for mounting to the stand and even CA medium gel for cannon to the deck. My answer for glue is whatever the job requires. You’ll find as many preferences to the glue question as there are modelers, even the two Glenn’s don’t agree 🤣
- 382 replies
-
- 4
-
-

-
- Vanguard Models
- Duchess of Kingston
- (and 1 more)
-
Thanks Rusty, I can never have too many tools or too many options for sanding stuff😁
- 778 replies
-
- 2
-
-
- cheerful
- Syren Ship Model Company
- (and 1 more)
-
Looks good, glad you sorted it out. Chuck had a good point, do the scale conversion and see if the scale width your contemplating seems reasonable at full size.
-
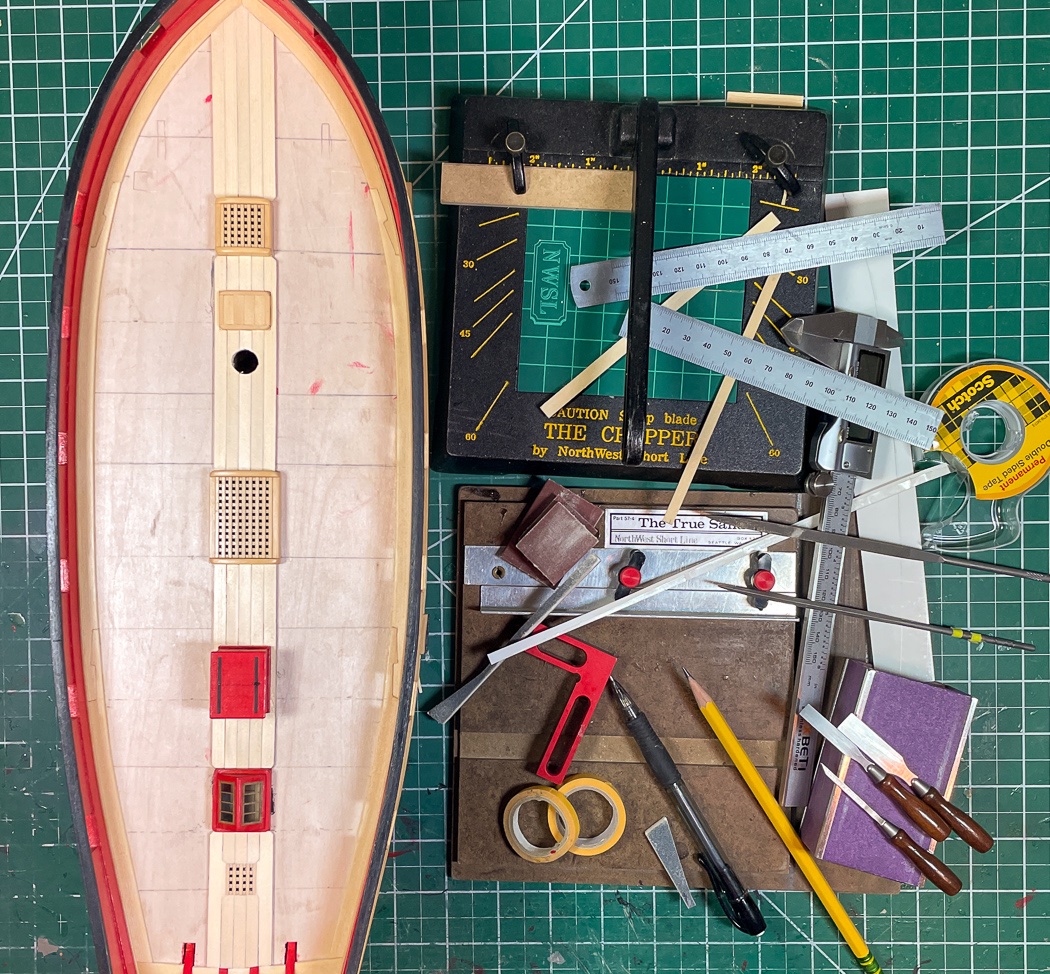
The decking begins. Not a lot new to report, just the measure, cut, fit, we’ve all done to lay a deck. This is the first time I’ve first glued the deck furniture to the false deck and the planking fitted around it. While it definitely looks better, it is also definitely more work to get the planking cut to fit. I use Tamiya tape to fit angles and tight space, just cutting the tape to the right fit, taping that to the plank and cutting from there. I also use card stock, just depends on the piece I’m trying to fit. While laying the first phase of the deck is straight forward, I piled up all the tools I used. It turned out to be quite the pile of stuff. I don’t know if I’ve mentioned The Chopper and The True Sander before, I’ve got these long before my Byrnes machines. They make life easier with quick cuts (it uses a standard razor blade so easy to change) and sanding to get tight square fits. It’s one more way to sand stuff along with my sandpaper, blocks, and sticks - sooo many ways to sand… In case you’re wondering things are even and centered, only the iPhone and the person holding it are a tilted throwing off perspective. I cut ¼ planks to have to fill the notched either side on the bread hatch, I’m sure the shades of the yellow cedar will even out as I go and once the completed deck is sanded and WOP applied. So now it’s time for the planking fan and tapered planks to form the curved deck planking. This will take a while…
- 778 replies
-
- 19
-
-
- cheerful
- Syren Ship Model Company
- (and 1 more)
-
Yes, the design of Cheerful is as you note. The cap rail is finished flush with the bulwarks. I wasn’t sure when I first read this in the monograph, but it looks good and Chuck notes it’s also accurate, at least for Cheerful. And yes the moulding strip was added only to the outer edge. It’s a much more scaled look I think. It worked for me, I hope it does for you too should you go this route. If it doesn’t I was never here🤣
-
I carefully sanded my cap rail flush with the bulwarks after they were painted. They needed touching up afterward but it wasn’t as bad as I’d thought it would be. Then it was Tamiya tape to mask off rail and bulwarks alternately to paint one red and the other black. id recommend you try that before ripping off anything.
-
Agree with Derek and James. Everyone brings something different to the table with their logs. If not none of us would do one after James posted his. 🤣
- 382 replies
-
- 2
-
-
- Vanguard Models
- Duchess of Kingston
- (and 1 more)
-
On Cheerful I was surprised by how thin the cap rail was called for in the plans after having done lots of kits, and how way much better it looked when I completed it thin. No offense, but it does appear to be a bit clunky, if you can thin it at this point I’d go for it.
-
I like them too, I think a lot of it has to do with how nice boxwood shapes up and looks after a couple of coats of WOP
- 778 replies
-
- 4
-
-
- cheerful
- Syren Ship Model Company
- (and 1 more)
-
Thanks Dana, The beer stein made an appearance, just not at 1:48 and not on the ship..:-D
- 778 replies
-
- 1
-
-
- cheerful
- Syren Ship Model Company
- (and 1 more)
-
On Derek’s recommendation I picked one up a while ago as well, puts the old third hands tool I had to shame. Sail holder is a clever use for it. I admire your patience in attaching all those reef points, it does make a big difference.
- 261 replies
-
- 5
-
-
- muirneag
- vanguard models
- (and 2 more)
-
I’ve never put stain on a model, not sure how it will react to glue, I’d recommend you do some off model testing. In regards to poly, it doesn’t hurt to do light sanding, but in a tight area or limited access it isn’t essential as long as it’s had ample time to dry. Again, I’d test it by making up samples off the model to be sure. Not all glues are created equal and some hold less if the bottle gets too old.
-
@Chuck @Edwardkenway @BobG @Matt D @Blue Ensign Thanks for the comments. I appreciate your taking the time. I did enjoy making these pieces, stress free work and I like how they came out.
- 778 replies
-
- 4
-
-
- cheerful
- Syren Ship Model Company
- (and 1 more)
-
Very kind of you to say so, but I’m a long way from that.
- 778 replies
-
- 2
-
-
- cheerful
- Syren Ship Model Company
- (and 1 more)
-
Nice looking ladder, I don’t see any flaws. Your scratch made parts are impressive work!
-
Time to rig the cannon.....😁
-
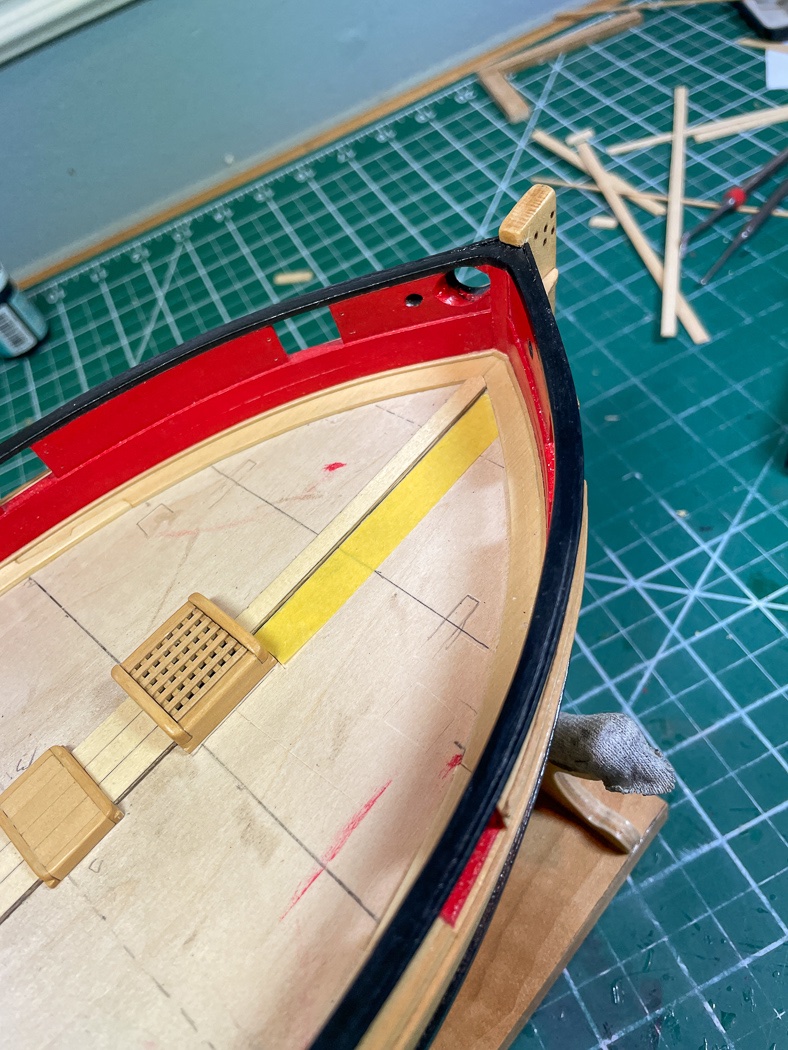
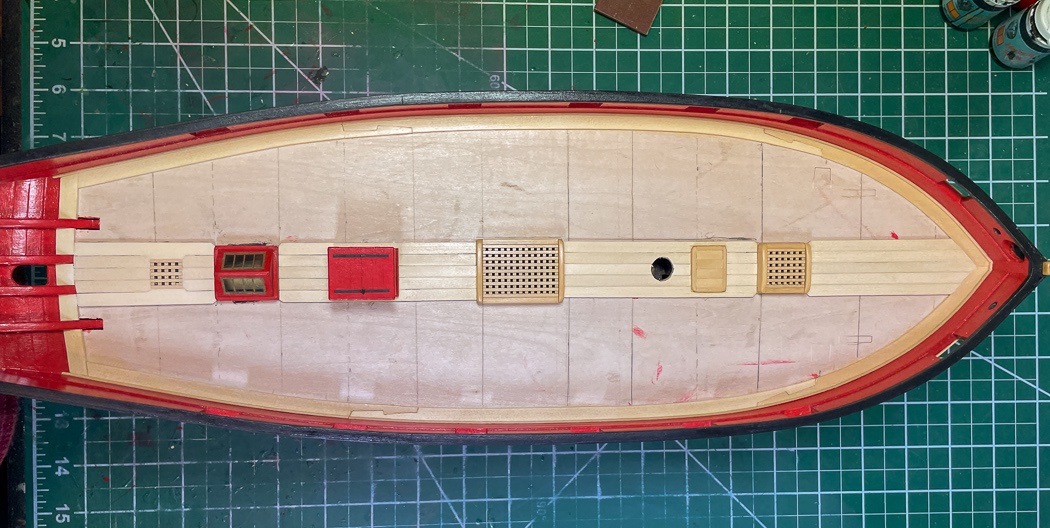
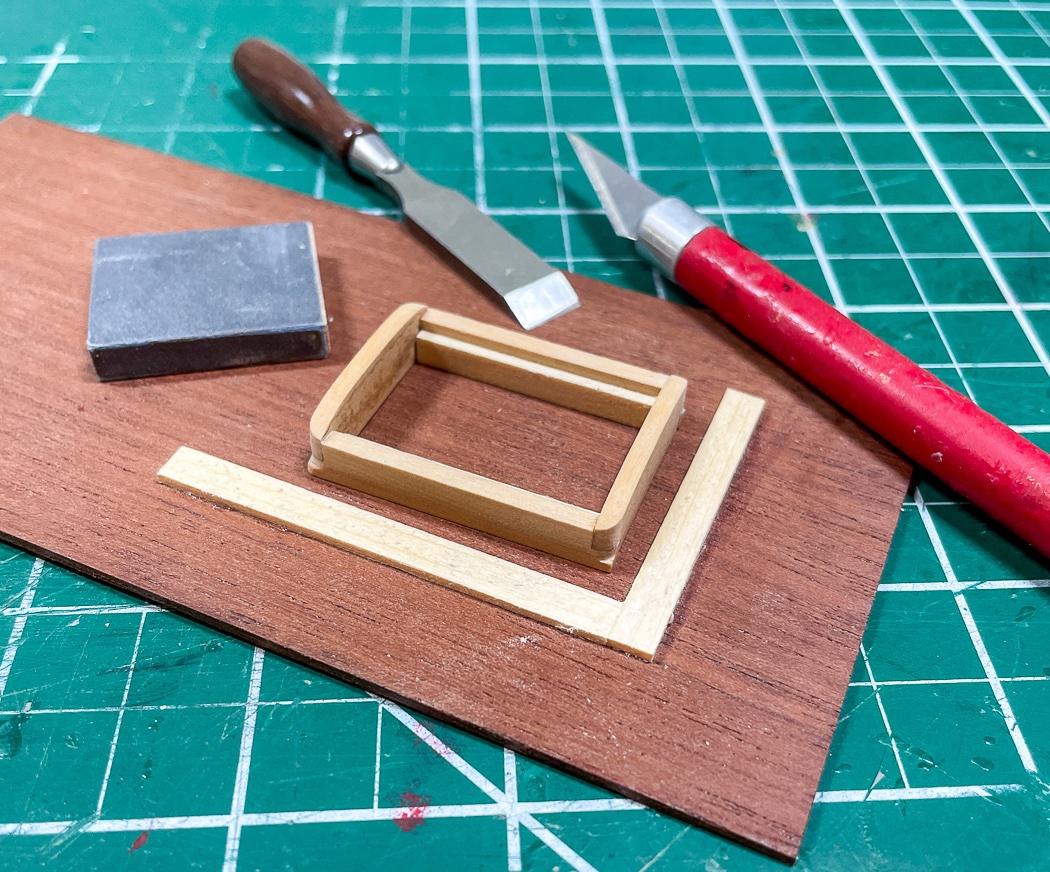
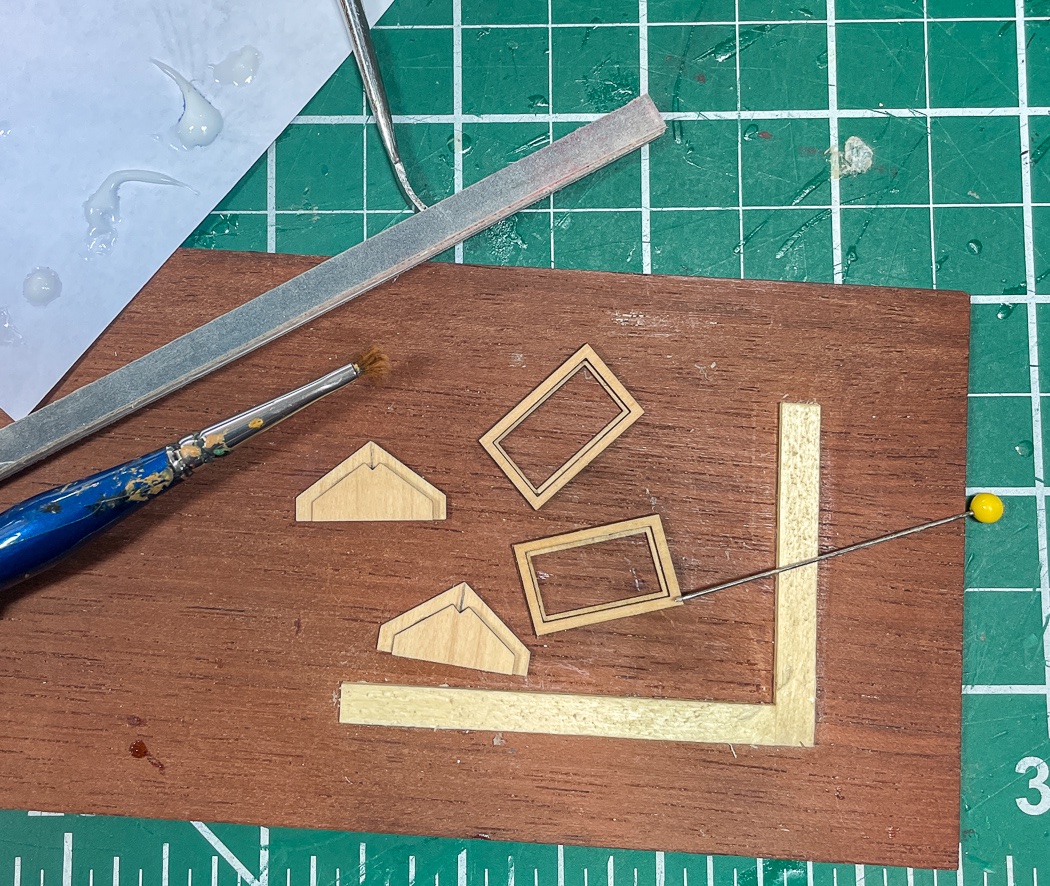
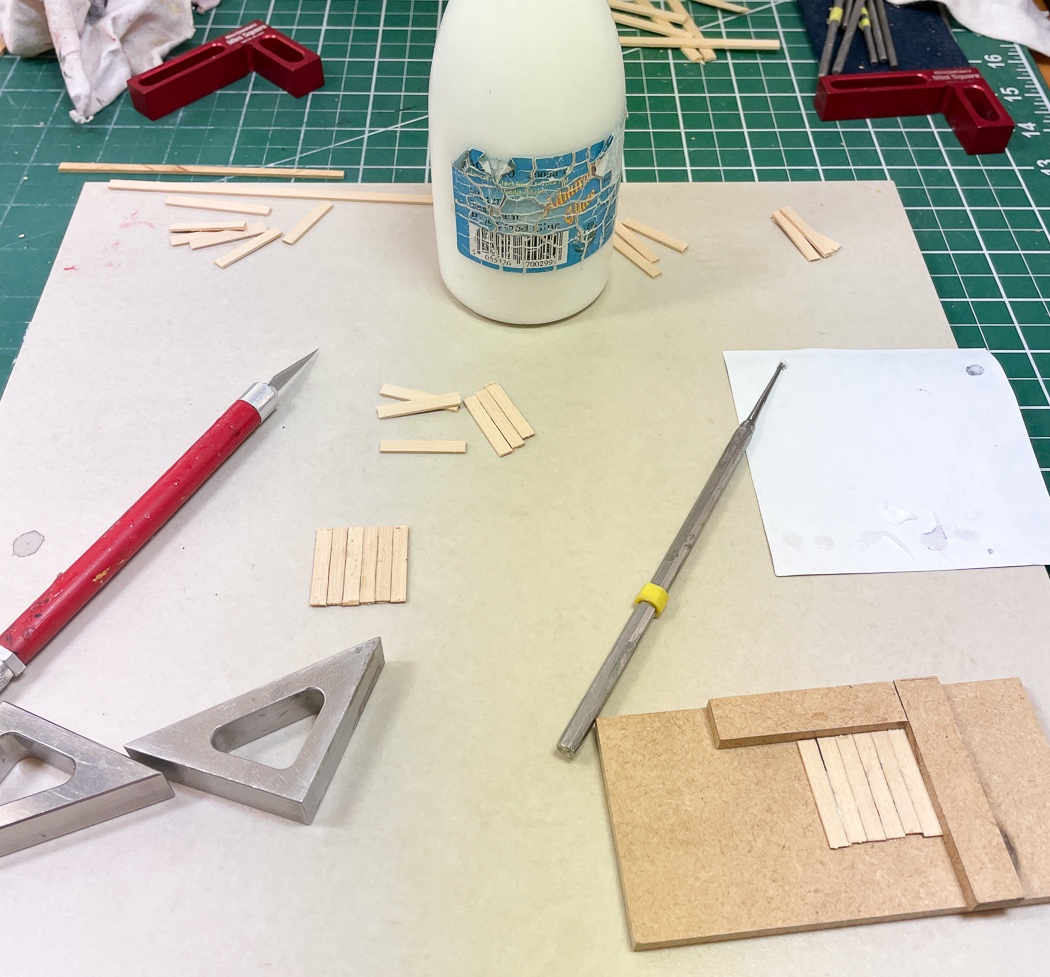
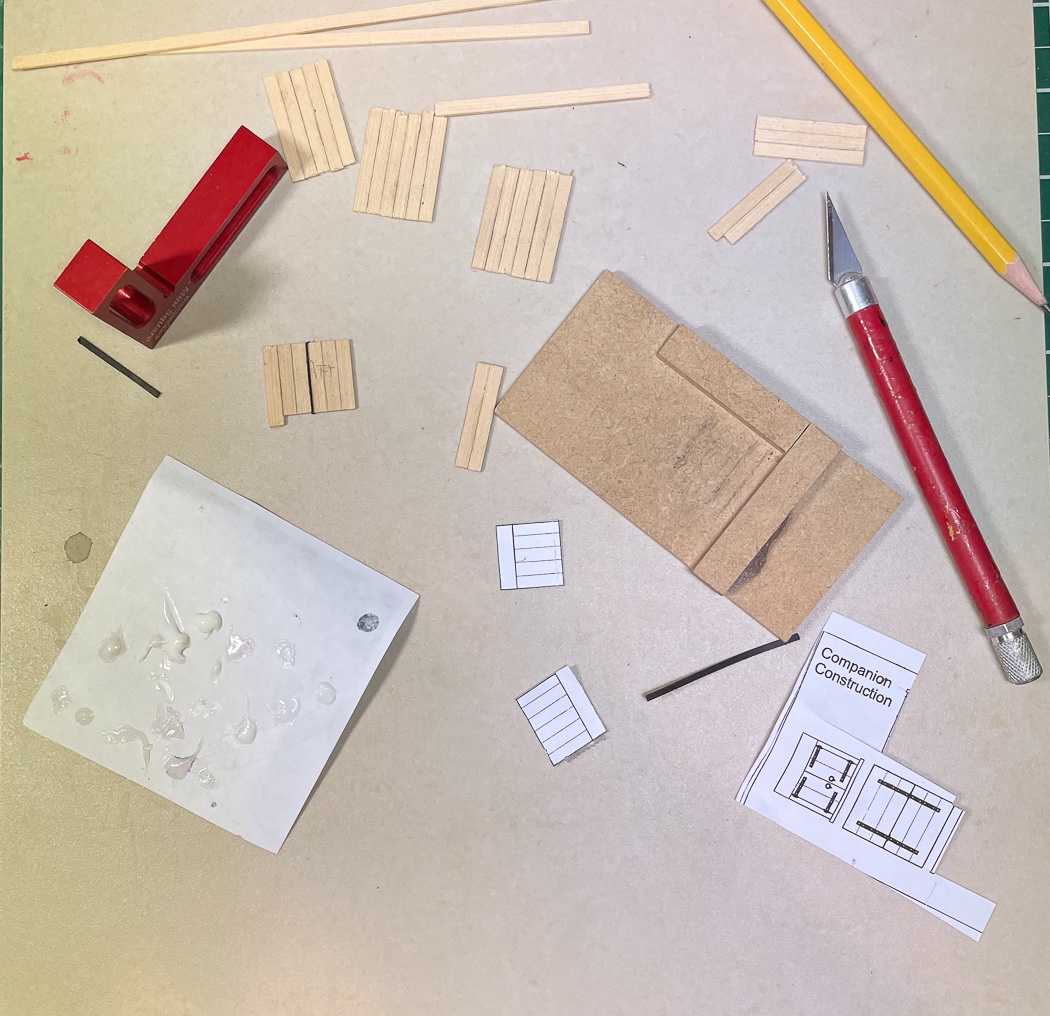
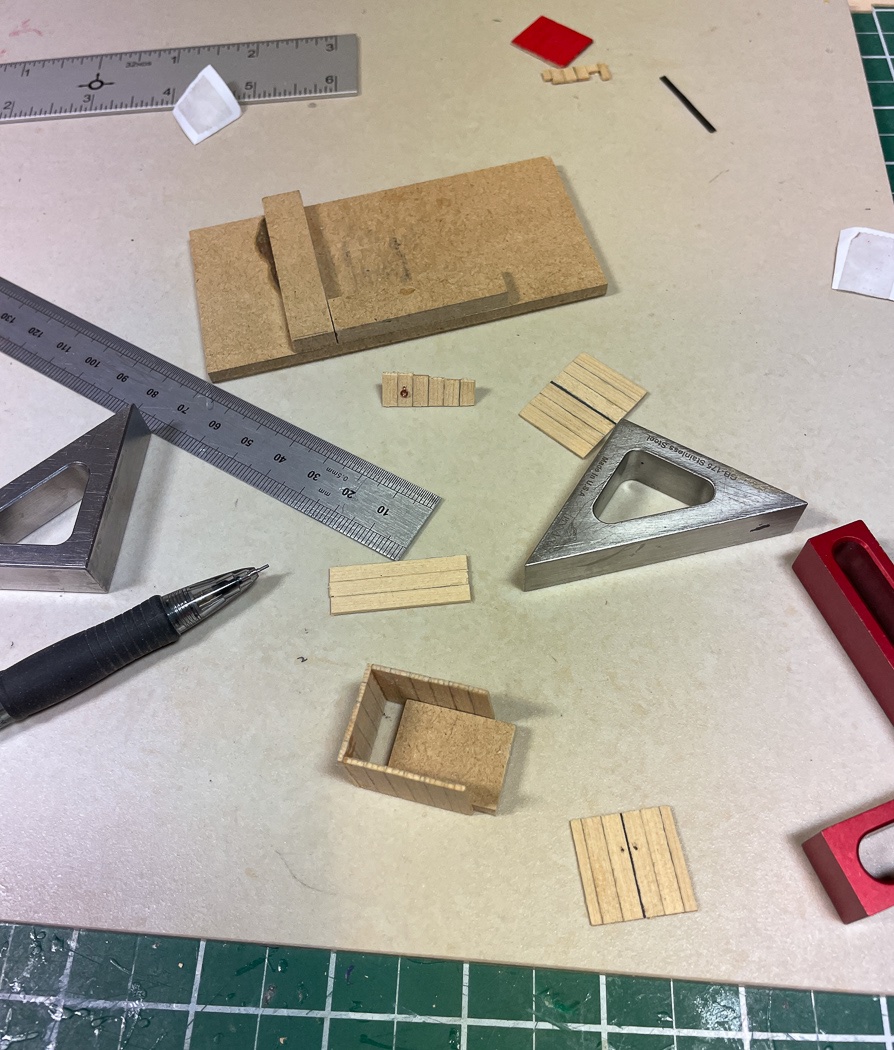
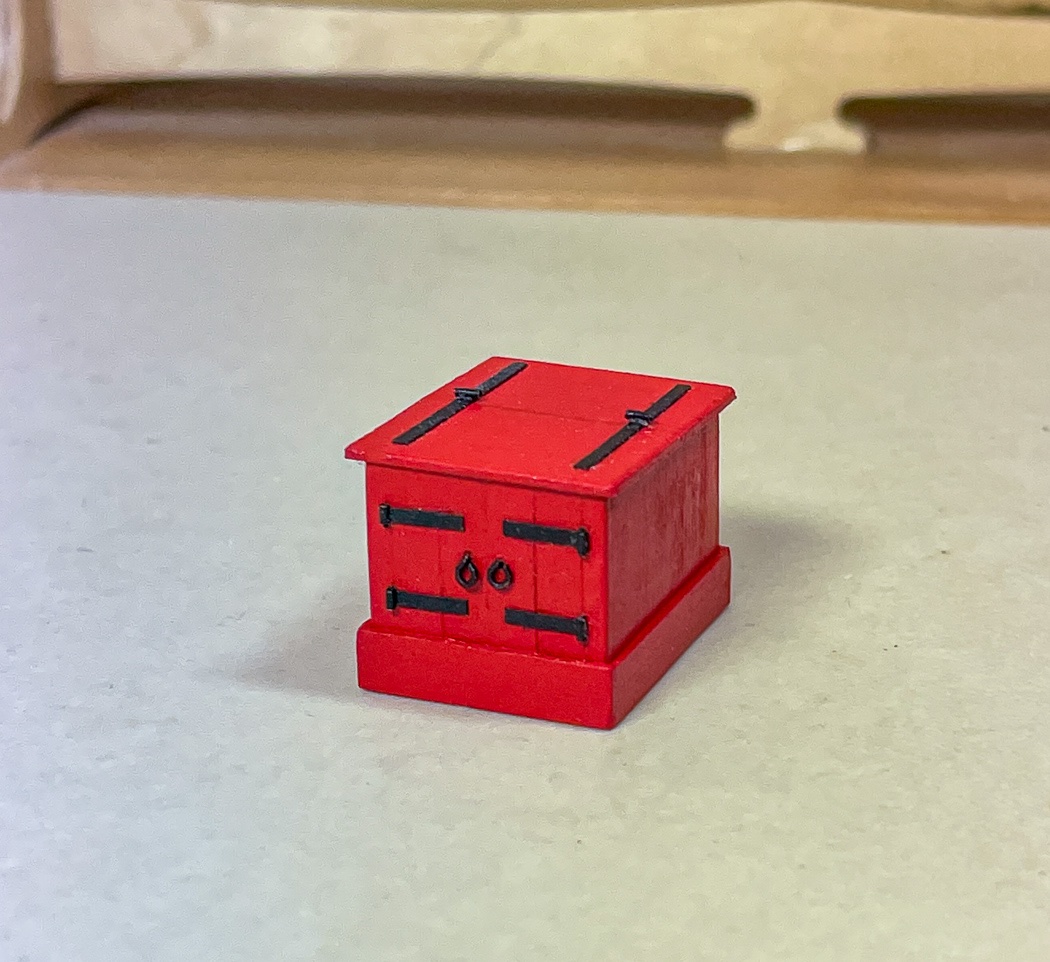
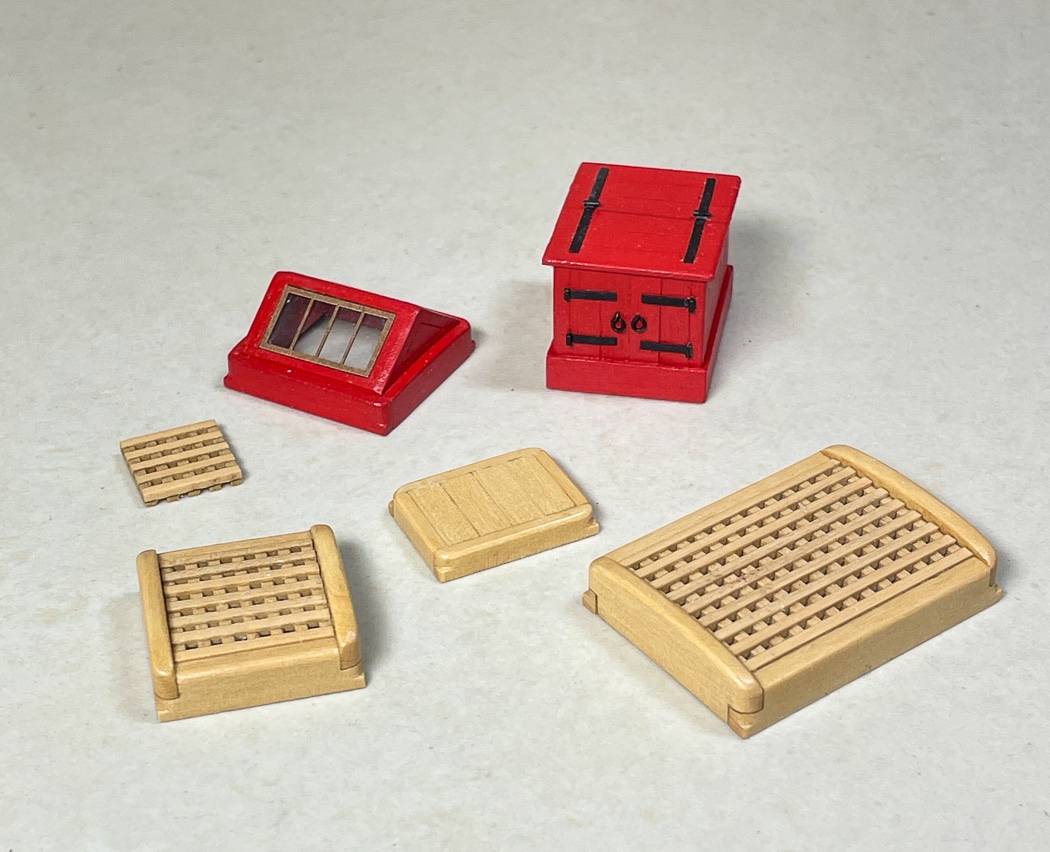
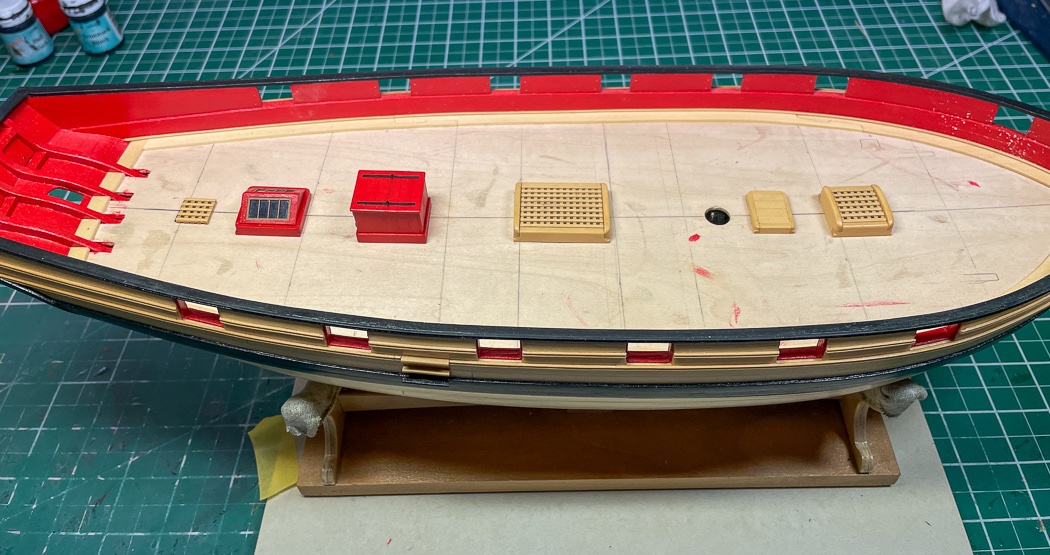
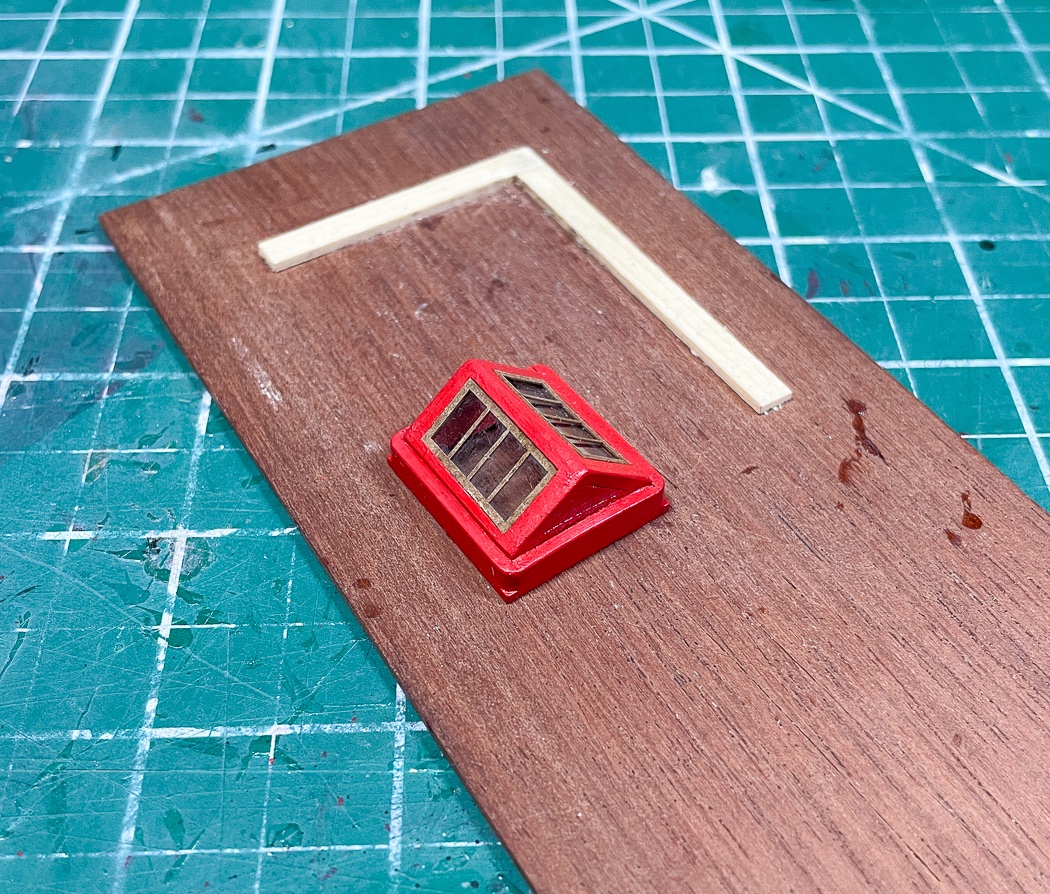
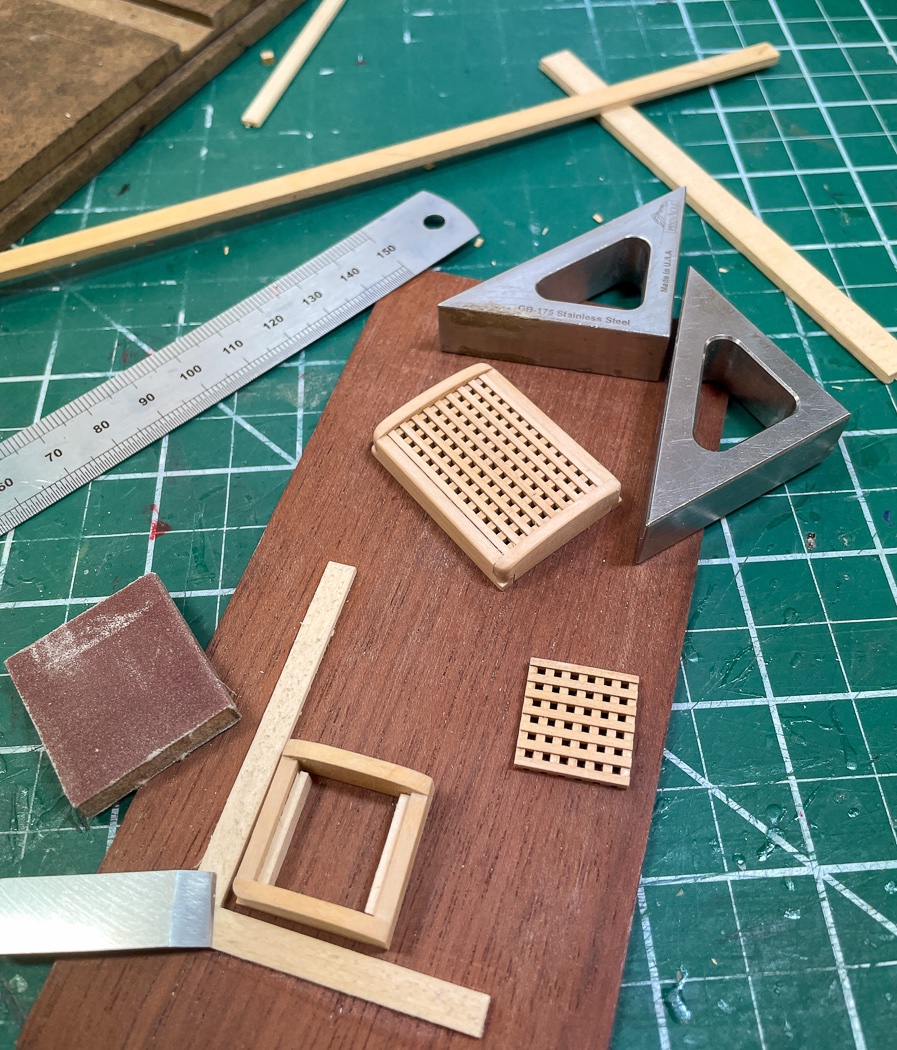
I'd once again wish to thank everyone for the likes, comments, and following along with my build. On I went to making the Deck Furniture, actually six mini projects and a nice change of pace. The hatches and skylight are based on Chuck’s mini-kits, the companionway was scratch-built. I first made the cross-hatches from boxwood using the Syren mini-kit. These made up into much nicer than the traditional jigsaw kit pieces I’ve used before. With the hatches made and sanded I had the measurements needed to make the frames. As Chuck points out, it’s easier to make the frame second than to force fit the hatch into an already made frame. I elected to pull out my limited supply of boxwood to make the hatch frames, both to match the hatches themselves and to provide a little contrast to the cedar deck. Plus who doesn’t love to work with boxwood. I made a simple jig both to help square up the frame and more importantly to notch the frame to fit the deck. On Cheerful the deck furniture mounts directly to the false deck with the planking fitted around it. I used my chisel, #11 blade and a jig consisting of planks from the batch I have already cut for the deck glued at 90 degrees to some smooth scrap to round off the corners while leaving a 90 cut matched up with the decking. You can see the resulting corners in the photos. The hatch material is curved, so the frame is rounded as well. Corners on the hatches are done with lap joints. This is a nice exercise in precise cutting, with my Byrnes saw and cross table accessory it’s no problem than other than getting the math right. I think the rounded corners, lap joints, slightly rounded hatch tops and frame all in boxwood made for pretty nice looking hatches. A couple of coats of WOP followed after these photos. Next up was the skylight - the four pieces in the photo are actually eight pieces, each being two layers. I used PVA white glue applied with a needle to give me time to keep things aligned and to keep it neat. The lower layer of the frames is the inset for the “glass” (acetate) and glass frame, a brush dipped in water cleared away any excess glue. This mini- kit is very well designed, its amazing to me how the laser cut pieces all fit so perfectly together (when it’s done it consists of six layers). I got a little caught up in the doing and forgot to take photos, but next was squaring up and assembling the pieces, including cutting the corners identical to the hatches using my handy jig. I've noticed Cheerful builders vary here. Some opt for natural color on the skylight and some forgo the coaming. My including the coaming and RED paint is purely personal choice. Last up is the companionway, fully scratch built based on the plans. I used 1/32 board cut into planks, The width of the planks is determined by the plans, divided by six. I then edge-glued those planks with PVA after first penciling one side of each edge (I used black sharpie on the edges where the doors and top would separate if they actually worked). Although I was painting it red, this helped to keep some definition to the planks - otherwise I could have cut solid pieces. I made up the four sides, all larger than needed, used double sided tape to connect the plans to the planks, then made the required cuts with a #11 blade. Precision is important with making any cube, in this case there’s a little extra challenge added since the sides are angled to correspond to the slope of the deck. I cut a piece of scrap MDF to the interior measurements, this made it much easier to square up my “box” along with my mini-engineering triangles and squares. I’ve had these for years, they come in handy a lot. The back panel was made up a little different with narrow outer edge planks to distinguish the doors. Since the top is wider and longer, but still six planks I cut a different width from the 1/32 cedar board, again using the plans (the top in this photo ended up being a reject). Here is another point where Cheerful builders vary, either no coaming, integrating the coaming as part of the the sides or leaving it natural. I chose to have the coaming stand proud, but only a little bit by using .025 board. For the latch handles I simply bent a couple of eyelets 90 degrees. The hinges are made up of 1mm wide black card stock. I went back the Syren hinge mini-kit and cut 1.5mm lengths of the micro brass tubing I still had left. Though 24 gauge wire was suggested I thought the brass tubing is a crisper (looks good on the stern ports so...). All of this was assembled using white PVA glue to ensure I could align everything properly. So here are my completed mini-projects ready to mount. I like the look of the boxwood hatches and marvel at the precision cutting of the skylight kit (which is also angled to meet the slope of the deck). Here they are sitting loose on their future homes. I simply painted black squares below the hatches, not much can be seen through them. A long while ago just for grins I’d put a bit of decking on the frame below the cutout of the skylight and painted black around it. I was please to find out that flooring can be seen through the skylight, adding a little depth and well worth the five minutes it took at the time. Now I’m thinking why didn’t I build a checkered floor, a table, a small beer stein, and a seated 1/48 character down there (well, it’s not that visible….). Now I glue these down, hopefully all in a straight line, and begin the process of planking the deck.
- 778 replies
-
- 19
-
-
- cheerful
- Syren Ship Model Company
- (and 1 more)
-
That you know what any of this means is impressive enough on its own, I have no idea what you said 🤣😂
- 261 replies
-
- 7
-
-
-
- muirneag
- vanguard models
- (and 2 more)
-
I join James in recommending you start a build log of your own, it can get confusing for us following to see two different models in the same log. You can learn a lot by reading others, often you learn more by sharing your own. Best of luck on your build.
- 382 replies
-
- 3
-
-
- Vanguard Models
- Duchess of Kingston
- (and 1 more)
-
Likely we’ll founded, this can be tricky. A wire jig as a spacer helps but it’s about care and balance tensioning. Resist the urge to over tighten, it’s not a guitar string. I admire your going a level above on the rigging, nice work. Aside from rat lines I enjoy this stage. I have no idea how I got every historically standing and running rope installed on Pegasus, I’m hoping Cheerful proves a little easier, but I’m months from that. I mentioned this somewhere recently, my most used rigging tools are two large and medium needles with the threading end cut off, leaving a fork, and the sharp in glued into 6 inch dowels. I can maneuver the rigging even tying off on belaying pens. That and another dental tool, long but small scissors.
- 436 replies
-
- 4
-
-
- vanguard models
- alert
- (and 1 more)