


glbarlow
-
Posts
4,126 -
Joined
-
Last visited
Content Type
Profiles
Forums
Gallery
Events
Everything posted by glbarlow
-
 For Flirt I did it like BE described, with the plans, a pin vise, and eyeballing the angle. For Cheerful I was a bit more exacting by inserting a fake mast with lines tied on, I ran those lines to match the plans then pre-drilled the holes based on those lines and finally glued the chain plates on with the standard little nails. It’s shown in my build log (post #496), if that helps.
- 505 replies
-
- 4
-

-
- vanguard models
- Sphinx
- (and 1 more)
-
Gun port patterns are never ever easy, you’re doing fine. For the record I did say lightly on those tabs, the good news is they’ll break off easily when you want them to now.
-
You work fast, took me along time to get to that point.
-
Which is the correct carriage size for the 1 9/16 barrels? I probably missed it, is the binnacle a mini-kit, I don’t see one on SSMS?
- 1,784 replies
-
- 1
-
-
- winchelsea
- Syren Ship Model Company
- (and 1 more)
-
A fun little project, it looks great.
- 642 replies
-
- 2
-
-
- winchelsea
- Syren Ship Model Company
- (and 1 more)
-
Well done Frank.
-
😊Not what I was referencing, I’m glad it helps you. Btw, it’s a poor substitute for lining the hull to really get it right but it works.
- 362 replies
-
- 1
-
-
- Amati
- Lady Nelson
- (and 2 more)
-
I’ll skip providing any further comments, enjoy your build.
- 362 replies
-
- 1
-

-
- Amati
- Lady Nelson
- (and 2 more)
-
Common problem from not overlapping the next plank to the one above it and starting the taper where they naturally cross. You’ve started all the tapers for the bow too far back. Another reason for the importance of lining the hull. It gets better with practice.
- 362 replies
-
- 2
-
-
- Amati
- Lady Nelson
- (and 2 more)
-
Thanks Bob, it’s definitely nice to have those templates now.
- 840 replies
-
- 1
-
-
- winchelsea
- Syren Ship Model Company
- (and 1 more)
-
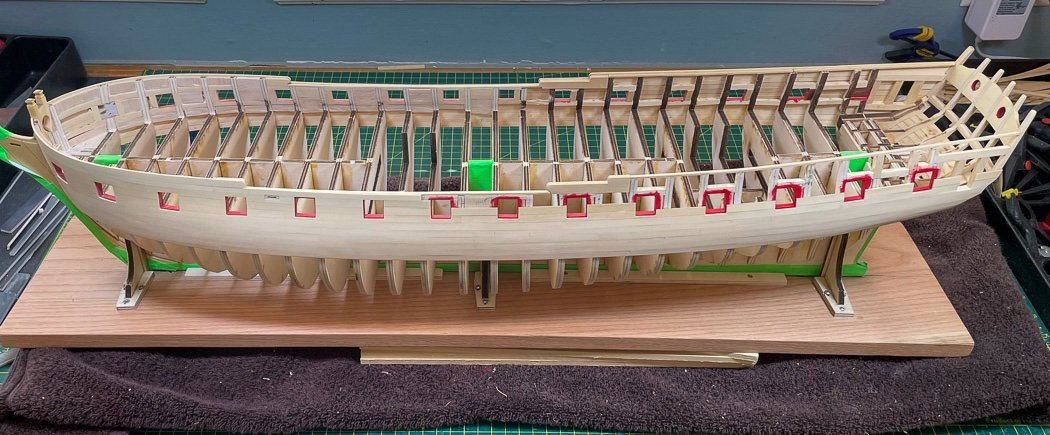
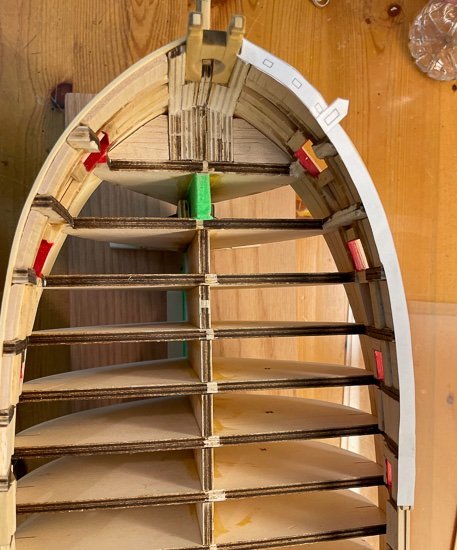
It’s a process. Still working on cutting out ports to complete planking above the wales. I finished the port side bow and needed a change of pace after fitting 20 ports (8 more to go) so I decided to do some preliminary fairing on the starboard interior. I’ve added 1/8 balsa between the frames to act as spacer, that plus the planking gets me close to the 3/16 required. I’m not done still more to do, but its close. It’s a little heart stopping to grind this out with a very light touch of the Dremel. It is made a little easier, still requiring deep slow breaths, by my new addition of a Proxxon pen sander for a lighter touch, then by hand and with chisels to clean up when I get close. I have it close enough now to go back later and polish up what I’ve done and complete the starboard interior. Really I just wanted to establish a little confidence I could pull it off and not have a port sill fly off the ship. Cheerful now seems like a piece of cake comparatively. Good news, with both sides of the bow now planked above the wales I’ve confirmed via the Chapter 9 template they meet the required shape for when, in the far distant future, I get to Chapter 9. Back to the port side planking now.
- 840 replies
-
- 21
-
-
- winchelsea
- Syren Ship Model Company
- (and 1 more)
-
Looks good to go.
-
Upload or type in your text then upload the photos. Place you cursor where you want to place the photo. Hover over the thumbnail of the photo, then click on ‘Insert’ and there you have it.
-
That’s right.
-
Don't have to hope for the best. Leave the aft edge on those forward of the waist and fore edge on those aft of the waist (so as not to overdue it and lose the shape and to keep both sides even) while taking the edges off the couple of center bulkheads so its smooth all the way. The batten needs to contact at least 90% of the bulkhead but if done well it will contact 100% of every bulkhead front to back. The stern takes a little more attention to follow the flow to the counter, it isn't especially hard on Flirt as my log will show. Slide the very thin batten up and down covering at least 4-5 bulkheads at a time, up and down back and forth - it will be right. Then it's just tapering and edge bending the first planking and you're home.
-
Looks like you have some fairing to do, this is the most important step on every model and critical to what comes after.
-
Red Ochre Paint
glbarlow replied to starlight's topic in Painting, finishing and weathering products and techniques
Admiralty Paints Red Ochre is the best there is. Get it from Cornwall boats, excellent service whatever country your in. -
More or less yes, it’s tapering thinning the deadwood area so it’s 2mm at the end where the stern post attaches, not the whole deadwood. Just a variation what James describes in a he instructions. I think he went thinner and I wasn’t comfortable with that.
-
I don’t know, that shocking orange color of the Sphinx could be the way to go 🤣😂
- 857 replies
-
- 2
-

-
- Sphinx
- Vanguard Models
- (and 1 more)
-
It really looks great, so meticulous.
- 607 replies
-
- 1
-
-
- winchelsea
- Syren Ship Model Company
- (and 1 more)
-
You are certainly doing a lot of nice custom work on this model, all exacting and well done!
- 419 replies
-
- 5
-
-
- Victory Models
- Pegasus
- (and 2 more)
-
You’re not alone in this, I sorted it out but not without challenge.
-
You should fare the bulkheads so there is a smooth run of a test plank fore to stern before adding the gunport strips, the probably would fit better. You definitely need to fare them before starting planking. The deck needs to be pushed / weighed down and glued to the bottom of the bulkheads side to side forming a slightly bowed deck before the gunport parts are added. Hang in there, solving problems is have to fun, for me creating often seems to be the other half.
- 65 replies
-
- 2
-
-
- Ballahoo
- Caldercraft
- (and 1 more)
-
I think what we did with part 21 is perfectly logical 😊 As you probably discovered the bulkheads have a little notch at their base. The way to get the deck to fit is to get one side to fit under the notches then work it down the other side to fit into those notches. It is not a simple task for sure and I don’t recall if the notches are mentioned in the instructions. The notches are a great idea for holding the deck, not fun to get it there. The stern frames are indeed fragile little things. Solving problems and fixing mistakes is all part of the fun, you did it and you’re moving forward, congratulations!
