


glbarlow
-
Posts
4,126 -
Joined
-
Last visited
Content Type
Profiles
Forums
Gallery
Events
Everything posted by glbarlow
-
 Thank you, I’m glad you found it. Cheerful was a joy to build.
 -
So much nice detail work. Very well done!
-
The second layer and paint makes it look so much more like a ship. Fun stuff😊 Your planking looks great.
-
Cool, I like the entry way sign to the “factory.”
-
Thank you Frank! Thank you Dusan. You, Frank, and I are all about the same place. We’ll continue on together.
- 840 replies
-
- 2
-

-
- winchelsea
- Syren Ship Model Company
- (and 1 more)
-
Thank you, but it’s far from that. I feel every mistake
- 840 replies
-
- 1
-
-
- winchelsea
- Syren Ship Model Company
- (and 1 more)
-
Speaking of literal. This is a feel thing and it isn’t hard, just practice it some. I use a travel iron for bending (right on the wood of course) and just recently added a small crafters hot air device, not a hot air gun, for twisting. I use NO water, sometimes I may wet my finger and rub it over the wood. Just heat the wood, slowly bend it, hold it with clamps. I don’t bother letting it cool completely, it may spring back some or not. I can bend a blank in about a minute start to finish, a plank with two bends and a twist may take 3-4 minutes. If I don’t bend enough or bend it too much I just do it again. How long depends on the wood and the amount of bend. Again it’s a feel thing, it comes with practice. Read too many options here and there’s a danger of becoming paralyzed. I show my (actually Chuck’s) method in my current and previous two build logs.
-
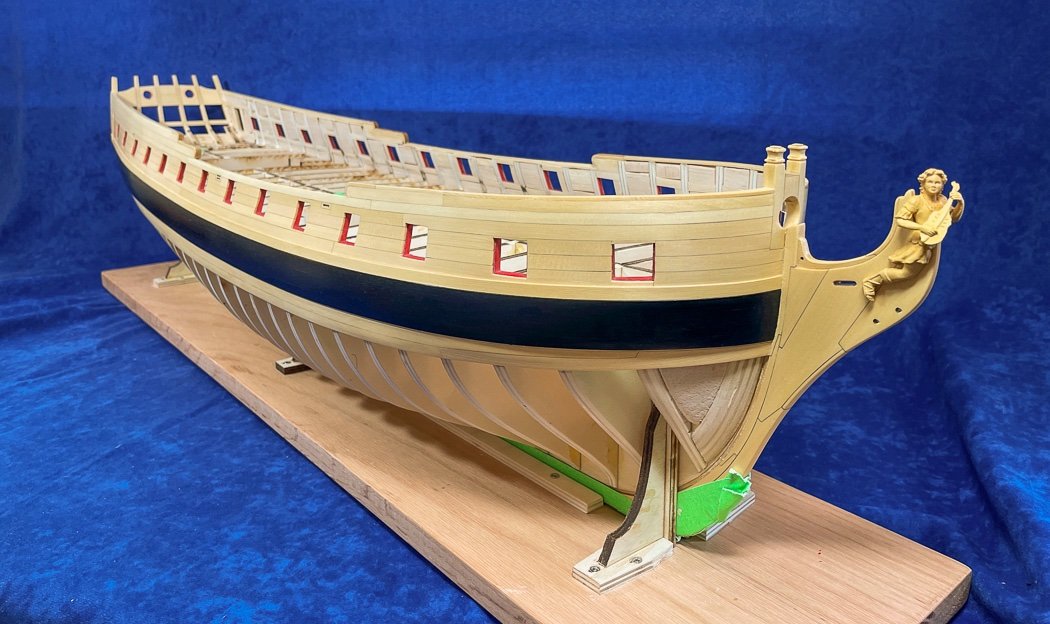
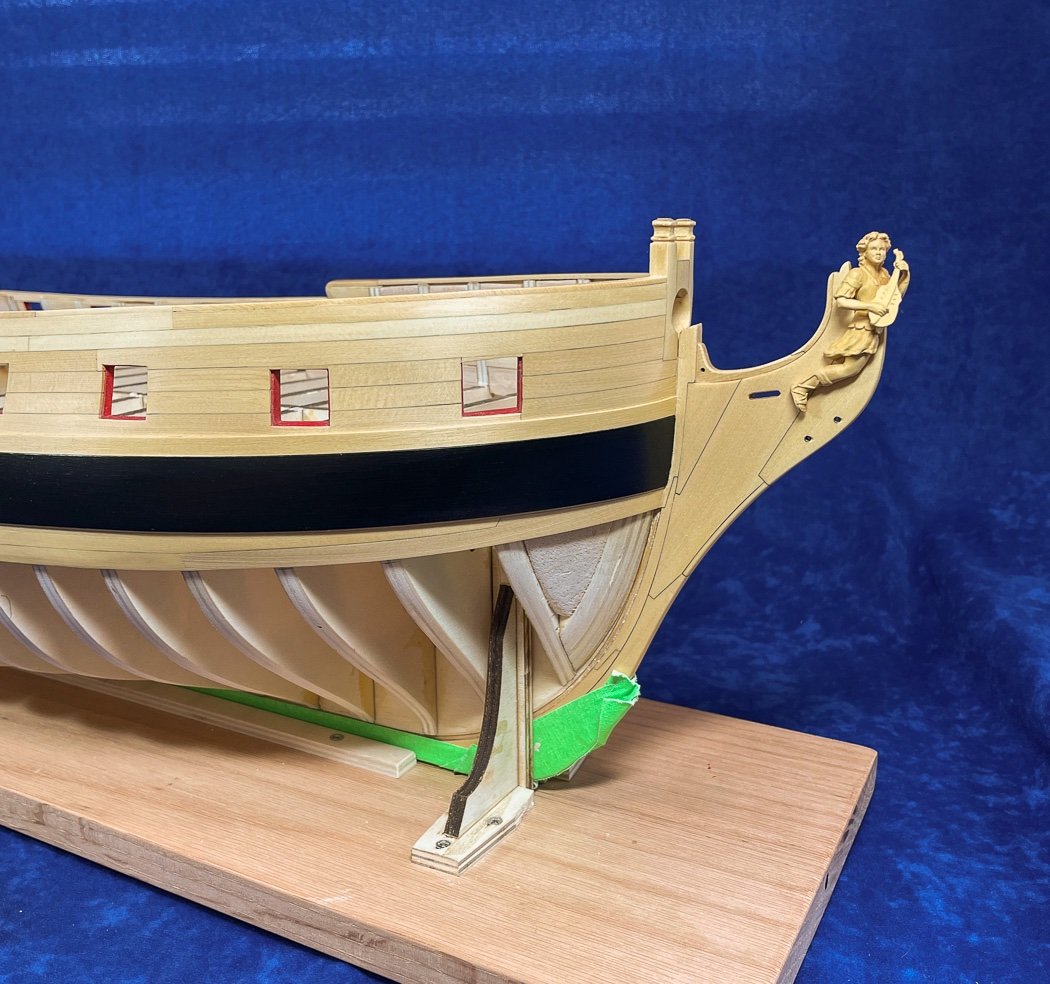
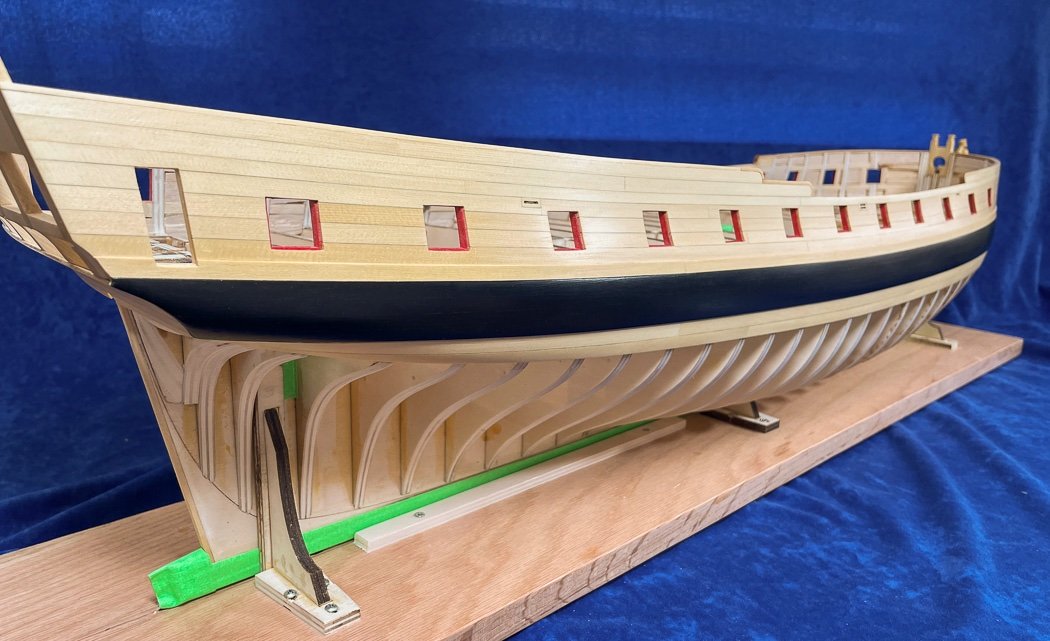
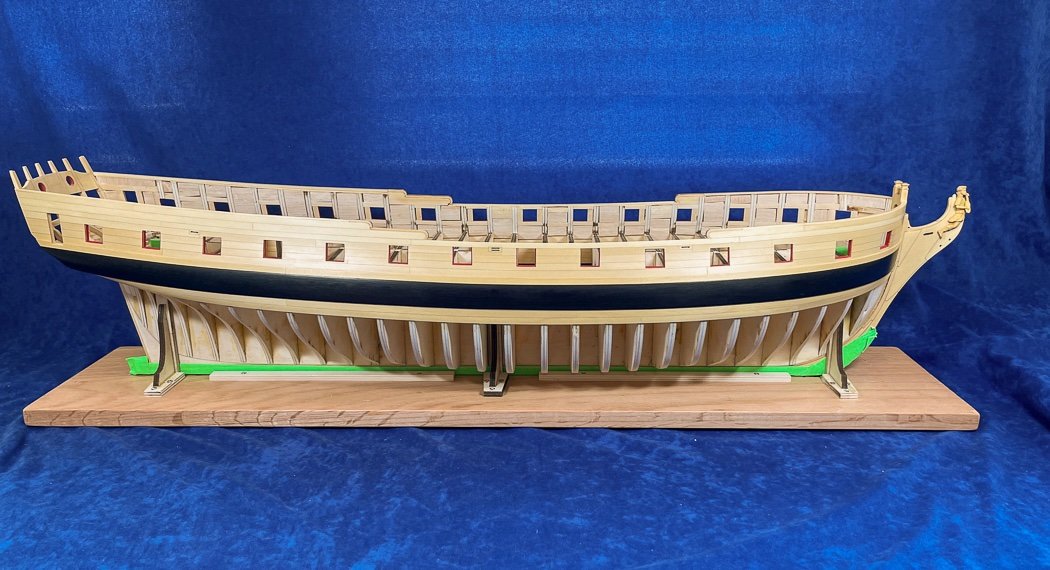
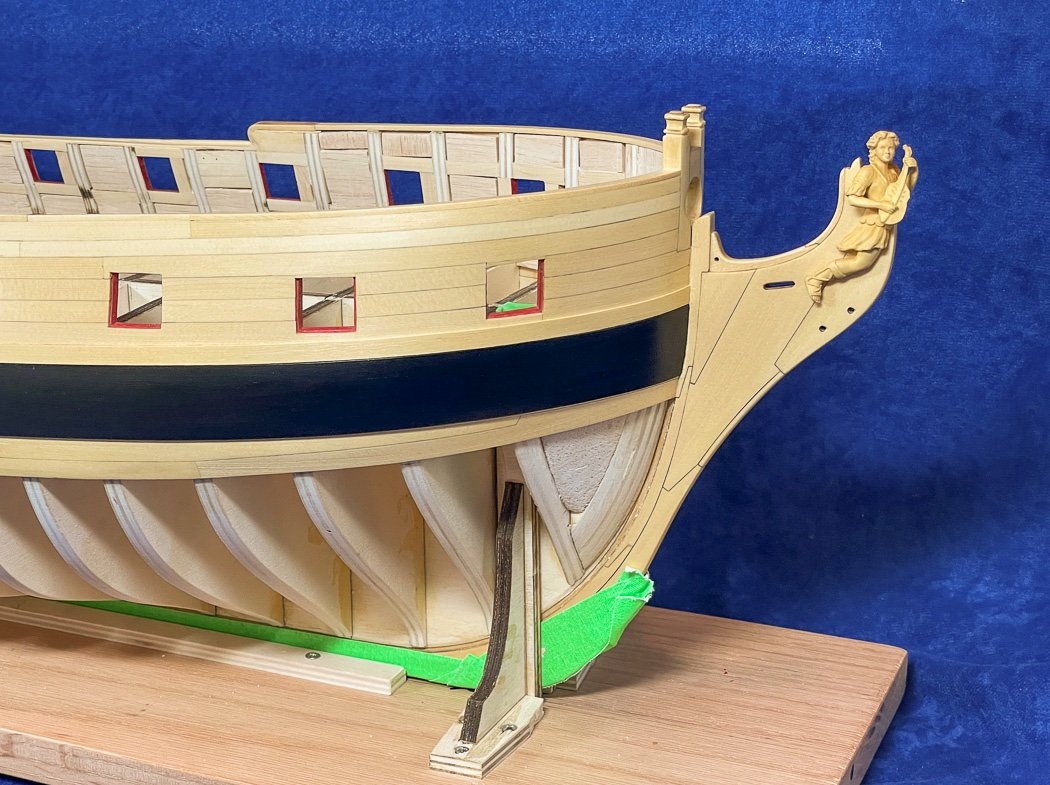
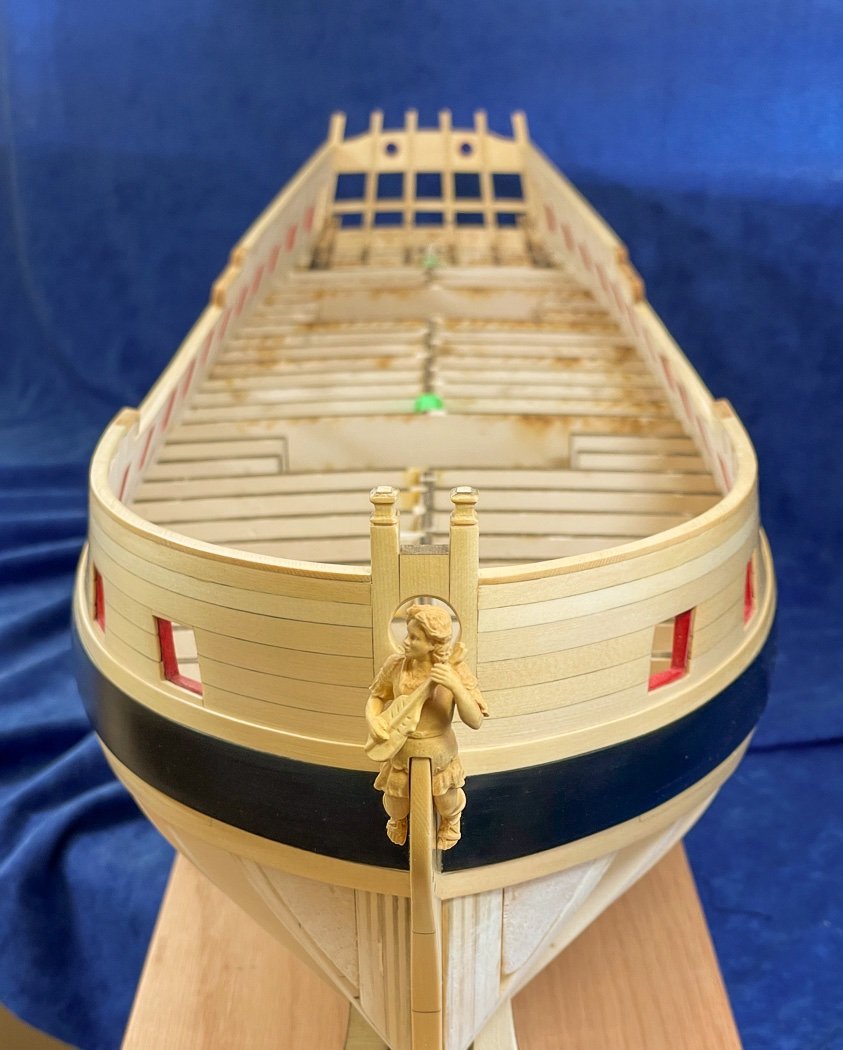
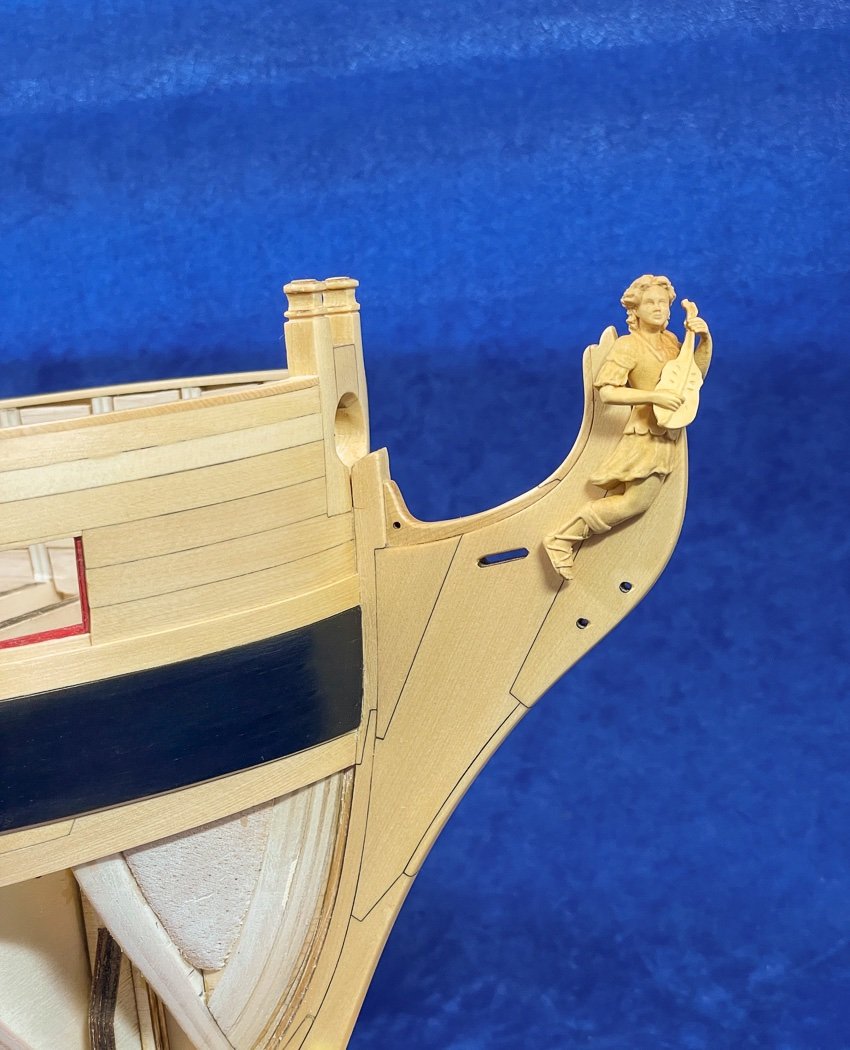
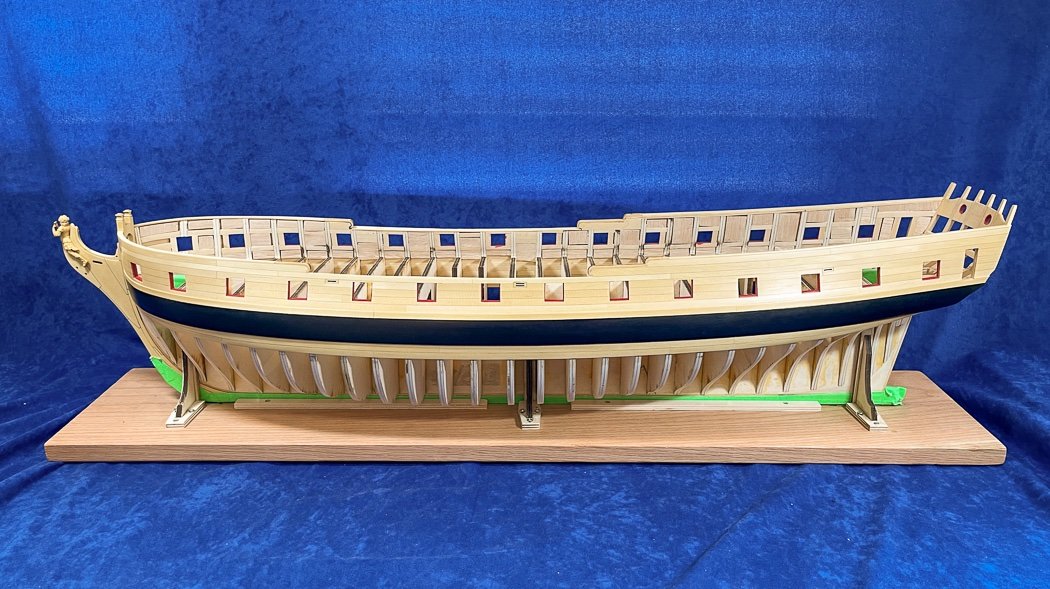
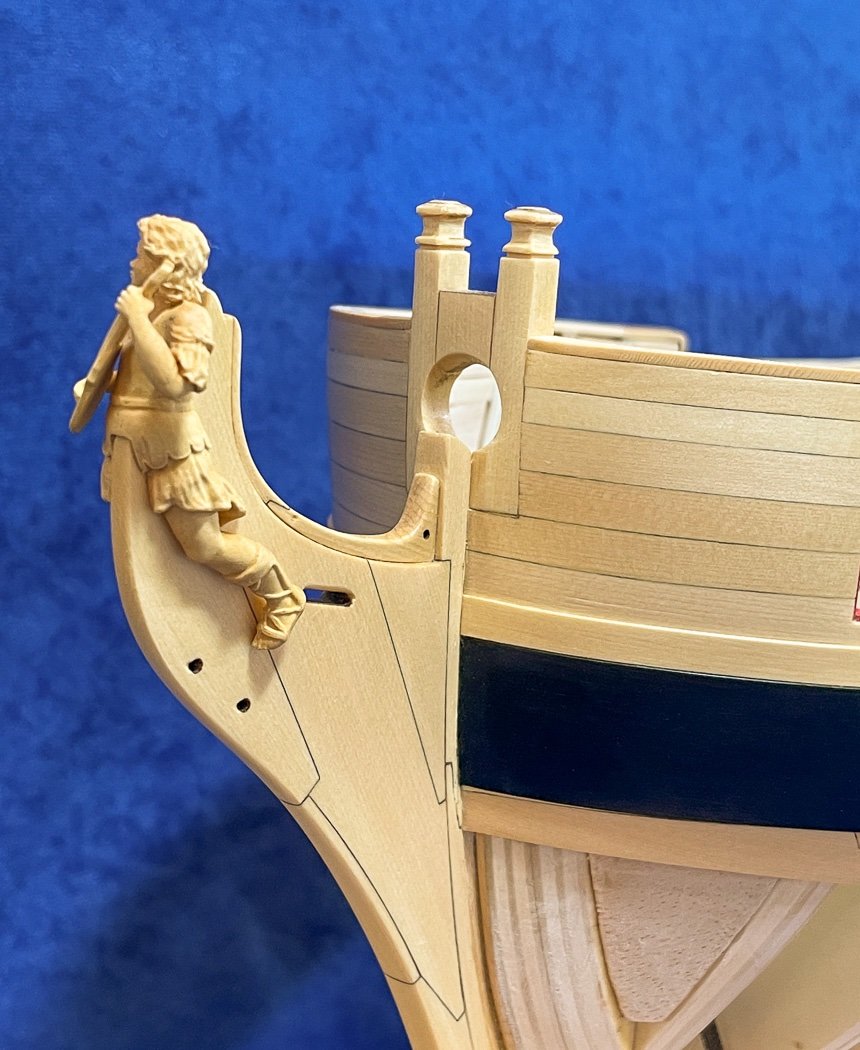
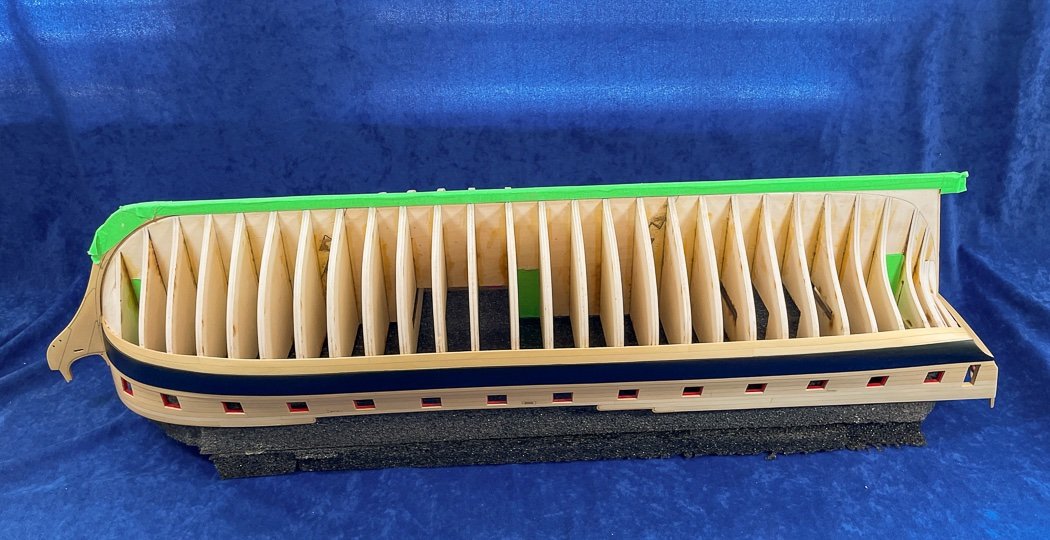
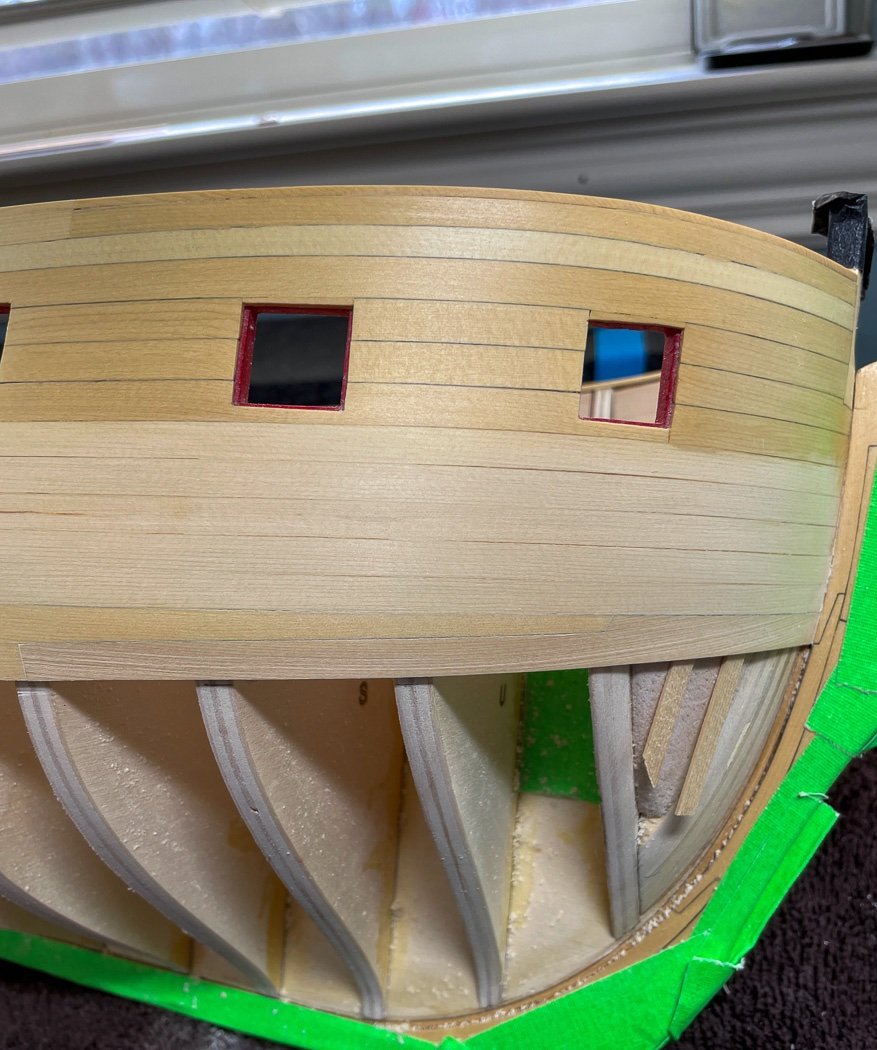
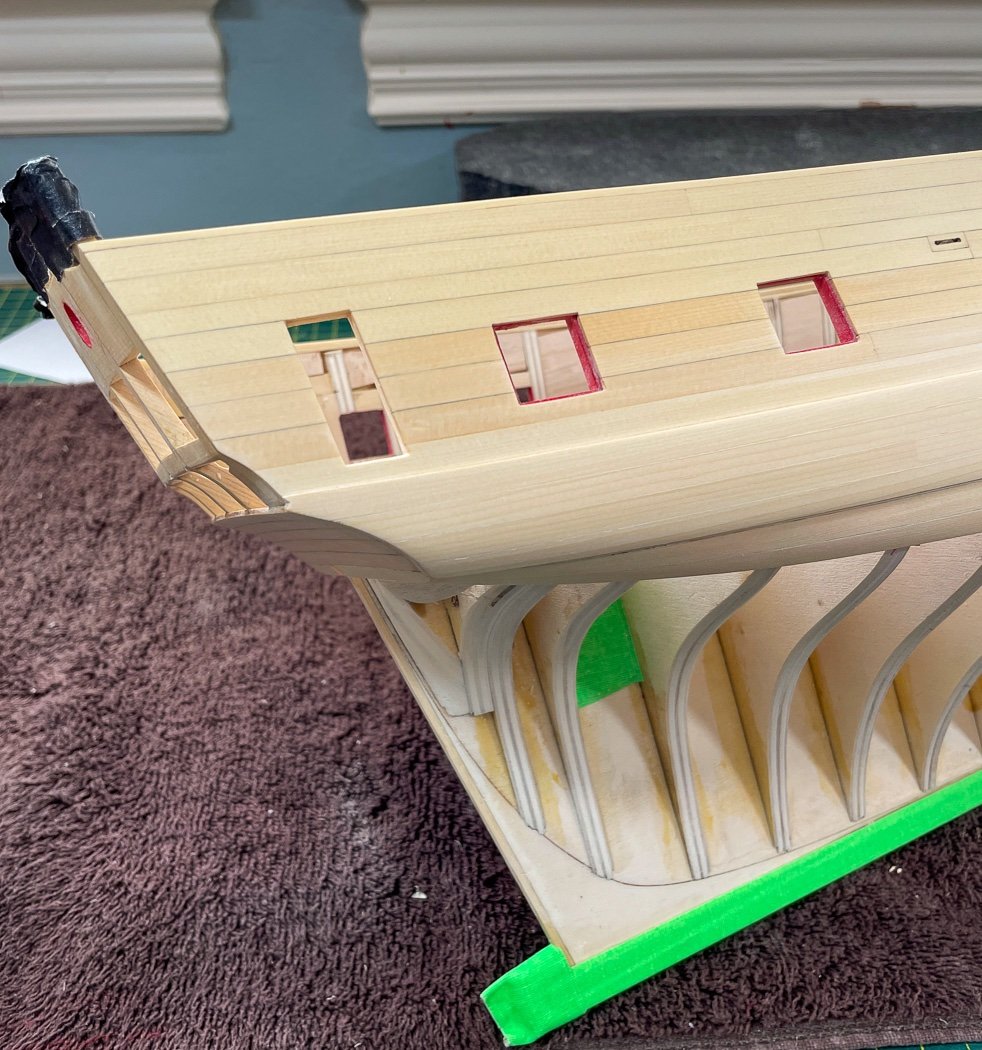
Wales and upper planking complete The wales are now painted and finished. Before I move on to planking the rest of the hull I thought I’d pause and capture a few current state photos. Just on a simple blue background and with my iPhone, I’ll bring out the camera gear and white backdrop when I finish the hull. I chose to stay with my favorite Admiralty Ironworks Black. While purposed for simulating metal, I like the deep black matte finish it provides on wood. I started and finished with a coat of WOP. I like the smooth semi-polished finish the AYC wood allowed me to achieve. I sanded between coats with 400, then 800, and finally with 1200 grit sandpaper. Admiralty Paints come ready to use, but I thinned that a little more with distilled water. I feathered the wales and the black strake into the stem. It's nice to remember the top two rows will be covered by paper friezes later in the build, it made the surgery I did earlier easier to complete not worrying about color match. The black strake started at 1/32, I ran it through the thickness sander to about .63mm. Which I learned is about as thin as the sander can go. It stands proud of the planking and the wales stand proud of the strake, not by much but enough to look good, or so I think. Just to show my ship does have two sides. From the bow dead on. What is that dude looking at. The quarter shots - which does such a nice job showing the graceful lines. One from slightly above. A couple from full profile. And finally, the position my Winchelsea will be in for about the next 6 months. I’m taking a brief pause to take care of some neglected home chores, like tax prep. My photos won’t be very exciting for a while but I’ll post some progress photos from time to time just so you know I’m still here. Thank you for your support, comments, and likes. They are always appreciated.
- 840 replies
-
- 20
-
-

-
- winchelsea
- Syren Ship Model Company
- (and 1 more)
-
I hope those hooks work out. I’m all for making our own hooks but the ones needed for cannon rigging would just look out of scale for anything we could practically make. I will vicariously enjoy the rigging watching yours develop 😊.
-
Really amazing work, such patience, diligence, and technical skill! Actual working door latches, wow.
-
Well done!
-
Thank you. The so far part is my ongoing challenge, I have a lot of planking in front of me😊
- 840 replies
-
- 3
-
-
- winchelsea
- Syren Ship Model Company
- (and 1 more)
-
Thank you. Those are two words I’m always striving to achieve, planking is a great opportunity to practice both.
- 840 replies
-
- 4
-
-
- winchelsea
- Syren Ship Model Company
- (and 1 more)
-
There are a lot of great Winnie builds, I’m doing my small part to encourage more. 😊
- 840 replies
-
- 2
-
-
- winchelsea
- Syren Ship Model Company
- (and 1 more)
-
Thanks Rusty. Planking is still the thing that scares me most, I really don’t want to hold it up to the light and find I see through it 😳 so far so good.
- 840 replies
-
- 1
-
-
- winchelsea
- Syren Ship Model Company
- (and 1 more)
-
I enjoy seeing what I hope mine will look like some far distant day, we’ll done Bob.
-
Hey Bob, how’s your Flirt coming along?
-
Thank you Bob, much appreciated Thank you, your planking is more than fine and impressive as well. Thank you Bob, I follow your build and think ‘some day I hope mine looks this good.’
- 840 replies
-
- 2
-
-
- winchelsea
- Syren Ship Model Company
- (and 1 more)
-
Thanks Chuck. I’m ready for it, each plank a project. I’ll just keep telling myself that.
- 840 replies
-
- 4
-
-
- winchelsea
- Syren Ship Model Company
- (and 1 more)
-
Check with me in a about a year 😄
-
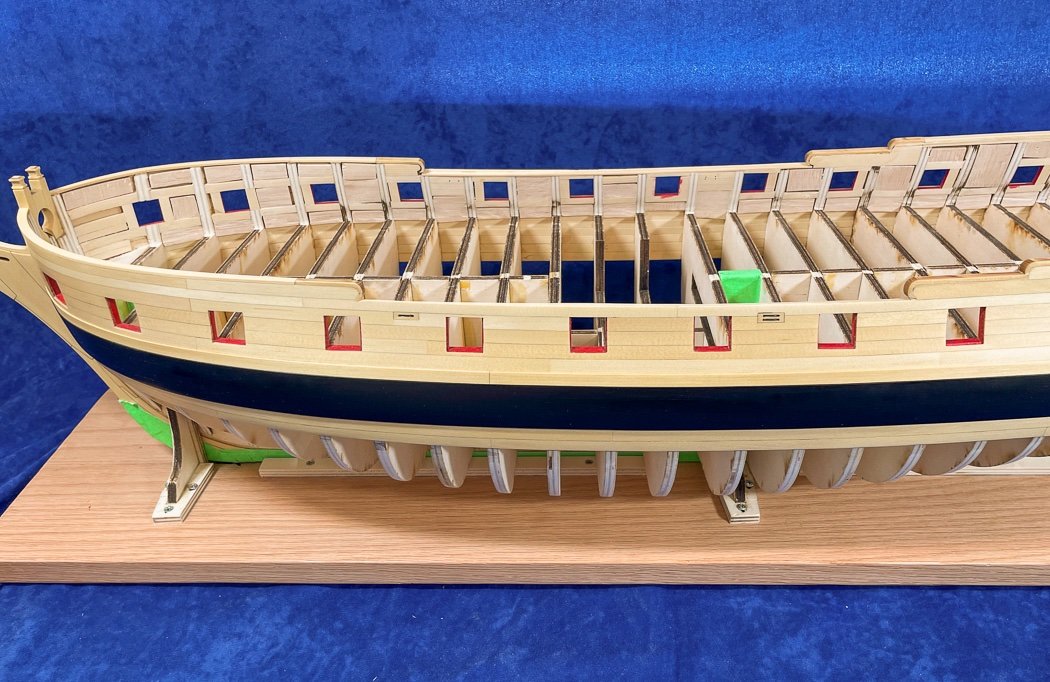
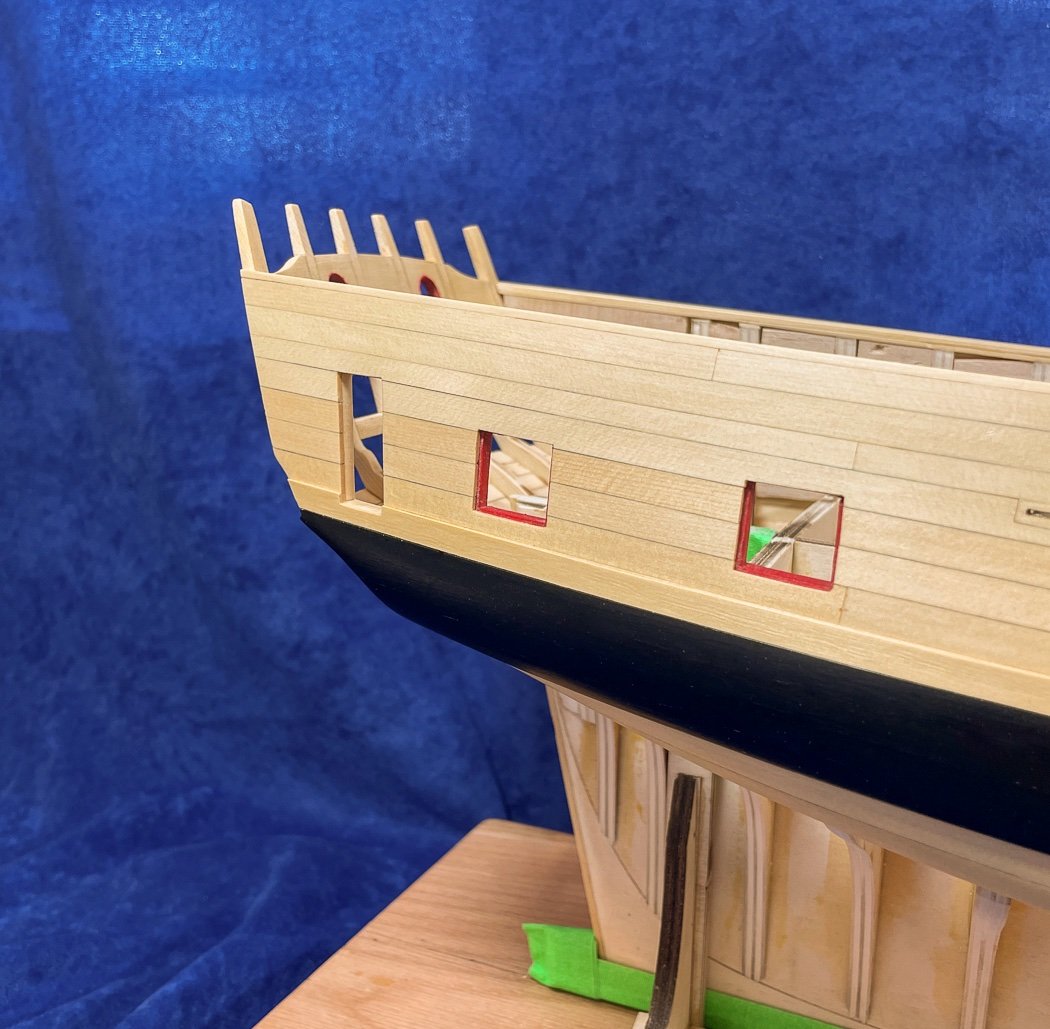
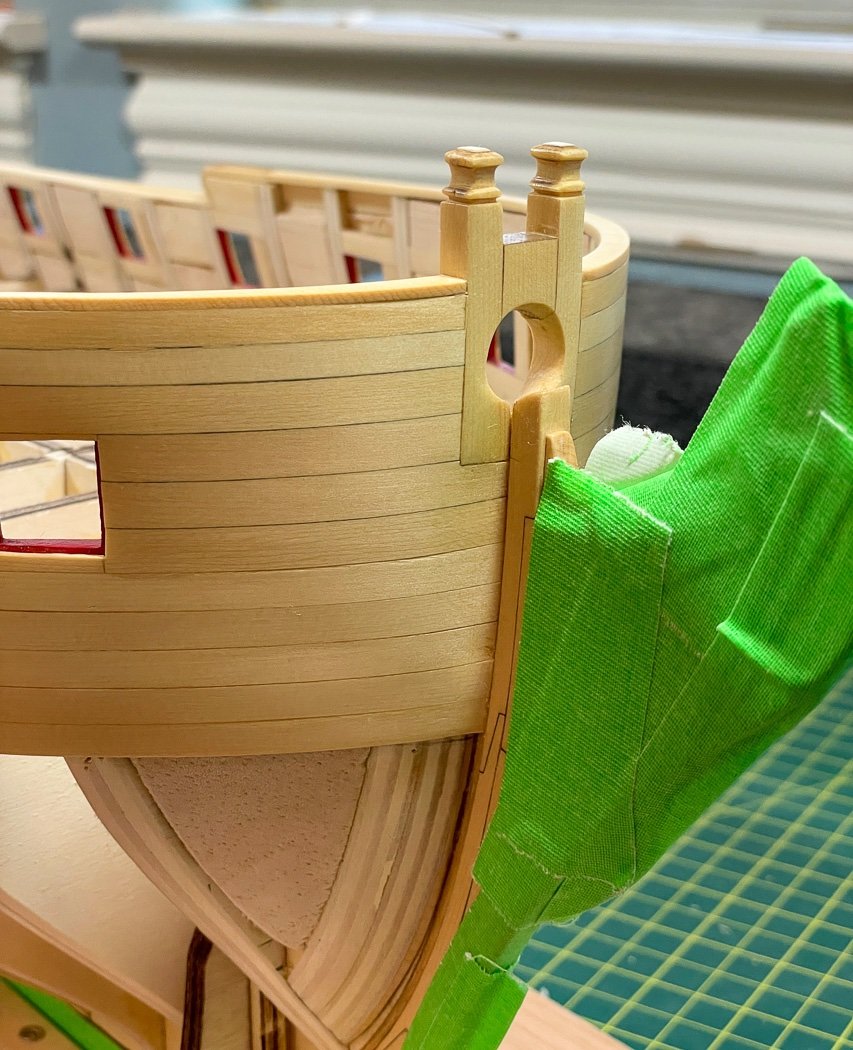
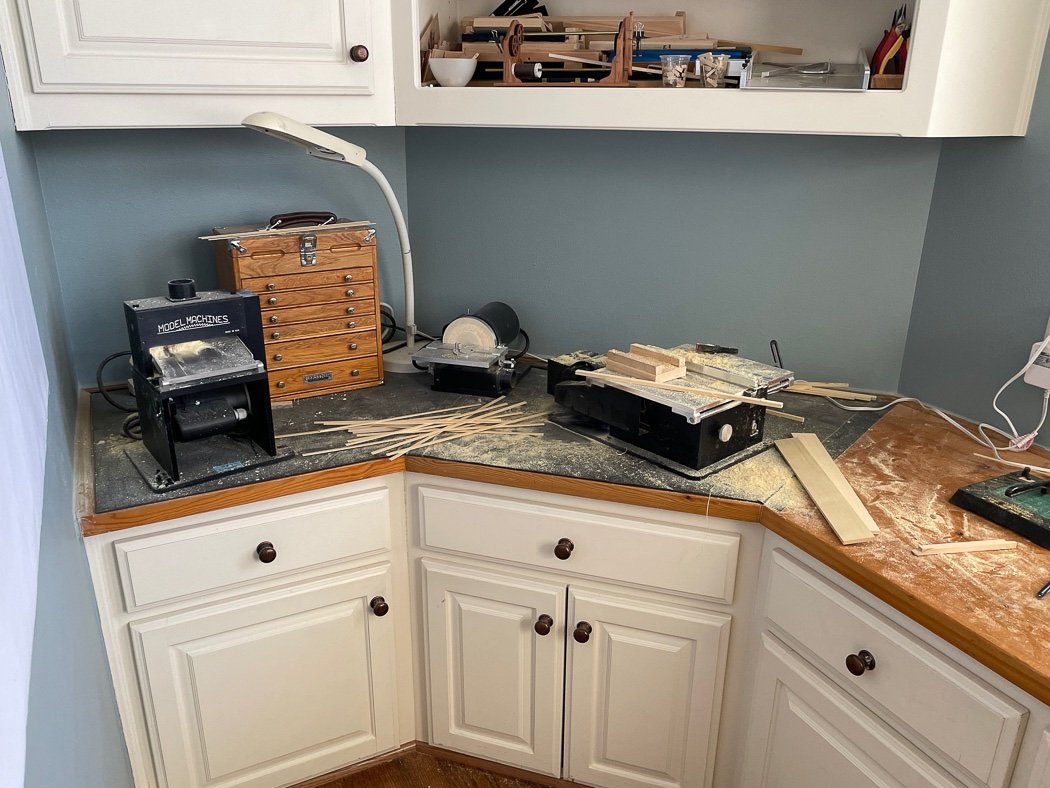
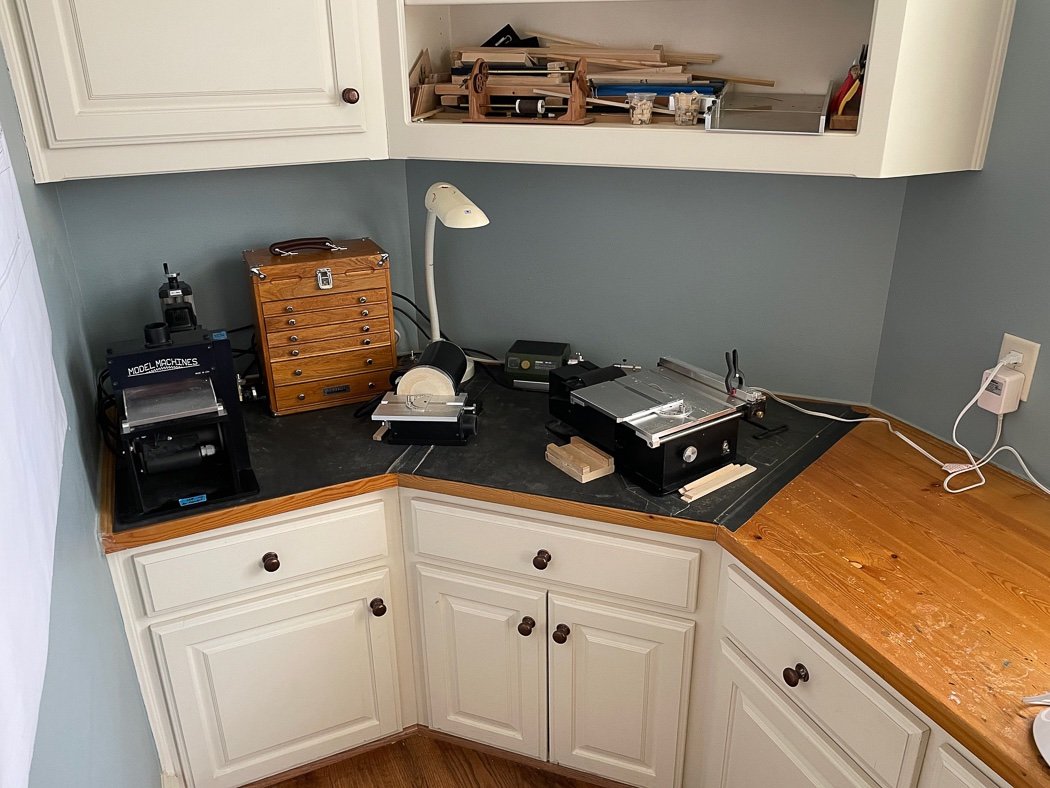
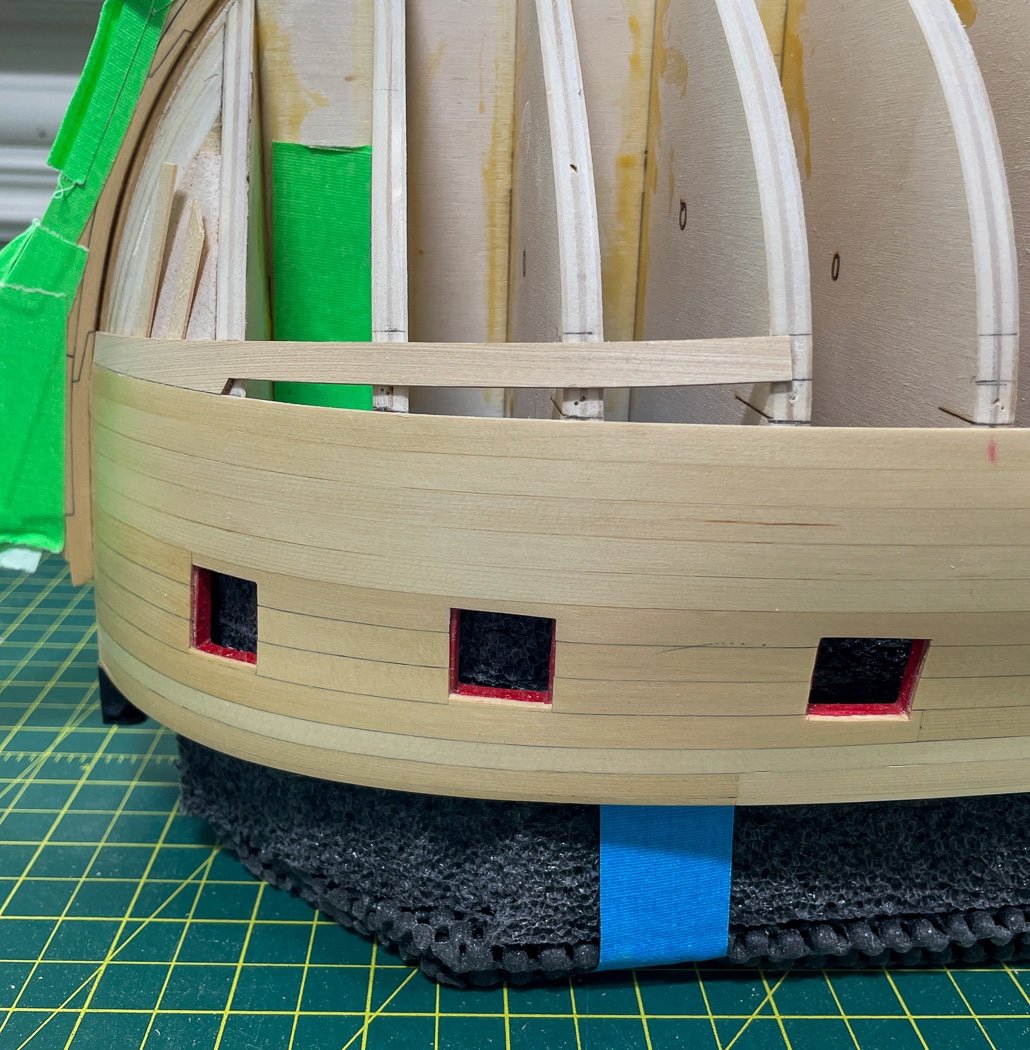
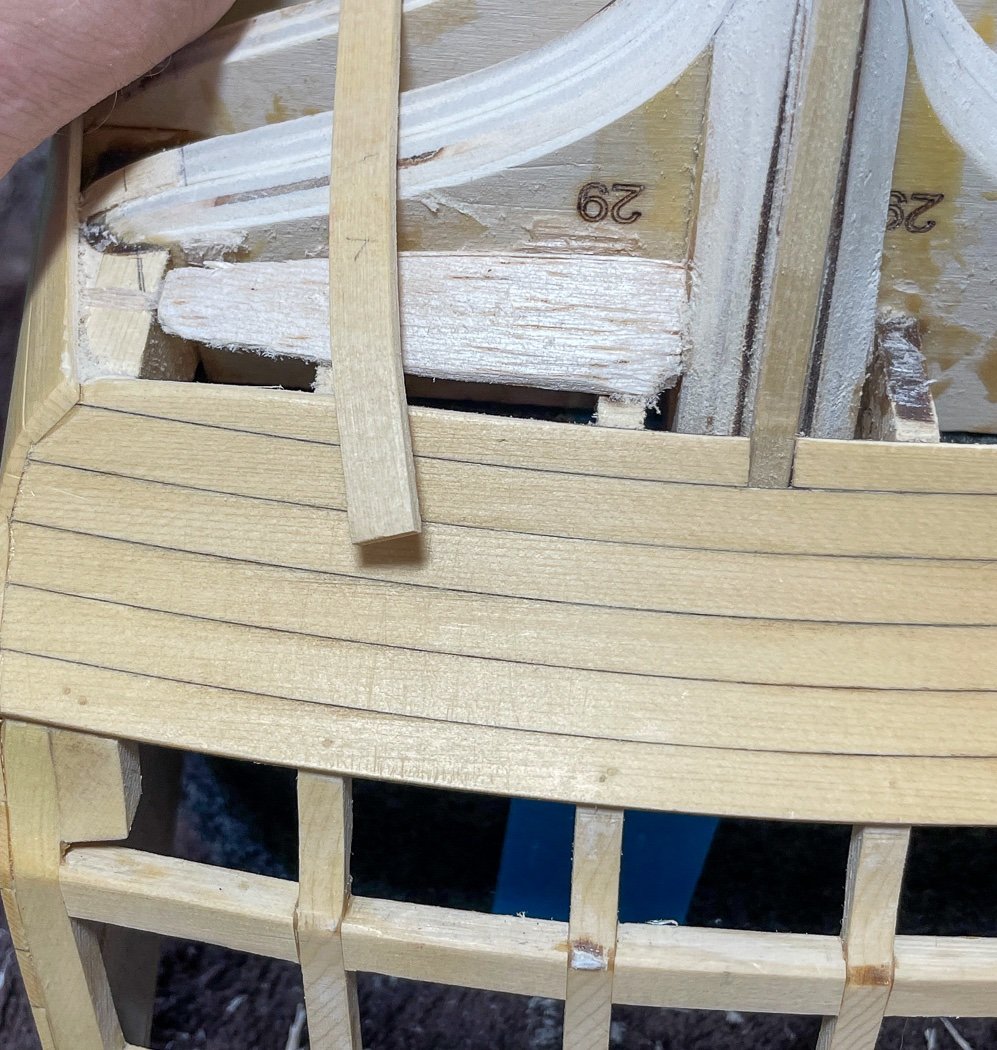
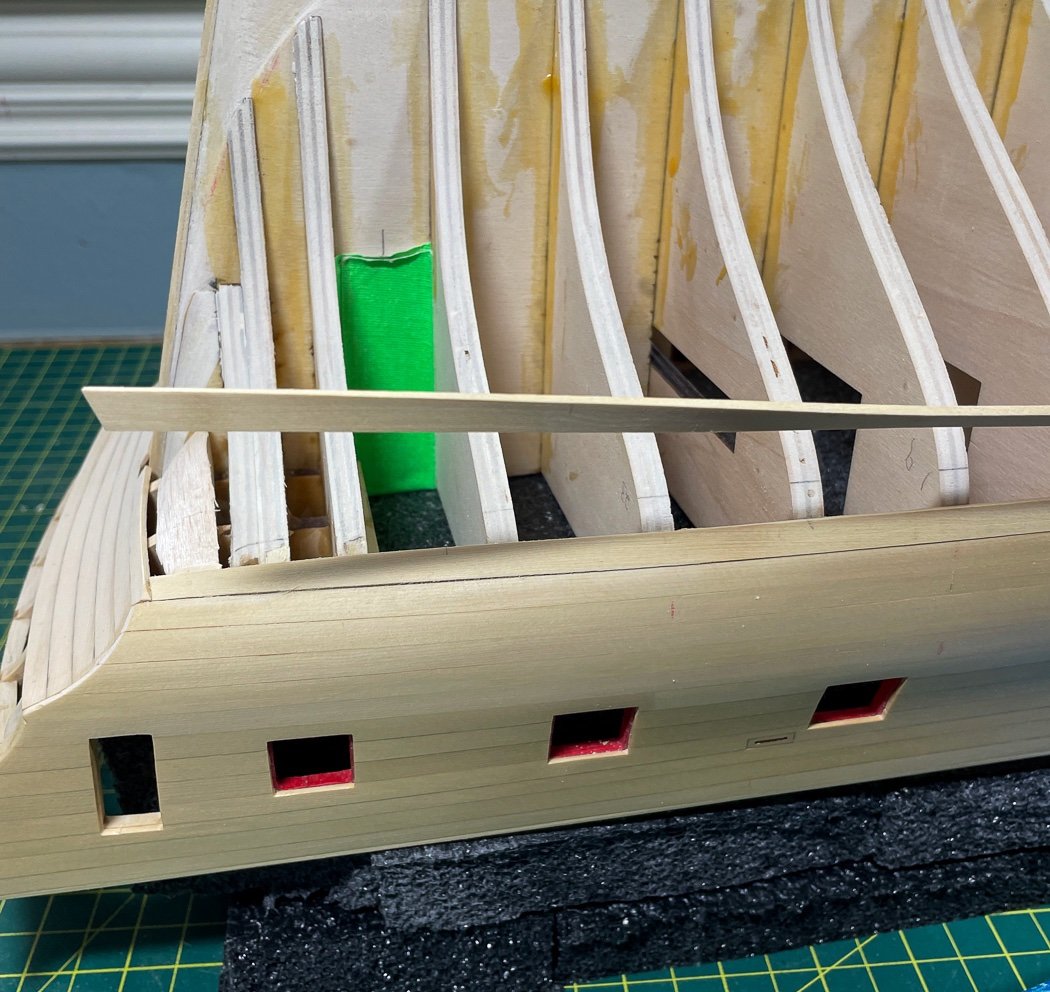
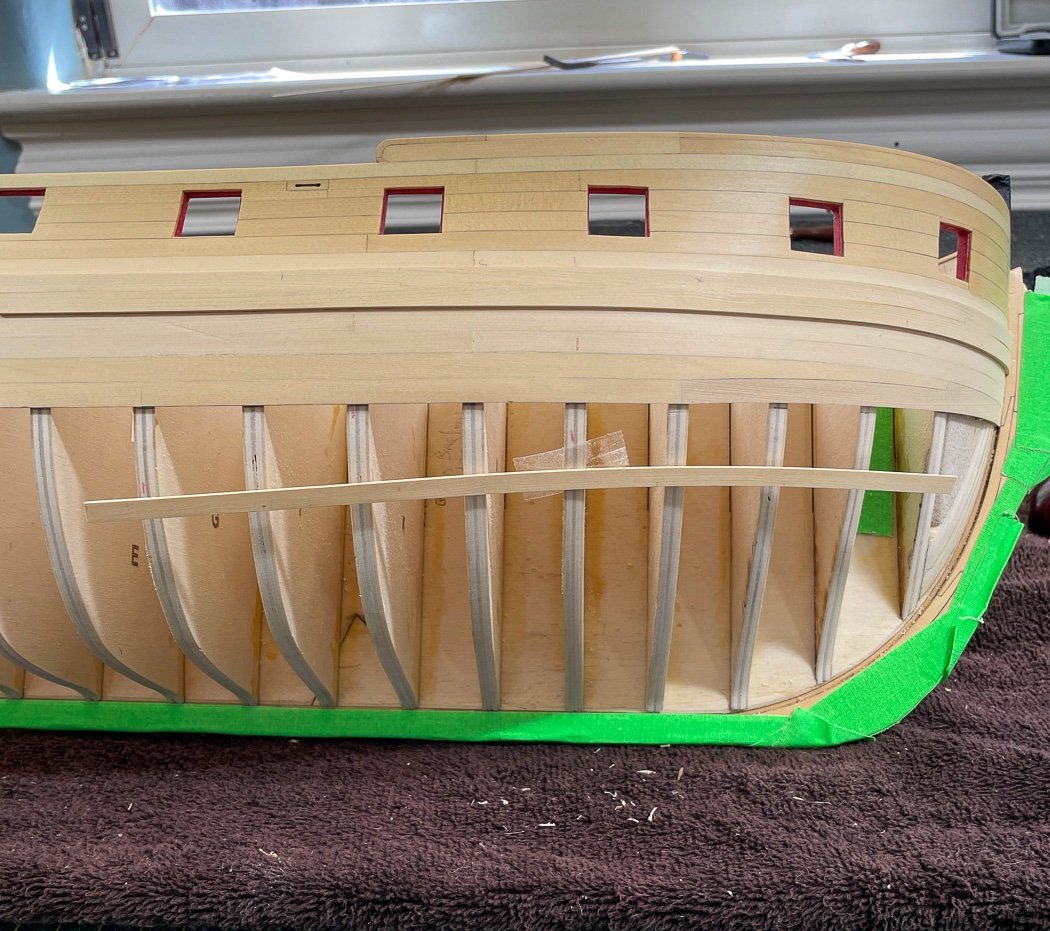
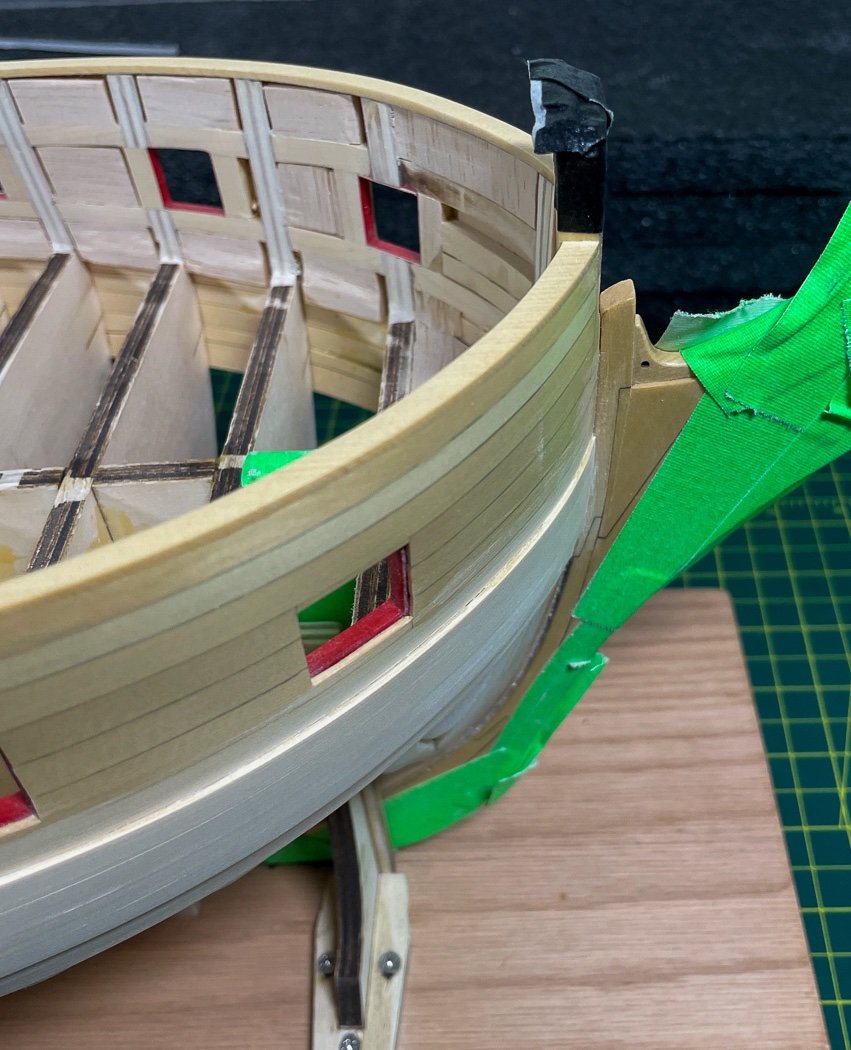
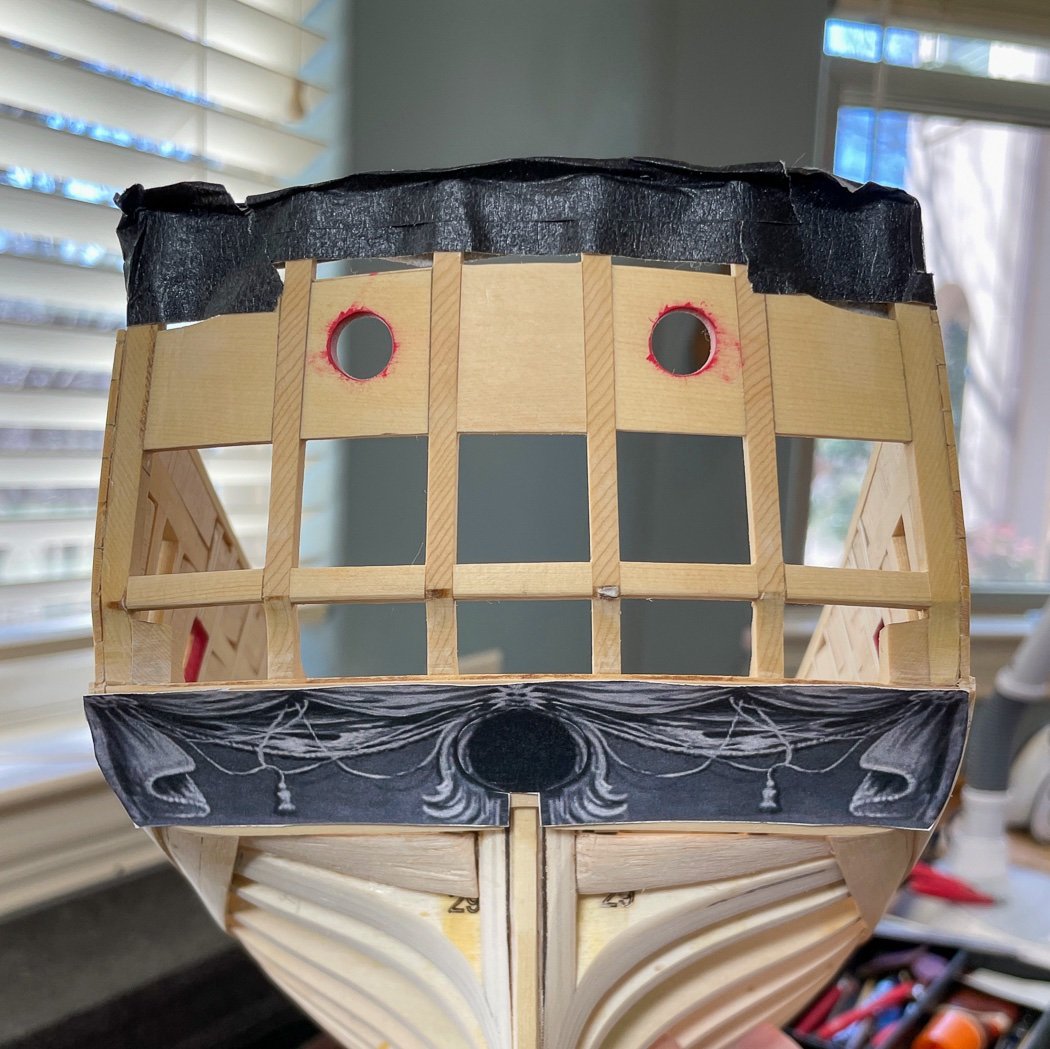
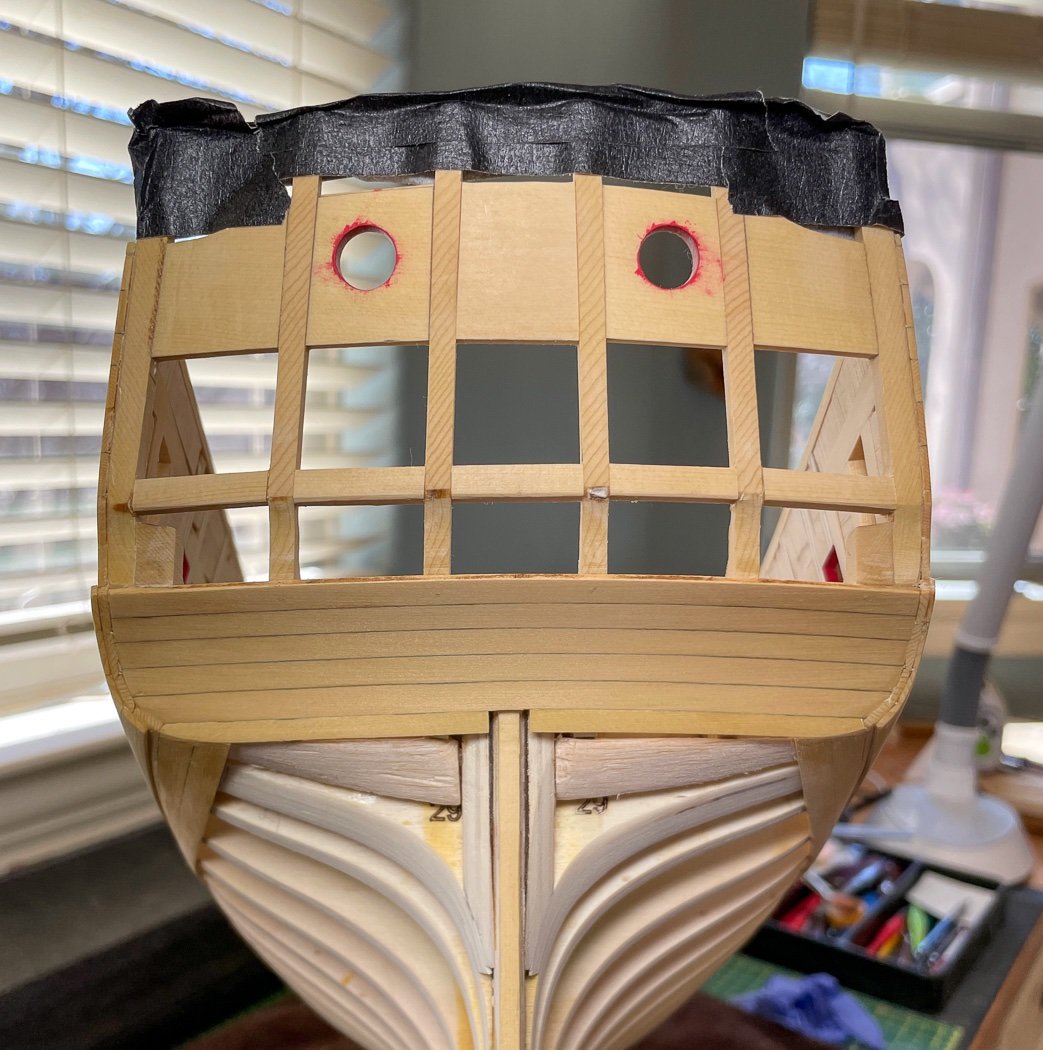
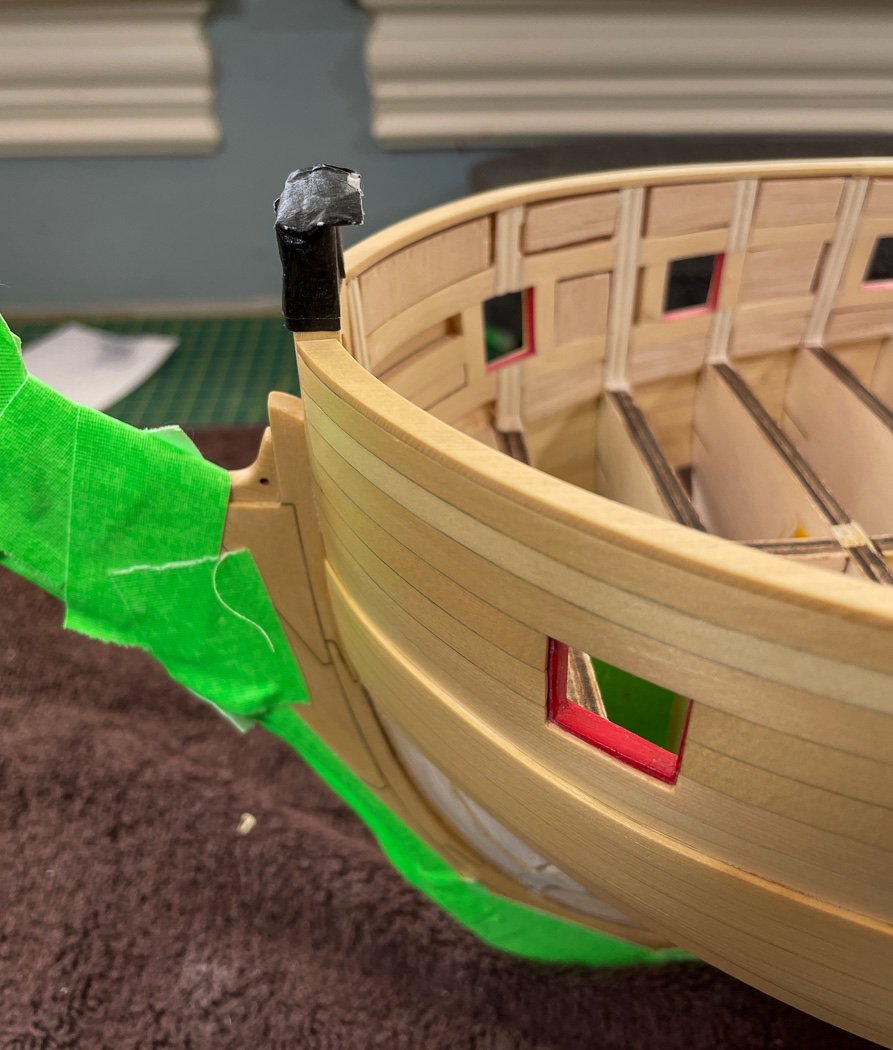
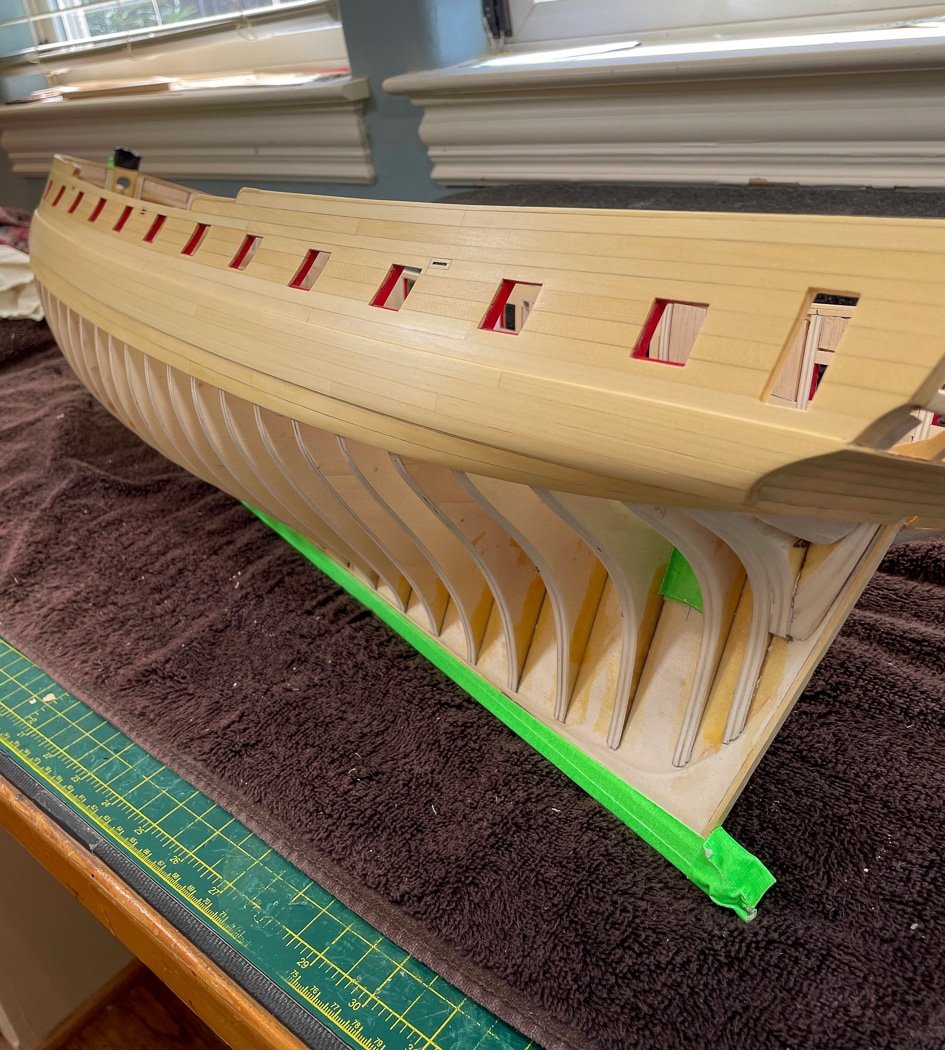
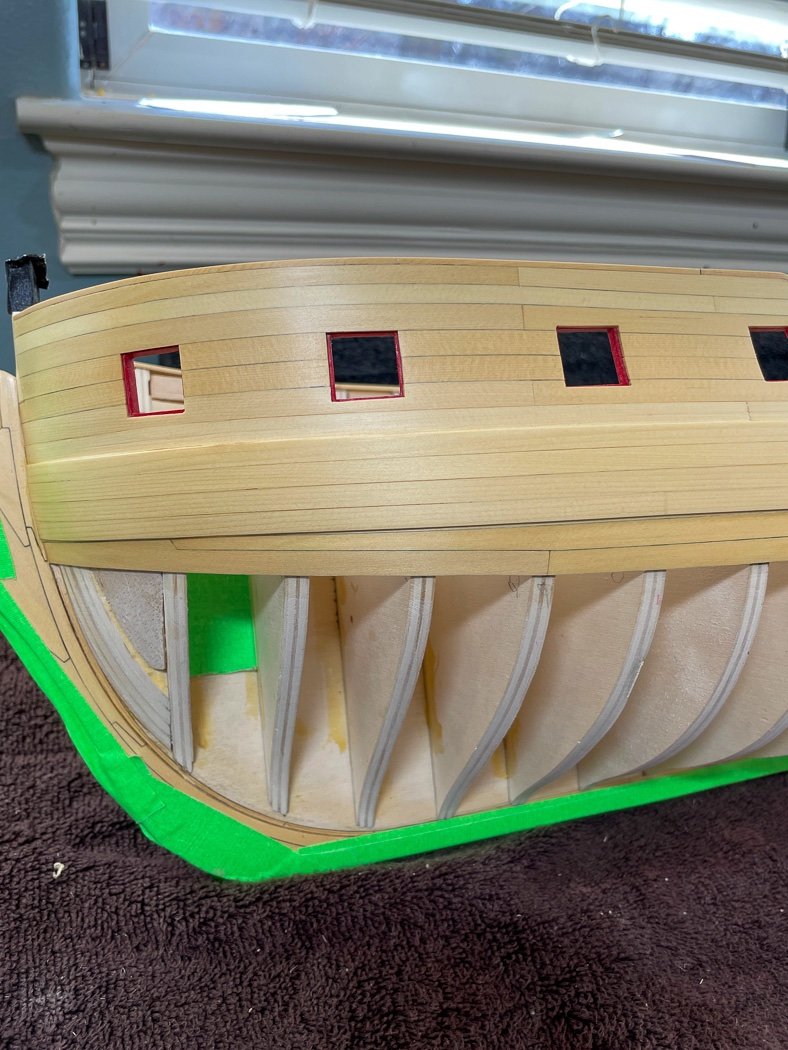
Drop Plank and Wales With the hull above the wales complete it’s time to move on to the rest of the hull. Before doing that I took another look at the bollards. I think they turned out ok, especially as I wasn’t at all sure how to go about these at the start. One of the great things about Chuck’s Winchelsea is it's much like an actual ship in both appearance and construction. I’ve built eleven models at this point and not once before did I need give a second thought to bollards and how they integrate with the hull. Fun stuff. My work room was a complete mess from the work above the wales, there were tools I hadn’t seen for days and sawdust everywhere. My Rabbit Air Filter has been working over-time keeping up. So since I had the mess already it was a good time to rip and plane some ¼ planks. Even after several hours at it I know I don’t have enough to complete the hull, but I do have enough to make a good start. I’ve become quite fond of my Byrnes Thickness Sander, though I think I’m pretty consistent with the saw, the sander brings the planks within a .002 tolerance and makes it much easier to get an evenly planked hull. (I also planed the 7/32 planks for the wales post clean up but elected to carry the sander outside, it throws some significant saw dust.) With that done I took a day to do a deep clean of the workshop. It won’t last long like this, but it’s nice for the moment (ignore the pile up on the shelf, I could only spend so much time cleaning). The rest of the room looks the tool corner too, or it did on that day. I had a lot of trouble sorting out the drop plank when I built Cheerful. I guess that experience paid off, Winchelsea’s was a piece of cake. It helped, a lot, to have Chuck’s laser cut option and his abundantly clear instructions in the monograph. Following those instructions paid off, as it often does. Marking the two rows on each bulkhead made lining up the planks and making the necessary cuts easier to complete. I only wish the wood matched color a little better. I was a little baffled at first on how to terminate the plank at the counter. My working assumption had been it would just lay on top the bottom counter plank, but that’s not the case, it tucks in behind that bottom plank. Ohhh, I said when the fog cleared. I had to remove and replace my balsa filler piece to accommodate this tuck. It makes cutting the stern planks more fun since they have to be a tight fit on both ends, no slack to cut off it it had it just laid on top the counter. That fit is a tad more challenging as it has a nice twist and curve to it, which will get even more fun as I work my way towards the stern post. There may be a few do-overs before I’m done. Jewelry makers are a frequent source of modeling tools. I’ve long been a fan of my trusty travel iron to bend planks, but the curving and twisting is made more easy by this simple crafters hot air device. This relatively inexpensive tool is easy to hold and plenty hot enough to accomplish the job. The brass clamp in the background allows me to grip the tip of the plank without crushing it and keep my fingers from becoming part of the plank. This bend, twist, and curve was achieved without water, no soaking necessary, nor did it take long. The nice thing about this method is I can work my way to the right curve, each plank a project, until the plank lays right where it goes. If I go too far I can unbend using the same method. This photo and the one below are an advertisement for Chuck’s plank bending technique - it you haven’t tried it, you should. You might not think so looking at it, but the wales and all the planks above have a gentle but definitive S-curve. There’s no forcing a plank to fit, the heat bending, and in my case experimentation, is required to fit these planks. Once the curve is determined and I add the curve for the bow it just lays right in saying “glue me.” I mentioned before I soften the inside edge of the next plank (top or bottom depending which way I'm going) to tighten the fit. After laying in the four rows for the wales (the unpainted black strake is the 5th row, I’ll add it after painting the wales.) it was time to thin the wales at the bow to simulate them fitting into the rabbet. After completing the other side I further tapered both sides into the stem - any more will have to wait until the black strake is installed. I like how Winchelsea’s wales curve into the stern, such a sleek look these frigates. With the wales installed the lower counter is complete. In case you’re wondering about all the tape, Alaskan Yellow Cedar is a beautiful wood and easy to work with, part of the reason for that is its a bit soft. I banged Cheerful around enough that this time I’ve fluffed up some black masking tape or green gaffer tape to protect the many edges from me. I try to be careful, the tape helps when I’m not. As an aside - I would have never know this if not for this forum - a minor dent or ding in the wood can be raised with steam. I hold my travel iron over the dent and magically the majority if not all the dent disappears. It takes a little temperance though, too much and the wood burns, the WOP peals off and the glue disintegrates - or so I’m guessing - fortunately this hasn’t happened to me…yet… I did a quick B&W print of the counter painting and what do you know, it’s a close fit. I pass on my thanks to the Winnie builders before me. My counter was heading a different direction back at the beginning but reading multiple build logs and asking questions steered me in the right direction, the adjustments and foundation I built then pays off now. With that I’ll be ready to tape, mask, and paint the wales after the WOP I applied as a sealant is dry. Until then thank you for your likes and comments - it’s fun to share and read about the work we do on this great forum. I know the Winchelsea builders ahead of me are both inspiration and guidance.


- 840 replies
-
- 24
-
-
-
- winchelsea
- Syren Ship Model Company
- (and 1 more)
-
Are your ropes crossed and then seized? I’m sooo far from doing guns….
-
Plus with Model Expo the paint is probably dried out. Why buy an old design when Vanguard has such nice new ones.
-
Nice jig, what's holding the sticks in place? You're work is always a marvel to behold. Those deck planks lay so perfectly at the stern.
- 607 replies
-
- 1
-
-
- winchelsea
- Syren Ship Model Company
- (and 1 more)
-
I use Smith Industries medium CA, it shouldn’t take much to hold, I can see why thin CA wouldn’t work. Dip the tail in the glue then into the pre-drilled hole or use a straight pin to apply the CA to the shaft of the eyebolt. I’ve used CA to attach hundreds of eyebolts with lines and lines of rigging ands have no failures. Medium CA is all you need.
