


glbarlow
-
Posts
4,126 -
Joined
-
Last visited
Content Type
Profiles
Forums
Gallery
Events
Everything posted by glbarlow
-
 MSW included one of the photos from my last post on Facebook. Thank you MSW, it allows me to share with my friends so they can see what I do with my time. i belong to a couple of Facebook wood ship model groups. They include many hapless lost souls (modeling wise I mean). I frequently recommend they join MSW to find help and answers to their questions, my small effort for a membership drive.
- 840 replies
-
- 9
-

-
- winchelsea
- Syren Ship Model Company
- (and 1 more)
-
🤣😂. Thanks Don! I too like the quarter shots, they really show the graceful lines of Winchelsea. I also thought you’d be impressed with my including the nautical term of tumblehome 😊(though I had to Google it)
- 840 replies
-
- 4
-
-
- winchelsea
- Syren Ship Model Company
- (and 1 more)
-
Well said. No reason for a V2, you’ve designed an innovative model that allow those of every experience level to build in the way their expertise provides. They can all enjoy the process and have a result to be justly proud.
- 857 replies
-
- 9
-
-
- Sphinx
- Vanguard Models
- (and 1 more)
-
Thanks, though It’s far from perfect, I continue to learn every day.
- 840 replies
-
- 2
-
-
- winchelsea
- Syren Ship Model Company
- (and 1 more)
-
Thanks, I’ve enjoyed your build as well. Thank you. I am amazed by the difference it makes, and by the thickness variance of a plank cut by the same saw with the same settings. Thanks Bob. Your excellent Winnie log is a regular reference for me. Thanks Rusty, my planking improved exponentially once I adopted Chuck’s method, and with all the practice Cheerful afforded me. I’m enjoying following your pear version of Winnie.
- 840 replies
-
- 3
-
-
- winchelsea
- Syren Ship Model Company
- (and 1 more)
-
Thanks Chuck, for the model and even more for your help and guidance.
- 840 replies
-
- 2
-
-
- winchelsea
- Syren Ship Model Company
- (and 1 more)
-
Great work Rusty, it’s always worth the effort to correct an error.. Guess your Winnie will be carrying cargo from here on…miscellaneous ship parts. 🤣
- 642 replies
-
- 4
-
-
- winchelsea
- Syren Ship Model Company
- (and 1 more)
-
Great that you’re back at it.
-
The way to do it is to cut them out with a #11 blade as you plank each row. It will be much harder now but you can still do if you’re careful and go slow. It’s a good idea to think these thinks out in advance. If you rush it you’re going to split the planking.
- 362 replies
-
- 2
-
-
- Amati
- Lady Nelson
- (and 2 more)
-
Thank you for the kind comments and likes, much appreciated. I’m really enjoying this build.
- 840 replies
-
- 3
-
-
- winchelsea
- Syren Ship Model Company
- (and 1 more)
-
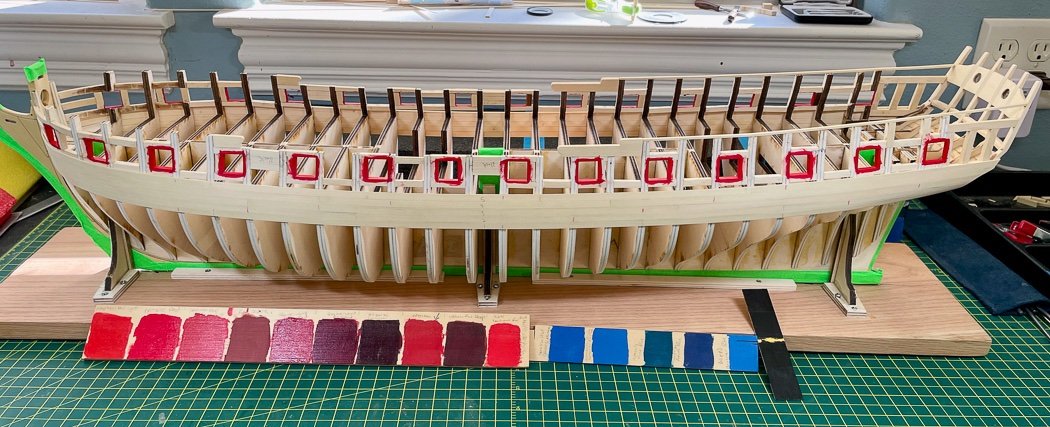
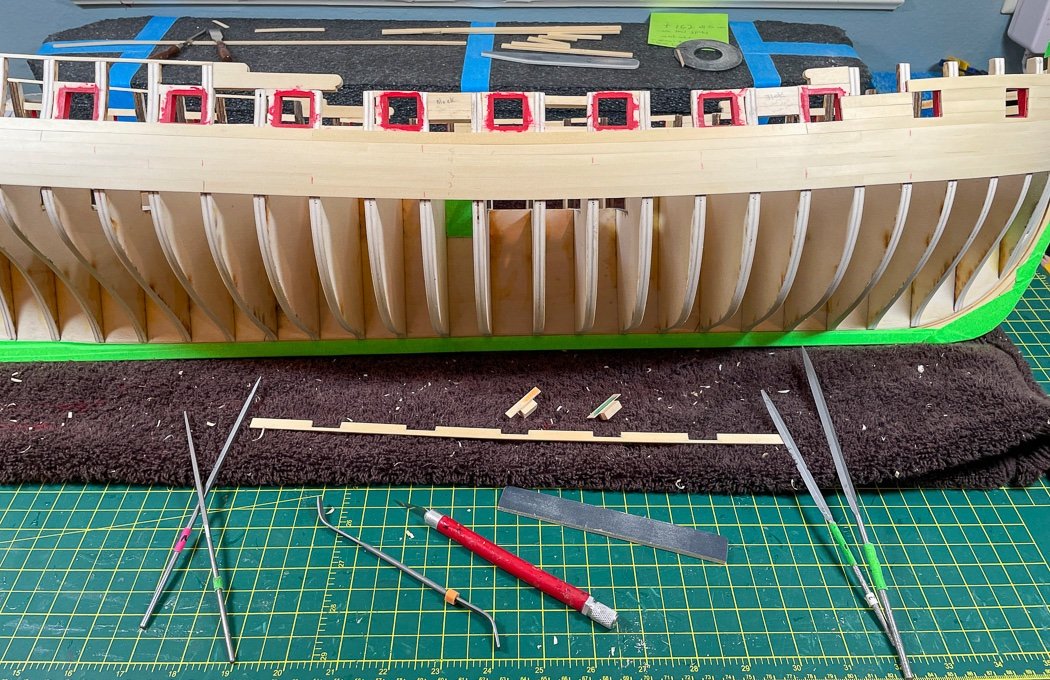
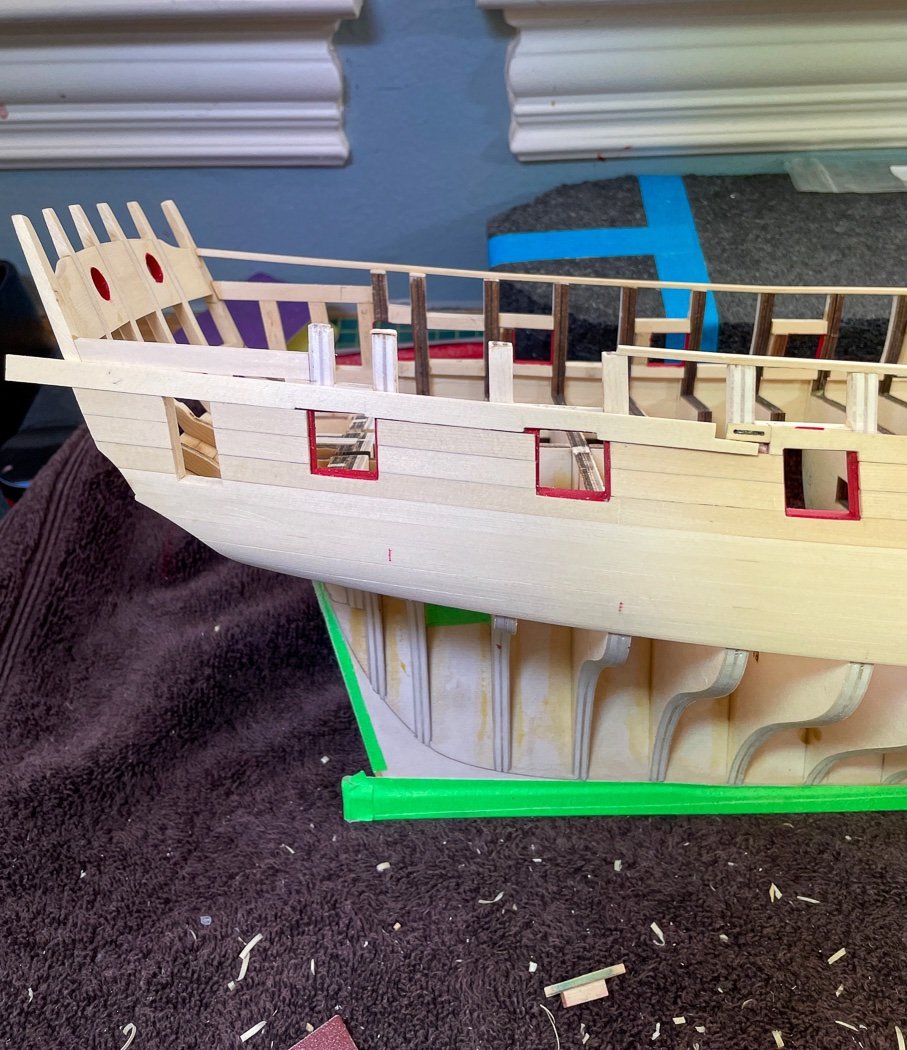
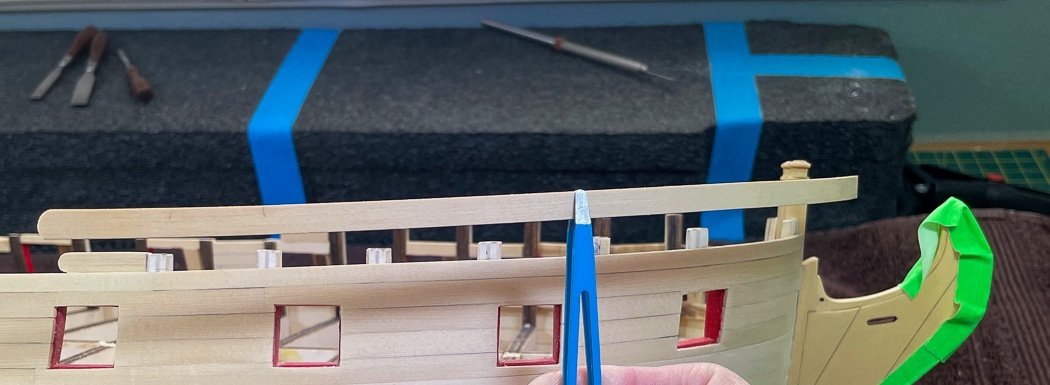
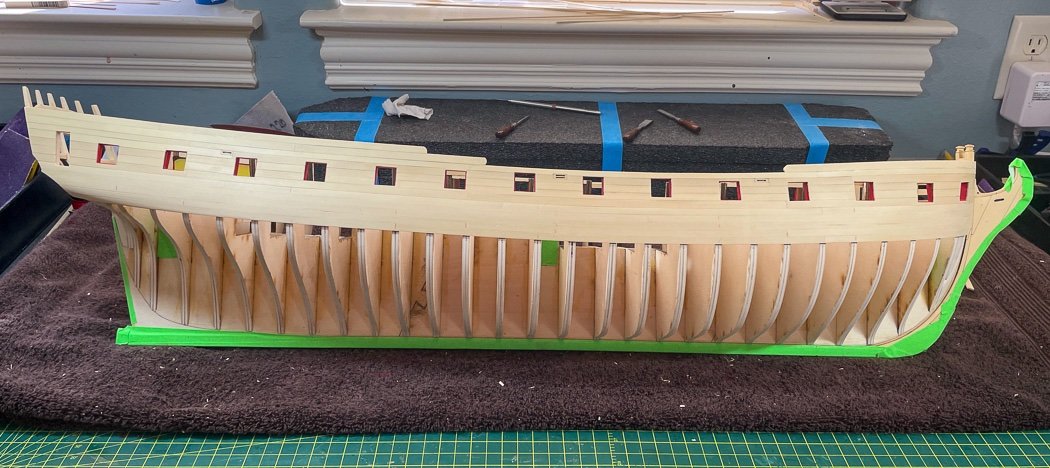
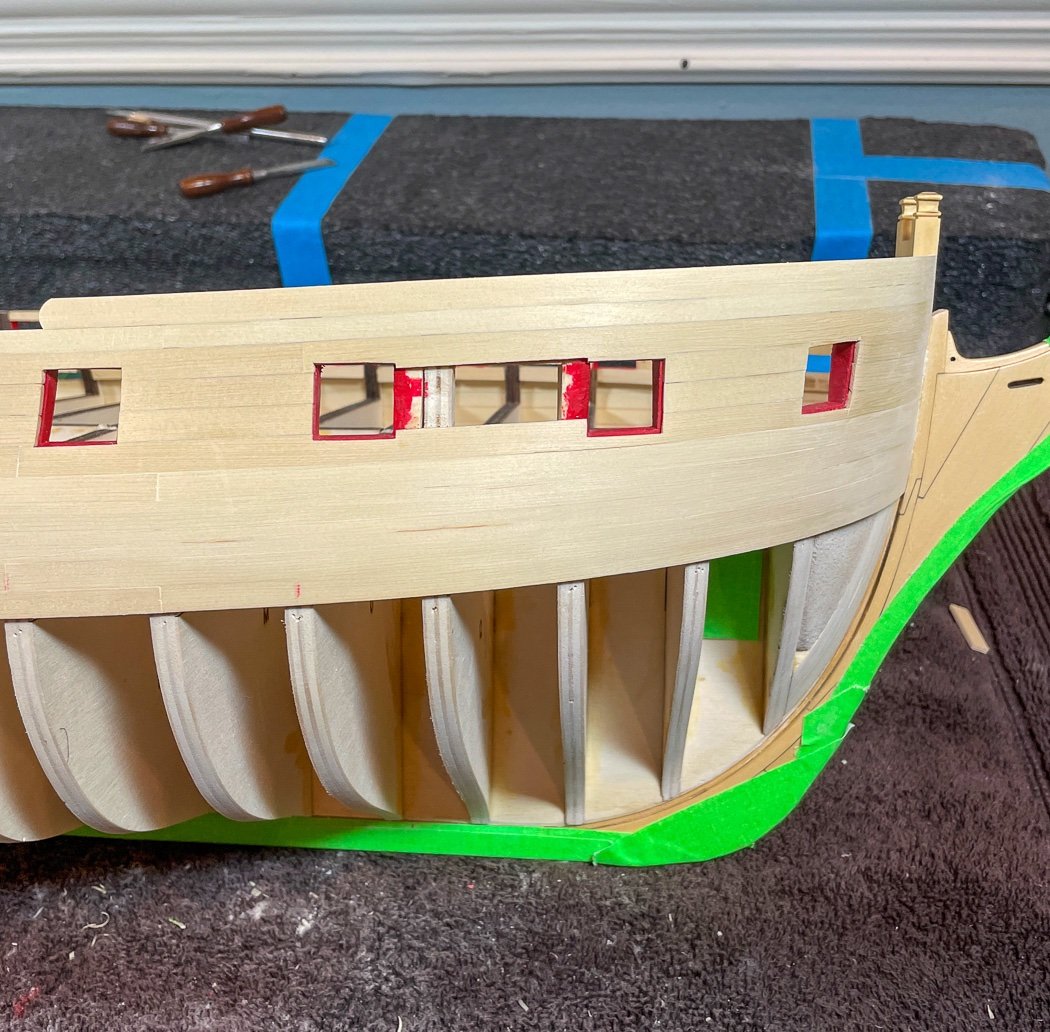
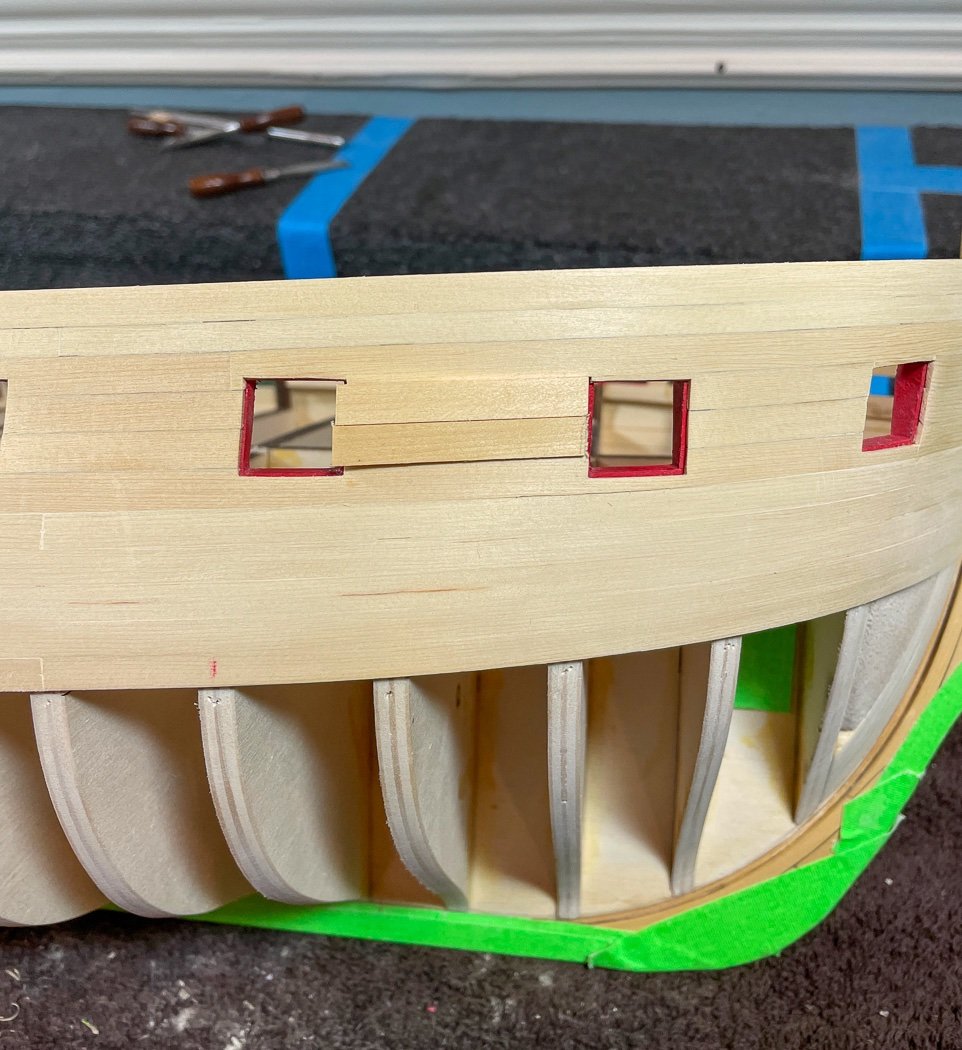
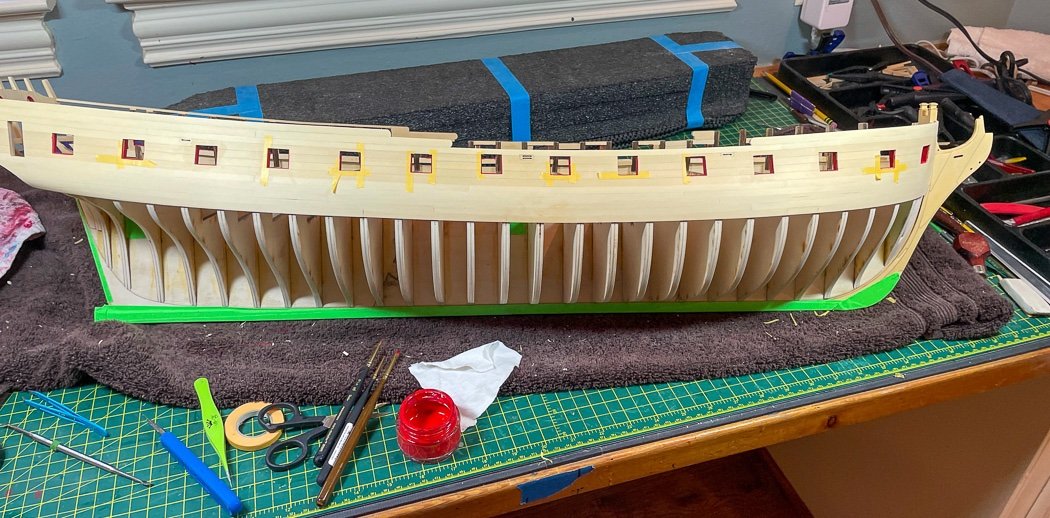
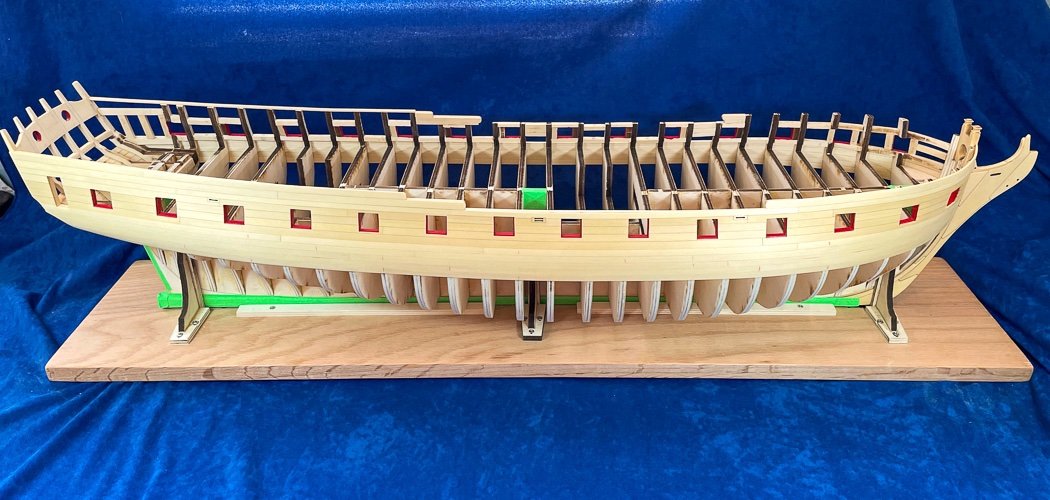
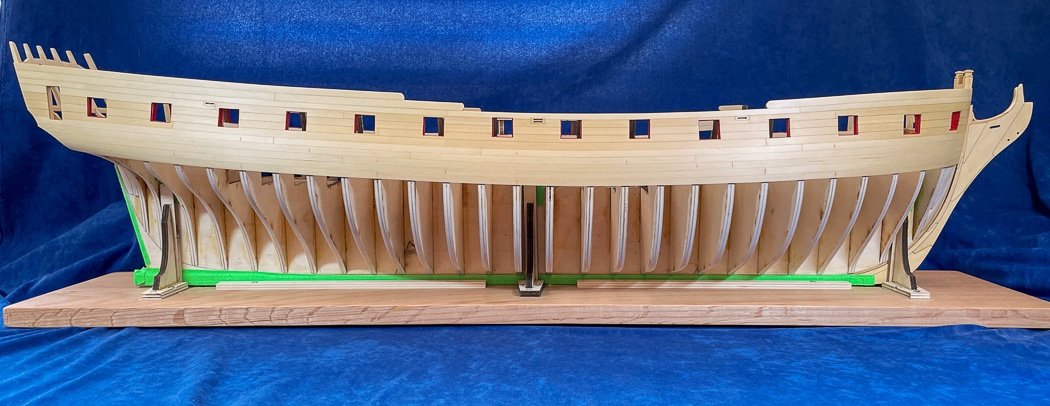
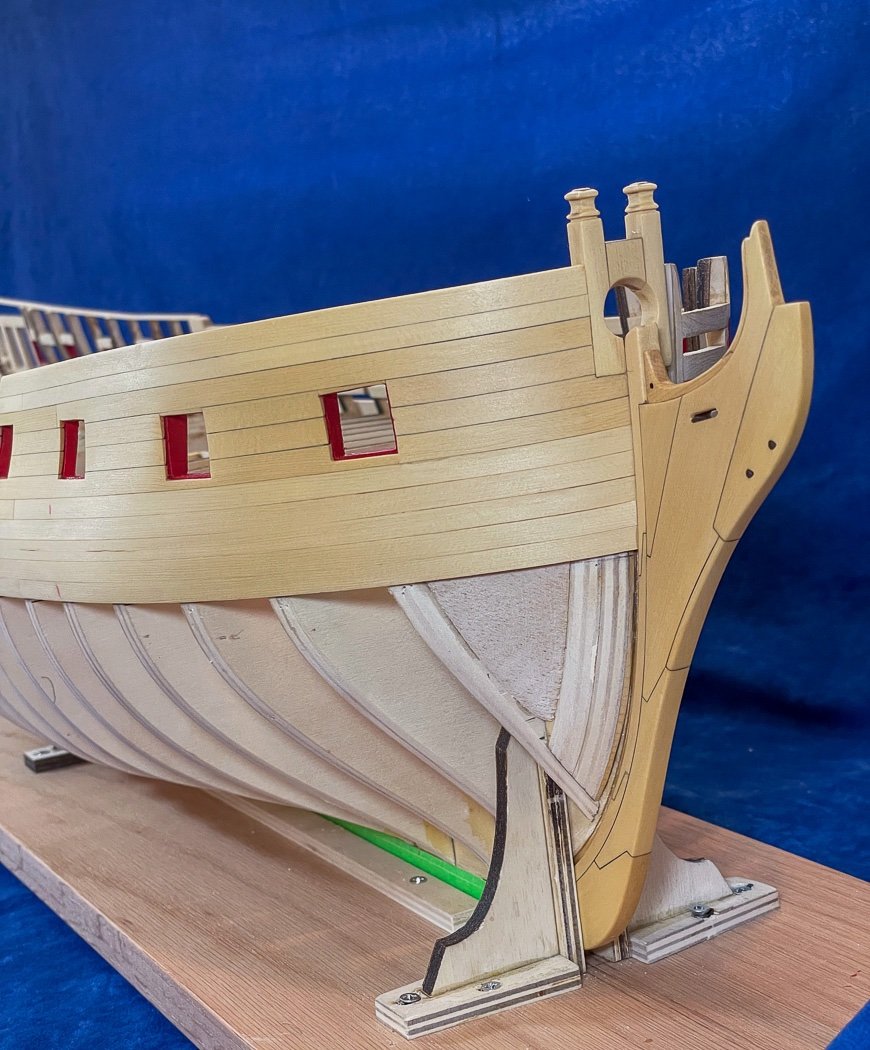
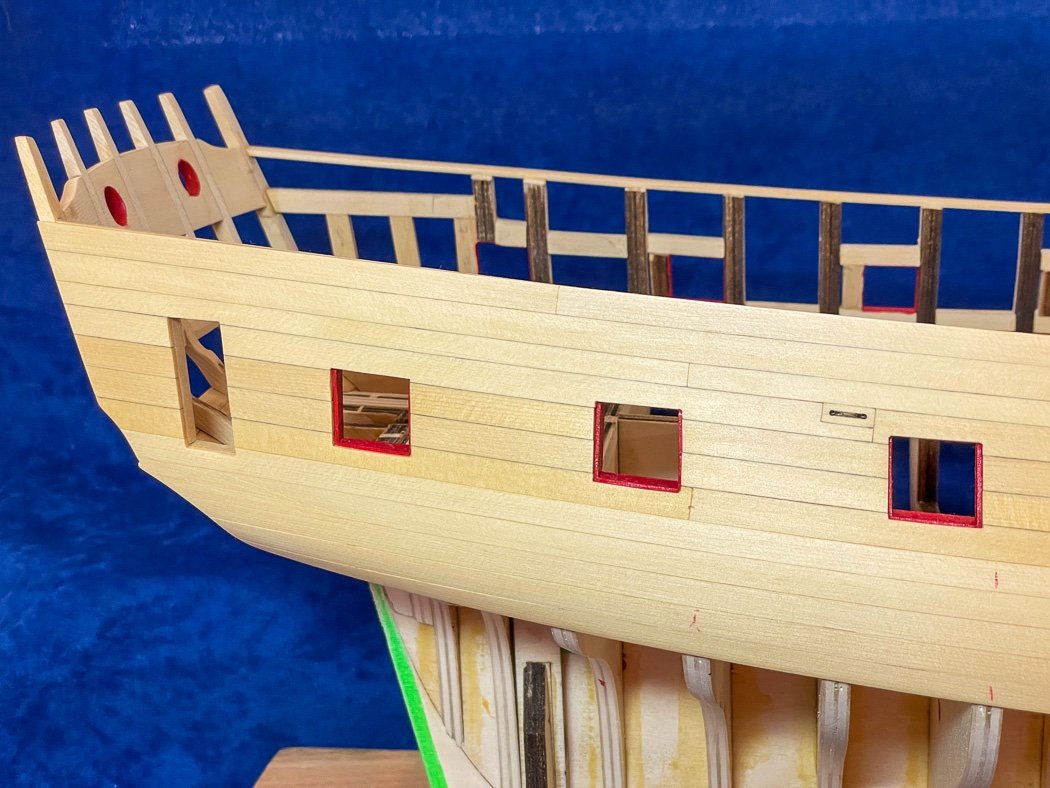
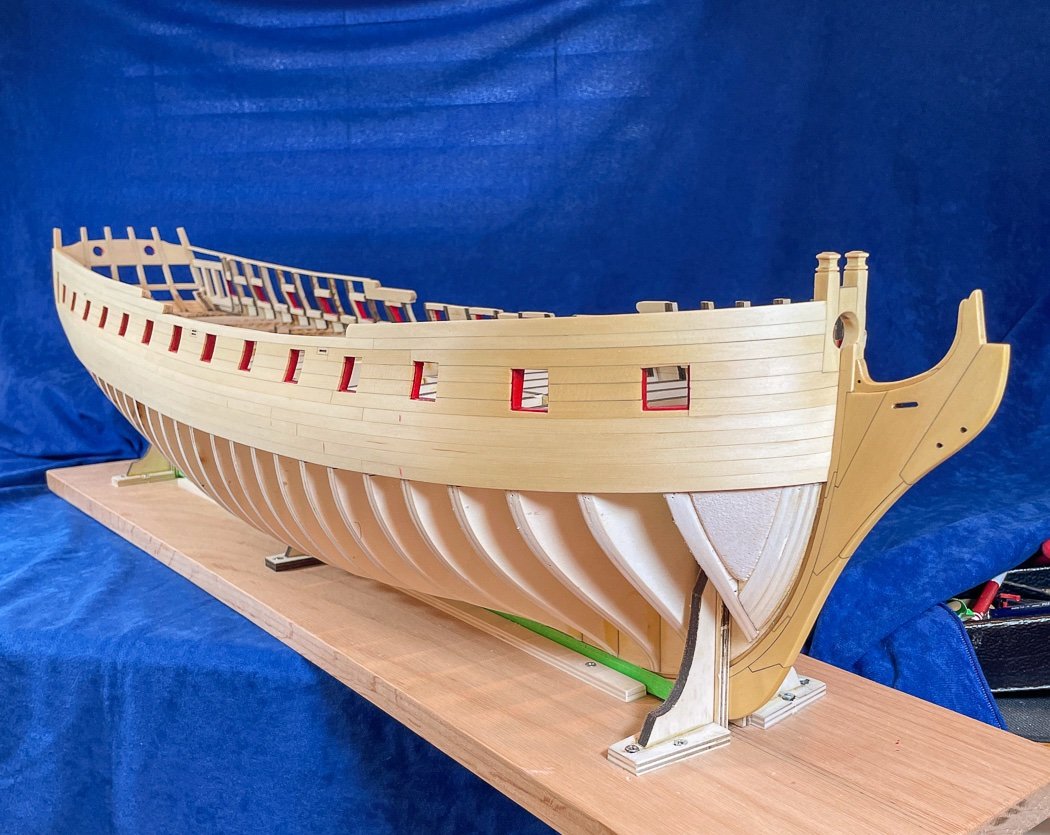
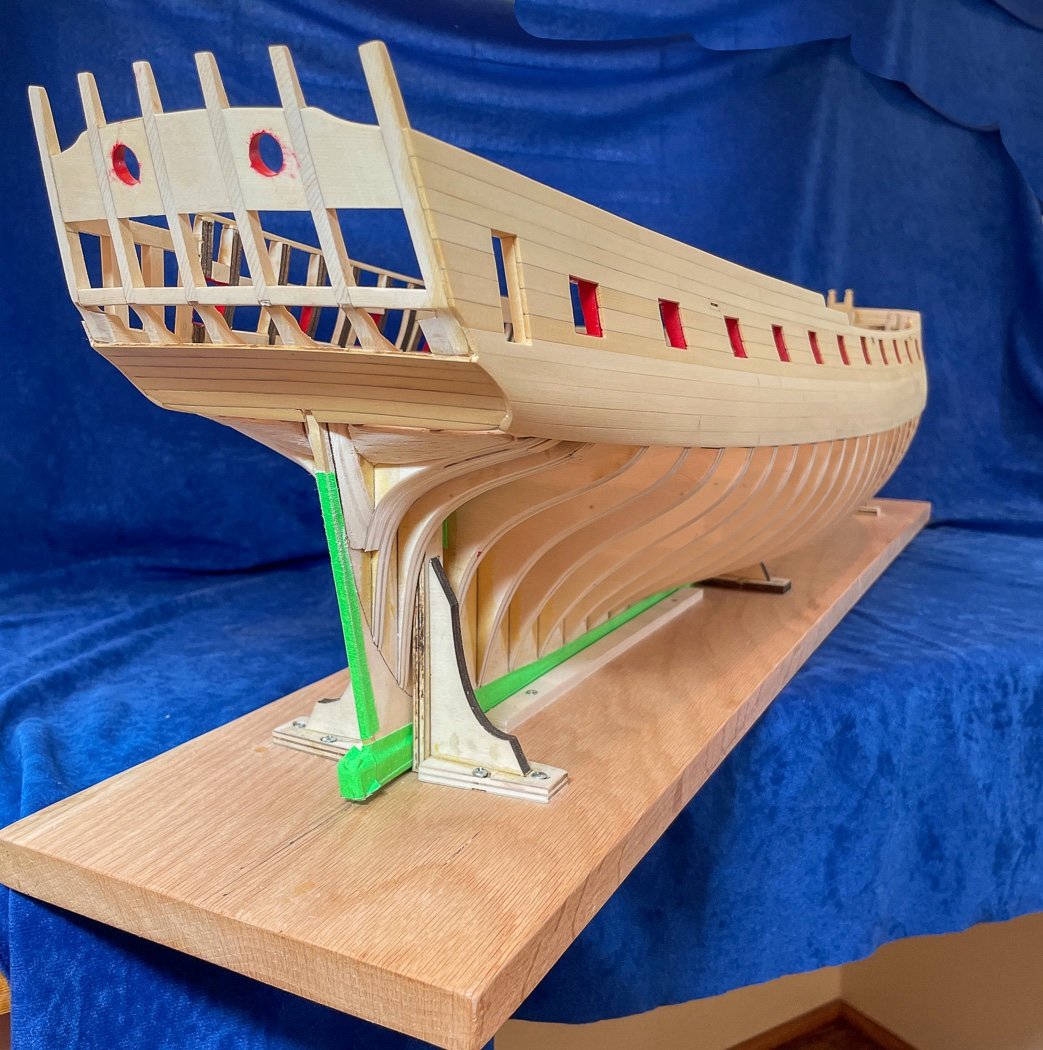
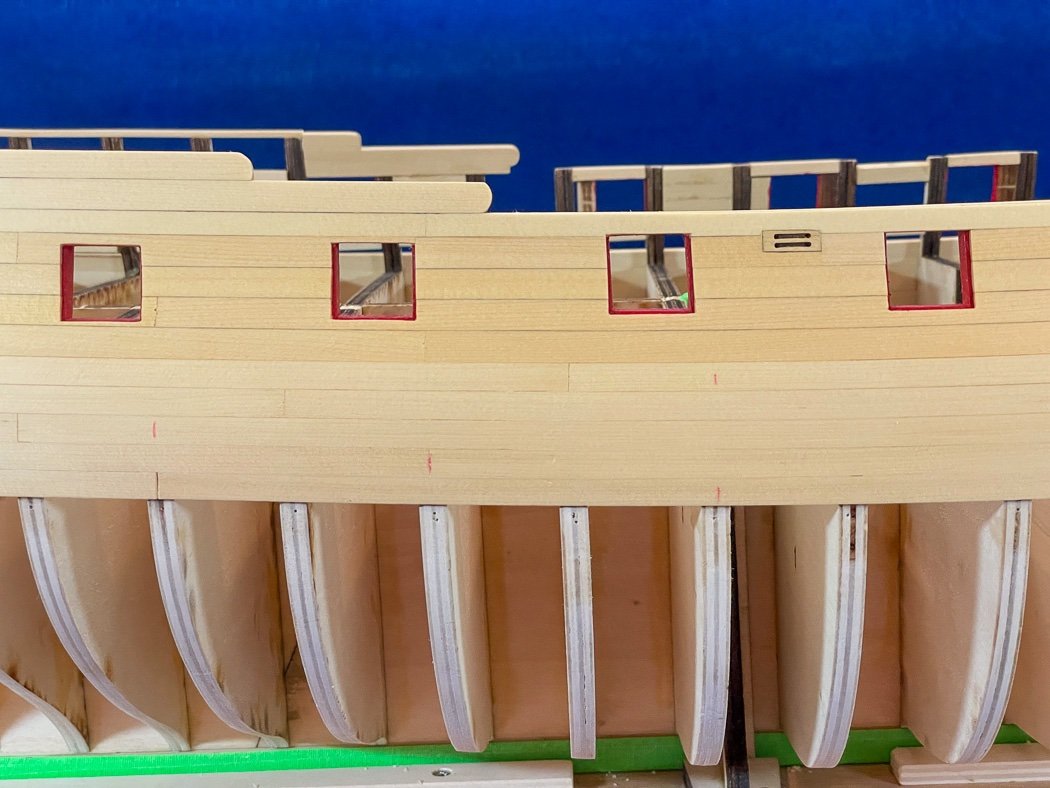
Planking above the wales It’s been a minute since my last post, it took me this long to complete the planking above the wales on just one side. The first step was deciding on what my primary color would be since the ports need to be painted before planking begins. My first thought was to go darker, perhaps more on the maroon scale, than I had done with my Cheerful. The more I looked at my paint board the easier the decision became. I liked Cheerful RED so Winchelsea would also be RED, maybe REDDER with Winsor & Newton Crimson as my choice. While I was at it I also prepared a blue paint board to compliment the friezes, I’ll defer that choice until I get to that point. I also looked at a couple of black choices. Despite some nice other options I always come back to Admiralty Paints Ironworks Black - a paint that looks as good as matte black on wood as it does to imitate metal in my opinion. I may go with Grumbacher Mars Black, we’ll see when I get to painting the wales. It would be challenging enough to cut planks around 28 ports, it is more fun, to do so while providing for a 1/32 rabbet around three sides of each port. It took me the better part of a day to cut the one shown in the photo that runs along the bottom of five ports midships. Each is a bit different as the ports follow the sheer of the eventual deck with the sides parallel to the waterline, in other words not square. The little port jigs came in handy to determine the 1/32 rabbet. The tops are equally challenging, and still with all that I still had more adjustments with sanding sticks to do later. Once again I am amazed at what can be achieved with nothing more than the heat from a travel iron when it comes to shaping planks. Not easy see in the photo but this one plank follows a gentle S curve front to back and is curved to conform to the bow. Without soaking, clamping or nailing I can shape a plank to lay right onto the bulkheads with very little finger pressure. Like all my planks the inside bottom edge is softened for a tight seal to it's mate below. I do as little as needed, I don’t want to later sand right through the bottom edge. Every plank also has #2 pencil added to the top to imitate tar seams. I recently added a Byrnes Thickness Sander to my shop, it has proven helpful. Even a nicely milled plank can vary in thickness enough to make for a bumpy planking. I ran all my planks though the thickness sander and it paid dividends. This is the un-sanded planking, I didn’t have to do a lot more to smooth it out. - After completing all the planking then sanding above the wales I didn’t like this one section, so I popped it out and replaced it. I plank happily with CA, I try to keep it in the middle of the plank and not too close to ports (the CA not the plank). So it didn’t take a lot to remove the planks without collateral damage. I planked a good part of one side of Cheerful three times, I’m not reluctant to remove a plank and do it again - though I’d like to determine that as I go and not after I’m done as happened here. (I rejected and replaced the lower piece for color match after the photo.) One more step before adding WOP, touching up the ports. I’m normally pretty handy at free-handing this work but I wanted to make sure I had nice edges between the port and the plank. I choose not to paint the out to the edge of the planking. It would be difficult to do for one thing but more importantly the recessed painted port highlights the rabbet and is a better look in my opinion. Excuse my impromptu photo studio, I just hung a bit of cloth over my workspace and used my iPhone. It offends the photographer in me but it’s fast and at least a little neater than my usual workshop photos. After one last sanding with 400 grit I added a coat of wipe-on-poly to seal it up. This first coat is almost absorbed into the yellow cedar as fast as I put it on (and is still slightly wet in these photos). By the time I’m done the ship will have at least three coats, maybe more, of WOP. It is my opinion nothing brings out the rich gold tone of the Alaskan Yellow Cedar better than WOP, they are the perfect companions. I tried to color match the planking rows above the wales and below where the friezes will eventually be, that made for and interesting ribbon of color it seems. As a follow up from a prior post here is the bollard timbers tapered flush with the planking. I’ll shape them more when the other side is complete Using the plans I’ve marked the butt shift pattern to follow for the second layer of the wales. I love the sweeping lines and tumblehome of Winchelsea, so cool. So after two weeks I have the starboard side done above the wale - off I go for another two weeks to complete the port side. Thank you the follows, likes, and comments. I’m just one of many working on this magnificent, and very large, model, I appreciate your stopping by to see mine.
- 840 replies
-
- 24
-

-
-
- winchelsea
- Syren Ship Model Company
- (and 1 more)
-
We’ll that’s a creative approach to those strips, very clever.
- 112 replies
-
- 1
-
-
- Cheerful
- Syren Ship Model Company
- (and 1 more)
-
I’d be interested to know what that is. I’m fine using a pin vise, all the rotary ones I’ve found are either too fast or too bulky and mostly both.
-
I found these particular drill bits to be junk. They broke faster than I could use them. Too bad as they seem like a good idea in their design. (The cheap ones, not the one in the pin vise).
-
I think whatever color you like is the color you should use, there is no right answer. It looks great.
-
Nice work on the belfry solution, end grain char is the worst. I have some luck with a #11 blade but if tolerances allow sometimes I hit ever so gently with the Byrnes sander. That of course wouldn’t work on the belfry, hence another creative solution by Derek.
- 345 replies
-
- 3
-
-

-
- Duchess Of Kingston
- Vanguard Models
- (and 1 more)
-
For your next model if you don’t follow a common butt shift pattern I’d recommend at least staggering the joints fo structural support. I hope they are indeed tight and smooth enough not to be visible after painting.
- 476 replies
-
- 2
-
-
- sphinx
- vanguard models
- (and 1 more)
-
I’m sure he means butt joints. He’s new to the hobby, don’t see a reason to call him out.
- 362 replies
-
- 2
-
-
-
- Amati
- Lady Nelson
- (and 2 more)
-
Have you corrected the garboard plank? Any planking will be difficult without that happening. For LN I’d advise you just do a full length plank. A shift butt pattern on so small a hull would be aggravation you don’t need first time around. You can see my Cheerful build to see one, but on my LN I just did full run for the reason I note. My advice anyway.
- 362 replies
-
- 4
-
-
- Amati
- Lady Nelson
- (and 2 more)
-
She has really come along nicely. It’s almost disappointing as the finish line looms near, at least it was for me. It was such a fun build.
- 112 replies
-
- 1
-
-
- Cheerful
- Syren Ship Model Company
- (and 1 more)
-
Gingher scissors are the best. I’ve used them on rigging for years, though I prefer the non-stork embroidery version. They’re also good for goatee trimming, so I have several pairs.
- 542 replies
-
- 4
-
-

-
- Sphinx
- Vanguard Models
- (and 3 more)
-
Let’s see yours on your Flirt build😊 I replaced all hooks and belaying pins on mine.
-
I think Chris’ point was the doors are a precise rendering of the actual plans, even though he’s not sure what they’re for. And if Druxey doesn’t know….