glbarlow
-
Posts
4,126 -
Joined
-
Last visited
Content Type
Profiles
Forums
Gallery
Events
Everything posted by glbarlow
-
Other than fairing all I use is 150, 220, 320, & 400. I have never finished anything beyond 400 grit. I really like Soft Sanders with their adhesive paper, foam sanding sticks I get on Amazon and more adhesive sandpaper on small wood block I cut, 1 ¼ and 1 ¾ square by ¼ thick plus loose paper in those 4 grades. I have a tray on my bench filled with all this stuff.
-

Planking Question
glbarlow replied to Malazan's topic in Building, Framing, Planking and plating a ships hull and deck
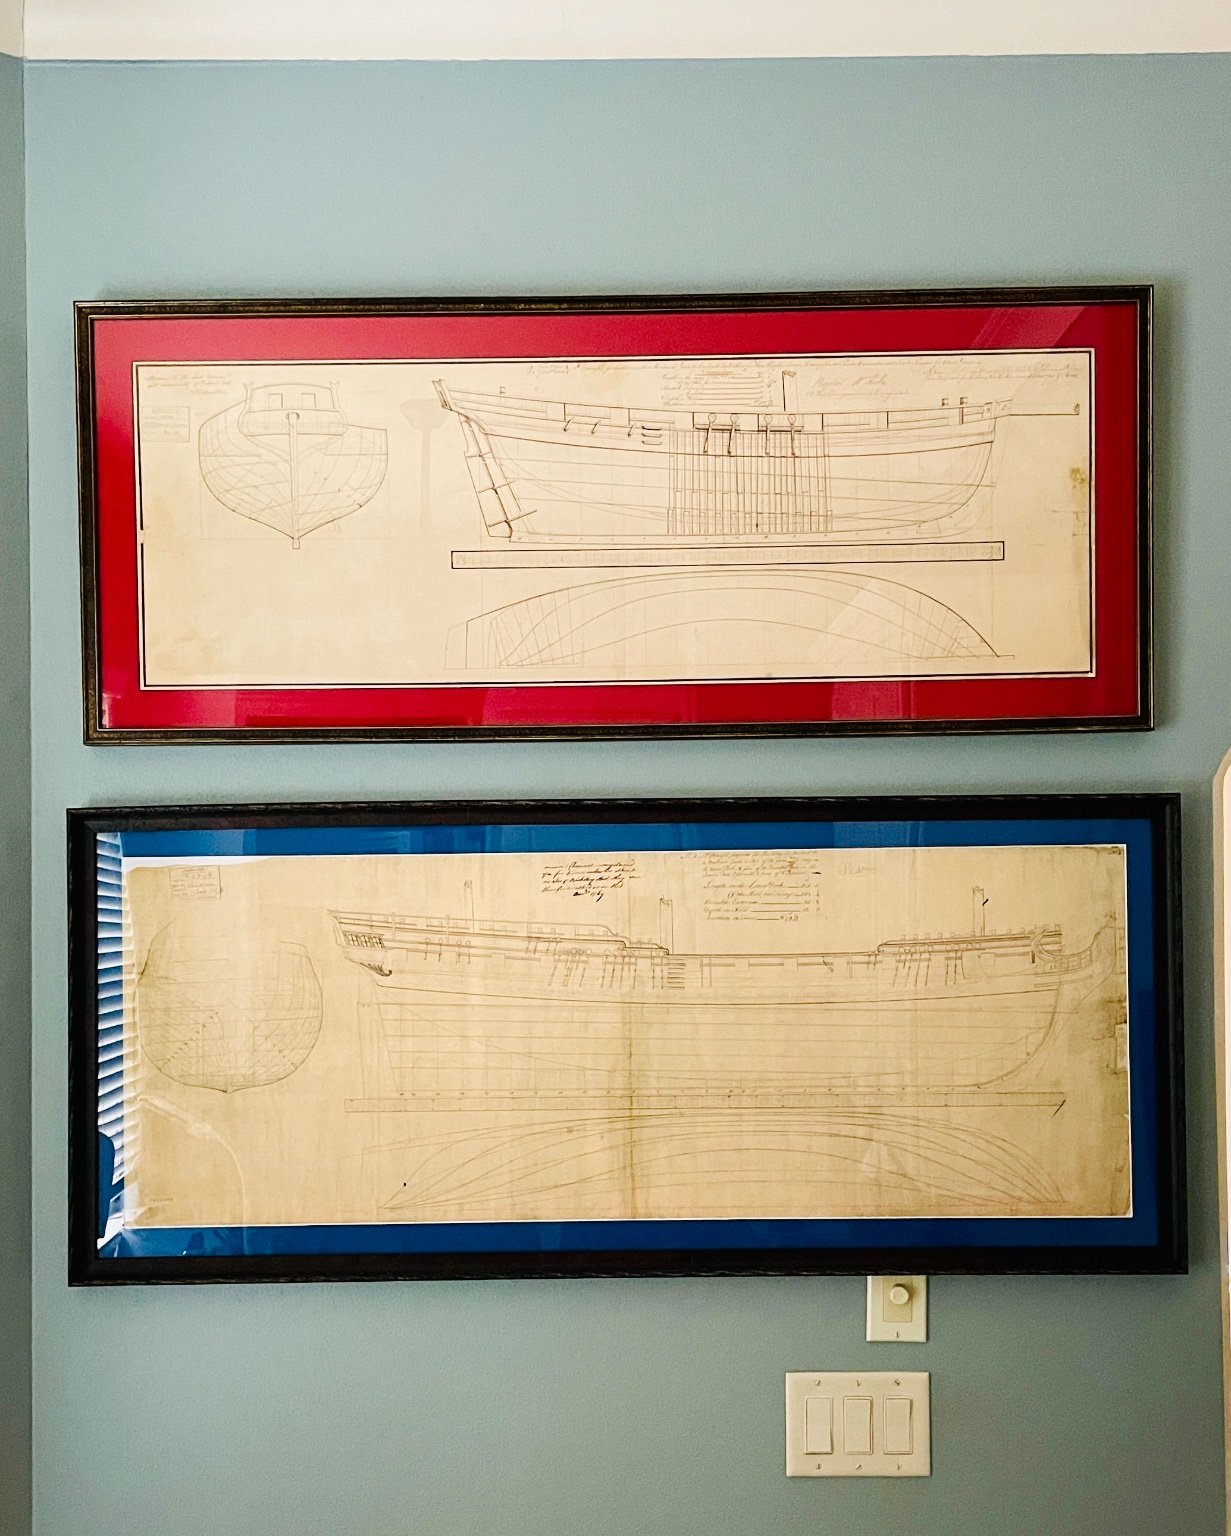
Justin helps makes my point, thank you. To be clear I’m an avid reader, my Kindle always has multiple books and one in progress at all times. I also have a number of the key reference books, which I used rigging Pegasus to be historically accurate. A beginning modeler doesn’t need to fall down the rabbit hole of maritime research, building a basic model should be simple, rewarding, and purposeful. Building confidence and basic skills through experience of doing comes first. While I did use references to make rigging on my LN a bit more complete it wasn’t my first model and there is little gained from detailed research on this entry level model (I built it as a refresher after a very long layoff to see if I wanted to restart my building, a small investment if I didn’t.) I’m not saying research and books aren’t good, just that it’s overkill and possibly overwhelming when first starting out or for building most commercial models as is. For example I trust that Chris for Flirt & Sphinx and Chuck for Cheerful & Winchelsea have done all the necessary research needed to build a great model. As Justin said, there is a time for reading and a time for building. And…I like plans and drafts far better anyway (my ship room wall):
-
All my models have a brass plate with the ships name, my name, and the year I built it on the stand. Three also have the name on the stern, I think it’s your model, your call.
-
Yes, I ordered some boxwood from there a few years ago. What I received could best be called kindling. They finally gave me my money back but said keep the wood, it made for great fire starters. Don’t waste your money. The place to go is Modelers Sawmill at the link above. I got a large order of yellow cedar from him and it’s perfect, both the quality and the cut.
-
I wouldn’t be so discouraged Glenn, it looks like all you need to do is remove and replace the roof of the quarter galleries. There’s not that many pieces to the quarter gallery eve if you had to replace them all. I’m confident you can sort it out.
-
Planking Question
glbarlow replied to Malazan's topic in Building, Framing, Planking and plating a ships hull and deck
Thank you for referencing my log. After the Lady Nelson I’d suggest Speedy, Flirt or Duchess. Alert is just a better version of Lady Nelson, a small cutter. You shouldn’t need a rabbet on any of those and running planks the full length of the hull is the best course with all these models. If you wanted a rabbet on the keel you can sand or file the frame former to about half its width, ¼ on each side. Once you attach the keel, you have a rabbet. The simpler way is just to bevel the plank to match the angle to the keel, same concept at the stem, it works fine on these models. Garboard by the way is nothing more than the plank closest to the keel, it’s a little more challenging to fit, but it’s still just a plank. My advice is to read less and build more, these models don’t have to be complicated or researched. You can learn as you go or research along the way if that interests you. As a beginner the best thing to do is build stuff. There are plenty of logs, post your own and you’ll get the help you need as you need it. -
Looking forward to seeing your Flirt log.
-
Planking Question
glbarlow replied to Malazan's topic in Building, Framing, Planking and plating a ships hull and deck
No one has asked this and you haven’t said. What model are you building? Expansive libraries aren’t essential or even necessary for a beginner,in most basic commercial models a rabbet isn’t necessary, you can bevel the plank to match the stem and keel. If it’s a double planked hull, go with a single plank bow to stern but watch those videos and learn how to plank properly. If you do the right planning, measuring, and tapering you shouldn’t need to cut planks in half to fit on a standard model, in fact that won’t help you learn to plank better. This advice posts can over complicate things as often as not. Frankly you haven’t provided enough information to get a clear answer so things go on tangents. What model are you building, do you even need a rabbet, as a beginner a single plank bow to stern is easier to manage that scaled lengths. Even then you need a proper shift pattern planned out, not just randomly cutting planks. -
My nautical dictionary refers to drop planks just before the bow, as you said to drop a second plank into one to better allow equal planking at the stem. Both Cheerful and Winchelsea have one such plank. I fully acknowledge most of my maritime knowledge comes from you so what do I know🤪
- 345 replies
-
- 2
-

-
- Duchess Of Kingston
- Vanguard Models
- (and 1 more)
-
Are they really though, doesn’t the name say it all, and isn’t it drop planks. Could’nt resist 😂🤣😂
- 345 replies
-
- 2
-

-
- Duchess Of Kingston
- Vanguard Models
- (and 1 more)
-
Good luck with that, I screw up the terminology all the time and I’ve been at this for a long while. 😂🤣
-
Planking Question
glbarlow replied to Malazan's topic in Building, Framing, Planking and plating a ships hull and deck
Try looking at these -
They are that. Remember they need to be treated and sharp now, they don’t come ready. I love these tools, I use them a lot and for more than just chiseling.
-
Yes, that’s correct. I noted that in my LN log
-
Just checked mine and remembered there is a molding piece between the counter and the square tuck too. I did the thin paint thing on the counter…it does finish nicely. Just remember the top of the rudder has to be done the same to match. It makes me happy to visit my Cheerful, I’m sure it will be the same for you.
-
Sorry, you can't trademark that, I make so many mistakes it's hard to keep track:-)
-
Really nice to see the designer and prototype builder taking an active interest in addressing mistakes by builders. Thanks Chris and James.
-
Thank you. James was a big help narrowing down the countless options. I won’t use it much, it takes as long to clean as it does to paint it seems.
-
Thank you. Best of luck with your planking, my painting was more of a choice than a fall back, I like to paint. Thank you, I appreciate your saying so.
-
I knew I could count on you to correct my spelling and maritime terminology, I don’t need that dictionary 🤪🤣Hawser holes is so much more fun.
-
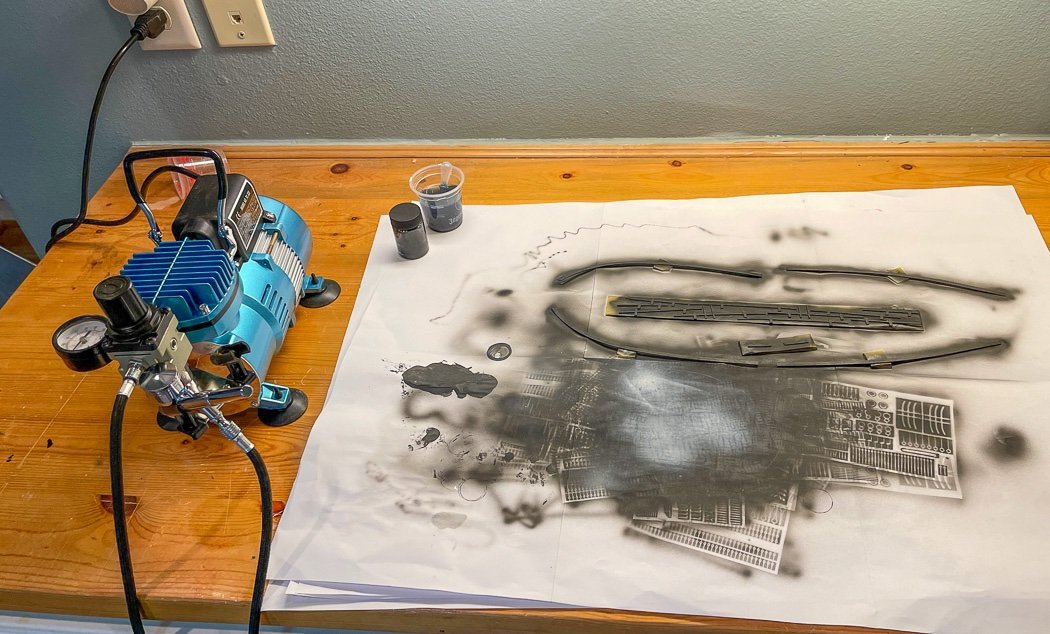
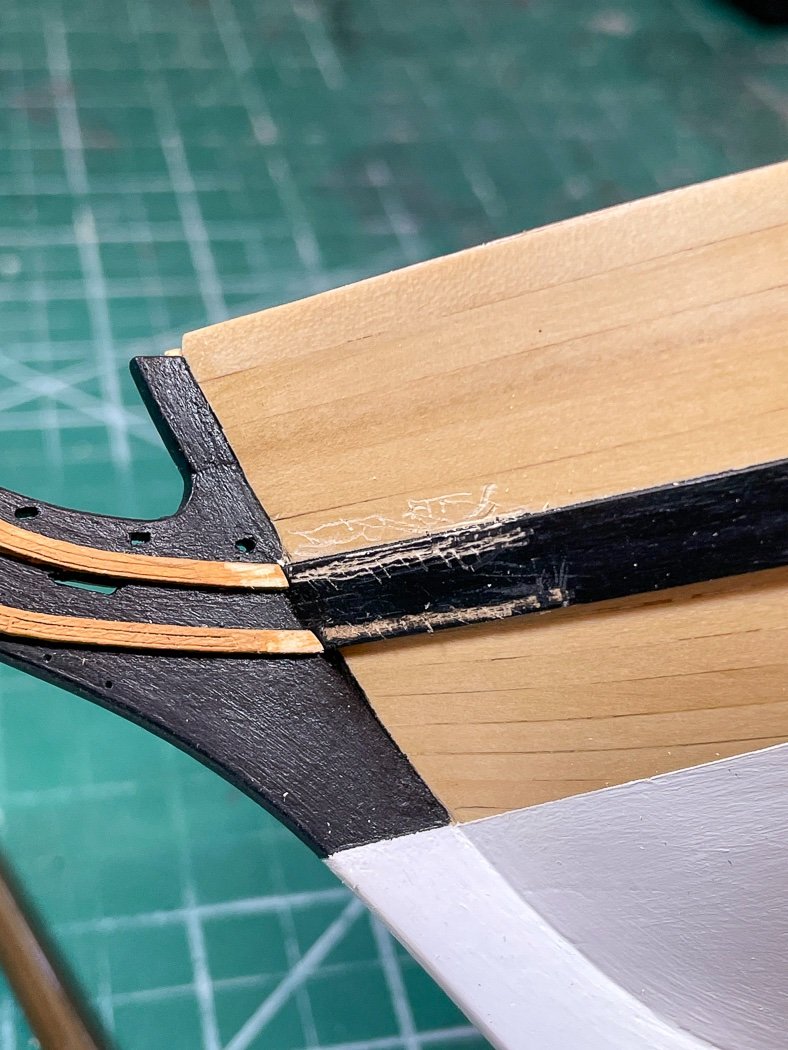
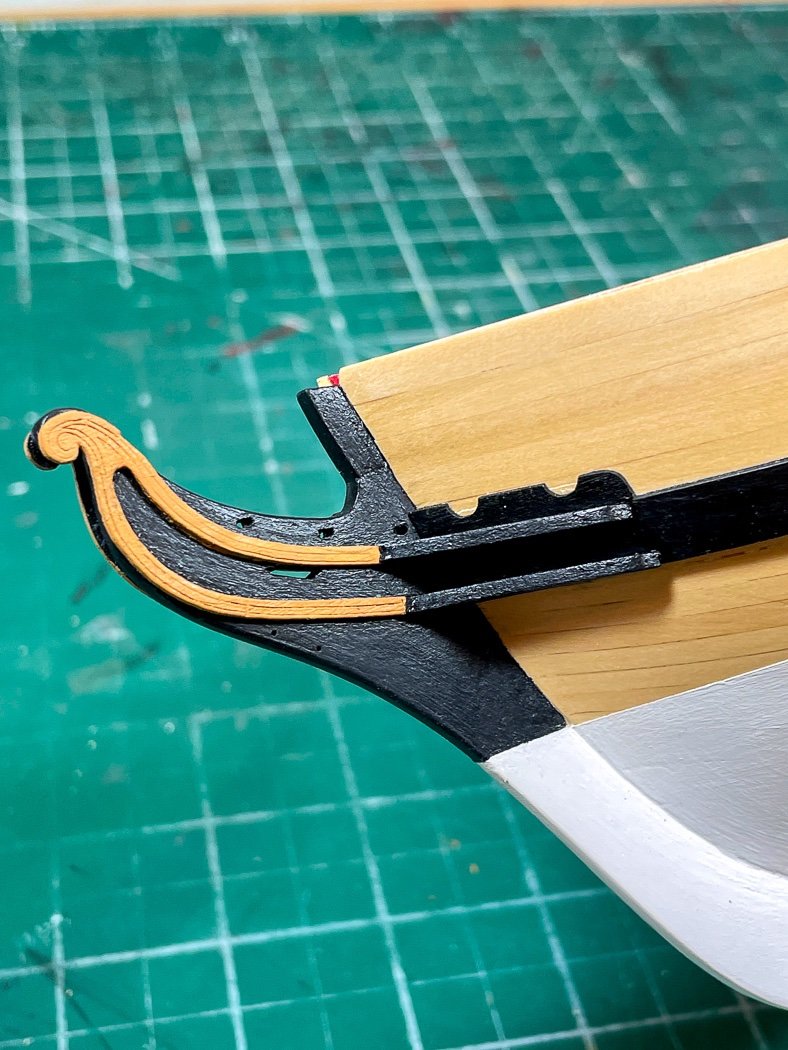
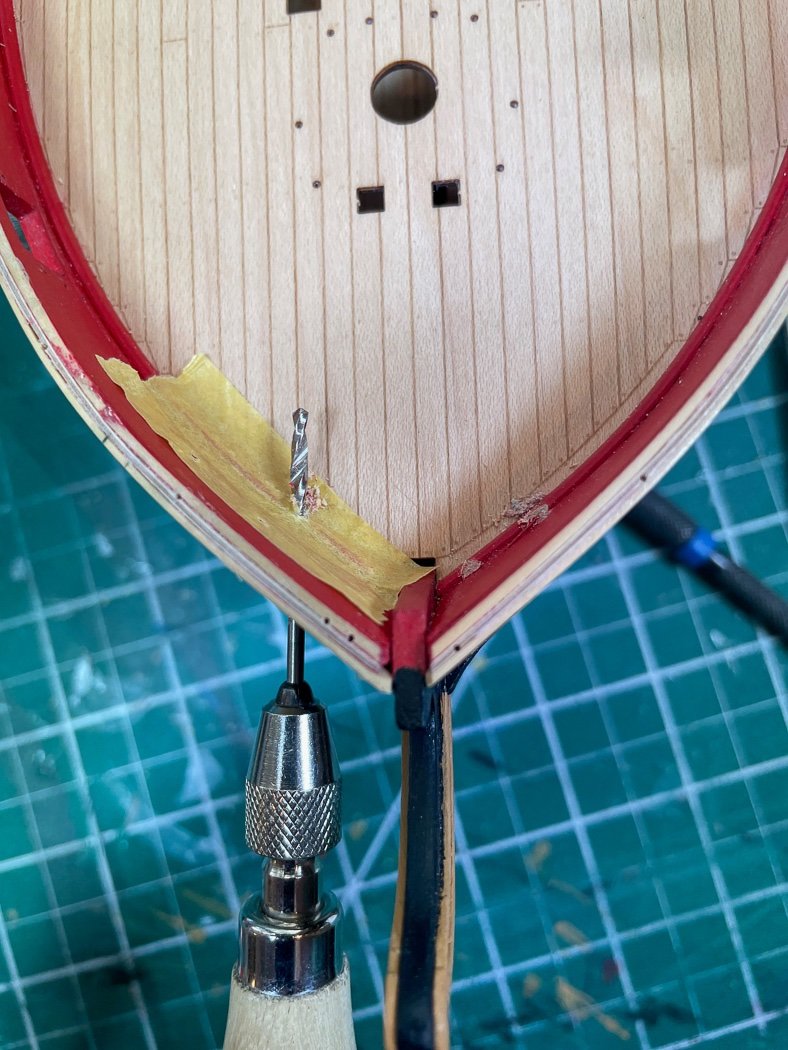
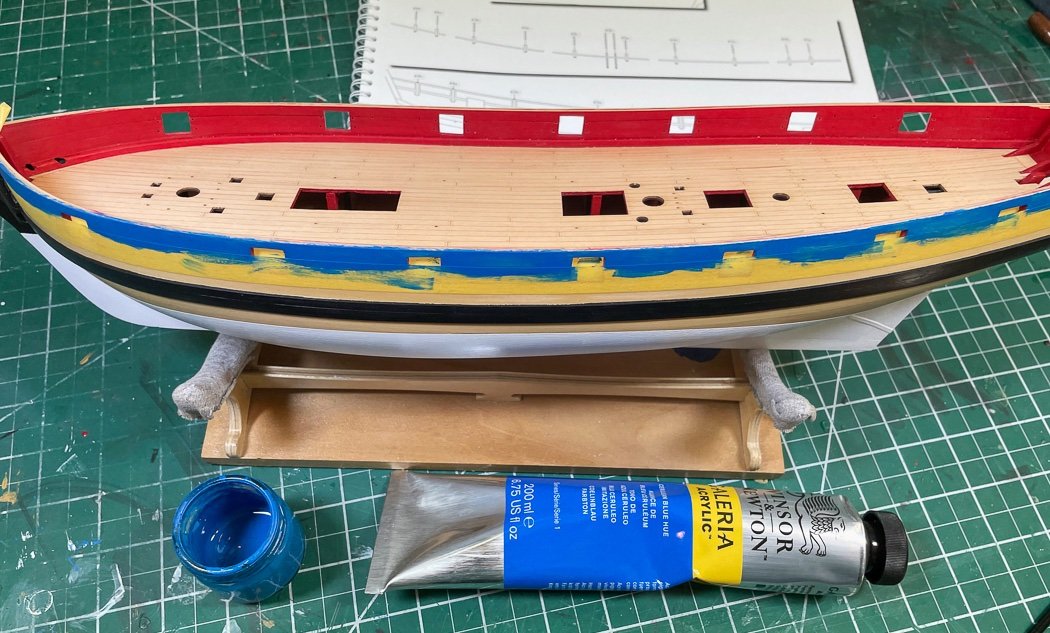
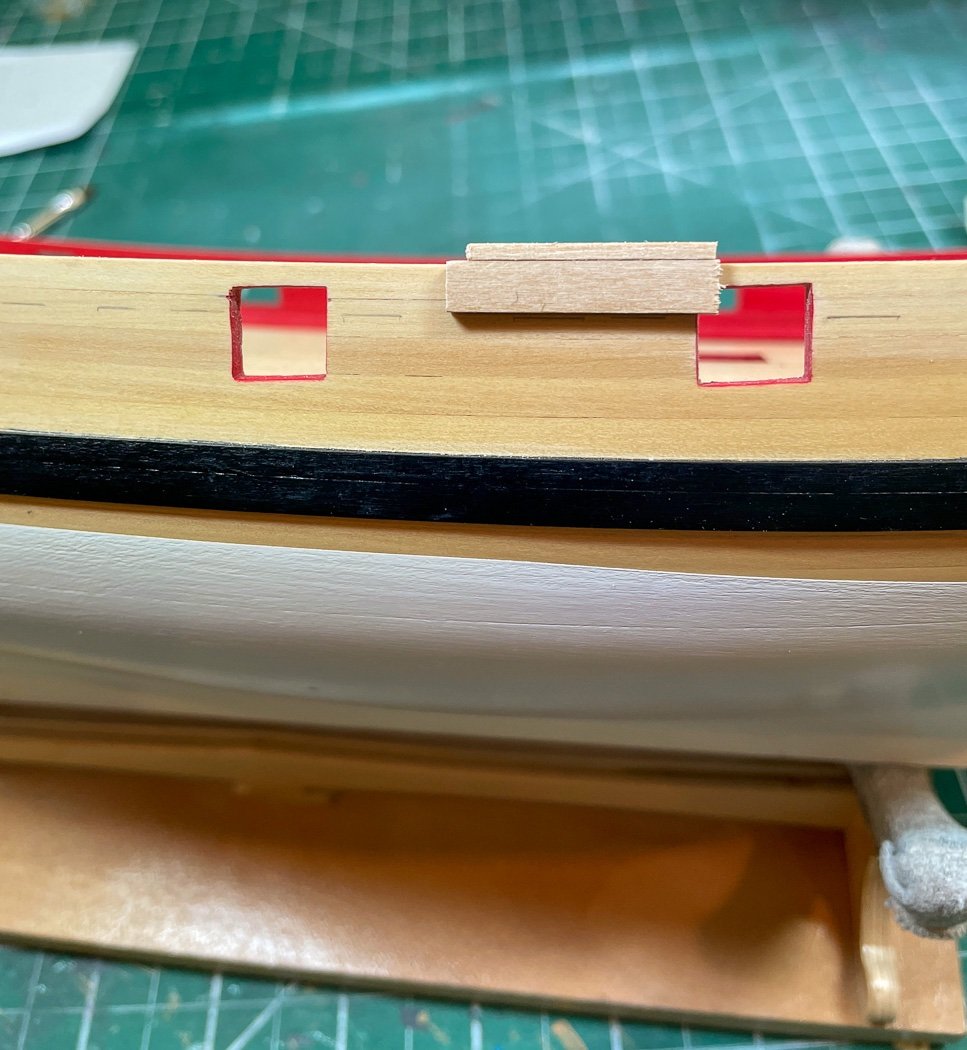
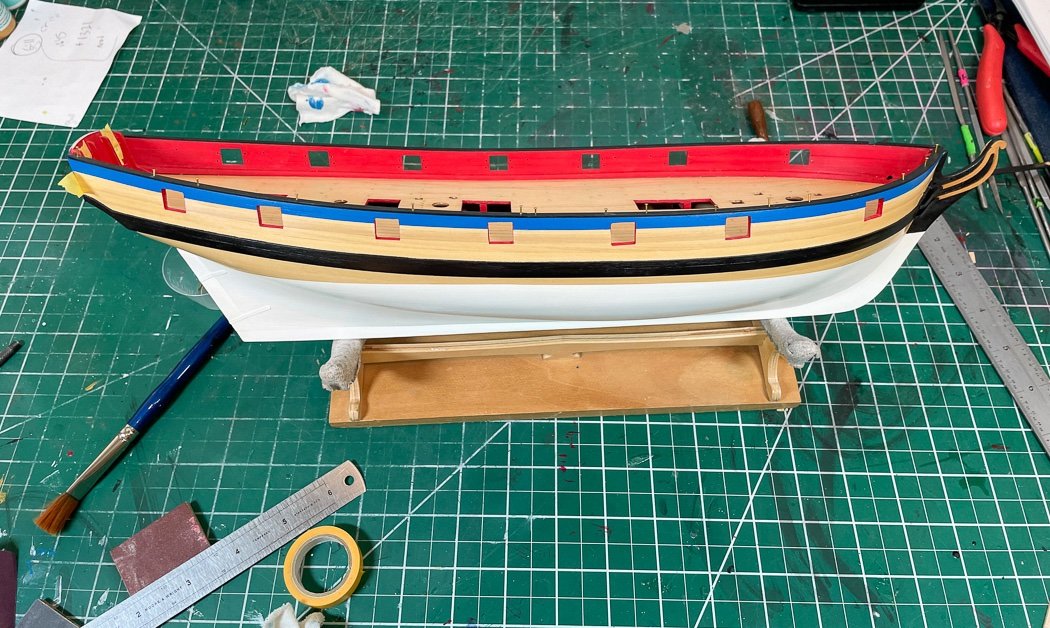
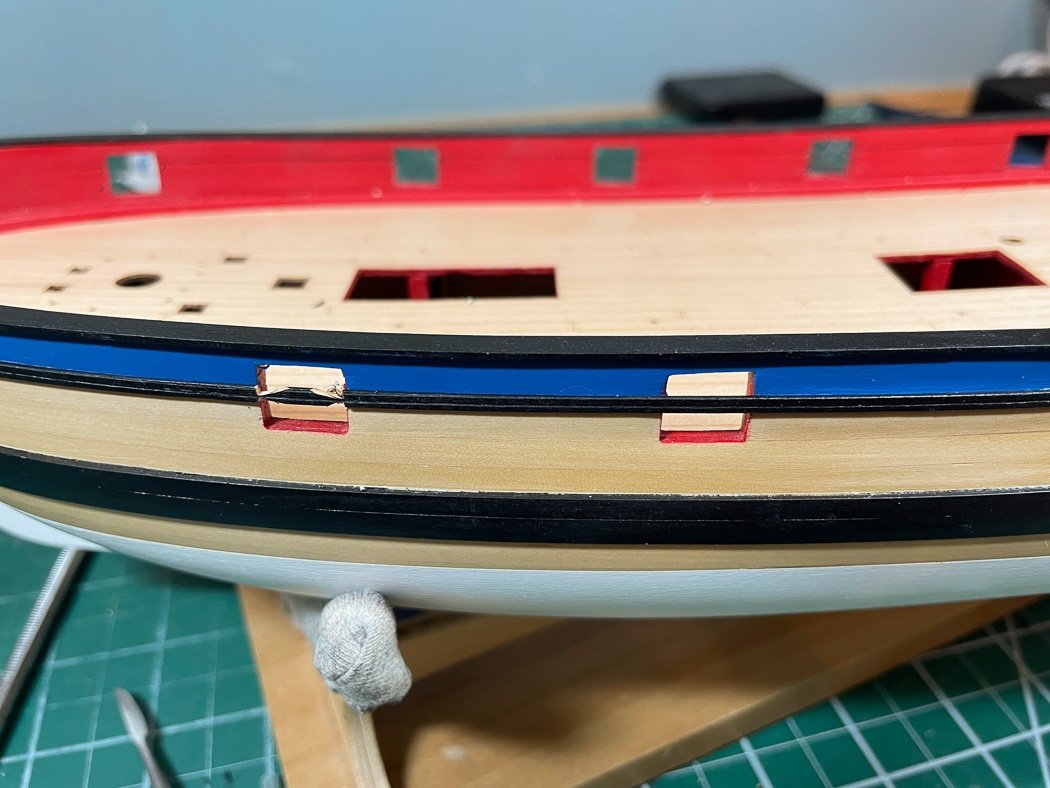
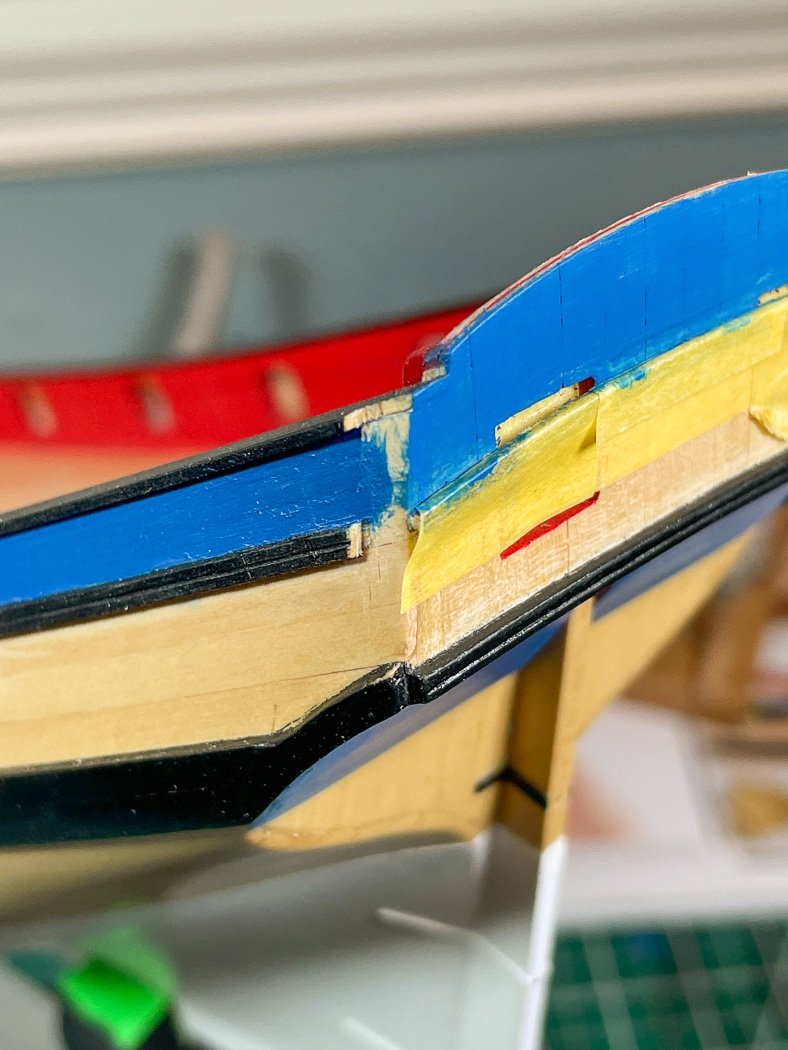
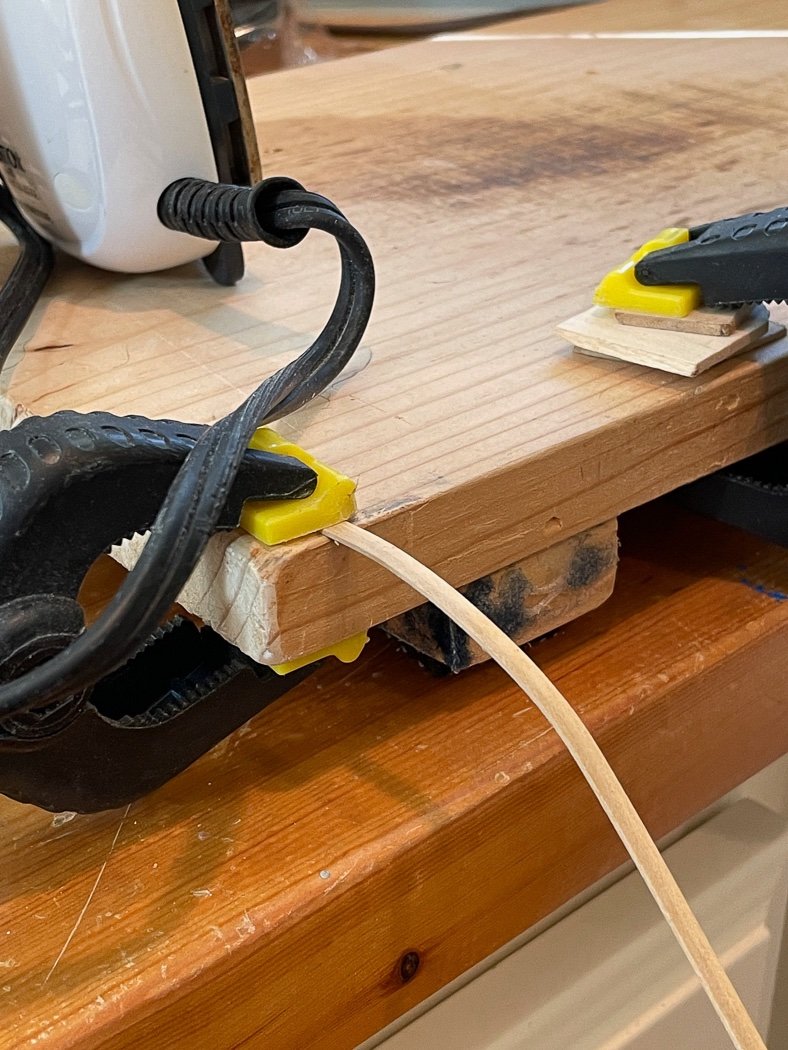
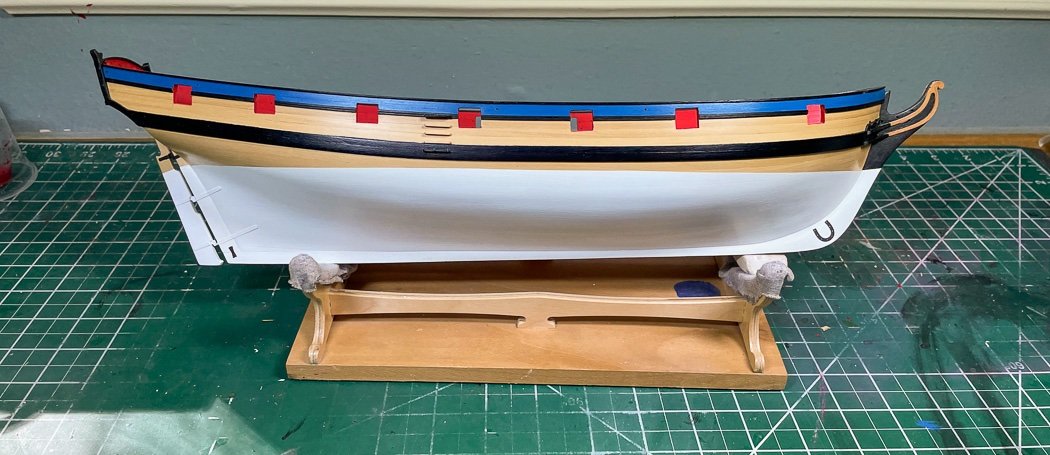
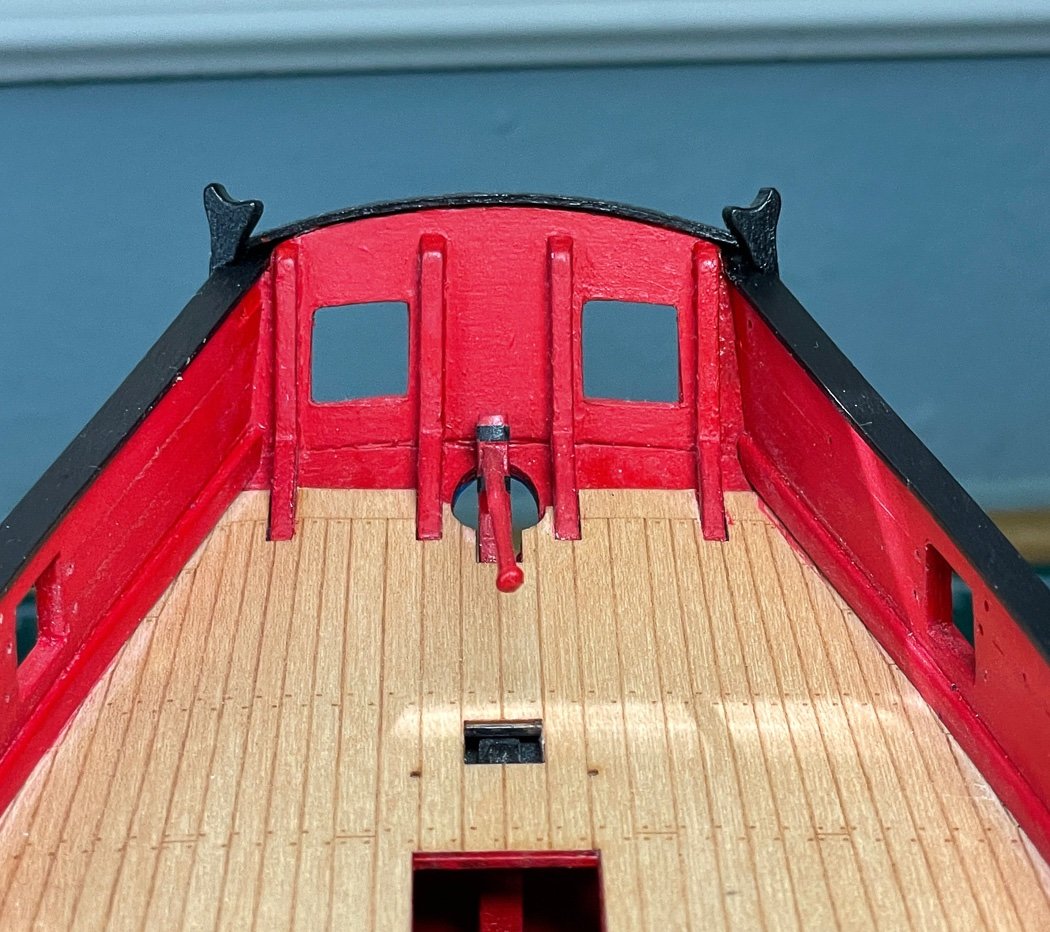
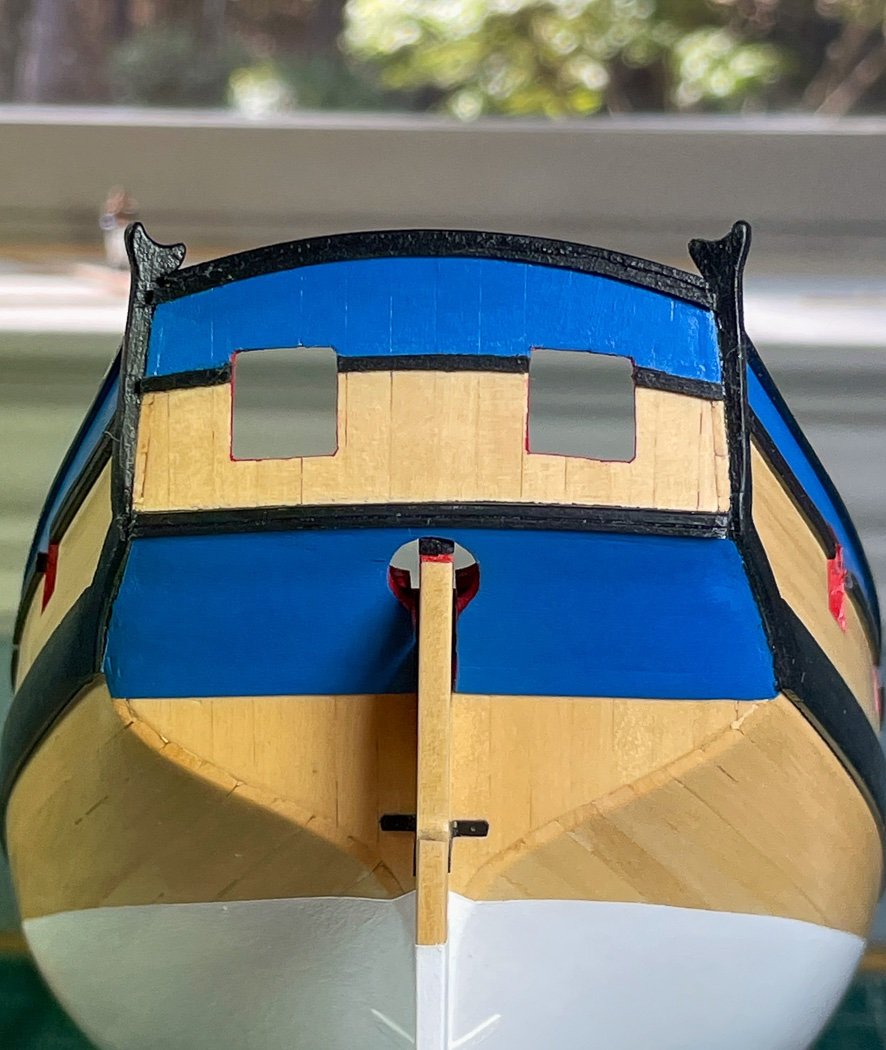
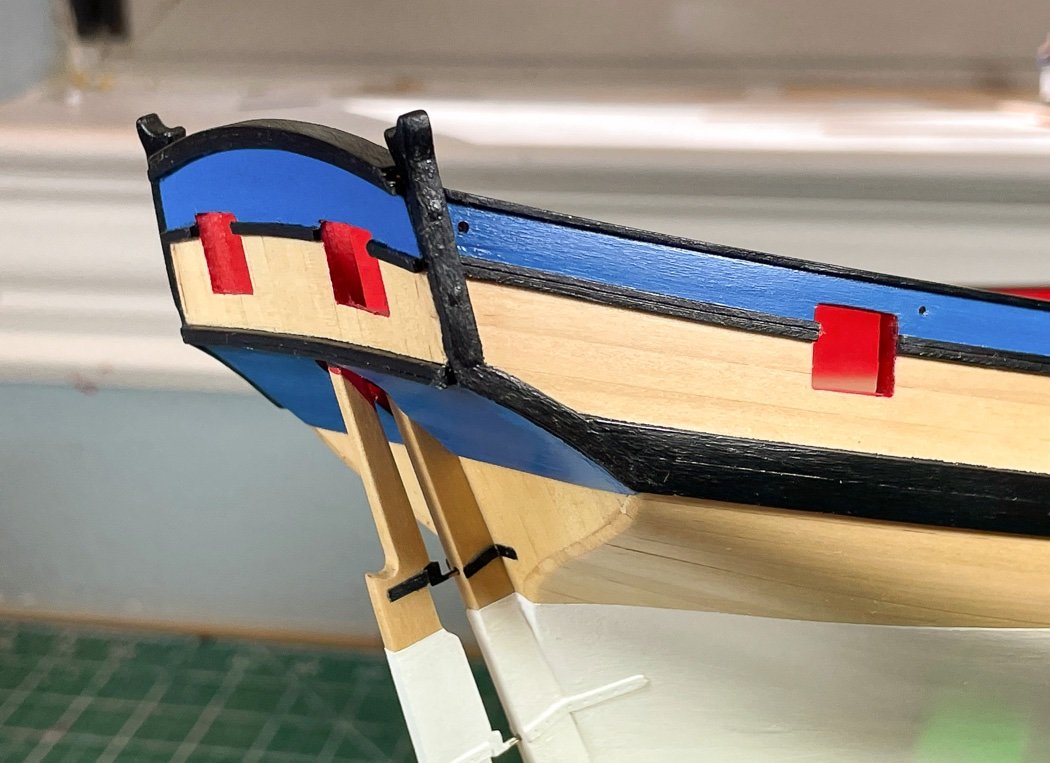
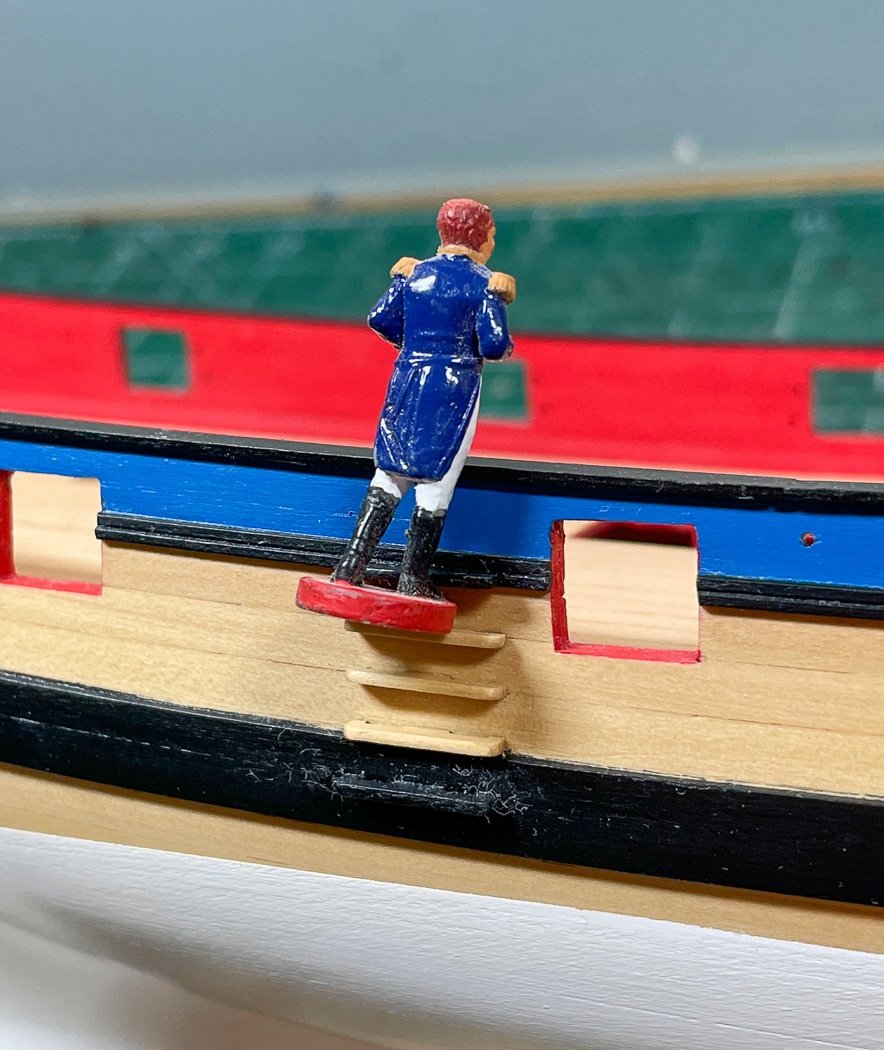
Upper Hull and Stern I’ve made some progress on the upper hull, largely completing it and the stern. Sometimes creation begins with destruction - I’m not sure it its essential but I usually “etch” a surface before gluing something to it as I’ve done here on the hawser holes (is that the marine name, sounds wrong 😄 and the first phase of the stem decoration. I also etch the mounting side of what’s being attached, in the recesses of my mind I see the glue adhering better. Maybe not… At any rate I’m careful to contain my knife attack to what will be covered. The instructions show these stem decorations as natural, I elected to paint them yellow ochre since I’ve painted the stem black. The engraving is very nice, but that means the paint has to be thin to not fill and cover the engraving….ask me how I know that…. I did encounter a small problem here. The decoration covered the slot for wrapping of the bowsprit, I had to enlarge/lower the slot with a file. It’s a good thing I caught it or it would have been 90% covered and very difficult to correct. I always assume these things are my fault and not a design issue - I had so many issues with the stem why not one more. This is also a good time to check the three small slots along the top of the stem. There are three brass pieces that slide through these slots, not just fit into but slide through to the middle of each. It’s a great design idea, but here again I had to enlarge the slots, mostly to remove excess paint. The temptation is to drill the hawser holes (there’s that name again, it can’t be right) straight through as they lie. However they need to instead be straight with the run of the deck since the hawsers feed along the deck to the hold. I go slow with these, a great opportunity to split some wood. First a pilot hole with a small bit, then a larger one and gently finishing with a round file. The tape on the inside helps prevent splintering. Sometimes the best jigs are the simplest one. To mark the paint line for the upper hull I just edge glued a 5mm scrap to another one in an L shape. It needs to be short since the deck curves. I just ran it along the cap rail marking with pencil (lightly so not to dent the wood) below then came back and ran Tamiya tape along that dashed pencil line. Before doing that I lightly sanded above the wales with 400 grit. This Cerulean Blue is the color I hope to use on Winchelsea and at any rate is a pretty color. I mix the tube with distilled water until I get the consistency I’m looking for and paint away with my brush. And end up with this. Ok, before I go any further, it’s time to confess. I have purchased an airbrush and compressor. My thanks to @James H who provided gracious and expert advice on what to get. I ended up with an Iwata Eclipse along with this basic compressor (which came with some cheap airbrushes, but I’m an all in kind of guy). I still prefer a brush for most things but there is stuff I think the airbrush will prove helpful, like gun carriages and priming PE for example (when I don’t instead blacken it). First up were the long trim pieces and the cap rails for the hull (I’m not brave enough to paint anything on the ship, it has to be done off to the side). No judgements please, I’m on a beginner’s learning curve. Here I went off book. I decided I wanted a simpler look that highlighted the pretty blue/black/boxwood/white combination. Plus I really don’t like swivel guns, I think they detract from the elegance of the hull and make it instead look busy. Of course I now lose the historical accuracy merit badge. So if I wasn’t going to mount swivel guns why include the swivel gun mounts. Instead I scraped a simple molding into a slightly larger boxwood strip and ran it along the bottom edge of the blue paint. I always run these things as one piece then come back and trim out the gun ports. I’m sure there are other ways to do this, but I prefer to use a really sharp #11 Excel blade. The #11 scalpel may be sharper, but it is way to flimsy for this onion peeling approach to trimming. I score it top and bottom at the edges of the port and peel it back from both bottom and top to prevent splitting - going slow is essential and not something to do after too much coffee, too much scotch, or while watching the Cowboys beat Philadelphia. In the 'always plan ahead' mode it was time to take a look at the stern. I wanted the blue trim to match up with the trim on the transom, separated by a black trim piece. It was also easier to mark and cut the side trim piece to match up to the boom crutches rather than trying to cut it away later (this applies if using the kit supplied hull trim as well). I spent a lot of time fitting the boom crutches, I wanted to turn them in a little bit (not thick enough to turn in enough) and match them up to the counter fashion piece for a contiguous flow. That meant both thinning them and matching up angles. Having done one the often more challenging task is to make the second one a mirror identical. Care is required to ensure they both wind up the same height above the cap rail. (the tiller is temporarily mounted, I see in the photo it isn’t straight, and I leaned up that paint in the corner later). A quick trip to the plank bending station to iron a curve into the transom top rail. It took a bit of fettling (my favorite English word) to get a good fit between it and the crutches, including a little beveling. With that the stern is complete. I added a couple of bolts to the crutches for no particular reason by drilling holes, inserting 24 gauge black wire, then cutting it off to stand a little proud before I installed the crutches and before I painted them. (rudder is temporary and not pushed in tight). There are a series of 1mm holes drilled in the hull for future rigging as per the plans. I always check the plans for anything I can do earlier because its generally easier to do earlier. I added the mounting ladder, stopping short of the layout shown on the plans. I didn’t necessarily want a rainbow of painted rungs with a blue one at top - and Admiral Cochrane on his visit to Flirt didn’t seem to need it to climb aboard. Lot of dust on that bottom rung, sorry Admiral we’ll get right on that. With that the exterior of the hull (minus the bow, that’s next) is largely complete. I’m happy with the paint lines (all by brush except trim). With the blue trim, black molding, and red lined gun ports I spent a lot, a lot of time going back and forth with a 10/0 Shader touching up and touching up again. I try to tell myself to move away from the paint jars, then immediately find something else to touch up. When I get to the 20/0 shader its really time to stop, and then…. Thanks as for your time spent to visit my log, the likes and the comments are always appreciated.

-
Looking good Paul, so near the finish line now. That has to be the world's cleanest work mat.
- 274 replies
-
- 1
-
-
- Cheerful
- Syren Ship Model Company
- (and 1 more)