
HOLIDAY DONATION DRIVE - SUPPORT MSW - DO YOUR PART TO KEEP THIS GREAT FORUM GOING! (Only 13 donations so far - C'mon guys!)
×


druxey
-
Posts
13,292 -
Joined
-
Last visited
Content Type
Profiles
Forums
Gallery
Events
Everything posted by druxey
-
Very sobering indeed.
-
 An interesting and ambitious project, Adrian! Judging from your lifeboat model, you should certainly build an outstanding model.
 -
Yup! Those T-slots work much better with access. But lovely cabinetry work anyway.
-
Great progress, Gaetan. She is looking lovely.
-
Congratulations, Adrian. I hope your model does well in competition. It certainly deserves to!
- 184 replies
-
- 3
-

-
- ruby & arthur reed
- lifeboat
- (and 1 more)
-
Beautifully done! I can see why these would be tricky to make.
- 184 replies
-
- 3
-
-
- ruby & arthur reed
- lifeboat
- (and 1 more)
-
Your cross-chock joints are nice and neat looking!
-
Nice. You'll be finished framing in no time now!
-
If you look at the forecastle deck plan above, you will see that the deviation of the upper deck beam is to allow the long ends of the spanshackle bolts to pass down through the upper deck beam to be forelocked below it. You may wonder why the beam wasn't simply a regular straight one placed slightly further forward. The outer ends are placed closer to beneath gun port #2 for support.
-
Beam Arms
druxey replied to allanyed's topic in Building, Framing, Planking and plating a ships hull and deck
You are partly correct, Meddo. The other reason is reinforcement for the main mast partners immediately aft of them. -
I've just looked at a handwritten contract for a sixth rate (1775) and the phrase 'iron stair cases' is included in the rubric. As this was not a regular fighting ship (see dafi's suggestion above), it strengthens my thought that this refers to the railing around the companion openings.
-
Aiee! What a complex set of procedures to carry out, Ed. I would have been strongly tempted to simplify and fudge those blocks at that scale. My hat is doffed to you, Sensei!
- 3,618 replies
-
- 8
-
-
- young america
- clipper
- (and 1 more)
-
The speculation sounds plausible, Wayne! Certainly iron stanchions and rails were used for safety to surround three sides of a companion coaming on, say, the quarter deck. Contemporary models show these.
-
Thanks for the rest of your back-story as you worked against the clock, E & T!
- 346 replies
-
- 2
-
-
- terror
- polar exploration
- (and 2 more)
-
Silly question: are the stirrups for the footropes long enough? They should hang about 3' 0" below the yards. Unless ship is manned by midgets, of course. (No offence meant to the height-challenged.)
- 310 replies
-
- 2
-
-
- cheerful
- Syren Ship Model Company
- (and 1 more)
-
Those would be very 'compassy' timbers then!
-
That seems like a reasonable assumption, Mark. It's certainly a new term for me! Thank you for posting the actual examples of this. I do note the provision "as shall be directed", implying that this might be a catch-all phrase preceding those words.
-
ancre Chebece 1750 by Jeronimo - FINISHED
druxey replied to Jeronimo's topic in - Build logs for subjects built 1501 - 1750
I can only echo what has already been written: beautiful and precise! -
The Berwick draught is a very interesting drawing. Those 'extreme' hanging knees shown on the gun and upper decks must surely be iron - they appear to be considerably less than a foot wide, judging from the scale in the upper right. The standards on the upper deck are wider and must be wood. I was also looking at the knee of the head: all the joints are tabled ones. That would be a modelling challenge!
-
Looking lovely, Mike. Ignore those jealous comments about how good your work and photography is!
-
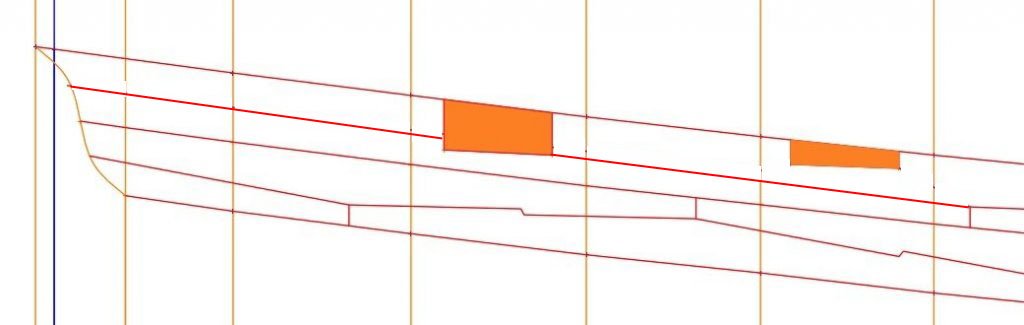
They would be unlikely all cut to the same length, as A) the shift of butts have to be taken into account and all butts must land in the middle of a frame. As for the aft end of the wale, for wood economy it might have been something like I've sketched. What do you think?
-
I assume the swivel helped level the yard when the ship was heeled.
- 3,618 replies
-
- 1
-
-
- young america
- clipper
- (and 1 more)
-
As long as you shift the butts properly in correct sequence, you should be all right.
-
Sweet! She is looking very nice indeed, Rusty.
- 310 replies
-
- 3
-
-
- cheerful
- Syren Ship Model Company
- (and 1 more)