druxey
-
Posts
13,368 -
Joined
-
Last visited
Content Type
Profiles
Forums
Gallery
Events
Everything posted by druxey
-
 I totally understand, Steven. I worked without power tools and on a shoestring for many years. A thin coat of wax shouldn't narrow your grooves. Other solutions are a coat or two of gloss varnish. I wouldn't recommend anything that is water-soluble like white glue (sorry, Mark!). Personally, I use paste wax over gesso. And I don't think soap is quite 'it' either - water soluble.
 -
Ah, yes. Th aggro of printers and scaling! My empathy on that, Maury.
- 525 replies
-
- 3
-

-
- anchor hoy
- hoy
- (and 1 more)
-
Gorilla glue is ghastly stuff! I had a friend who tried to fix a piece of furniture only to have it end up glued to his carpet.... Use white PVA or yellow aliphatic glues. Much better choices.
-
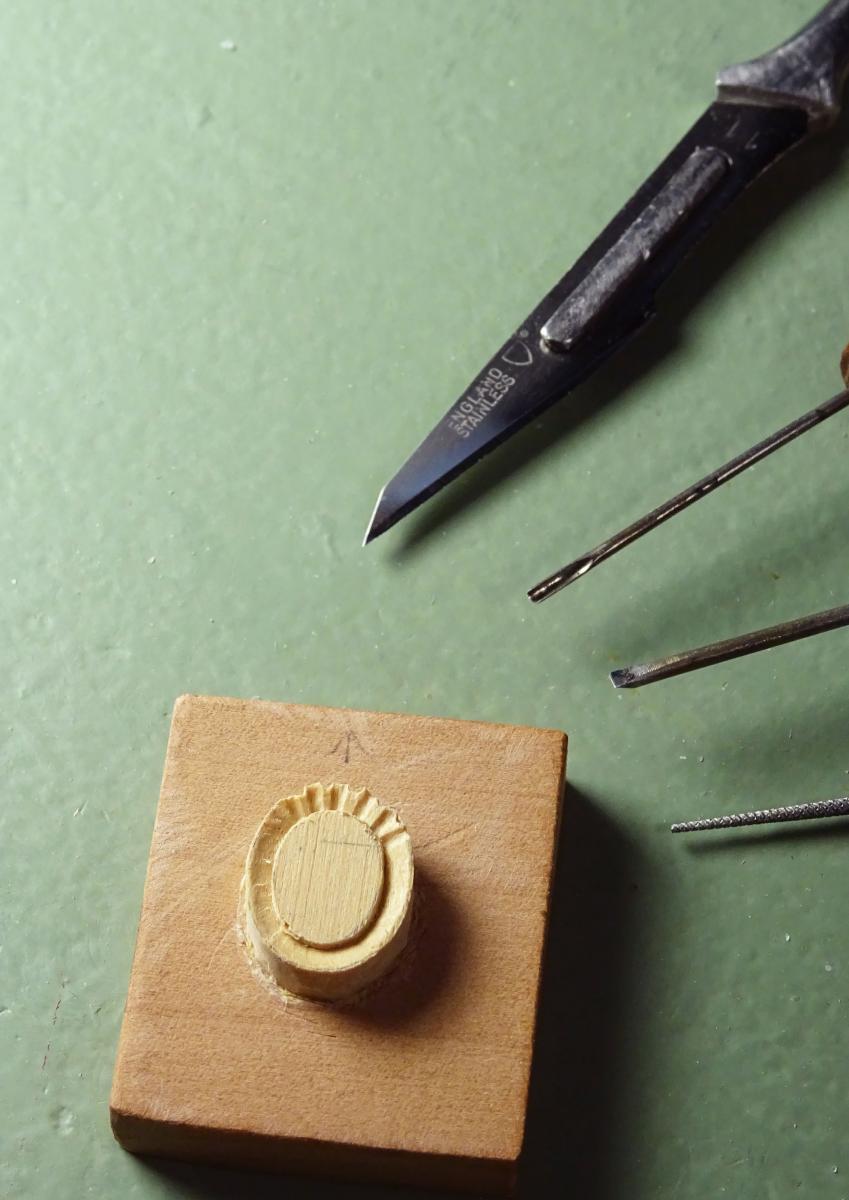
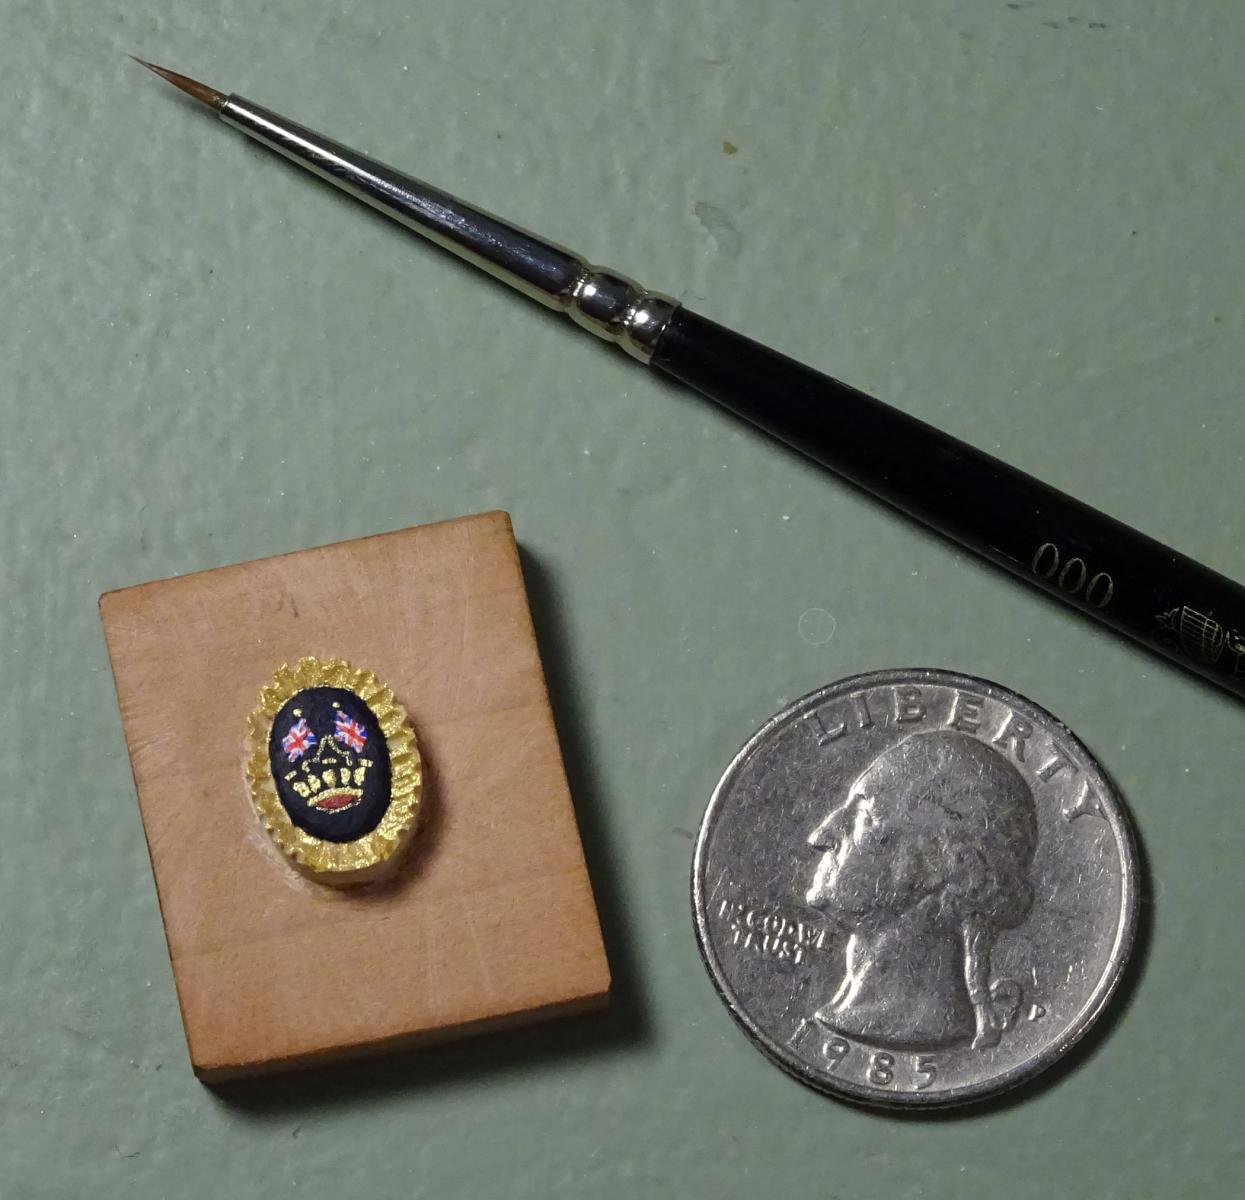
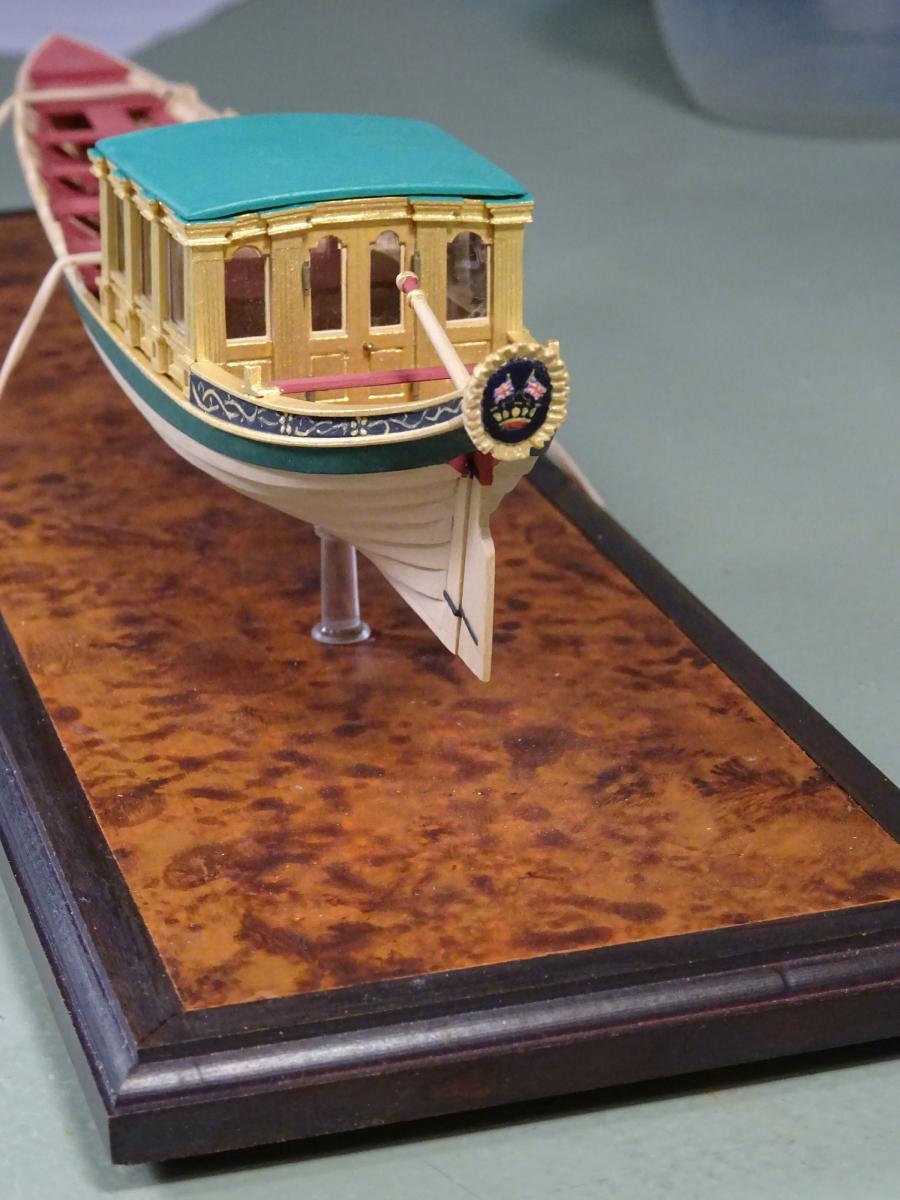
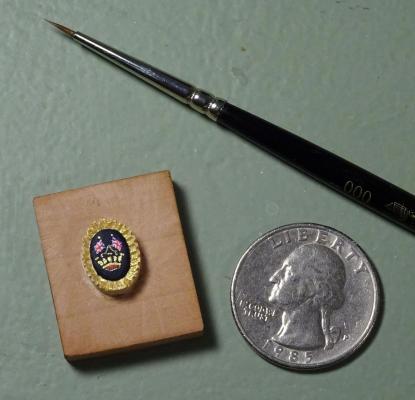
Thank you all, yet again. Today's work was on the Hospital badge that is mounted high on the boat's stern over the upper transom. The pictures are self-explanatory. At this scale the paintwork is more impressionistic than accurate! I'll be refining the shell on the fore side of the badge more.


- 641 replies
-
- 53
-
-
- greenwich hospital
- barge
- (and 1 more)
-
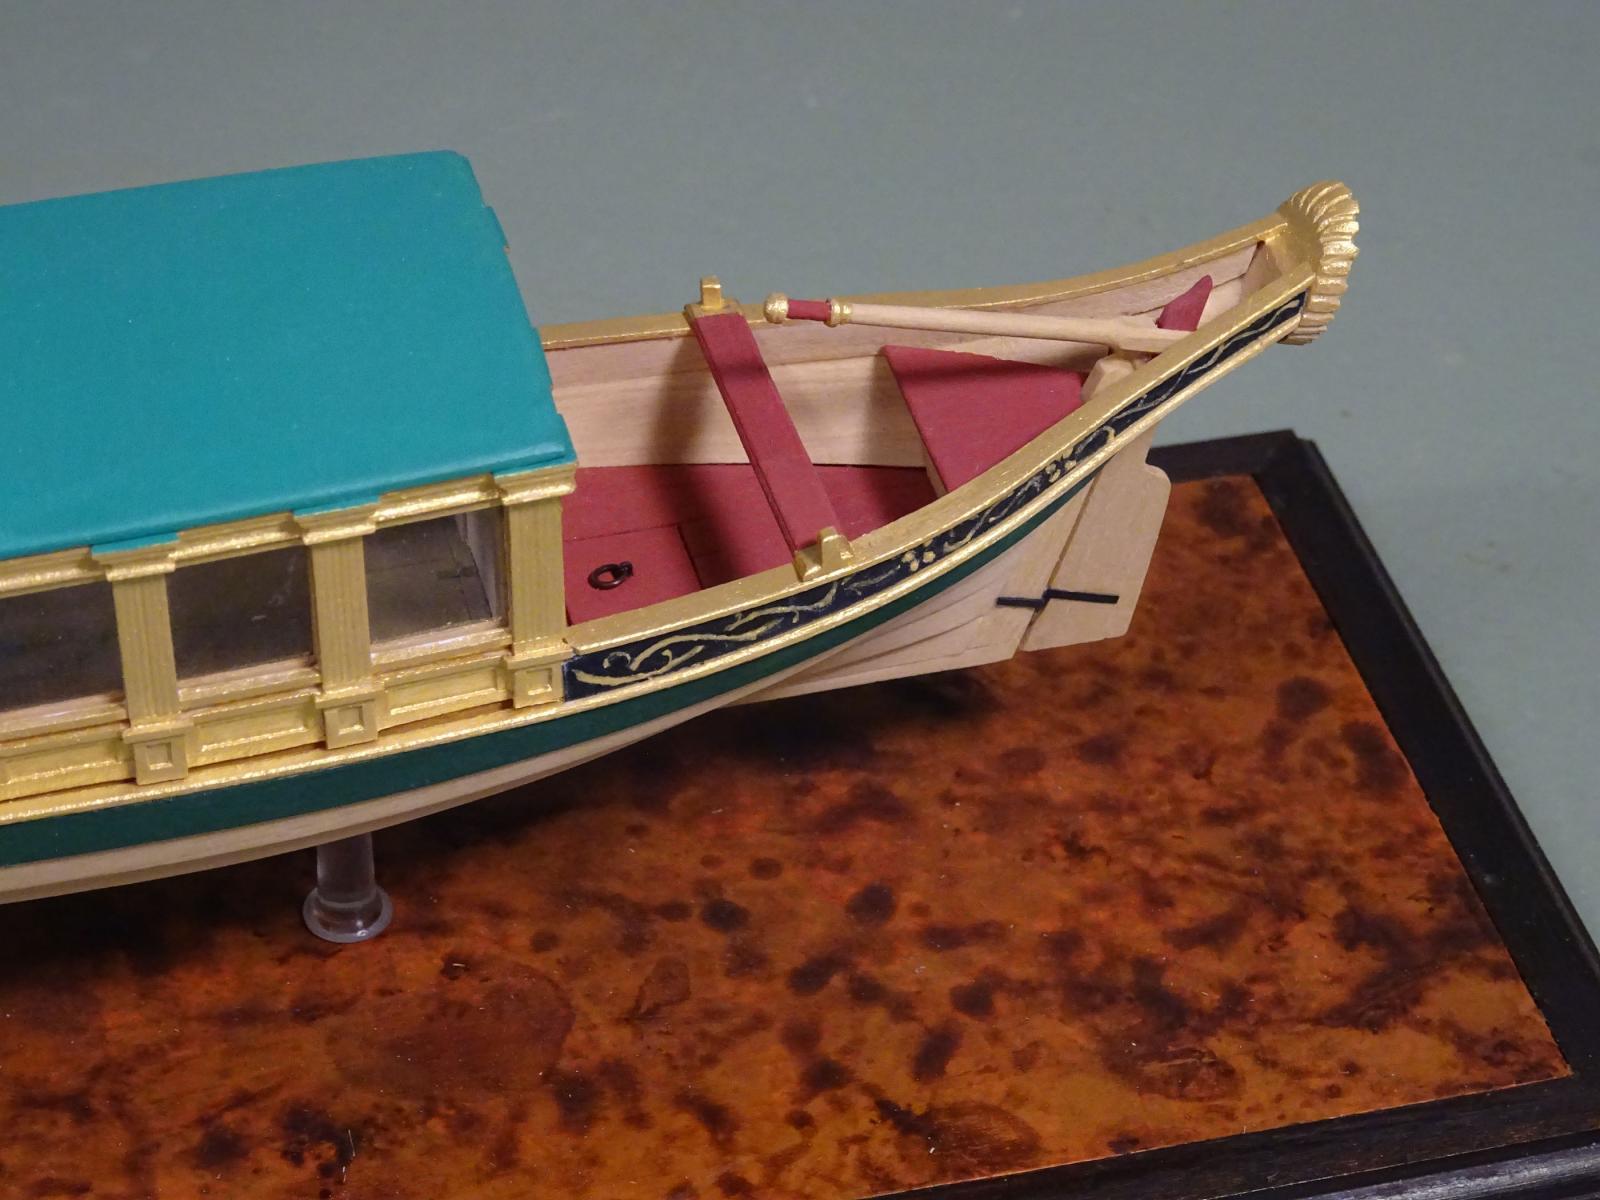
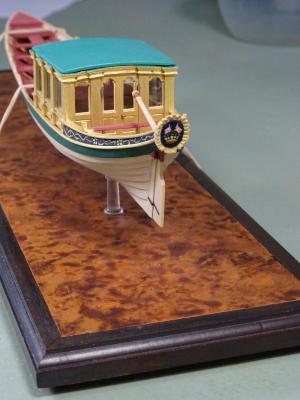
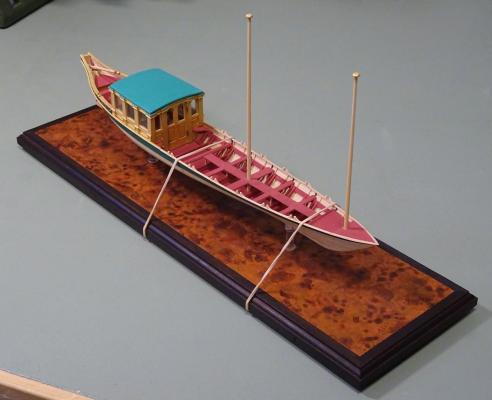
Well, some progress to report. The ensign staffs are done. They were made and tapered using the usual square to octagon to round method. The trucks plus a few inches below them are painted gold. I scored around each staff to act as a stop for the paint: it was too small to mask conventionally. For those wondering why the pace has slackened a bit, I've another project to announce shortly.
- 641 replies
-
- 46
-
-
- greenwich hospital
- barge
- (and 1 more)
-
Ah, I misunderstood. Yes, the framing will need lateral stability when you come to fair. Even wedges of dense styrofoam should do the trick, I would think.
- 649 replies
-
- 4
-
-
- dunbrody
- famine ship
- (and 2 more)
-
Nice progress. I like your planking layout on the upper bow. I see McKay has drawn the wale planking thicker at the bow rabbet than the rest of the planking. This was not usual: wale planks normally taper around the bow and are the thickness of the rabbet where they land in it.
-
Good stuff! Nice to know the kids aren't being entirely neglected....
-
Those frames look terrific, Frank. As for keel flex, once the keelson is in and there are longitudinal such as deck clamps, the structure will be much more stable. As far as time goes to construct frames, your results are worth it.
- 649 replies
-
- 5
-
-
- dunbrody
- famine ship
- (and 2 more)
-
If you are a serious modeller - and it appears that you are - and can afford it, you should seriously consider a small circular saw.
-
If I may comment again, Maurys, those lodging knees look rather 'chunky'. Check out photos of contemporary models, and you'll see that the athwartship arms are narrower.
- 525 replies
-
- 2
-
-
- anchor hoy
- hoy
- (and 1 more)
-
Seems like a more workable solution, both from a stability and ease of construction perspective.
- 525 replies
-
- 2
-
-
- anchor hoy
- hoy
- (and 1 more)
-
Do you have a small saw like a Microlux, Proxxon or Byrnes? It makes cutting dimensioned material very consistent, without the wastage that will occur with the knife-and-ruler method. It's also much quicker! For small section, you should have or make a zero-clearance insert.
-
It probably wouldn't lay very flat with all that gunk on it! If you have The Fully Framed Model, Volume II, there is a plan of a rudder coat (British, but the French couldn't have been that different) on page 289 with description of how it was put together and installed.
-
Thanks again, everyone. I was away this weekend, so no progress. Back agin soon, though! BTW, I did paint the tiller handhold, and like the result.
- 641 replies
-
- 3
-
-
- greenwich hospital
- barge
- (and 1 more)
-
Hate to say it, but Wikipedia is not always correct. Here I'm sure they are wrong, as iron below salt water will corrode.
-
I wonder if the tank was that wide. If it was not completely filled, water sloshing across from side to side would make the hoy unstable. As for lining, perhaps it was sheet zinc at this time period?
- 525 replies
-
- 2
-
-
- anchor hoy
- hoy
- (and 1 more)
-
Interesting back-story, Glenn. 'Handyman' is grossly under-selling yourself, though! Thanks for sharing your journey. And yes, kids just love the gross stuff, don't they?
-
Correct on your assumption, Ed. I've a number of sizes made for different diameters. To prevent damage to the holder, a small hole is bored all the way through first. This allows a wire to be poked through, should the deadeye be unwilling to drop out after processing. Next the bore is drilled slightly smaller than the deadeye for about twice its thickness, then the hole opened out to the diameter of the deadeye for its depth. The deadeye then sits on a slight step and the drill bit doesn't chew up the holder.
- 3,618 replies
-
- 9
-
-
- young america
- clipper
- (and 1 more)
-
To save bad language and lost deadeye blanks down the chuck, I turn the end of a piece of brass rod with a shallow cup the diameter and depth of the deadeye. I tap and drill into one side with a tiny thread (00-90) and use a screw to secure the blank from moving around while drilling the three holes. Try that, Ed.
- 3,618 replies
-
- 9
-
-
- young america
- clipper
- (and 1 more)
-
Dear Glenn, I wish you could see my smile as I studied your latest photographs. Standing ovation!
-
Nice re-do, Frank. Those mini-cam clamps are a useful aid. Must make a few myself....
- 649 replies
-
- 5
-
-
- dunbrody
- famine ship
- (and 2 more)
-
Thanks, gentlemen all. One of the 'dignitaries' who would have sat in the coach was Sir Thomas Hardy. He was Governor of Greenwich Hospital from 1834 to 1839. I forgot to mention one other item on the 'to do' list: the stern badge.
- 641 replies
-
- 8
-
-
- greenwich hospital
- barge
- (and 1 more)