


druxey
-
Posts
13,362 -
Joined
-
Last visited
Content Type
Profiles
Forums
Gallery
Events
Everything posted by druxey
-
 Things to bear in mind: 1) The roundup or spring of each transom and gallery increases as you go upward. This counteracts the illusion of sagging. 2) The apparent spring in photos can look exaggerated as the lower the viewpoint, the greater it appears to be. This illusion is because of the round aft of the various knuckles and rows of lights. 3) Any row of lights have the same height throughout, as you've noted, Mark. I thinks that exhausts the subject - for now, anyway!
 -
Echo by Maury S - FINISHED - Cross-Section
druxey replied to Maury S's topic in - Build logs for subjects built 1751 - 1800
I agree with Greg. Your model is progressing very nicely, Maury. -
Shaping stern fascia
druxey replied to pauls's topic in Building, Framing, Planking and plating a ships hull and deck
Walnut ply isn't the best material for this purpose. Soaking it well was a good move, but rather than bend it on the model, bend it and clamp it on a curved form that will support the whole fascia. Best is a two-piece curved form if you have the facility to cut it out. Leave the assembly overnight. Hopefully this will work for you.- 1 reply
-
- 2
-

-
I'm personally not a great fan of contact cement. Volatile fumes require respiratory protection, no wiggle room in laying the wood down, and so on. Plain ole white glue does it for me. If the pieces to be joined are thin, water content can cause warping, so dampen the unglued sides of the wood to balance out this potential issue.
-
HMS Sussex by mij - Scale 1:48
druxey replied to mij's topic in - Build logs for subjects built 1501 - 1750
If wood glue ever freezes, that can compromise it, mij. Is that a possibility? -
'Spring' Ed, in the 18th century referred to the round-up of the stern transverse curves. Your quote, "The after beams of the quarterdeck must be gradually sprung to answer thereto." implies - to me, at least - that the beam round up increases, rather than is forced up by pillars. Thanks for coming across that one. I don't recall having read it. This should set Mark's mind at rest, as well as those of us that have participated in this thread!
-
Good stuff, Sam! And a happy New Year as well, if it's not too late to wish you it.
-
One small addition to the good advice: never use power equipment if you are tired or in a hurry!
-
From your drawing I would hesitantly say that round-up did increase in this specific case. Lucky you, Mark! If you don't increase it, the 'spring' of the stern gallery will not look right. You are correct to be concerned about this detail.
-
Michael: the OED cites 'rhoding' from naval architecture books, 1850,(which is very late) but, alas, gives no origin as to its meaning.
-
This was Volume III, Wayne?
-
Ridiculous prices! Sorry to disappoint you, but several copies are currently available for $250.00 or less on abebooks.com
-
Daniel: back in Steel's day what you now refer to as 'camber' was called round up. Camber (back then) was used to describe a deck that curved downward longitudinally. Confusing, eh? 'To round up' is a verb, 'round up' is a descriptive noun.
-
Sometimes headroom in the great cabin was improved by progressively raising the deck clamp aft, relative to the deck below. I suppose it might be possible that deck beams were of decreasing radius to achieve a similar result. However, that would be far more complex and time consuming. It seems unlikely, but one never knows….
-
So, the gauntlet has been picked up! I'll look forward to seeing the result. Good move, sir.
- 1,215 replies
-
- 1
-
-
- sloop
- kingfisher
- (and 1 more)
-
OK, Mark: assuming that the midships round up is correct at 8½" as measured on the draught, what is the round up at the stern if you use the same radius? Is it much different from the 5" that you've measured?
-
Coming along nicely, Toni.
-
Looks like a good start, A.P. Nice drafting!
-
It's expensive, but front-silvered glass eliminates that 'gap' in a mirrored half model. A possible help for rigging of the earlier period might be to look at blocks recovered from Mary Rose. They are certainly different than 18th century or modern blocks. OK, they are not as early as your model, but might give some useful pointers anyway. Lovely work, Dick.
-
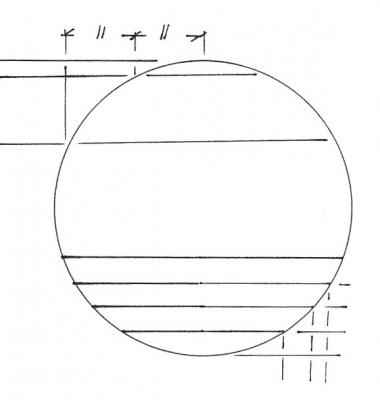
The fallacy in your argument, Mark, is assuming that the round up is directly proportional to the with of the beam. A moment's thought will tell you this is not so. As the beam narrows, the 'fall off' of the round up is quite small. The wider the chord of the circle (i.e the width of the beam), the more rapid the increase in round up. In the upper half of the illustration, twice the beam width is not twice the round up! The corollary of this idea is shown in the lower half. Hopefully this clears up your dilemma.
-
Not that I wish to influence you in any way, Remco, but a) a brick hearth would look really interesting and different and I'm sure you could make a superb one. (He walks away, whistling nonchalantly…)
- 1,215 replies
-
- 7
-
-
- sloop
- kingfisher
- (and 1 more)
-
Mark: if you can find good linen line without slubs in it, either keep the source secret or just share it with me! Seriously, it's nearly impossible to find that quality any more.
- 728 replies
-
- 1
-
-
- le fleuron
- 64 gun
- (and 1 more)
-
It looks as if the lower deck was lowered forward to accommodate the galley. The notation on the drawing suggests that draught is very close to the 'as built' for Swan and Kingfisher. Remember that these two ships were the leading ones of this class, so the earlier type of galley would make sense here. It's a nice variation on the Swan theme - or is that the swan-song?
- 1,215 replies
-
- 1
-
-
- sloop
- kingfisher
- (and 1 more)
-
It's a nice compliment to your research and drafting that you are getting these requests, E&T. Do I also sniff a book in the making?
- 346 replies
-
- 1
-
-
- terror
- polar exploration
- (and 2 more)
