
catopower
-
Posts
1,588 -
Joined
-
Last visited
Content Type
Profiles
Forums
Gallery
Events
Posts posted by catopower
-
-
16 hours ago, Roger Pellett said:
What wood are your models made from? It certainly results in a crisp, clean appearance.
Hi Roger, thanks for the comments.
Most of my models are made from a wood that the Japanese call Hinoki, it's Japanese cypress. It's a lightweight wood, kind of like basswood, but doesn't fuzz up when sanded. Over time, the color will turn to a nice tan color, but starts off very light, which is why I dye the wood. It is actually quite brittle when dry, but it doesn't take much to dampen the wood enough to make it bend. Closest wood in the States is Port Orford cedar, which I have used with some models.
For the 1/10 scale models, I use a wood called Sugi, which is Japanese cedar. It's the same wood that most boatbuilders use on their actual boats. It's not a great wood to work with, but I use it to maintain the Japanese model aesthetic (props to Ekis!).
- FriedClams, mtaylor, druxey and 1 other
-
 4
4
-
Hello Ekis,
You bring up an interesting topic about aesthetics and accuracy between east and west. I'll have to think about it a bit.
But, one really big issue is that there is almost no historical information on the construction of these ships. Something as obvious as the construction of those hull "sheets" is not just simplified because it makes the kit easier. It's also done because nobody really knows how they made the large flat sides. Certainly, they weren't one solid sheet as you say. But, there's also a tendency for us to think that it was made up of strakes. Clearly, they would have to use smaller boards, but they would actually be quite wide, and may not run the way we might think they do.
Details like this is one of the main reasons Woody Joe rejected the idea of producing an Atakebune kit in the first place.
The Higaki Kaisen is another matter, as these ships were around into the 20th century, and there was the recently built reproduction to pattern the kit after. But, even that has simplifications compared to the actual hull planks, which have been documented. Still, it shows
I kind of run into this issue a lot on my models of Japanese watercraft. In my mind, it's better to simplify than to add details showing the world how much I don't know... 🙂
Perhaps that's part of the cultural aesthetic?
In any case, I'm interested to learn what you come up with. I actually had considered a hull planking modification for a while, based on drawings, paintings, and models of other Atakebune.
- Ekis, FriedClams, mtaylor and 2 others
-
5
-
Peter, Bob, Mike, thanks for the kind words of support!
Ekis, the Higaki Kaisen kit is a more serious ship model kit. Woody Joe really designs their kits to be buildable by first time modelers. But, their Higaki Kaisen kit is more of a ship model kit for ship modelers, designed with the assistance of the former president of the ship model club the Rope Tokyo. Definitely more challenging a kit than the Kitamaebune kit, and supposedly even the Atakebune kit. I wrote a 3-part article in Seaways' Ships in Scale on it, so I'm interested to know what you think about the kit.
-
Thanks Druxey, Mark.
Ron, I've been using Transtint dye thinned with denatured alcohol for all my Japanese boat models. The mix I'm going to try here is 24 drops of Dark Vintage Maple, 9 drops of Amber, to 2oz of denatured alcohol. That's a bit darker than I've done for most of my Japanese boat models. But, any coloring will reduce the appearance of the plywood, laser char, and seams. I'm not sure if I'll use the same mixture for the decks. I may go with less of the Dark Vintage Maple, or just apply the same mixture, but thinned with more alcohol.
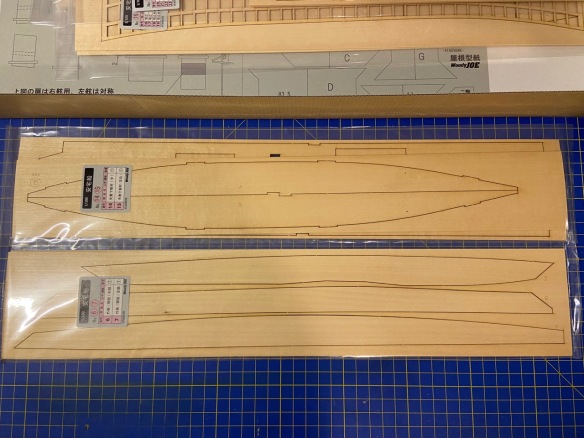
All the thicker laser-cut wood seems to be maple ply. It's mostly internal structure, but the main box-shaped body of the ship is this ply and so is the bow and transom pieces. Turns out that this stuff takes the dye really nicely. But, I think I'm going to end up covering up the bow and transom pieces with a thin layer of Japanese cypress. While it will then match the wood used for the hull, that's not why I'm doing it.
There are a couple places where Woody Joe put some locking tabs that poke through the wood in those pieces. I've decided, at minimum, to thickness sand those pieces down from 3mm to 2mm, and to cover them with a solid layer of 1mm Japanese cypress. This will cover those tabs.
But, even if I didn't do this, the stain will make the tabs less noticeable. And, there is really only one in the bow that will be visible, and maybe two in the transom. But, the transom is generally hidden except when viewed from behind the ship.
I'll post details about this shortly.
-
Hello All, I'm a little burned out on posting build logs these days, but this kits is a brand new release and kind of important to me. I know there are others here that want to read more about the kit and some of the modification that could be done to make it stand out better, so I figured I'll get my build log started. However, to save time, since I maintain my own blog site, I'm pretty much just copying the contents from there to here, though there's room for questions and discussion here, so please chime in.
Let me begin by saying that while I've been doing a lot of work studying and building Japanese wooden boats, I don't have a great deal of historical knowledge about the warships of Japan's Warring States period, except that the at this time, the Japanese basically had three classes of warships. The smallest were called Kobaya, which were literally small fast boats. The mainstay were the Sekibune, sometimes called Hayabune. They were like the cruisers of day and were large and relatively maneuverable and provided good protection for their occupants, then there were the heavies, which were called Atakebune. They were somewhat large and lumbering and formed the core of a naval formation.
The Atakebune is the subject of a new kit from the Japanese wooden kit manufacturer Woody Joe. It's something that I, Kazunori Morikawa of Zootoyz, and a few others were actively petitioning Woody Joe to produce. There was hesitancy on their part as there is actually very little solid information on the construction of these largest of Sengoku Period Japanese warships.

I don't know what changed their minds and got them to produce this kit, but my feeling was that if they could produce a kit based on a museum model, then it would essentially be a model of a model, which is not without precedent, and is a perfectly valid subject, in my opinion.
The first news I heard that Woody Joe was actively developing this kit was in early Summer, and that they were basing it on the large model in the Saga Prefectural Nagoya Castle Museum. I was initially hoping that they would produce the kit at a scale of 1:72, as that is then scale comparable to their Higaki Kaisen and Kitamaebune kits. It would also then be compatible with available 1/72-scale samurai figures. But, the demands of the manufacturing process, costs, shipping boxes, and all meant it would be 1/100 scale.

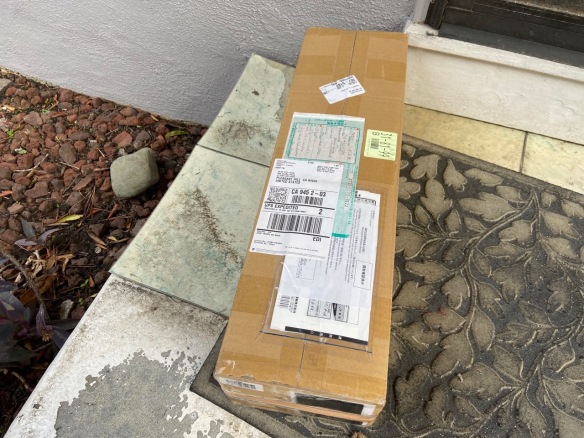
In any case, we finally got word that the kit was to be released at the beginning of November. As I had four months to prepare to place my order, I had saved up and asked Mr. Morikawa at Zootoyz to set aside two kits for me. And, as soon as shipments went out from Woody Joe, I placed my order. Amazingly, less than a week after they were shipped from Japan, they were at my door.
The costs of wooden kits from Japan are pretty pricey, and at ¥38,000, this kit is no exception. However, I had actually expected this kit to be a little more expensive. As it is, with the current exchange rate in our favor here in the U.S., the price comes out to about $336. Now, shipping is a particularly difficult issue, as it was expensive before Covid. Then, for about a year, Japan Post would ship at all to the U.S. That changed in the Summer, but prices for shipping were higher than before.
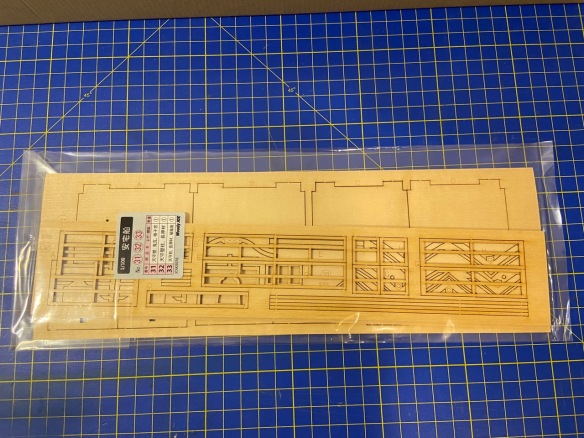
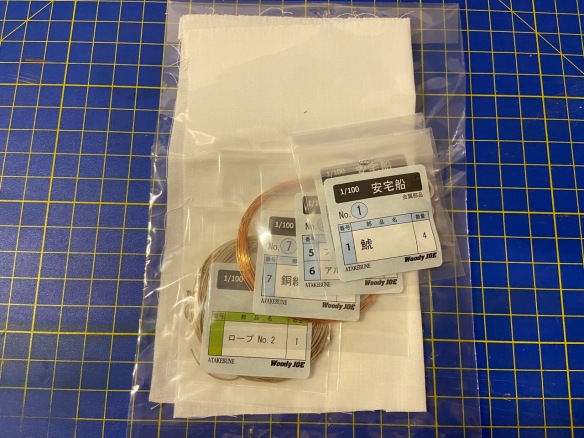
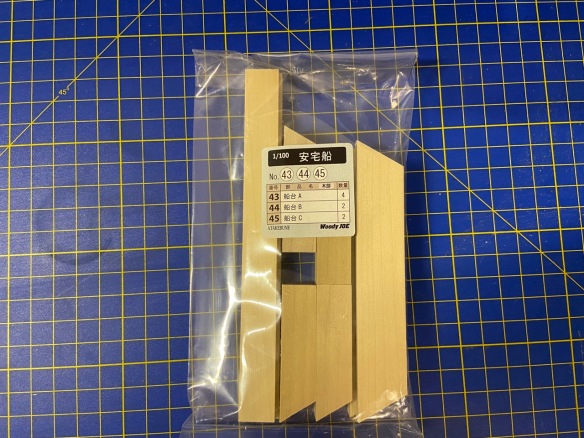
About the Kit
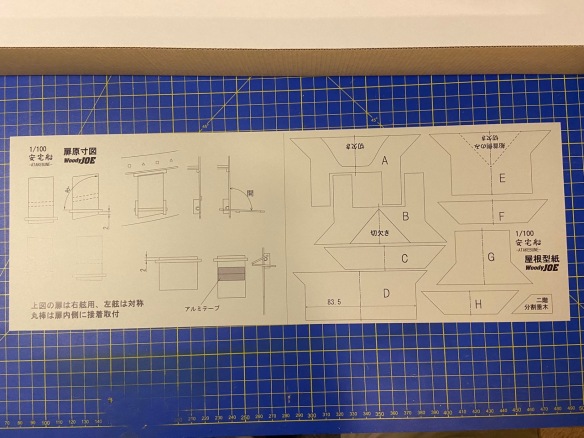
I'm not going to get into a lot of detailed description of the kit contents. Woody Joe kits are pretty consistent in terms of what you get, what the instructions are like, how parts are identified, and all. So, I'll just post some photos of the kit contents as I removed them from the box.

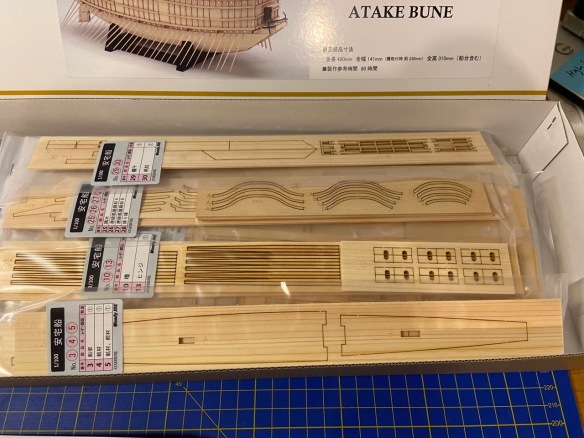


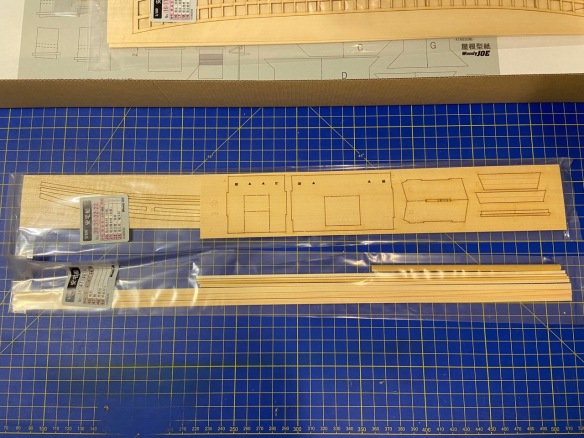

According to the Woody Joe product information, this kit will take approximately 80 hours to complete. Of course, that figure goes out the window if you are going to add any extra details to it to improve on the basic kit. But, this gives a good comparison, whereas their Hacchoro kit is listed at 50 hours, their Kitamaebune kit at 70 hours, and their Higaki Kaisen kit at 100 hours.
In terms of difficulty, the Atakebune is rated by Woody Joe as a skill level 3 kit on their scale of 1 to 5, with 5 being the most difficult. In comparison, both the Hacchoro and Kitamaebune are listed as skill level 2, with the Higaki Kaisen listed as a skill level 4.
My Atakebune Build
Build logs can get very repetitive after you've read or written a few. So, I think I'll keep this pretty simple and just post some photos as I go. I'll discuss issues and modifications along the way.
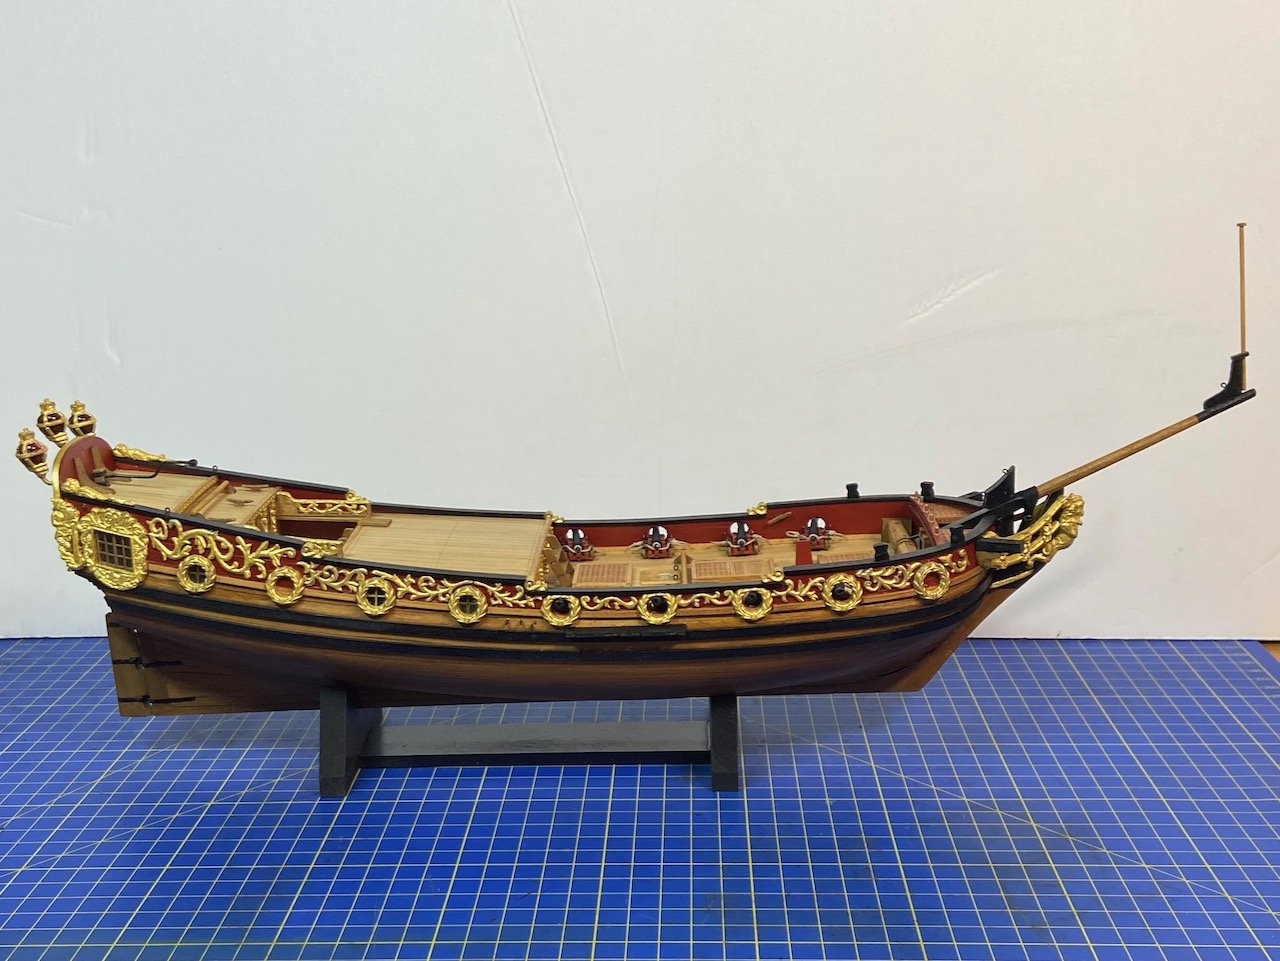
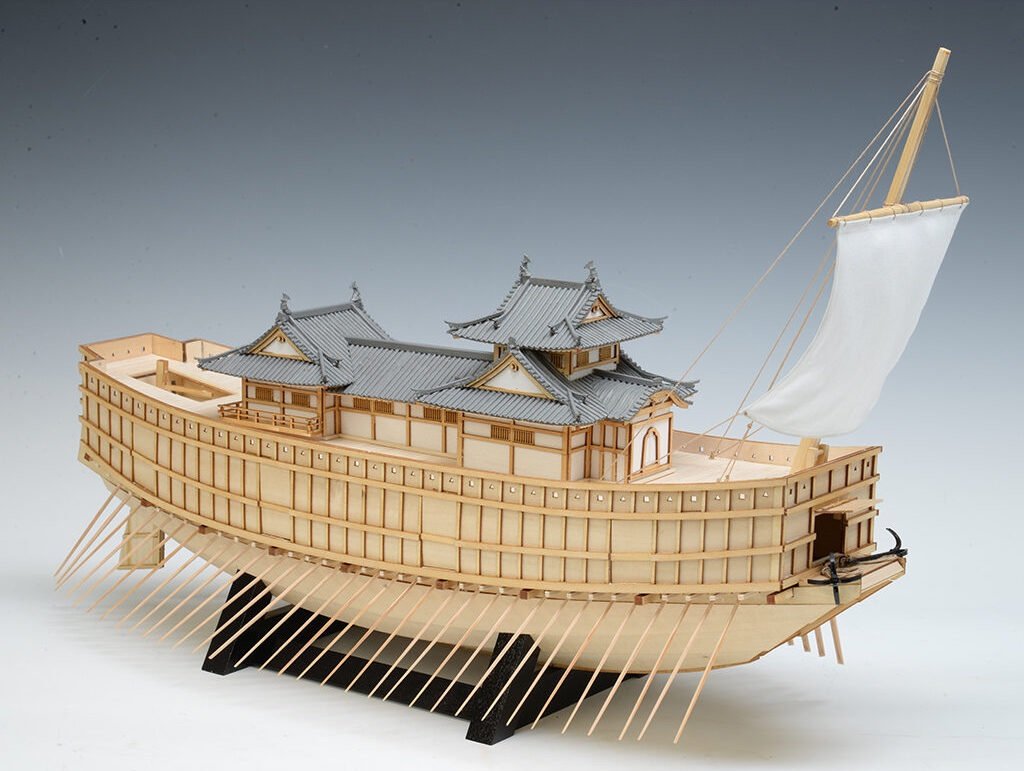
But, I'll begin by saying that this seems like a very straightforward kit. It's a little bit light on some small details, but all the major details appear to be here. I think the challenge of this kit is that it's like a ship kit PLUS a small castle kit, so you get the challenges of both.
As for accuracy, it appears very close to the museum model it's based on, though there are a few minor difference that can be spotted right away. One is the doors in the side of the hull structure. On the museum model, these are basically double doors that swing outward. The Woody Joe kit makes these drop down doors that act like a boarding ramp. I don't know which is correct, but I have seen drop down doors on other Atakebune museum models. Perhaps this is Woody Joe's work to make the model more accurate, or maybe it just to make it more interesting, as these seem to be designed with hinges, so you can open them up as you like.
My first planned modification of the model is to dye all the exposed wood, so I made up my mixture of wood dye, going a little darker than I have in other models, and prepped a pair of jars, which should last through this model. But, I've recorded my formula, so I can always mix some more if needed.
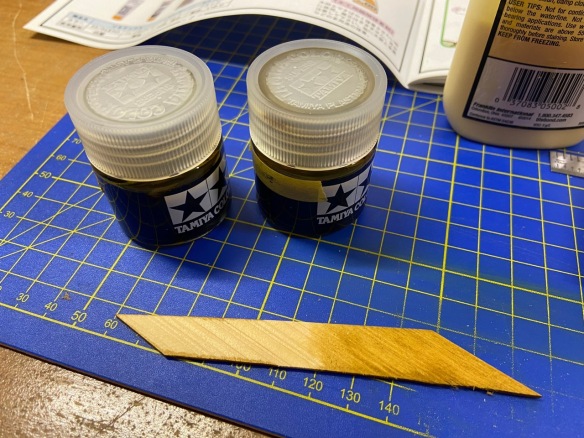
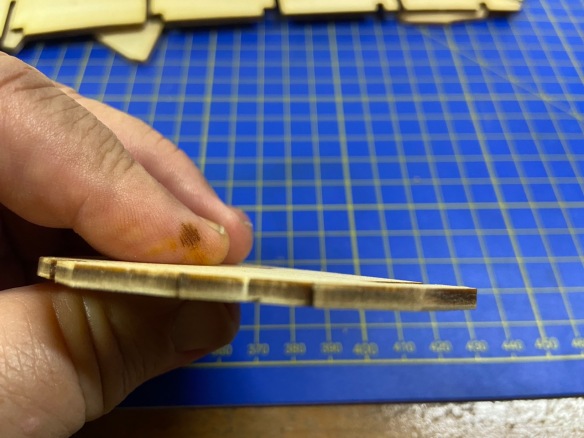
With laser cut parts, you always end up with char on the edges. As ship modelers, we've trained ourselves that char must be removed to make for better glue joints. But, with laser-cut kits, you have to be very careful about this, as the kits are engineered to fit together as designed. It's a good idea to file off some of the char, but you don't want to remove much wood, as that will change the way parts will fit. So, below, you can see how much char is on the edge of a part that hasn't been cleaned up, and then the edge of one after I've rubbed it down with a few light strokes of a sanding block.

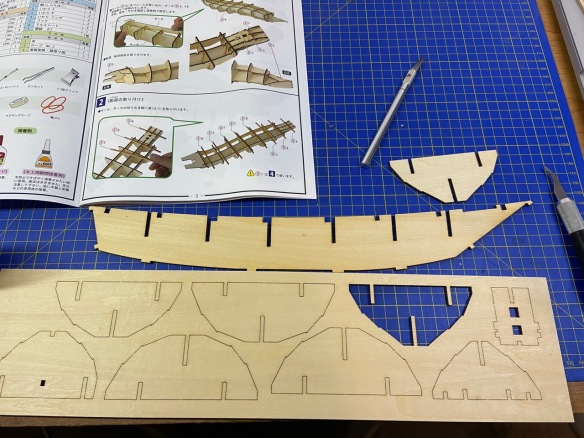
Below, you can see the first parts I've cut out for the hull skeleton. But, at this stage, I'm just test fitting. Next time, I'll have some parts glued up.

In the meantime, Mr. Morikawa of Zootoyz is building the Atakebune as his first wooden model kit, and you can follow his work as he posts his progress on the Zootoyz Facebook page here.
As I begin the first steps of this kit, I am thinking about how to make this kit more like the museum model. But, at the same time, I am wondering how accurate the museum model is. Many Japanese museum models that I've seen in person and on the Internet are built to represent a particular ship or type of ship or boat, but are not necessarily built with detail and scale accuracy.
For instance, the hull planks on this and the museum model are made from a single sheet of wood. Certainly, on a ship of this size, that's not possible. I've seen some Atakebune museum models and illustrations that show large areas where planks are overlapped. And, certainly, planks as wide as those used for this ship are made up of narrower planks that were edge fastened. But, at this scale, those individual planks would not be noticeable, though large overlapped joints would be quite visible. But, since they are not on the museum model, we'll assume that this is correct.
However, one feature that appears on the museum model that could easily be added here are the beams whose ends just pierce the hull. You can see these along the length of the museum model.
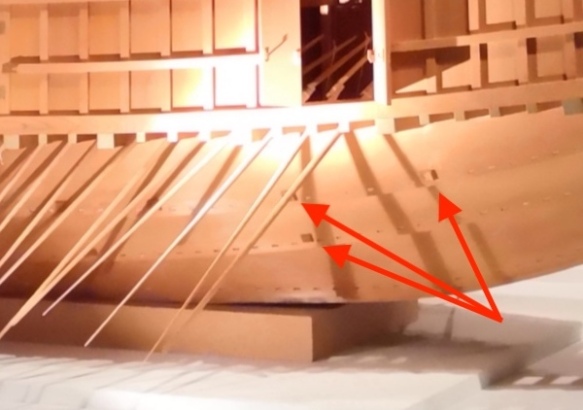
In addition, you can see the nail mortises along the edge of each plank. These are normally covered with copper plates, as are the ends of the beams, including those that support the sculling oars above. I've simulated these as an oxidized brown color on my Kitamaebune model, and I could do that here as well.
One more thing that I spotted is that if you look closely at the following photo of the museum model, you can see a kind of gallows structure at the head of the rudder. This would be a pair of heavy posts supporting a windlass. I don't know what the windlass is for exactly, but a similar structure exists on the Higaki Kaisen and Kitamaebune, and the whole thing generally supports a rope that wraps around the rudder head to keep it in position.

This structure should be easy enough to add. In addition, I noticed that the whole rudder platform that is slightly recessed down below the top deck has no planking. It's just a solid piece of plywood. So, I plan on fixing that too.
I'm sure there are some other places where I think the model can be improved, but these few should go a long way toward a nicer looking model.
-
By the way, Ekis, is there any word on the repair of the Bleriot model? Did someone ever connect with your friend to do a repair?
-
A fellow ship modeler out here in the SF Bay Area built a wooden crate that the model is secured to at the base. He did this for his scratch built model of the Philedelphia, which the Lake Champlain Museum wanted. The cost to ship by a shipping company, not the generic shipping companies like UPS, but some trucking company that probably trucks things around the country, was $2000.
As someone at the museum was flying out to visit family in California, they made a stop in the area and took the model and bought a seat for it on the flight. They had to remove it from the crate, but then it fit nicely on the seat, and made the trip safe and sound. Apparently, the airline and airport staff were really great about it. I think everyone thought it was pretty cool that it had it's own seat on the plane.
-
Good question, Eric.
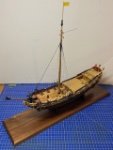
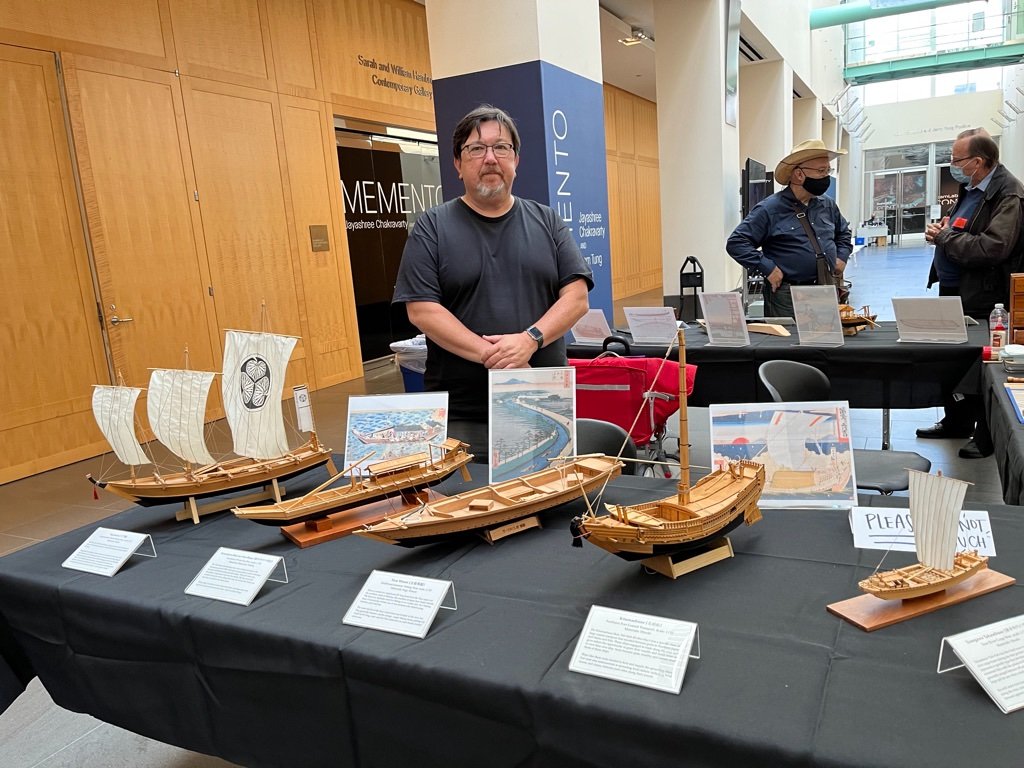
I had a display of my model Japanese watercraft at the Asian Art Museum in San Francisco last month, and I included the unfinished Kitamaebune.
The event was part of a "Japan Day" event that an acquaintance of mine organized and had asked if I'd be interested in participating. How could I not say yes to that? Started off a simple plan to set up the models and maybe work and something as I talked to visitors at my table. But it ended up taking more and more time, and next thing I know, I was asked to spend another day at the museum as they having a videographer come in and do interviews with all the "artists". It got more and more involved, and I'm REALLY glad it's done now. But, on the actual day of the event, it was fun, and several of my ship modeling, and other friends came by in support.
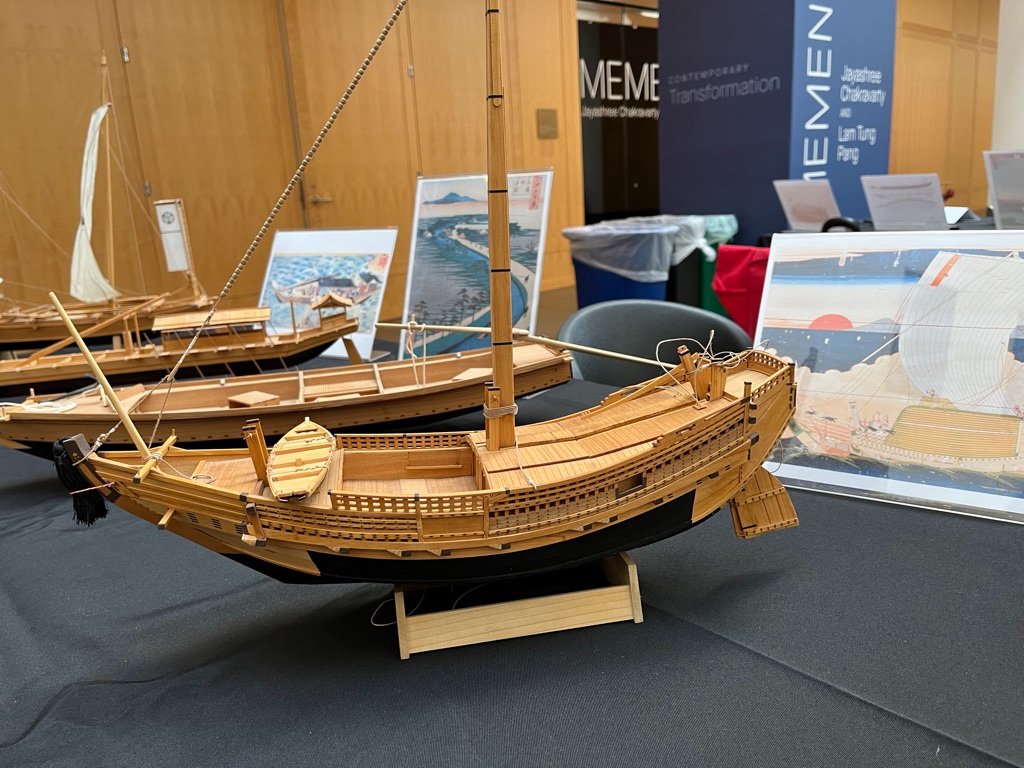
But, regarding the Kitamaebune model, as the event loomed, I thought maybe I should just use the original kit sails and get it done. I didn't do that and, as I said, I just displayed it with a bare mast. Most people didn't know what they were looking at anyway. Well, probably nobody knew what they were looking at, which is a main reason I want to get the models displayed more.
After the event, I really started to notice that the sail on the Takasebune looked very detailed and very correct, at least to my eye. So, while I had these various schemes as to how I was going to try to make the sail, I think I'm going to go back to the method I used that was pretty successful for the Takasebune.
I'm currently trying to finish up a large fishing boat based on drawings in the Souvenirs de Marine. It's being built to the same scale as the Kitamaebune and Takasebune models, or 1/72, so it's very small at about 9-1/2" long. That also means it's pretty easy to build and goes relatively quickly. However, interpreting the drawings and deciding how I wanted to approach construction, causes me to sit and stare at the information and the model a lot.
This weekend, I've had something of a burst of interest on working on my projects again, so it probably won't be long before that is done and I'm making progress on the Kitamaebune.
Also, my new Atakebune from Woody Joe arrived a couple days ago, and I've got that to get started on soon too!
-
12 hours ago, Ekis said:
I am the first customer in the world!
Congratulations on the honor!
I guess I'll have to settle for being the first customer on my block... 😐
But, my order is on its way. Looking forward to your Higaki Kaisen build. Are you going to do a build log?
- Ryland Craze, mtaylor, Canute and 2 others
-
5
-
Ron, no worries about the pics, though I did create a topic called "All Things Woody Joe", so we could share about their kits of castles, temples, boats, ships, teahouses, etc.
You can find it under Shore Leave here:
Anyway, the kit is out now, and three people including myself have been really pushing to convince Woody Joe to develop this kit, so I'm sure hoping I'm not the only one who builds this kit, or they are not going to be very happy with us!
Clare
-
Great photos Ron, but since this thread is about the Woody Joe Atakebune kit, I want to make sure that people get the word that Woody Joe officially announced the release of their new Atakebune kit today, and it will begin shipping starting this Sunday.
I've contacted Zootoyz, where I think most of us here get our Woody Joe products, and began arrangements to get my kit.
The price is actually better than I expected at ¥38,000 (currently about $335). The prototype model looks a bit simplistic in the photos, but with some wood stain or dye, and a little bit of detailing, I think it will make for a pretty nice model. Again, it's a 1/100 scale kit with an overall length of just under half a meter, that's just over 19".
Mr. Kazunori Morikawa, who runs Zootoyz.jp, visited the museum model and took a lot of photos. I think they're all posted on the shop's Facebook page, so those should help anyone who wants to add some more detail to the model.
For those interested in buying the kit, I went and tried to search for it on the two Zootoyz web shops, but I don't think it's listed in the sites menus, or at least I couldn't find it. But, here's a direct link to the product where it can be ordered: https://www.japan-wooden-model-kits-zootoyz.shop/contents/en-us/p25066.html.
-
I love your work Ron! I really need to start working on more dioramas. I have trouble with people though – I guess I'm just not a people person...
As for the image rotation, that's weird – it's not even consistent. Good thing my computer is light enough to flip upside down as needed! 😁
Oh, the latest word is that the new Atakebune kit is due to be released early next month. Hope you've all been saving your pennies! I may be into this for a fair chunk of money, as I'm planning on getting two kits.
At least the dollar to yen exchange rate is really good right now...
Clare
- Canute, mtaylor and thibaultron
-
3
-
I posted this information in a topic I created in the Shore Leave section called All Things Woody Joe, but it's about the Woody Joe Atakebune kit. I got the dimensions from them, but no further word on cost or expected release date.
Scale: 1/100Length: 490mm or 19.3"
Width: 230mm or 9"
Height: 310mm or 12.2" (including the stand)
- thibaultron, BobG, mtaylor and 1 other
-
4
-
42 minutes ago, tomsimon said:
I was thinking of buying this base kit as a start then sourcing the glass/plexi, as per above. Does anyone have a review to share about this display base kit from Mantua, as it, also, seems reasonably priced from American-based distributors?
https://www.mantuamodel.co.uk/products/ship-fittings/miscellaneous/1545/boat-stand-universal-detail
This is just a display stand. It's the same one that's included with their HMS Victory kit. Nothing special, but it's made for models with a keel that's flat and parallel to the waterline, as the model is supposed to rest directly on the stand. The only downside I see is that the edge of the baseboard is visible, and it's plywood. So, you see all the ply layers.
Also, it won't serve as the base for an acrylic case, unless the case is just a 5-sided box and you're using it as a simple dust cover.
-
-
Thanks for the tip Mike!
Actually, I just finished building my 14th Woody Joe kit a couple weeks ago, and another 8 or 9 in my stash!
Most of those completed are smaller kits, but include all of their Japanese traditional watercraft, which is really where I've turned most of my attention to these these days.
Hey, I'd love to talk more about Woody Joe kits, ships, temples, pagodas, castles, etc., but I feel like we're hijacking this thread.
Can we move the discussion? I guess it would have to go into Shore Leave???
- Canute, Kusawa2000, mtaylor and 2 others
-
5
-
Mike, beautiful job on that pagoda! I actually have this kit and want to get to it. But, I did a quick weekend build of a 1/150 scale version of the same thing. It's a new kit and they use printed paper for some of the detail, which works really well for the small model. I agree that Zootoyz.jp is the way to go if you want to buy a Woody Joe kit.
EKE, I have the hull started for Woody Joe's 1/75-scale kit of the Dutch-built corvette Kanrin Maru. Maybe I mentioned this earlier in this post, but Woody Joe does their homework. I purchased some plans from a museum in the Netherlands and used it to check the Woody Joe kit's hull, and it's spot on. I think you'll find the same is true of the Cutty Sark (as well as the Susquehanna).
- Kusawa2000, EKE, mtaylor and 1 other
-
4
-
The Katy manual is very good. I checked the current manual and it's pretty much the same as the old manual I have by Jim Roberts. When he developed the Lively, he did the same thing in regards to the line sizes, blocks sizes, what's siezed, what's served, etc.
I personally think it's the most detailed I've seen, which I suppose you can do with such a simple rig. That may be why I got so interested in these early schooners, and the pilot boat type in general.
46 minutes ago, Tim Holt said:One thing I can see in various pilot boat designs is that they have a very minimal bulwark - something that Chappelle's books refer to as a "log bulwark". I've been a bit
tempted to carve down the bulwark height on the kit, but I also think I should just leave well enough alone at some point
")
But, it would certainly make for an interesting modification to a very popular kit.
In any case, this is an ideal kit to try out various upgrades. I actually think that all Artesania Latina kits are pretty well like that, as they go together very cleanly, and are easy to build. It's easy to change a little here and there to suit your needs. It's also nice to end up building a kit that looks different from all the other kits. Good chance to develop scale accurate details, sail making, etc.
And yes, I think it's better to finish the model than mess TOO much with "improvements". Sometimes, that hard to do – I know I have that problem!
Good Luck!
-
Hi Tim,
Sorry, I missed the part about you building the AL Swift kit. That was one of my earliest builds too.
It was actually the third one I'd completed, with the intent of doing up all the small details, including replacing the wood for the deck planking and replacing the forward deck house with a simple grating. Before I built the schooner Lively, I'd considered just beefing up the rig of the Swift and adding a pivot gun in place of the forward deck house to convert it to an early War of 1812 privateer. That's basically all that the Lively was supposed to represent.
I would normally suggest you just buy a copy of the Katy plans from ME, to protect their intellectual property. But, I can't seem to find it on their site. So, if you PM me your address, I'll just send you mine. It just sits on the shelf now anyways!
-
Actually, I wouldn't refer to the Model Shipways Katy kit as a crappy little old kit. To my recollection, it's one of the better researched kits around. It may not have all the glamour of the bigger ships, but those instruction don't need much modification. In fact, I knew the designer of that kit, and he seemed to know his stuff.
I even keep a copy of the instructions and plans on my shelf. I also keep a copy of the instructions he wrote for his kit of the fictional privateer the Lively. It's so well written and detailed that I used it to help me rig a model of the American revenue cutter Dallas, so many years ago.
As for Petersen's Fore-And-Aft Craft book, I have it, but I'm not a fan. I don't think much of his choice of examples for a schooner – a ship type which is so important. The others are probably okay, but I don't know them as well as schooners.
I think if you study that instruction booklet for the Katy, and build the model without skimping on details, you'll have a very accurate model. Not glamorous, but accurate.
On 8/9/2021 at 7:48 PM, Tim Holt said:I doubt for example a stay is just a rope strung between two eyes.
It's an interesting point, but I don't see that as an error. It may be just as likely that the builders would save the expense of the iron bands and eyebolt and just seize the stays around the masts. Only thing is that there is nothing to keep them from sliding out of position, so I'd think the eyebolts/bands make more sense.
- mtaylor and Roger Pellett
-
2
-
Hello Druxey, good question! It's not actually scalloped. It's simply that the sails are individual cloths that are laced together. The sheet lines are attached at the foot of the sail at each of these lacings, so these "seams" can't billow out, but the sail material itself can. You're just seeing sail material here just kind of hanging down, or out.
On a model, I can achieve an illusion of this effect a little better by actually scalloping the foot of the sails a little, which I ended up doing with the Takasebune model. The head of the sail would actually be similar in that the sail material at the "seams" would be up close to the yard, but hang down slightly in between "seams".
Yes, I'm back... or rather back from lurking... 😳
-
I've been awfully idle this year, and have had a hard time starting back into my projects again.
So far, the only thing that I've had any motivation for has been a card model from Shipyard of the Dutch fluit Schwarzer Rabe. I started that kit as simply something to do while I was out of town taking care of my aging mother for a month. Later, it turned into an ongoing project, and at some point, I had a hard time putting it down. I finally managed to pull myself away from it, but it still took a while to get back to my Japanese boats projects.
Then, earlier this week, I managed to make a trip to Monterey to study a model of a Japanese fishing boat that I was alerted to by the curator of the Japanese American Citizens League Hall (JACL) and Museum in Monterey. I'd made arrangements to meet him and to examine and record measurements and details of the model. At some point, I'll try to create a drawing and maybe a larger scale model based on this information.
But, that whole process kind of got the juices flowing again. Plus, a friend of mine is organizing a "Japan Day" event at the Asian Art Museum in San Francisco and invited me to set up a station to display my Japanese boat models and to possibly work on them there during the event.
With there being plenty of Kitamaebune in Japanese art and my model being so close to completion, I finally broke down this past week and started back into it.
So, here I am, back at the sails. I've decided that the method I used for the Tonegawa Takasebune may be too delicate for so much larger a sail, so I've gone back to earlier design ideas.
Basically, I'm back to simply sowing the seams between the strips of sail cloths. I will make the sail up from 4 panels, and I'll attempt to then lace these panels together.
I didn't use the Terial Magic stuff that I did for the smaller sails. I found that it stiffens the cloth so much that it make it harder to sew straight lines. Also, I had used my Cameo Silhouette to draw dotted seam lines for me to follow. I modified this to just draw some tiny reference marks at the top and bottom of the sail cloth, which I would then connect with pencil line. The full dotted seam lines stood out too much, and since I couldn't sew straight enough at the time, my stitching kept drifting, revealing these lines. But with pencil lines, after the sewing is all done, I can wash them out.
So, I sewed the cloth for a new set of sails (well, two pieces of cloth for one big sail and enough left over for the small sail) a few days ago, using a lighter colored thread. I hadn't done much sewing in a long time, so my seams were a bit off in places.
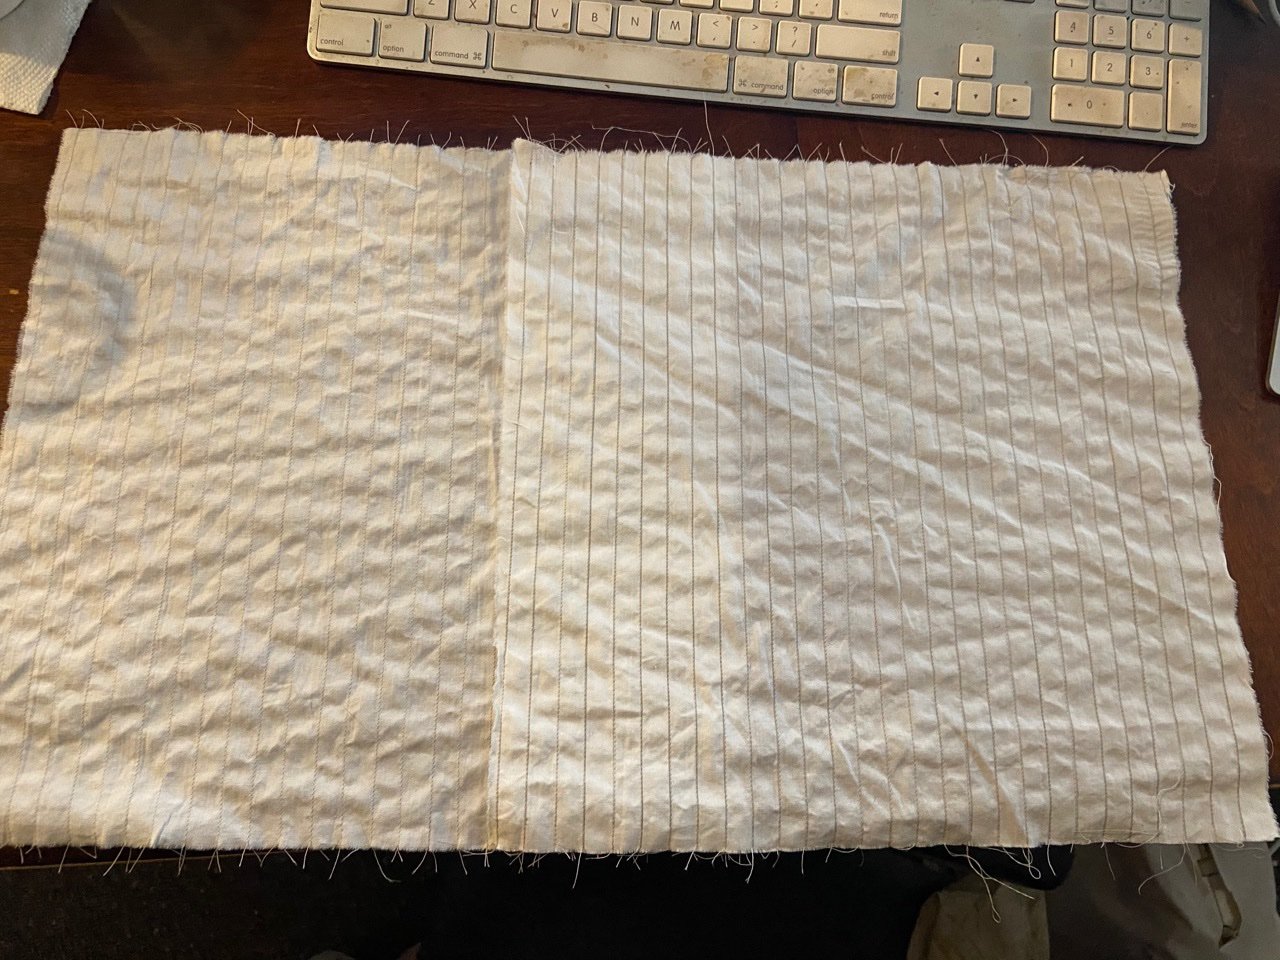
I was actually pretty impressed with how much straighter my seams were, but if you take a closer look, you can see it's still off in places. But, since I realized that I did prefer the darker thread for a more authentic look anyway, I set these aside and yesterday I repeated the whole process with darker thread. The above cloth turned into a practice run, and I think it actually paid off. The newest cloth seams are pretty well right on the money and very straight, if I do say so myself. Those, I washed by hand to get rid of the pencil lines, and they're air drying now.
There is actually one more continuous, horizontal seam that I need to sew about 2/3 of the way down the sail. In the kit, this has an arch to it that follows the arch of the foot of the sail. I just realized that these are arched to give more of the illusion of a billowing sail. Though not exactly accurate, it's actually quite effective, and it makes the model look more like a real ship. So, I'll look at doing the same with this model.
One thing is that I plan on "scalloping" the bottom edge slightly, to give more of an illusion that the individual cloth strips are billowing and held back by these seams, much like in the photo from the Takasebune book I posted previously.

But, at this point, I need to pause and think about the order of tasks and give some thought to how I'm going to finish up the sail.
More later!
- FriedClams, chris watton, mtaylor and 5 others
-
8
-
Dear Paul,
I've been ship modeling for over 25 years now, and I still make silly mistakes! It never seems to go away.
It's good that you are scratch building your own replacement parts. I think that is the best way to move beyond a simple kit. Some modern kits pre-make the parts for you in perfect scale. But, for me, the fun has been that the kits aren't perfect and I've always enjoyed learning how to make them better. You are doing that with the San Juan. It gives one much more sense pride that just following someone's instructions.
I understand what you're saying about complicated rigging of the square-rigged ships. My most recent projects are lateen rigged or have a simple, single mast and sail. It is much simpler to get to the rigging stage. It doesn't last too long, and the then model is compete!
About the lugger, do you mean that it is something you are interested in trying to build? I built one lug-rigged gunboat model and it was kind of nice to do such a simple rig. I have often looked at building a model of the French lugger Le Coureur. It's a nice looking ship with history and there are a couple kits available in wood. There are even a couple available in paper, which is something I've been doing a little the last few years.
By the way, it's funny that we're discussing simpler rigging, but I too have an OcCre Montañes kit in my workshop! It is difficult not to love and be lured by the big complicated square-rigged ships 😁
Anyway, good luck with your San Juan build. It looks like you are nearly done. I'm looking forward to seeing how the scratch built details look on the model.
-
Paul,
I don't know why nobody else has commented since you started this build. But, it is looking very nice.
I agree that this is a very nice looking ship. Although you are an experienced modeler, I think it would make an ideal first model for a beginner. It has a nice easy hull shape for planking, and a square-tuck stern, which also makes for ease of planking. There are some metal parts, so they simply need to be painted, and glued into place. Again, this is easy for a beginner to do. Plus, the lateen rig is simpler than a square rig, and it's interesting.
You've done a nice job making your own replacement parts and showing us what an experienced ship modeler can do with this kit!
- Baltic_submariner and RDDP
-
2


Kitamaebune by catopower - Woody Joe - 1/72 scale
in - Kit build logs for subjects built from 1751 - 1800
Posted
Hi Bob,
I used Transtint brand dye I buy from Rockler. I just add a few drops to a small mixing jar, add denatured alcohol. Then, I just use a piece of cloth to wipe it onto the wood. You'll want to experiment with mixtures of color and your wiping technique to get consistent color. Since it's a dye, I apply it to all the parts before assembly, as it won't affect the glue joints. Sometimes, I take a thinned mixture and brush it on afterwards, but only if I was really careful with the glue not getting onto the finished surface of the wood.
I usually try to mix up a batch that will last me through a project, to make sure to avoid color variation.