


Bob Cleek
-
Posts
3,374 -
Joined
-
Last visited
Content Type
Profiles
Forums
Gallery
Events
Posts posted by Bob Cleek
-
-
It depends upon the level of quality you want to attain in the model you're doing. There are many faux metal paints to chose from, but they all look like faux metal and not the real thing. If you find them satisfactory for your purposes, then by all means use them. That said, achieving a realistic impression of a bare metal in a scale piece with paint is a difficult thing to do. Nothing looks as realistically metallic on a model as real metal itself. For this, you will have to fabricate the pieces from metal, or paint them with a conductive paint made for the purpose, and electroplate them. Electroplating can be accomplished with simple household chemicals and an automotive battery charger or even a 12 VDC "wall wort." You don't have to buy any expensive equipment or materials. If you want chrome, you can simply electroplate with nickel. (Real chrome can be electroplated, but it's a more involved process.) If you wish a slightly more subdued shine, you can experiment with zinc or aluminum plating or even silver plating. The mechanics are all the same.
There are tons of DIY electroplating and electroforming videos on YouTube.
- John Ruy, Canute, John Fox III and 1 other
-
 4
4
-
1 hour ago, ah100m said:
To get a bit ahead of the game. No matter what the model (ships, armor, cars, aircraft) I only spray automotive lacquers (Duplicolor from Amazon) that I decant from the spray can and mix the colors myself. No thinning necessary and they spray beautifully. Easy clean-up with lacquer thinner. Try it. Cheap too. They also have sanding primers (fills scratches) and thin primers in white, gray and red oxide.
That will get you a bit ahead of the game, but if you really want to get way out ahead, quit buying hugely overpriced rattle cans and spraying the paint out of them to load your airbrush. Instead, use canned paints and thin them to suit. (1-Shot Lettering Enamel is especially good, although glossy and will require a bit of flattening solution.) Alternately, you can use tubed artists oils and acrylics, mixing your own colors (or buying ready-mixed, if you wish) and thinning with the appropriate spraying conditioners and solvents for use in your airbrush. In terms of quantity, rattle can paint is very expensive stuff.
- thibaultron, Canute and mtaylor
-
3
-
28 minutes ago, Roger Pellett said:
A lint free rag is first dipped in linseed oil. The rag is then dipped in the rotten stone.
The rag can be dipped in water and it works just as well without the mess of cleaning up the sticky linseed oil and rottenstone and/or pumice left after hand rubbing. I never use anything but water when hand rubbing finishes.
-
If there were such a thing as a standing ovation on the internet, we'd all be jumping up and down on our seats. Thanks so much for sharing your work with us. Your progress was a pleasure, and an education, to watch. Keep safe and know that all of us in the West are rooting, and praying, for you and for Ukraine.
-
2 hours ago, bridgman said:
Copper powder is a component of modern day bottom paint. It is mixed into the binder before the paint is applied.
The power is a fine as face power, and I still have tools that are stained by it, doesn't wipe off. A common component of
Interlux bottom paints, don't know if it's sold separately. You might have to haunt the boat yards this spring looking for a possible sample.
Bridgman Bob
Metal powder, including copper, is sold in artists' supply stores in small bottles. Copper powder for mixing antifouling paint is sold in larger quantities from chemical supply houses. It's a component of certain fireworks, as well. Copper Powder for Sale | Metal Powders USA "Copper" bottom paint is about as much as you can buy these days. Until the late 1970's, antifouling paint contained tributyl tin oxide (TBTO) which was a marvelously effective biocide. Unfortunately, perhaps, some international organization agreed to outlaw its use everywhere in the world, or so it seems. TBTO is only available now to licensed purchasers for a few scientific applications. It was determined to be harmful to the environment because it killed marine organisms. Now we have bottom paint that is barely effective for a year (six months is more like it) before it must be recoated. TBTO would provide effective antifouling for sometimes as long as five years.
-
6 hours ago, thibaultron said:
Having looked at the Constitution photos above, it seems to me that the seams are invisible, when first coppered, and only really show once the weathering gets advanced and the seam lines pop out, like on a weathered aircraft..
In those photos above, what makes "the seam lines pop out" is actually the moisture in the drying wooden hull that is making its way out from beneath the copper sheathing. It has no way out except between the copper sheeting seams. For that reason, a recently hauled wooden hull will show her seams because the seams remain wet longer than the plank or sheathing faces do. Once the hull dries out more, the seams aren't wet anymore, and so don't appear darker than the surrounding material.
-
1 hour ago, DaveBaxt said:
The use of paints with actual metal parts interests me and that can be applied by a brush, although I haven't ruled out requiring an air brush, but no doubt lots of practice would be required using either. Also hopefully as lots of instruction would be needed with either air or paint brush so hopefully it is out there. One question I would ask if I may are all of these above methods re versable ie can it be removed at start again.
Copper (and other metal) powder is readily available online and in fine arts stores. Copper Powder, 30 g | Home Science Tools This is real copper that is ground to a very fine dust. It can be applied with a dry brush over a partially-dried (tacky) shellac or varnish coat and, upon final drying of the sizing, can be lightly burnished with a cotton ball and will appear as solid copper. (Brass powder can be used for depicting gold leafed details and polished brass on ship models.) That said, coppered ship bottoms don't ever look shiny, except for a very brief time when the copper is first applied and, on a large ship, the time it would take to copper her bottom would probably have the first sheets oxidized before the last shiny ones were hung. I really don't know where the idea of shiny copper bottoms on ship models came from or why. (There are many pictures online of Cutty Sark's recently restored sheathed bottom and it is "shiny," but she is not "coppered," but rather sheathed in Muntz metal, which is a type of brass invented in 1832 and not found on earlier vessels.)
As a practical matter, at 1:64 scale, your hull shouldn't require showing individually lapped sheathing at all. Always consider the "scale viewing distance." Better to omit a detail entirely than to add a detail that is over scale. (Don't ask me how I learned this.
 ) You'd probably be better off finishing the bottom smooth and painting it with a base coat of "used penny brown" and then using an airbrush to add a bit of verdigris "green" at the waterline and a few patches of "dark green grunge" here and there. Do the math and you'll see how small scale plates are at 1:64, then figure out how many you're going to have to apply to cover the bottom! Look at the pictures of coppered bottoms above. There's no place for shiny copper on a ship's bottom. Even if the plates are shiny from the mill, in the time it would take to hang them, they'd be well on their way to acquiring an oxidized surface.
If you aren't familiar with "scale viewing distance," consider the U.S. Navy's"mil spec" contract standard for Navy ship models: "Generally, all items on the prototype twelve inches or larger for 1:96 scale (six inches or larger for 1:48 scale) will be reproduced." [Nautical Research Guild - Article - Specifications for Construction of Exhibition Models of U.S. Naval Vessels (thenrg.org)] Your 1:64 scale is roughly in the middle between 1:96 and 1:48, so, on your model, a good rule of thumb would be that any detail nine inches or larger should be reproduced and any detail smaller than nine inches may be omitted. Obviously, at 1:64 scale, the edge of a 1/16" thick copper plate isn't going to be possible to reproduce, or to see if you could reproduce it.
Myself, I wouldn't go crazy trying to lay a "checkerboard" patchwork of differently colored copper plates on a bottom. I suppose there are times when a vessel is hauled and a few random sheets were replaced during repairs and they'd "stand out" color-wise, but I've seen my share of coppered bottoms freshly hauled out in the boatyards and, truth be told, they all have a uniform color appearance after they've been in the water a while. It takes a bit of time for them to develop that "copper green" look after the air gets to the copper.
As Jaager noted, shellac is reversible with alcohol, but that doesn't mean it's not a messy job to be avoided. As with all finishing on a model, it is essential to do experimental examples of any coating before going forward on the model itself unless you are absolutely familiar with the technique, compatibility of materials, and environmental conditions. This is the best way to avoid ever having to refinish a hull! Take pieces of scrap planking stock (glue them up side by side even) and try various approaches until you get one that satisfies you. Your finished hull isn't the place to experiment.
An airbrush is one tool investment that will kick your modeling abilities up a bunch of notches. It is an investment and there is a learning curve, but if you search for airbrush information on this forum, Kurt can give you all the information you'd ever need about purchasing an airbrushing set up and it doesn't have to put you in the poor house. Learning to use one really boils down to reading the manual and watching YouTube videos. You can use water sprayed on a piece of paper or cardboard to practice getting the hang of controlling the spray, then, when you feel confident, you can graduate to some watercolor and eventually to paint. The airbrush is a very versatile instrument, but for modeling purposes, we generally only avail ourselves of the basics. Think of it as a refillable spray can that will pay for itself in what you'd spend on "rattle cans" with clogged nozzles and wasted paint. The other advantage of an airbrush is that it is a lot easier to obtain a perfect finish than using a brush because learning to use a brush well is apparently more difficult for most. A fine brushed finish will require multiple thin coats, each applied to perfection and very lightly sanded between coats as needed. You have to wait for each coat to dry. An air brush will let you build up fast-drying thin coats in far less time.
-
It all depends on the scale. At eighth inch scale, copper plate thickness isn't going to be visible. At a quarter inch to the foot scale, perhaps plate thickness would be barely visible. The modeler should calculate the scale viewing distance and model accordingly.
If a realistic scale effect requires actual lapped plates, cutting plates from paper of suitably scaled thickness and gluing these to the hull (shellac is a good adhesive for this purpose) will provide the desired effect. If individual lapped plates are not required, then the modeler can proceed directly to painting the hull. Realistic coppered bottom weathering effects are best achieved with an airbrush using standard artistic techniques. Refer to online photographs to observe the actual appearance to be replicated.
Ship model kit manufacturers frequently include "real copper hull plating" for what can only be a sales gimmick suggesting their kit is "high quality." Unsophisticated purchasers expect this, apparently in the mistaken belief that a high quality model should be constructed of the same materials as the prototype vessel. Individual copper sheet or foil plates would only be useful in very large scale models and the use of real metal sheet or foil is not preferable due to the limitations of adhesives. Most all of the kit-supplied coppering material is over-scale as to thickness, if not as well as to surface dimension. Fasteners will not be visible at model scale viewing distances. (In fact, the mark of a proper coppering job was that the nails were as flush with the surface as possible (accomplished by a proper "coppering hammer" with its dimpled head.) A smooth bottom is a fast bottom. A bottom studded with nail heads the scale size of a man's fist is not.


Photos before and after re-coppering. Note that copper in saltwater environment will quickly turn verdigris green when exposed to air as seen here with USS Constitution in dock as it's pumped out. The second picture shows her newly coppered bottom right before launch. Here the new copper, exposed to the elements, but not saltwater while in the dock, shows the classic "used penny brown" color of naturally oxidized copper. The modeler will have to decide in which condition they wish to depict the vessel's bottom: freshly coppered (which isn't to say "new penny copper" colored,) as a just-hauled fouled bottom, or as a hauled and cleaned bottom exposed to the air (verdigris green, which many prefer.)
Note that Constitution has about a five-foot wide band of reddish bottom paint applied over her coppered bottom just above her light load waterline. Modernly, most coppered bottoms have antifouling paint applied over the copper in this fashion. While the copper provides a mechanical barrier to marine boring organisms, it does not prevent fouling with seaweed. The bottom paint prevents this growth in the "sunlight zone" below the surface of the water. Further antifouling applied below where there is sufficient sunlight to sustain seaweed growth is omitted as redundant. Note that this is a period issue. Bottom paint came into common usage around 1850 and copper plating correspondingly decreased thereafter.
-
5 hours ago, Jaager said:
Any plans available from the current operation would be a guess?
From what I can see from their literature, about the only archaeological data on the Sutton Hoo ship that exists is an approximation of its length. The Sutton Hoo "replica" will actually be a replica of one of the Scandanavian ships that was excavated intact, more or less. The stem and stern of the Sutton Hoo ship was non-existent when discovered. The presence of any wood was indicated only by a discoloration in the sand. All the archaeological field notes and other research records were reportedly destroyed in the Blitz. It's one of those famous ships the actual appearance of which is unknown and unknowable.
- Roger Pellett, mtaylor and druxey
-
3
-
1 hour ago, Keith Black said:
Tom, how very kind of you. Now I know why mom liked you best.
Wow! What a prince! I'm impressed.
Looks like your mom had an heir and a spare and you're it. I suppose there's nothing for it but for you to tattle to the tabloids and cable news. Not to worry. The last "spare" to do that got $100,000,000 for his tell-all TV special!
- mtaylor and Keith Black
-
 2
2
-
-
I'd be interested in knowing whether there is any archaeological evidence of woven wool cloth being used as "caulking" in the manner depicted by saxonship.org's website. Since none of the wooden hull survived the centuries, it's hard to believe there is any evidence of woolen woven material used in the Sutton Hoo ship. It's surely unlike any clinker planking technique I've ever encountered before.
From the project's website:

Clinker or lapstrake planking is always plainsawn, not quartersawn, as it is with carvel planking. Clinker planking is generally not caulked at all. The flat plainsawn planks swell tightly against one another at the laps. There's no way to drive caulking between the laps without damaging the lapstrake plank seams. (Although, today's clinker builders often resort to some poly-something goop to avoid the need to permit a dry stored boat to take up or to compensate for plywood's lack of swelling at all.) As pictured above, they have quarter-sawn (edge-grained) planking with a rather thin lap and what they claim is woolen fabric laid flat between the lap. I can't see how that piece of fabric adds much of anything at all to "caulking" a lapped seam that doesn't require any caulking in the first place. Moreover, I don't believe the builders in that era even had sawing technology. I could be wrong on this, but I believe they got out their plank by splitting it from the trunk and then shaping it with broad axes, adzes, and draw knives. That alone would preclude quarter sawn planking.
I am unsure whether the Norse ships that have been discovered with their wood intact in Scandanavia were constructed identically to the Saxon period English vessels. I also was of the impression that none of the wood hull of the Sutton Hoo ship survived the elements, save to leave a "ghost" impression in the surrounding soil which permitted some very rudimentary measurement of her midship lines. (Any trace of the bow and stern were gone completely when excavated.) I do know that all the Science Museum's records on the Sutton Hoo ship (which was excavated immediately prior to WWII) were destroyed in the Blitz. I am unsure whether the Norse ships that have been discovered with their wood intact in Scandanavia were constructed identically the Saxon period English vessels. However it would appear this "replica" ship is really going to be another "educated guess" a in the case of Columbus' ships of discovery, Drake's Golden Hinde, Mayflower, a host of other "replicas" extant today.
I'm not knocking replicas. They have their place and any boat is fine, some are just finer than others. This outfit has some nice CGI depictions of their ambitions, but I'm afraid they need to realize that there's many a slip between the cup and the lip.
- GrandpaPhil, Canute, Roger Pellett and 3 others
-
6
-
15 hours ago, Keith Black said:16 hours ago, archjofo said:
Isn't it too far down for a lamp?
The compass had to be illuminated, if that's not the lamp then where is the lamp? Yes, if in fact that is the lamp then it's low but then the compass itself is low which I don't understand the reasoning behind as compasses/binnacles were normally close to eye level.
A lamp in that position isn't too low at all if the compass card is illuminated from below. It's exactly where it ought to be in that case. That permits the card to be closer to the glass at the upper end of a tube-shaped "bowl" which has a glass face on both the bottom and top of the bowl. With the card closer to the top of the bowl, it is easier read in the daytime. With the lamp illuminating the space in the base of the binnacle stand, the inside of which would be painted white, or the lamp even having a "bullseye" Fresnel lens and a right angled mirror in front of it, sufficient light could be transmitted up through the bottom "window" of the compass "bowl" to light the card from below in the night-time. No?
- archjofo, Keith Black and shipman
-
3
-
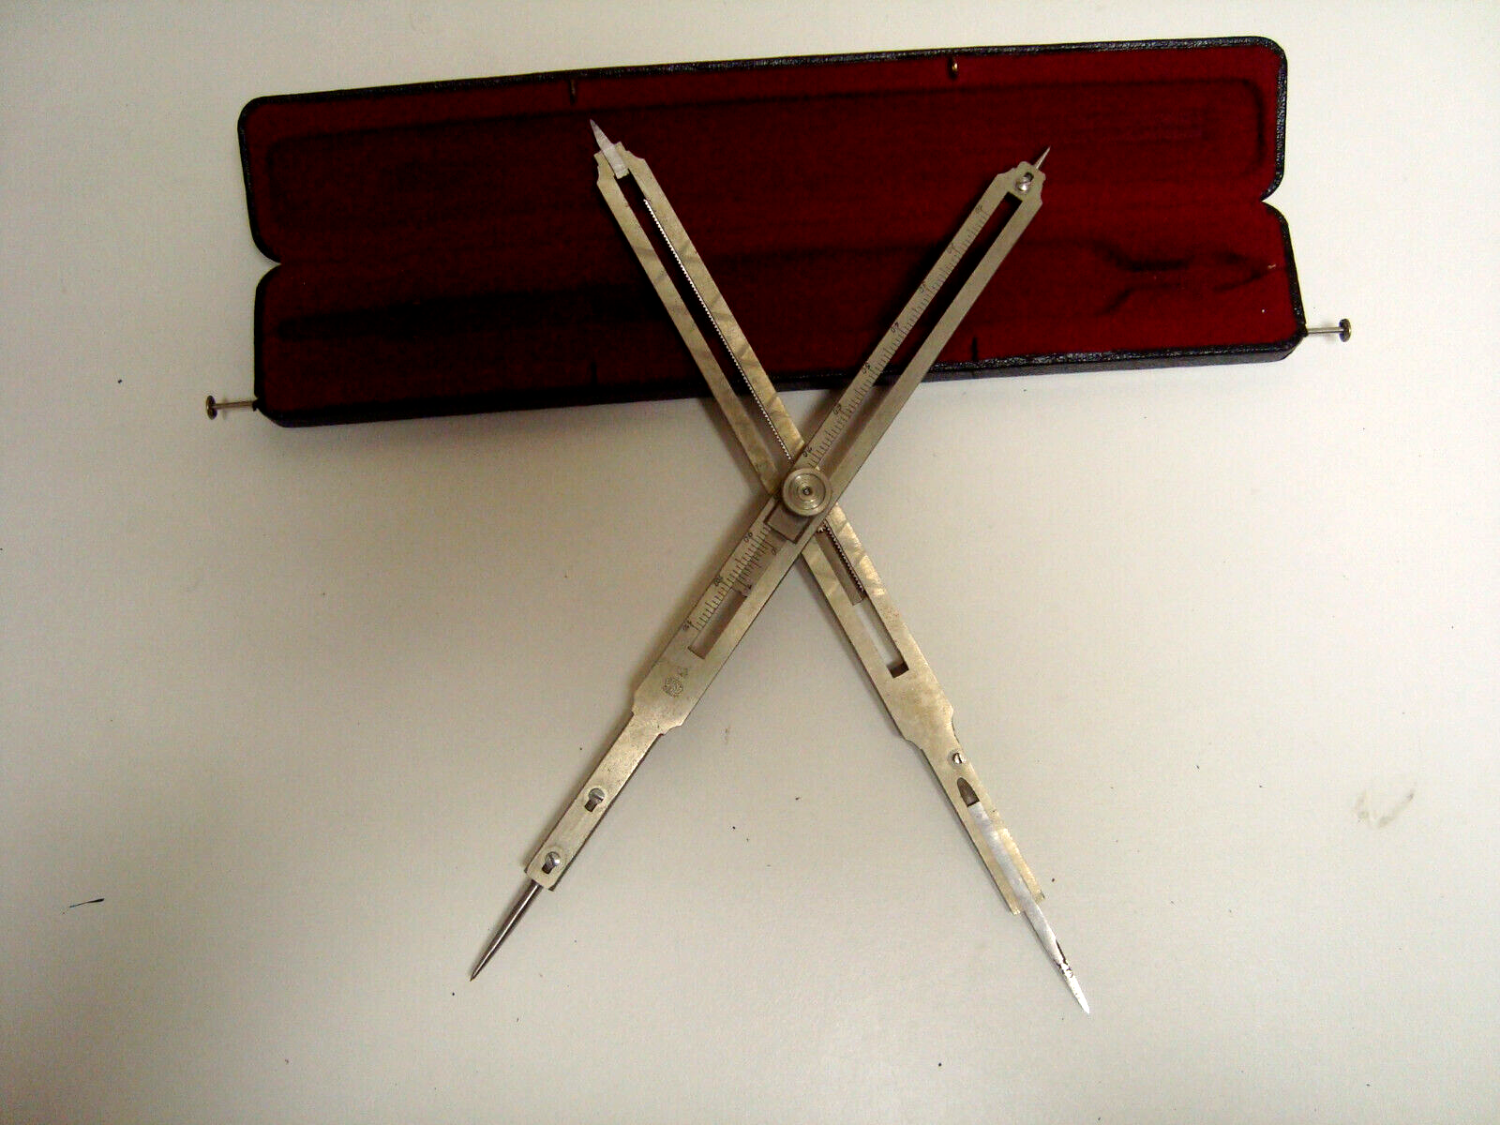
Yes, indeed. Proportional dividers are invaluable modeling tools. They are also very handy for scaling plans. Rather than worrying about getting copies that are accurate to a different scale, you can simply take up the measurement from the plan you have at whatever scale (or better yet, if you are an accuracy wonk, take the measurement indicated on the plan from a rule and then let your proportional dividers translate that to the scale you desire with exact accuracy. (Of course, alternately, the same can be accomplished with a regular divider and a scale rule.)
I'd urge anybody who is interested to spring the extra few bucks for the Keuffel and Essser Paragon (model) ten-inch rack and pinion decimally scaled proportional dividers, rather than the less expensive 6" or 7" proportional dividers. The rack and pinion 10" dividers are easy to set with a high degree of accuracy and are adjustable with Vernier adjustment to .001. The beauty of the decimal scaling is that you can accurately set the instrument for any proportion, expressed as a decimal equivalent. The less expensive models only give you proportional scaling of 1/2, 1/3, 1/4 and so on. (You can adjust them "manually" by setting the points to known measurements without regard to the scaling on the instrument.)
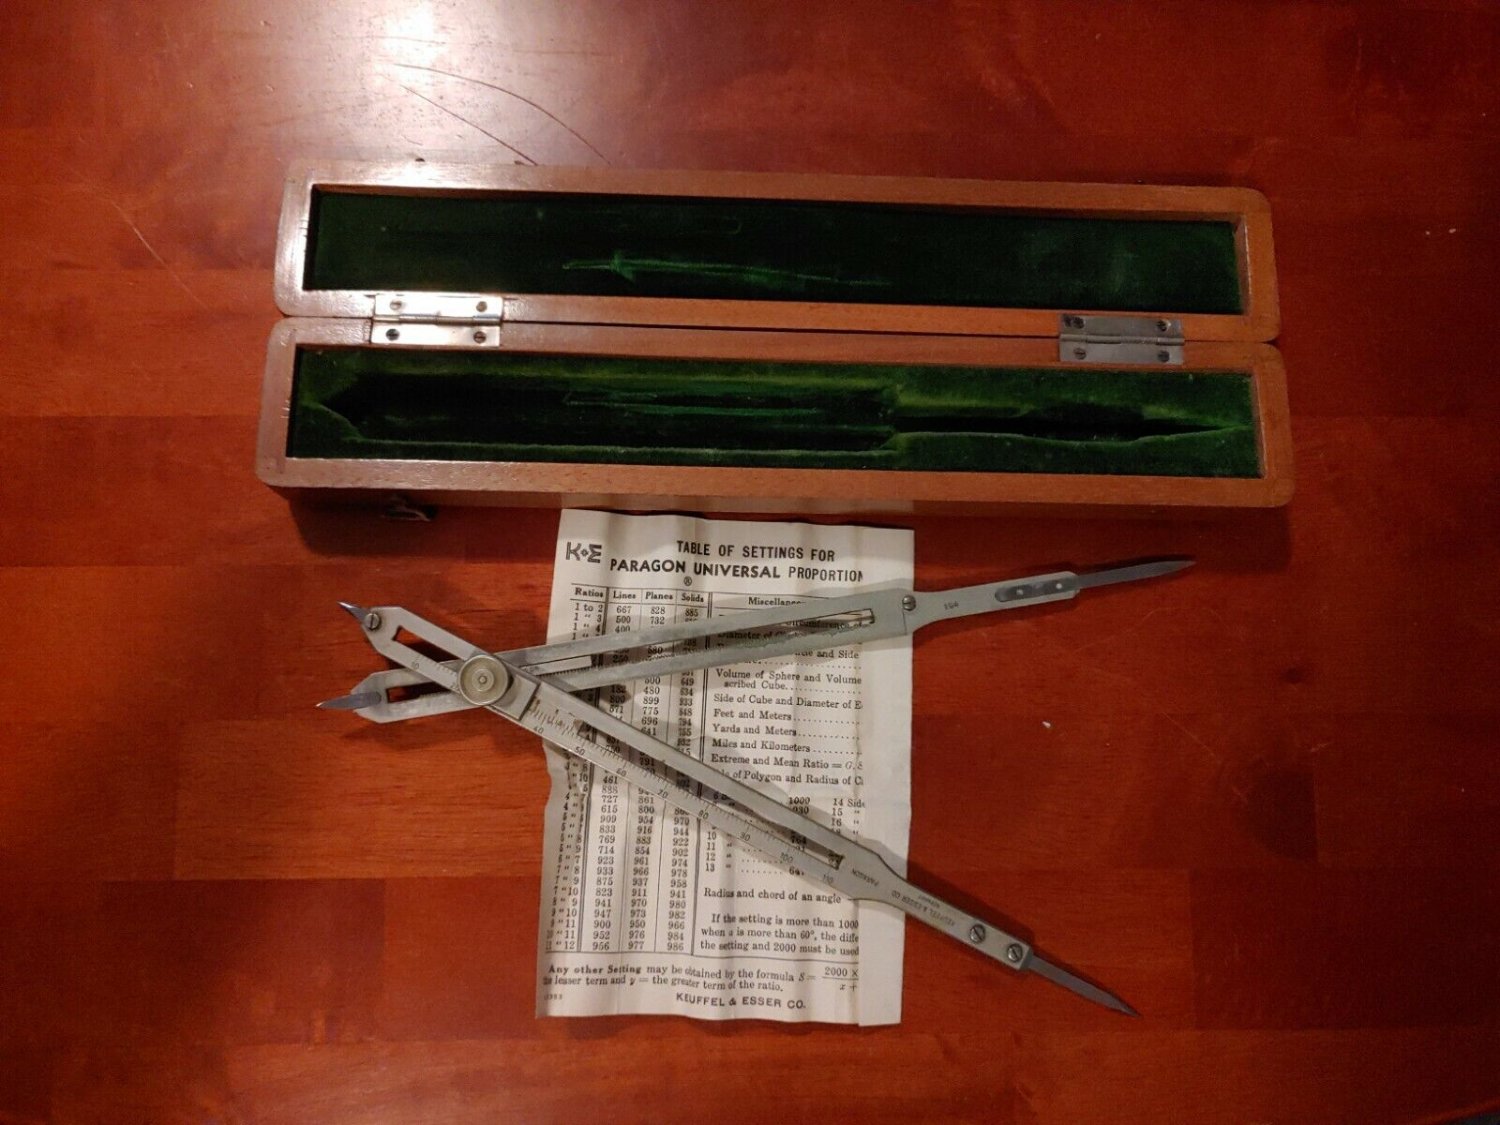
The 10" proportionally scaled dividers are also sold by other instrument makers, such a Post, Bowen, and Dietzgen. All of these are the same instrument made in the same German instrument factory and branded as required. the Keuffel and Esser Paragon models seem to bring a higher price on eBay because K&E is recognized as a top end marque (although they offered a wide range of quality at different price points.) A ten inch decimally scaled geared adjusting proportional dividers in decent shape can usually be had on eBay for less than $100. (Highly collectable "mint in the box" examples often sell for much more.)
An example sold by Post now listed on US eBay for $89.99:
VINTAGE POST #931 10" PROPORTIONAL DIVIDER W/ ORIGINAL BOX GERMANY | eBay

An early Keuffel and Esser model listed for $109.99 Vintage K&E Paragon 10" Proportional Dividers Drafting Set Drawing Instruments | eBay

Very late production (1980's?) K&E in apparent mint condition asking $269.99 and will probably never see that. KEUFFEL & ESSER PARAGON UNIVERSAL PROPORTIONAL DIVIDER TOOL W/ CASE GERMANY | eBay The "end of an era" "Mark I" line of K&E instruments were of a lesser "fit and finish" than the earlier K&E "Paragon" line, which was their highest quality model line. Much of the older Paragon stock was packaged in "Mark 1" boxing, as is the case with this example. Still a fine example, but not as "elegant" as the earlier hand-fitted matched serial number instruments of the "Golden Age."

Later production K&E case with "cheat sheet" plate on bottom of case listing common settings and equivalents:
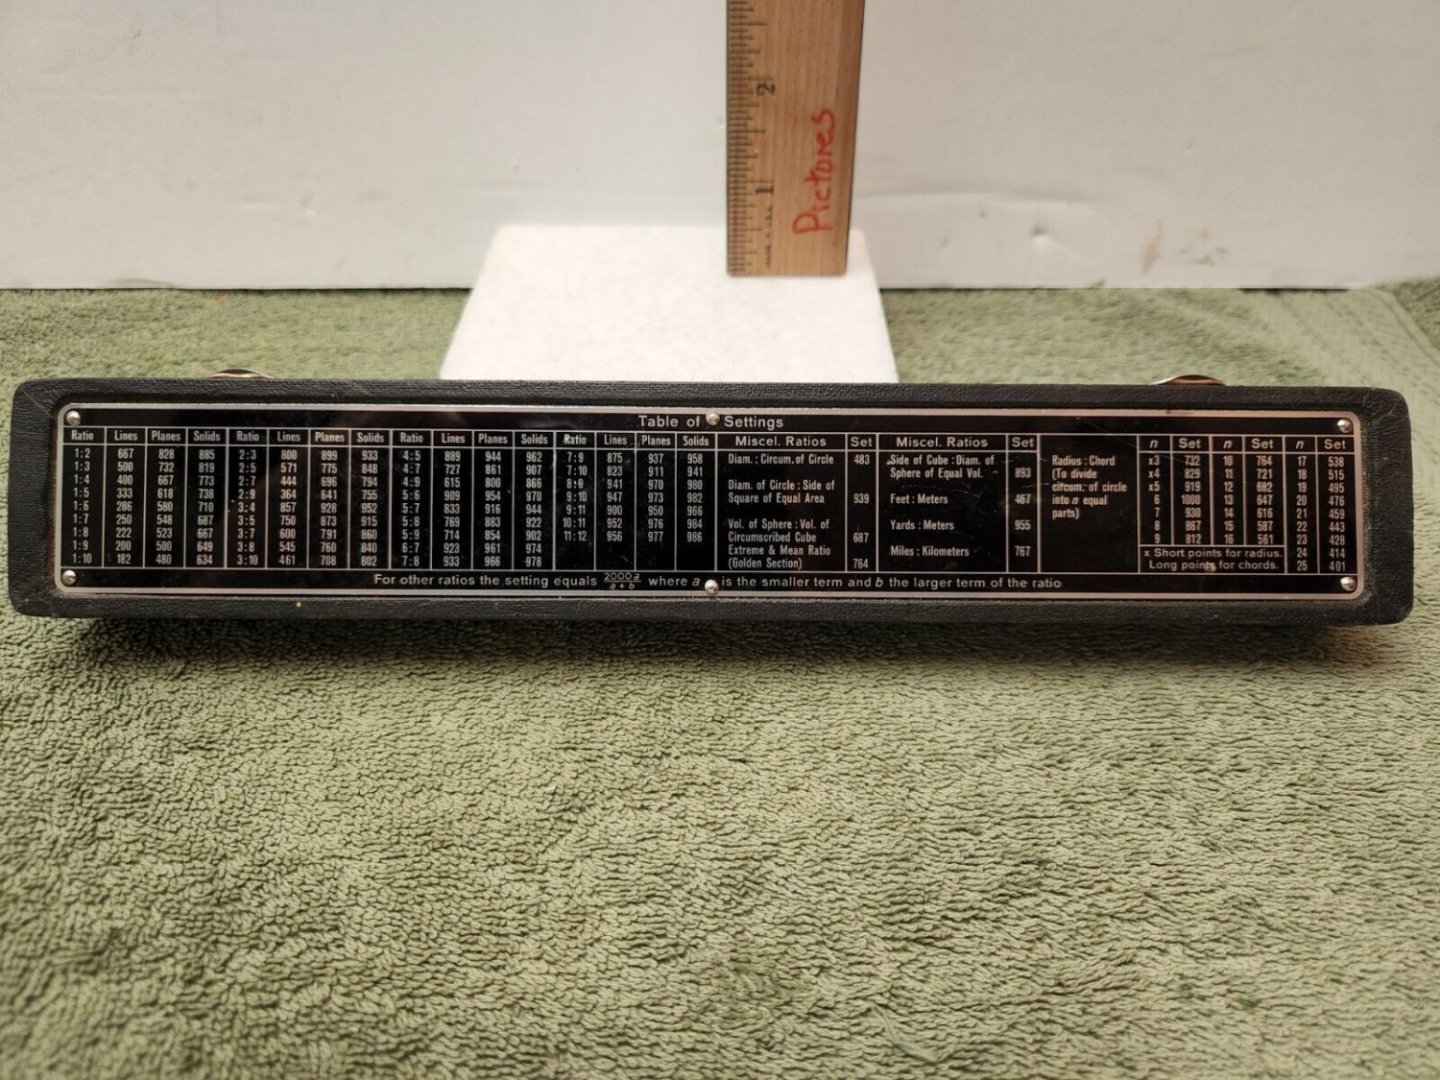
These price points may be a bit steep for some, I realize, but this instrument will last you for a lifetime and many more if given reasonable care. You will never wrestle with the math of calculating proportional measurements or dividing a line of a circle into any number of equal segments, plus loads of other stuff you'll probably never need or understand if you are mathematically challenged like I am. And you'll never have to fiddle with dead batteries! These are the finest and most versatile proportional dividers ever manufactured and they aren't making any more of them, so the prices keep going up as time goes on. Compare these to the junk MicroMark is selling for $165! Proportional Divider, scale drawing up or down, moveable pivot point adjusts ratio one end to the other (micromark.com)
- modeller_masa, Canute, Ryland Craze and 2 others
-
4
-
 1
1
-
From the Blue Jacket Shipcrafters' post:
Fine braided and twisted wire is readily available, although it may require a bit of toning down for modeling use. It would take a magician to turn in a Liverpool splice in 1 mm wire, but a socket terminal could certainly be fashioned from copper tubing and soldered on.
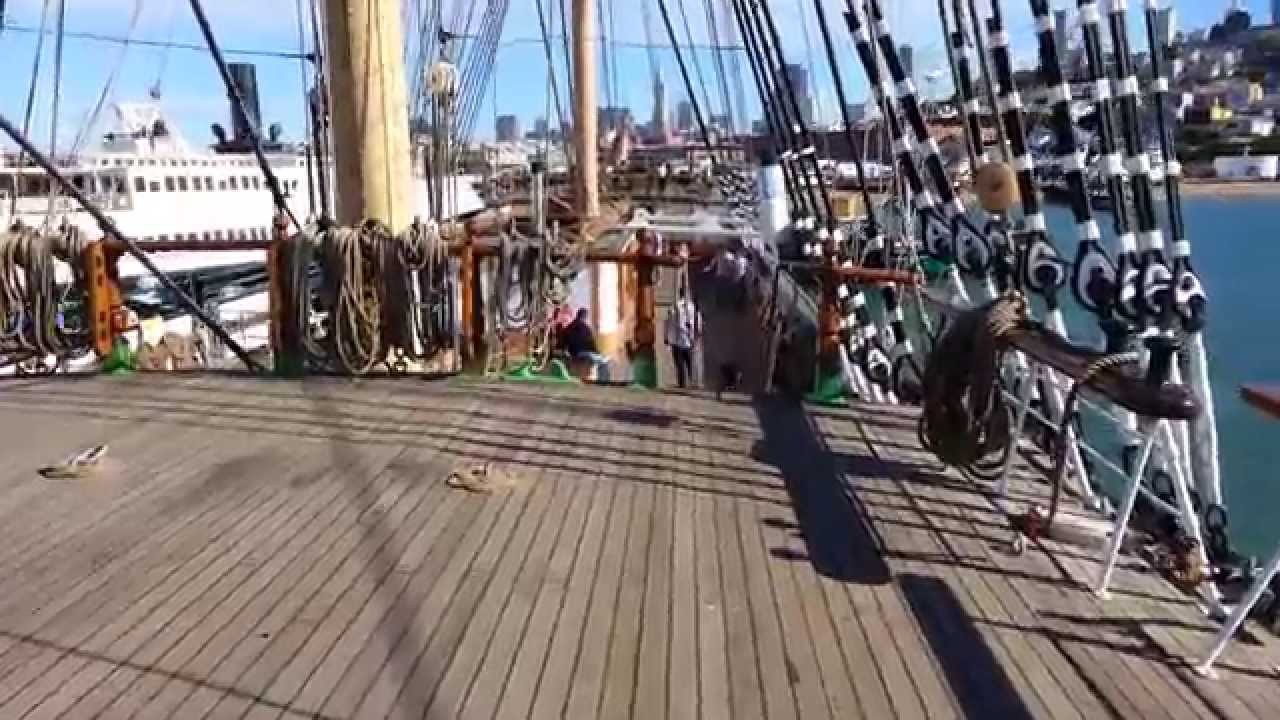
Here's a photo of Balclutha's wire cable standing rigging and turnbuckles. Her are simply doubled and seized as shown. Note the metal rod that runs through the top of all the metal thimbles which is intended to prevent the wire from untwisting under load. The turnbuckles are coated in painted canvas boots.
- mtaylor, Keith Black and bridgman
-
3
-
There was a time fifty years ago that I'd have dismissed this model as a "decorator piece" having no value. While I won't make any estimate of value, I will say that I'm not so quick to dismiss it today, fifty years later. As it reaches its 100th birthday, it becomes a genuine antique. As a mass-produced item manufactured for export, it won't have any "folk art" value, but it isn't without a certain whimsical charm. Well cleaned and restored, it could still be a valued "decorator piece" again. I wouldn't say it was worth any great amount of money, but I'm sure somebody would love to have it in their library or "man cave." I wouldn't turn my nose up at it so quickly today.
- jud, mtaylor, Harvey Golden and 3 others
-
6
-
The Administrators may wish to add their trademark registration notation to their FaceBook page, as well.
Also, perhaps it's time to send Remco's Model Ship World FaceBook page a "cease and desist" letter. See: (1) Remco's Model Ship World | Facebook
- Keith Black, Canute, mtaylor and 2 others
-
5
-
30 minutes ago, Gregory said:
1:155 Will be a bit challenging, particularly for the smaller sizes..
This may be a case of " what looks good, is good.. "
In smaller scales, very fine wire is frequently a better option for rigging line. Fishermen's fly-tying thread is also a good material for fine rigging line.
- allanyed, Keith Black and mtaylor
-
3
-
11 hours ago, popeye2sea said:
And herein is the thing that makes me think that the cannon on offer is not authentic. It seems to me that if this was an insurance cannon it's only real purpose was to satisfy the insurance company requirement. No ship owner or captain would waste much money on it. The cannon posted for sale looks way too well made and also has no proof marks.
While I'm no expert on period ordinance, I agree that there are questions that I'd certainly be expecting answered before I bought it. Consider the following:
If it is an "insurance cannon," of approximately 1780, how did they come to this conclusion? What was it doing in a river? What river and what was the archaeological context in which it was found. (A shipwreck or just alone in the mud? Etc.) I suppose if the river was freshwater, this cannon might show less deterioration than were it in saltwater for 250 years, but, based on the old iron cannon I've seen, I'd expect this one to show a lot more evidence of iron corrosion, even with state of the art conservation. The rusting (which accelerates rapidly once they are out of the water) can be stopped but not reversed. This cannon looks suspiciously well-preserved, but here again, I'm not an expert in conserving cannon.
If it is an "insurance cannon," it was present for "insurance purposes" and I doubt any insurer would have extended coverage to the vessel without a survey which would include confirming the required ordinance aboard, together with proper provision for the safe stowage of powder, competent crew to operate the piece, etc. I wouldn't be surprised if the insurer would have required some identification data on the requisite cannon when the vessel survey was done, but it seems this cannon has no identifying markings at all.
I would presume that any ordinance barrel of that period would have been made by a competent cannon foundry, but during that period only certain barrels would have been proof-marked, primarily military ones and then only when placed in service. British tubes would certainly have carried the "Broad Arrow" together with other identifying marks. (American arms were, and still are, not required to be proofed, although many were and are.) This marking chart may, or may not, be helpful if there are any foundry markings on the piece: https://www.nramuseum.org/media/940944/proofmarks.pdf Foundry markings, as distinct by proofing-markings, have been somewhat standardized for centuries now. As you probably know, these marks will be found on the top of the breech, the face of the muzzle, and the faces of each trunion. I find it suspicious that this cannon carries no identifying markings at all.
From the photo of the muzzle, it appears the barrel was sleeved, which is curious. This is done to restore the usefulness of worn barrels or to strengthen old barrels for use with modern smokeless, rather than black powder. This could have been done at any point in the cannon's life, but it is interesting to note that the technology for boring cast cannon bores, which would have been a prerequisite to installing a sleeve, didn't come into existence until the late 1700's as the Industrial Revolution developed the technology to do it. It is possible that this cannon was cast modernly and sleeved when new. Some reproduction cast iron cannon sold today can be ordered sleeved to permit actual projectile firing.
As I understand it, "insurance guns" were primarily mounted on wheeled carriages similar to mountain howitzer carriages so that they could be easily stowed and easily rolled to where they were to be used, being the only gun on deck. Some were also mounted as swivel guns. Most fired grapeshot, since that would be most effective against pirates approaching in small boats and the size of this cannon shot wouldn't do much of anything against the hull of a ship. (The merchantmen carrying the "insurance guns" were no match for any well-armed vessel.) The naval truck it is now on would not likely have been used because not only is it less easy to move and train, but also because it requires a gun stations with gun ports, and breeching rope and training tackles at each station, none of which are commonly found on merchantmen.
There are a number of retailers in the US and GB who make cast iron reproduction cannon very similar to this one. It may be that the story about it being found underwater and 250 years old is pure bunk, in which case, it would be a lot of fun to have and to fire if you have $2,500 you don't know what to do with. See: https://www.castcannons.co.uk/
- mtaylor, Ondras71, Keith Black and 2 others
-
5
-
The listing stated it was an "insurance cannon." What's an "insurance cannon?" I looked it up. I learn something new here every day!
1840 BRITISH INSURANCE GUN - SWIVEL CANNON - DECK CARRIAGE (buckstix.com)
- thibaultron, Keith Black and jud
-
2
-
1
-
3 hours ago, Roger Pellett said:
I believe that the old Delta saw that grsjax mentioned above was a 14in saw. These were the industry standard in the 1980’s and if you can find one it should meet your needs. These saws can be upgraded with new tires, new guides, a new tension spring and if necessary a larger motor. Many of these improvements are designed to fit the Delta saw.
Yes, and there are many of them out there on the used market. The actual Delta "old 'arn" models aren't nearly as common as the "pirate clones" turned out (and still being turned out) by the "Revolutionary Peoples' Patriotic Bandsaw Collective," but these Chinese knock-offs are fine at the top end (e.g. Grizzly G0555) and there are a ton of after-market up-grade kits that can turn them into real "hot rods."
-
I sure don't. Cured PVA doesn't sand well and I doubt adding sawdust to the matrix would make it all that much easier to sand.
-
2 hours ago, Harvey Golden said:
The local museum here has a full set: The Columbia River Maritime Museum in Astoria, Oregon. If anyone is in the area, it's a first-rate museum and has a shockingly good library and archives. If you want to see the HAMMS, add an extra day (or two)!
Harvey
Not many maritime museums have a full-sized real-life USCG surf boat in the lobby and at the same time a number of Lloyd McCafferty's miniature ship models, all under the same roof! Quite a range of subject matter. Out of the way, but as Harvey said, definitely worth the side trip. It deserves to be on every modeler's bucket list!

-
1 hour ago, DaveBaxt said:
I have managed to find a photograph of a Gaff sail without a boom and this shows the sheet tack atached to the clue of the sail but connected to the deck aft. So when the sail is to be furled is this tackle then moved forward to just abaft the mizzen mast as seen in the previous photo.
Yes. That's how it's frequently done when the clew blocks are left attached to the sail when the sail is furled, which would be the practice when the sail was ready to be set. As I mentioned previously, "Different ships, different long splices." It's one of several options and these are often dictated by the size of the sail. The larger the sail, the larger the blocks and sheets. The posted picture you mention is perfectly accurate.
Note that in figure H13/22 above, and in the photo above, there is but one sheet which is led to the stern amidships. An alternate arrangement would be to run two sheets, one port and one starboard to the quarters. When the sail was tacked, the corresponding sheet would be taken up and the other left to run free. Thereafter, the leeward sheet could be taken up to cause the clew to be pulled down further which could be desirable for flattening the sail shape on a close reach.


Painting a ships hull with a copper and green look paint
in Painting, finishing and weathering products and techniques
Posted · Edited by Bob Cleek
First off, there is probably no "ready to go" paint, acrylic or otherwise, that is made for airbrushing that doesn't require some sort of conditioning. If there is, you can bet it will require some conditioning the second time you open the bottle to use it. There is a bit of a learning curve to painting and it's best to learn from someone who knows what they are doing and can show you. Writing out instructions takes a long time and I've done it several times over the years and have no taste for doing it again. Suffice it to say your paint for airbrushing must be around the consistency of skim milk or just slightly thicker than water. To get the right consistency, you will have to experiment with your particular airbrush. They are not all exactly alike. Some will atomize quite thick material and others are partial to much thinner material. Follow the instructions with your airbrush to set it up for the material you are using. You should use the manufacturer's recommended thinner and other conditioners, at least until you get the hang of it. Acrylic coatings are best thinned with alcohol, which mixes with the acrylic's water base, but evaporates quickly to permit the best application behavior for spray painting. Alkyd paints should be thinned with mineral spirits or acetone, which, like alcohol in the case of acrylics, dries quickly when applied with an airbrush. Lacquers, should you use these, require lacquer thinner. You should practice with your airbrush until you become comfortable with it. You can use water in it and spray it on cardboard material to practice using the airbrush. Once you have the control mastered, you can use the coating you intend to use applied to a piece of cardboard to make sure you've got the actual material application down pat. Always do a test before any application to the model itself. It's a lot easier to throw a piece of cardboard or paper in the wastebasket than it is to remove sprayed paint from the workpiece.
As for colors, I mix my own. I use artist's oils mainly, but acrylics on occasion as well. I buy the paint which is sold in "toothpaste tubes" in art stores. Mixing your own paint is a simple skill that will save you a lot of money over time. You can purchase any color you want ready mixed or primary colors you can use to mix your own colors. You can purchase modeler's paints in any color under the sun, as well. They sell them in "brushing" consistency and in "airbrushing" consistency. I see no reason to buy the paint thinned for airbrushing because you are paying the same price as thicker paint with more pigment and getting only paint thinned for airbrushing. Paint is a lot more expensive than thinner. You can go to the painting and airbrushing section of the forum and read the reviews and comments on the various brands of premixed paint. As for colors for copper sheathed hulls, use your eye. I doubt that anybody sells "oxidized penny copper" as a color. I use a medium-dark brown with a fair bit of red in it as a base color for copper sheathing or bottom paint. You'll find many shadings of this color in the "boxcar colors" section of the modeling paint companies' model railroading selections. Verdigris is verdigris color. It's often sold as "copper green" or "verdigris. It's a fairly common color, so pick it off the color chart or rack in your hobby shop. All I can say about colors is what I've said before: search the web for photographs and replicate the appearance of the real thing, always keeping scale in mind. Refer to the pictures I posted in post #3 above. The "green" bottom is the vessel hauled and exposed to the air, hence the green oxidation, and the "brown bottom" is the vessel with new copper just applied and about to be launched.
You can use whatever sealer and primer you wish on your wood, providing that your later coats will stick to it. Anything and everything sticks to shellac. I prefer using shellac because it is very thin and soaks into the wood and dries very quickly. Its thinness doesn't build up on parts and "thicken" crisp details. It also cleans up easily with alcohol. You should sand lightly after sealing, but make sure not to sand so much that you remove all of your sealer in spots. If you do, reapply the sealer and sand lightly again. You can spray shellac if you wish, but you'll need to clean your airbrush with alcohol, of course. I find it easier to brush it on, since it soaks right into the wood and brush strokes are not an issue with shellac. Recognize that acrylic coatings often will not adhere well to oil-based coatings, so if you are using acrylic top coats, you'd be well-advised to test your acryllic top coat material on any oil-based undercoat you may have used. When using different types of coatings it is always best to spray test pieces before you shoot the real deal.
"Some brush strokes with a fan-shaped brush" will not make your hull look more realistic. It will make it look like you are a poor painter who leaves brush strokes when you paint because you don't know how to condition your paint. In the scale you are working with, I'd say you'd be better off forgetting about trying to "make it look realistic" beyond painting it. At your scale viewing distance, the individual plates aren't going to be discernable, really. If you want to apply paper "plates," you can do so, but you should be careful to apply plates that are of scale thickness. These can be applied using shellac as an adhesive and then shellacking the whole hull afterwards. You will, of course, have to take care also to apply those plates in the proper orientation correctly lined off and so on. That would be extremely tedious, however. The bottom of your model isn't an area that contains much detail and the viewer's eye isn't drawn to it. There's no point in distracting from the finer details of the model with an out of scale and improperly colored coppering job. There is a reason why a realistically depicted coppered bottom on a ship model is an extremely rare thing to encounter.
Your hull will not look better by failing to sand it well. In fact, it will look bad. The whole point of an airbrush is to apply paint thinly so it doesn't build up and ruin the crispness of scale detail. Any lack of sanding is going to be more apparent after having been spray painted. You must sand your hull and topsides until they are as smooth as a baby's bottom. I use 220 grit for coarse sanding, followed by 320 for finer sanding. I will spray color coats after sanding to 320, but I will sand between finish coats with 600 grit. The sanding must be perfectly smooth with no scratches, nicks or dings. It must also be totally free of all dust. Blow the worst of it off with compressed air (if you have it), then wipe the workpiece down with a tack rag (available at any paint store.) Follow the instructions on the tack rag package or have somebody show you how to use it. If you fold it correctly, you can get a lot of use out of a tack rag. You should also store it in a ziplock plastic sandwich bag after you open its original packaging and it will last you a good long while. Only a tack rag will pick up any dust from the surface, which is what it is designed to do. "Cleanliness is next to godliness" as they say.
On a large painted area like a hull, should dust specks end up on the painted surface, these can be removed after the paint dries by hand rubbing with pumice and rottenstone applied to a cloth dampened with water.
See: Amazon.com: Vallejo Game Color Verdigris Paint, 17ml : Arts, Crafts & Sewing
Modeling Verdigris: The Weathered Patina of Copper Roofing - Bing video