knightyo
-
Posts
531 -
Joined
-
Last visited
Content Type
Profiles
Forums
Gallery
Events
Everything posted by knightyo
-
 I'll bet I'm not alone in my modeling process. If I build something and the joints look magnificent, I'll leave it as natural wood. If what I've built needs filler or is sub-par, it gets painted in order to hide my sins. 😊 Alan
 -
If it were me, I wouldn't give them away. I might pin them up in my hobby area as "art" or find some other use. If giving them away, the person who they were given to would be less likely to purchase the plans from someone who should receive legitimate payment for their work, etc. Alan
-
RGL, you should know that you are responsible for about 5 of my model purchases. Oh they'll never be finished, but this thread inspired me to buy them. lol Alan
-
Hi Dave, This is a very good topic. Just about everything I do is scratch, and my tools over the years have primarily consisted of fingers/sandpaper/x-acto blade, coupled with occasional usage of a mini-saw and files here and there. I will say that I purchased a mini-lathe in order to turn cannons however, as that's incredibly fun. But you seriously don't need to spend a lot of money in this hobby. You can, and you can save a lot of time by purchasing dedicated tooling, but it's not strictly necessary. The most satisfaction I get from this hobby is by retreating into my cave and slowly shaping objects with sandpaper while lost in my own thoughts; it's definitely the process, not the destination that brings me happiness. When I'm working with machinery, it feels more like work and isn't as enjoyable. Alan
-
I'm not even building the model as I have about 300 others in the works, but when that figure/table/accoutrements goes on sale, I'd love to buy a copy. I'm envisioning a little cabin scene diorama under glass that I can place under my monitor while I work. Alan
-
NRG VIRTUAL WORKSHOP - INVITATION
knightyo replied to kurtvd19's topic in NAUTICAL RESEARCH GUILD - News & Information
Hi Kurt, I'm late to the party on this one but was wondering if the link to your recording is going to be placed with the other workshop links on the NRG site, or if it is a different section. I might be looking in the wrong place, but definitely want to watch your presentation! Alan -
This looks like a fun model! When the hull planking was attached, was it glued in addition to having the pins? If so, I'd strongly recommend removing the pins before starting the second layer of planking. Once the pins are removed, filler is applied to the hull (including any damage incurred during pin removal), and the hull sanded smooth, you should have a very good surface in which to apply the second layer of planking. Alan
-
Thanks Gregory. I actually really did go straight online to order a copy. I appreciate your offer, however! The nice thing about not having any definitive plans for these ships is that it sure gives me leeway to model what I like, and not have to worry about being proven wrong on anything. My model is a real hodge-podge of what I liked most about the Nina and Pinta replicas. Alan
-
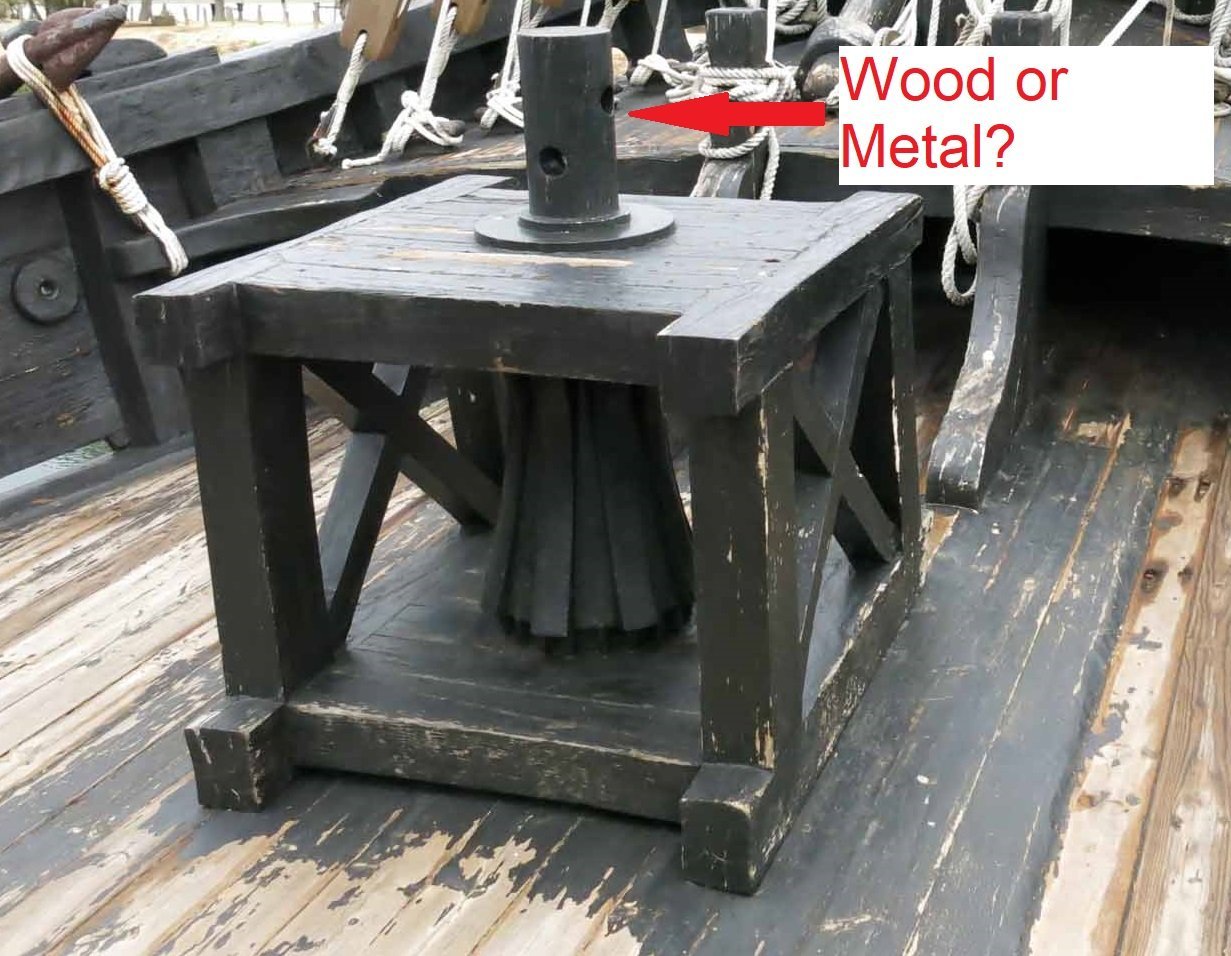
Thanks guys! I was thinking the head would be wood, and had already been shaping it to fit the "boxy" structure; I was just really given pause when thinking about the stress that tiny piece would be under as it was being turned. Gregory, I have the Mondfeld book as well, but unfortunately don't have the AOTS for Columbus' ships; I'm a little embarrassed to admit that as I'm building one of the models. Guess who's now going to go book shopping? I admit to also being curious about the structure of this thing; I think it's actually the capstan from the replica Pinta; it was just more interesting than the one on the replica Nina, so I thought I'd go with it. Alan
-
Hello, I'm building the capstan for the Nina, and am trying to determine whether the capstan head in this photo would be wood or metal. Any thoughts? It's hard to tell what is metal, and what is wood on this one! At present, I "think" the discs and baseplate are metal and everything else wood, but it really doesn't seem like the head would remain intact under strain if it was wood as opposed to metal. Alan
-
Was the impossibility of making them out of wood that you had referred to based upon drilling correctly spaced holes? You could also use the metal deadeyes you made as templates to pass a pin-vice through in order to create perfectly spaced holes in a blank of wood the thickness you desire, then carefully sand the wood blank to shape around the outside. I've been using boxwood strips to make things lately, and it's been great to work with. It can be held between your fingernails while you sand it, and it's hard enough that your fingernails don't "dent" it while you are sanding (I look through a cheap magnifying unit while working). If there are dents, they will be shallow and can be sanded out pretty quicky. Alan
- 396 replies
-
- 4
-

-
- Idea
- Bright Idea
- (and 1 more)
-
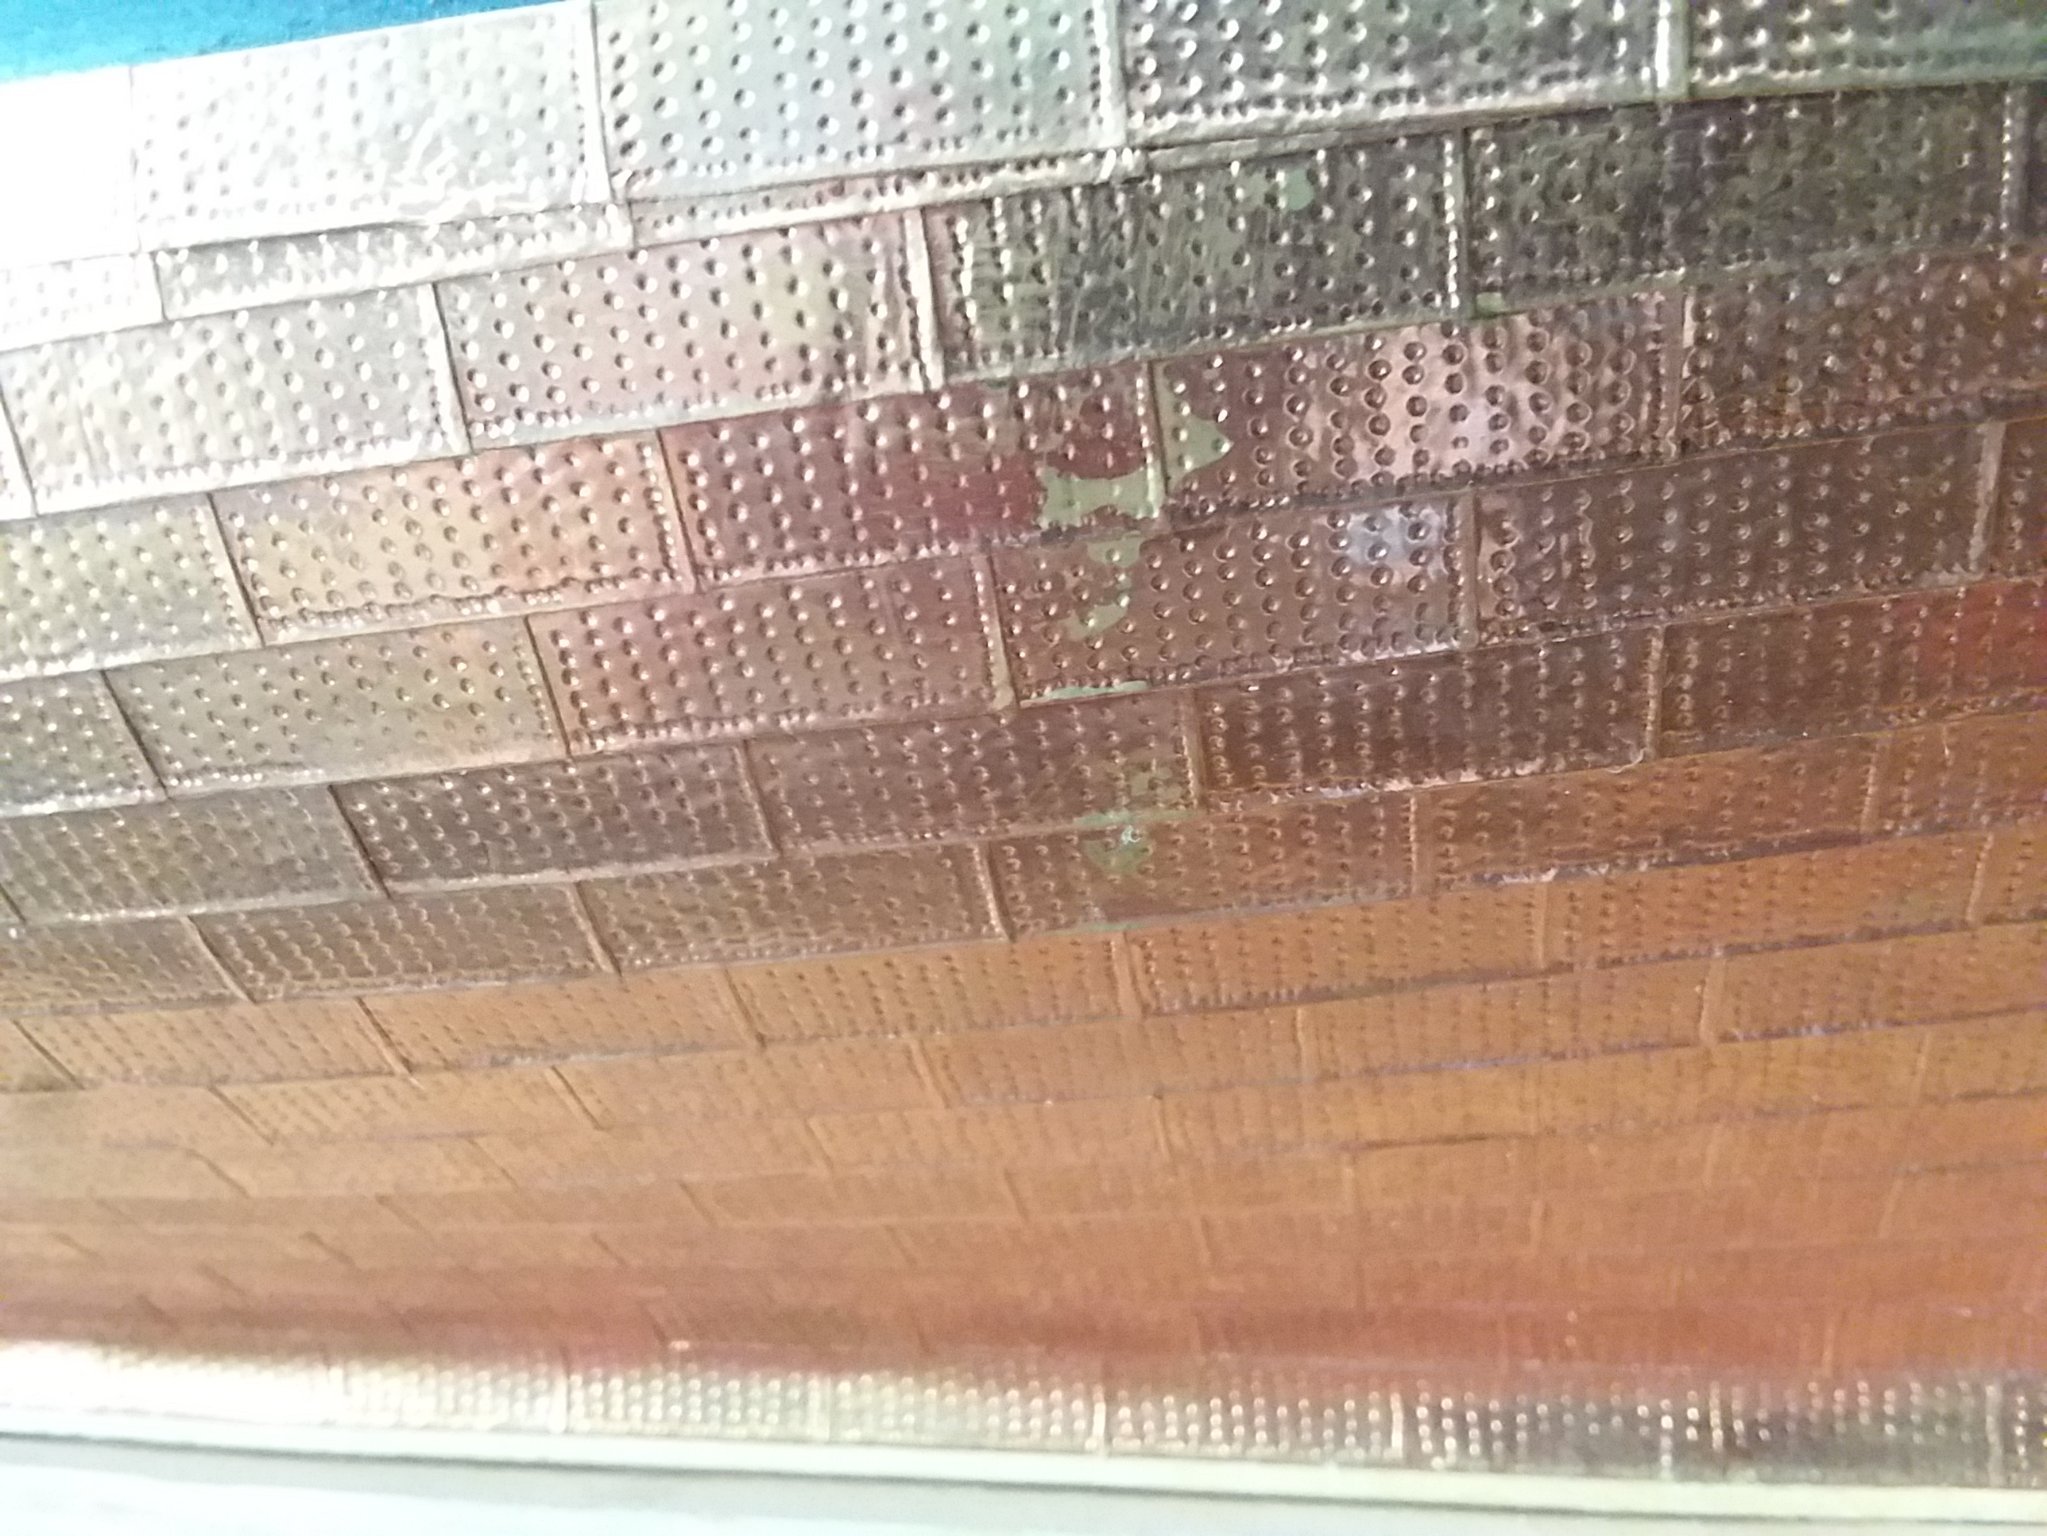
I think the mystery has been solved. I very gently felt the areas of concern under my magnifying station using a few different instruments, and could not feel any "edge" to the discolored areas at all; I could have sworn that there would have been edges. I think the hypothesis that the plating has been affected by accidental contact to some other substance is correct. I also worked around one of the edges to see if I could get it to flake, but there was no discernable transition from area to area. Now I feel comfortable moving forward with trying to "age" them a bit more, especially if something can be applied which will slightly fill the dimples bringing them a little closer to scale. I still have the jig used to create these plates; I might press a bunch more plates and then experiment on them with different mediums. Thank you everyone for your help with this! I sincerely appreciate the input; especially for something that I should have been able to figure out on my own. Alan
-
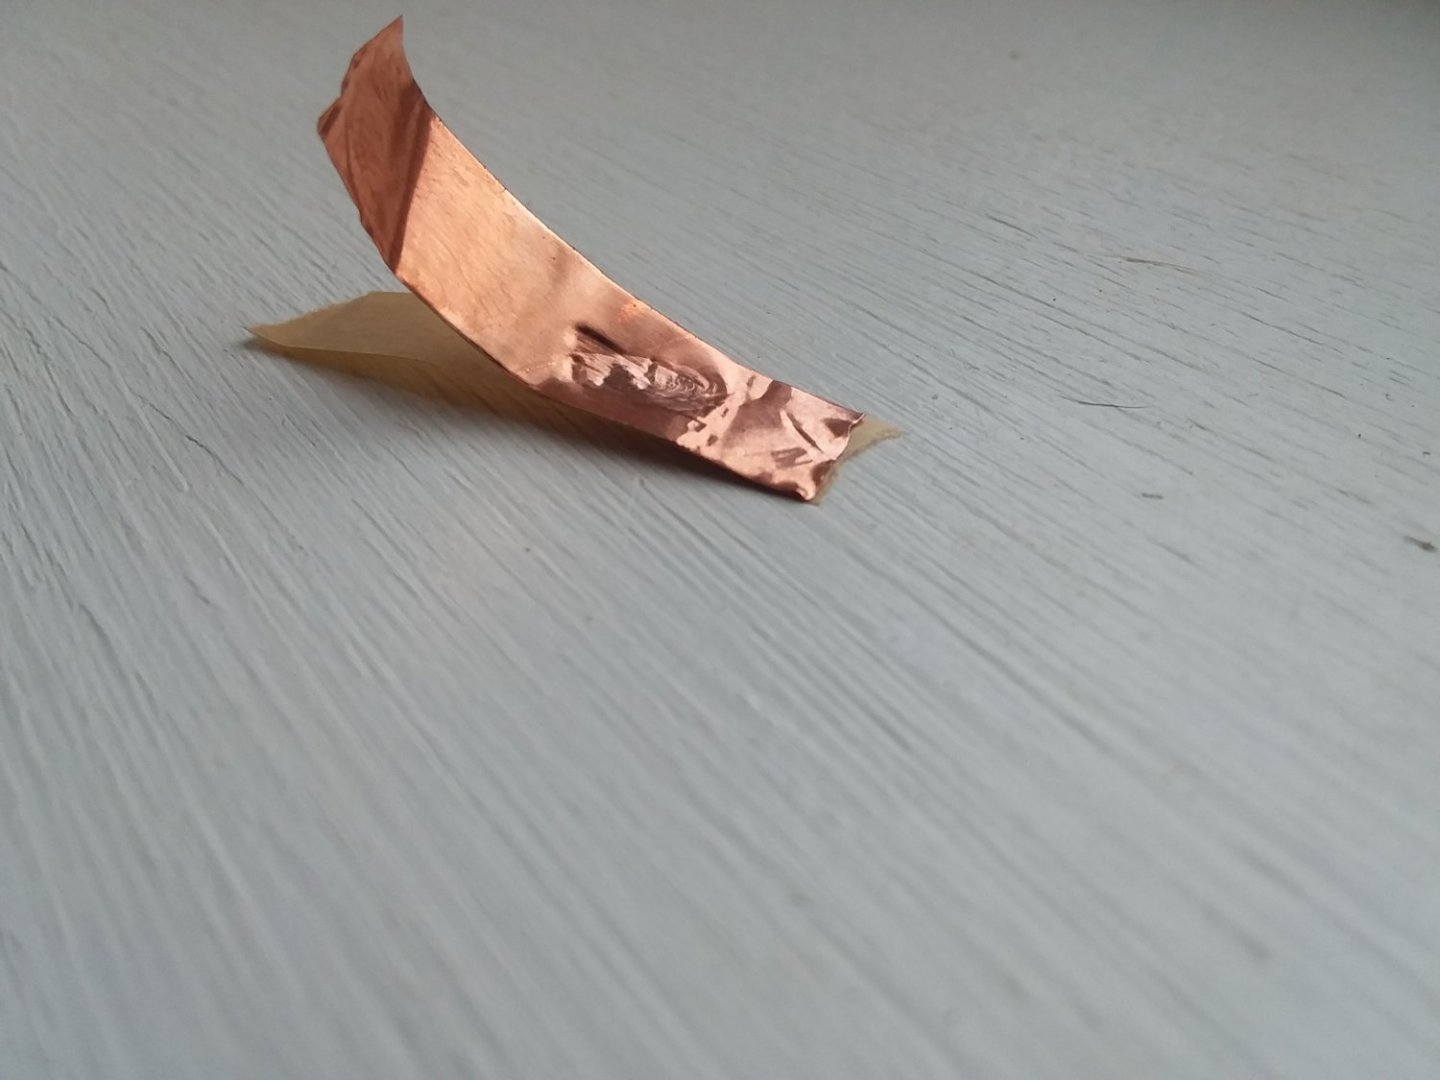
The tape does indeed have a paper wax-type backing. The copper peels off of the backing for installation, and has an adhesive on the back side; there's definitely nothing but "sticky" copper on the back side. I've tried to replicate the flaking on a sample piece I just took from the roll, but ironically could not get it to flake. I'm a little mystified. If I can get the nerve up, I might try to further "flake" that section of the hull when I get off work.
-
Yep, I've been pondering this as well; additionally, anything applied over the top might actually accelerate the flaking just due to added weight. It seems like if the plates are to remain on the hull, some type of medium would need to be applied which would flow into the edges and dimples of the plates in order to keep everything locked into place. The unfortunate part of this plan however, is that the plates overlap each other from the top down, so there aren't "shelves" along the tops of the plates that a sealing agent could rest upon. I just found the tape I used back in 2008. It turns out that it was 1/4" .0015 Copper FOIL tape. This does seem to explain the current dilemma. I think I have some Googling to do on this issue. Alan
-
Thanks Phil, that cupola looks fantastic. I might indeed need to experiment with that as well! Alan
-
Thanks Allan, I really appreciate it. It is mighty tempting to apply an oxidized copper green to these; that's a fantastic alternative idea if I don't in fact replace these plates. I do have to admit that the out of scale dimples I created have also bugged me a bit, however I suppose a paint application would also fill those in a bit as well. It looks like there's a good deal to consider on this one. Alan
-
Hello, Back around 2008, I used what I "thought" was copper tape to plate the hull of my Syren. I've always been curious as to why my copper plates didn't ever appear to "age". Wefalck mentioned in one of my posts that it appeared that my plates were constructed from copper painted paper as opposed to actual copper tape. This makes sense as you can see that the "paint" is flaking from the paper in the below photo. Soo..... This is irritating. Now, how to remedy? I've been thinking about redoing the plates with legitimate copper tape for the next go-around. However if I'm going to invest that much time in redoing the plating, I want them to look far more authentic. The very bottom photo is from Alex Baranov's Cumberland log which I find to be striking. However Alex creates his plates from brass. I've been scouring the web for tutorials on this process, but have been coming up empty. Yes, I've been tempted to send him a message requesting assistance, but don't want to impose; especially if there are readily viewable tutorials out there that I just haven't yet found. Is anyone aware of brass plate tutorials? I guess I'm not wedded to the idea of brass... I just want my "next" plates to look more like Alex's than my own feeble 2008 attempt. Alan

-
I learned the hard way to have a healthy respect for non-powered tools as well. Back in 2008 I lost my grip on a piece I was carving, and within milliseconds, cut the tip off of my middle finger. The tip grew back, but feels very strange to this day whenever it makes contact with anything. Alan
-
I was intimidated by the hobby for years due to people indicating how hard it was. I finally realized that the hobby is as easy or difficult as you wish to make it. Since you are already used to working with your hands in the plastic medium, I'll bet you could tackle the USS Syren by Chuck Passaro (sold by Model Shipways). His instructions are fantastic and far superior to the instruction provided in most kits. I've also noticed that he pops into people's build logs on this site to offer advice/encouragement. You can't go wrong with a well-designed kit and the advice you receive in build logs; it also greatly helps if you leave comments in others' build logs who are building the same kit; they will be more likely to view your own build log and forewarn you of upcoming sections they may have found challenging and offer tips/tricks. In addition to the USS Syren, it sounds like Chris at Vanguard Models also provides high-quality instruction materials. I haven't built any of his kits, but can tell by the posts I've seen on the forum that he also provides exceptional instruction. I really don't think you can go wrong with any of Chuck or Chris' kits. They both also have links to their sites in the right-hand margin on the home page. Alan
-
It's ironic that few people partake of non-electronic hobbies any more, right when we start getting access to unbelievably detailed parts. Those splinter mattresses are really nice. (Thinking your ships fleet would look really cool in a larger glass display cabinet with little lights softly illuminating them from above and below. It might be time for a wall cabinet). lol Alan
-
I agree with Mark. Don't feel bad if you have delays. I have a work in process log from 2008; I've got to be the recordholder in that respect. Also, check out the builds by RGL. He also works in 1:350 plastic, and shows fantastic weathering techniques. Alan
-
Hi Mark, We just purchased a home in Brownsville. I figured there'd be a group or two in the Portland area, but not sure about Eugene/Salem area. Alan
-
It's great to see another Idahoan joining the group. It sounds like the local group Mercator mentioned is a good one. I'd join myself, but will be moving to Oregon in about a week due to my job. Alan