


mtaylor
-
Posts
26,273 -
Joined
-
Last visited
Content Type
Profiles
Forums
Gallery
Events
Everything posted by mtaylor
-
Is there a Boudriot's 74 Gun Ship in "kit" form???
mtaylor replied to Michael Scarborough's topic in Wood ship model kits
Ah... there's a number of scratch build French 74's but I know of no kit. The only 74 I've run across is the English one I mentioned earlier. At 1:48, Jaager is spot on the size. Naturally there's bit of + or - depending on the plan set. I'd have to check ANCRE to see if they have something besides their 4 book set on the generic 74 but it would be a scratch build. -
Bob, I do understand your fears and can relate. This is something only you can resolve. If you decide to go ahead a get one, then I offer a few suggestions. These apply to basically any circular saw, full size or model size no matter what brand. My disclaimer is that I don't have a Byrnes but another brand of small hobby saw but the principles are the same. 1) No matter what saw you buy, download and read this. https://modelshipworld.com/topic/23843-byrnes-saw-reference-also-good-for-other-desktop-hobby-saws/ It has a good section on blade tooth count vs. wood thickness which works also for non-Byrnes hobby saws. I use it a lot for my saw. 2) To be honest, never lose your fear. Accept it and use it to your advantage such as double checking everything before hitting the power switch. I also make sure that I'm standing out of the line of fire as such if there's a kickback. If need be, make a check list and post it at the saw area. 3) Push sticks in my view are an absolute must as well as assorted "homebrew" fences. I do a dry run (no power) at least once to make sure there's no issue with fences, etc. and check that my fingers can stay well away from the blade. Forget the gloves as they seem to block a lot of situational awareness of where fingers are and in many ways give a false sense of security. 4) I do have set of those wood "fingers" that can be installed to the fence and deck. The fingers are angled such that the wood being fed in, is prevented from kicking back. But they do need adjusting and checking that they're not too loose or too tight. 5) Never, ever take anything for granted. Check and then re-check before hitting the power. This last is a suggestion.... make or buy some zero clearance inserts and if they don't have them drill some holes so the vacuum can pull of much of the saw dust from the top of saw. The zero clearance insert will keep small cut-offs from sliding down the side of the blade and creating a problem the might make you reach next to the blade to grab the wood. Hope this helps. Just make shop safety a focus whether it's using a saw, drill press, a mill or any other tool.
-
Is there a Boudriot's 74 Gun Ship in "kit" form???
mtaylor replied to Michael Scarborough's topic in Wood ship model kits
A 74 gun ship and not the ship's boats, correct? Looking for French or English? Also, what scale? I know of one kit for an English 74 that is a POB not a POF. See CAF models (a sponsor). There are others if I remember right that all POB with varying scales, quality, and accuracy. A search in the kit area for "74 gun" or "3rd Rate" may give you some logs. -
I'd like to suggest you open a log in the kit area where the other builders of this have logs. This is more of a "reference" area and in the build log area, you'll get more eyes and thus help if you need it.
-
Water does work on some woods but I find that a short water soak and then applying heat from bending tool, a curling iron, or my preferred method, a heat gun and bending board works very well. In the plank bending area (here: https://modelshipworld.com/forum/98-planking-downloads-and-tutorials-and-videos/) Chuck has at least one video using the soak and hair dryer/heat gun method. Water alone doesn't do what's necessary due to the cell structure of the wood. The heat is what does the bending and the water transmits the heat into the wood. As the wood cools it will retain it's shape. I've bent pear, basswood, boxwood, cherry, and even ebony using this method. On some woods (like ebony) I have to do a resoak and bend several times to get the curve right.
-
Try this as quick Google says they have them. https://www.modelerscentral.com/model-ship-plans/underhill-model-ship-plans/
-
Untangling and rerigging or start from scratch?
mtaylor replied to Rgpracer's topic in Masting, rigging and sails
You might consider this one.... it's a group build in that all the builders have a common goal and there's many logs to reference. https://modelshipworld.com/forum/77-medway-long-boat-1742-public-group-project/ -
Red Ochre Paint
mtaylor replied to starlight's topic in Painting, finishing and weathering products and techniques
Have a look at Vallejo Red (Rojo 70.926) as a starting point. Since main paint was power form with the liquid added time if use (linseed oil it seems) they were usually mixed using local materials. So there's a wide variation in the reds and no one can really tell you it's the wrong shade. -
Somewhere I read that after the ship was commissioned, it was up the Captain to provide the paint for the ship's upkeep. If this were true, then would be up to him to spend money and also his pride on a good-looking "ship shape" vessel. I've also read that much of what is "gold" on most models was actually yellow ochre.
-
Welcome to MSW, Marcus. If you're interested, look in the Non-ship model area. You have to search it (use the search feature) but you'll find card models of birds there also. If you haven't read this yet, it's well worth your time... When you're ready, do start a build log on the Polaris. Do be cautious on your tool buying as it is addictive. Many (including myself) suggest you buy tools as you need them and not because of some marketing hype. There's a lot of useless tools out there.
-
Untangling and rerigging or start from scratch?
mtaylor replied to Rgpracer's topic in Masting, rigging and sails
I agree on removing the wheel. Some kits do strange things like that. Since you've stripped away the damage, now might be appropriate to give it a good cleaning and get a good look at the hull, decks, etc. Use q-tips and spit is the best way. The enzymes in spit help to remove the dust and grime. Use a clean q-tip when the spit stops working and don't put it back in your mouth to re-wet it. Tedious work, but the payoff is usually a good one. -
HO trains and layouts by popeye the sailor
mtaylor replied to popeye the sailor's topic in Non-ship/categorised builds
I remember seeing one the "big boys" in the museum of transport in St. Louis. Not sure if it's still there or if the museum is even still there. Been probably 30 years since I was there. -
Your log is excellent, Eric. You're showing outside the box thinking on this and pointing out the pitfalls.
-
Very well done on the blocks, Mark. Great to see you've returned. Druxey makes a good point about the friezes. This seems to be catching on a bit as there's a couple of models that have recently used this method.
-
Untangling and rerigging or start from scratch?
mtaylor replied to Rgpracer's topic in Masting, rigging and sails
I was about to suggest what Tom did, before I saw his post. Look as some other log (use the MSW search and keyword: RESTORATION). I wouldn't start cutting away rigging and masting in a wholesale fashion. Sometimes things can be unraveled and put back into position. As for what been said about deadeyes and rigging.... it's a kit, not a scratch build and there's probably more period incorrect things then those. The question that you need to ask yourself is "how deep down the rabbit hole do you want to go"? If you want to deep dive, go get a Caldercraft kit of Vic or wait a bit and get the new one coming out designed by Chris Watton for Amati. -
Happy new year to you, Christian. I don't envy you doing 100 gunports but I know you'll do a great job of them.
-
Untangling and rerigging or start from scratch?
mtaylor replied to Rgpracer's topic in Masting, rigging and sails
One further bit of advice. As you work on stripping her down and sorting things out..... take lots of photos. print them out and annotate them. All removed parts, bag and label. If you rely on memory alone, you will forget which bit came from where. -
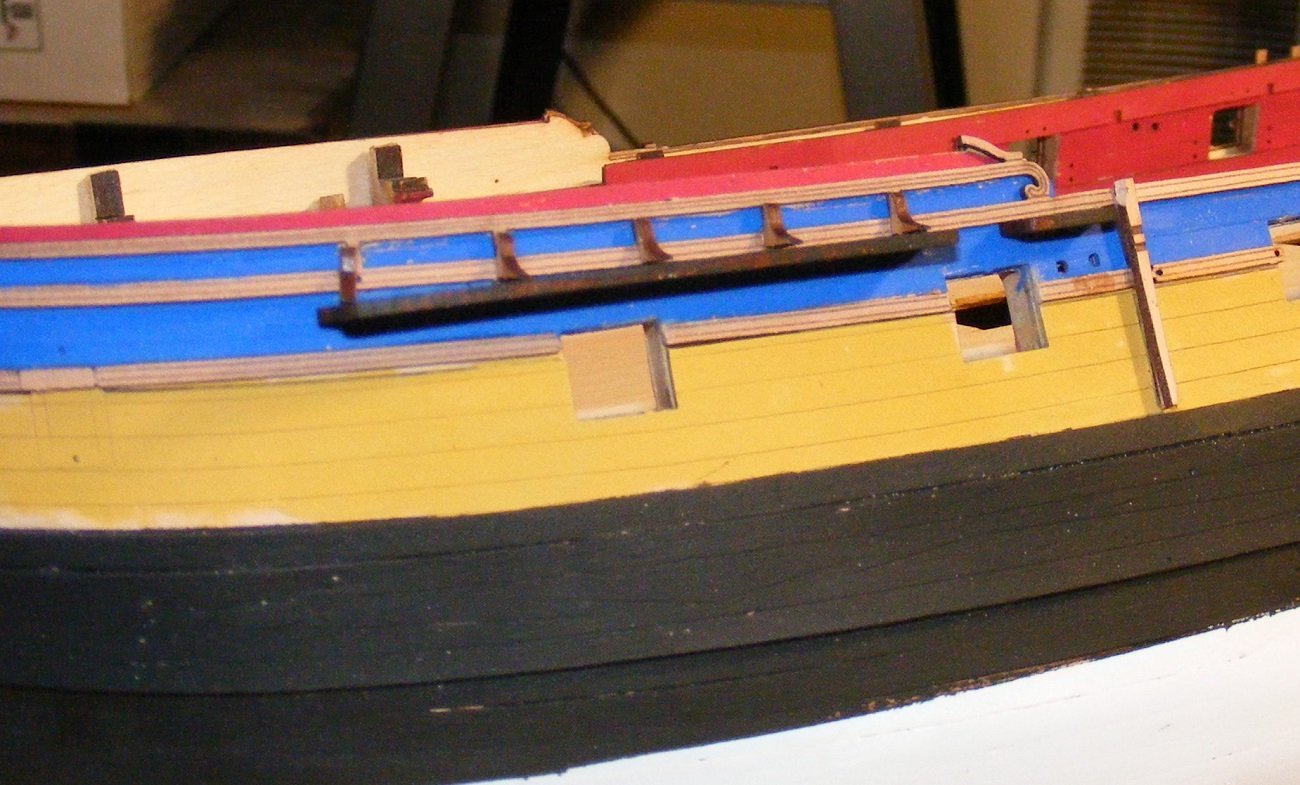
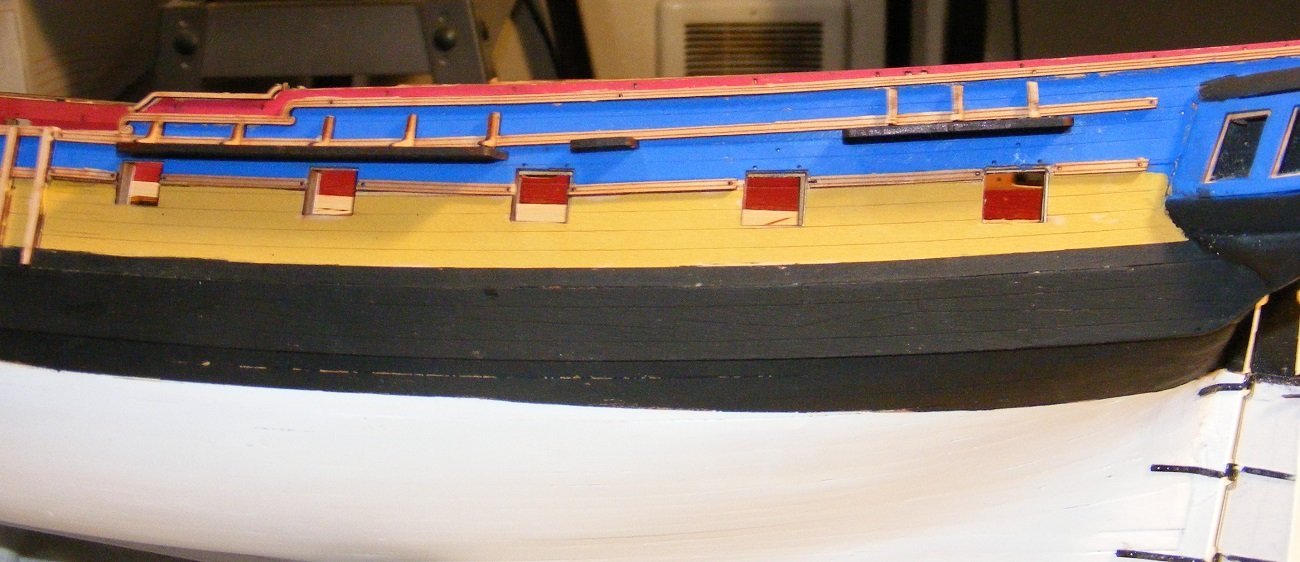
Just a short update and how I solved a minor but irritating issue. The instructions have us install the channels and then knees. The issue I had was getting the channels installed at the proper angle and all of them having the same angle from the hull as the instructions have you install the channels first. I finally removed them, cleaned up the mess and decided to do it backwards. Installed the knees first and aligned them with to the proper placement. Then installed the channels and am very happy with the result. Onwards!!!!!!!!!!
- 505 replies
-
- 19
-

-
- vanguard models
- Sphinx
- (and 1 more)
-
Welcome to MSW, Pirate. What model are you considering? I suggest a read of this topic before buying a kit...
-
Error code 200
mtaylor replied to Blue Ensign's topic in Using the MSW forum - **NO MODELING CONTENT IN THIS SUB-FORUM**
I did spot a work around for this issue. One of the builders got the error and posted without the photo that failed. Then hit "edit" and added it and it worked. Those of you experiencing this might try it. -
I suspect it's part of this problem: https://modelshipworld.com/topic/30784-error-code-200/ One builder did note that after posting, if he went back and hit "edit", it would take the failed photo and post it.
-
What a great build and a great log. Thanks for sharing it with us. BTW, I hope you'll put your finished build pics in the Gallery.
-
Thanks for the road trip, Steven. It's been a joy to watch and see your research and reasoning for each decision along the way. I'm looking forward to your finishing the Great Harry.
-
I think the term "difficult" is very subjective. It depends on many factors such as "how much experience do you have?", "how much detail in the kit?". And then there's this one: "How much scratch building of parts?" By that, some kits gave you a sheet of wood and a plan and basically you had to cut out and shape the part.
-
Great work, Grant. I'm glad you were able to overcome the obstacles.

