

CaptMorgan
-
Posts
163 -
Joined
-
Last visited
Content Type
Profiles
Forums
Gallery
Events
Posts posted by CaptMorgan
-
-
Looks very nice. Keep up the great work...
Removing the jig is a fun step to get to. Enjoy....
Steve
-
The sweep port and the gunport base have not been glued in yet so I can take them out to trim them before I glue them in. They were there to help with alignment.
From everything I have seen so far those upper frame joints will be hidden by planking so I decided to not trim those. Hopefully I'm not wrong....
-
Well, it has been a long time since my last update but I have been making some good progress. So I live in Florida and do the snowbird thing in the summer. I took all of the frames up north with me so I could have something to do up there.
The only issue I found was I was missing an upper frame 9 and I had 3 uppers for frame 10. I let Chuck know & he will take care of it. I just need an upper for frame 9 but will wait till whenever I order Chapter 3 sometime in the future. I wont be needing it for a while.
Everything fit together real good and there were no other problems that I have encountered.
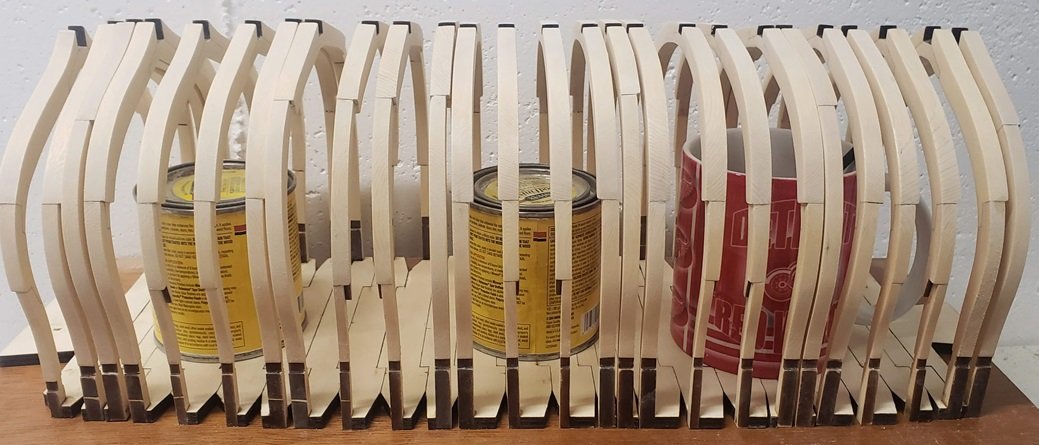
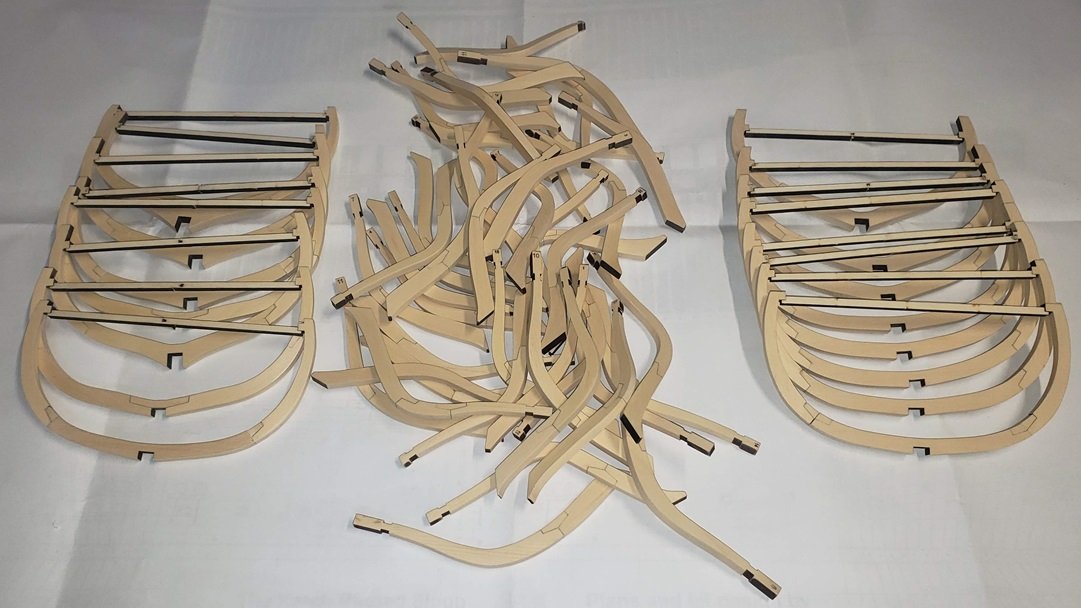
I got the frames all assembled, sanded, and ready to install.
Below are a few pics to show where I am at this point. I went ahead and put in the tree nails into all of the tall frames, short ones will come later. I also put WOP on all of the fore and aft sides of the frames because they will be to close together to do later.
By far the biggest challenge is to keep everything as square and spaced as possible. Just have to take your time & follow Chucks awesome instructions. I think I'm off to a pretty good start.
Moving on --- one frame at a time....
Steve
-
I've been making a little progress and got the keel finished up. Thought I would throw a few pictures of where we stand so far...
I have the build board all set to go. I pretty much followed Mikes lead - can't go wrong doing that....

Next up will be attaching the false keel - seems I forgot that till I seen the pictures... After that I think I will put on some WOP that to protect what I have done so far.
Then fixing the plans to the build board.
So far --- so good... Thanks for looking in.
Steve
- KARAVOKIRIS, yvesvidal, rcweir and 11 others
-
 14
14
-
-
Thanks Mike & Chuck -- and the likes. I'm not in any hurry - I just have an abundance of spare time right now. That will be probably be coming to a end when I head back north in about a month.
-
-
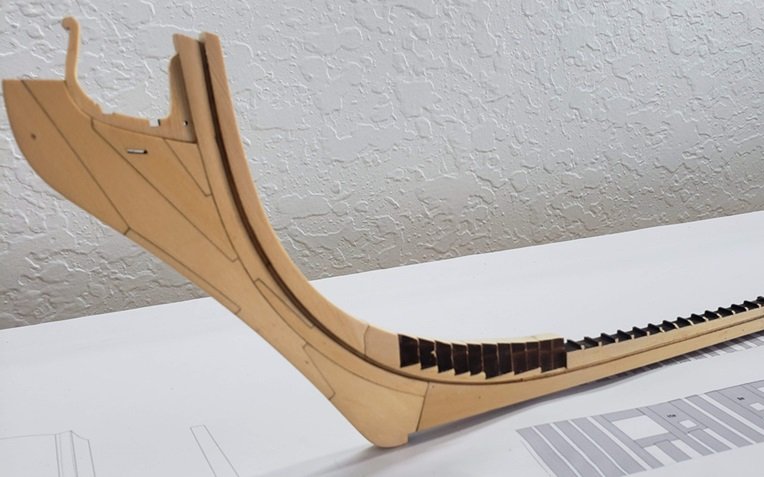
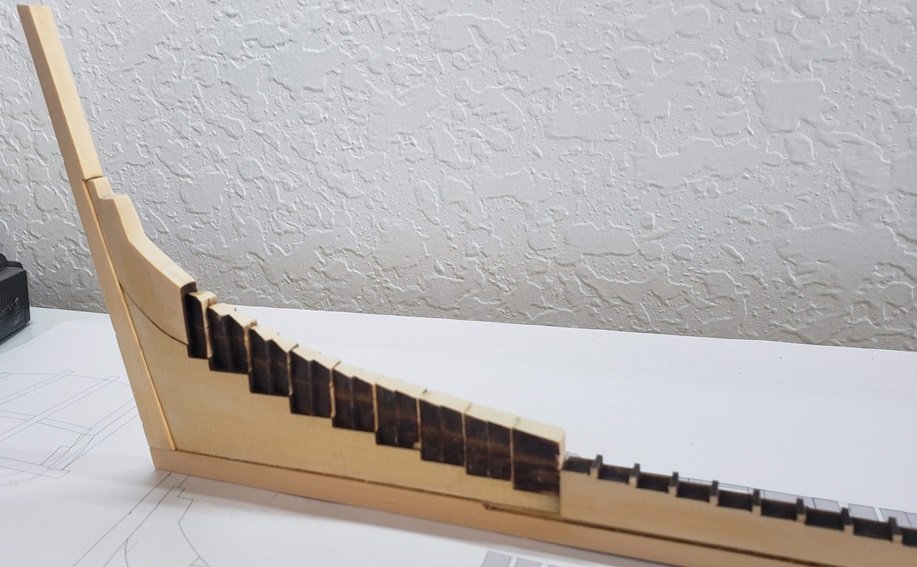
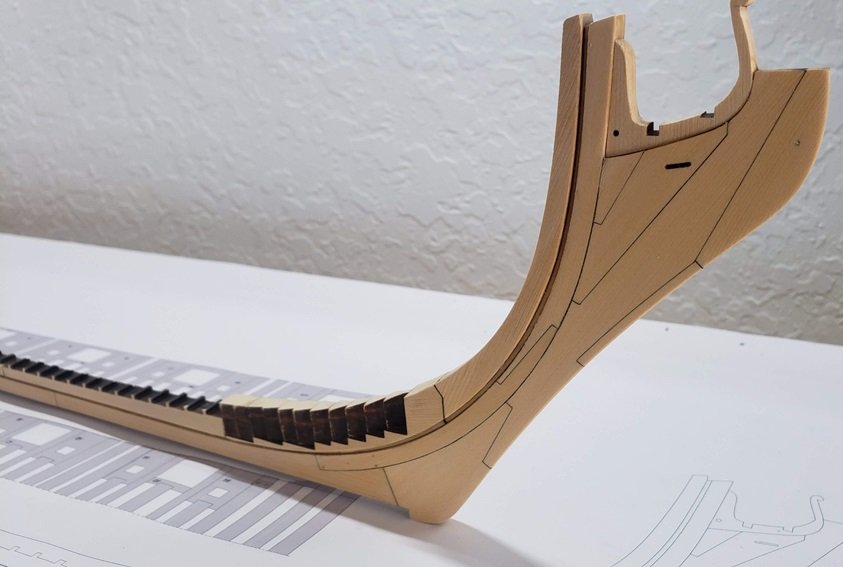
Hello everyone:
This seems to be the day to start Speedwell logs.
I received my first 2 chapters about a week ago. I don't think I will be buildings as fast as some others but I have started and we are off & running.
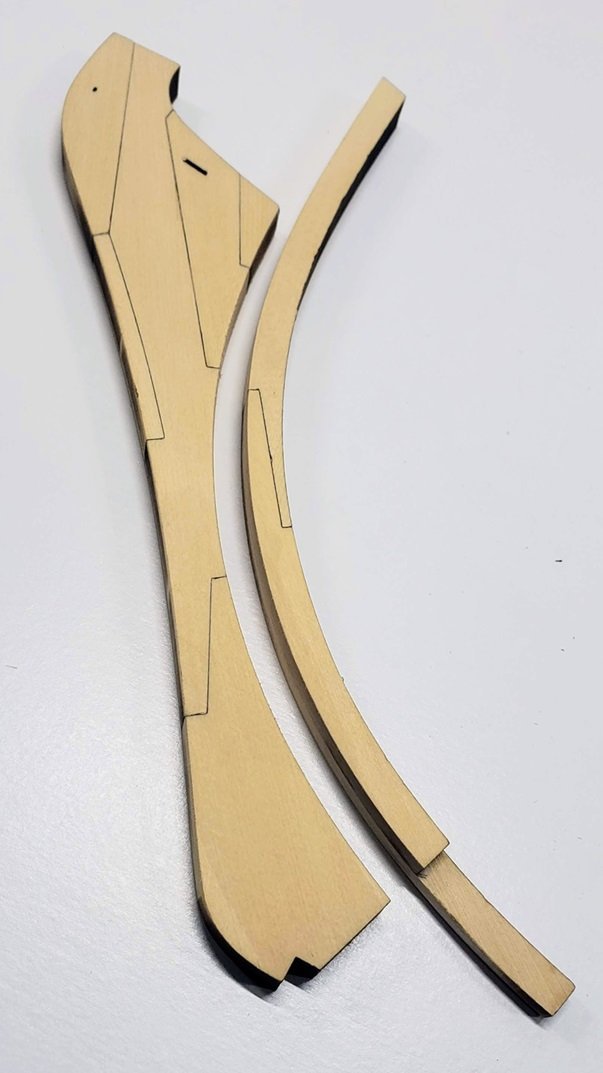
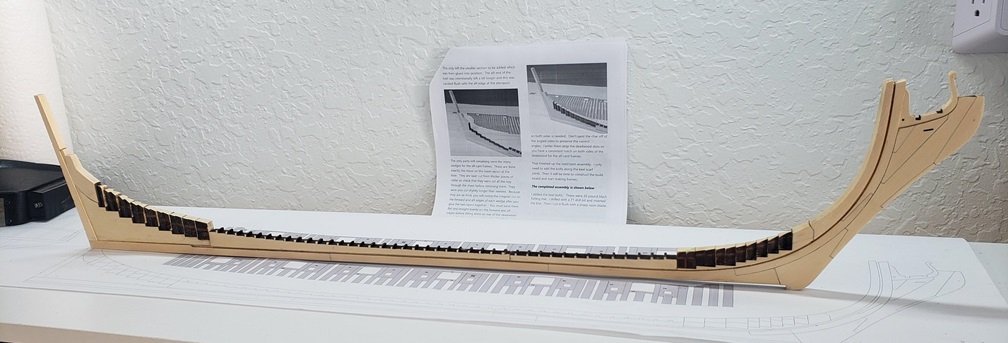
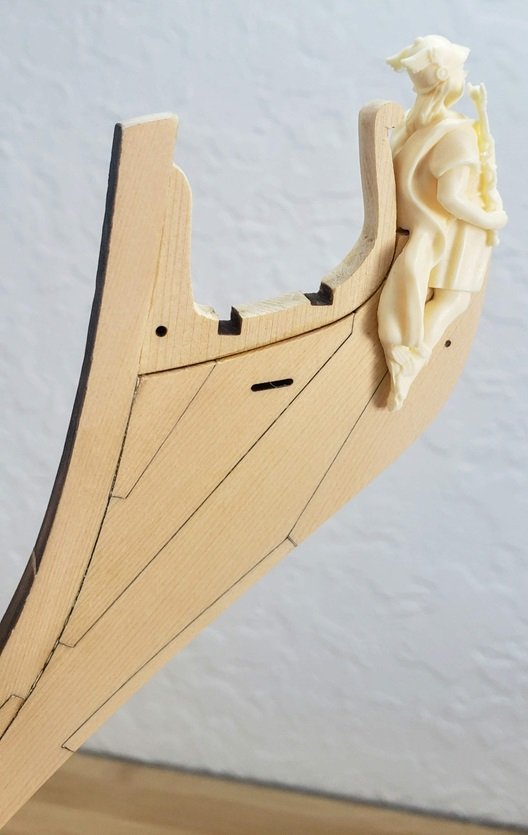
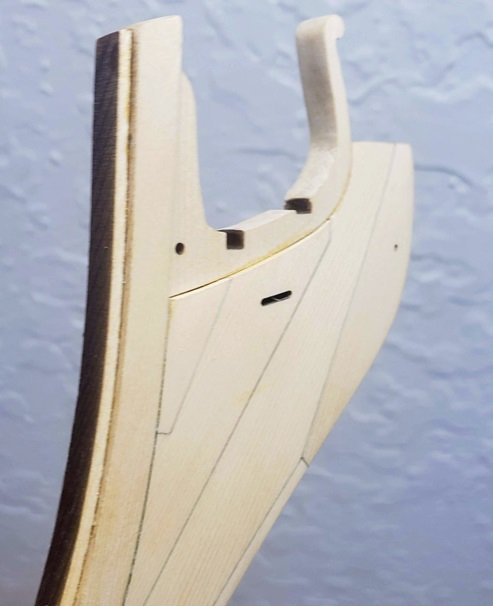
My only thought so far is when attaching the two curved pieces together make sure they are as exact as possible. Mine were off a little, and then you have to sand them to get a good fit with the stem assembly. And trust me - you don't want to sand any mating surfaces you don't have to...
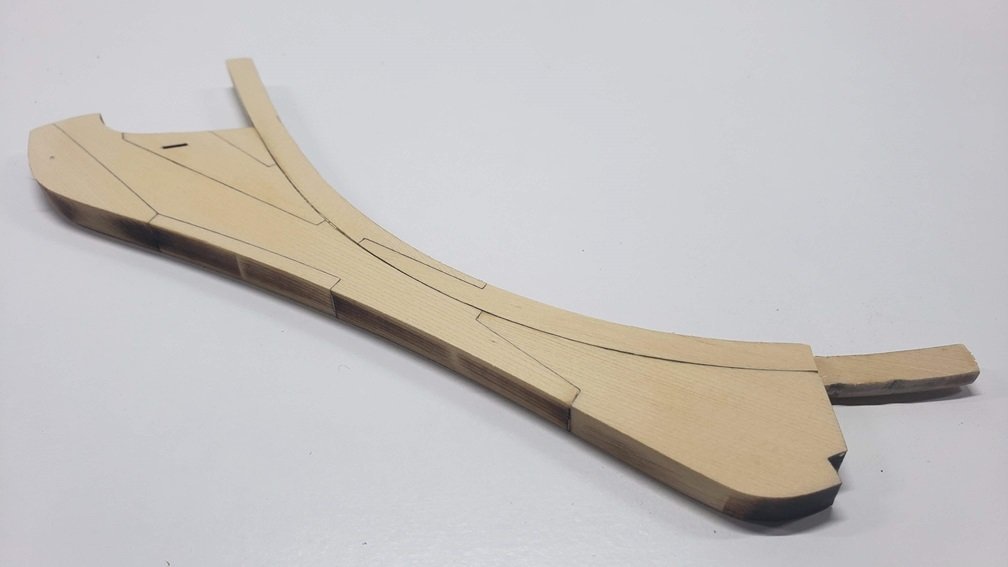
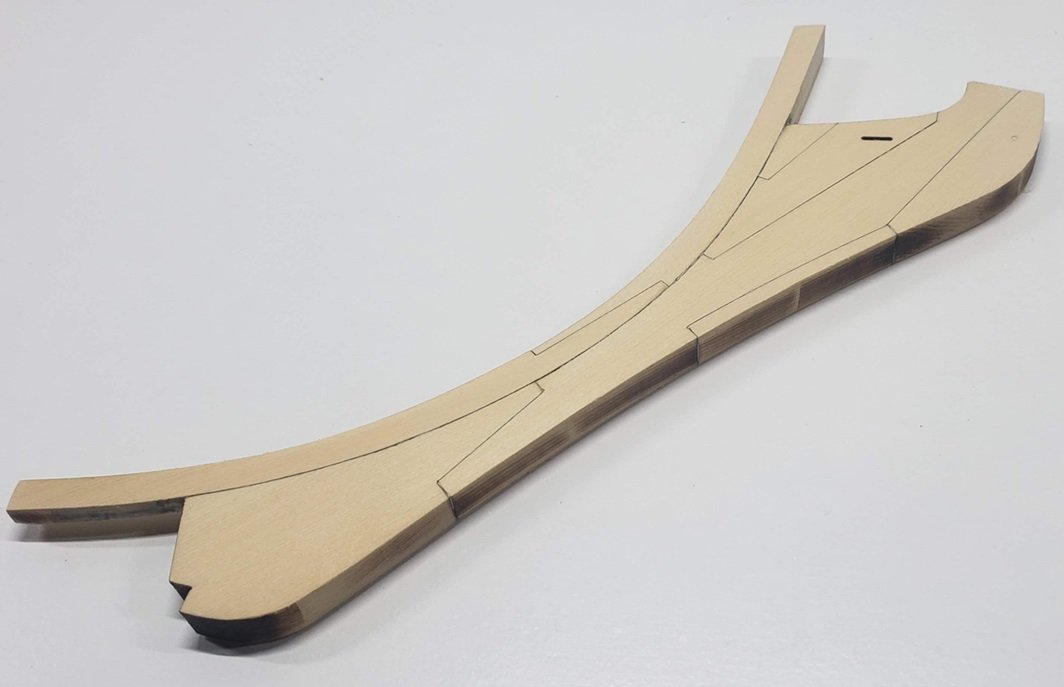
I think I finally got a decent fit. It took a lot of extra time but worth it. Now a little extra sanding for the figurehead and the fancy piece on the top. Then it will be time to get the plans out and lay the keel.
I also hope we can start a group build. It might encourage a few others to join us.
All for now
Steve
- Matt D, Ryland Craze, JeffT and 10 others
-
13
-
Wow - I know you said this was going to be a very detailed model - but damn....
Love the details. Hope the will be part of the kit - or at least available.
Awesome stuff....
- FrankWouts, Jack12477 and mtaylor
-
3
-
Thanks for the update...👍
- FrankWouts, mtaylor and Chuck
-
3
-
Beautiful work -- always look forward to your updates.... Keep it up!!!
- mtaylor and billocrates
-
2
-
Very nice -- one of the cleanest model I have seen.... 👍
- James G, FrankWouts and Dave_E
-
3
-
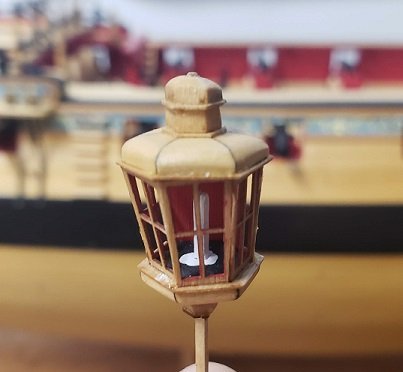
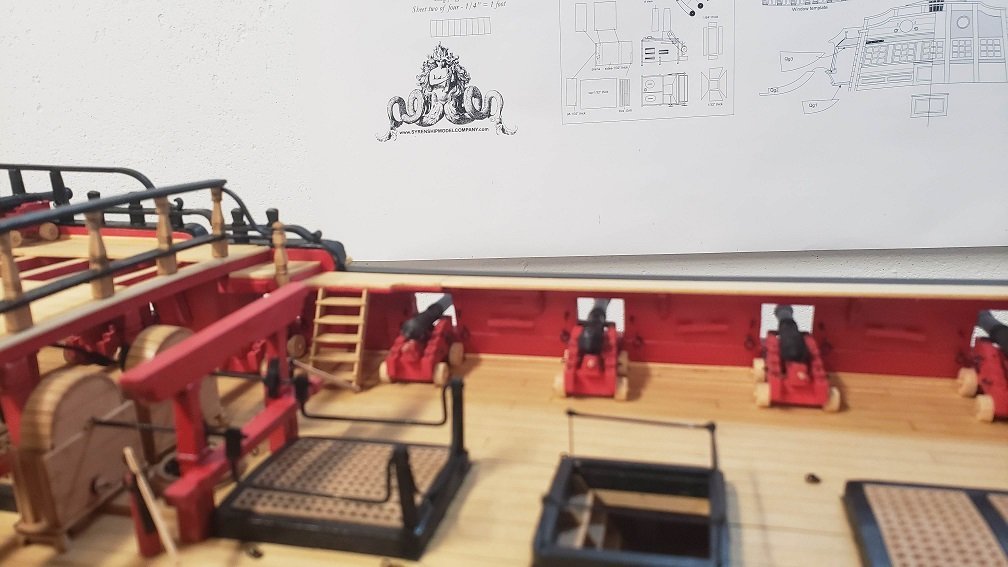
Well, I'm calling the Winnie a finished ship. Well, 99.5% finished. Everything is done with the exception of installing the bumpkins and the ships lantern. Both of which are ready to install but the model has a trip from Michigan to Florida ahead of it so I'm going to wait in installing those for safety reasons. And I almost forgot the 2 seats of ease which will be installed tomorrow.
Below are a few last pictures.
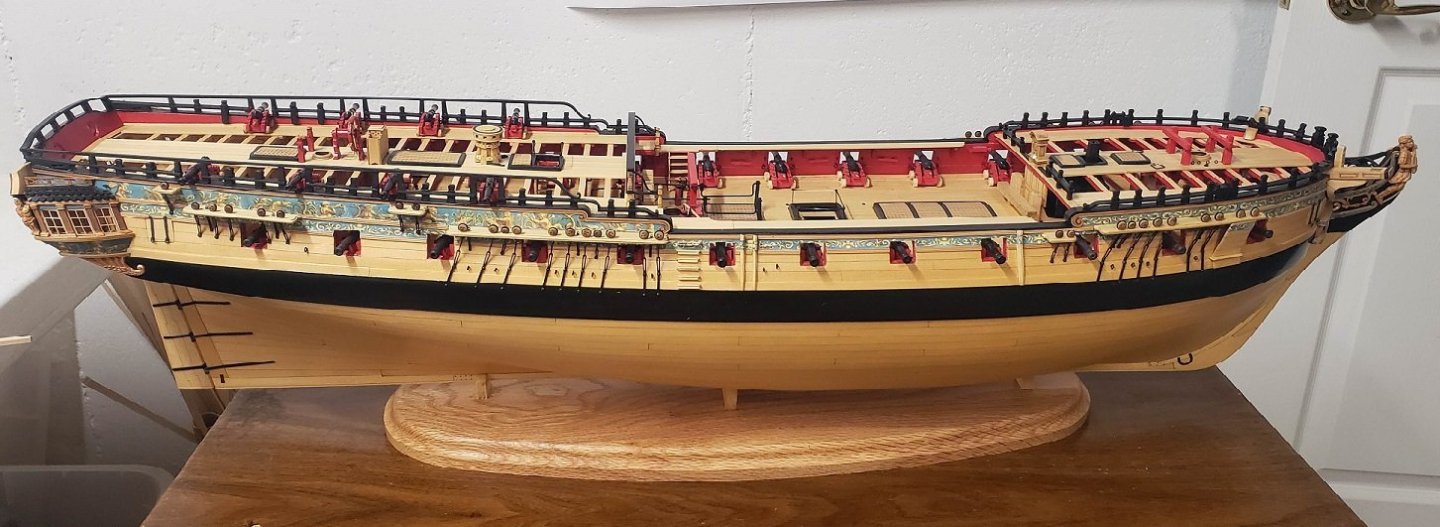
It has been a fun journey and it sure would not have turned out as good as it did without all the tips & project logs of those before me. Thank everyone for all the likes & comments. They sure help to keep me motivated.
A special thank you to Chuck for the plans and everything to make this possible. It is a beautiful model......
Time to clean up the shop & get things ready for the next project.
Steve
-
Just a short update since I am officially done with Chapter 11. I am still debating about adding the swivel gun but they are easily added later.
Moving on to the last chapter. I will have to keep reminding my self to be patient & take my time...
Steve
- FrankWouts, JpR62, Chuck and 5 others
-
8
-
Wow - I can't believe it has been almost a whole year since my last update. Mostly because I have been in Florida all winter while the ship has been chillin in Michigan.
Anyway, I have been back in the shop for a while and am in the process of finishing up Chapter 11. While not done yet it is pretty close.
Some photos of the current state of affairs is below.
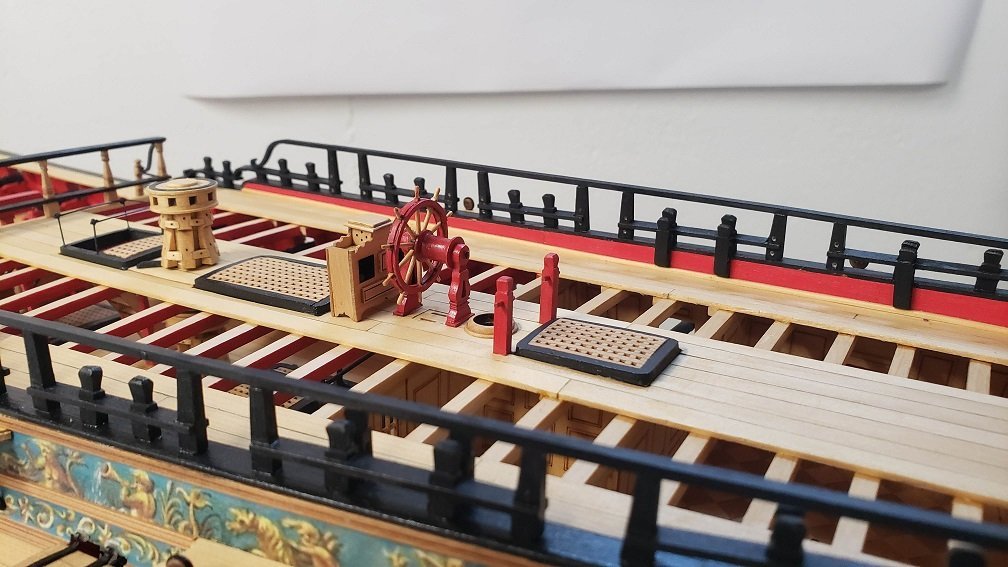
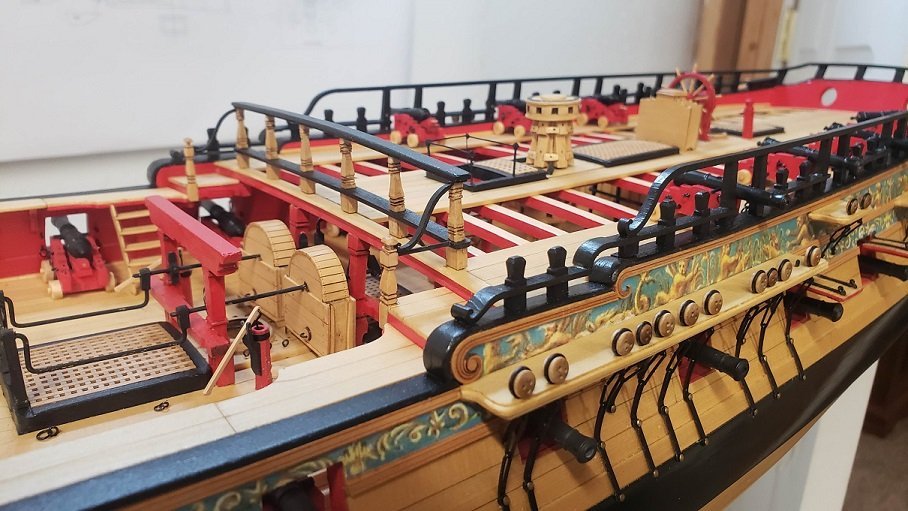
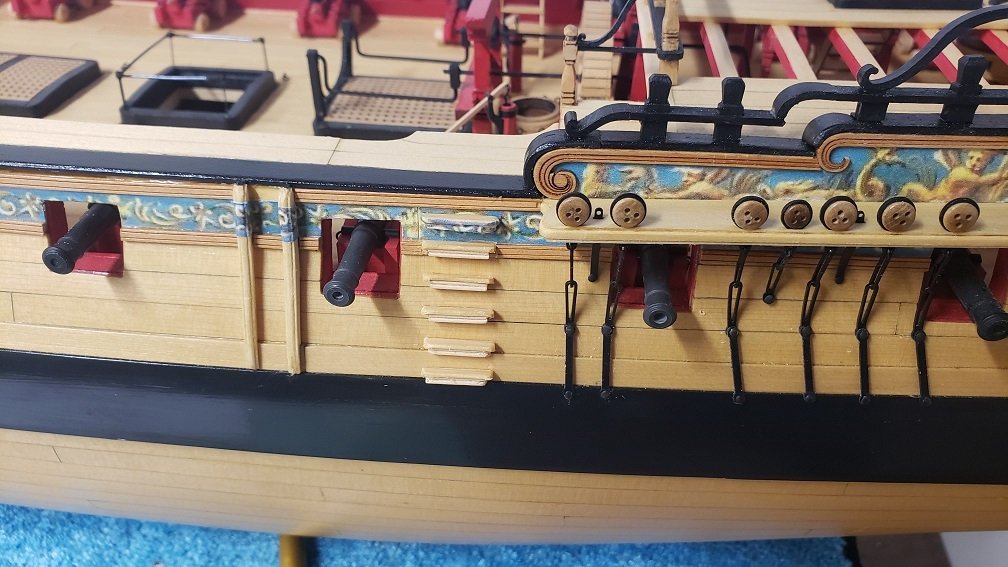
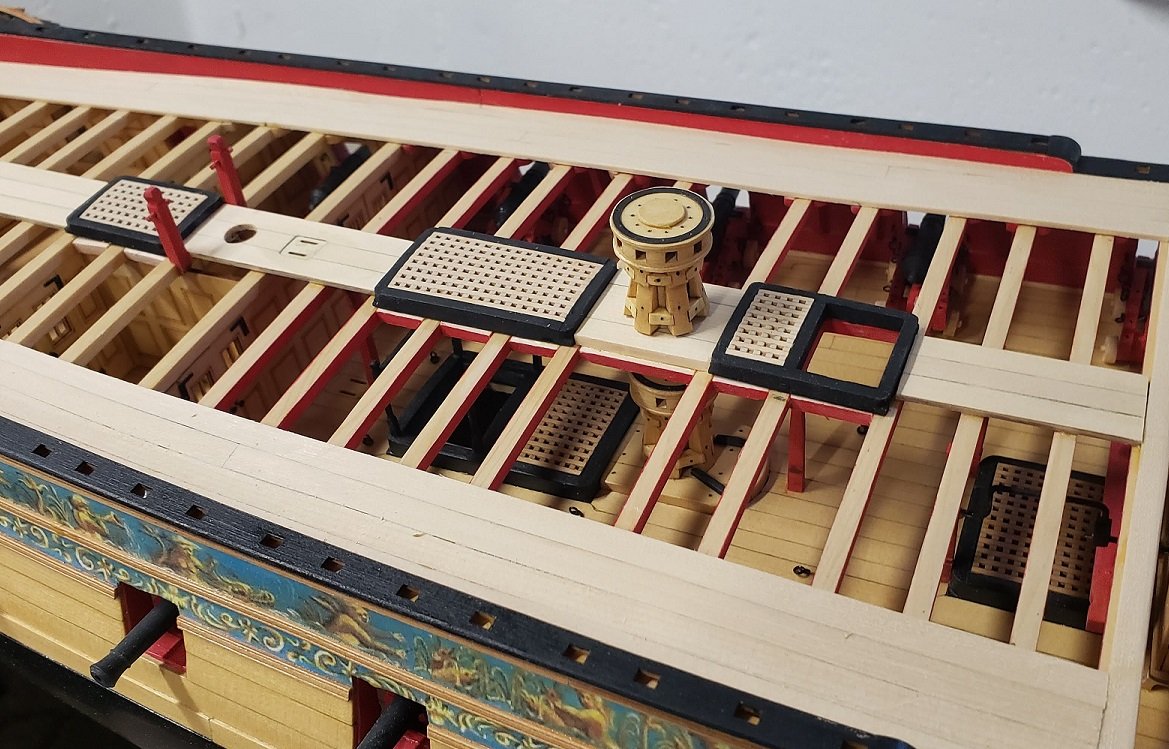
Finished up the gangways & ladders. It was nice to finish up the inside details
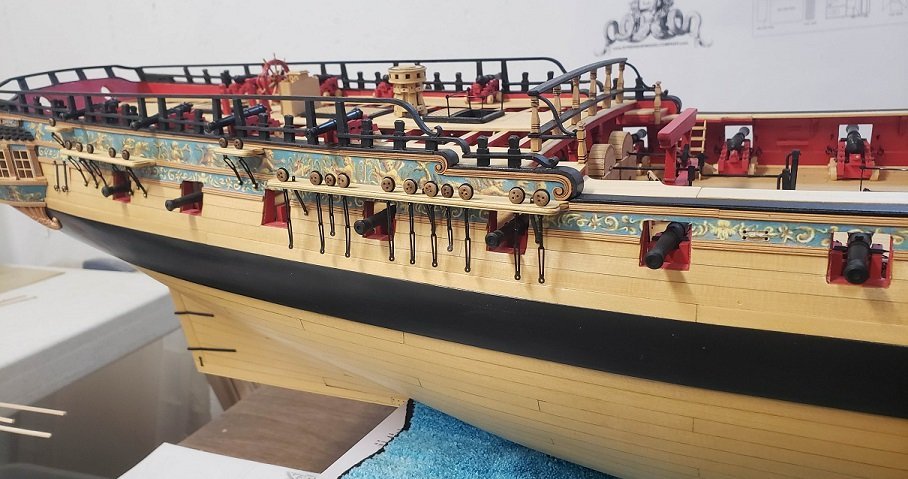
I have to finish attaching the chain links, the fenders & steps and clean up the nail heads & some other little details. Then I'll be moving on to Chapter 12 in a while.
Looking forward to that....
Steve

-
Beautiful job Rusty. Love the cherry wood and you did a fine job. Congrats!!!
- Rustyj and FrankWouts
-
2
-
Wow -- awesome stuff Chuck. I always look forward to your updates. Your a very busy young man... Can't wait to get my hands on one down the road....
- scrubbyj427, mtaylor, Chuck and 2 others
-
5
-
-
That is a shock to hear this. I have followed Bob for many years in this forum. May he rest in peace and my thoughts & prayers for his family....😢
- Matt D, FrankWouts and Ryland Craze
-
3
-
Congrats Chuck on a beautiful model. I think all of us have learned a great deal from your talents in both design and modeling skills. I know I have!!!
Speedwell looks like a fantastic project & I have purchased both books a few months ago. Pleasantly surprised to see it at 3/8 scale. Hope that will be the 'production' scale, if so I am definitely in. It will make things a little easier with these fingers....
Enjoy your well deserved vacation....
- Chuck, Edwardkenway, Ryland Craze and 2 others
-
5
-
On 8/20/2022 at 11:07 AM, glbarlow said:
This is some really nice work, not only the model, also the photography. Well done on both!
What is your method on removing char from the cannon trucks, they look great?
Thanks everyone for the great comments. Not sure I deserve them but we are our own worst critics I think.
I just used a small sanding stick very much like a finger nail file. They were a little time consuming but most of them turned out pretty good.
Steve
- FrankWouts and glbarlow
-
1
-
 1
1
-
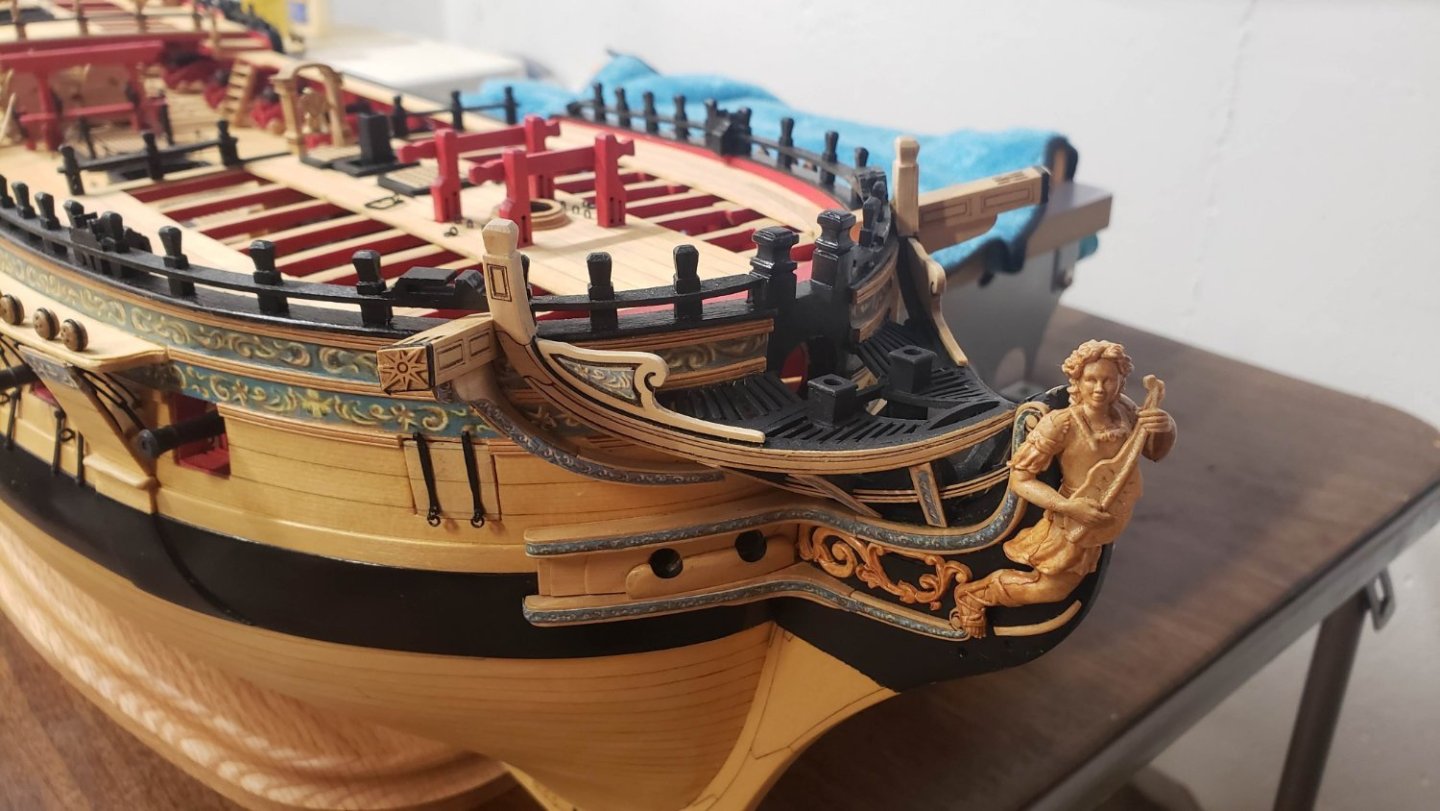
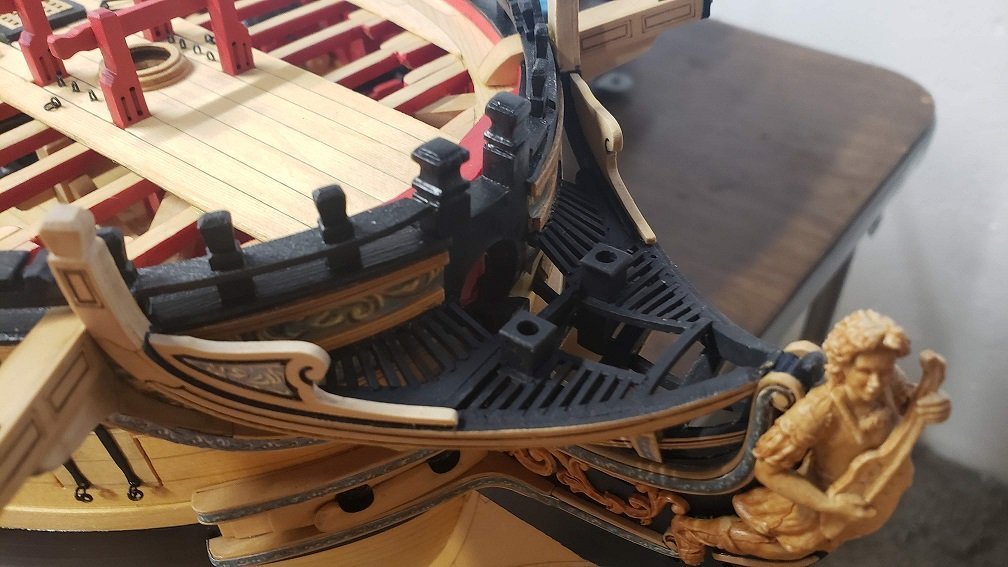
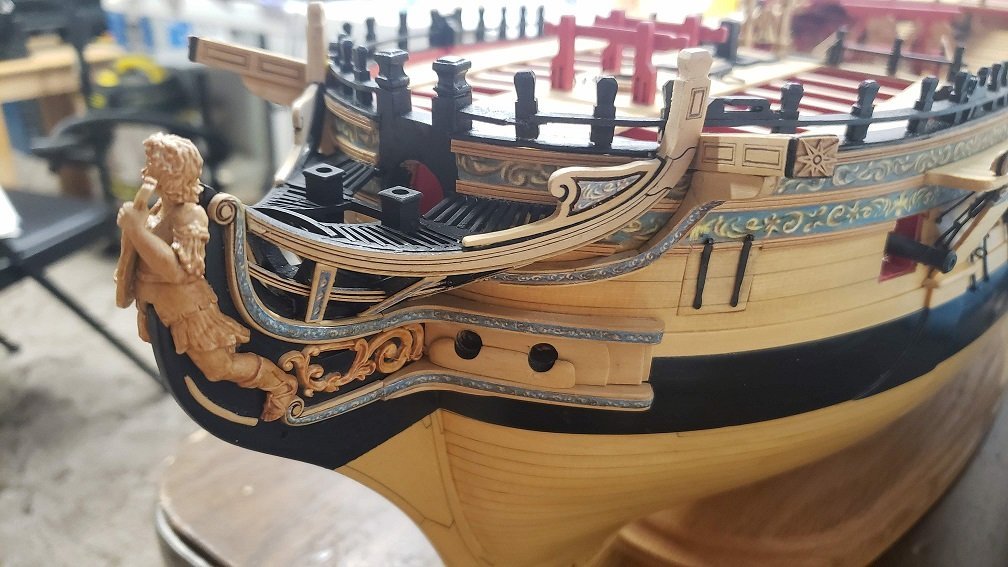
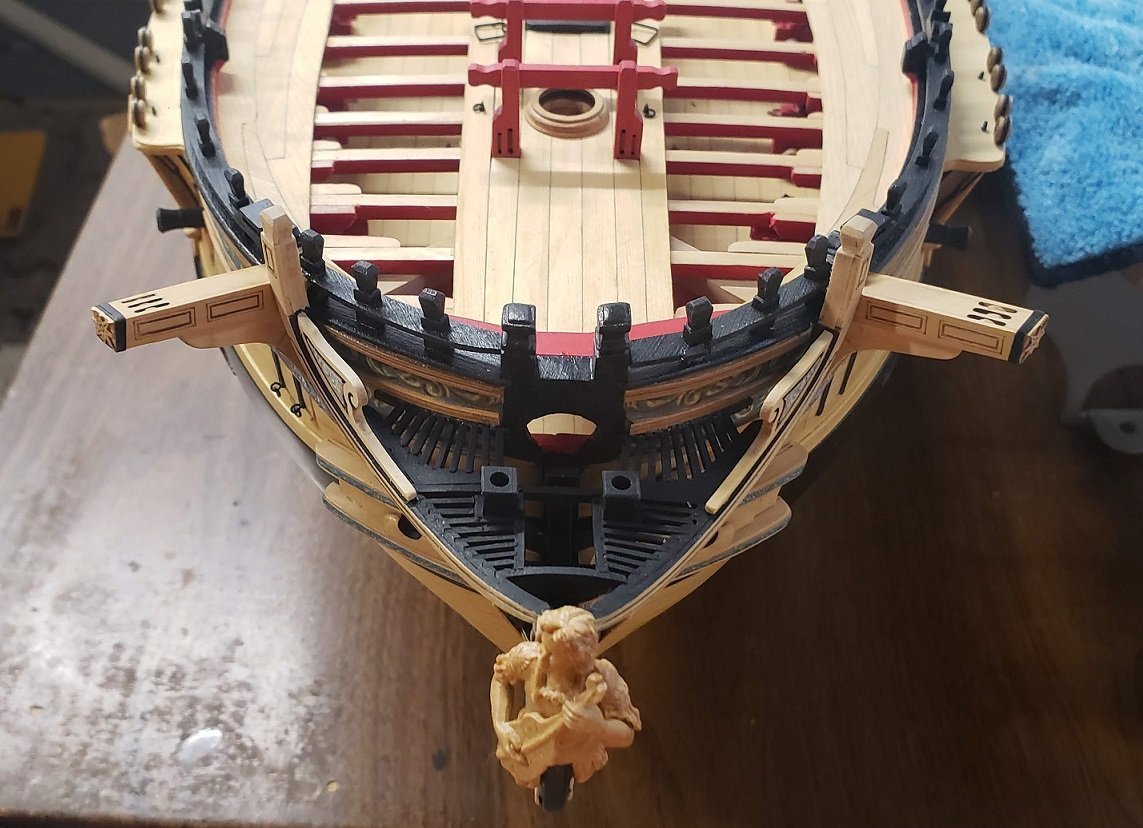
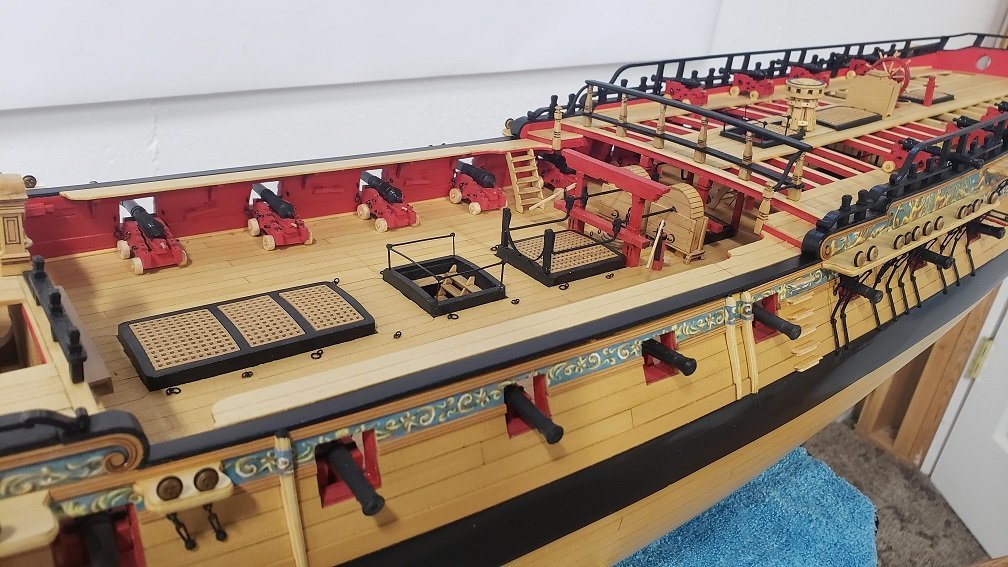
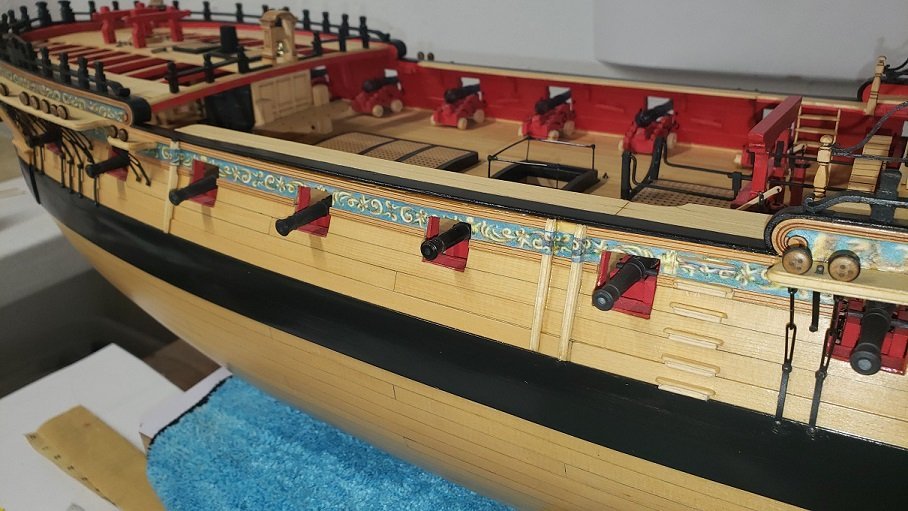
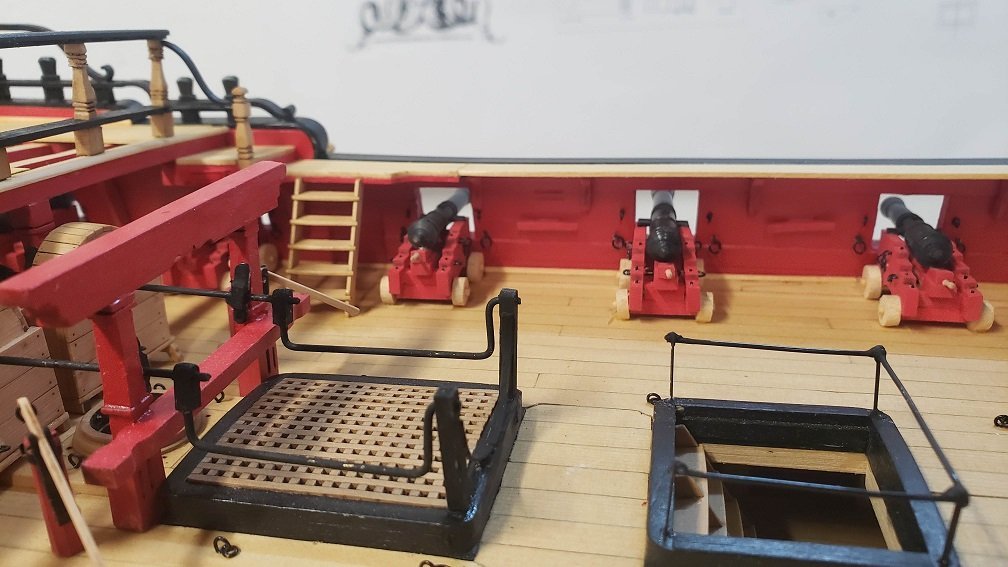
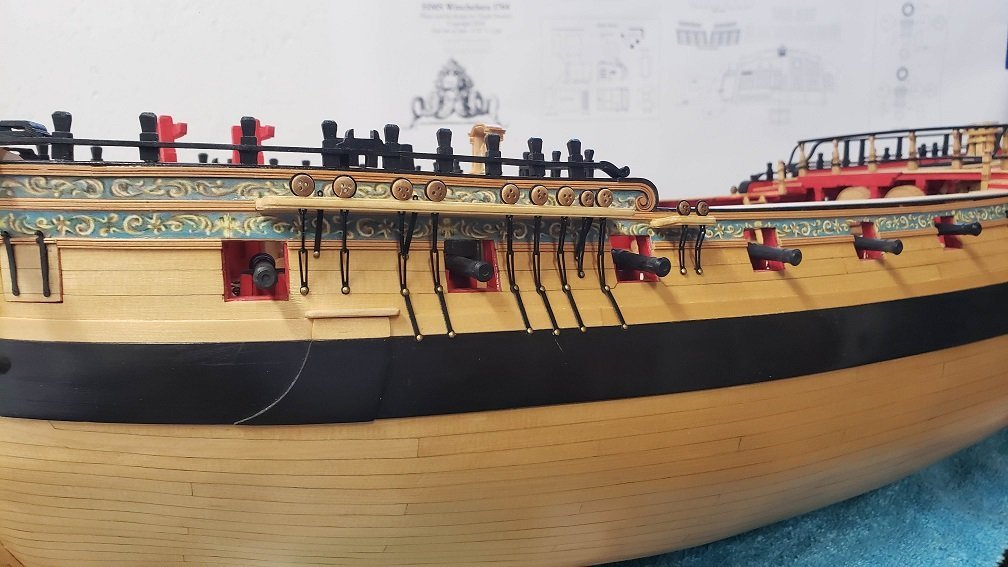
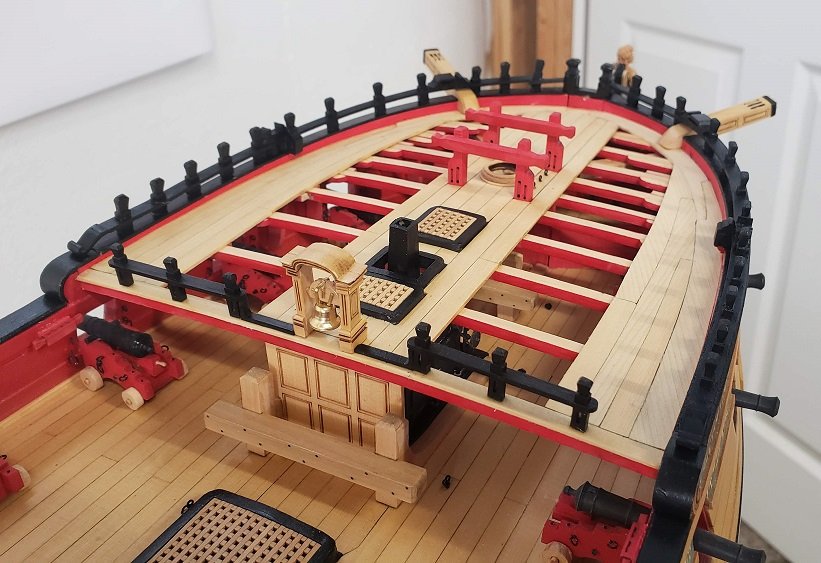
Here are some pictures of my Chapter 10 work. It is pretty much finished except the eye bolts along the rails. I have all the holes drilled but need to make more eye bolts & rings. I have not done the ships wheel yet as I forgot to order it with the Chapter so will probably wait till Chapter 12 is available & get that done then. I also need the chain plates, etc, for Chapter 11.
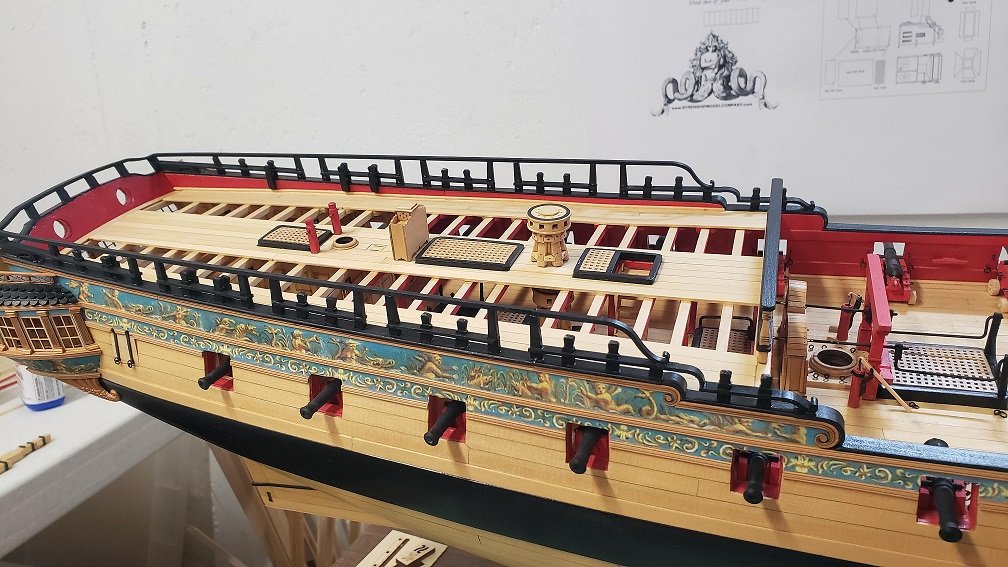
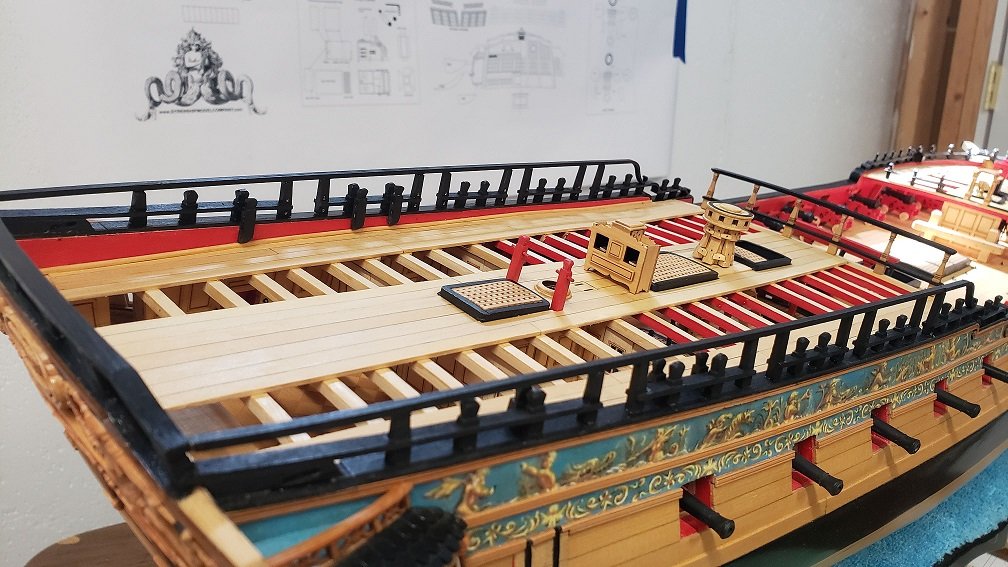
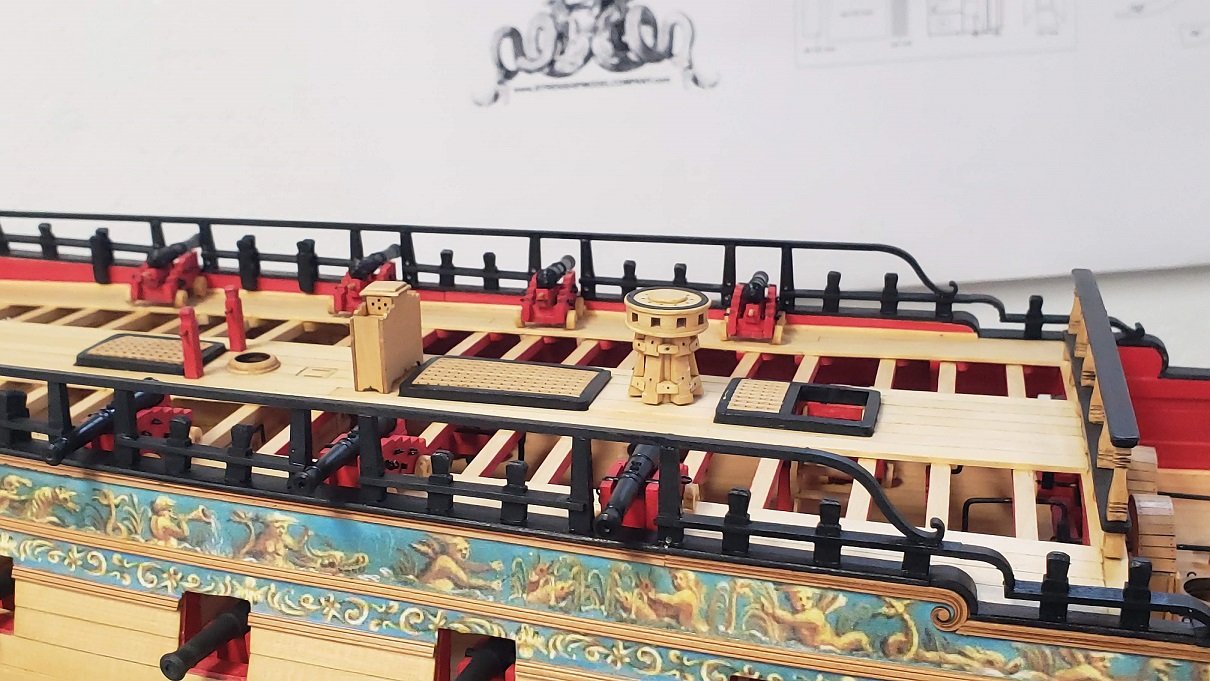
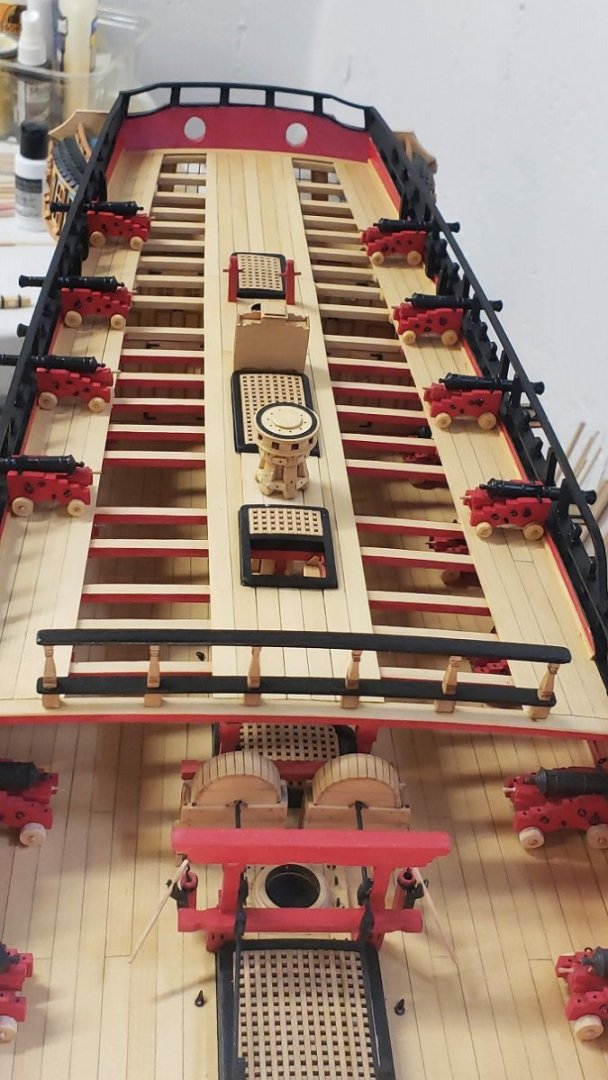
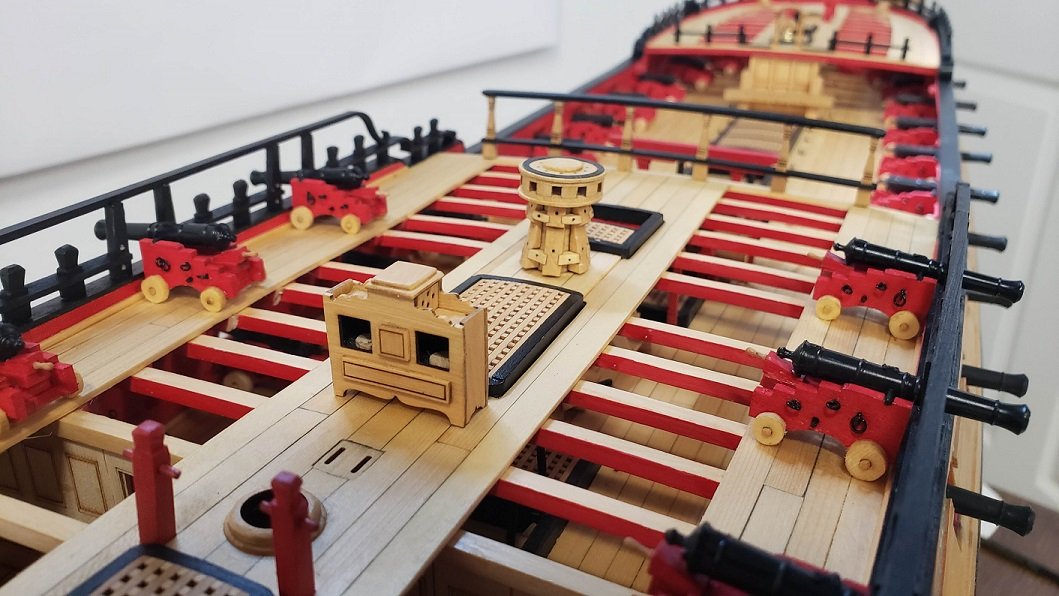
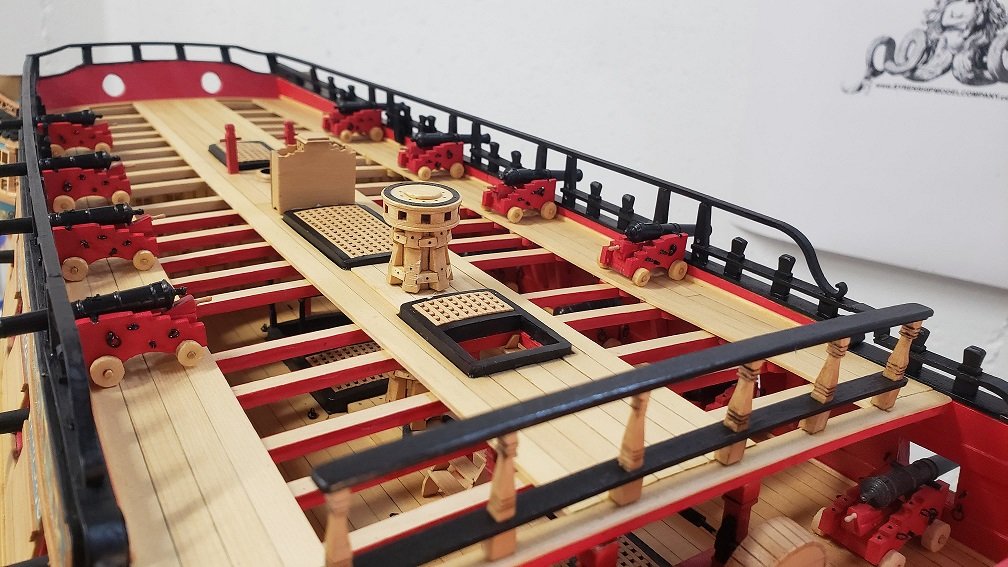
None of the cannons are attached yet. They are pretty glossy so I might dull them down a bit. I think I will put the emblems on the Binnacle but leave it natural color. Also leave the capstan natural - I couldn't bring myself to paint it.....
Pretty good progress for the last 3 weeks. Till next time.....
Steve
- FrankWouts, WalrusGuy, scrubbyj427 and 12 others
-
14
-
 1
1
-
Hello everyone:
It has been a long time since my las update - almost 6 months. Been pretty busy with life and a few other things.
I have managed to get in some shop time lately and thought I would let you all know I'm still plugging away.
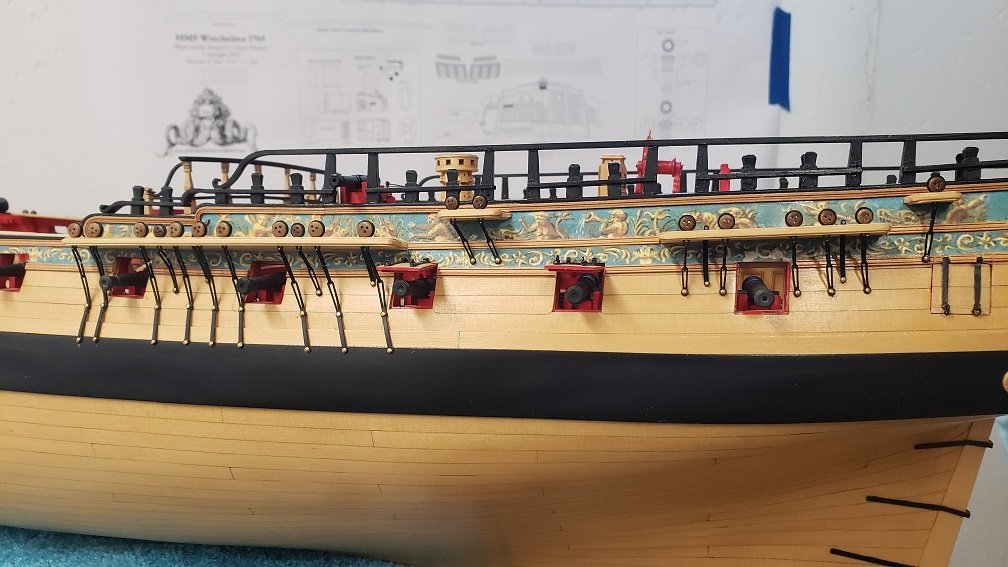
I have finished up Chapter 9 (still a couple things to add) and have a small start on Chapter 10. The planking on the sides of the fore deck proved to be quite a challenge.
Below are some pictures to show my current state of the Winnie...
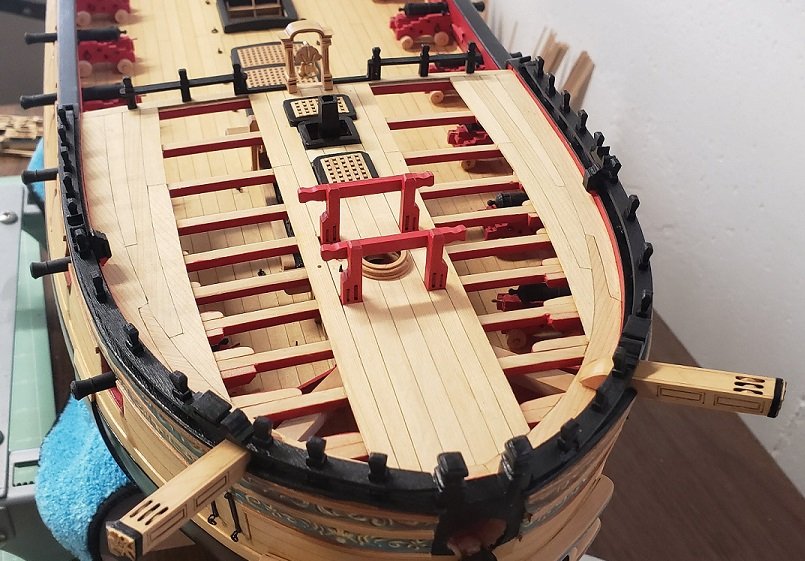
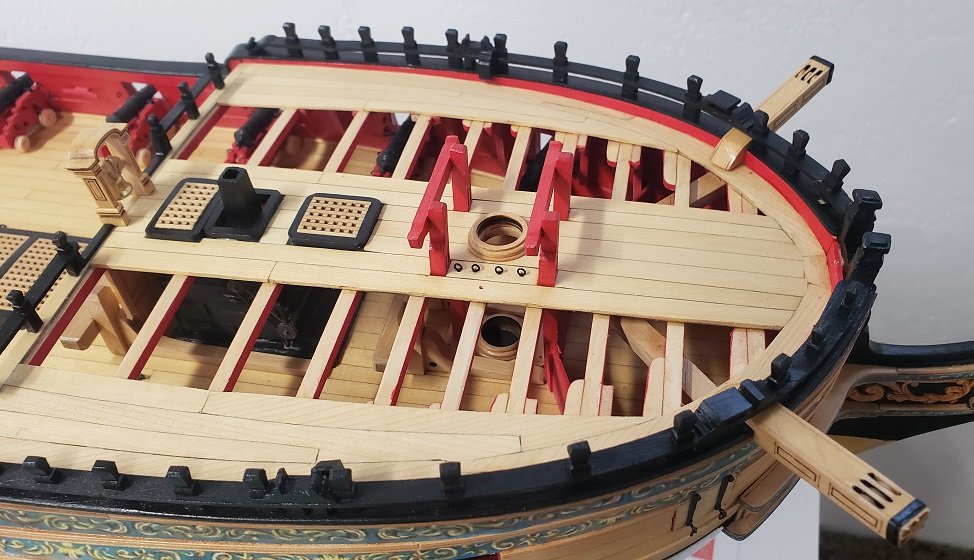
And my beginning of Chapter 10.....
Hopefully it won't be 6 months before I have another update.
Be safe everyone....
Steve
- Rustyj, scrubbyj427, FrankWouts and 10 others
-
10
-
3
-
I love the added details. Beautiful work....👍


Sloop Speedwell 1752 by Capt Morgan (Steve) - Syren Ship Model Company - 1:32 Scale - POF Sloop
in - Kit build logs for subjects built from 1751 - 1800
Posted
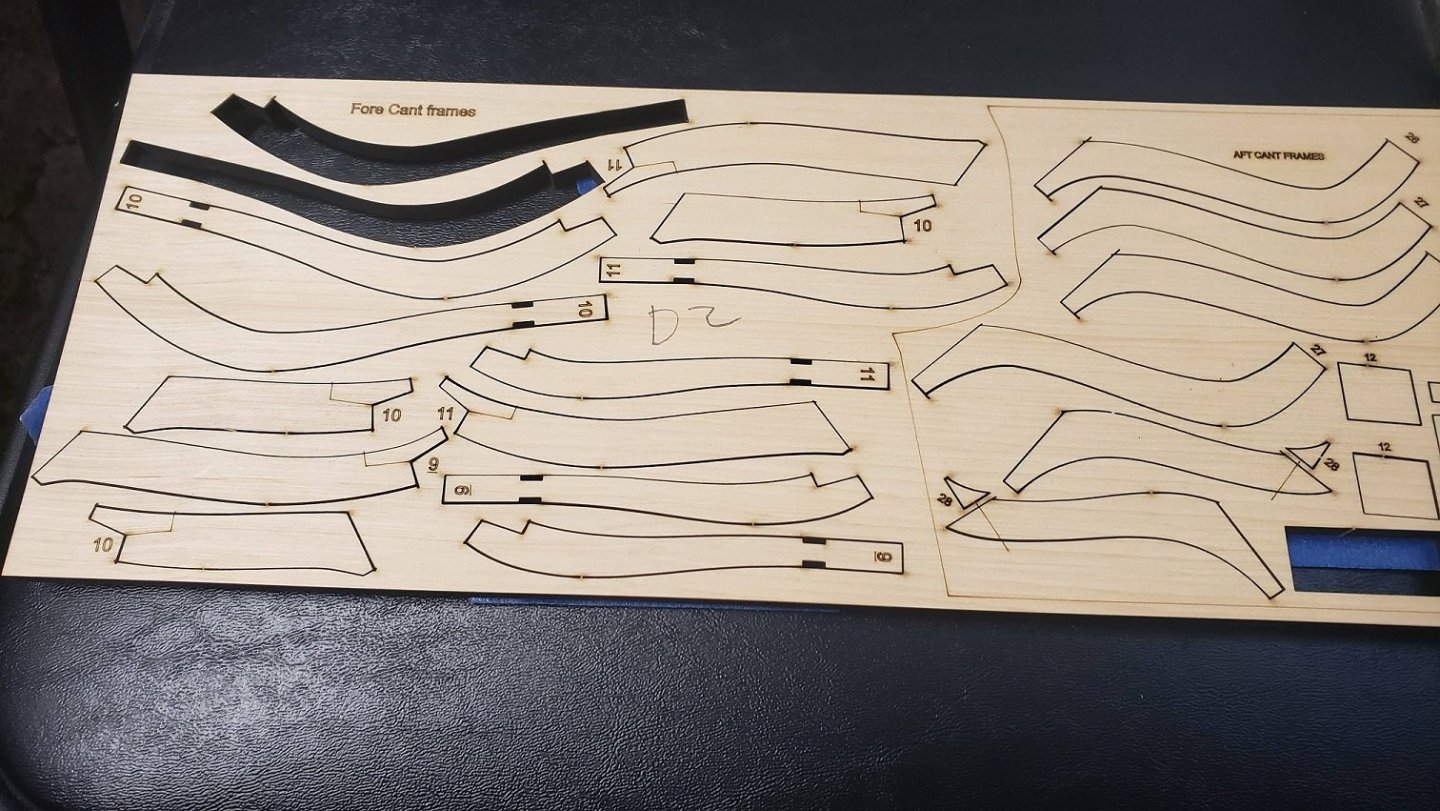
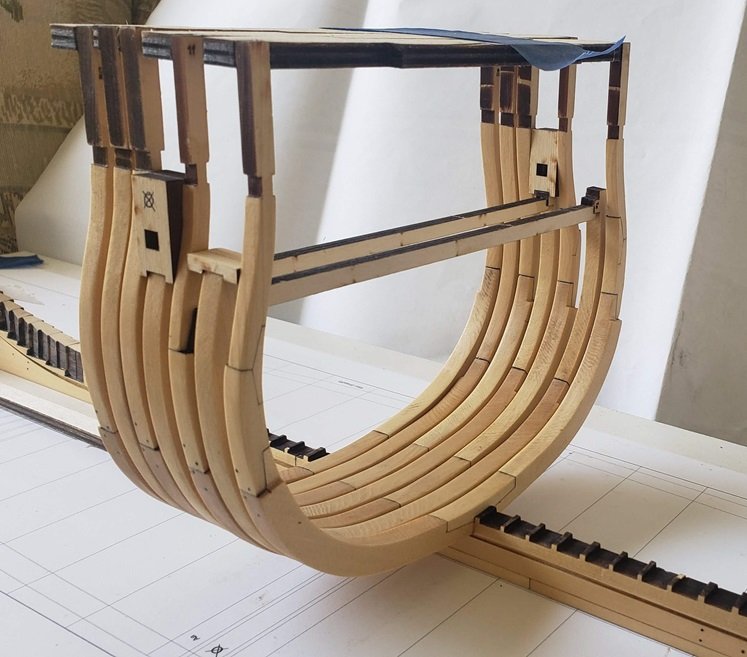
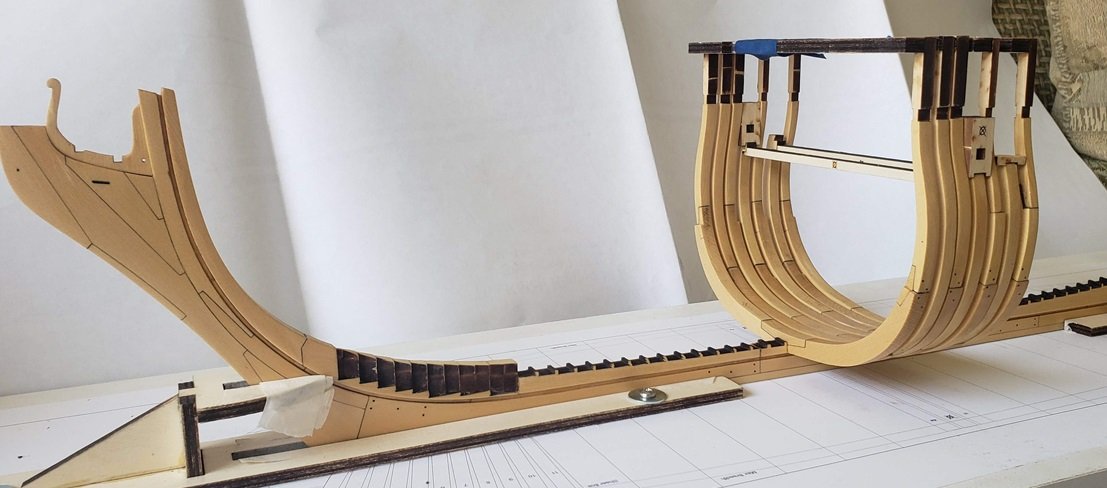
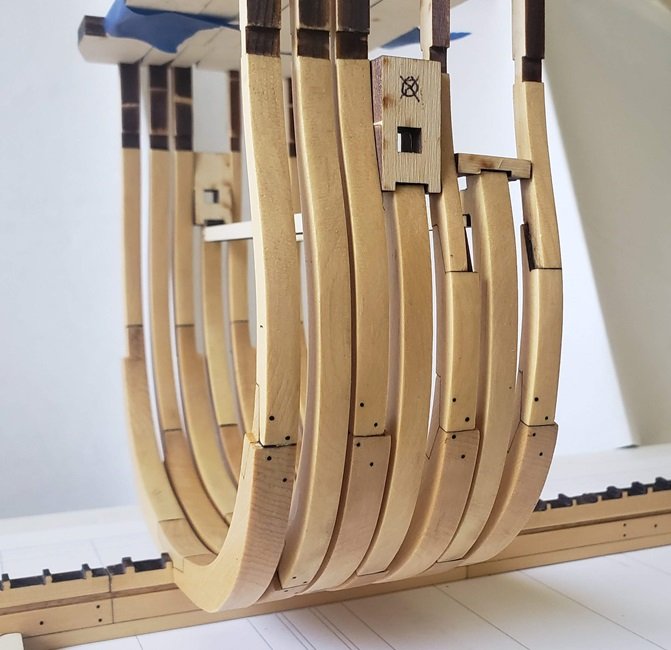
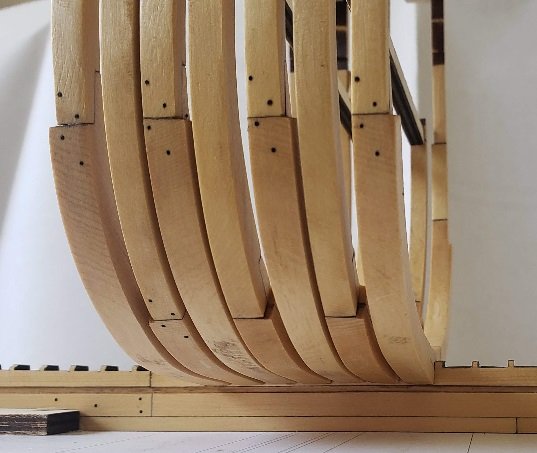
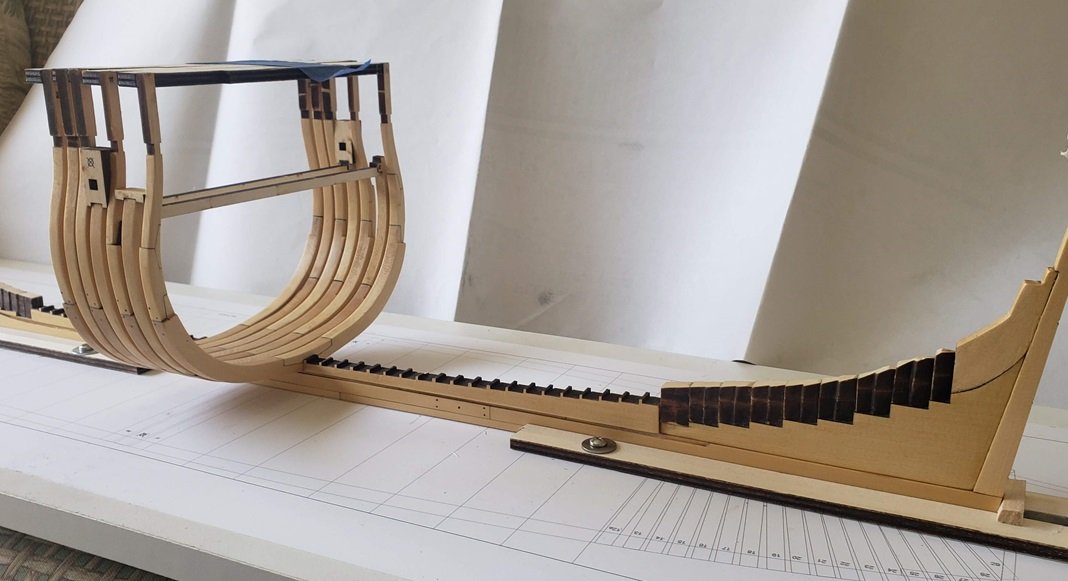
Hello everyone. Its been a while since anyone has posted any Speedwell progress. I have finished up Chapter 2 and everything seems to be progressing pretty good. I had to do my fair share of de-construction of the frames a few times but it's all squared up pretty good now.
I do have a question. My plans show the top plank as 5/32 wide (above) and Chucks and Mikes (below) show it as 7/32. Not sure which is correct.
Its going to be a while before I have to worry about that but it will make a difference when it comes time to cut the tops of the frames.
Pretty much on hold now until Chapter 3 parts become available again. I missed the day that they were available on the website & they were gone before I could get one.
Hope everyone is moving along out there...
Steve