HOLIDAY DONATION DRIVE - SUPPORT MSW - DO YOUR PART TO KEEP THIS GREAT FORUM GOING! (Only 20 donations so far - C'mon guys!)
×


Ulises Victoria
-
Posts
1,790 -
Joined
-
Last visited
Content Type
Profiles
Forums
Gallery
Events
Everything posted by Ulises Victoria
-
-
 Quote from previous post by Chris: The length of the hull, from stern to figurehead is 1066mm. With the bowsprit and mizzen boom, it increases to 1582mm, or there about. After working on it for so long, it doesn't look that big anymore..... Regards
 -
Hello JD. Flat (matte) varnish has always been one of my favorite things to use when securing rigging knots. I honestly don't see a problem with "requires setting overnight". You tie the knot, apply the varnish and forget about it!
-
Chris!!! How nice to hear from you again! And better yet when you bring such wonderful good news about Victory and Prince!! Thank you so very much for the updates, and so glad you are well and getting in shape.
-
Hello Sunsanvil. That deviation is nothing. Do not spend much time worrying about that. Instead, take much care to glue the bulkheads at exact 90º against the keel.
-
Comparison of Victory kit manufacturers
Ulises Victoria replied to dchrismiller's topic in Wood ship model kits
Because there is nothing definitive. I am one of those eagerly expecting this kit to come into production. At 1/64 it will be a behemoth. I don't know if I will ever build it, but still, I want it.- 19 replies
-
- 3
-

-
- Victory
- kit manufacturers
- (and 5 more)
-
nails brand
Ulises Victoria replied to michael101's topic in Building, Framing, Planking and plating a ships hull and deck
I bought these N scale RR nails some time ago. I use them mainly to hold planks in place while glue dries. There was a one star review of them claiming they were waaay too small. That one star review was what made me purchase them immediately https://www.amazon.com/gp/product/B001BHLR4E/ref=oh_aui_search_detailpage?ie=UTF8&psc=1 -
In actual practice, there wasn't a fixed length for the planks in a ship. It very much depended on the availability of materials, so a rigid rule is almost impossible to establish. I most of the time choose a length of 120 mm for my planks. Why? just because 120 can be divided exactly by 1, 2, 3, 4, 5, and 6 and this sometimes facilitates some calculations.
-
After tying several thousands of clove hitches, I find it even more difficult to tie an overhand knot.
-
Indeed! I like to build my models to win contests, and then as decorative elements in my home. I had a really nice experience at a modeling contest in San Antonio, TX a few years back. I presented my Bounty in the contest. There were these two senior persons next to it and they weren't aware that I who was standing next to them, was the builder. I overheard one of them saying "Wow... this is one of those things that you can only dream about doing". These are the moments that make worth all the tears, sweat and blood you put in your models.
-
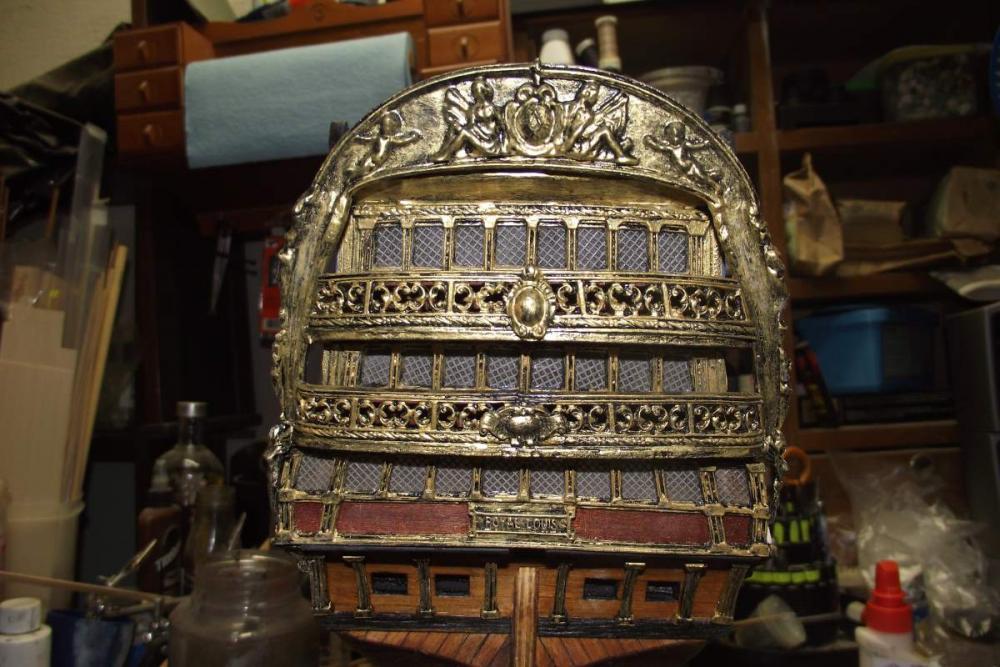
Well these are great news. I wish this had happen some time ago and you had the time to redesign the transom of the Royal Louis. That area is giving me nightmares. (See my build log near the end.)
-
That kind of racing boats usually had a really shiny surface. It's supposed that the shine gave them more speed, since the gloss paint is less rough than the flat. As far as the roughness of the paint that statement is true; how much more speed they actually got is debatable, IMO. But... as always been said, it's your ship. Do with her as you please. I would airbrush several coats of a clear varnish, preferably of the same brand as your paint. Looks like you are proficient with the use of an airbrush. How flat or shiny is up to you. Oh, and yes... how can you keep your workshop that clean???
-
Sjors. Great planking job. I like the way you left the planks a little short around the gunports to make a frame for the lids. What color did you use to paint the red in the bulwarks? Best wishes Ulises
-
Oh yes! I do like those and have profound admiration for the craftsmanship involved in making them. But I would never attempt to do something like that. Besides being outside my level of skill by a mile, I would rather invest my time and effort in making something more closely similar to the original. But as you said... that will never happen in a kit!
-
Thank you Pat for your comment on my ship and your wishes for my sis. Dr. said she is progressing very good. Hmmmm... what is TLC?
- 786 replies
-
- 1
-
-
- Royal Louis
- Finished
- (and 1 more)
-
Outstanding! Is the word that comes to my mind. So neat and clean. Hats off to you, Mark. Ulises
- 652 replies
-
- 3
-
-
- royal william
- euromodel
- (and 1 more)
-
Mindi!!! How nice to see you back!!! Somehow I missed your first post. Your Endeavour is looking great. Hope to see more of it soon. Again, welcome back!!! Ulises
-
I am a late comer to this topic. The question asked was : Does it have to be wood? In my opinion, if it was wood in the original, then yes! It has to be wood. Unfortunately this is not always practical in ship modeling. Making belaying pins at 1/90 or smaller scale is almost impossible. I would love to see (and I am yet to see) a kit where everything that was wood in the original, is wood in the kit. My other hobby and part business is turning pens. Wood is my favorite media. I turn acrylics only because they are much more colorful and some people likes the reds and blues and yellows and sparkling goldens. I have also turned some corian, but it comes out very dull. There are not bright colors in corian, So to me, wood is wood and by far, my preferred material to both make ships and turning pens.
-
Wow!!! You certainly did a big advance between the last and the previous photo. Why didn't you post photos of the process???
-
Sjors: Thanks for counting the photos for me. And thanks for your kind words for my sis. We will move her to a special care home this Saturday so she can have better care. I am actually a lousy nurse
- 786 replies
-
- 3
-
-
- Royal Louis
- Finished
- (and 1 more)
-
Thank you Arthur! My sis had a small crack in the bone where the femur joins the pelvis. It was rather small, so they put a "nail" and a plate there. No need for prothesis Thank God. Thank you and all who posted above for your good wishes!
- 786 replies
-
- 2
-
-
- Royal Louis
- Finished
- (and 1 more)
-
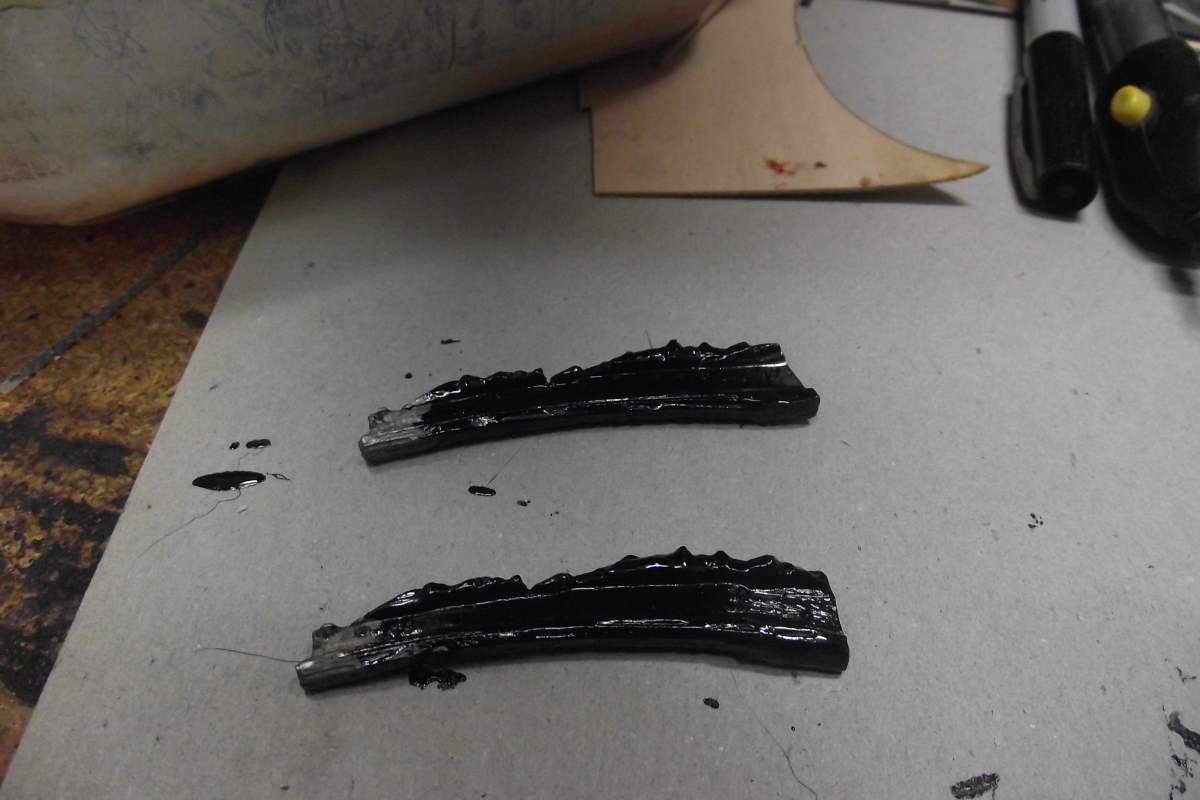
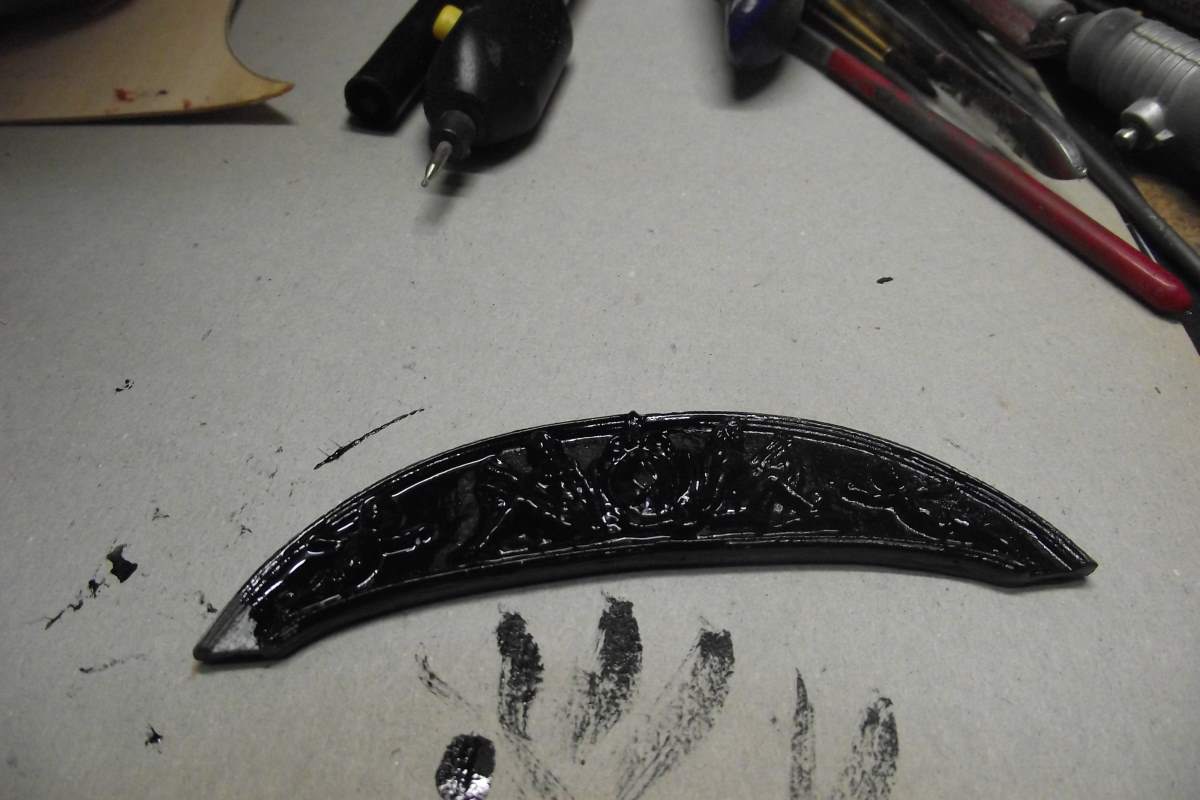
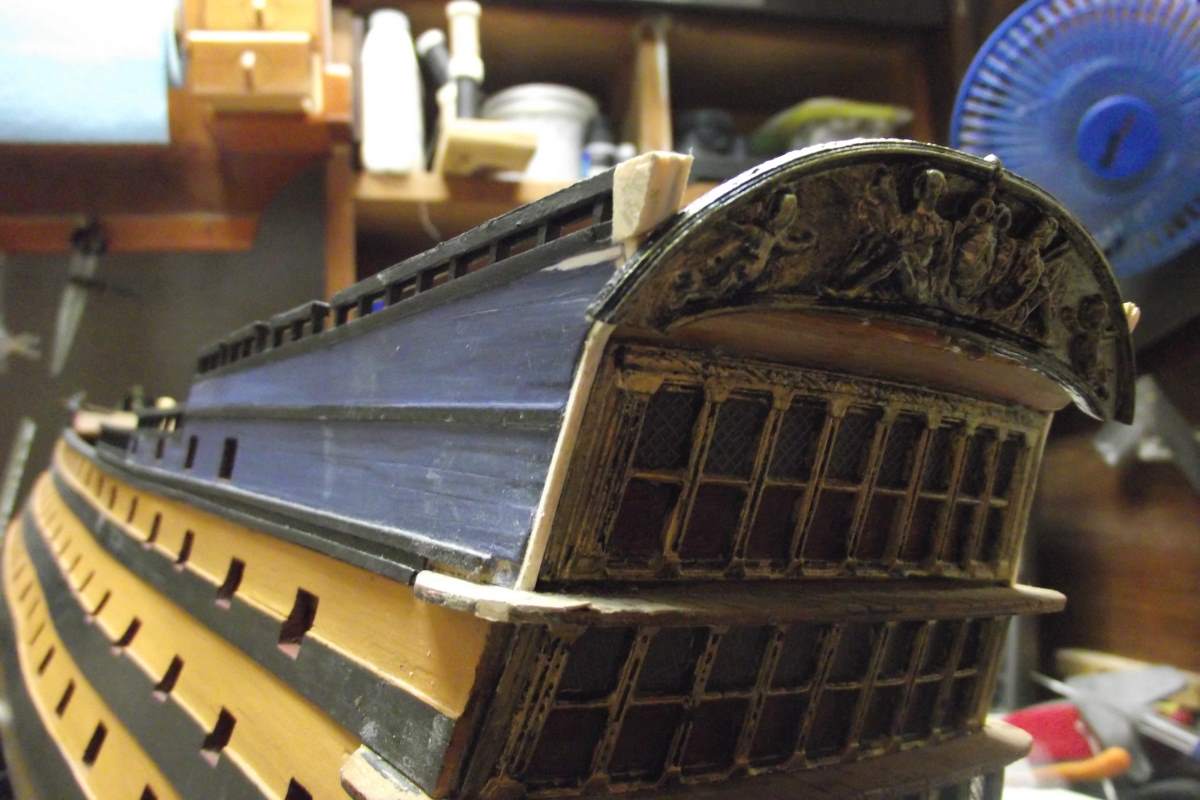
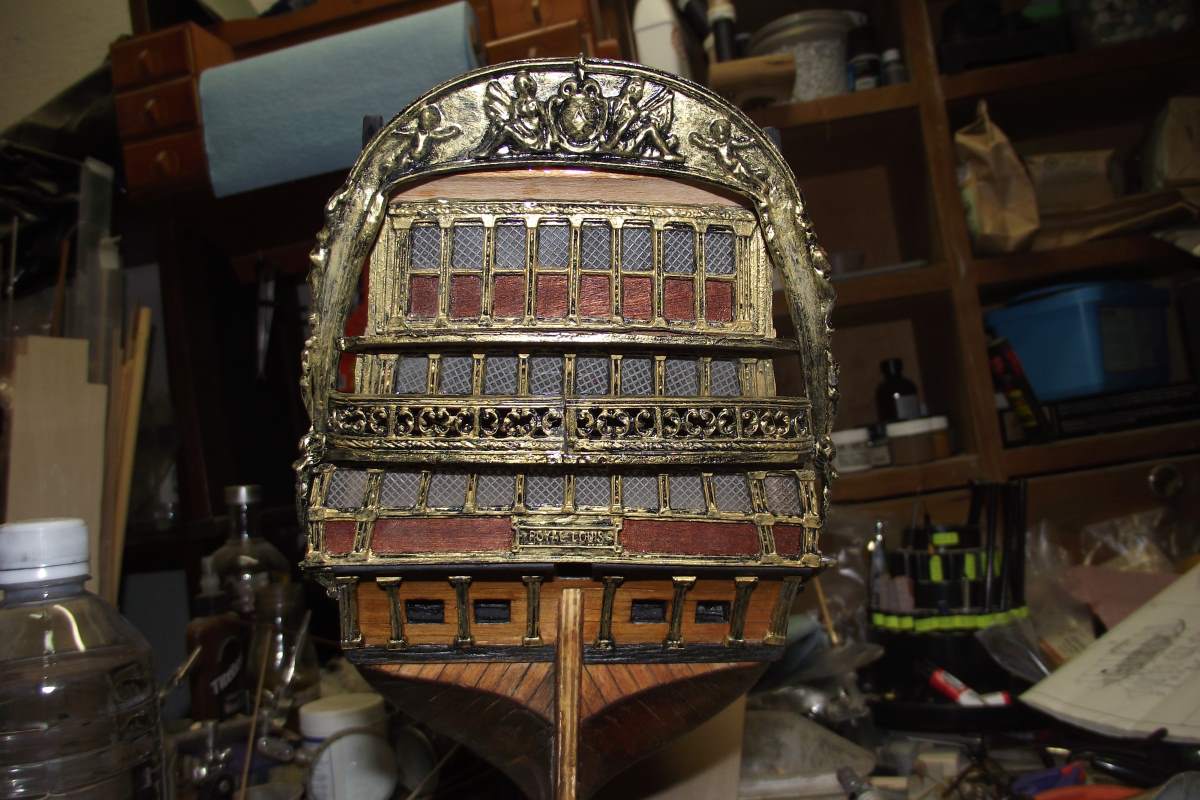
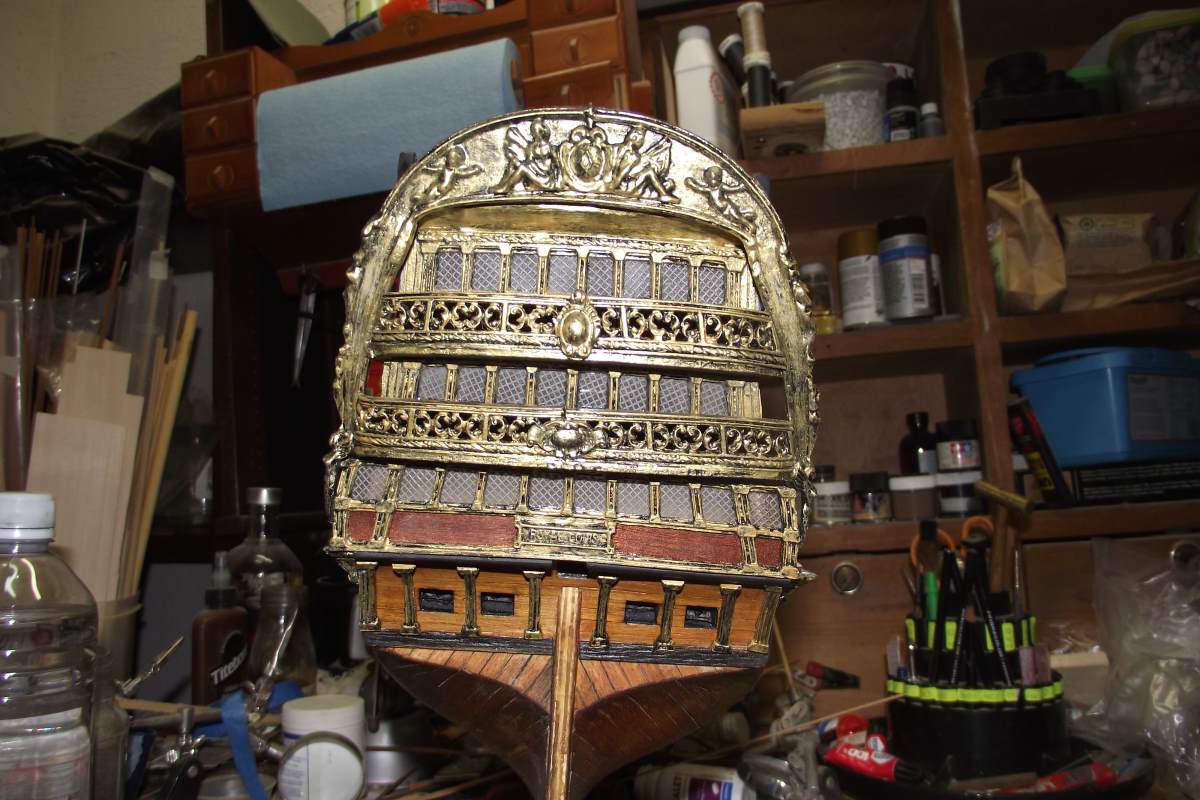
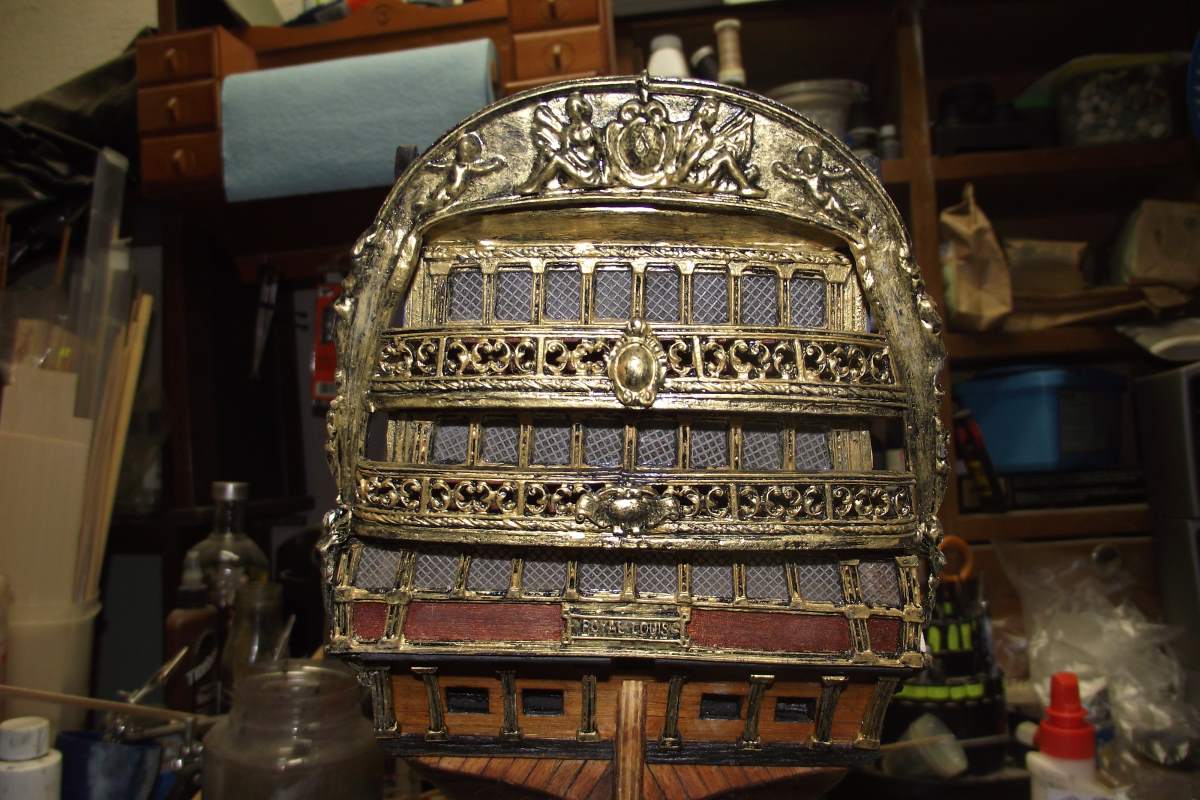
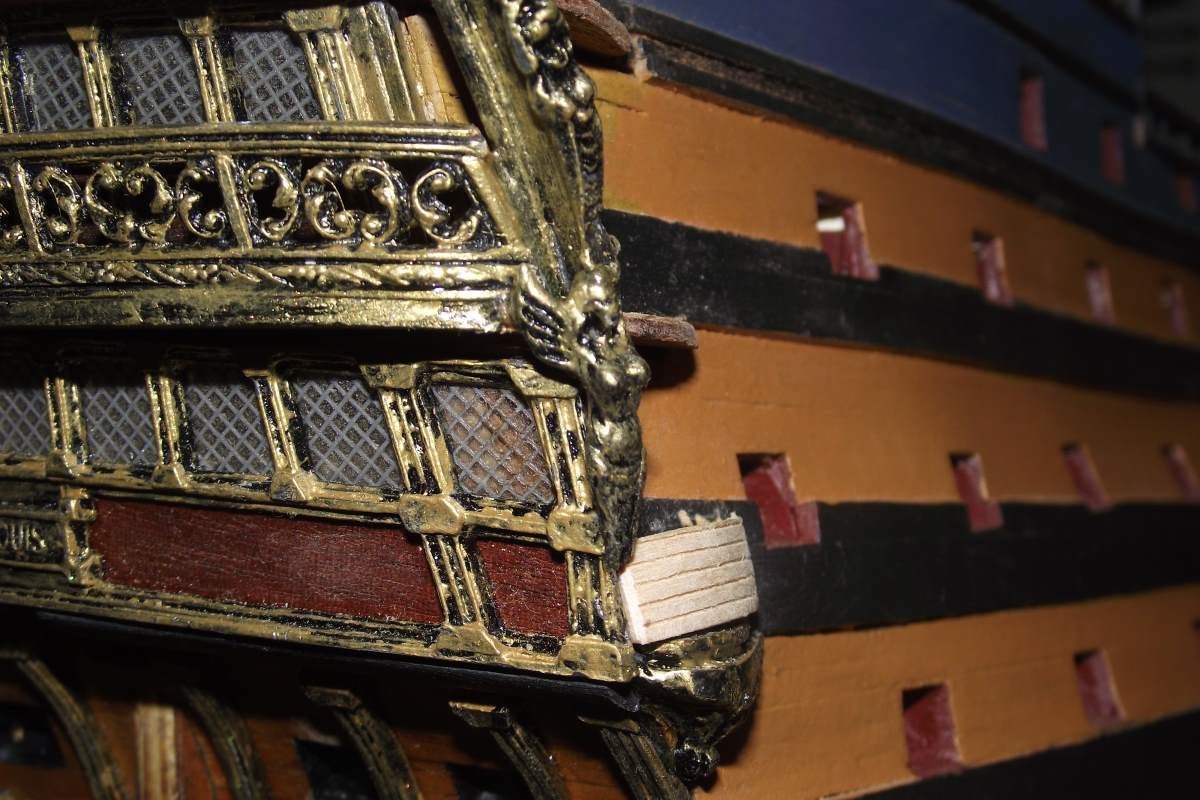
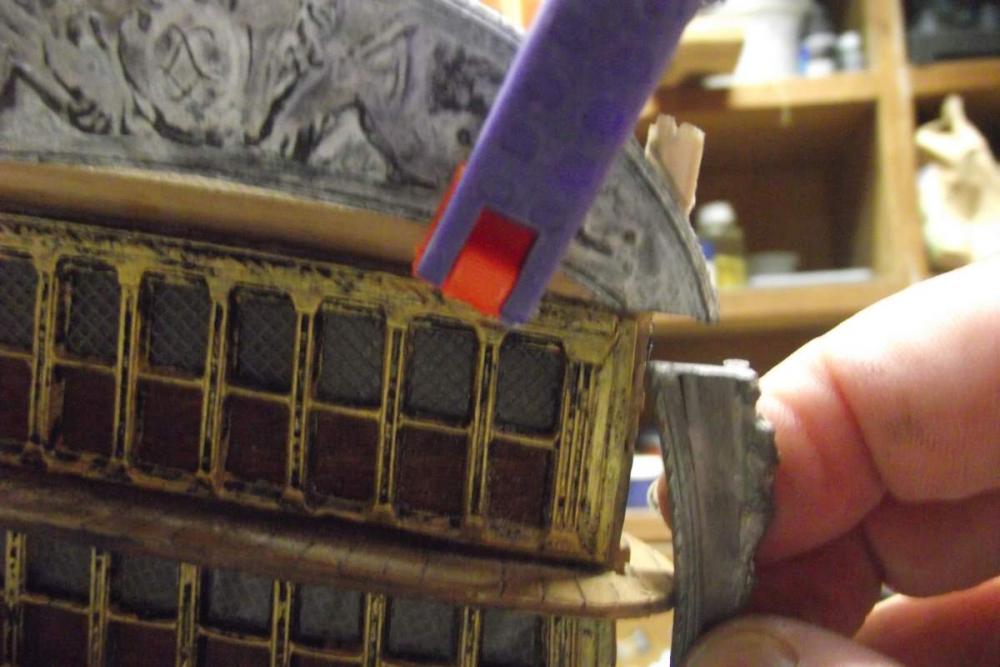
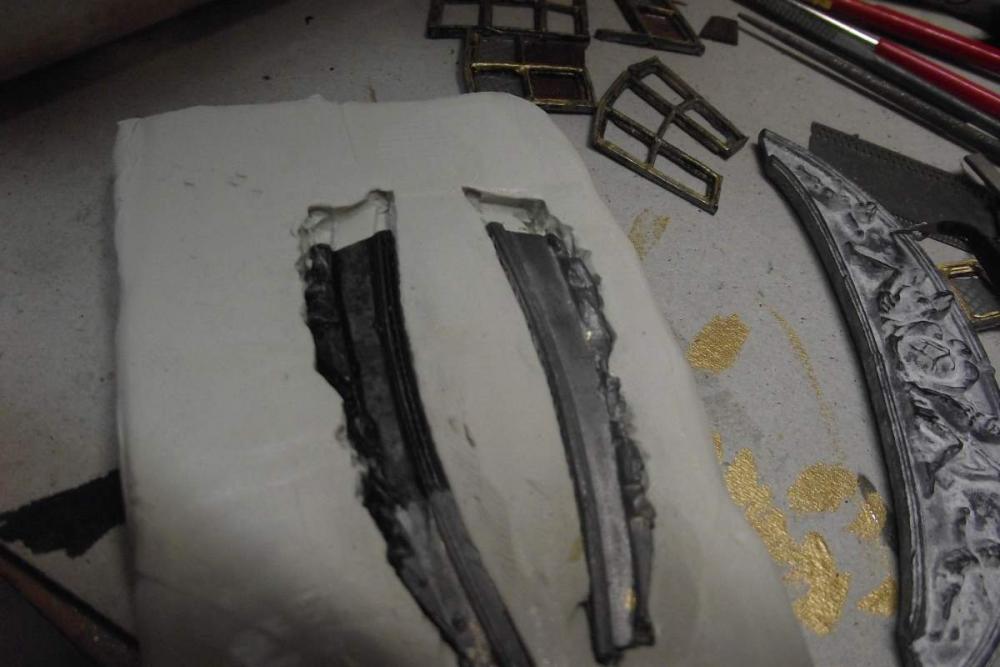
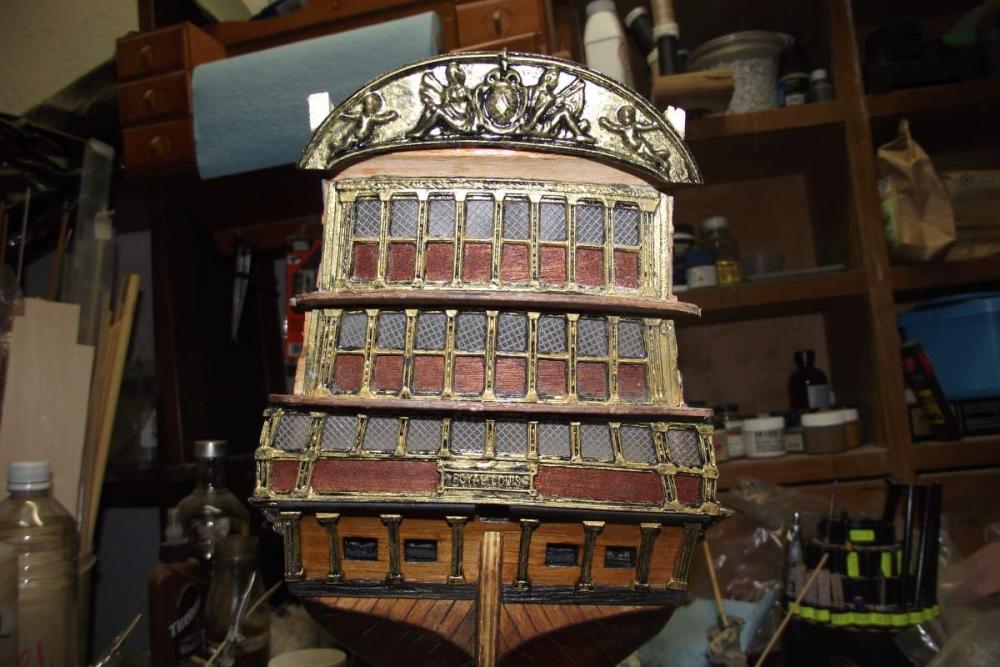
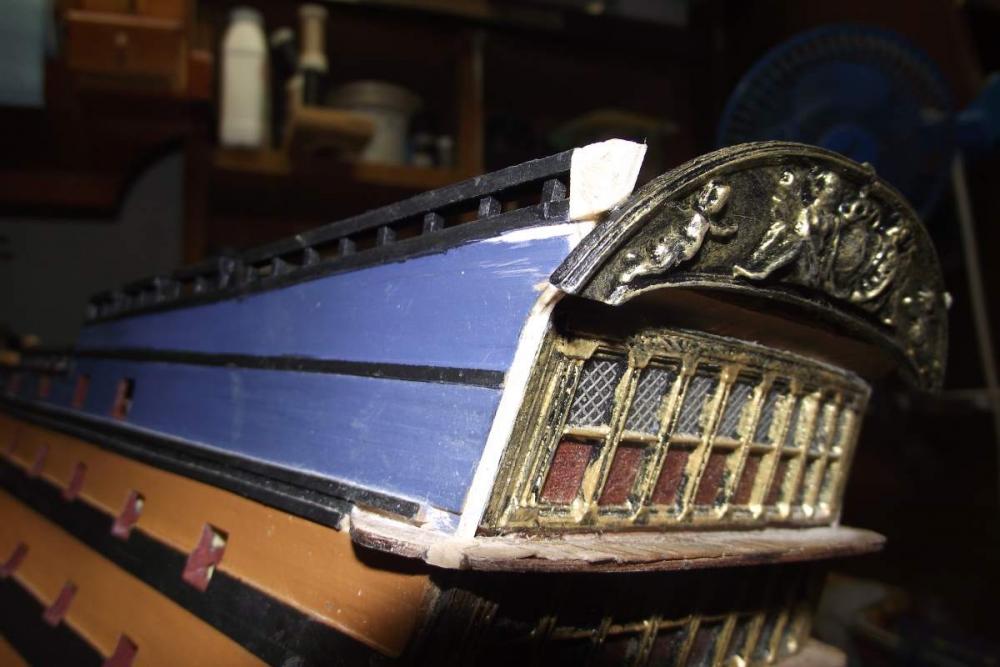
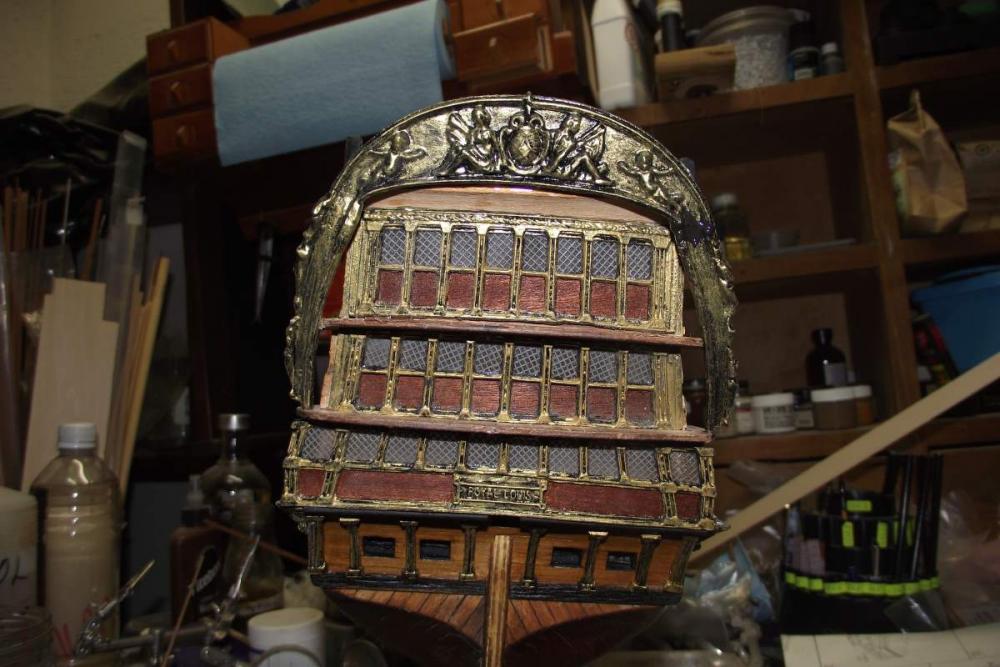
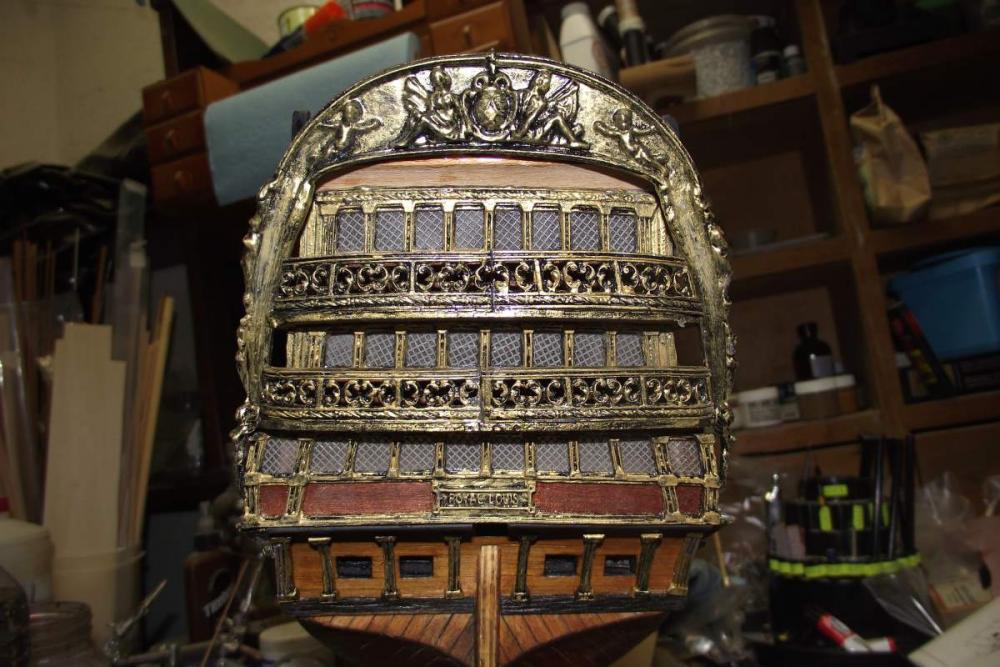
Hello fellow ship modelers. Here's some good and bad news. I wanted to post an update when the whole transom was completely done. I have completed only the rear part, (not the sides) as you will see in the following pictures. The sides, the area where I posted before that the parts broke and cursed and blah blah blah, will have to be finished later. I am still thinking of ways to do that area. So many options, so little... whatever My sister, who is totally dependent upon me because her diabetic feet and other illness, and lives with me, broke her hip, had to undergo surgery and today is being moved to my home. So my building time and mood will be severely undermined for some time in the future. So I decided to post what I have done so far. As always, thanks for visiting, and every single word of positive criticism will be taken in account. I love you guys!!! This area had to be filled I used play doh to make a mold. then I moved the parts a bit downwards. I then filled the space with "Plastiacero" (Plasi-steel) which is a two part epoxy component with a metal charge that hardens very hard. Here the two parts with the extension added and filed, and partially painted. Also the upper curved part partially painted The upper part glued in place. The white wood parts you see are fillers which will be reworked later Here the 2 vertical sections have been glued. You can see at the right the black spot plastiacero left. I used plastiacero to bond metal to metal, and 5 min epoxy to bond metal to wood. Lower and upper balustrades added. Close up of one of the winged female angels. I didn't know angels had gender, but this one obviously do. Thank you all for visiting!!! Ulises


- 786 replies
-
- 16
-
-
- Royal Louis
- Finished
- (and 1 more)
-
Hello Messis. I see your problem now. I use clear flat (matte) varnish when securing all my rigging knots. It dries without leaving a shiny spot as CA does, is completely invisible and does the job! Good luck. Ulises
-
Excellent tutorial, John. Thanks a lot!!!!
-
Can't wait for part 2. Making the boats for my Royal Louis is something that interrupts my sleep at night. I just don't want to use the metal ones that came with my kit! Although, on second thought, making them to look as if they are made of wood may pose a different challenge.