vulcanbomber Posted March 27, 2019 Author Share #121 Posted March 27, 2019 On 3/26/2019 at 4:18 AM, mtbediz said: Caroline, your Pegasus is coming along nicely. I like your lantern too. Thank you Mustafa Piet, mtbediz and popeye the sailor 3 Quote First Completed Build: San Francisco (Original Version) Current build: Victory Models HMS Pegasus Cross Stitch Project (Finished): Battle Of Agamemnon and Ca Ira Cross Stitch Project : Victory & Temeraire Link to comment Share on other sites More sharing options...
vulcanbomber Posted March 27, 2019 Author Share #122 Posted March 27, 2019 (edited) Thanks to everyone for your likes. I have completed the lantern and am quite pleased with my handiwork. I extended the LED 'legs' by using the excess ends of the resistor. One end of the resistor was threaded through a hole made in the stern fascia and soldered to the long leg of the LED. Then soldered the other end of the resistor to the red wire, after cutting it down to length. The cut off length of the resistor wire was threaded through another hole through the fascia and soldered to the other 'leg' of the LED. The other end of the resistor wire was then soldered to the cut down black wire AND it all fit neatly under the rudder head housing! Finally a small 0.5mm strip was inserted between the LED 'legs' so they wouldn't make any contact. The only problem I can foresee is the 'legs' of the LED are quite soft and too much bending would break them, so I fitted the lantern supports and this has made the whole lantern now quite solid (as long as I don't give it a hard knock!) I have also fitted a bracket on the inside of the fascia and a hole in the rudder head housing for the flagpole. All lit up. Next I think i'm moving onto the channels. I am also considering scratching the ship's boats, but can't decide on what wood strips to buy. I have narrowed the choice down to Cherry, Maple or Walnut, they will be 0.5 x 2mm and 0.5mm x 3mm strips from Cornwall Model Boats. I think I'm going to leave the boats natural and just varnish them. What wood would you recommend? I've just noticed the top two brass etch layers of the right hand knight have disappeared, does anyone know if it's possible to get replacements? Thank you. Edited March 27, 2019 by vulcanbomber src, mtbediz, Martin W and 4 others 7 Quote First Completed Build: San Francisco (Original Version) Current build: Victory Models HMS Pegasus Cross Stitch Project (Finished): Battle Of Agamemnon and Ca Ira Cross Stitch Project : Victory & Temeraire Link to comment Share on other sites More sharing options...
Blue Ensign Posted March 28, 2019 Share #123 Posted March 28, 2019 Caroline, in the end I didn't use the knights on my build, and removed them when I did my second stern modification. You are welcome to them, pm me your address and I will post them on. Regards, B.E. vulcanbomber, Piet and popeye the sailor 3 Quote Current Build: HMS Indefatigable-1794-by-blue-ensign-vanguard-models-164-scale Medway-longboat-1742-by-blue-ensign-½”-scale Completed builds: HMS Sphinx 1775 by Blue Ensign. 1:64 scale - Vanguard Models Queen-Anne-Royal-Barge-circa-1700-by-Blue-Ensign Fifie fishing boat Lady Eleanor Muirneag-1903-–-a-scottish-zulu-fishing-boat-164-scale-based-on-the-vanguard-models-zulu-kit/ HM Cutter Alert 1777 HM Cutter Cheerful 1806 18th-century-English-longboat-by-Blue-Ensign-ms-148-scale/ finished 18thc English Pinnace by Blue Ensign-Model-Shipways-1:24 scale/ finished HMS-Pegasus-by-Blue-Ensign-finished-Victory-Models-1:64-scale/ Heller Seventy-four 1:150 scale - modified Le Superbe/Le Glorieux kit after Boudriot, waterline setting with sails. The schooner Pickle, Jotika pob kit 1:64 scale, my interpretation. Link to comment Share on other sites More sharing options...
vulcanbomber Posted March 28, 2019 Author Share #124 Posted March 28, 2019 1 hour ago, Blue Ensign said: Caroline, in the end I didn't use the knights on my build, and removed them when I did my second stern modification. You are welcome to them, pm me your address and I will post them on. Regards, B.E. Hi B.E, Thanks for your offer, much appreciated. PM sent. I love the modification you made to the stern of your Pegasus, it looks fantastic. I would not be brave enough to attempt anything like that! Piet and popeye the sailor 2 Quote First Completed Build: San Francisco (Original Version) Current build: Victory Models HMS Pegasus Cross Stitch Project (Finished): Battle Of Agamemnon and Ca Ira Cross Stitch Project : Victory & Temeraire Link to comment Share on other sites More sharing options...
Piet Posted April 2, 2019 Share #125 Posted April 2, 2019 Nice way you worked the lighting out Caroline, looks quite nice. Cheers, popeye the sailor 1 Quote Piet, The Flying Dutchman. "Your greatest asset is not the quantity of your friends , rather the quality of your friends." (old Chinese proverb) Current Builds: Hr. Ms. Java 1925-1942 VOC Ship Surabaya Planned Builds: Young America Diorama - scale 1:3000 Future Builds: KPM ship "MS Musi." Zuiderzee Botter - scale 1:25. VOC Jacht in a 6" lamp, Buginese fishing Prauw. Hr. Ms. Java - Royal Navy Netherlands Cruiser. Completed Builds: Hr. Ms. O16 Submarine Hr. Ms. O19 - Submarine Royal Navy Netherlands Ship Yard Diorama with Topsail schooner - Friendship Sloop Gwenfra Muscongus Bay Lobster Smack Golden Hind - Cutte Sark (both not in this forum) Link to comment Share on other sites More sharing options...
vulcanbomber Posted April 7, 2019 Author Share #126 Posted April 7, 2019 Channels and chain plates now done. I have also added the bolsters, billboards and linings as seen in Blue Ensign's Pegasus. Captain Fraser and his second in command, Mr Patrick, have visited Pegasus today to cast their eye over her progress. I think they are pleased with what they see! popeye the sailor, Dan Vadas, KARAVOKIRIS and 12 others 15 Quote First Completed Build: San Francisco (Original Version) Current build: Victory Models HMS Pegasus Cross Stitch Project (Finished): Battle Of Agamemnon and Ca Ira Cross Stitch Project : Victory & Temeraire Link to comment Share on other sites More sharing options...
Jim Lad Posted April 7, 2019 Share #127 Posted April 7, 2019 Very nicely done, Caroline. John vulcanbomber and popeye the sailor 2 Quote Link to comment Share on other sites More sharing options...
mtbediz Posted April 8, 2019 Share #128 Posted April 8, 2019 Very nice Caroline. vulcanbomber and popeye the sailor 2 Quote Mustafa Current Build, USS Constitution 1:76 Scratch https://modelshipworld.com/topic/34741-uss-constitution-by-mtbediz-176/#comment-991858 Finished, HM Cutter Alert 1777. Scratch https://modelshipworld.com/topic/31859-hm-naval-cutter-alert-by-mtbediz-finished-136-scale/#comment-902949 Finished, USF Essex, Scratch https://modelshipworld.com/topic/25954-usf-essex-by-mtbediz-150/ Finished, Santa Maria, Mantua Kit https://modelshipworld.com/topic/23113-santa-maria-by-mtbediz-finished-mantua-150/?tab=comments#comment-683297 Finished, HMS Pickle (Scratch) https://modelshipworld.com/topic/21684-hms-pickle-by-mtbediz-140-finished/?tab=comments#comment-651070 Finished, Santa Maria https://modelshipworld.com/index.php?/topic/15541-santa-maria-by-mtbediz-handmade-kit-by-a-friend/&do=findComment&comment=483052 Finished, San Francisco II, AL Kit https://modelshipworld.com/topic/17344-san-francisco-ii-by-mtbediz-finished/ Link to comment Share on other sites More sharing options...
vulcanbomber Posted April 8, 2019 Author Share #129 Posted April 8, 2019 Thank you John and Mustafa. I'm working on the boomkins and bowsprit next. john2013, src and popeye the sailor 3 Quote First Completed Build: San Francisco (Original Version) Current build: Victory Models HMS Pegasus Cross Stitch Project (Finished): Battle Of Agamemnon and Ca Ira Cross Stitch Project : Victory & Temeraire Link to comment Share on other sites More sharing options...
vulcanbomber Posted April 13, 2019 Author Share #130 Posted April 13, 2019 Boomkins in place and bowsprit made. I have bashed the bowsprit a bit using B.E's log and Lee's 'Masting and Rigging' book as a guide. I remade the bowsptit/jibbom cap as it was impossible to get the kit supplied one to fit properly due to the angle of the holes, when I filled the holes to match the angle needed I didn't like the end result. Also scratched some new bees, added the bee blocks, remade the jibboom saddle and made the spritsail yard saddle. I need to add the fairlead saddle and have the woolding still to do, but I am pleased with my interpretation. The jibboom still needs lashing to the bowsprit. I will stain the gammoning cleats brown to match the bowsprit more. KARAVOKIRIS, Blue Ensign, popeye the sailor and 6 others 9 Quote First Completed Build: San Francisco (Original Version) Current build: Victory Models HMS Pegasus Cross Stitch Project (Finished): Battle Of Agamemnon and Ca Ira Cross Stitch Project : Victory & Temeraire Link to comment Share on other sites More sharing options...
src Posted April 13, 2019 Share #131 Posted April 13, 2019 Nicely done. You will thank yourself later for installing the fairlead. I neglected to do mine and paid the price with some additional unneeded adapting and improvising. Sam popeye the sailor and Martin W 2 Quote Current Build Constructo Enterprise Link to comment Share on other sites More sharing options...
Blue Ensign Posted April 13, 2019 Share #132 Posted April 13, 2019 Nice job on scratching the Bowsprit cap Caroline, the kit provided item is worse than useless. B.E. john2013, popeye the sailor and Martin W 3 Quote Current Build: HMS Indefatigable-1794-by-blue-ensign-vanguard-models-164-scale Medway-longboat-1742-by-blue-ensign-½”-scale Completed builds: HMS Sphinx 1775 by Blue Ensign. 1:64 scale - Vanguard Models Queen-Anne-Royal-Barge-circa-1700-by-Blue-Ensign Fifie fishing boat Lady Eleanor Muirneag-1903-–-a-scottish-zulu-fishing-boat-164-scale-based-on-the-vanguard-models-zulu-kit/ HM Cutter Alert 1777 HM Cutter Cheerful 1806 18th-century-English-longboat-by-Blue-Ensign-ms-148-scale/ finished 18thc English Pinnace by Blue Ensign-Model-Shipways-1:24 scale/ finished HMS-Pegasus-by-Blue-Ensign-finished-Victory-Models-1:64-scale/ Heller Seventy-four 1:150 scale - modified Le Superbe/Le Glorieux kit after Boudriot, waterline setting with sails. The schooner Pickle, Jotika pob kit 1:64 scale, my interpretation. Link to comment Share on other sites More sharing options...
vulcanbomber Posted October 13, 2019 Author Share #133 Posted October 13, 2019 I'm starting to make the boats for Pegasus. She will have a 25ft Pinnace and a 19ft Longboat. I'm thinking of having the Pinnace stowed on board and toying with the idea of having the longboat shown being lowered from the yards, to show all the tackle and how it was used - but that's only an idea at the moment. I am trying a different approach to making the pinnace. In stead of plank on frame, I am attempting a plug method. Never done this before, so don't know how it will turn out, but it is something I want to try. A good tutorial I am using is by John (Jim Lad) and can be found Here and Part 2 is Here. This is how I made my plug. First I glued some scaled down parts to some card and cut them out and glued the frames to the keel, using plenty of glue to keep the frames in place. After the frames had dried completely, I filled the gaps in with balsa. After a good shaping and sanding. I needed to add some more height to the plug in order to glue the ends of the ribs to while making the boat. It's not perfect, but I hoping it will be good enough to use. If it doesn't work out, I can always go back to the plank on frame method anyway! Landlubber Mike, popeye the sailor, Martin W and 4 others 7 Quote First Completed Build: San Francisco (Original Version) Current build: Victory Models HMS Pegasus Cross Stitch Project (Finished): Battle Of Agamemnon and Ca Ira Cross Stitch Project : Victory & Temeraire Link to comment Share on other sites More sharing options...
Jim Lad Posted October 13, 2019 Share #134 Posted October 13, 2019 It's great to hear from you, Caroline. Looks like your boats are coming along nicely. John vulcanbomber and popeye the sailor 2 Quote Link to comment Share on other sites More sharing options...
Blue Ensign Posted October 13, 2019 Share #135 Posted October 13, 2019 I see you’ve not wasted any time getting started Caroline, it certainly has the look of a Pinnace, looking forward to seeing how it works out. B.E. vulcanbomber and popeye the sailor 2 Quote Current Build: HMS Indefatigable-1794-by-blue-ensign-vanguard-models-164-scale Medway-longboat-1742-by-blue-ensign-½”-scale Completed builds: HMS Sphinx 1775 by Blue Ensign. 1:64 scale - Vanguard Models Queen-Anne-Royal-Barge-circa-1700-by-Blue-Ensign Fifie fishing boat Lady Eleanor Muirneag-1903-–-a-scottish-zulu-fishing-boat-164-scale-based-on-the-vanguard-models-zulu-kit/ HM Cutter Alert 1777 HM Cutter Cheerful 1806 18th-century-English-longboat-by-Blue-Ensign-ms-148-scale/ finished 18thc English Pinnace by Blue Ensign-Model-Shipways-1:24 scale/ finished HMS-Pegasus-by-Blue-Ensign-finished-Victory-Models-1:64-scale/ Heller Seventy-four 1:150 scale - modified Le Superbe/Le Glorieux kit after Boudriot, waterline setting with sails. The schooner Pickle, Jotika pob kit 1:64 scale, my interpretation. Link to comment Share on other sites More sharing options...
vulcanbomber Posted October 18, 2019 Author Share #136 Posted October 18, 2019 (edited) Thanks for looking in John and B.E. My wood strips arrived yesterday. (Well, they actually arrived a couple of days earlier, but whoever took them in forgot to tell me!!). I chose Maple, Pear, and Cherry. Maple is top, Pear is middle and Cherry bottom. I cut a 3mm strip of Maple in half down the length and then cut it into strips for the 'ribs'. After boiling them in a saucepan to make them pliable, I bent them over the plug and held the ends down with rubber bands and left overnight for them to dry and set into shape. I also used some clothes pegs held down with rubber bands (not shown) at the stern to get the reverse curve shape. This is the result after completely dry and with the pegs removed Next I put a piece of cling film over the top part of the plug to stop anything sticking to it, leaving the bottom part free of cling film to stick the long ends of the ribs to to hold them in position while it is planked. I then left it to set overnight. Next day I made a cardboard template of the keel, getting a good fit before cutting a keel out of a some walnut from the parts sheet of Pegasus (actually the edge of cannon carriages sheet where it was just big enough!) Now keel is glued into place So, this is where I am at now. Next step: the hull planking. Edited October 18, 2019 by vulcanbomber Martin W, J11, fnick and 5 others 8 Quote First Completed Build: San Francisco (Original Version) Current build: Victory Models HMS Pegasus Cross Stitch Project (Finished): Battle Of Agamemnon and Ca Ira Cross Stitch Project : Victory & Temeraire Link to comment Share on other sites More sharing options...
vulcanbomber Posted October 19, 2019 Author Share #137 Posted October 19, 2019 Spent most of today planking the hull. Quite pleased with how it has come out. Needs a good sanding now and then hopefully remove it from the plug. Started by placing the strips on both sides to mark the topmost edge of the hull. Two strips at top and bottom on both sides now placed. Hull completed. Will let it thoroughly dry and set overnight and then sand the hull tomorrow. GrandpaPhil, J11, Martin W and 5 others 8 Quote First Completed Build: San Francisco (Original Version) Current build: Victory Models HMS Pegasus Cross Stitch Project (Finished): Battle Of Agamemnon and Ca Ira Cross Stitch Project : Victory & Temeraire Link to comment Share on other sites More sharing options...
vulcanbomber Posted October 20, 2019 Author Share #138 Posted October 20, 2019 Pinnace cont.... Hull sanded today and I think it has turned out well. Ribs cut just above the final strip. Now the moment of truth...... will it come away from the plug?? Yesssssssss!!!!! with just a little coaxing it came away quite easily. Success!!! Just need to add the transom, then I can start fitting the Pinnace out. KARAVOKIRIS, J11, Edwardkenway and 10 others 13 Quote First Completed Build: San Francisco (Original Version) Current build: Victory Models HMS Pegasus Cross Stitch Project (Finished): Battle Of Agamemnon and Ca Ira Cross Stitch Project : Victory & Temeraire Link to comment Share on other sites More sharing options...
Blue Ensign Posted October 20, 2019 Share #139 Posted October 20, 2019 Well done Caroline, cleaned up and fitted out, that will make a nice addition to your Pegasus. B.E. J11, popeye the sailor and Martin W 3 Quote Current Build: HMS Indefatigable-1794-by-blue-ensign-vanguard-models-164-scale Medway-longboat-1742-by-blue-ensign-½”-scale Completed builds: HMS Sphinx 1775 by Blue Ensign. 1:64 scale - Vanguard Models Queen-Anne-Royal-Barge-circa-1700-by-Blue-Ensign Fifie fishing boat Lady Eleanor Muirneag-1903-–-a-scottish-zulu-fishing-boat-164-scale-based-on-the-vanguard-models-zulu-kit/ HM Cutter Alert 1777 HM Cutter Cheerful 1806 18th-century-English-longboat-by-Blue-Ensign-ms-148-scale/ finished 18thc English Pinnace by Blue Ensign-Model-Shipways-1:24 scale/ finished HMS-Pegasus-by-Blue-Ensign-finished-Victory-Models-1:64-scale/ Heller Seventy-four 1:150 scale - modified Le Superbe/Le Glorieux kit after Boudriot, waterline setting with sails. The schooner Pickle, Jotika pob kit 1:64 scale, my interpretation. Link to comment Share on other sites More sharing options...
Sea Hoss Posted October 20, 2019 Share #140 Posted October 20, 2019 Nice! What do you call that method of hull making? popeye the sailor and J11 2 Quote Current: Emma C. Berry Lobster Smack-Model Shipways-1:32-1866 Back on the shelf: USS Essex- MS- "Old Yellow Box" Solid Hull Wall Hanger (Half Hull) Completed: 18th Century Armed Longboat-MS 1/24 USN Picket Boat-MS 1864 1/24 US Brig Syren by Sea Hoss- Model Shipways-1803 18th Century Carronade/Ship Section Mayflower-Pilgrims Pride by Sea Hoss-Model Shipways-1620 18th Century Long Boat by Sea Hoss-Model Shipways USS Constitution by Sea Hoss-Revel-Plastic Link to comment Share on other sites More sharing options...
vulcanbomber Posted October 20, 2019 Author Share #141 Posted October 20, 2019 3 hours ago, Blue Ensign said: Well done Caroline, cleaned up and fitted out, that will make a nice addition to your Pegasus. B.E. Yes, I'm quite pleased with the result so far. Just need to tidy up the inside and then think about tackling the fittings. 2 hours ago, Sea Hoss said: Nice! What do you call that method of hull making? Thanks! Its call a plug method. John (Jim Lad) shows how to make a plug method small boat. I put a link to his tutorial in my first post about the Pinnace above. popeye the sailor, J11 and Martin W 3 Quote First Completed Build: San Francisco (Original Version) Current build: Victory Models HMS Pegasus Cross Stitch Project (Finished): Battle Of Agamemnon and Ca Ira Cross Stitch Project : Victory & Temeraire Link to comment Share on other sites More sharing options...
Jim Lad Posted October 20, 2019 Share #142 Posted October 20, 2019 That's turned out very well indeed, Caroline! John popeye the sailor 1 Quote Link to comment Share on other sites More sharing options...
vulcanbomber Posted October 23, 2019 Author Share #143 Posted October 23, 2019 (edited) Thanks John, I'm enjoying this mini scratch build! Some more progress. A good clean up of the inside with my trusty Dremel and the interior looked a lot neater. Floor boards and platform installed and risers fitted. Yesterday I made the bow platform and cockpit seat back and fitted the transom. Today I fitted them to the Pinnace, along with the seat and thwarts. I still need to score the locker in the seat and add the hinges and I am cutting a toothpick down to make the stanchions for under the thwarts. Edited October 23, 2019 by vulcanbomber KARAVOKIRIS, amateur, Landlubber Mike and 9 others 12 Quote First Completed Build: San Francisco (Original Version) Current build: Victory Models HMS Pegasus Cross Stitch Project (Finished): Battle Of Agamemnon and Ca Ira Cross Stitch Project : Victory & Temeraire Link to comment Share on other sites More sharing options...
vulcanbomber Posted October 26, 2019 Author Share #144 Posted October 26, 2019 (edited) More progress, the planking above the thwarts installed and decoration added. Capping rails fitted and the breast hook. Helmsman's seat also done. Next onto the hull decoration, fitting the rudder post and rudder and making the oars. The end is in sight! Edited October 26, 2019 by vulcanbomber oneslim, KARAVOKIRIS, mugje and 9 others 12 Quote First Completed Build: San Francisco (Original Version) Current build: Victory Models HMS Pegasus Cross Stitch Project (Finished): Battle Of Agamemnon and Ca Ira Cross Stitch Project : Victory & Temeraire Link to comment Share on other sites More sharing options...
Jim Lad Posted October 26, 2019 Share #145 Posted October 26, 2019 Excellent work, Caroline! What a beautiful little model. John J11 and popeye the sailor 2 Quote Link to comment Share on other sites More sharing options...
mugje Posted October 30, 2019 Share #146 Posted October 30, 2019 Wow you got great skill! It's really nice to follow your log popeye the sailor and Martin W 2 Quote Link to comment Share on other sites More sharing options...
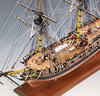
vulcanbomber Posted November 3, 2019 Author Share #147 Posted November 3, 2019 (edited) Thanks for your comments John and Mugje. Thanks also for all the likes. Pinnace update. Fitted thole pins, ruder post and knees. Painted blue background for the frieze. Now waiting for some fine brushes to arrive for the scroll work; as the ones I had, have been used by my son and didn't get cleaned properly and they now resemble Boris Johnson's hair do! Here are some pics of the Pinnace on Peggy. I have also made the main mast and top mast for Peggy. Edited November 3, 2019 by vulcanbomber Mirabell61, Edwardkenway, J11 and 6 others 9 Quote First Completed Build: San Francisco (Original Version) Current build: Victory Models HMS Pegasus Cross Stitch Project (Finished): Battle Of Agamemnon and Ca Ira Cross Stitch Project : Victory & Temeraire Link to comment Share on other sites More sharing options...
J11 Posted November 3, 2019 Share #148 Posted November 3, 2019 Outstanding work!! vulcanbomber and popeye the sailor 2 Quote Current build project: CSS Alabama 1/96 https://modelshipworld.com/topic/20148-css-alabama-by-jonathan11-revell-196-scale-kit-bash-90-historical-accuracy/ Finished build projects 2018: H.L Hunley 1/24 CSS Arkansas 1/96 Link to comment Share on other sites More sharing options...
Mirabell61 Posted November 3, 2019 Share #149 Posted November 3, 2019 Well done Caroline Nils popeye the sailor and vulcanbomber 2 Quote Current builds -Lightship Elbe 1 Completed - Steamship Ergenstrasse ex Laker Corsicana 1918- scale 1:87 scratchbuild - "Zeesboot" heritage wooden fishing small craft around 1870, POB clinker scratch build scale 1:24 - Pilot Schooner # 5 ELBE ex Wanderbird, scale 1:50 scratchbuild - Mississippi Sterwheelsteamer built as christmapresent for grandson modified kit build - Chebec "Eagle of Algier" 1753--scale 1:48-POB-(scratchbuild) "SS Kaiser Wilhelm der Grosse" four stacker passenger liner of 1897, blue ribbond awarded, 1:144 (scratchbuild) "HMS Pegasus" , 16 gun sloop, Swan-Class 1776-1777 scale 1:64 from Amati plan -"Pamir" 4-mast barque, P-liner, 1:96 (scratchbuild) -"Gorch Fock 2" German Navy cadet training 3-mast barque, 1:95 (scratchbuild) "Heinrich Kayser" heritage Merchant Steamship, 1:96 (scratchbuild) original was my grandfathers ship -"Bohuslän" , heritage ,live Swedish museum passenger steamer (Billings kit), 1:50 "Lorbas", river tug, steam driven for RC, fictive design (scratchbuild), scale appr. 1:32 under restoration / restoration finished "Hjejlen" steam paddlewheeler, 1861, Billings Boats rare old kit, scale 1:50 Link to comment Share on other sites More sharing options...
Jim Lad Posted November 3, 2019 Share #150 Posted November 3, 2019 A very elegant boat! John vulcanbomber and popeye the sailor 2 Quote Link to comment Share on other sites More sharing options...

Recommended Posts
Join the conversation
You can post now and register later. If you have an account, sign in now to post with your account.