
.JPG.ca33079f5815b861e67b9c2cccd37982.JPG)

Blue Ensign
-
Posts
4,572 -
Joined
-
Last visited
Content Type
Profiles
Forums
Gallery
Events
Everything posted by Blue Ensign
-
 That's a fine looking model Richard and very nicely done. I suspect you have to develop a whole new skill set to make those card models, they always look tricky to me. Regards, B.E.
- 18 replies
-
- 2
-

-
- card
- World of Paperships
- (and 2 more)
-
Look forward to seeing your progress Bob, what’s not to like about a Vanguard build. 👍 B.E.
-
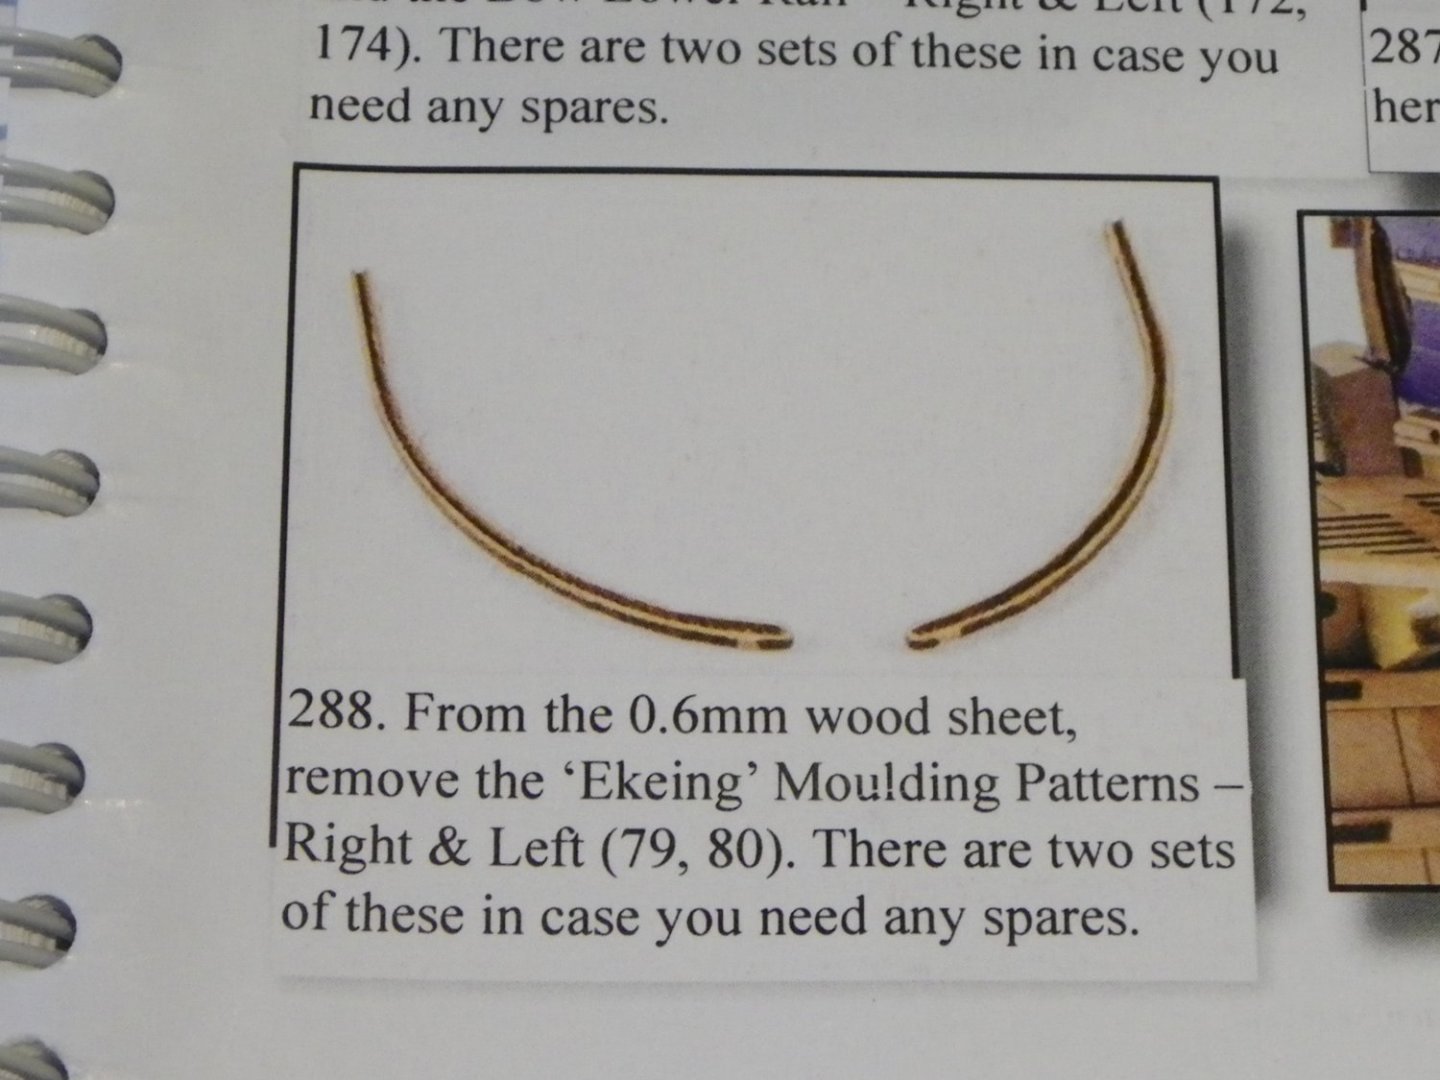
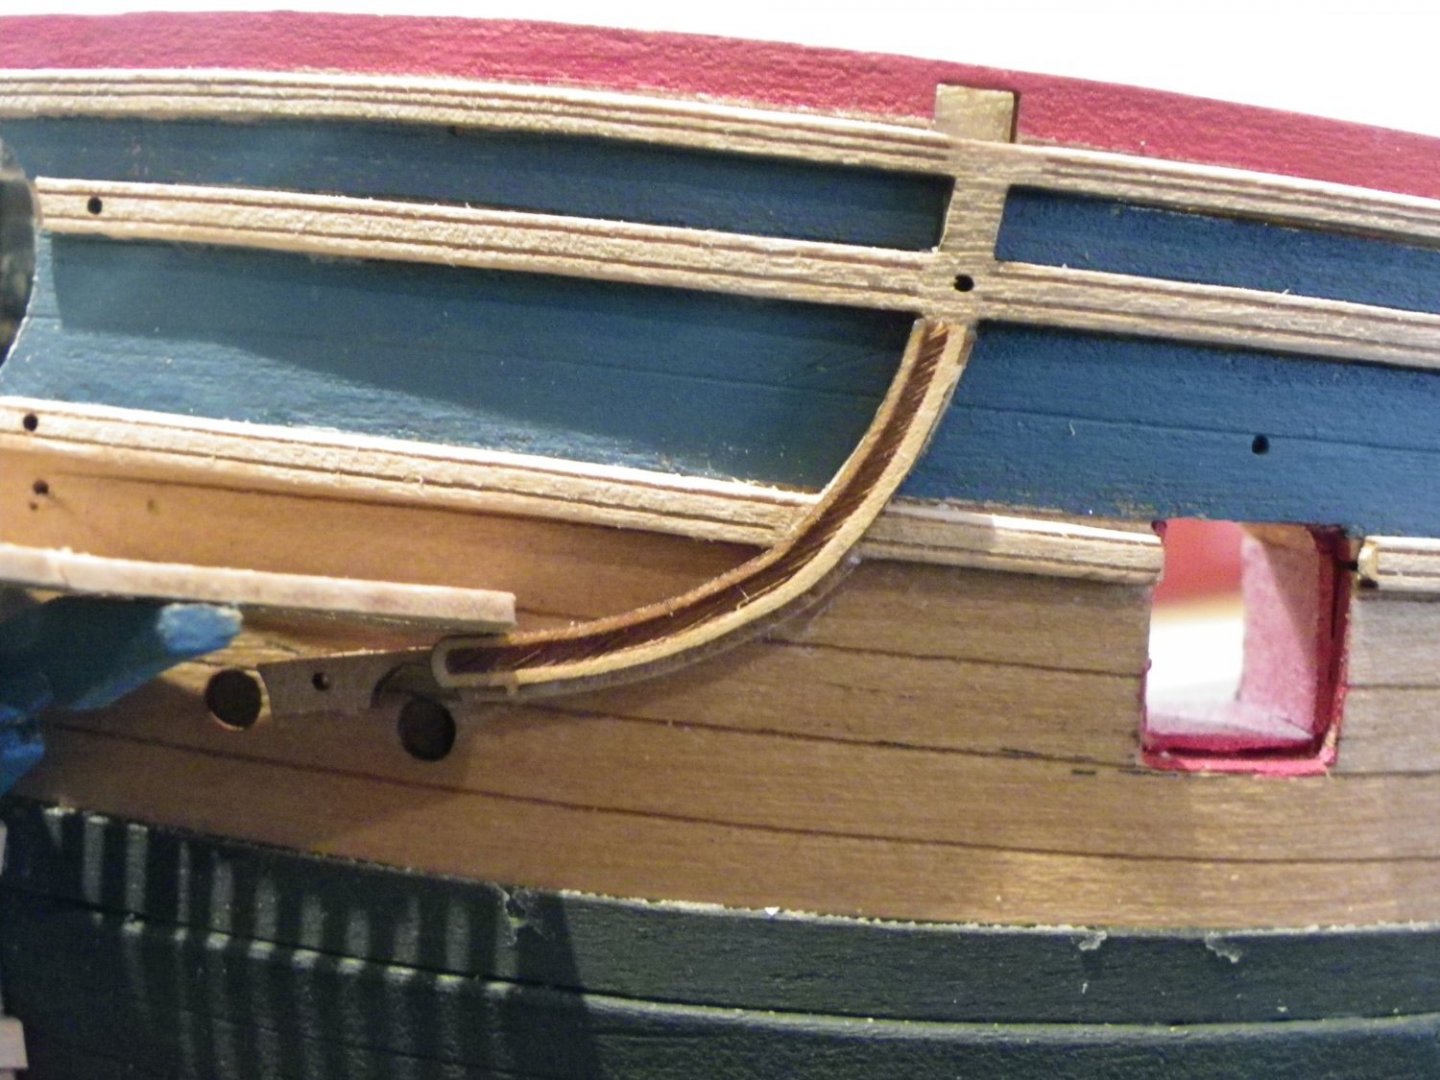
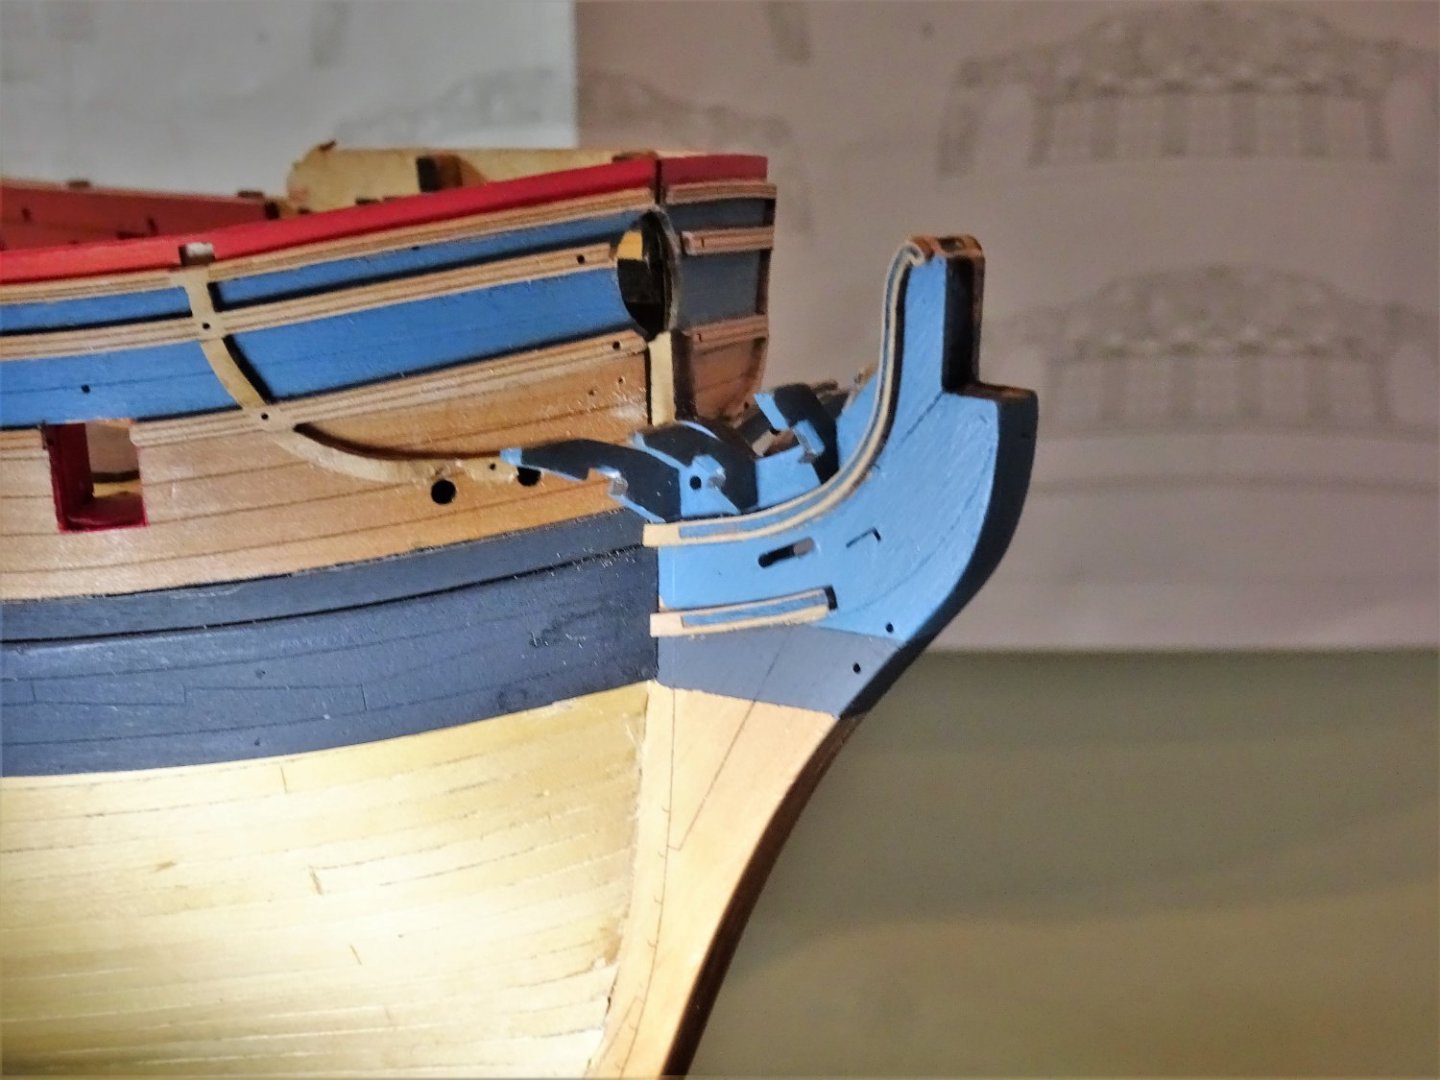
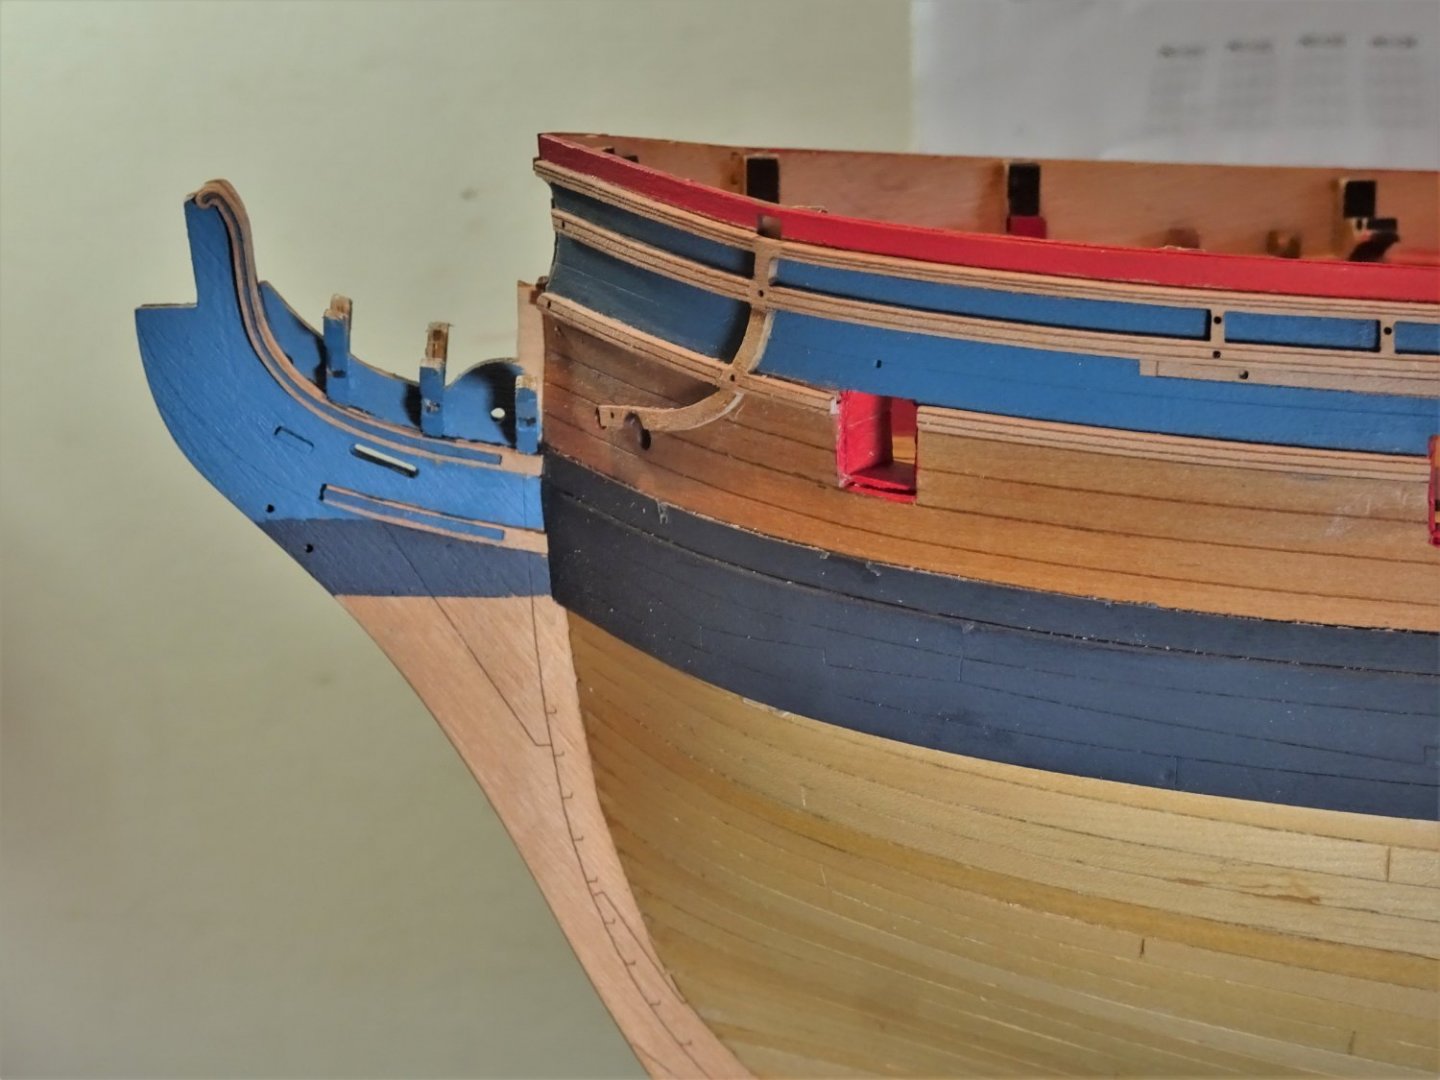
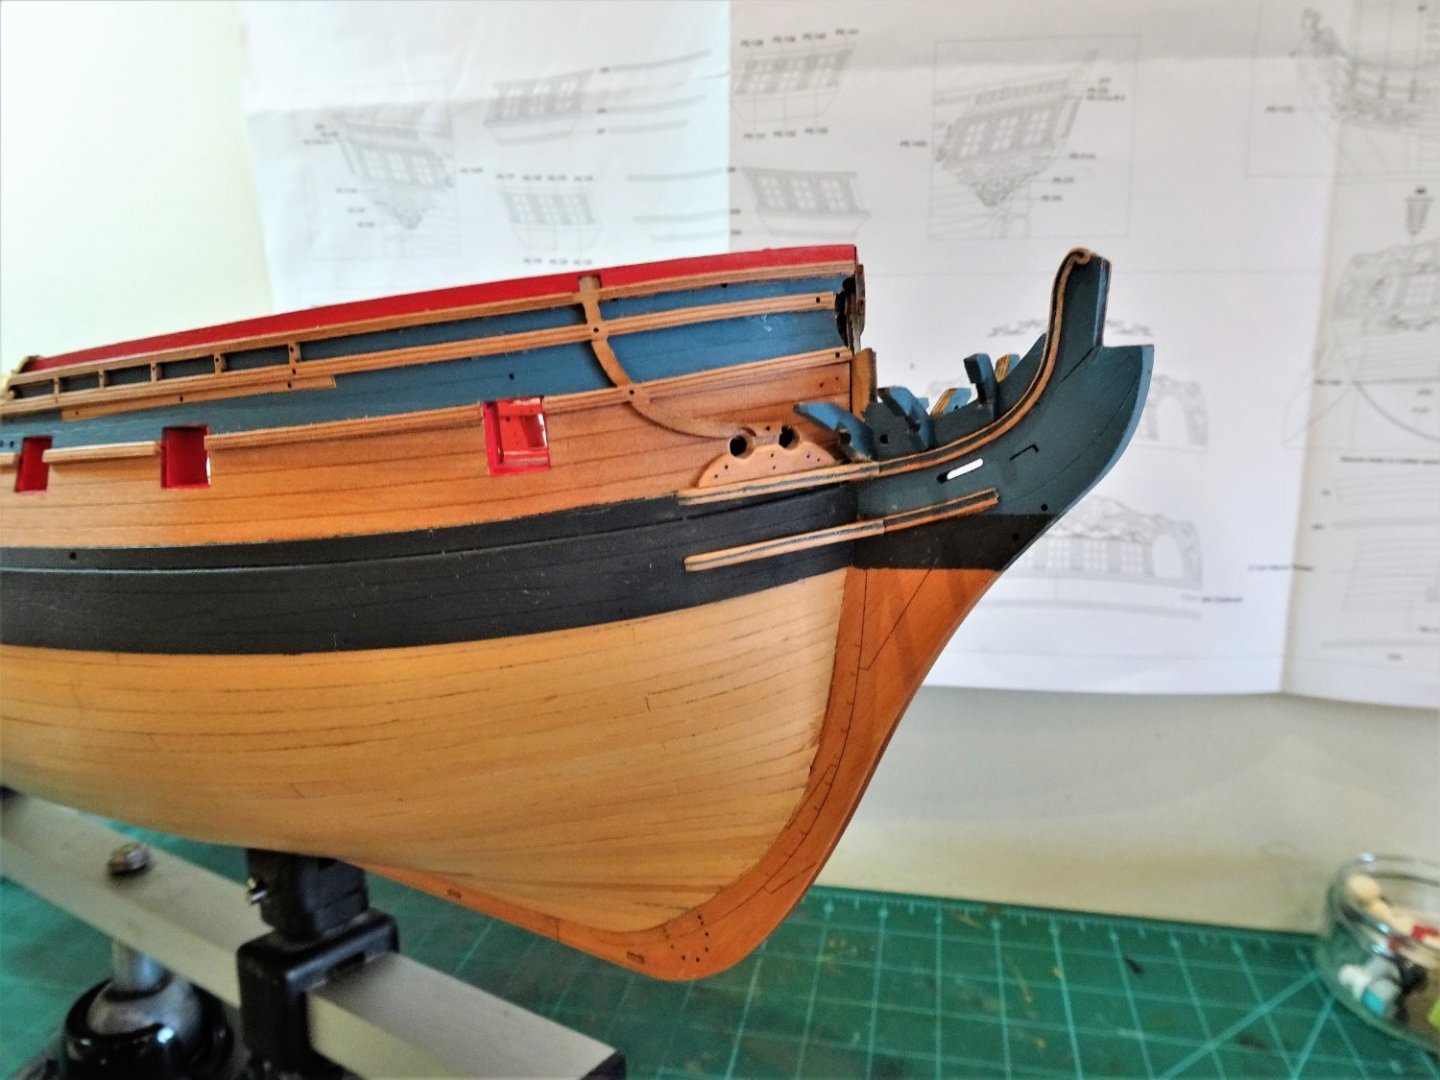
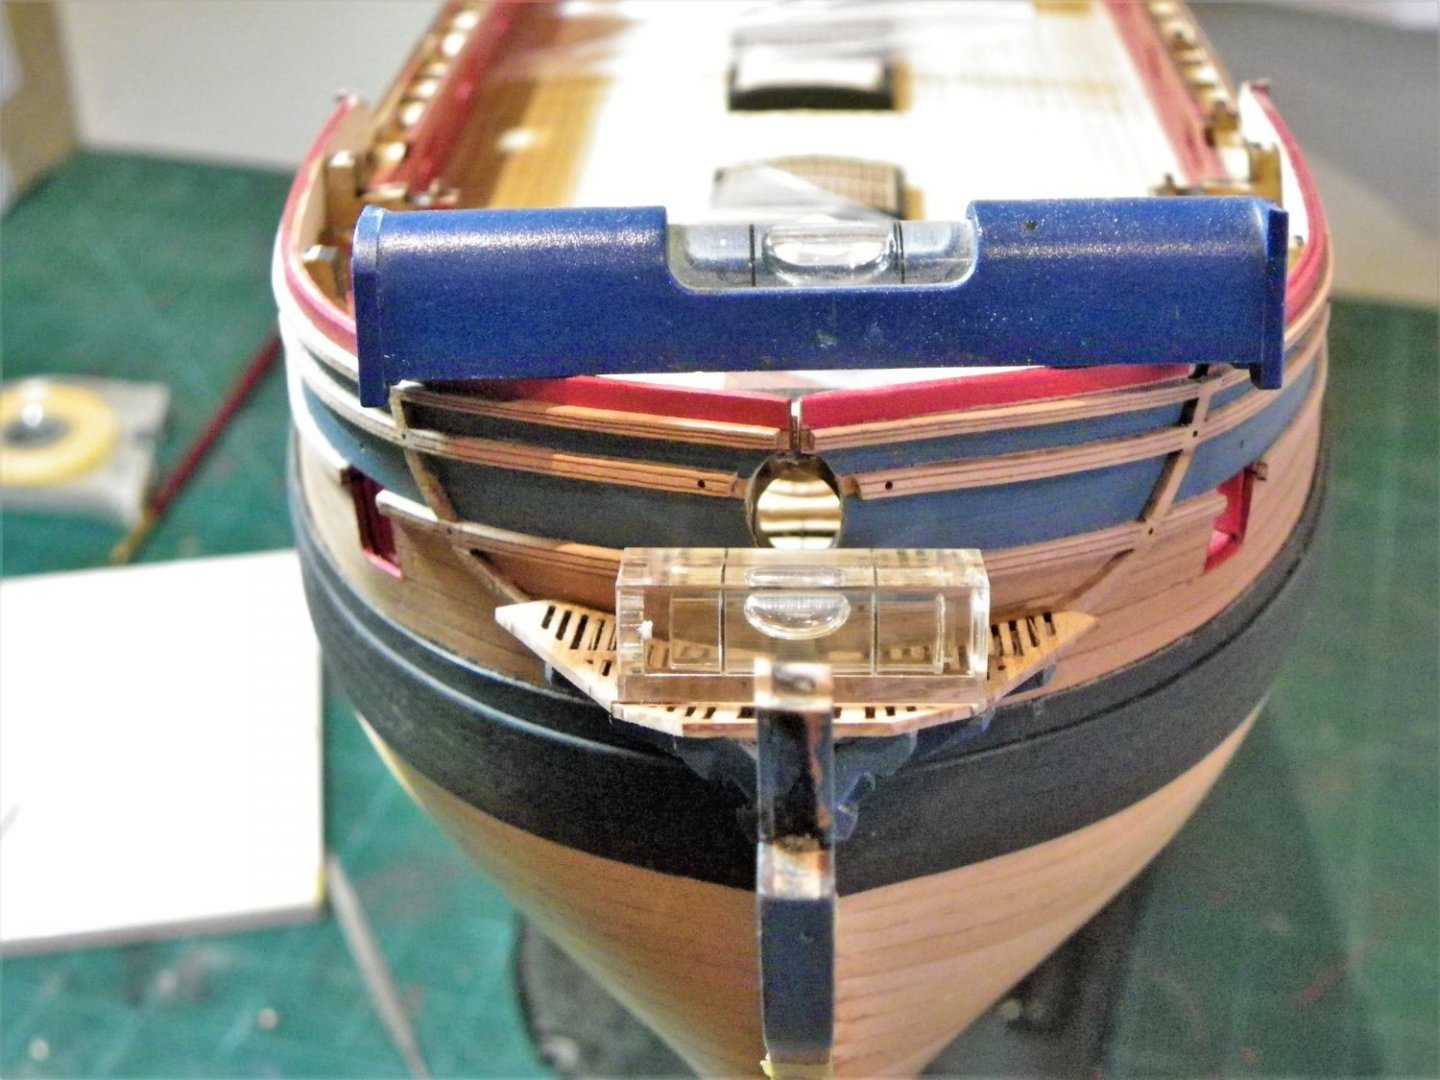
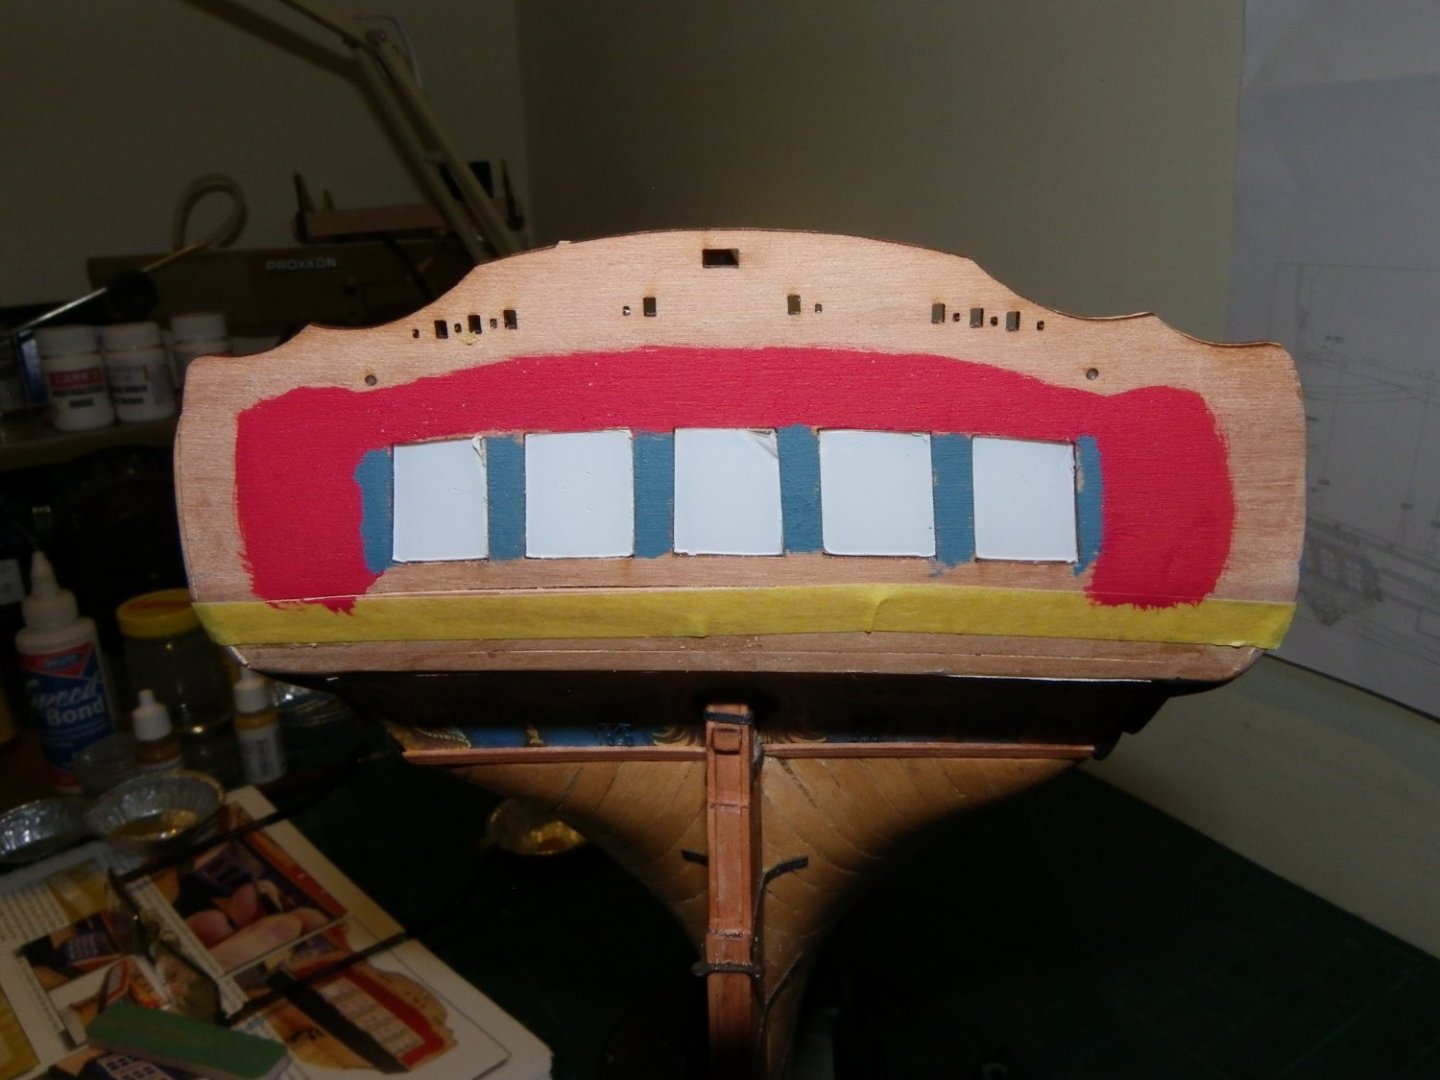
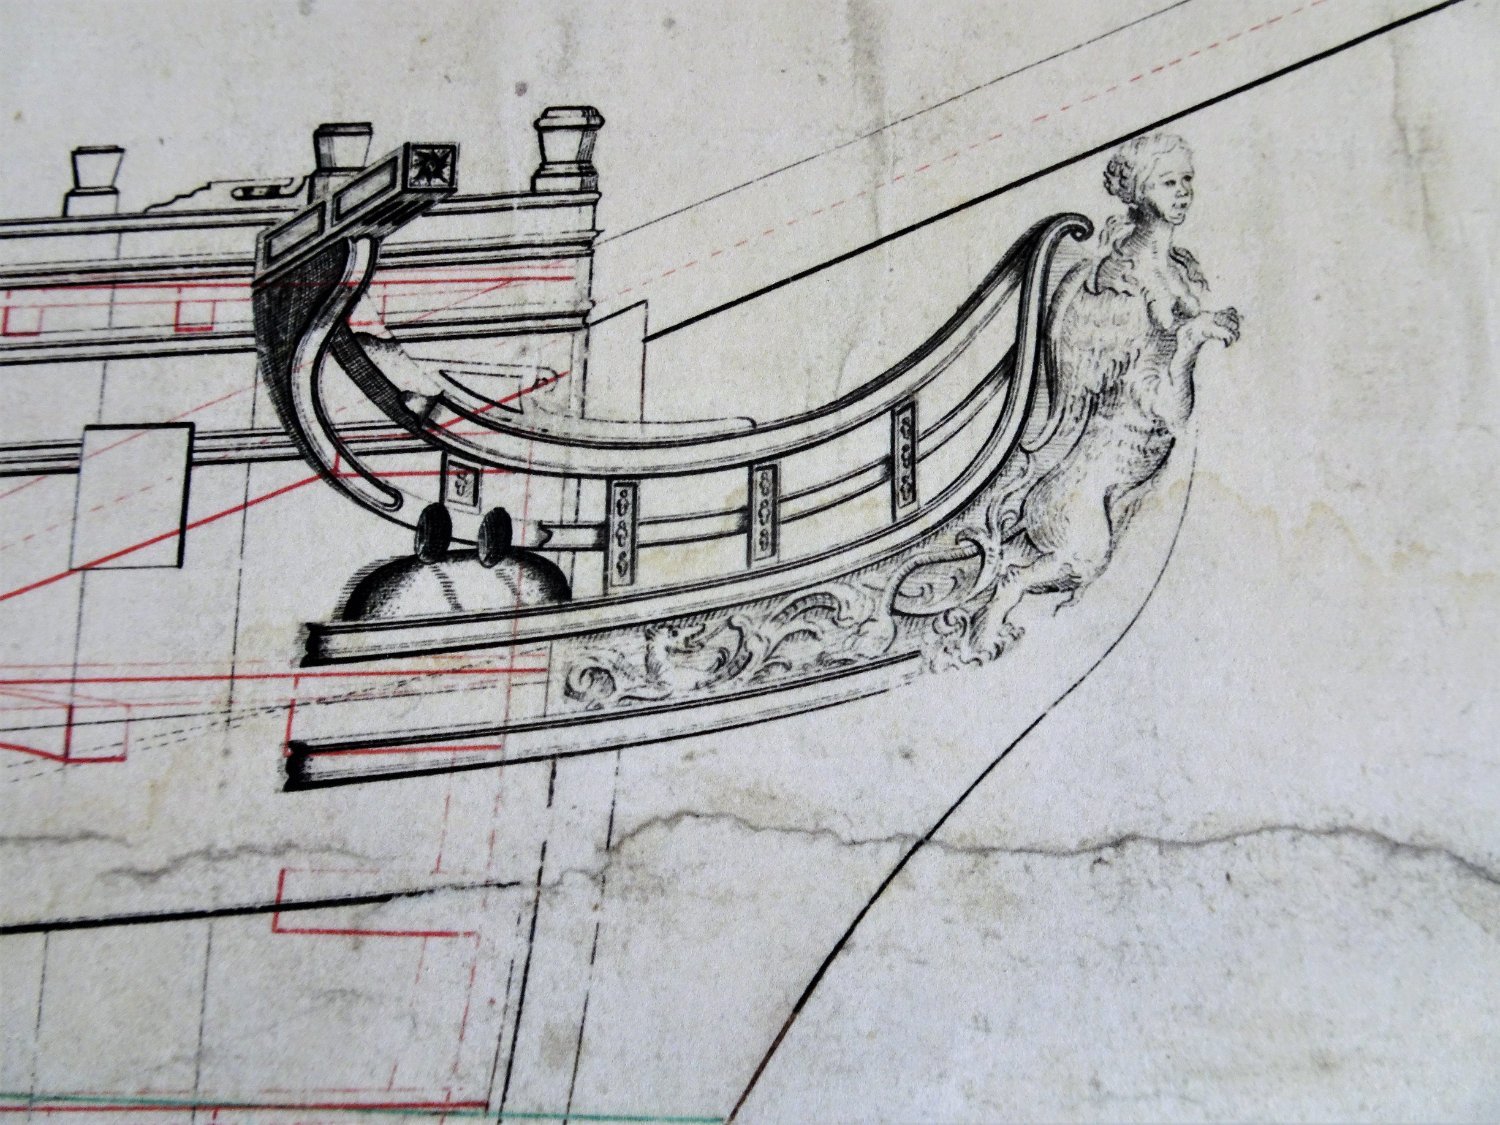
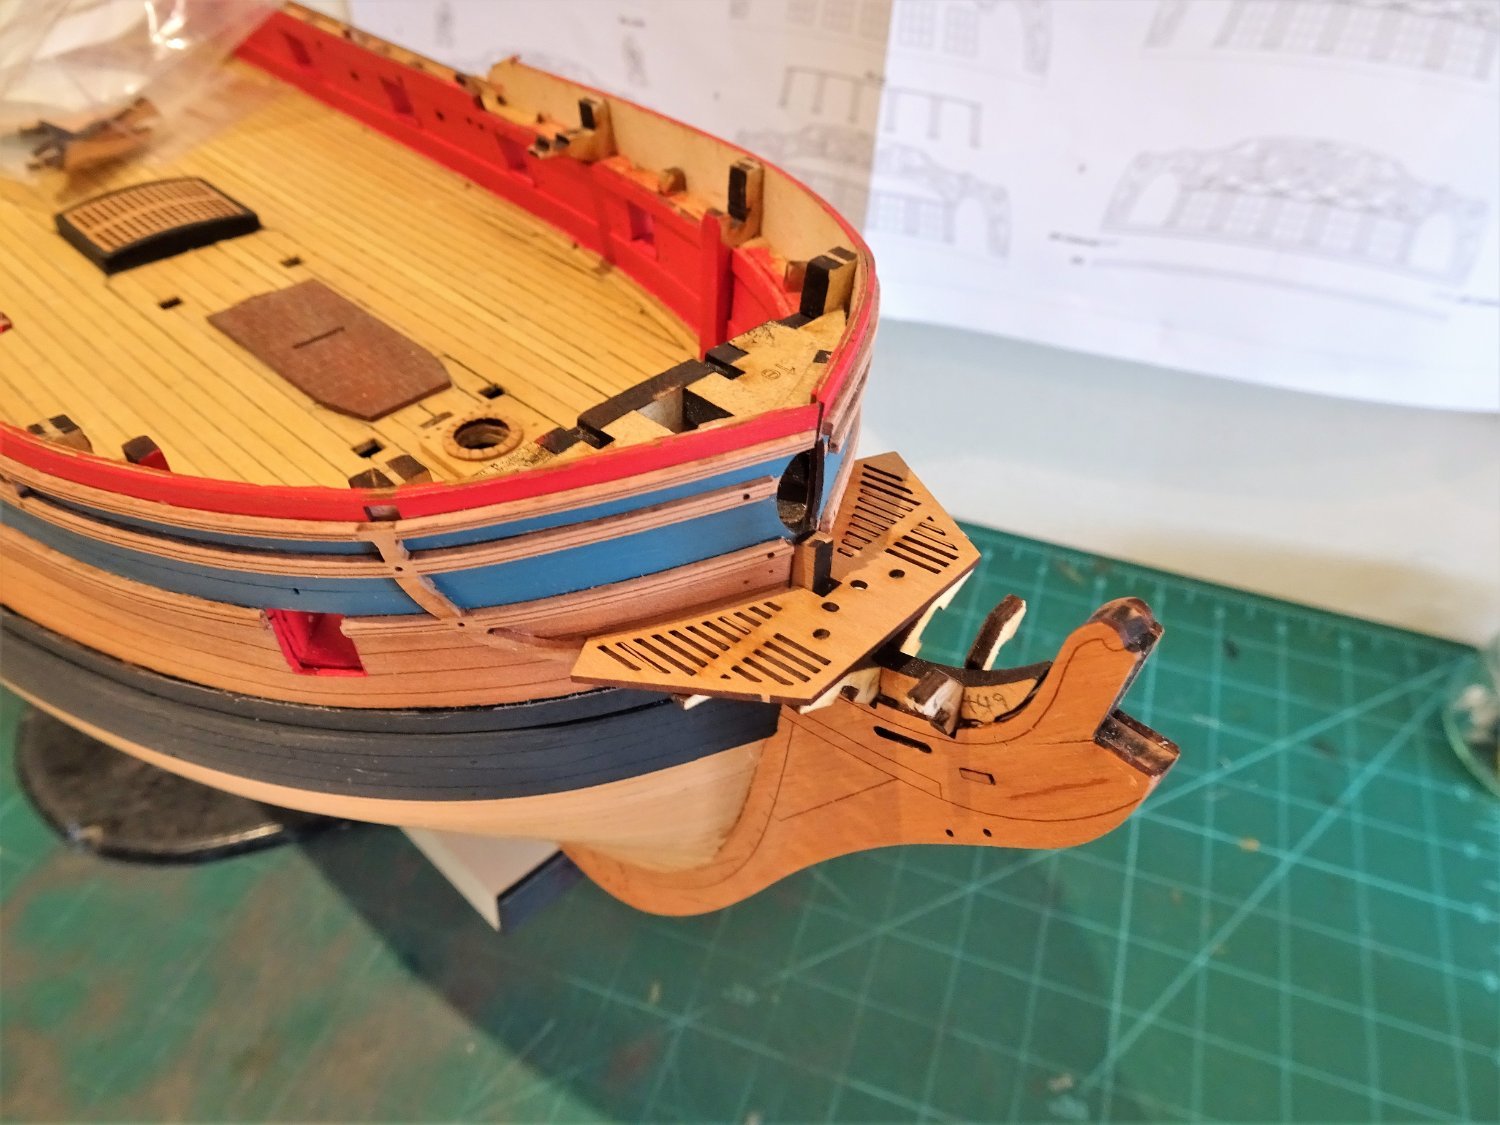
Post Seventy-five The Headworks – Part One This area of a build is one of the most critical and complex. There should be an elegance about how the rails sweep up to the head. The three head timbers are concave in shape flaring upwards from the cheeks/Hairbracket to meet the Main rail. 1649 Look at the elegance of the Headworks on Victory, this is what I will have in mind and hope to replicate as I approach the job. The kit provides laser cut parts to make up the head timbers with a separate Gammoning knee and laser cut grating. The assembly then fits atop the knee of the head. The laser cutting and fit of these parts is good but the Gammoning knee needs a little fettling to get it to sit right down on the knee of the head. 5507 This comprises sanding by degrees the locating nubs on the bottom of the knee. 5508 The grating set needs a little fettling to get a good fit to the hull. 2640 Checking the level of the grating set. Before I fit this stuff into place I need to paint the head. 5521 I am following the Marshall painting scheme rather than the kit. 5519 Above the Lower Rail the knee is painted Blue. The Timber heads are also painted blue on their faces. 5524(2) The black paint of the wale is carried across to the stem and abuts the Blue of the head. 5510 The Hair Brackets are very delicate serpentine shaped fittings and the softest of handling is required if the char is to be removed. They fit into place with the minimal of tweaking. 2643 When it came to the Ekeing patterns ((79/80) 0.6mm sheet 1) there is a mismatch between the manual (Sect.288) and the actual parts. 2645 These appear to be much longer that the actual parts. According to the manual (section 288) these are supposed to run from the Cathead mortise down to around the outer hawse hole and fit over the forward rail pattern. In practice, I think the unmoulded upper part may be for the Cathead bracket, which makes sense, but the mismatch does cause some confusion, and I spent some time trying to find those elusive long rails, thinking perhaps that the part numbers were incorrect. The Bow Cheeks are nicely shaped but I thought they can be enhanced by scribing a profile on their outer edges. 5525 Unfortunately the way the kit Cheeks are cut means the scribing along the edge is across the grain, which doesn’t make for a nice clean line. 5528 Not happy with this result, I’ll try facing the cheeks with a moulding, or cut new ones with the grain going the right way. B.E. 06/02/22


.thumb.JPG.4f356a9975117dcaabb2ca8ad59daeb2.JPG)
.thumb.JPG.90052474e3207d612292e28eb65e99fa.JPG)
- 857 replies
-
- 18
-
-

-
- Sphinx
- Vanguard Models
- (and 1 more)
-
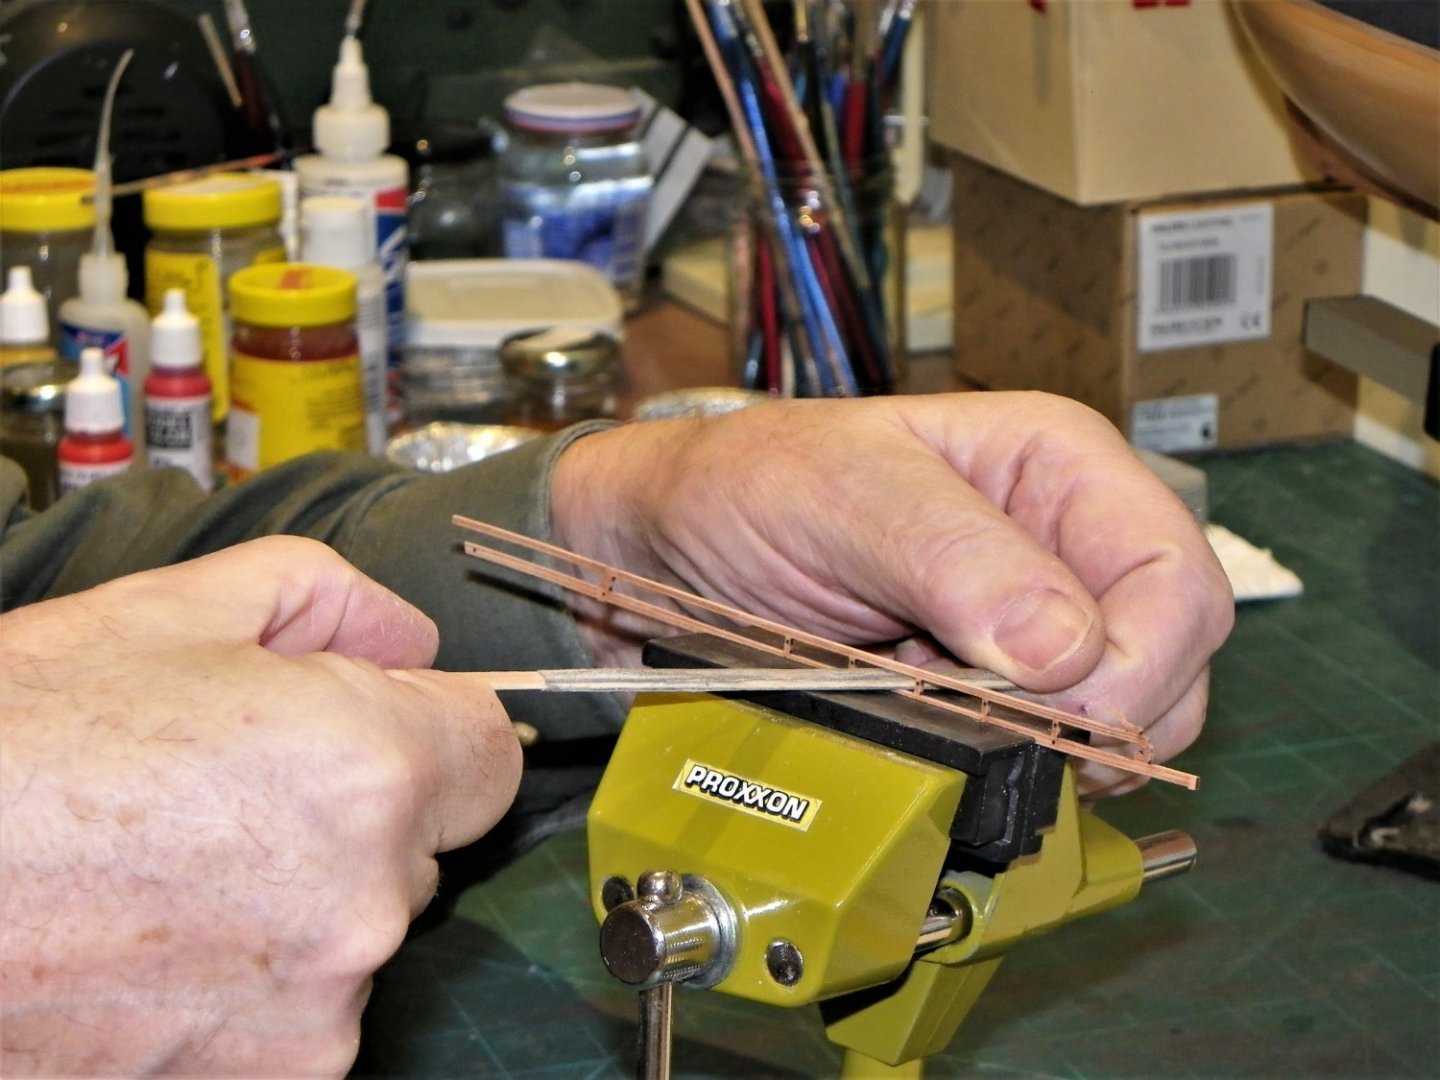
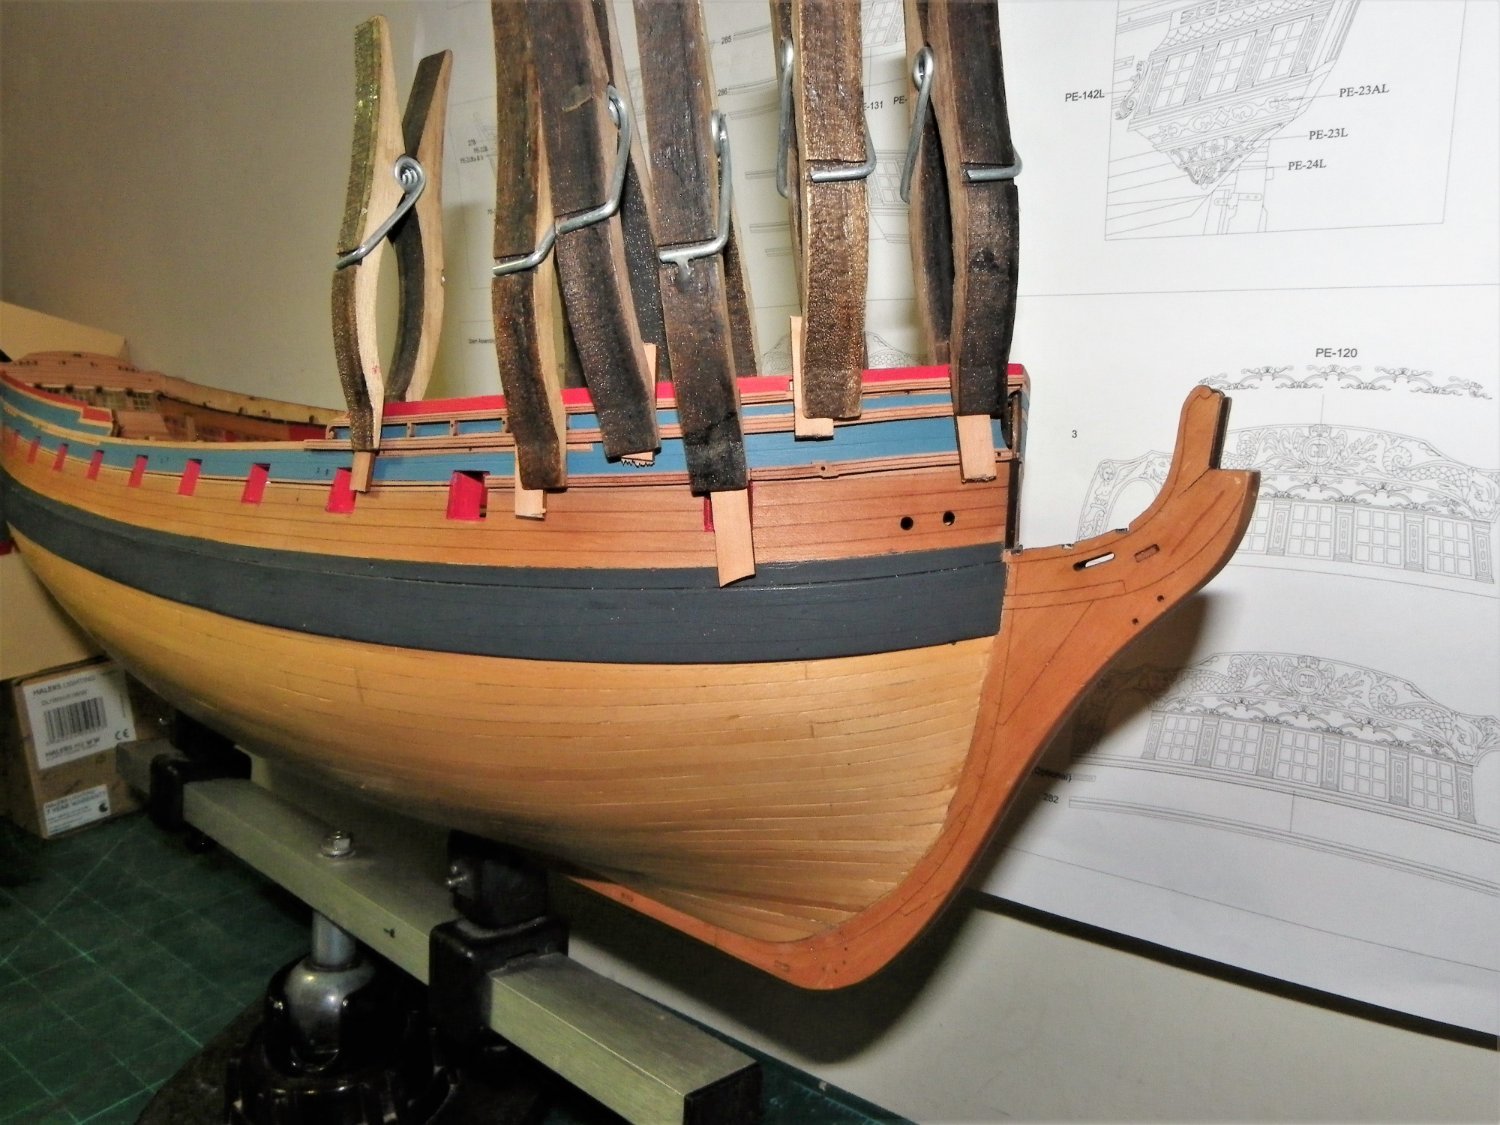
Post Seventy-four Fettlin’ the rails I will start with the forward section, and get that fixed into place first so I can proceed to the Headworks. 2609(2) I removed the Ekeing rail sections from below and above the lower rail. I left the middle and upper rails attached as I thought I could handle those without breakage, and I didn’t want to remove the tiny verticals between the two that form the connection for the channels support brackets. 2607(2) With the rails secured in the vice (with its rubber inserts in place) the char is very gently removed using sanding sticks with used paper on them. A slight round is also given to the top and lower edges of the rails. 2622 Very soft hands are required for this and I make bespoke sanding sticks for the purpose. 2613 The rails were soaked as per the blurb, and clamped in place to dry overnight. 2617(2) These are the bits left over, mostly unintended breakages, but they should fit into place once the main parts are secured on the hull. 2624(2) So far, so good, the necessary curve is retained. 05493(2) The rails were glued into place using PVA, I take the precaution of keeping a jar of clean water, and a small brush to hand, to remove any glue spread onto the ground. 05486 The bits that broke away went back without issue. 05498 05490(2) It is a slow and precise business fitting the rails, I’ve spent two days on the forward sections, but I think cleaning them up is worth the effort, for me at least. I will now move onto the Headworks. B.E. 04/02/22
.thumb.JPG.3933baf46082c6a8788e6b12805758fe.JPG)
.thumb.JPG.53b49e2dd04bdd20d2d61d7efc1471d9.JPG)

.thumb.JPG.22d256d45b0a2669d1cfd612760c6e5c.JPG)
.thumb.JPG.516b7476da016df269830cee0f708ccf.JPG)

.thumb.JPG.33e69ca6f3267ab2cd038118dd9ee144.JPG)
.thumb.JPG.848678000d3b94b06d061b1babaa633e.JPG)

- 857 replies
-
- 30
-
-
- Sphinx
- Vanguard Models
- (and 1 more)
-
Beautiful work Glenn, I love your planking. B.E.
- 840 replies
-
- 3
-
-
- winchelsea
- Syren Ship Model Company
- (and 1 more)
-
I like that idea of the Pearwood strips with the the brass etch profile cutter included, but that would up the cost of a kit and the line has to be drawn somewhere. The Sphinx laser cut rail sets are I think designed to be put into place without messing with them, that way if soaked and pre-bent they are not likely to become a problem. I've always made profile cutters from an old single edged safety razor blade, altho' cutting the profiles for a 2mm x 1mm strip would prove testy. I do have a set of micro scrapers made by Artesania Latina, but they are designed for larger profiles, the smallest is 1x3mm. Back to soft hands and gentle strokes. B.E.
- 857 replies
-
- 6
-
-
- Sphinx
- Vanguard Models
- (and 1 more)
-
I've been playing around all afternoon with these pieces with varying degrees of success. If they come out ok I'll probably use them, if not I do have the makings to create the rails, altho' some of those delicate volutes would be more problematical to reproduce. Hopefully I'll get there the end. Regards, B.E.
- 857 replies
-
- 2
-
-
- Sphinx
- Vanguard Models
- (and 1 more)
-
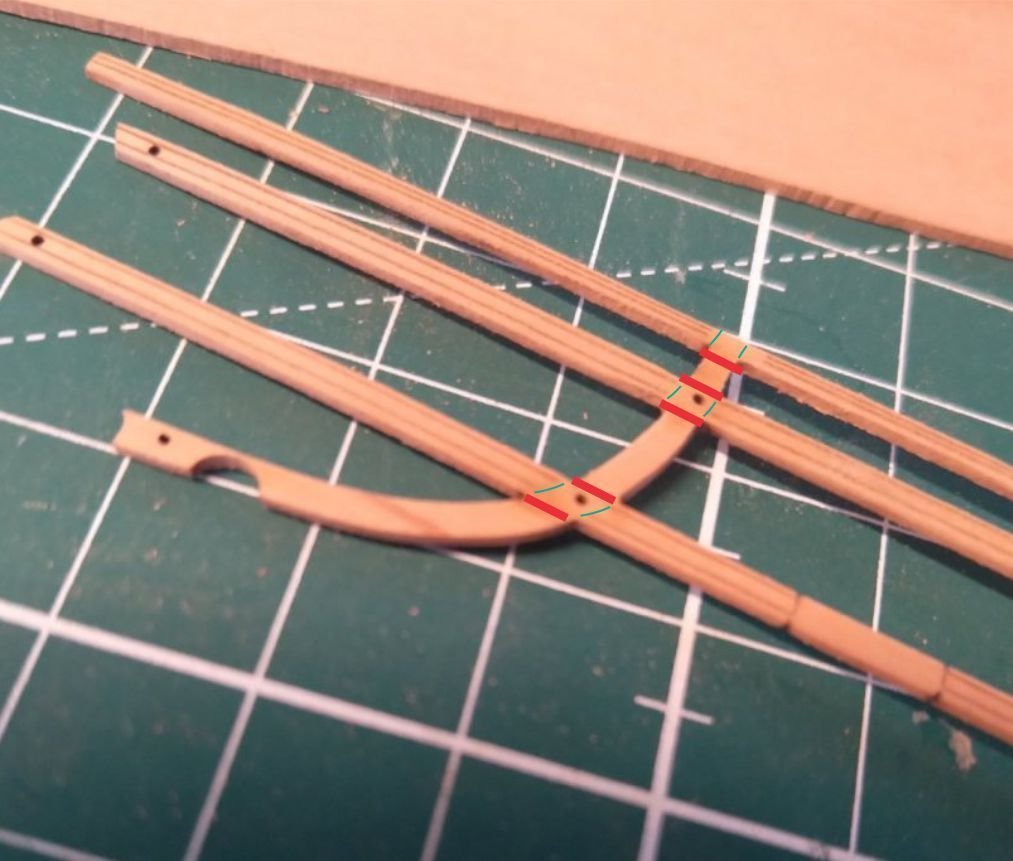
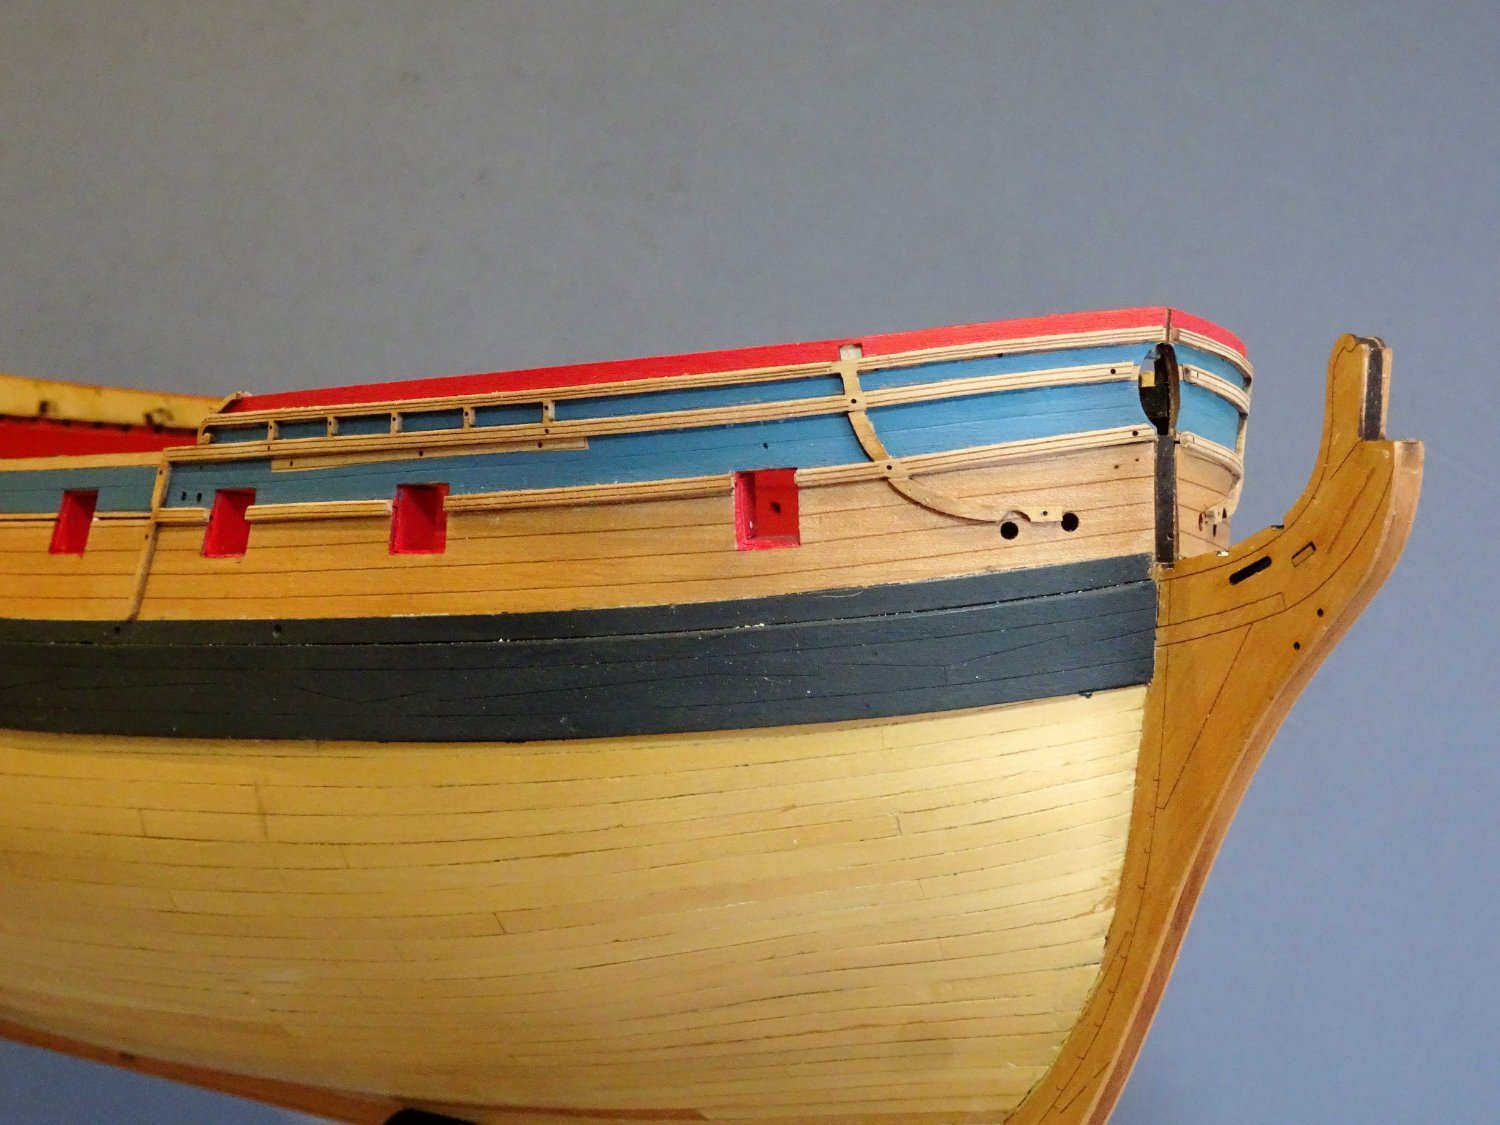
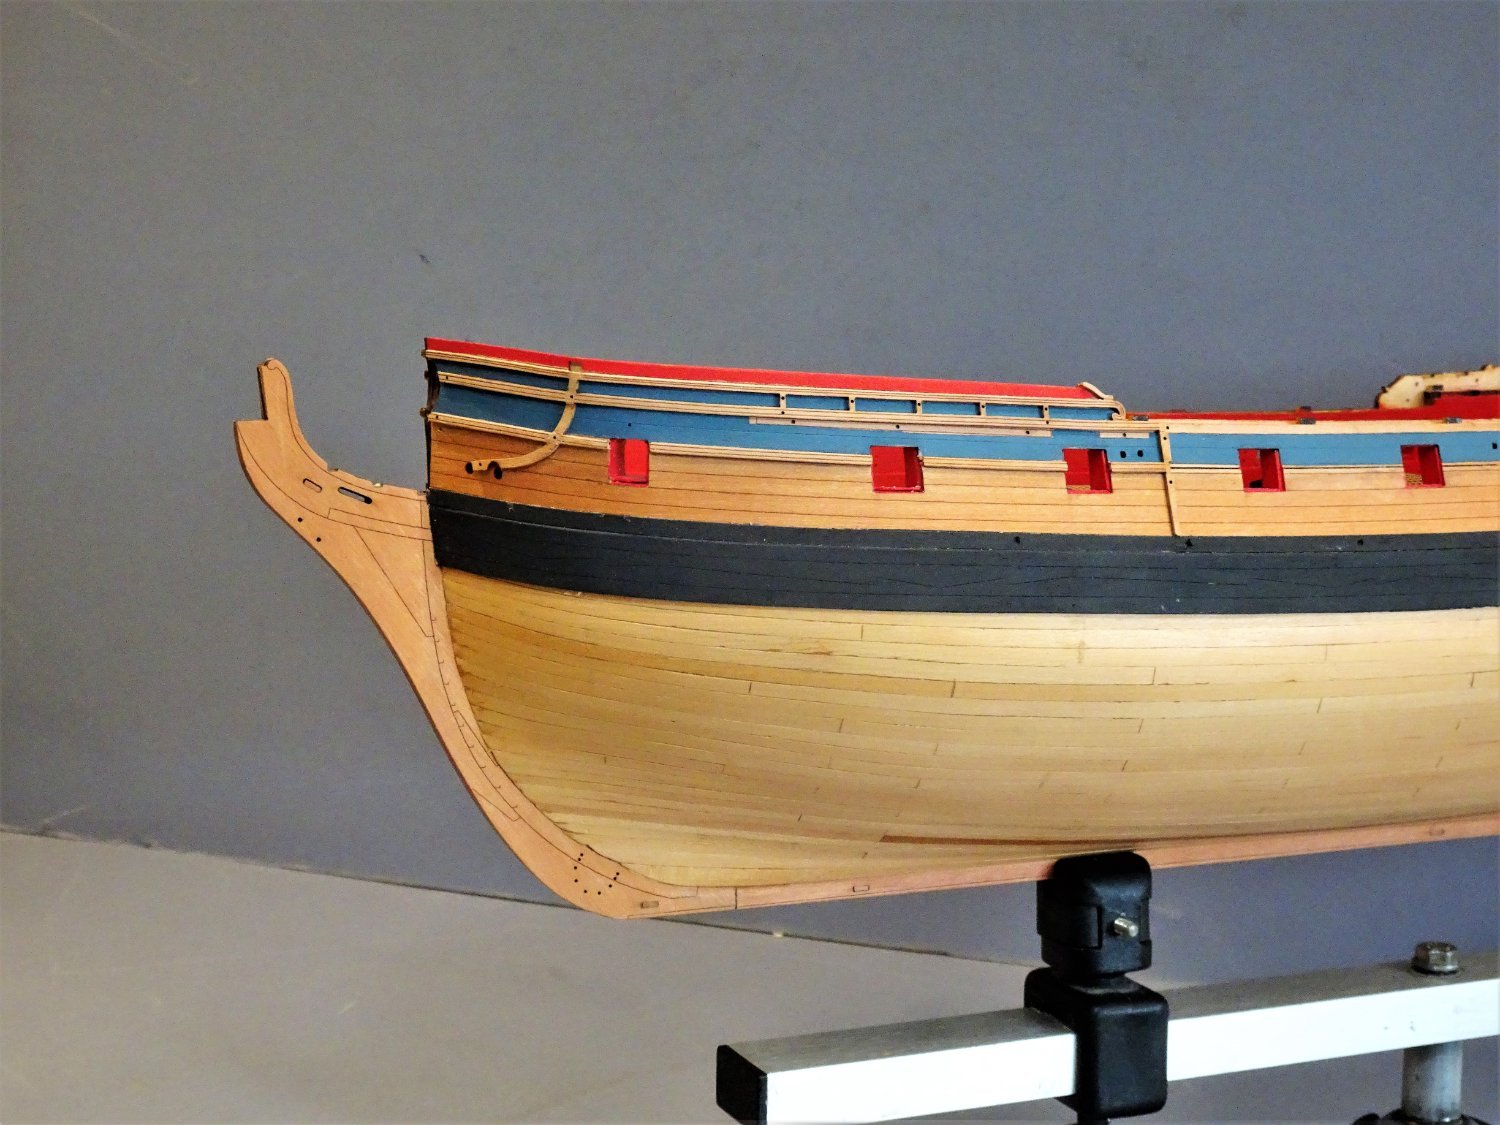
Cheers Guys, there comes a point in a build where the enjoyment level takes a sharp upward curve, I have now reached that point, with detailing taking over from the basic construction. Post Seventy three Painting the Topsides Just as I was thinking about moving onto the Headworks it struck me that I had better attend to painting the Topsides. 2592 Using 2mm Tamiya tape I covered the areas I didn’t want varnished or painted. Between the wale and the topsides w-o-p was applied by brush as rubbing it on with a rag risked getting the varnish where it wasn’t wanted. I used two brushes one in each hand, the first to apply the varnish, the second a dry brush, to immediately wipe off any excess. Three coats were applied. 2598(2) 2602(2) The Blue and Red grounds to the Topsides were done next, again three coats were applied, with a light sanding using old paper before the last coat. With a little reluctance I now need to look at those fragile rail patterns that run along the hull from bow to Qtr Gallery. The Forward Sheer and waist rail patterns include the hull section of the Eking Rail that runs up to the Cathead support and therefore has a link to the Headworks. 2595(2) Things didn’t start well, I swear Guvnor I barely touched it and bits fell off. I really don’t see how the char can be effectively removed whilst keeping the rail sets intact. This subject was raised in Jacek’s build, and I have decided to follow Chuck’s excellent advice on the subject. It is worth repeating Chuck’s advice here both as an aide memoire for me and for the benefit of those who may read this log. Chuck’s comments. But looking at the shape of those parts and the way they are cut, they lend themselves to breaking along the cross-grain. So, if it were me cleaning those, I would pre-emptively break those moldings in the most delicate spots such as the areas that broke for you. I would have carefully cut those cross-grain vertical pieces away so I could more easily hold the molding and sand them a little at a time individually down their length with some 420-grit sandpaper. I would cut the vertical pieces free right up against the fancy molding. Indicated by the red lines. But that’s just me. If you are really worried about placing the vertical elements back where they should be, you could also cut them free leaving a small nub against the fancy molding. But leave the break point as a clean break so the pieces will glue back without even ever seeing the seams. So this is the approach I will take, following Jacek’s lead who in my opinion has done a fine job in cleaning the rails, based on Chuck’s advice. This will be the next Job, getting the Sheer and Waist patterns fettled and applied so I can move onto the Headworks. B.E. 02/02/22
.thumb.JPG.1a531e7ad9f50cfe6475d6034d73c04e.JPG)
.thumb.JPG.8559e329c9c569fd216bb9fc03a1012d.JPG)
.thumb.JPG.876e431c789bcaf52d4c021ec05f1133.JPG)
- 857 replies
-
- 22
-
-
-
- Sphinx
- Vanguard Models
- (and 1 more)
-
If you used ca to glue the etch it should come off with a thin blade worked beneath it. Just hold a finger over it, or perhaps a piece of tape to avoid it pinging away. If it is stubborn paint a little acetone around it. As you probably know by now the piece you have below the upper rail of the QG properly belongs to the lower finishing piece, and is the wrong way up. Remove it, I think you can make it look a lot better, may need a sanding and repaint, but worth the effort. B.E.
- 505 replies
-
- 11
-
-
- vanguard models
- Sphinx
- (and 1 more)
-
Nicely crafted rails Bug, a vast improvement on the over-scale kit versions. B.E.
- 419 replies
-
- 2
-
-
- Victory Models
- Pegasus
- (and 2 more)
-
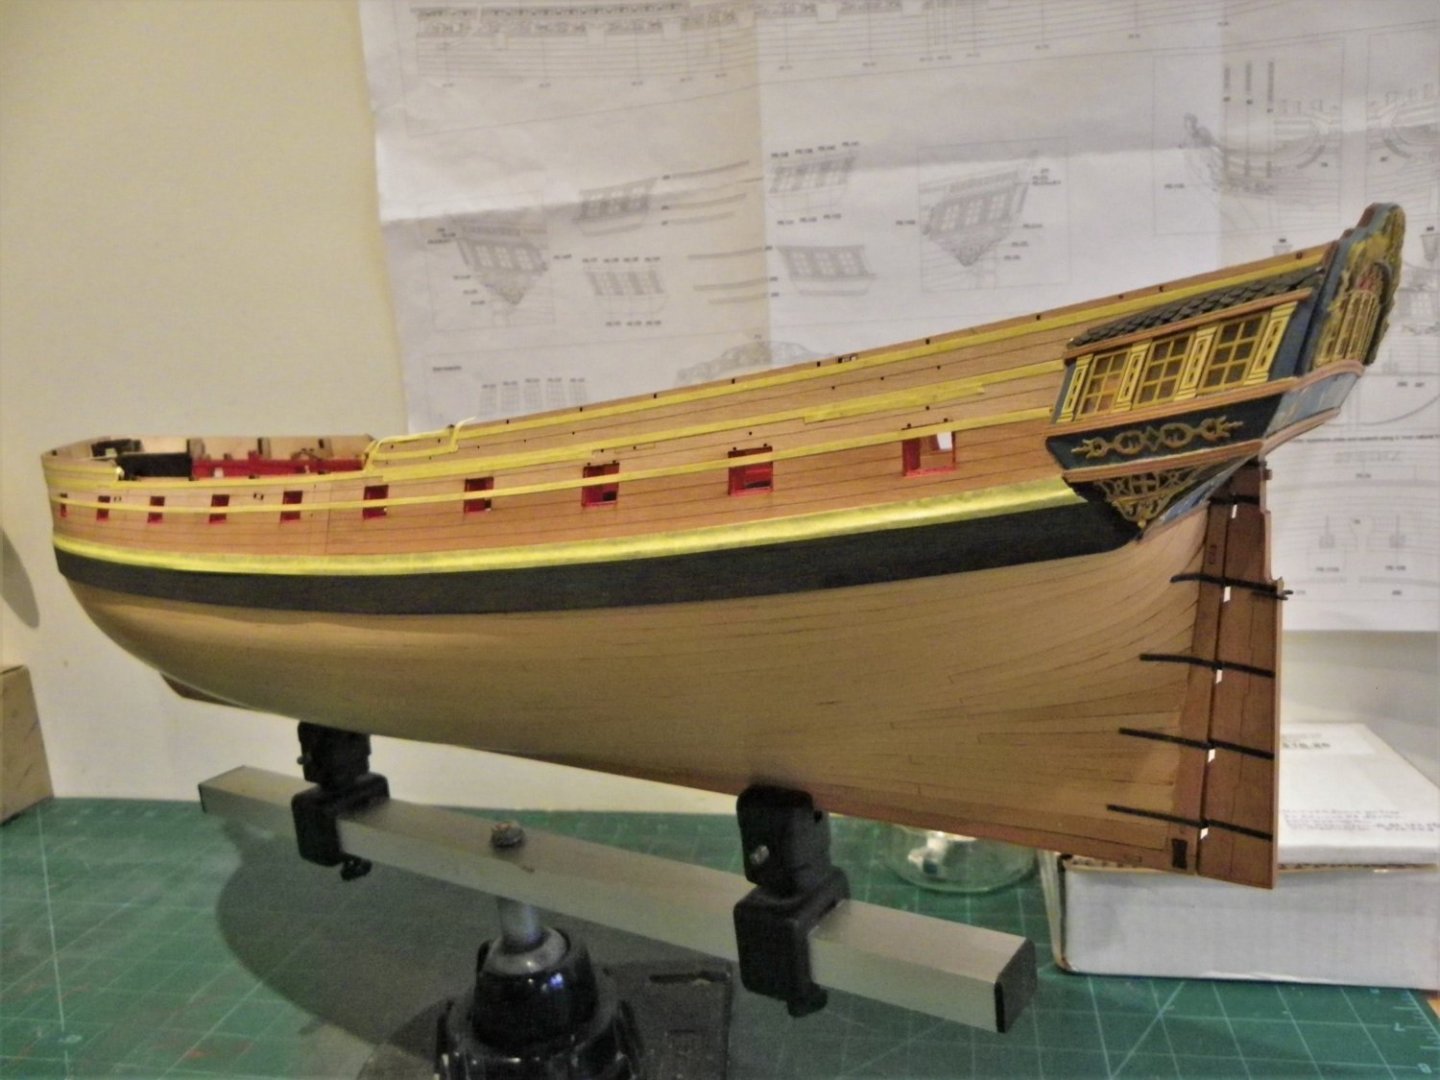
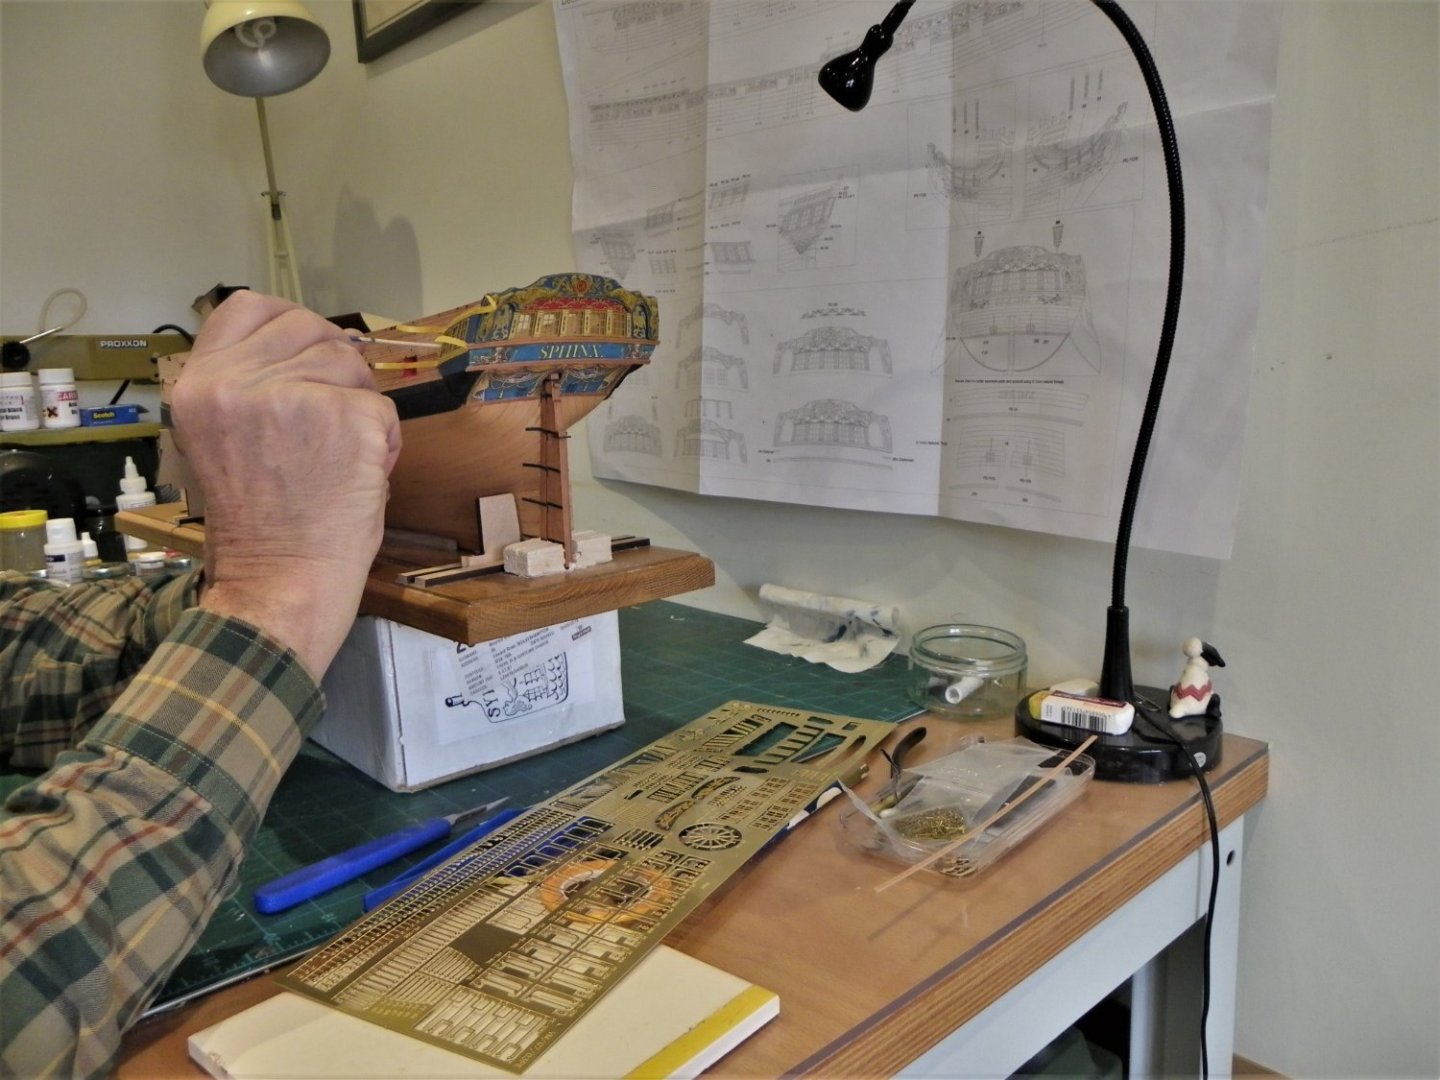
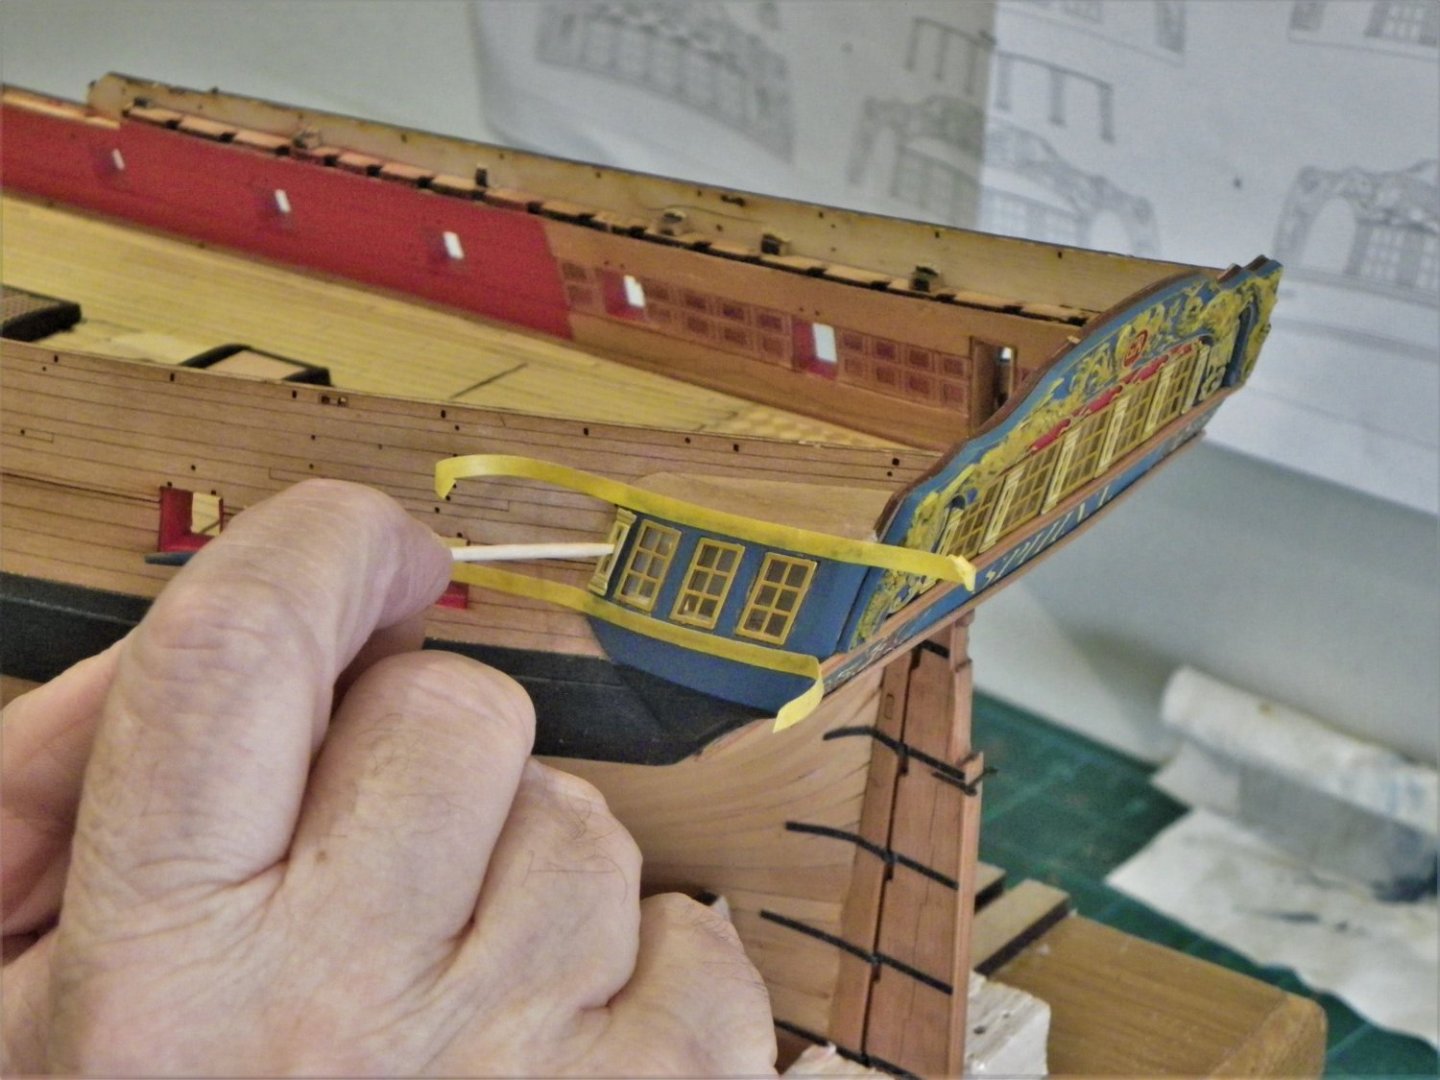
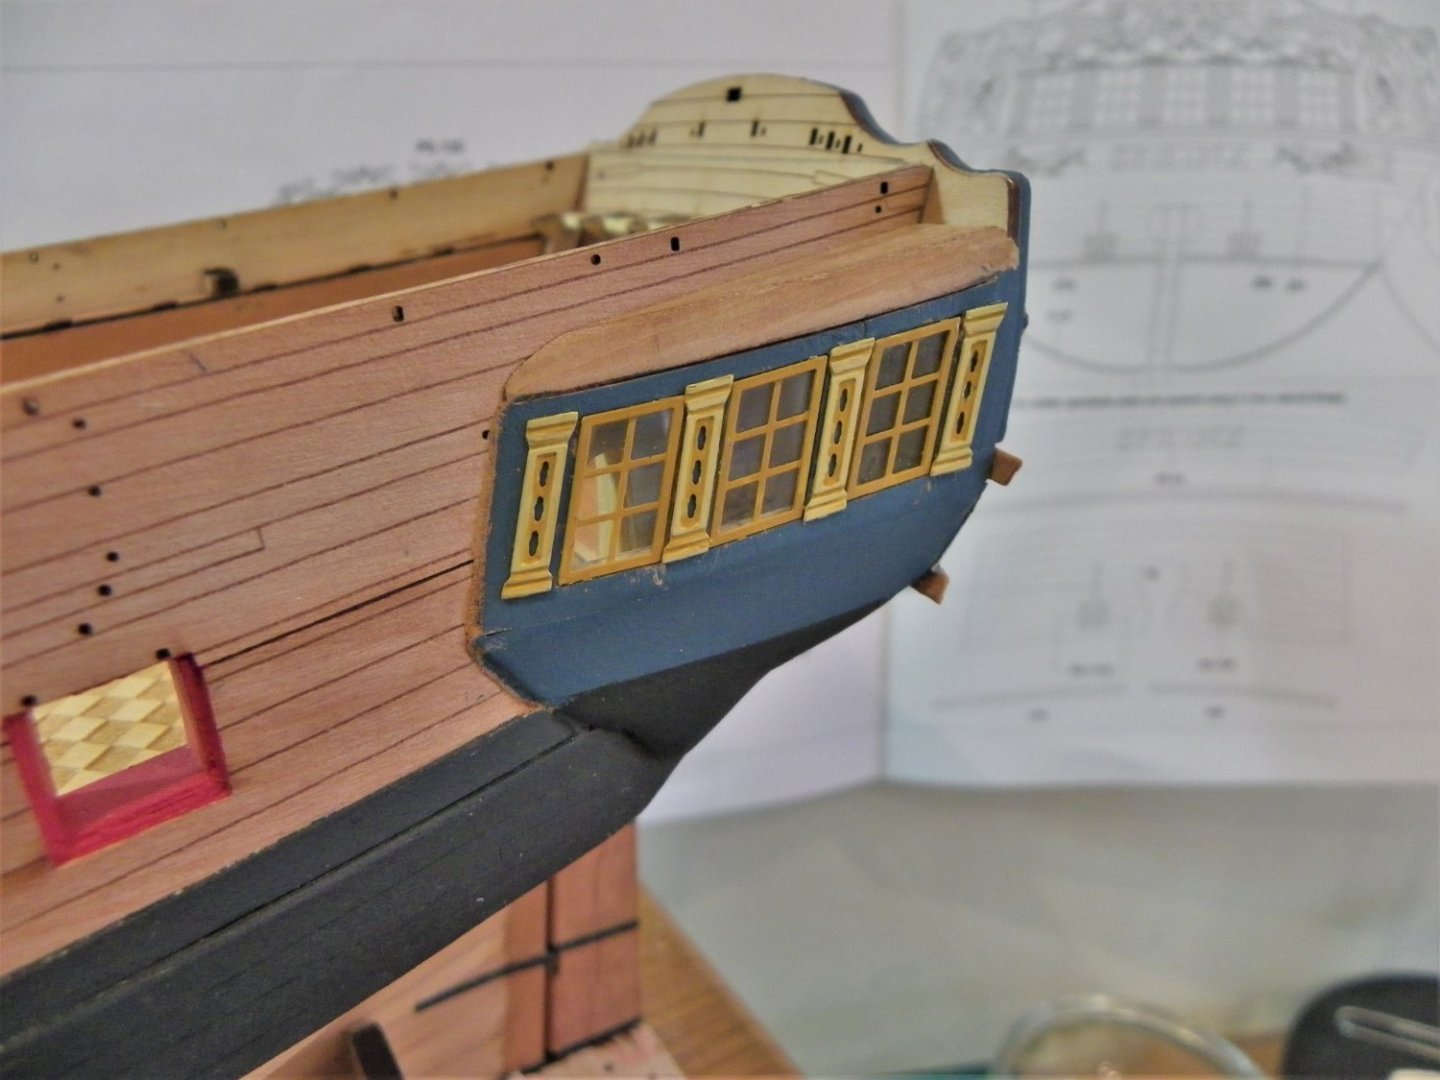
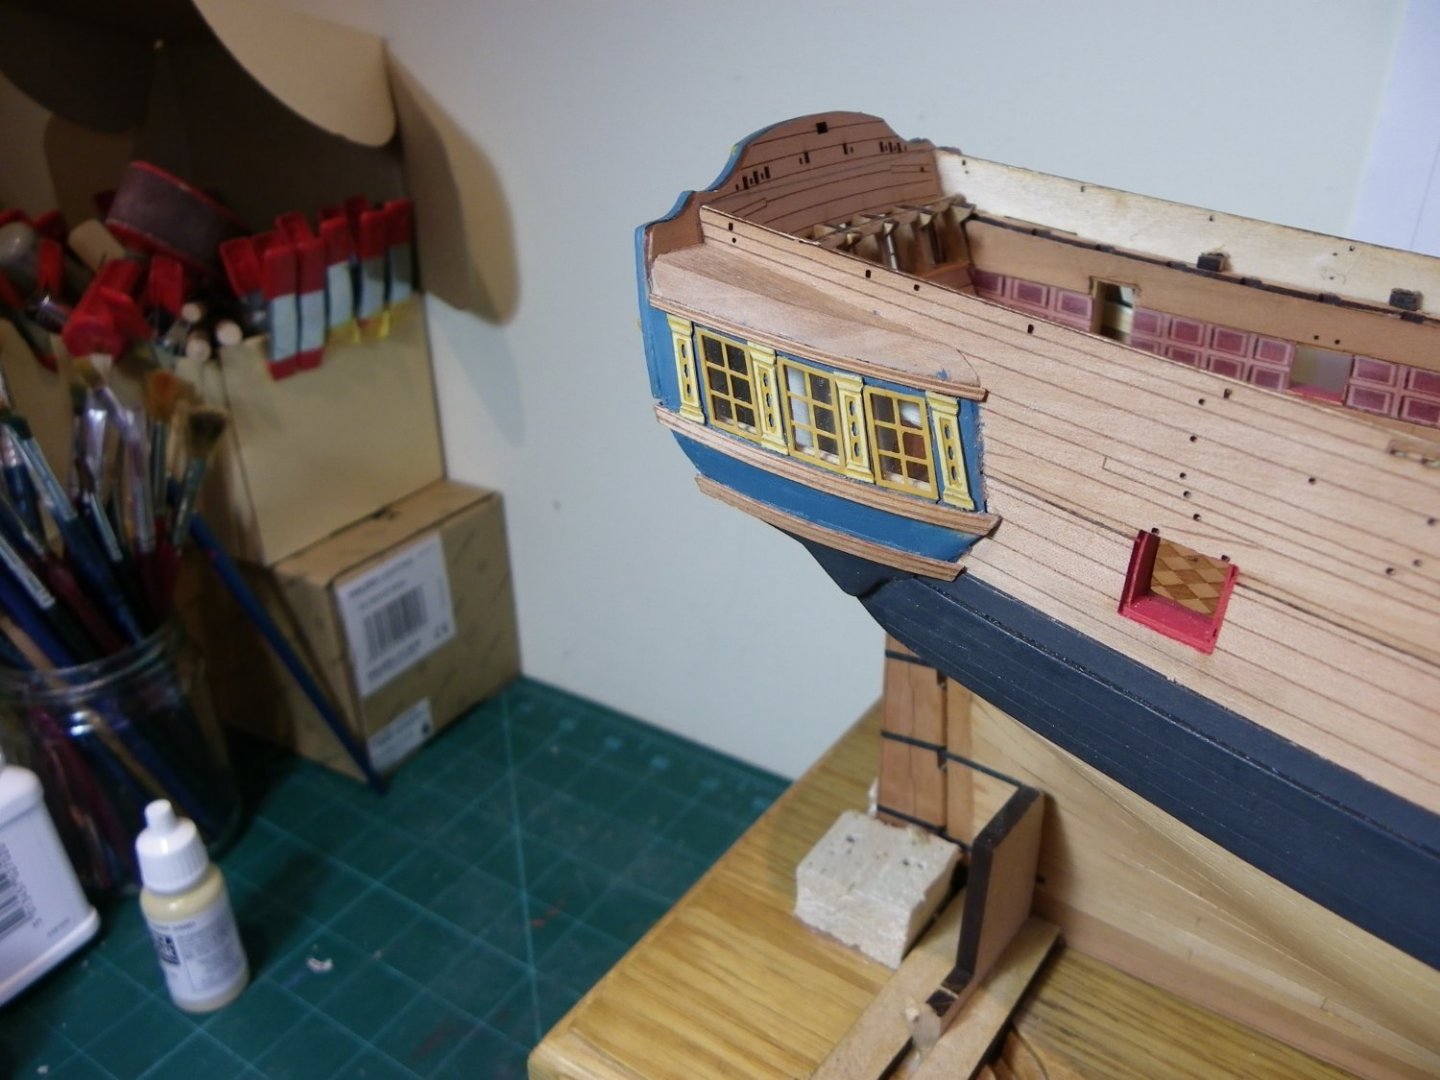
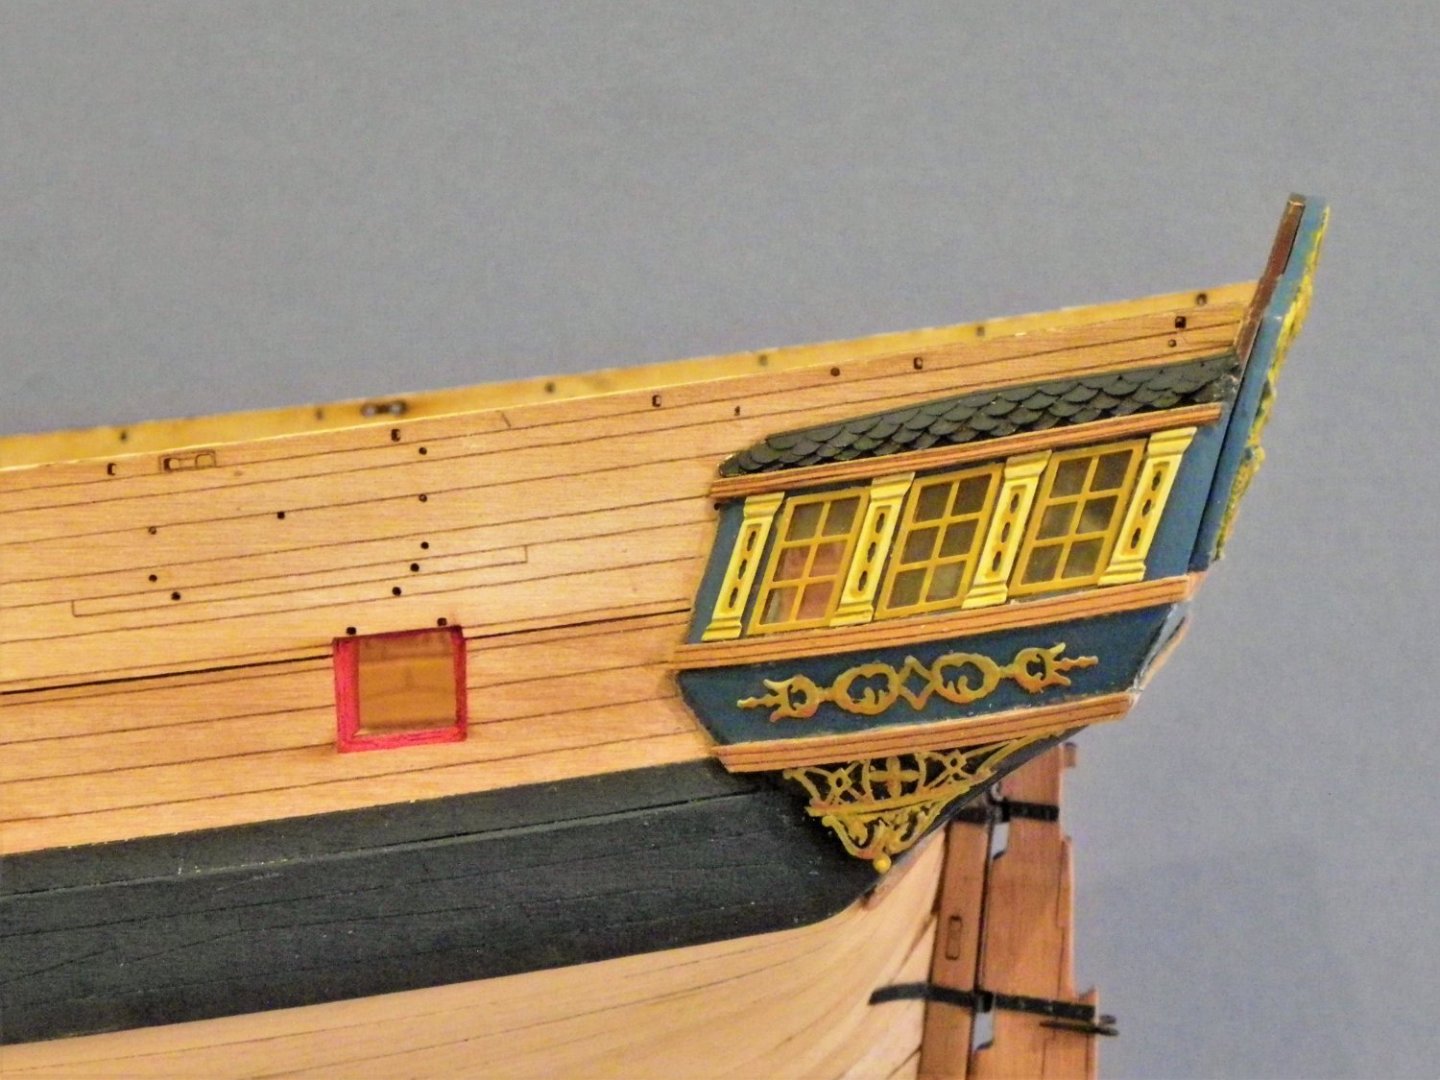
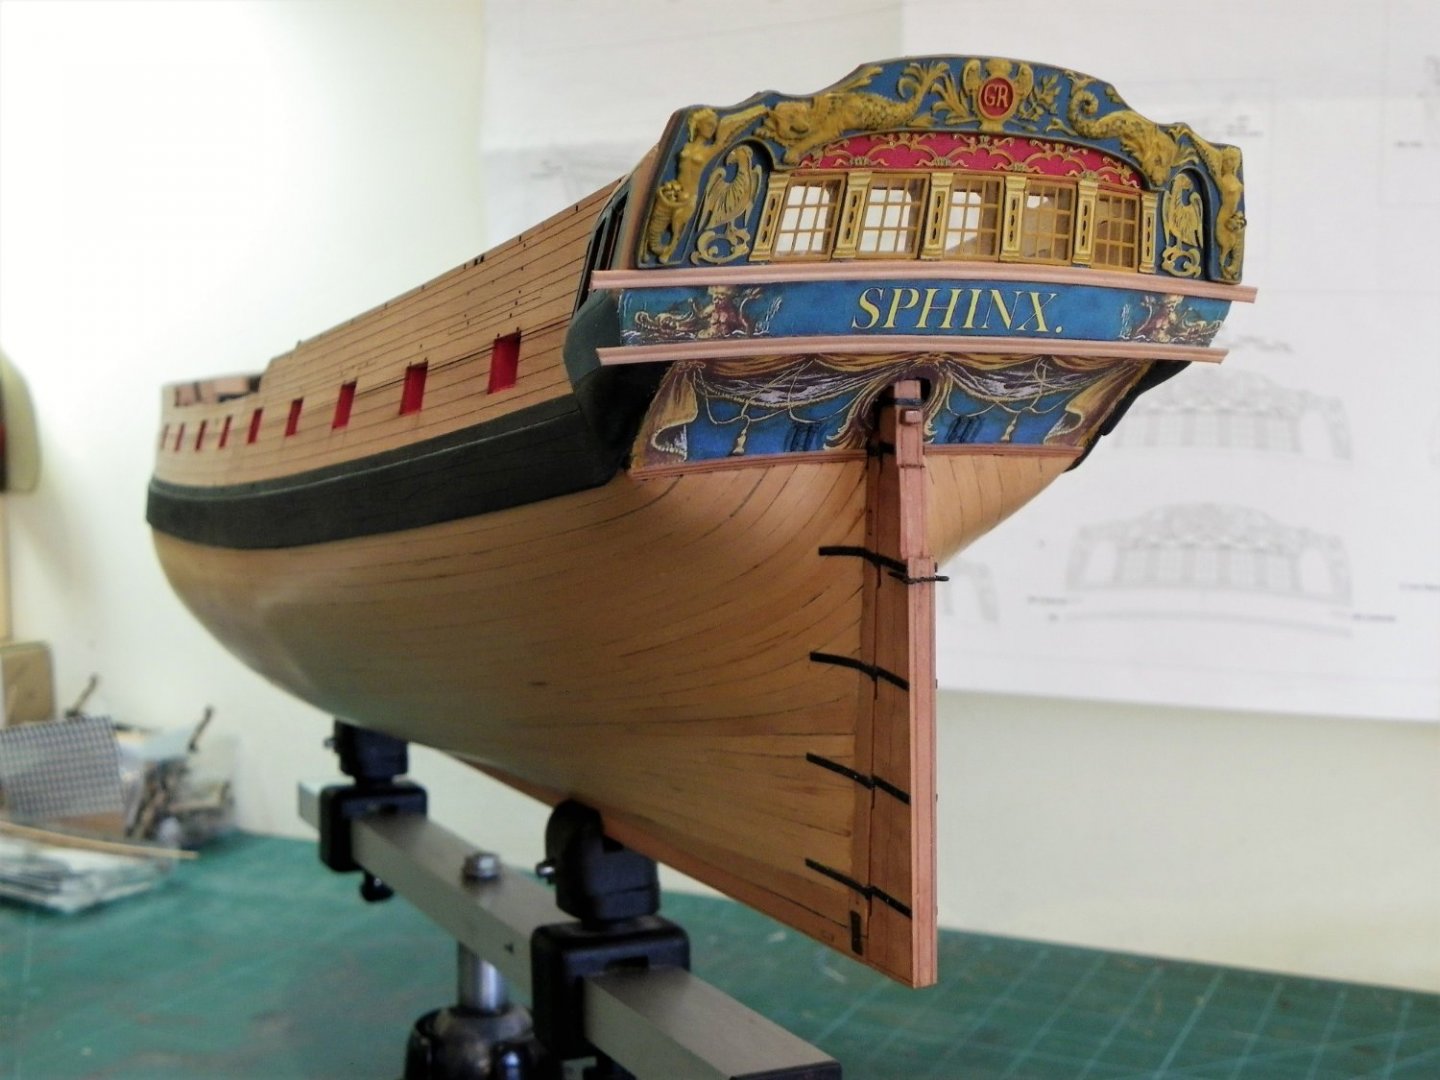
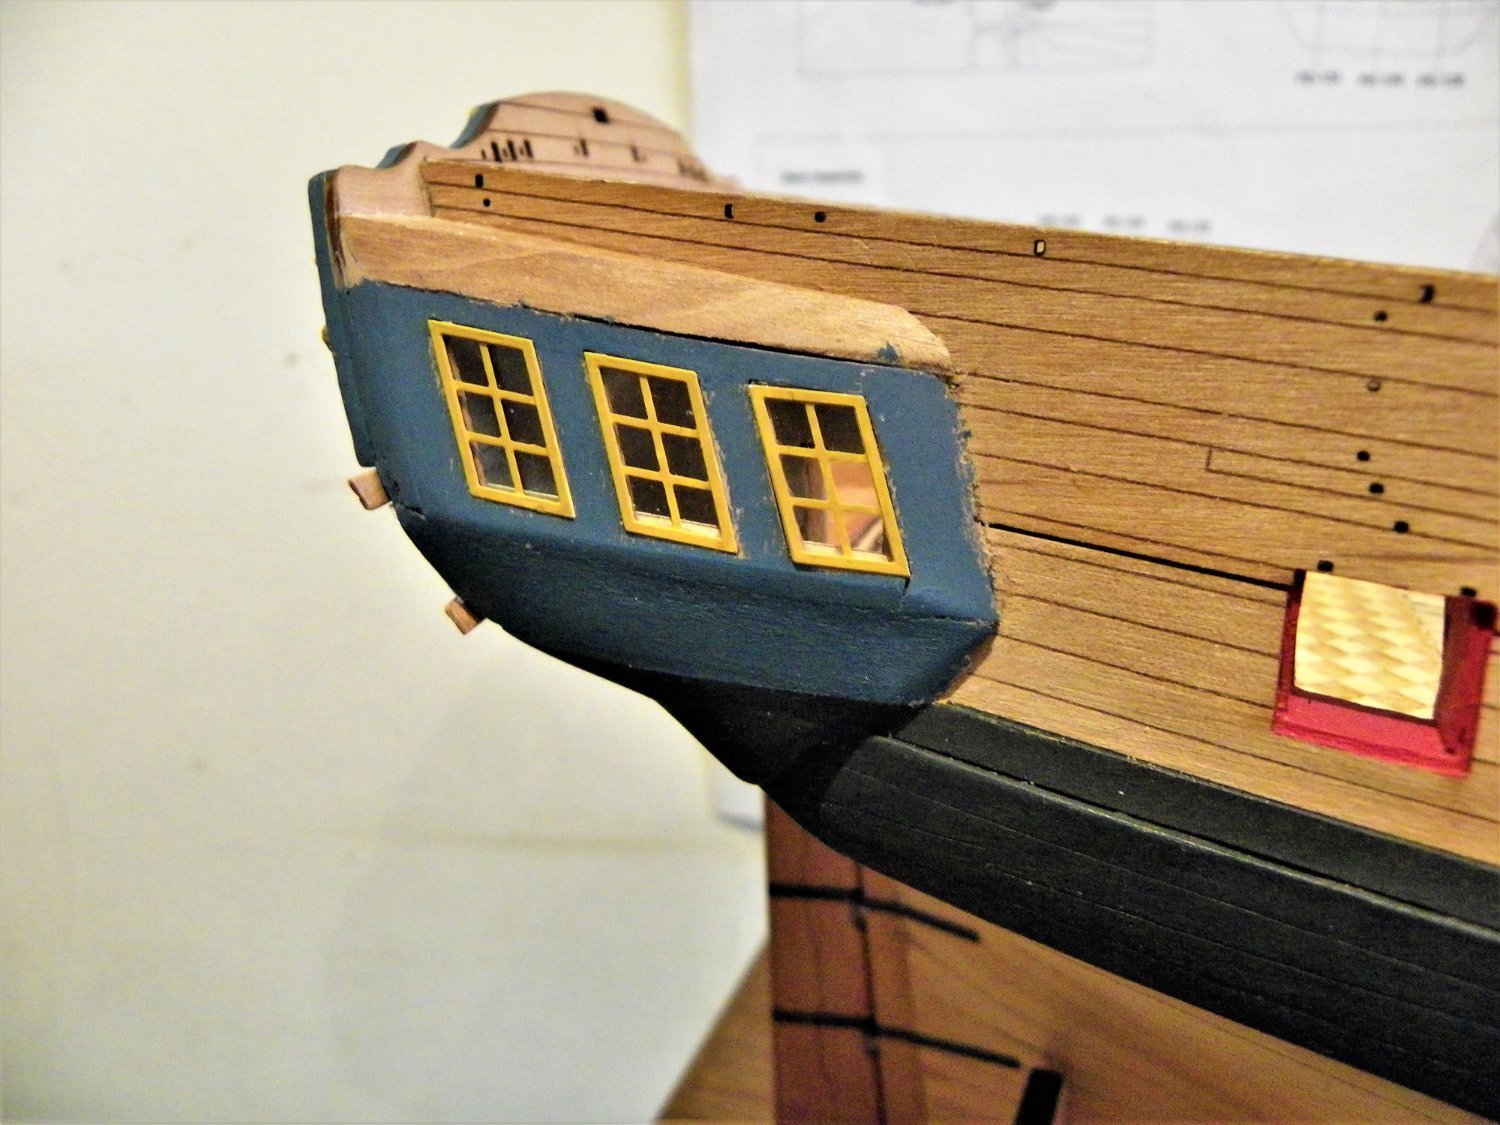
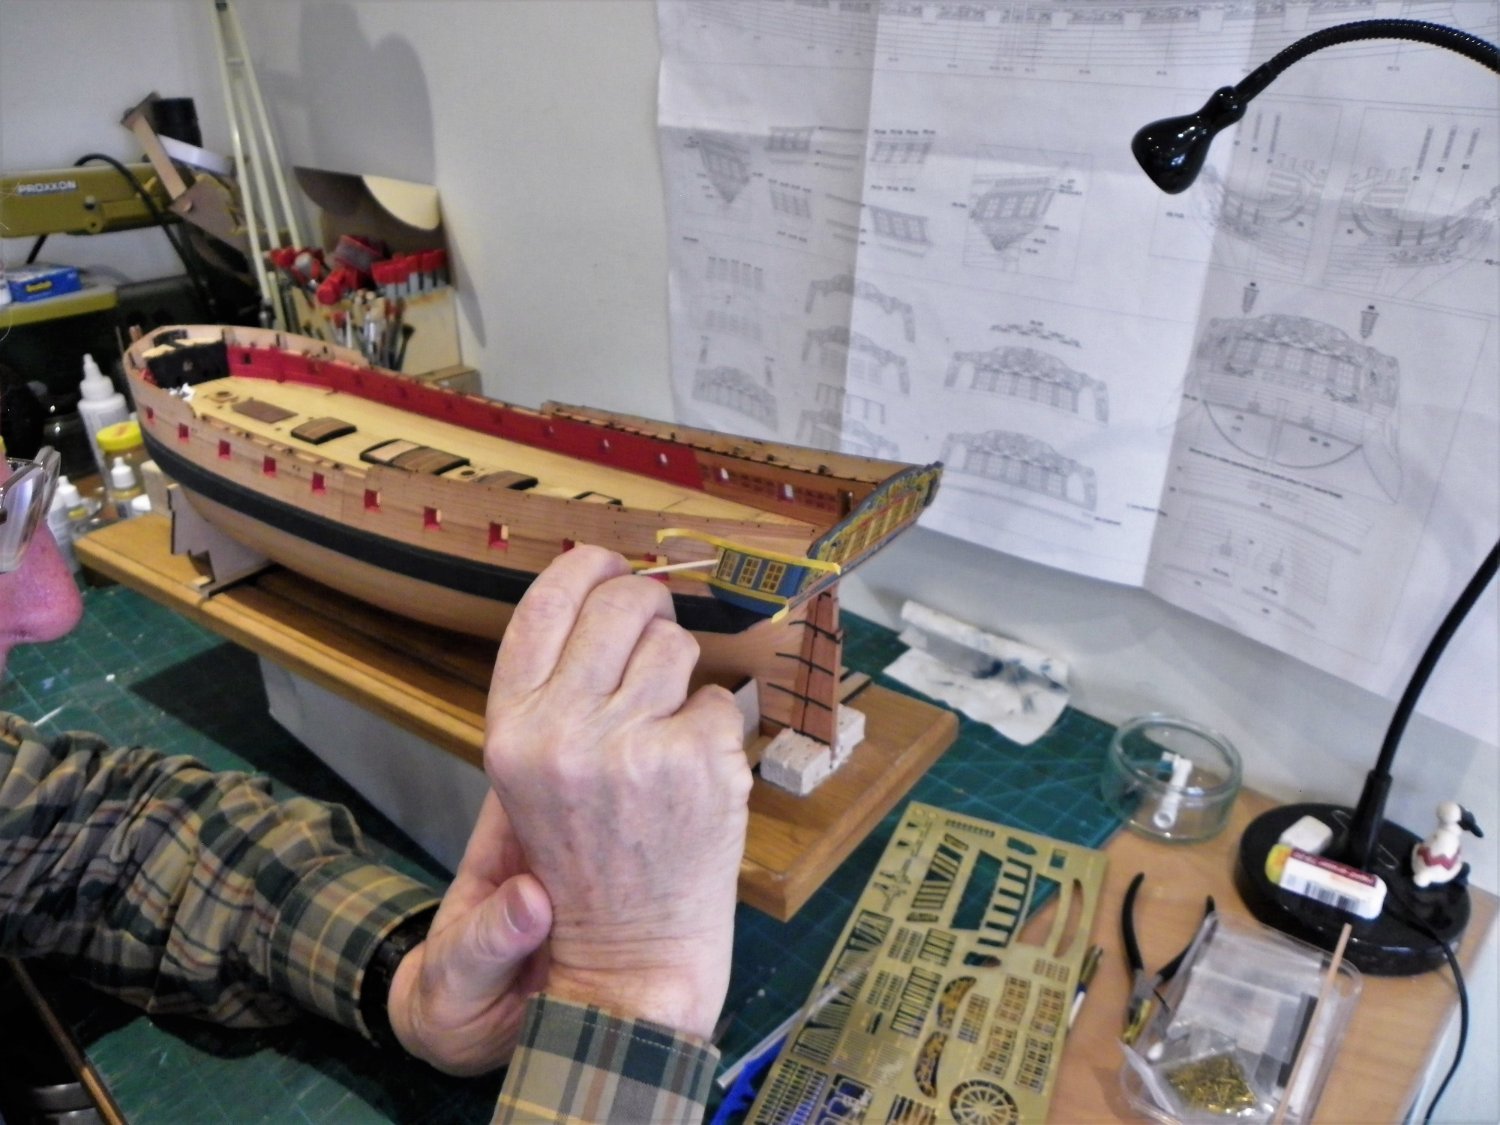
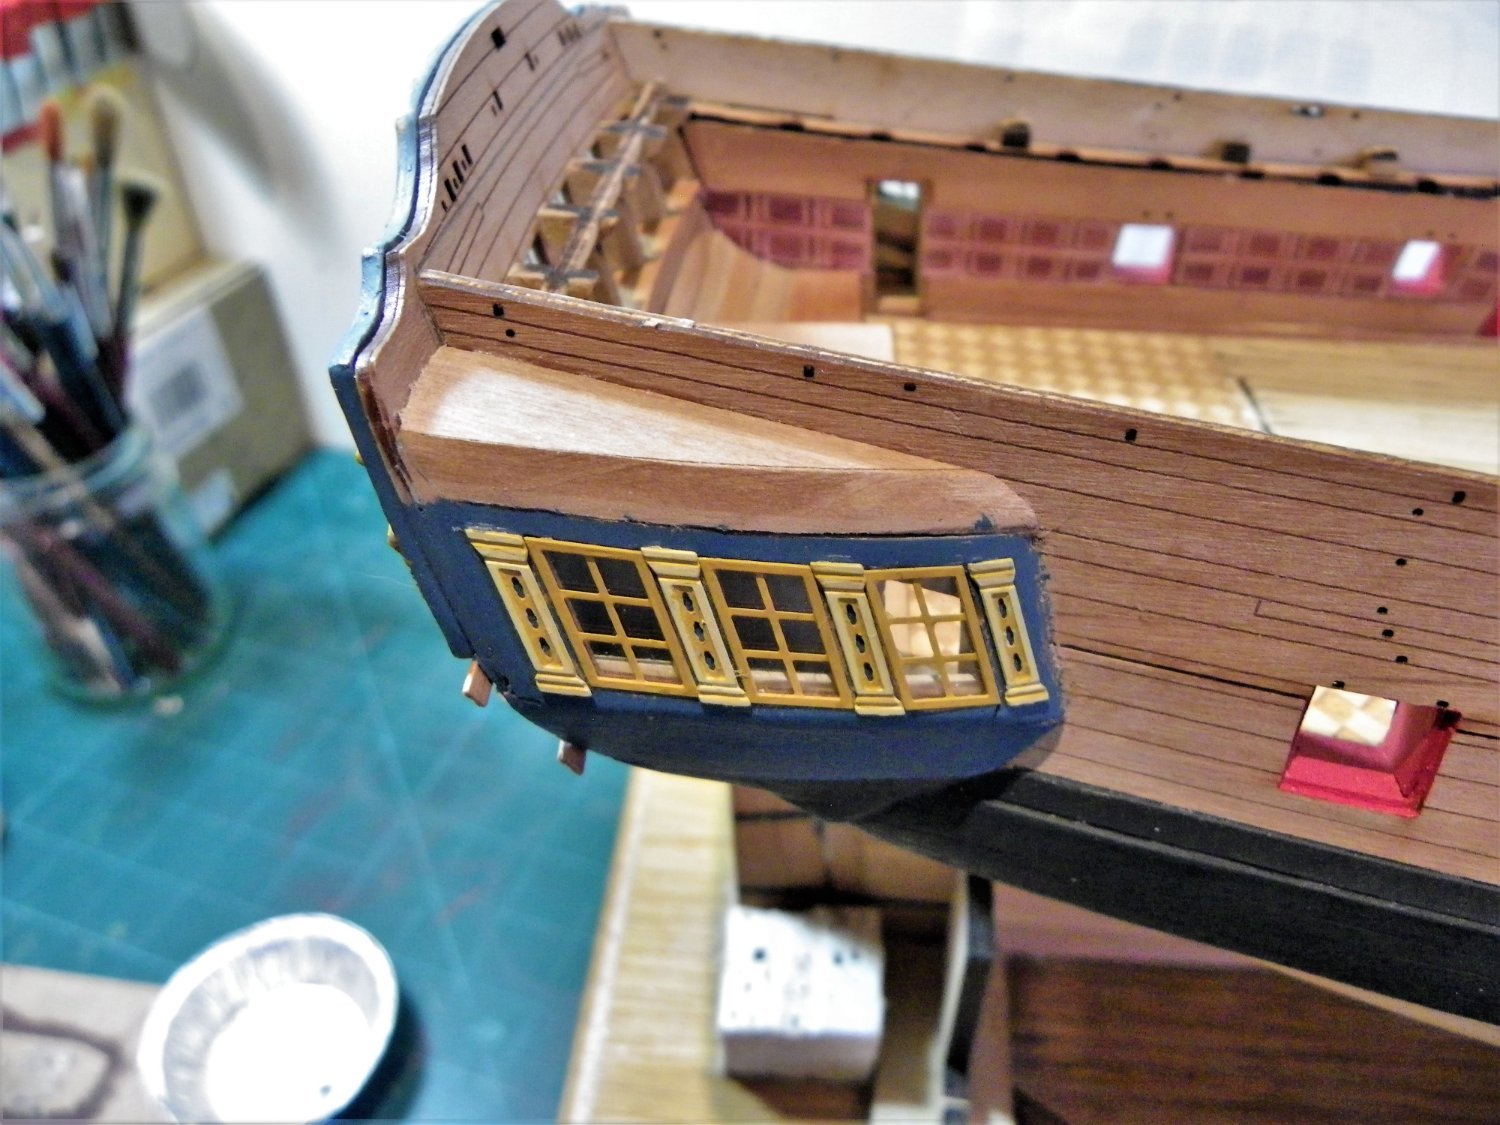
Post Seventy-two The Quarter Galleries. The first job is to glaze the lights. More careful gloved handling to reduce as far as possible any smearing of the acetate. I recall reading somewhere, the reference escapes me, that some of the lights, particularly the aftermost one, were false or only half lights, presumably to give an element of privacy. I have decided to fully glaze them not least for uniformity and aesthetic effect. 2543 With the frames in place the sense of depth and light as a result of opening up the Galleries achieves the natural look I was after. A word on the window frames These are handed left and right and fore to aft, there are I think subtle differences between the angles particularly the aftermost frame and the forward two. Follow the details on Plan 13. It then becomes an easy fit over the ‘glazing’. I again used Vallejo varnish to fix, applying dots on the outer framework using a toothpick. I allowed the varnish to slightly thicken before application, to improve grab and avoid any spread onto the glazing. Fitting the decorative columns between the windows gave me some pause for thought. Not as simple as for the stern gallery where there were clearly marked reference points. 2550 I removed the model from the Amati keel clamp where it had been for the fitting of the stern decoration, and set it back in its working stand. 2557 This gave me a better approach level for the task. At the correct height I can steady my elbows on the work bench while I apply these little parts. 2556 The trick is getting them all aligned at the right height and without getting any glue spread. The blurb indicates that the columns are placed evenly between the top and bottom of the window frames. Then there is the question of how to apply them without fat fingers getting the way and without marring the carefully painted surface. I used a toothpick shaped to fit in the centre recess of the column. Ideally a one shot attempt is best, I don’t really want to be sliding the part around spreading glue on the blue paintwork. 2560 Things will look better once the moulding strips are applied. Mouldings. These too I found tricky to fit, using ca gel. On the Starboard side the columns had to be removed as I couldn’t get the moulding to run cleanly to the stern; I think I had applied the aftermost column a fraction low. 2563 The trouble with removing etch is that there is a high risk of it pinging off into the ether, as one did, followed by a fraught ten minutes wrestling it from the carpet monster. 2566 On reflection I wonder if it is better to fit the mouldings before the columns. The joints with the stern rails were chamfered to represent mitre joints which give the neatest result at this scale. 2578 I used the discarded stern rails to make the two main gallery rails. For the decoration between the rails I went with the photo etch. Take note that the designated parts are PE 23AL AND 23AR, not as shown in the manual. Next came the shingle for the roof, cleverly designed in photo etch, these are applied one overlapping the other in four rows. They are primed and painted in Vallejo Black/Grey. 2586 The final and possibly the trickiest element is the decoration for the finishing piece. 2571 Two small separate pieces that need to fit in the space below the Berthing rail, and it is at this point whether you shaped the Finishing piece correctly all those weeks ago is revealed. As I had significantly messed about with the Qtr galleries I had my doubts. 2583(2) 2581(2) Still some fettlin’ to do on the stern but that’s it for the present, moving on in my opinion, to the most critical part of a build, the Headworks. What joy awaits. B.E. 31/01/22


.thumb.JPG.9a9070d5761f8bbe9a4c2b4c6d960cb4.JPG)
.thumb.JPG.502f6c423ba78da7c55e88ba387f3191.JPG)
- 857 replies
-
- 24
-
-
-
- Sphinx
- Vanguard Models
- (and 1 more)
-
Thank you everyone so much for your supportive comments, I am pleased with the way it has turned out, in no small way thanks to Chuck allowing me to use the ‘Winnie’ artwork and providing me with the bespoke lettering for the name. @ Tom - Painting the Tafferel decorations was a challenge I has to use high magnification specs with the optivisor on top. There was a lot of re-touching involved, and probably more to come. Cheers, B.E.
- 857 replies
-
- 6
-
-
- Sphinx
- Vanguard Models
- (and 1 more)
-
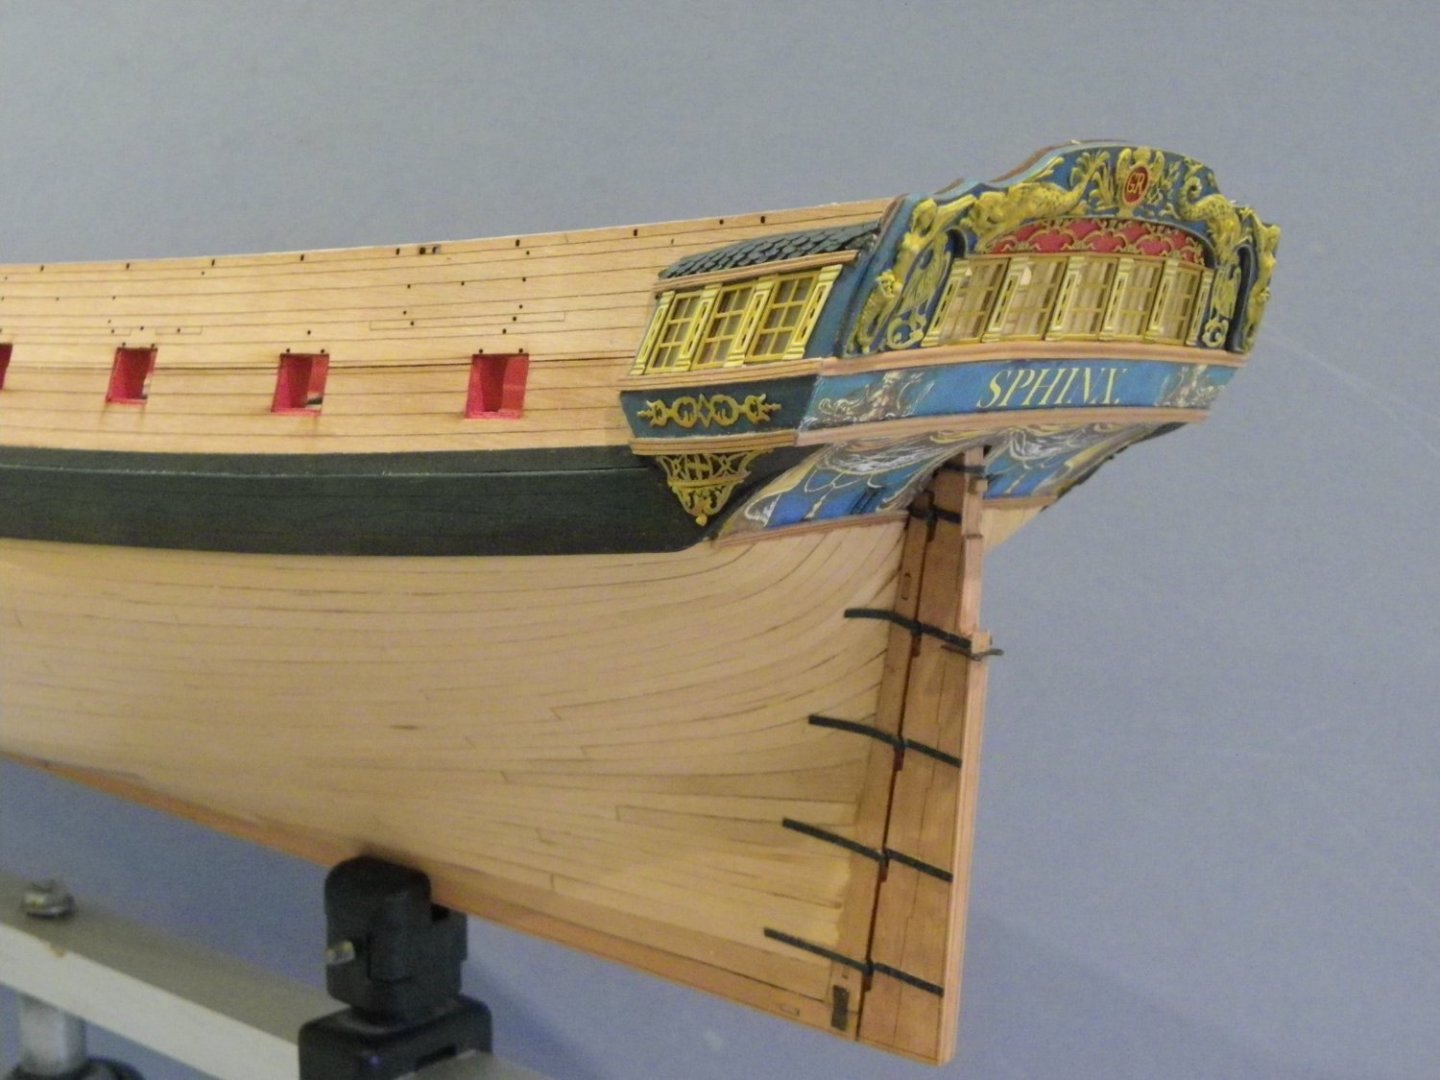
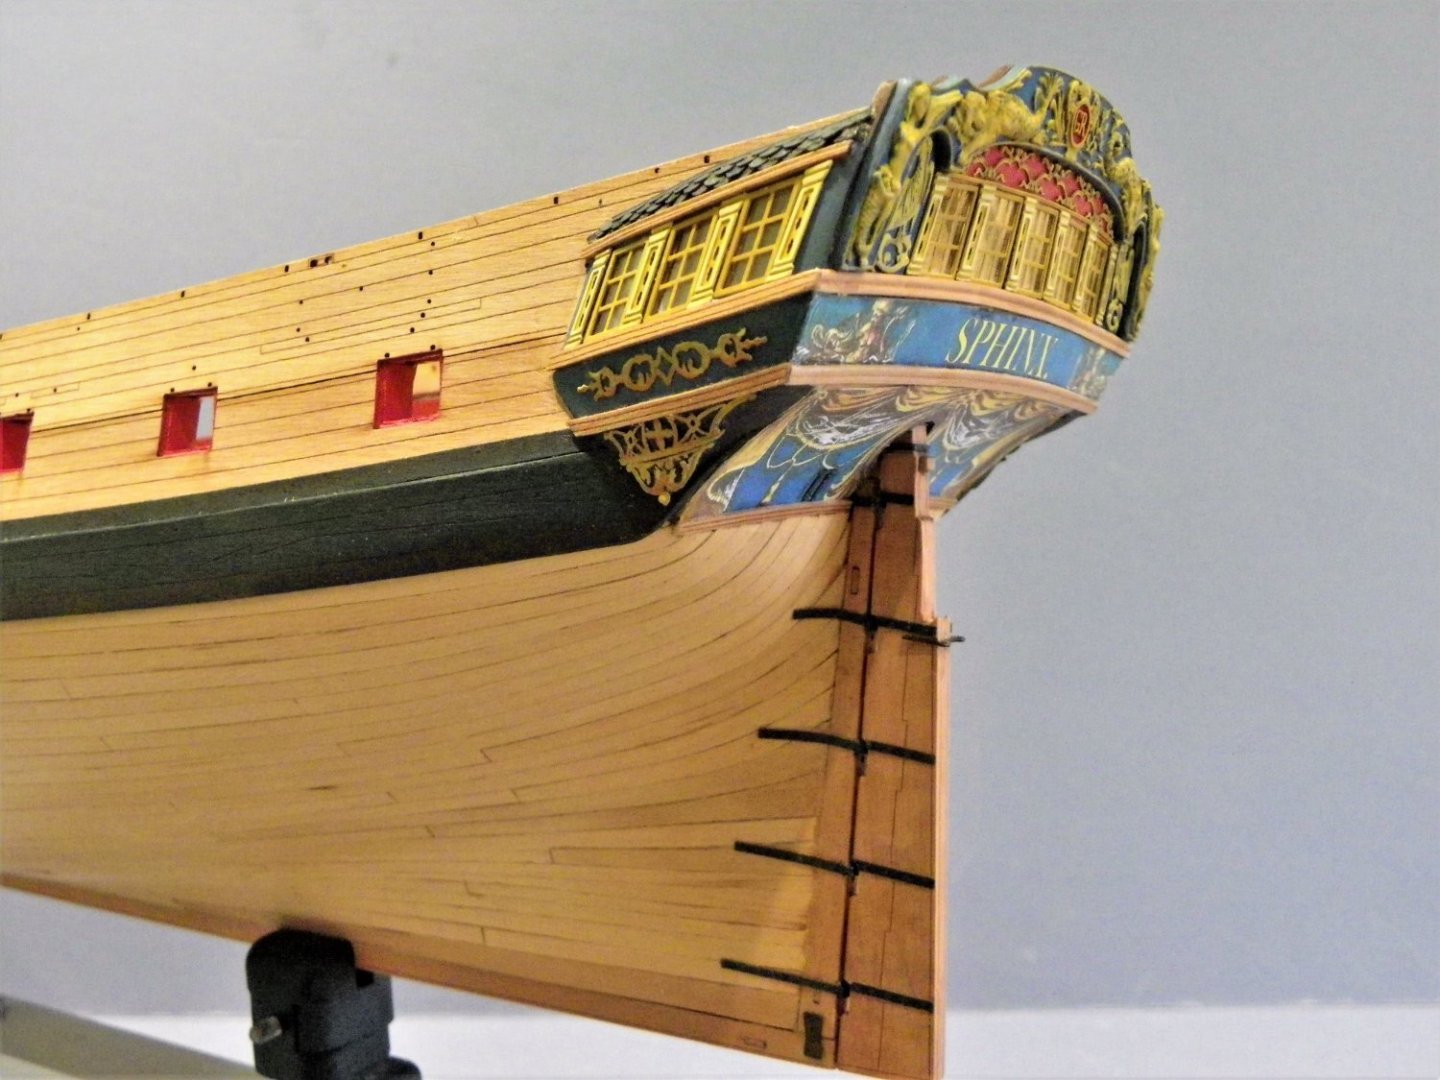
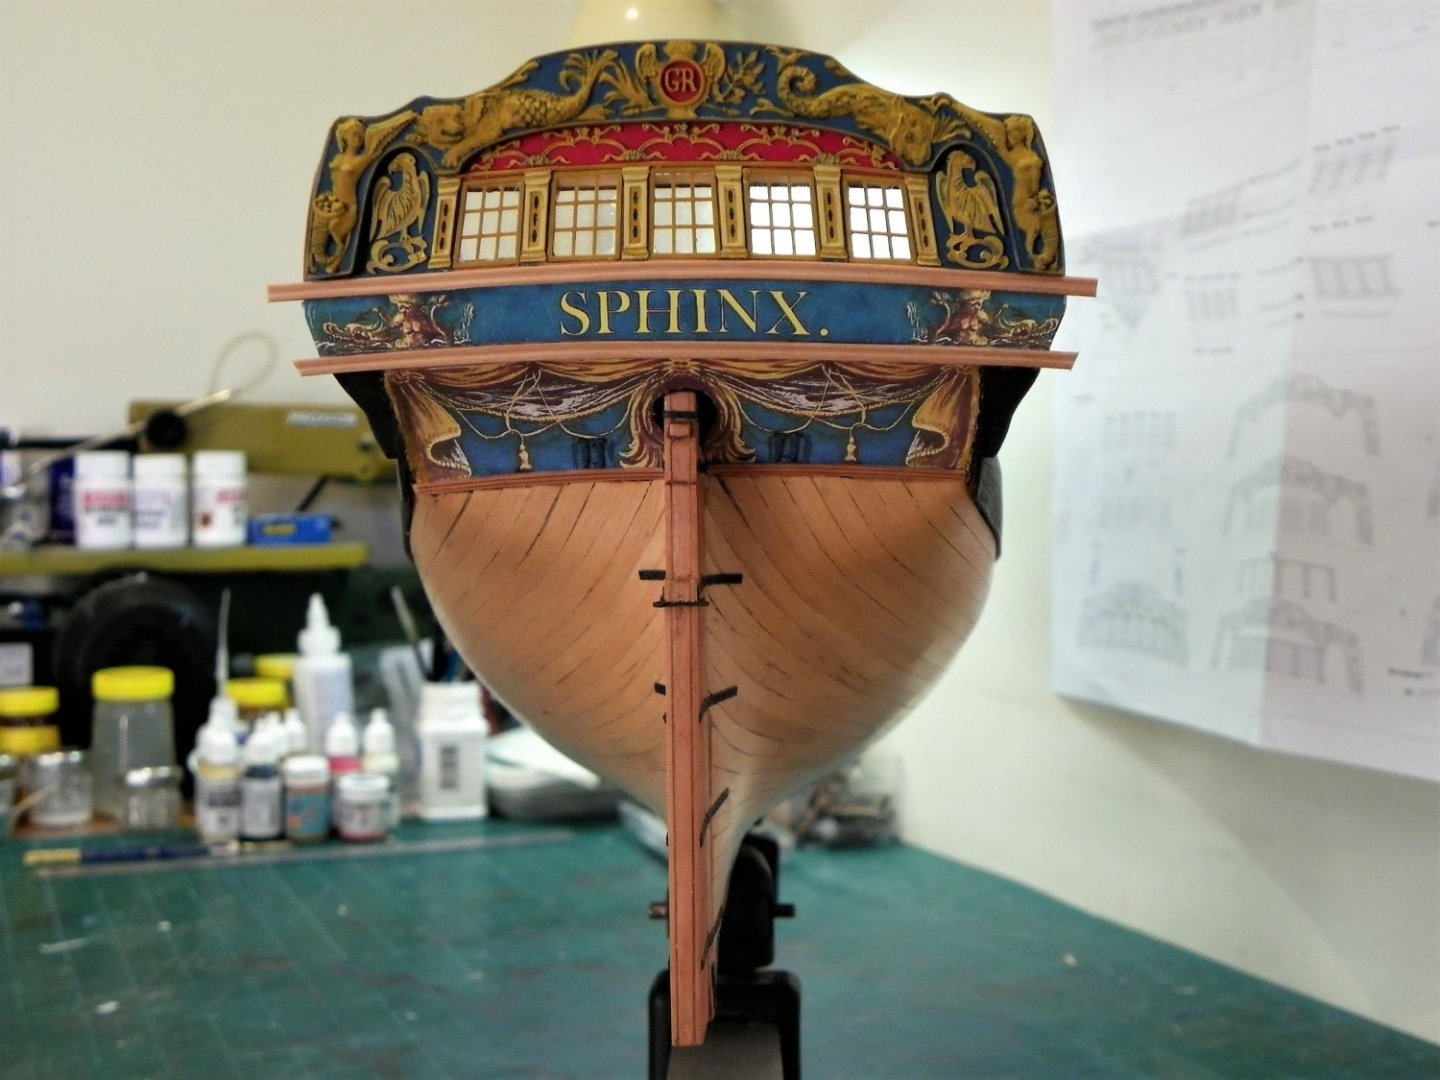
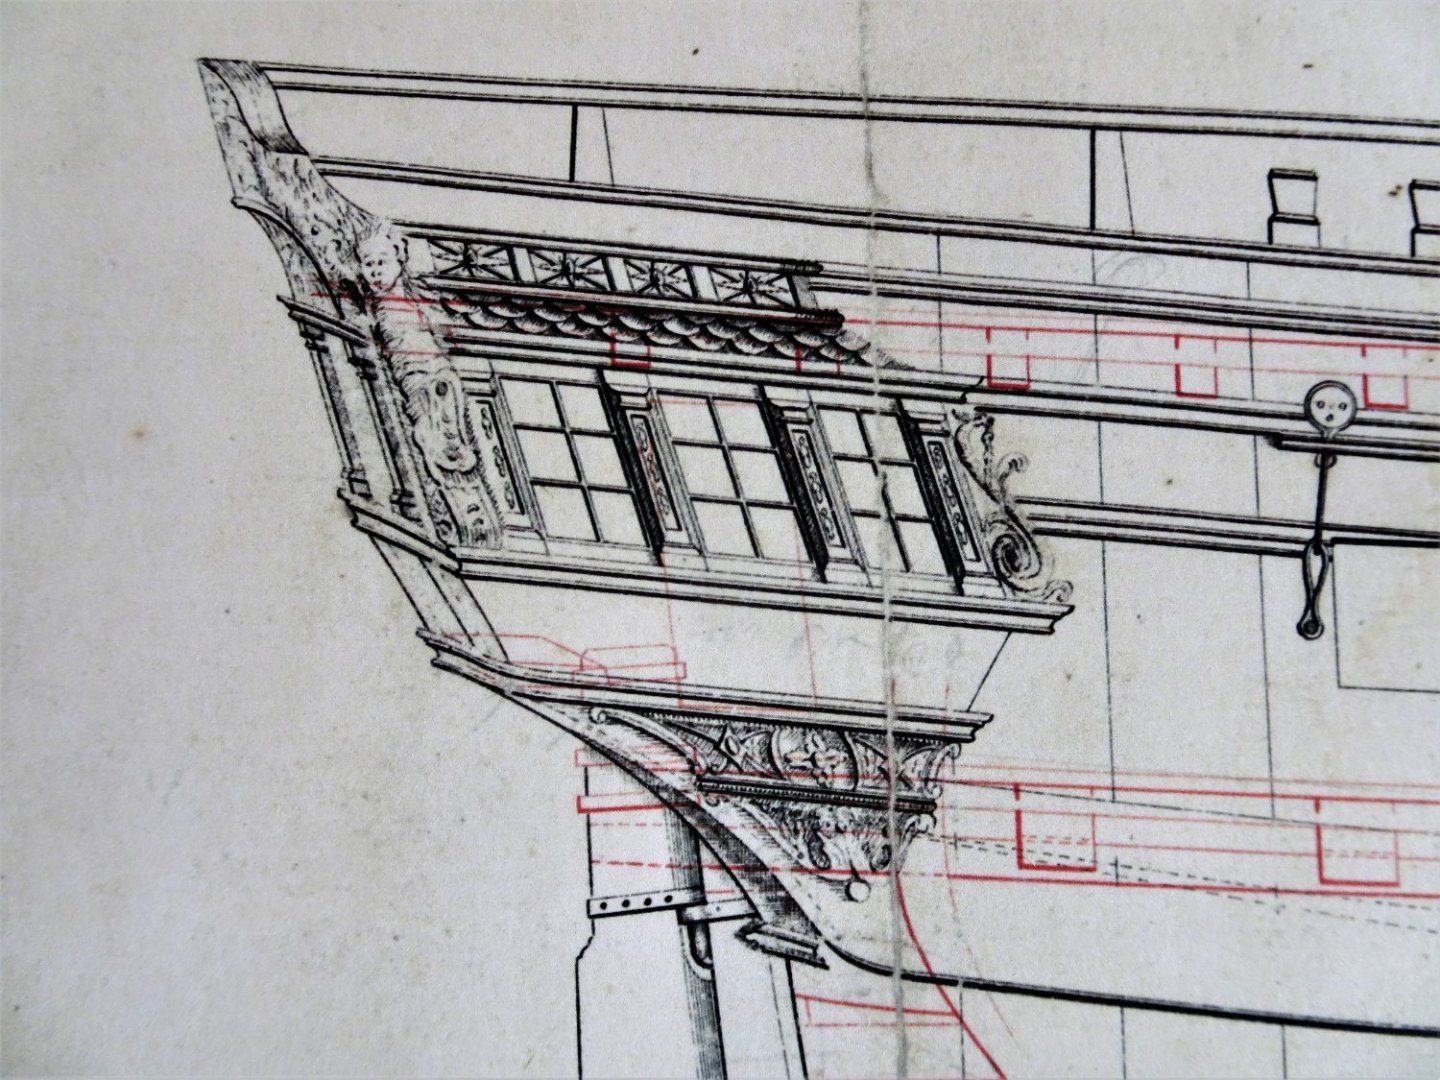
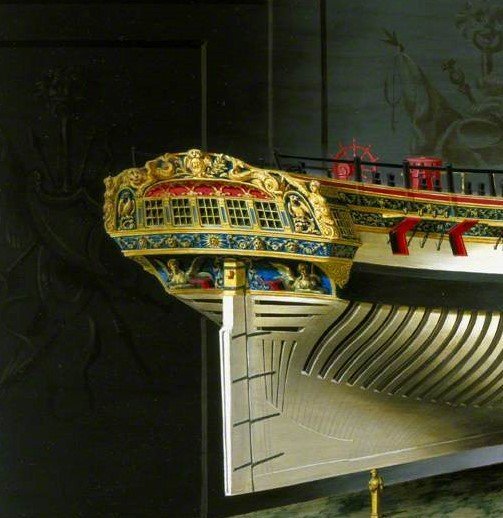
Post Seventy-one Stern work – the final stage The next stage is to add the Upper counter rail which runs directly below the windows and the bottom edge of the Tafferel. This sits neatly below the columns and the bottom end of the Tafferel. I had no need of the ‘filling’ patterns to raise the Tafferel level. 2466 I did however hit a snag, the length of the kit moulding strips is barely sufficient to reach the edge of the stern facia, leaving no excess to form a neat join with the corresponding rails that run along the Qtr Gallery. As far as I can see on the prototype build the ends of the Quarter gallery mouldings simply meet the stern rails with a cut grain end. Not so bad if the rail is to be painted as the joint can be fudged, but leaving it as clean varnished wood presents a problem on this highly visible feature. I wasn’t confident that I could make a decent job of the moulding joints using the kit parts, so the other option is to make your own. These two photos of Chuck’s Winnie build demonstrate how the moulding joins should be. I hope to emulate this on Sphinx. 2464(2) I scribed replacement rails using some lengths of 0.8mm x 3mm Pearwood strip, The lower one in the above photo. The beauty of scribing your own is that you have endless goes to get it right, at least until your timber or patience runs out. 2533 The Upper rail in place extending beyond the counter to allow for meeting the adjoining rail. It is now time to fit the counter decoration, courtesy of Chuck who designed the name lettering. Tricky this because it has to be tweaked to fit the specifics of the Sphinx counter whilst ensuring that the lower rail of the counter does not obscure the lettering. Trial and error produced one of the correct proportions. 2535 With the print glued into place the lower moulding is added. 2537 So Sphinx at last is named. It is interesting to note that on the Marshall painting (1775) the name is not shown on the Upper counter. As we know the order for adding the names to the counter came in in 1772, is on the Admiralty Plan, and most importantly I like to see the names on the sterns of ships of this era. Onto the Quarter Galleries. B.E. 28/01/22
.thumb.JPG.8ea5fb56ff93ef84ee0323381c87bc52.JPG)

- 857 replies
-
- 34
-
-
-
- Sphinx
- Vanguard Models
- (and 1 more)
-
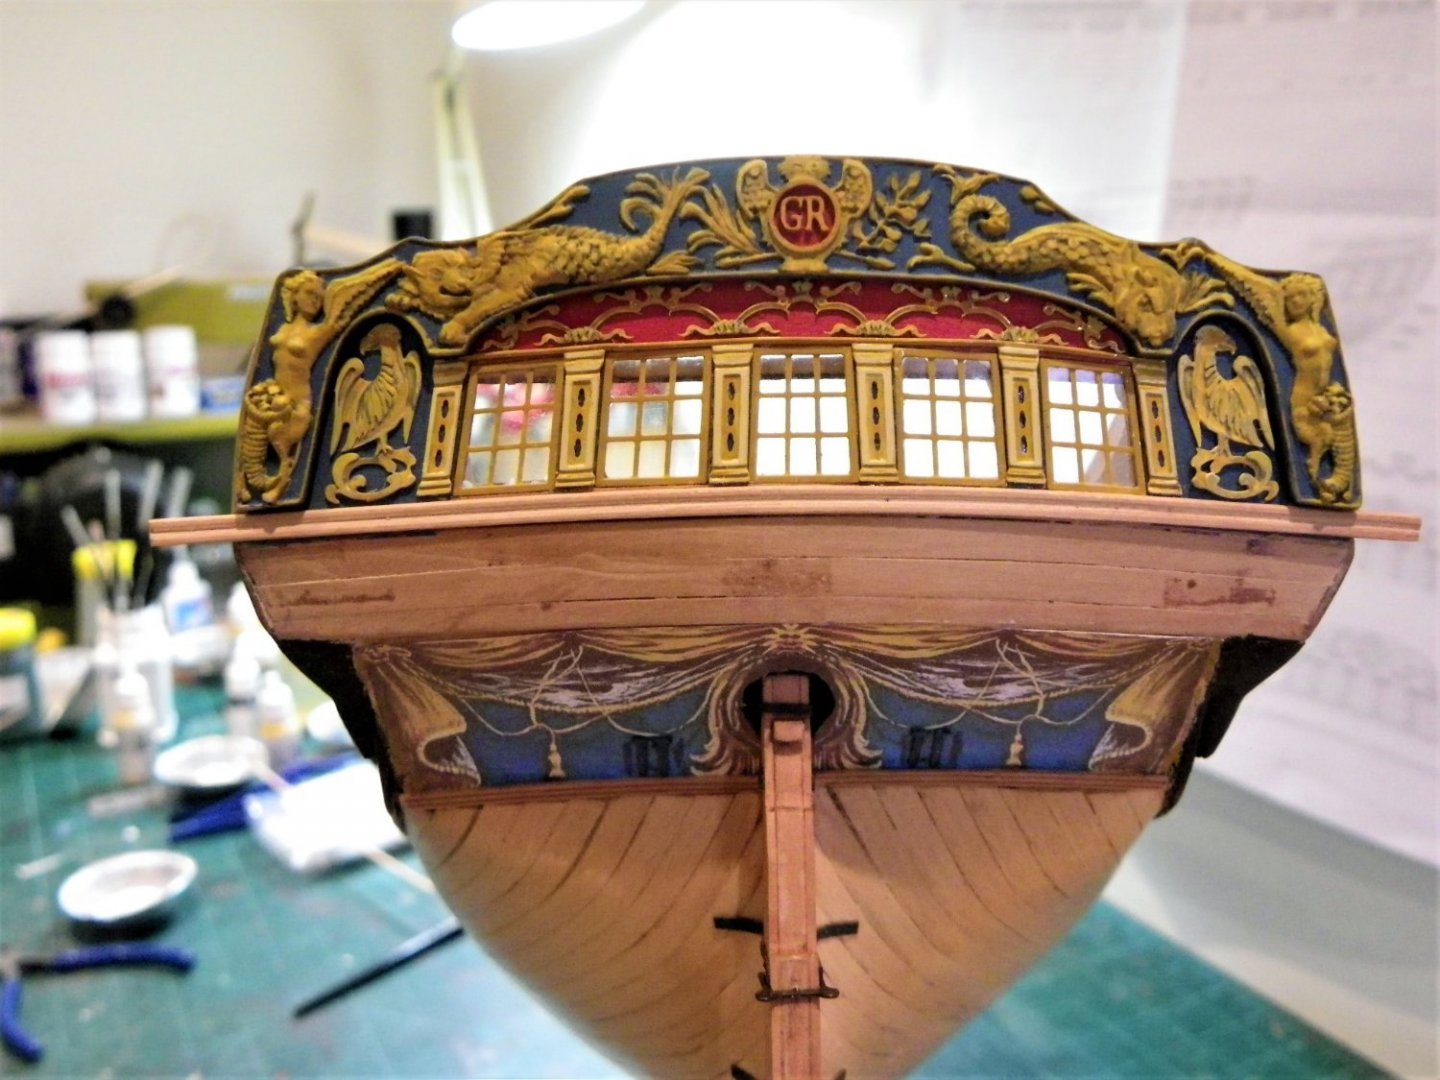
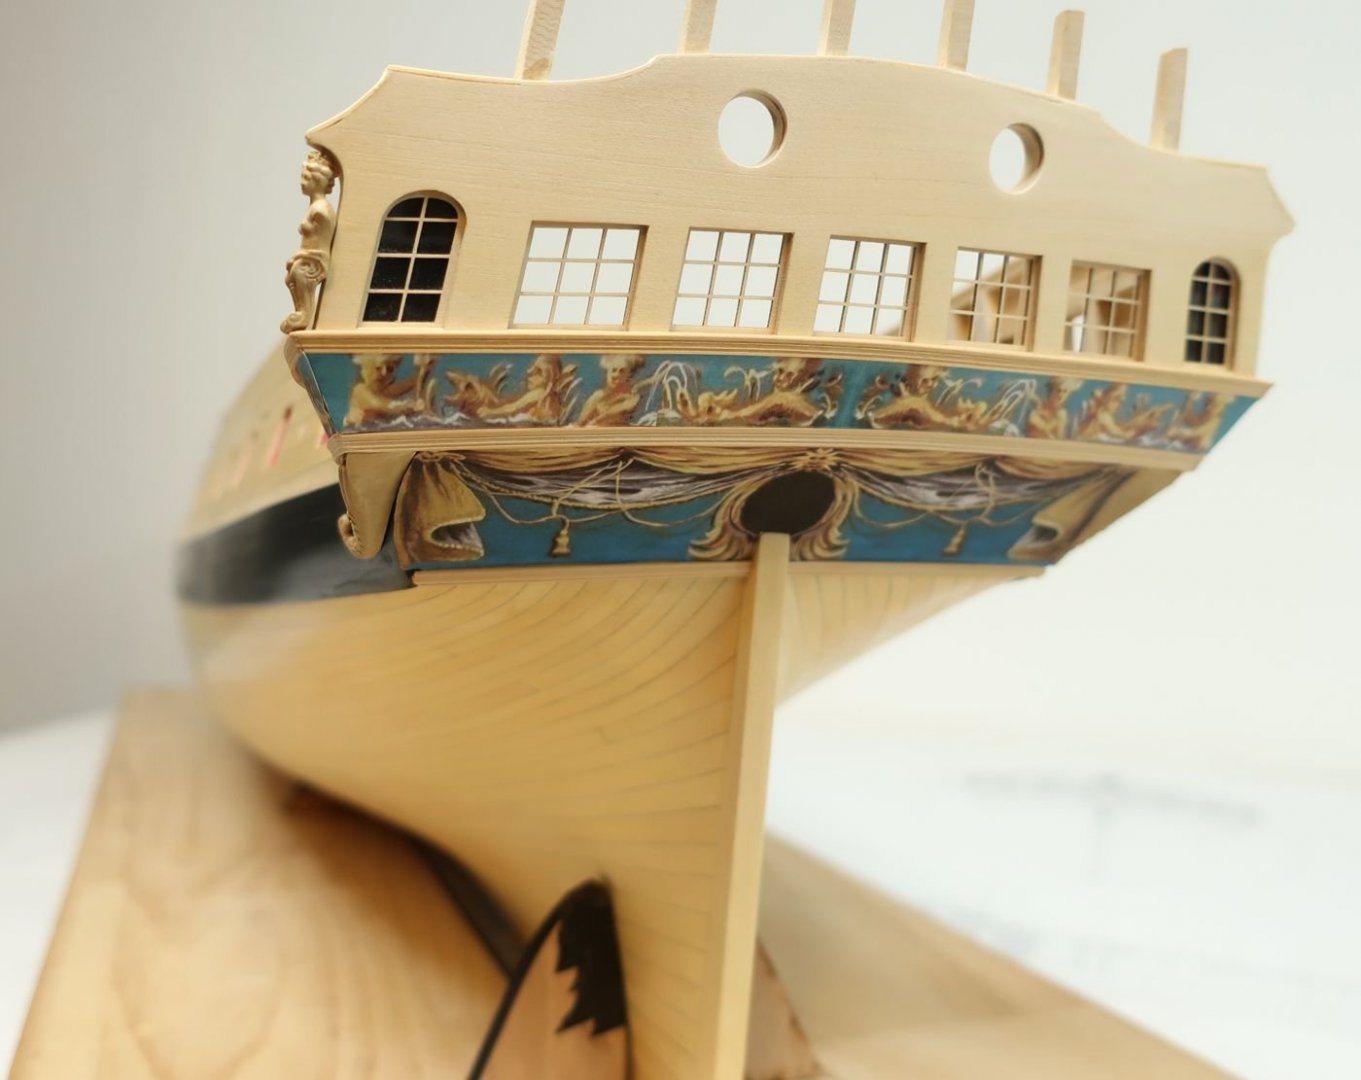
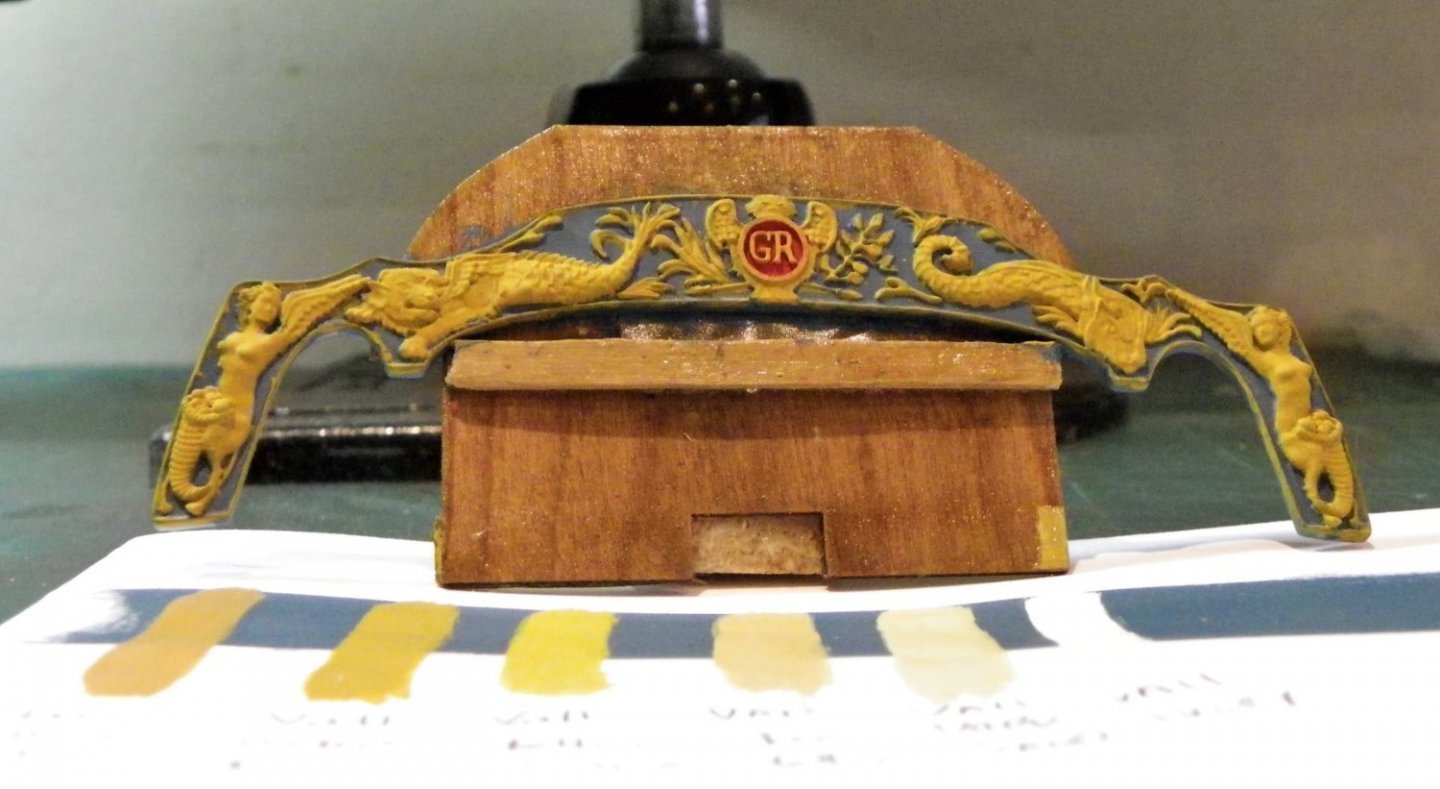
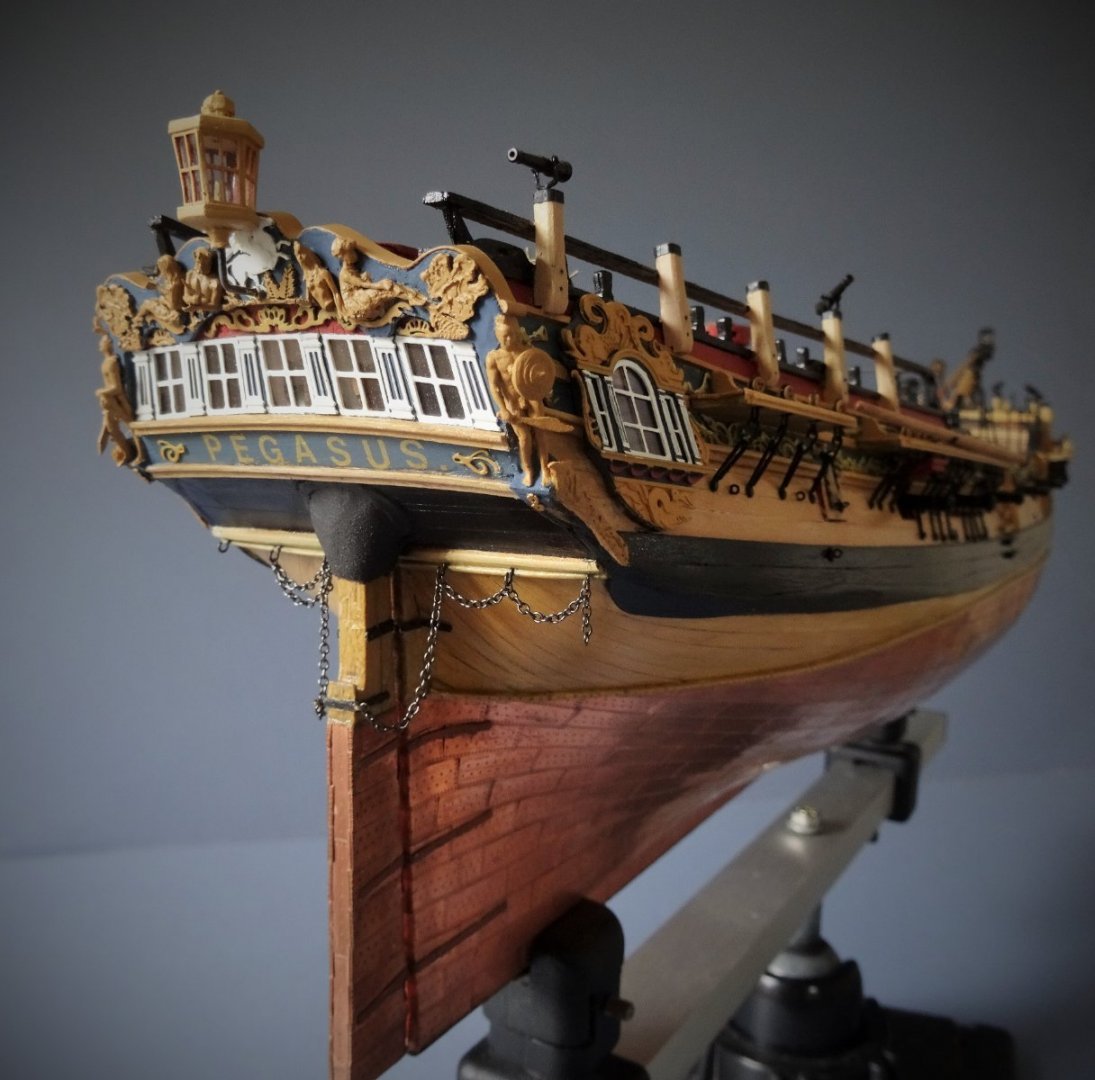
Post Seventy Stern work continues. The resin Tafferel is the significant feature of the stern. 3378(2) The decoration matches both the Admiralty plan (above) and the Marshall painting. An excellent job, cleanly engraved, and far ahead of the simple Brass etch supplied with the Pegasus kit. In reality the Quarter figures should really be angled slightly outwards, below and replacing the capping rail down to the counter. 3376 This detail from the Admiralty plan shows the arrangement. A tricky thing to achieve on a resin casting unless the Quarter figure was moulded separately. 1812 I modified the arrangement on my Pegasus build, but I have decided not to mess with the tafferel on Sphinx and leave it as is. I would hate to have to go to Chris and report that I have yet again messed up one of his nicely designed parts. The Resin piece is set up on a mini ‘easel’ and the painting begins with the ground.That’s the easy bit. To assist painting the raised designs, I make up a palette comparison to help me gauge the shadowing and highlights of the various Ochre shades. 2489(2) Various shades of Ochre against the blue ground. 2482(2) The Vallejo Ochre Brown is used for the base coat of the figures. 2493(2) Highlighting and shadowing is applied using a combination of the ochre shades combined with a little darker wash for the crevices. I think it is going to take a few attempts to get the lining around the frame right. 2500(2) Glued into place. My aim is to get the toning of the raised relief to be in keeping with the printed frieze work. 2524(2) Fixing the Cove design is a tricky business; very fine etch to be precisely positioned above the columns. For this I used Roket 10 second cyano glue gel, using pin prick spots on the Cove just above the columns and where the crowns sit. Above all I wanted to avoid the risk of glue spread from beneath the etch, marring the ground. There is really only one chance of getting the position right, the etch is delicate and the ca strong, trying to remove it would surely cause it to break. 2522(2) Onto the Upper Counter. B.E. 27/01/22
.thumb.JPG.50af7f83cc49f3da760d04d1f290a229.JPG)
.thumb.JPG.e2c72061830bff349f8f79da2798a691.JPG)
.thumb.JPG.00144267dd913df7545465ea120238e4.JPG)
.thumb.JPG.fe304d9cd9fb5e5132f9d4eaa2f4a307.JPG)
.thumb.JPG.f08eb53647dd8a8cdf2d891f50528d8b.JPG)
.thumb.JPG.b9271391ad18b089fa8dcbcfbc3c8cf3.JPG)
- 857 replies
-
- 27
-
-
-
- Sphinx
- Vanguard Models
- (and 1 more)
-
You could check with Hobbymill EU (A sponsor of MSW) they do advertise Hornbeam. I bought some supplementary Pearwood from them, it was good quality and a snag free transaction. B.E.
-
Thank you Thomas and Glenn. 'True Artist' Glenn, I wish , I just play around with the brush until I get something that suits my eye which with less than perfect vision is probably satisfied more easily than it should be. B.E.
- 857 replies
-
- 2
-
-
- Sphinx
- Vanguard Models
- (and 1 more)
-
Your work is of such consistent quality Rusty, a great example to follow. B.E.
- 642 replies
-
- 4
-
-
- winchelsea
- Syren Ship Model Company
- (and 1 more)
-
Unless we can go back in time to 1775, we shall never fully know the reasoning behind the onboard arrangements on a British Naval ship. Trying to equate 18th c practice with modern health and safety concepts is a pointless exercise. Sailors of any age are if anything practical and I’m content to accept that they knew what they were doing. Historical evidence does confirm that such screens were in use, whether we as modern model makers choose to display them or not. B.E.
-
She certainly has presence Ron, I don’t think you will have trouble achieving that "Wow. That really is a big, beautiful boat. It looks so real." accolade. I think the resin Yawl can be made to look natural, and I see that Chris has moulded the thwart supports onto the hull. Always a tricky business getting those right on a small boat. Dressed with Pear or Box fittings, I think it would certainly look the part. What a great choice of small boats Chris has now provided. B.E.
- 542 replies
-
- 3
-
-
- Sphinx
- Vanguard Models
- (and 3 more)
-
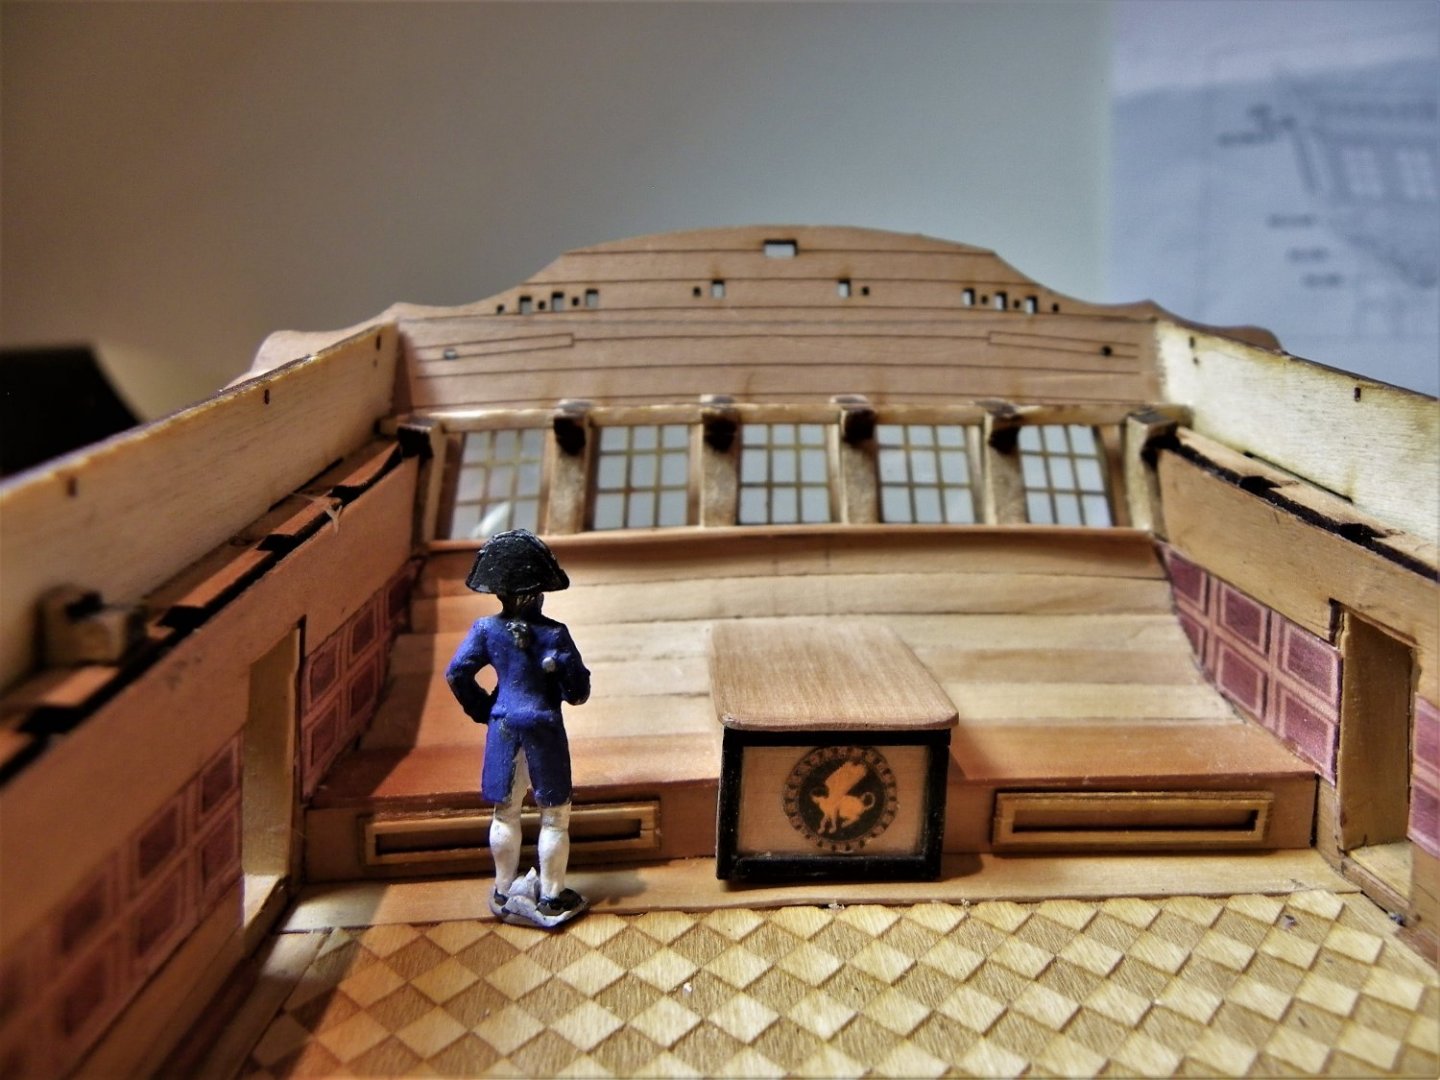
This has also puzzled me as well, between the Riding Bitts and the Galley stove there is barely room for doors to open. On my Pegasus build which has the same situation I fitted the cants on the deck into which the Forecastle bulkhead fitted (Including the Galley Doors) but left off the bulkhead as it obscured the view beneath the Foc’sle. None of my reference books indicate why the doors were there only that they were a feature. The bulkhead obviously provided weather protection/security but why not place the doors either side of the stove in the bulkhead. There are many such questions that bedevil us of the 21st century, but those of the 18th century no doubt had their reasons. I am prepared to leave it at that and get on with the model building. B.E.
-
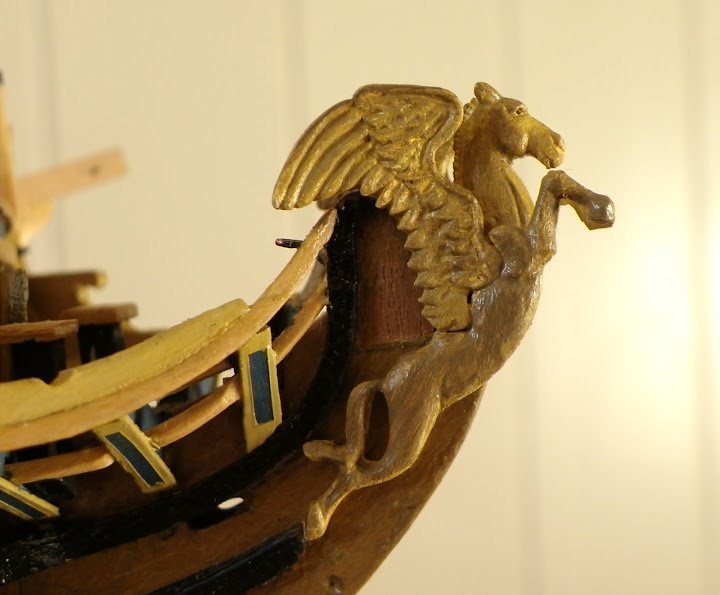
Cheers Guys, for your interest and supportive comments, much appreciated. @ - Bug - One of the great things about MSW is the information about stuff useful for our hobby. I picked up the reference about VMS elsewhere on the forum as I have done with so much else. @ Ron – heat shrink tubing comes in all sizes and I bought a box of short length mixed diameters many years ago. It is very useful for the iron bands on anchor stocks, and around the tops of things like Swivel gun posts. I’ve painted the columns ochre at present, as I intend to do for the rest of the decoration, using different shades to bring out the relief. I’m likely to be re-visiting the finish a fair few times. The Figure of the Sphinx at the Bow will also be painted in shades of Ochre. I took this approach with the rather wonderful figure of Pegasus on the model of that name. For this I used Artists oils I prefer the look, and the Marshall Painting indicates this even if in reality some figures may have been painted in colours, but that’s a whole different subject. @ Glenn - I tend to use slightly undersize tubing for the task, stretch it a little, and then heat shrink it. If it proves uncooperative I sometimes put a tiny spot of ca beneath and manipulate into position. B.E.
- 857 replies
-
- 7
-
-
- Sphinx
- Vanguard Models
- (and 1 more)
-
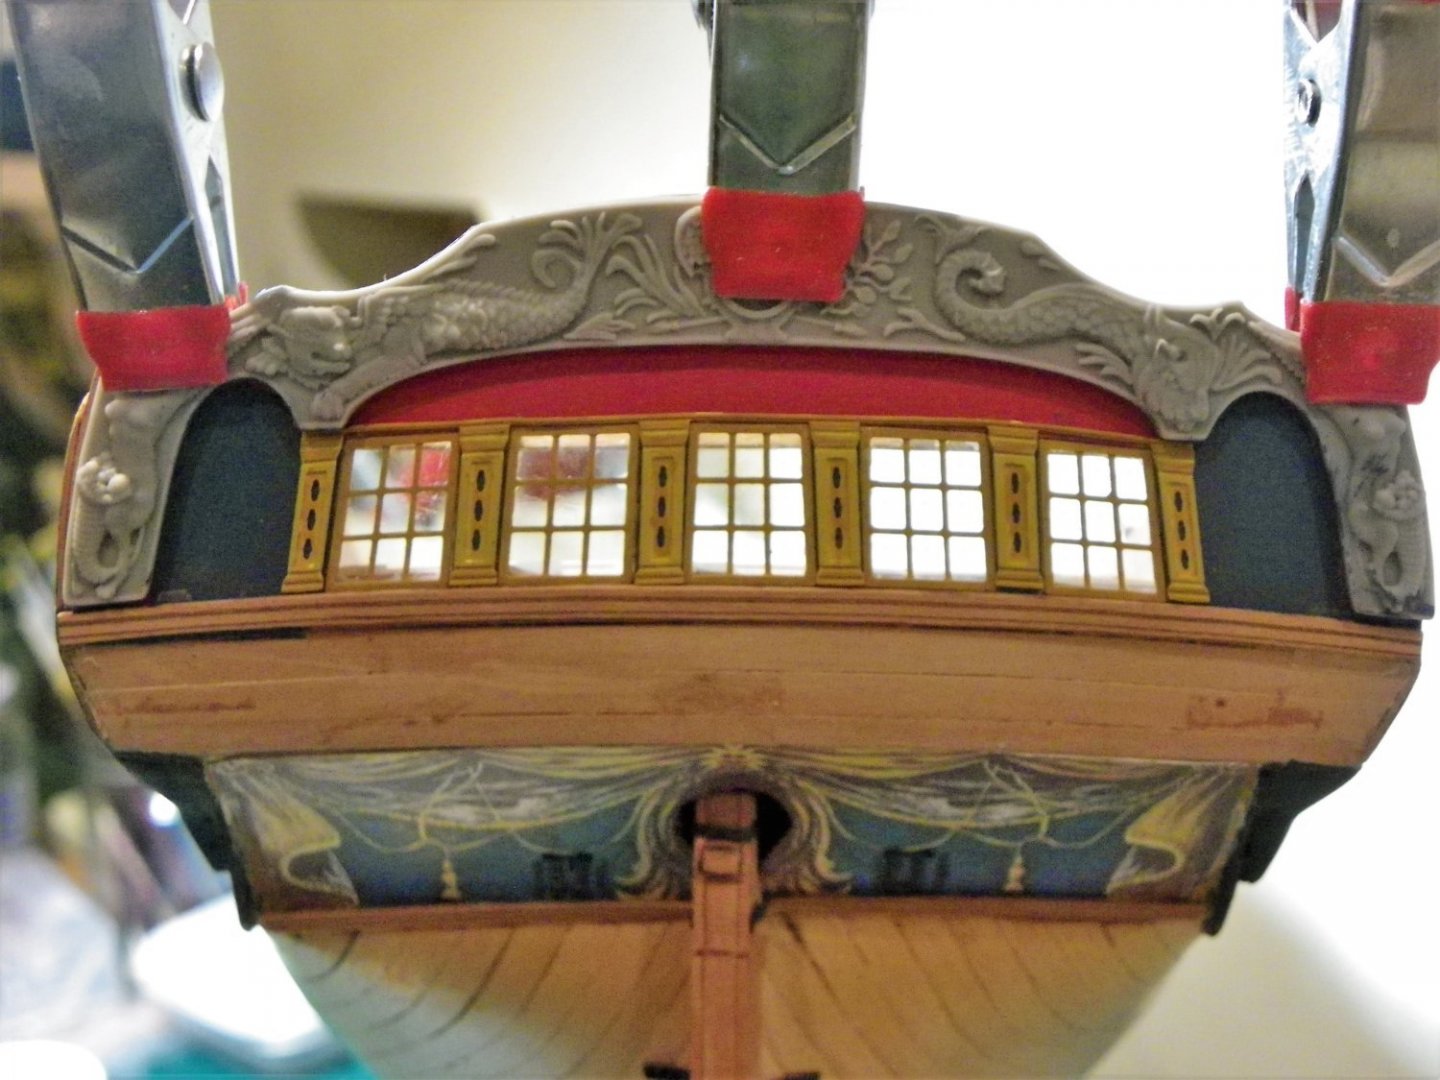
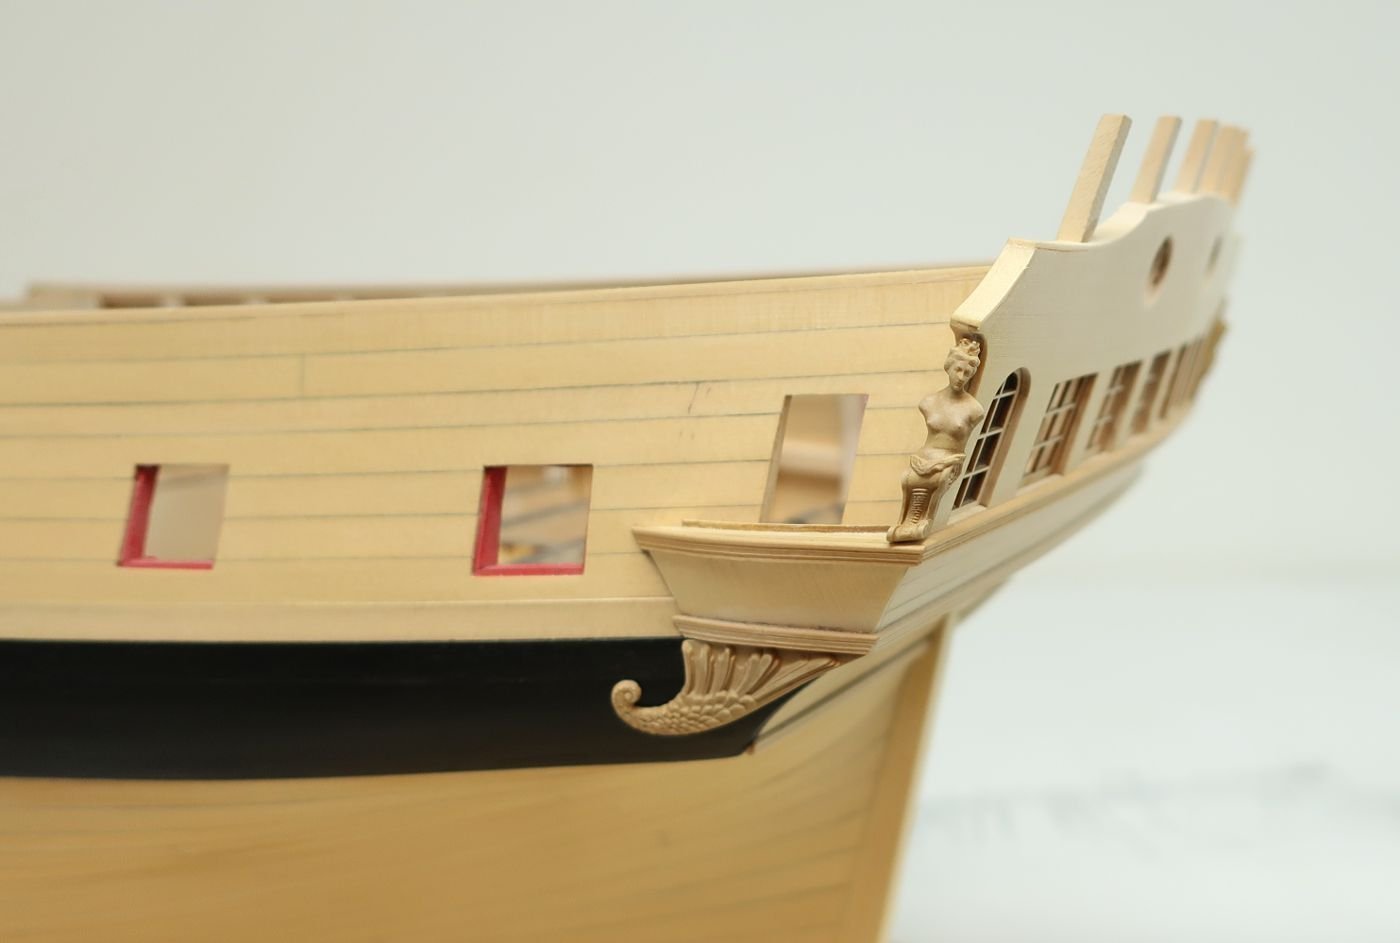
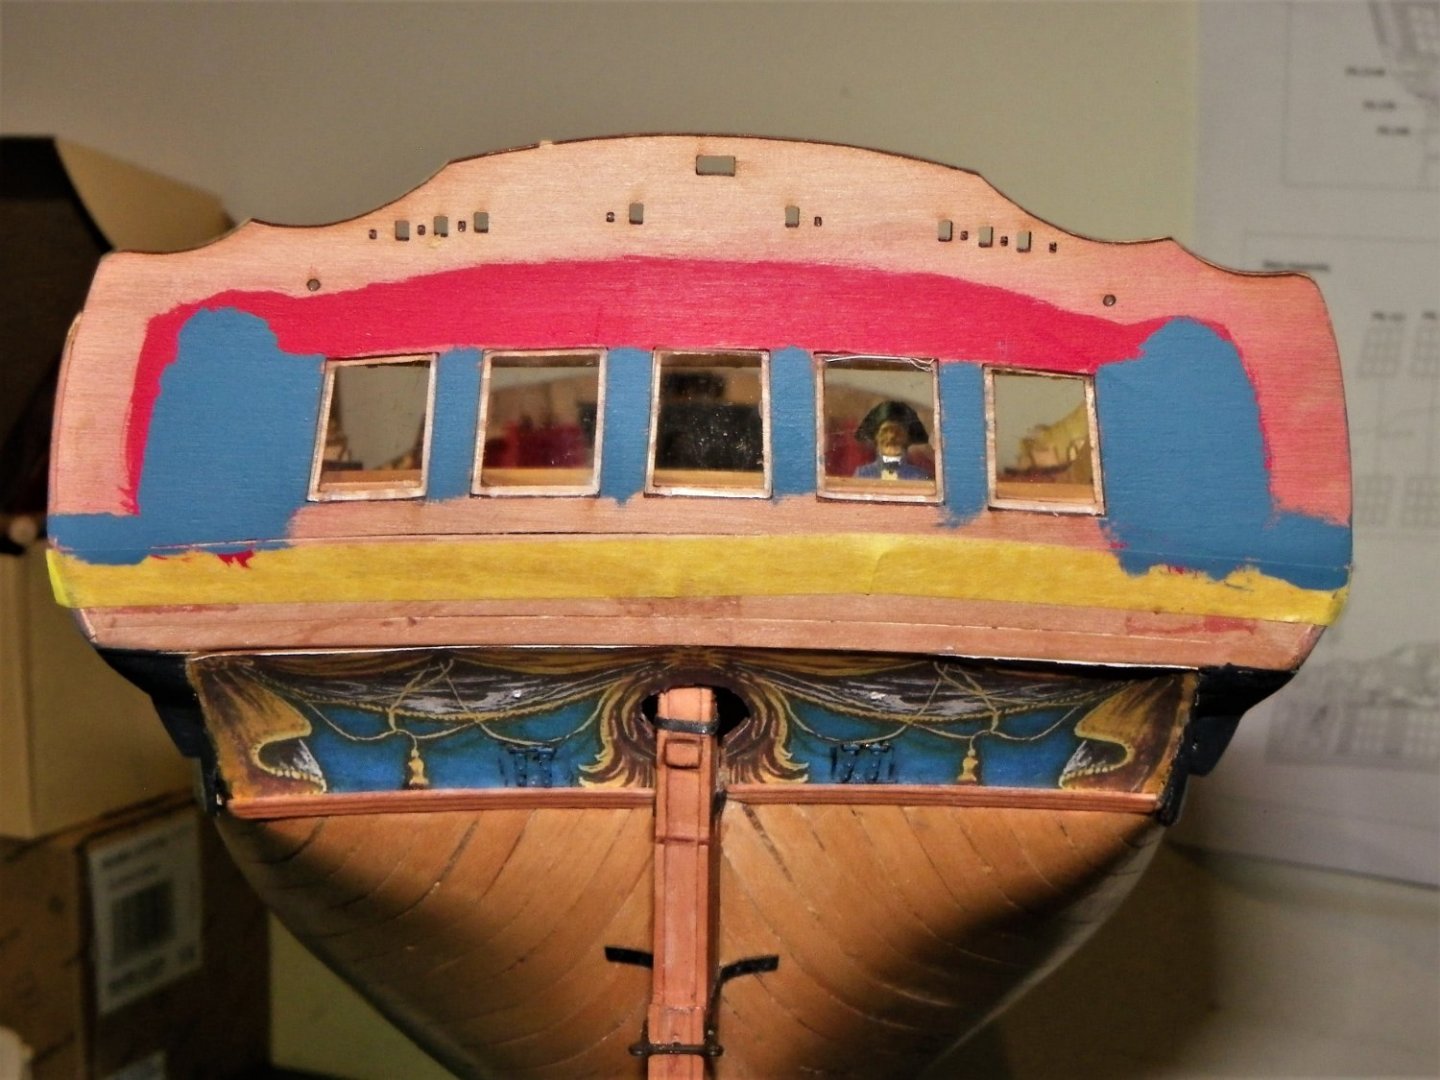
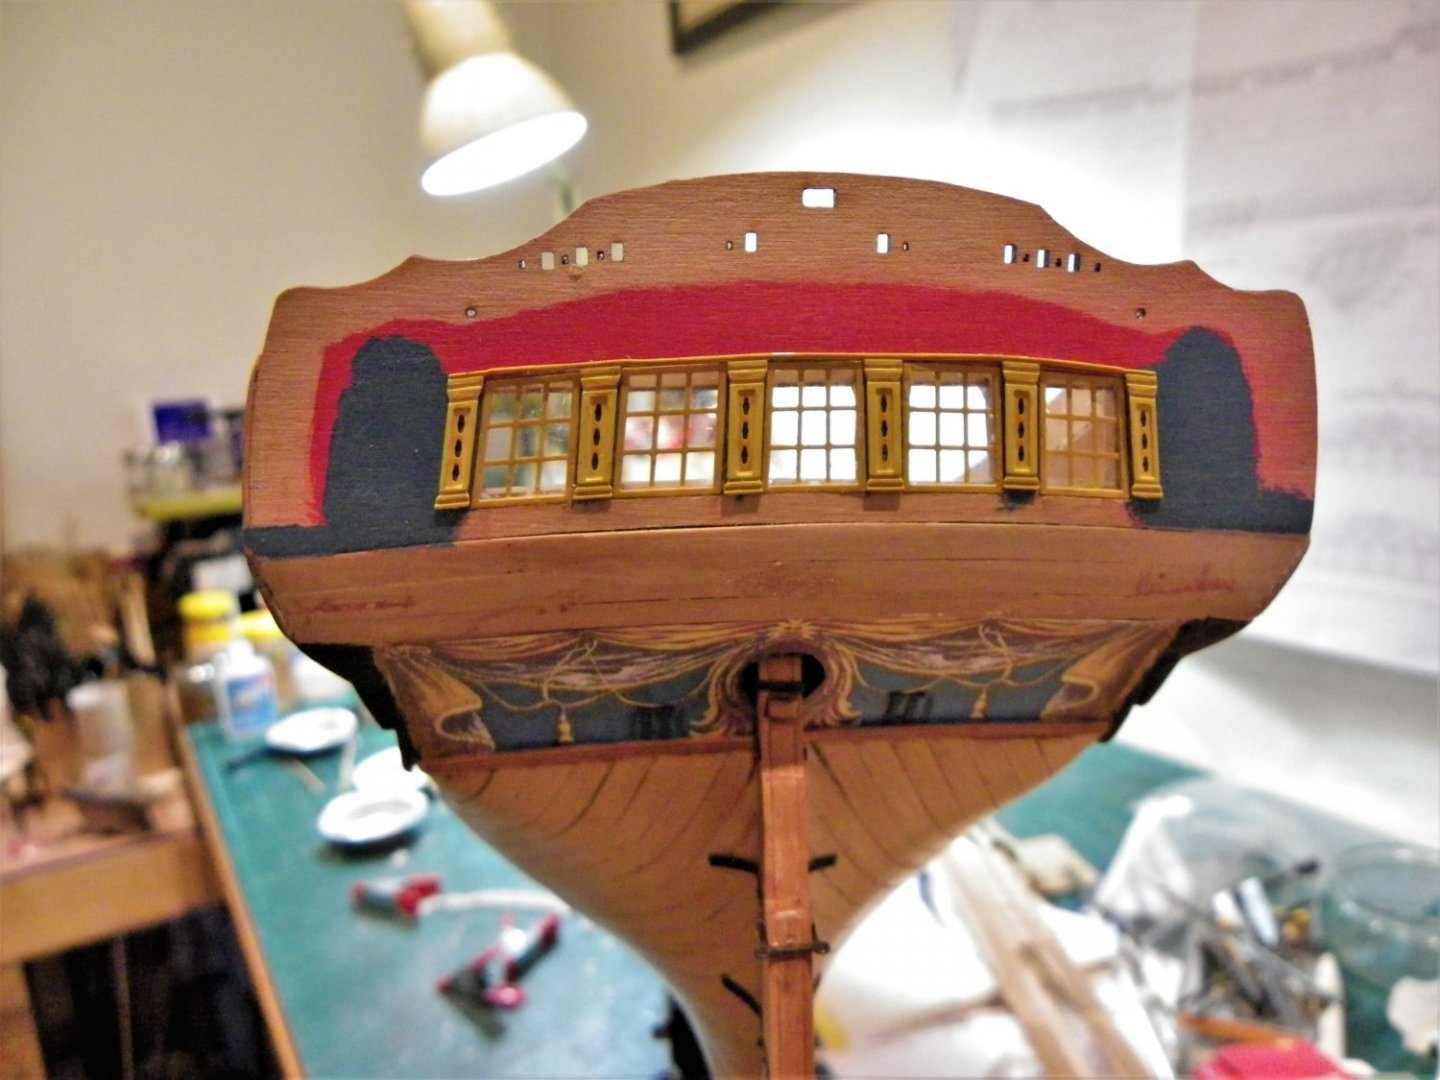
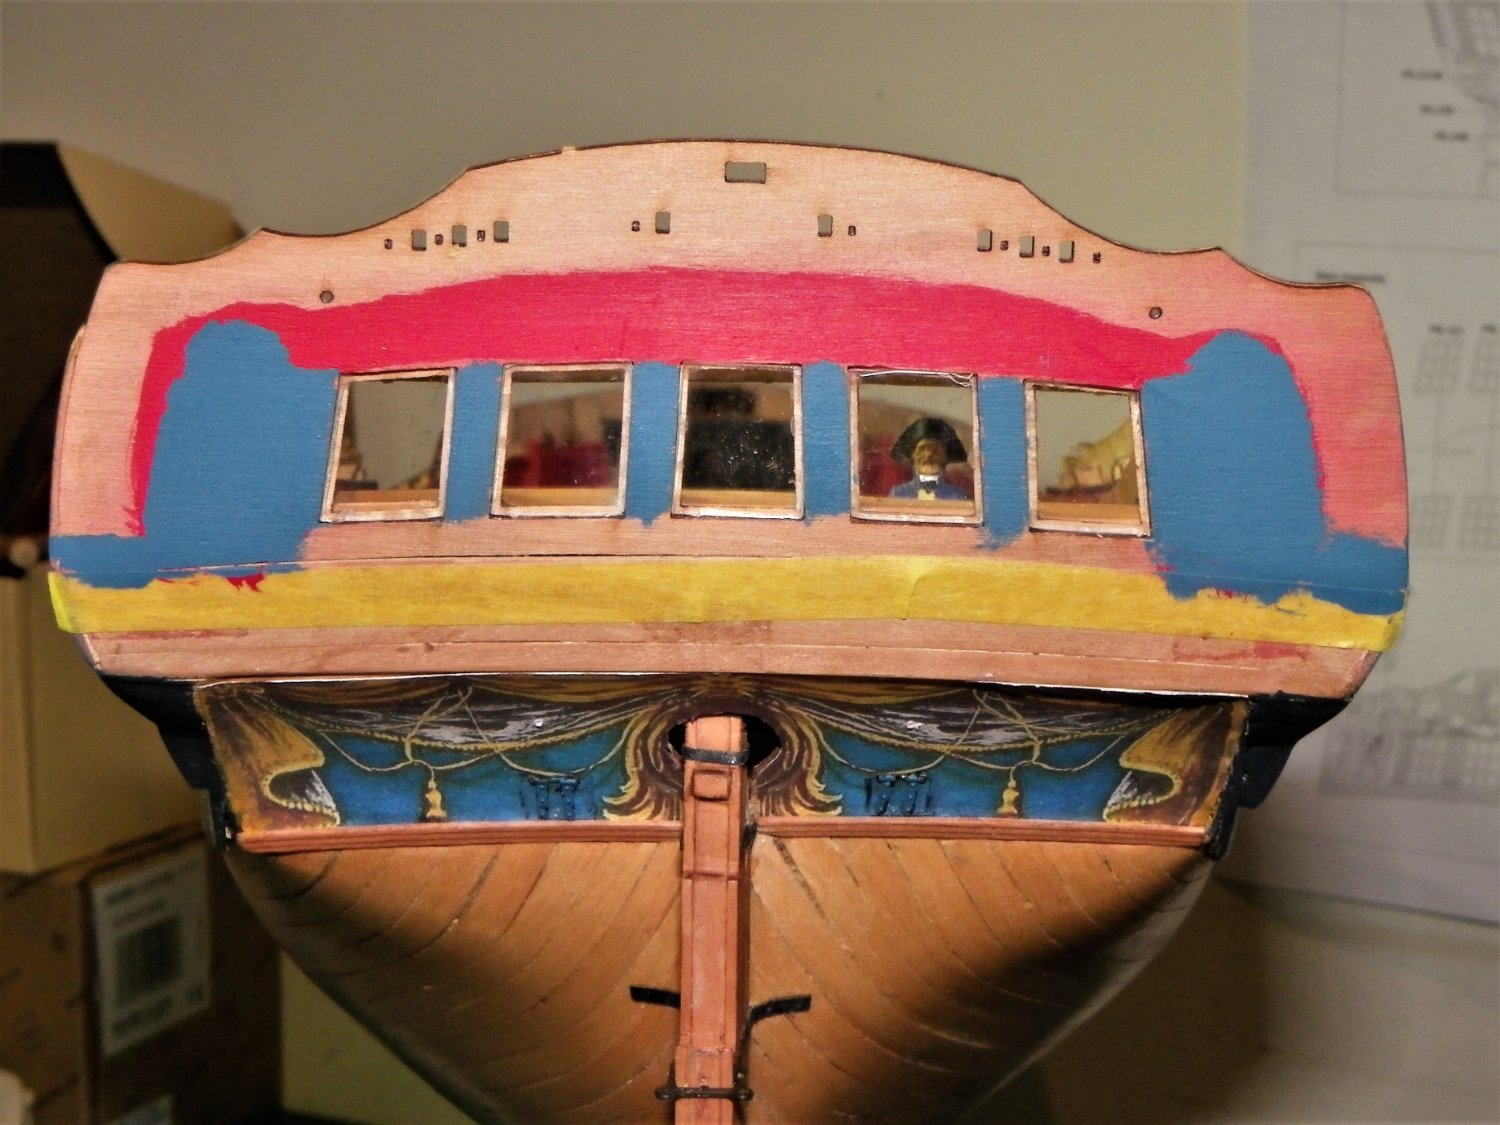
Post Sixty-nine Stern Facia and Upper Counter Major items of photo etch come into use next, the Window frames and decorative columns of the stern and Quarter Galleries. These require priming and painting, but before that they were given a good scrub with washing up liquid using an old electric toothbrush head. The painting will take place with the parts still attached to the fret, both for ease of handling and security. For priming I am using VMS Metal prep4k. This dries clear on the surface which is a bonus as I am using light colours. I considered whether to paint the window frames white as per the kit or a shade of Yellow ochre. Most contemporary models don’t show white window frames, and I think they may be a little stark for the effect I’m after. An ochrery shade it will be. 2417(2) The frames are painted with Vallejo Ochre Brown (127) It was also used on the other decorations highlighted with Yellow Ochre(121) The stern of Sphinx is highly decorated both in kit and contemporary painting. Artistic license no doubt, not reflected on the actual ship, but as I’m giving a nod to those 18th century models, I am happy to include it, but gold paint will not feature on the palette. 2416 The acetate windows (or lights) are fettled to fit without removing the protective cover, and are then fixed into place. Gluing in clear acetate always makes me nervous. I wear surgical gloves and use plastic tweezers for handling. I ensure there is a snug fit of the panes into the recess and use spots of Vallejo Matt Acrylic varnish applied with the point of a toothpick. 2432 Even so the window ‘glass’ always seem to to have a degree of smearing, which I remove using a moistened electronics wipe folded over a rounded stick The window frames follow; these really are finely crafted with beautifully scaled window bars. Careful handling is required once removed from the fret, any trace of the fret nubs is filed away, and I don’t handle the pieces with bare hands. 2438(2) Again tiny spots of Vallejo varnish are applied to the frame edges only and the piece is pressed into place. 2443 I hope it is sufficient to hold, and I suspect Capt. Grim is thinking the same. 2458 Finally in this section the stern column panel is secured in place. I found this quite tricky to do getting all the columns in the right position before the ca sets. 2455(2) Checking out the fit of the resin Tafferel, I will have more thought on this in my next post. I have reduced the use of red on the stern. The Cove was traditionally painted red on the sterns of British ships but I painted the secondary arches containing the stylised Eagles with a blue ground as per the Marshall painting. I’m quite pleased and relieved that the blue paint tones in nicely with the ground of the printed stern decoration. Work on the stern continues. B.E. 24/01/22
.thumb.JPG.58a9ac0bd55f3a640072b20875b2d7c3.JPG)
.thumb.JPG.9238e362d70d9b0476e0f255910ecf3d.JPG)
.thumb.JPG.8ee8e5aaa662f4b7107ac3616c235286.JPG)
- 857 replies
-
- 22
-
-
- Sphinx
- Vanguard Models
- (and 1 more)
-
Just a curiosity Ron, I have seen inverted boats on 19th c Clippers but never seen one as I recall on an 18th century warship. Is this just a bit of artistic licence on your part? that clinker finish on the Yawl does look good tho'. ps: I like the finish on your mast tops, very nice effect. B.E.
- 542 replies
-
- 2
-
-
- Sphinx
- Vanguard Models
- (and 3 more)


.JPG.60bd40607b1f6ec12af918400c9cac34.JPG)

.JPG.81389b145798e91479e98c7053b731f2.JPG)

.JPG.3c8c4effc80324a85871892dff37c4f9.JPG)
.JPG.69f26ec1d0057d8ee909874d73aa2ce0.JPG)
.JPG.c16100677d4af3a7cdd03edf54098dc3.JPG)

.JPG.65fdb0a83e478520636f2070a34e7182.JPG)
.JPG.50c437d088cfa22e3100e0c787ebb69e.JPG)
.JPG.9ff3d02b8386ff24681cd80325ae755f.JPG)

.JPG.edd4ecf3ec4790f874389dd39e7c9dd5.JPG)
.JPG.f9e4088c6dd01d4e48f99b148e3a95af.JPG)
.JPG.9e6028aaf3f997b3d5f14a79894115b1.JPG)


.JPG.d2ad3d9c57ae44d4603833f34c887c91.JPG)
.JPG.98ad2c1089c5dc469fee47f2a80d343e.JPG)

.JPG.59148037caa5536a11ec9e386ff78348.JPG)


.JPG.4a2f6b43e882af880219e9cea5cd1fca.JPG)
.JPG.103383cc2a48376c6249f631b0abbd8e.JPG)
.JPG.19f0655e2d81c6c2c42f5f59ae0fafb2.JPG)
.JPG.ded4c142eb80125a60ea7cc4972bdc39.JPG)
.JPG.5c735d6b9fe6099a4c2c082dda4b72ef.JPG)


.JPG.040f211fe4d08c20f339daf1ef7da000.JPG)

.JPG.3c56ca582929b08d5267fbbbcbe4dd6a.JPG)
.JPG.4b339feccfe58257f662736f20d82333.JPG)
.JPG.8578df16fb96bd5904d214aa2ed4ad81.JPG)
