Landlubber Mike
-
Posts
4,547 -
Joined
-
Last visited
Content Type
Profiles
Forums
Gallery
Events
Everything posted by Landlubber Mike
-
 Excited to follow your progress Rusty - great model and great modeler together are a perfect combination
 -
Hi Ian, thanks very much for looking in. I'm still waiting on my orders for the Byrne's machines, plywood, and upgraded wood from Hobbymill, but I should have all that in hand to start the build in earnest come May. In the meantime, I bought a second workbench for my power tools and a shop vac, so I'm getting myself ready to dive in (not to mention, the research and experimentation that I will do until then). If you're stuck on something and are curious as to what the more recent plans show, let me know and I can see how to best get you that information. Hope all is well! Mike
-
Nice job! Any plans for your next build?
-
Thanks for sharing your thoughts on the kit Brian. I ended up getting a great deal on the FWZP on eBay a few months ago that I couldn't pass up. But, I'm going to reserve working on that kit until I get a few more kits under my belt, as I really want to do the kit justice and get all I can out of the Euromodel kit experience.
-
Very nice Ian - I love the modifications you are making. You're going to be a tough act to follow I should be starting my Unicorn in the next couple of weeks. I need to source some plywood as my keel is a bit warped and twisted. I also am waiting on some tools and my wood order from Hobbymill
-
Absolutely gorgeous work Frank! I really love the weathering that you did with great effect. It adds a ton of character to your model. Thanks for sharing your journey with us - looking forward to your Alert build! Just saw that it is 1:24 scale - that should be a lot of fun, especially for the opportunity to add cool details.
- 389 replies
-
- 1
-

-
- supply
- caldercraft
- (and 1 more)
-
Really nice work Eamonn. Very crisp - your painting skills are very impressive!
- 1,039 replies
-
- 1
-
-
- ballahoo
- caldercraft
- (and 2 more)
-
Hi John, hope everything is well and under control. Good luck, and we'll be waiting for your return
- 2,250 replies
-
- 1
-
-
- model shipways
- Charles W Morgan
- (and 1 more)
-
Looking great Bruce. I should be starting mine in a month or two. Are you planning on double planking it? The instructions say that you can plank it with 0.50mm second planking if I remember correctly. I think I'm going to go that route, as I'm planning on using dyed pear.
-
Very nice build! I just completed my first build, and I wish it came out half as nice as yours!
-
Thanks for posting this question, as I was wondering the same thing.
-
It's a really beautiful ship, can't wait to see what you do with it. I have the Friedrich Wilhelm zu Pferde and I have been very impressed with the quality of Euromodel kits.
-
Thanks Eamonn! Love your Ballahoo by the way, the wood that you are using is fantastic, with very precise planking too.
-
Hi Cristiano - great minds think alike Glad to see another member of the Unicorn club. Looking forward to seeing you start a log on your build.
-
Thanks guys! Augie, I think you're right about the keel. I would have had to modify the keel anyway to have the pear components that would be exposed (like the stem, stern post and false keel) added to the keel, so I'm not too bothered by it. The rest of the wood in the kit doesn't seem to have any problems thankfully. Kester, thanks for the vote of confidence. Thanks also for pointing out the fact that the flags are incorrect - i'll have to keep that in mind. As for this build being interesting, it remains to be seen. One thing that I'm sure will be interesting will be the various expletives that will come out on a very periodic basis WQ, it's funny, when I started in the hobby, I didn't understand why people here obsessed about kit inaccuracies. As I went further along with the Badger, completing the model became less of a goal, and I really got into researching and learning about these incredible ships, which was just as enjoyable to me as putting it together. Friends and family always joked as to how long the Badger took me (5+ years), but for me, I got more out of the journey than having a completed product at the end. In any event, I guess I'm a convert to the kit bashing side of the hobby On the Morgan, thanks for the heads up. I have been following the log of my friend John on here, and I expect it might be a little more difficult. I'm actually planning to double plank it, with a second planking of 0.50mm stripwood, which the instructions say you can do. I figure that when I need a break from the Unicorn, it will be nice to work on something else, rather than taking a complete break from the hobby. I have a lot of ideas on how to enhance that kit as well, which I will detail in a build log that I will set up in the near future Peter, thanks for looking in. Your gallery photos are very inspirational. I was a bit worried about modifying the quarterdeck to have the portholes open up as you moved toward the bow, but it sounds like I might need to fiddle with it anyway. Thanks for the heads up about that - I'm going to have to really plan things out carefully, and I might have to bug you with questions if you don't mind. By the way, you live in a gorgeous part of the world - my wife and I took our first vacation out that way when we were dating, and we really loved it out there. Frank, thanks very much for looking in. You've been a great help on my Badger, and always gave me a boost of encouragement when I got frustrated. I hope all is well with you - did you finish the Supply?
-
Thanks Augie. It should be fun. Your work gives me a lot of inspiration, so hopefully I can do the model justice Le debutant, that's a really nice Unicorn - is that yours? I'm planning on building the stern and the galleries from scratch, in large part to avoid using the cast metal pieces.
-
My approach to the build I decided I'm going to try and step up my game and attempt to enhance the kit to the best of my abilities. So, I have a number of enhancements that I'm thinking of doing. I placed an order with Jim Byrnes for his table saw and disc sander, so I'll have some toys to play with. I also went with Jeff at Hobbymill for the upgraded wood. 1. Paint with wood. I'm not a big fan of paint on wooden models, particularly white which I think comes off as too garish, so I'm going to try and avoid paint as much as possible. I'm also planning on sticking with three primary colors for the build - pear for the hull, boxwood for the hull accents and deck, and black in the form of dyed pear. ChrisLBren's Confederacy was a big inspiration for taking this approach - I hope I can pull it off half as well as he does 2. Different color scheme. I'm planning on modifying the color scheme a bit, using black for the mast tops and spars and for a thicker wale per the Chapman plans). I havent decided whether to use red for the bulwark planking and cannon carriages - if I do, I have a couple of stains from General Finishes that might work nicely. 3. Scratch the stern. I think I'm going to scrap the cast metal pieces and build the stern from scratch. This would include scratching the stern galleries, windows and the stern decorations. That will probably be the most difficult part of the build I would guess. 4. Open up the waist. I will open up the waist as in the Guadeloupe plans. 5. Change to quarterdeck. Depending on how the build is going, I might reorient the quarterdeck to have a gradual opening up of the portholes per the Chapman plans. Not sure if I'll be able to pull that off, but I think it will be a nice touch if it ends up working out. 6. Sails. I think the furled sails came out ok on my Badger, so I'll probably try adding a mix of full and furled sails to this build. 7. Other details. I might try adding a few other details to the build, including ship's boats, additional anchors, etc. Well that's that. My goal is to really challenge myself and my abilities, especially after learning all I did on the Badger. In particular, I hope to get a lot more detailed and precise with the rigging - I think the rigging is what can really set apart great builds. So, hopefully I can try worming and parceling and not take as many shortcuts as I did on the Badger. First order of business is to replace the keel - the one in the kit is warped with a twist -- so rather than fighting with it, I'm just going to cut out a new one in plywood on my scroll saw I have to figure out how to cut it so that I can add the stern post, bow, and false keel in pear. Thanks to everyone that follows my (mis)adventures on this log. Looking forward to joining my Unicorn brothers soon
-
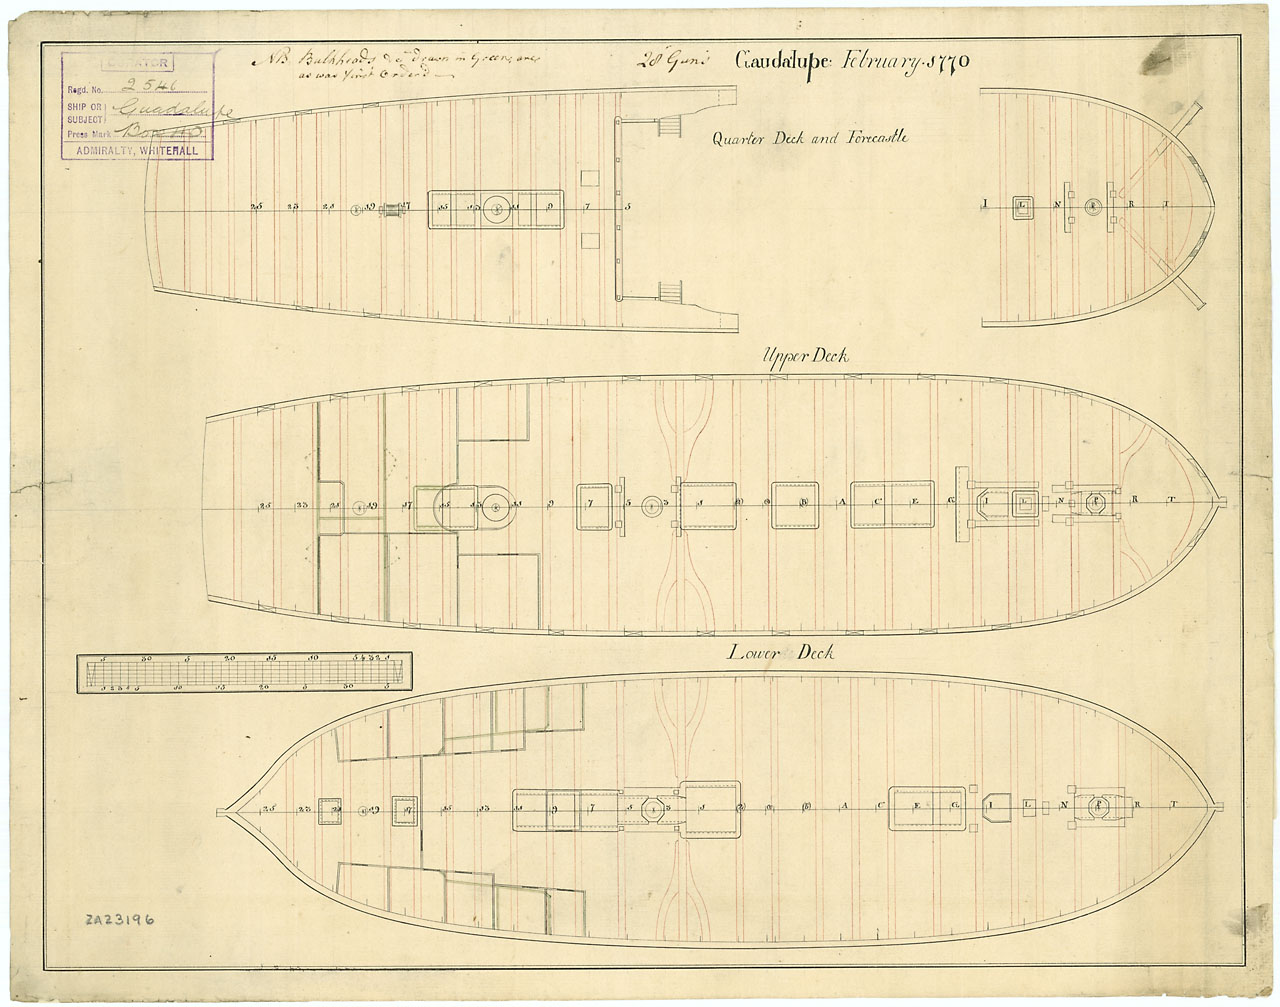
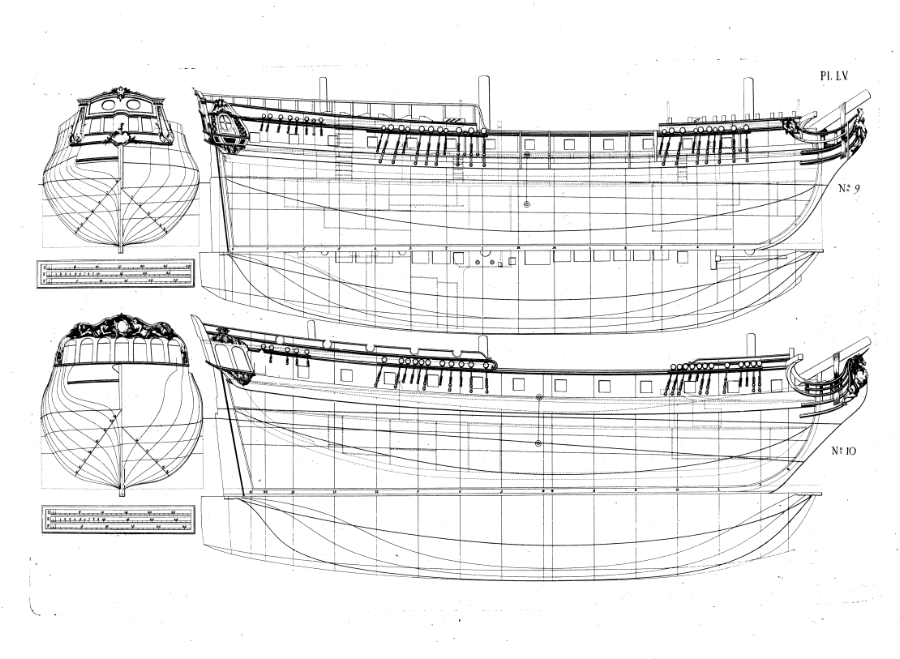
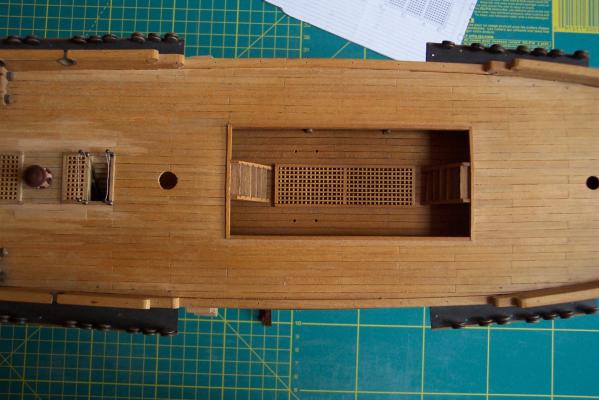
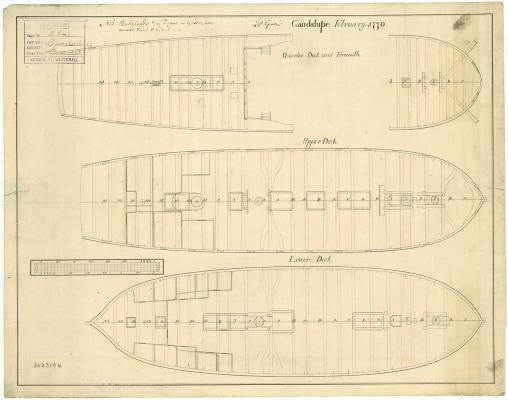
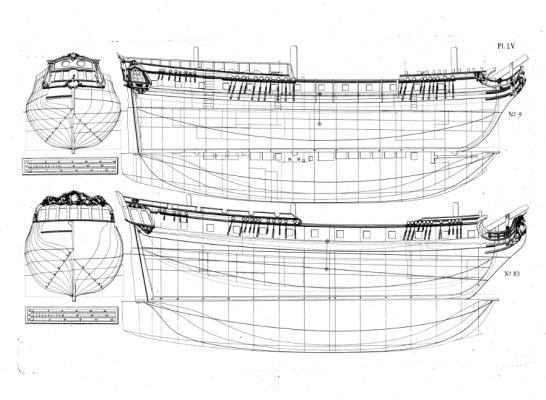
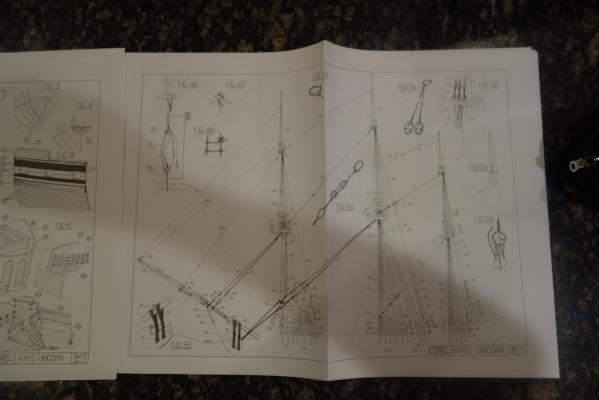
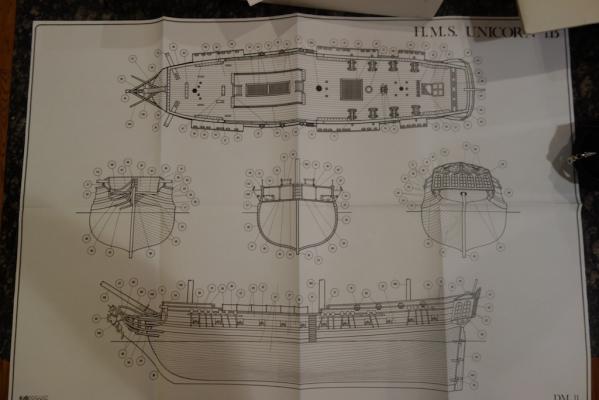
Probably the biggest inaccuracy with the kit is the waist - the kit as shown in the picture below (borrowed from Ian's log) would have you build the model with a very narrow waist. Gardiner's book has a chapter dedicated to the waist of frigates during the 1700s - in 1745, the quarterdecks and forecastle had a broad capping strip over the waist gunwales. With the advent of the "true frigates," the capping strip was broadened into a gangway. So, a more accurate representation of the waist would be something closer to what is seen in the second picture below, which is of the Guadeloupe, a close descendent of the Unicorn. The nice thing about opening up the waist will be that more of the deck details will be visible. Changing the waist should be a relatively easy fix. A more difficult issue is the cast metal pieces for the stern. They don't look all that great, and it sounds like other builders have had issues getting them to fit correctly. So, I think I'm going to scratch the stern and stern galleries. The plans for the ship also differ slightly from the Chapman plans in the "Architectura Navalis Mercatoria" book. The stern is slightly different, and the angle of the quarterdeck in the Chapman differs as the portholes over the quarterdeck gradually open up as you move towards the bow. A picture of the Chapman plans is below (the link below will take you to a high-resolution image) The Unicorn is the lower of the two ships. http://www.sjohistoriska.se/ImageVaultFiles/id_3085/cf_1803/55.JPG

-
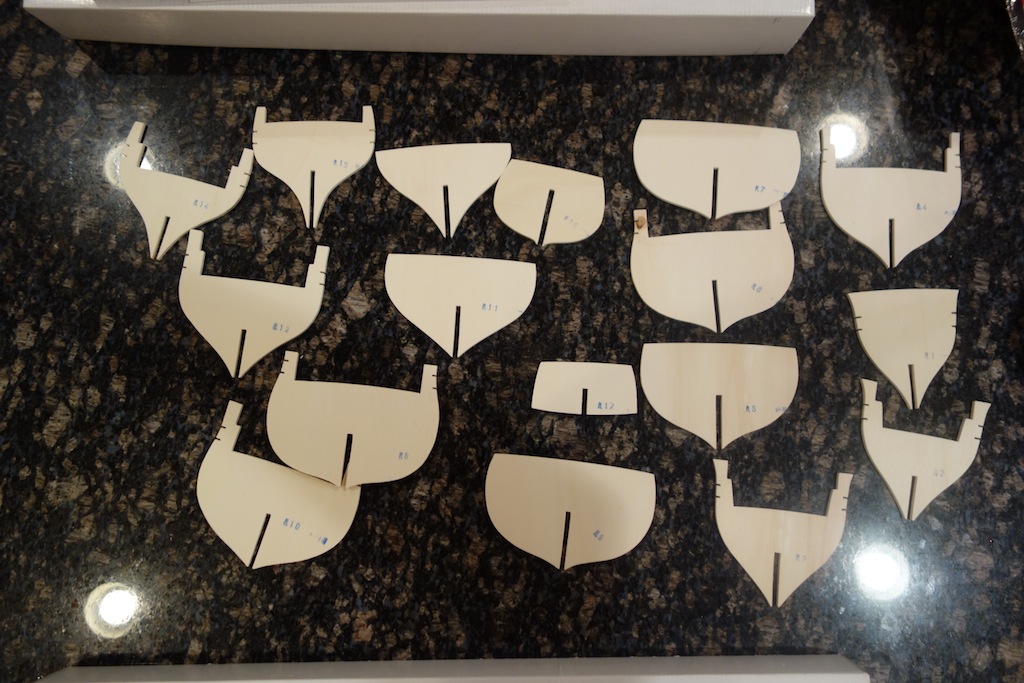
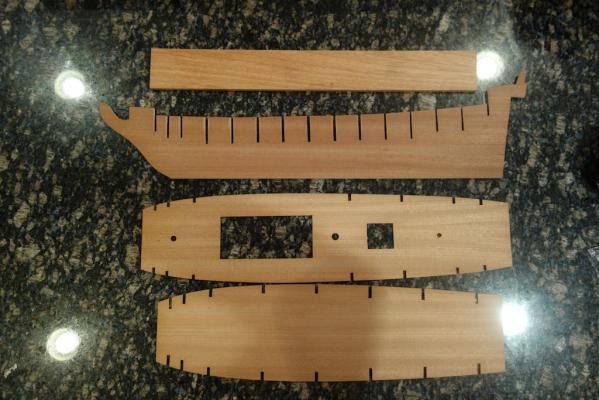
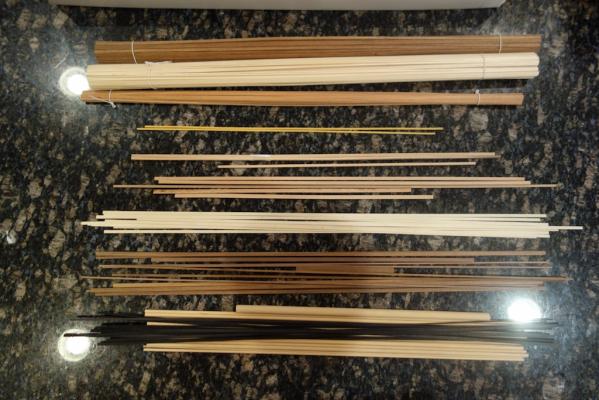
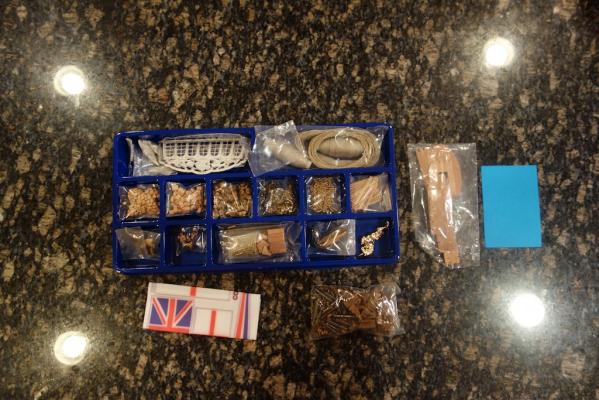
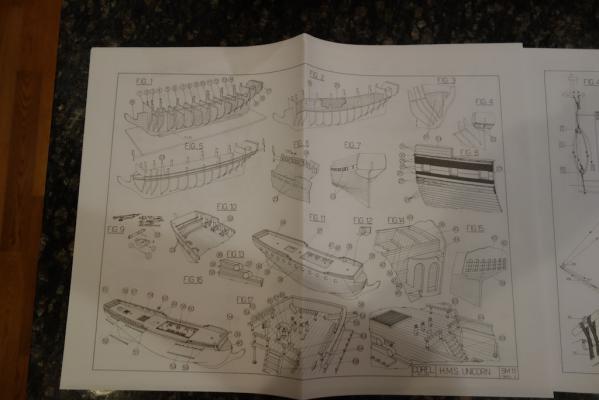
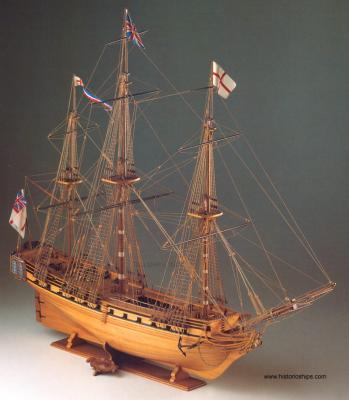
In case people are interested, here are some pictures of the kit components. Sorry for the four lights in the corners - I had to take the pictures on my kitchen island countertop, as my twins just celebrated their first birthday and their, uh, stuff is all over the place The kit components are not that bad all things considering. The wood quality is pretty good, and Corel gives you pieces that are blonde, yellow ochre and black so that you can build the kit without painting. In fact, as you can see in the picture in the first post, I think Corel assumes that you will build the kit out of the box without painting it. To me, the ship looks a bit too bland with this color scheme, so I am planning on painting with wood and adding more colors throughout the ship as I will detail in the next posts. The cast metal parts for the stern are a bit of an issue for me, which I will also get into in the next post. The blocks seem to me to be a bit oversized, but I'll have to examine them a little further when I get to the rigging stage. The instructions are a bit wonky, but the plans are actually very clear and detailed so the instructions shouldn't hold me back.


-
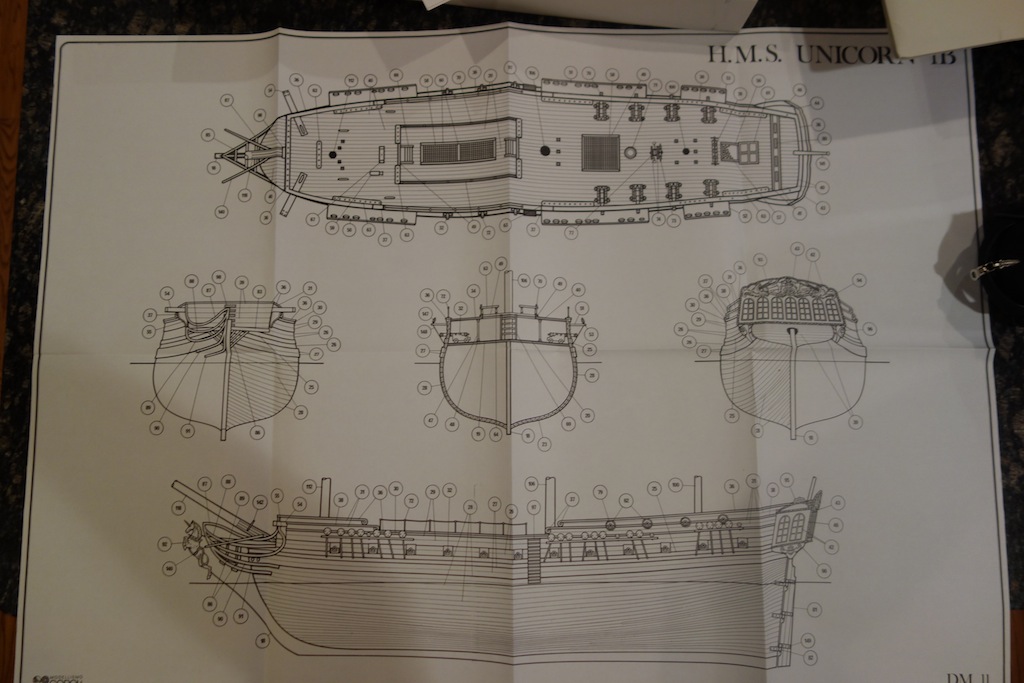
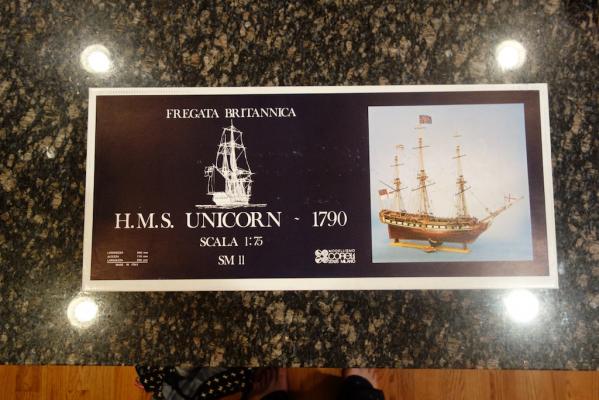
***NOTE - in January 2016, I decided to close this build log. I'll be building the Lyme as a new scratch build using the NMM plans, rather than try to bash the Corel Unicorn kit*** ***NOTE - in August 2014, I decided to build the HMS Lyme, the sister ship to the Unicorn, by bashing the Corel Unicorn kit. So, the log until then will be referring a lot to the Unicorn*** Hi my friends, now that I finished the Badger, I'm moving onto my second build, which will be the Corel Unicorn. The kit is scale 1:75, which ends up being approximately 33" in length and 29" in height, and some sites rate it as an "intermediate level" build. It doesn't look like it is too complicated a kit, but I plan to attempt a number of enhancements to the build which should raise the difficulty a bit. I was sold on the kit after coming across my friend Ian Major's beautiful build on here, so I blame him for my foray into this model -- hopefully my build comes out half as well as his In addition to Ian, ZyZux and Ollyweb have build logs on here, and Petervisser has a completed Unicorn in the completed kits gallery - so, plenty of good company as I no doubt will need help along the way. As other builders of the kit will tell you, it looks like Corel was very confused about the history of the Unicorn. Not only does the box imply the ship was built in 1790, but in the instructions, Corel says that Fredrik Henrik af Chapman designed the ship in 1700. Only problem is that Chapman was born in 1721 The instructions are correct that the "Architectura Navalis Mercatoria," which reproduces 62 plates from Chapman's ship engineering work (including the Unicorn), was published in Stockholm in 1768. Not only do the instructions have the history wrong, but the design of the ship with the narrow waist seems to be incorrect according to the frigate history outlined in Robert Gardiner's "The Sailing Frigate." In any event, the inaccuracies of the kit are well documented in the MSW link below. http://modelshipworld.com/index.php?/topic/2444-quality-of-corel-kits/ The Lyme and the Unicorn actually played an important part in British naval history. According to Gardiner's "The Sailing Frigate," the Lyme and the Unicorn were the first "true frigates." During the 1740s, the fifth and sixth rate vessels in the British navy were deemed inadequate, so it was decided that the navy would copy a captured French ship. British 24s had a heavily framed full-height lower deck while their French counterparts had a light platform lower deck with reduced headroom positioned just below the waterline (which compressed the height of the topside) along with an unarmed quarterdeck and forecastle and minimal barricades or rails. According to Gardiner, the fine lines and light framing made for fast and weatherly ships. The British ultimately copied the lines of the privateer Tygre, and launched the Lyme and the Unicorn in 1748 (these were referred to as the Lyme class). Apparently, the design was of such great success, that eventually 20 ships were built of this design. Some other tidbits in the Wikipedia links below: http://en.wikipedia.org/wiki/HMS_Lyme_(1748) http://en.wikipedia.org/wiki/HMS_Unicorn_(1748)
-
Love the windows Augie. I'm going to try that on my next build. Another issue with acetate is that it can be a little tricky to apply the glue and not get glue marks on the window panes - your technique avoids that (and looks better to boot!). Thanks for the tip.
- 2,191 replies
-
- 1
-
-
- confederacy
- Model Shipways
- (and 1 more)
-
Does the vinegar make your build smell? Does it go away over time?
-
CA glue and metal fittings
Landlubber Mike replied to cdogg's topic in Metal Work, Soldering and Metal Fittings
That's interesting because on my Badger, I used Gorilla glue, which is a type of PVA, to glue some metal parts to wood with no problem. These were mostly smaller pieces though, and I'm not sure if they would work on larger/heavier pieces. Personally, I can't stand CA, but it's probably just user error. -
Looking good Ian I have to say that you're a brave man cutting out existing work for your modifications!
-
Looking good Patrick, and I like the new toys I need to buy a few new ones myself... The Charles Morgan's keel also came in multiple pieces. I'm thinking of cutting out a new one out of one solid piece also. The multiple pieces are probably ok if glued correctly, but I think a solid piece will give me more comfort. Not sure why MS does their keels that way.