DONATION DRIVE - SUPPORT MSW - DO YOUR PART TO KEEP THIS GREAT FORUM GOING!
×


Landlubber Mike
-
Posts
4,541 -
Joined
-
Last visited
Content Type
Profiles
Forums
Gallery
Events
Everything posted by Landlubber Mike
-
 Probably logical, but I chose it because the box is in terrible shape and I was worried about keeping the contents secure! I have a Special Hobby 1/32 Buffalo in Finnish markings that probably should have gone next time wise, but it's a pretty nice kit and with a more complicated camo scheme, and I figured I needed a little more experience. Your card F4F sounds like a great, yet tricky, project! It has been nice building these in somewhat of a chronological order to follow the development of planes during this time. Amazing how much development there was, even during war time.
 -
Awesome, count me in on this one. I have the kit as well in the stash with I think the Infini upgrade set. Looks like it builds into a really nice model.
- 26 replies
-
- 5
-

-
- Yukikaze
- First Build
- (and 3 more)
-
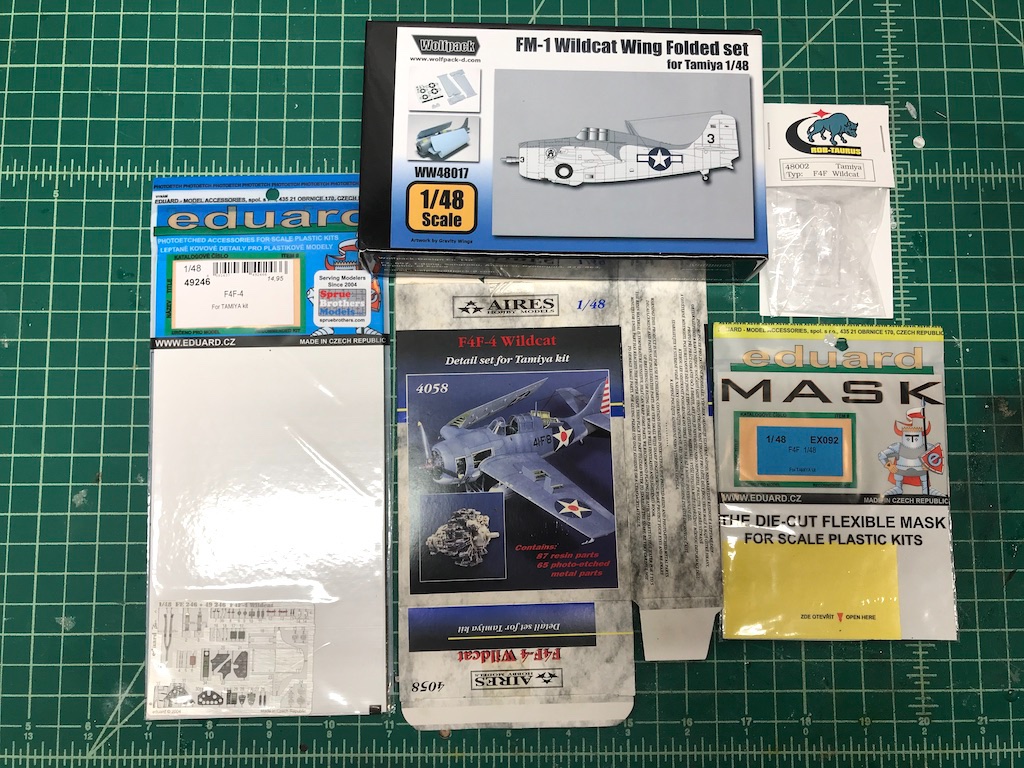
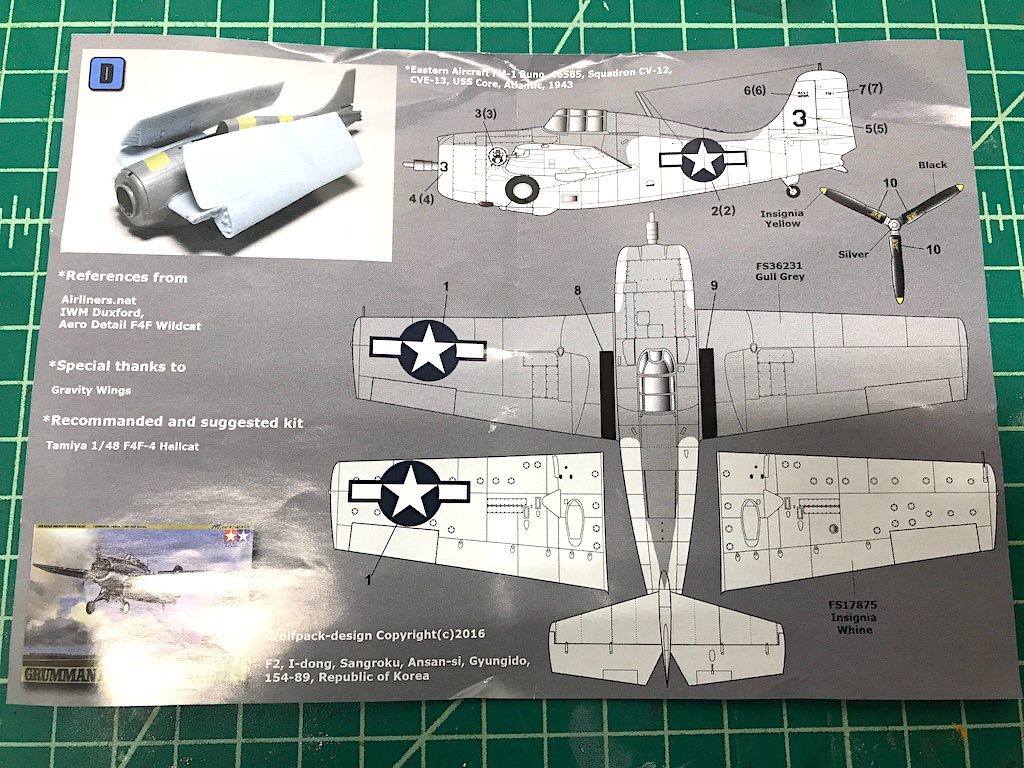
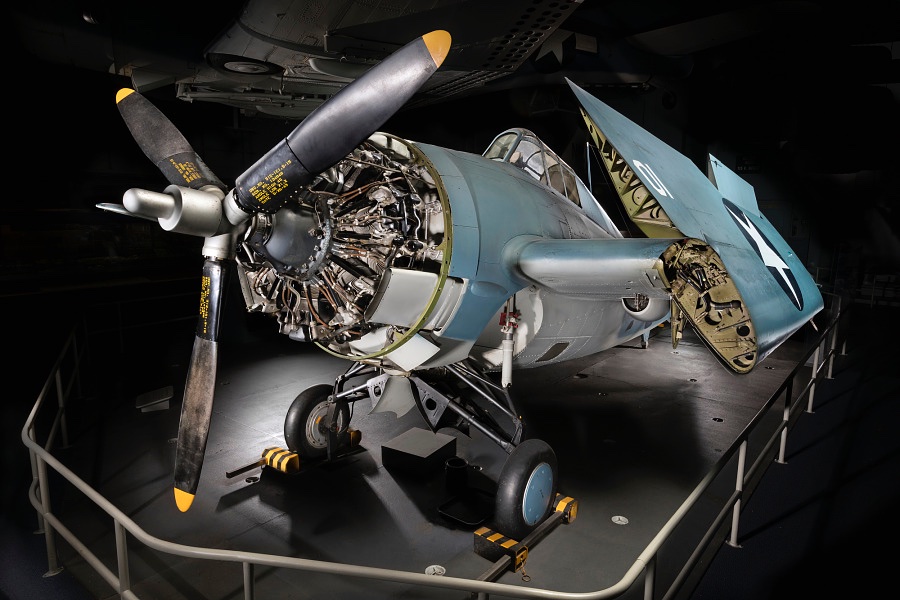
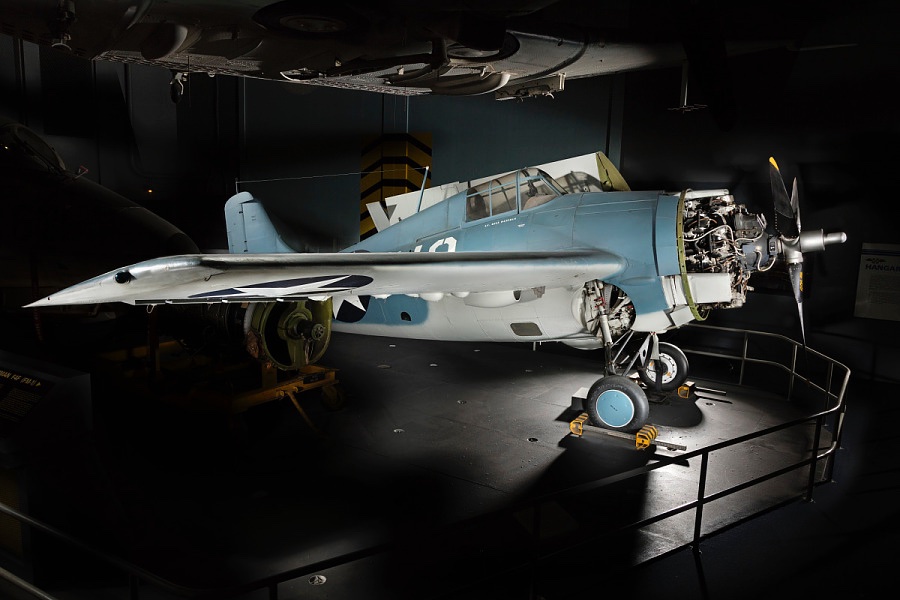
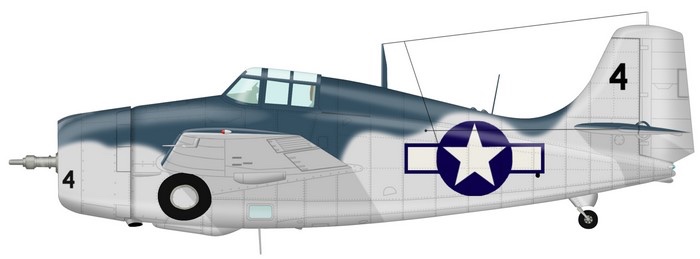
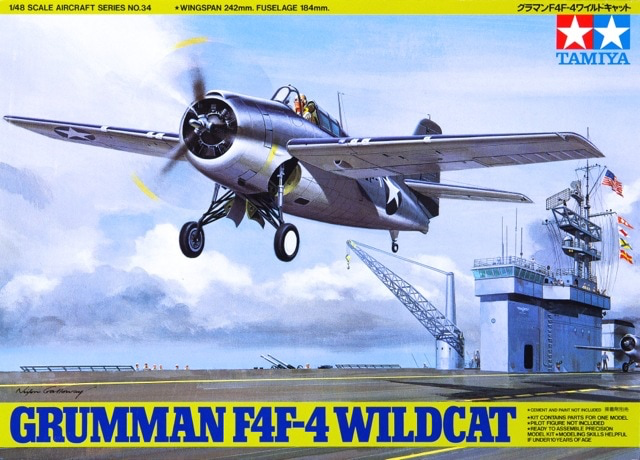
With the F3Fs completed, I'm going to build the F4F-4 Wildcat, but as the FM-1 version. The Wildcat was a carrier based fighter that began with the US Navy in 1940 (and was known as the Martlet with the British Royal Navy). It was built by Grumman, but Grumman ceased making the plane in 1943 to focus on the newer, and more superior, F6F Hellcat. General Motors/Eastern Aircraft continued making the Wildcat identical to the F4F-4, but reduced the number of guns to four and added wing racks for two 250lb bombs or six rockets. I'm going to build it using the Tamiya F4F-4 Wildcat kit. From everything I read, the kit goes together very well and easily. Of course as per my usual, I'm making things more complex for myself by adding a bunch of aftermarket, including a wing fold set from Wolfpack that allows you to build the kit as the FM-1. I happened to get very lucky and find this kit on eBay with all the aftermarket shown below, aside from the Wolfpack set, for under $50 with shipping from Greece of all places. The Aires set alone, which has a ton of resin and PE components, retails for $55 or over, so I figured why not? For the color scheme, it's fairly simple - a nice change from my past yellow wing builds! Here is sheet from the Wolfpack set, along with a diagram I found of what the scheme looks like (reminds me of the coloring of Great White sharks): Finally, here are pictures of an FM-1 in the Smithsonian collection. While I live in the DC area, unfortunately it looks like it's not on display at the moment (and I believe the museum is closed due to Covid). Oh well 😕 https://airandspace.si.edu/collection-objects/eastern-division-fm-1-grumman-f4f-4-wildcat/nasm_A19610122000 Should be a fun build! Thanks for looking in.

- 241 replies
-
- 13
-
-
Thanks Roger, that's really nice of you. With the pitot tube and the rigging, I feel like I need some kind of displace base just to keep them protected, let alone, to show in a diorama setting. I knocked the pitot tube off one of them last night when taking the final pictures, and it took me 20 minutes to reattach
-
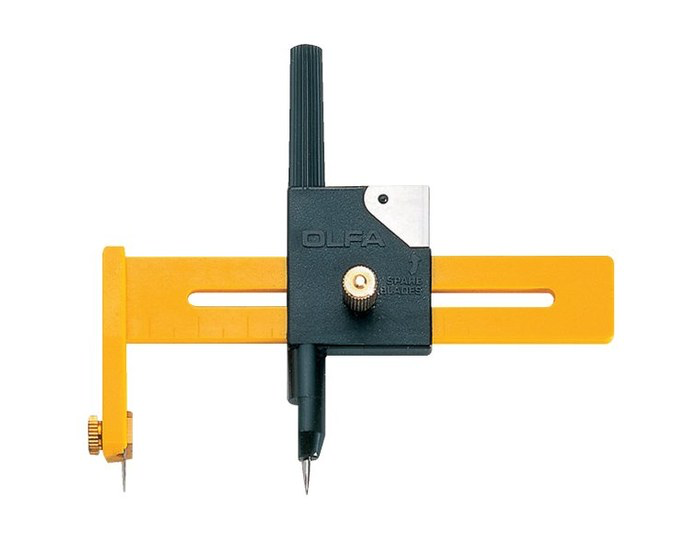
Thanks guys, really appreciate the kind words. I still have a long way to go, but slowly getting better thanks to all your helpful tips and suggestions. @CDW, thanks for posting that info along. Interesting that the pros don't use a clear coat under the decal. I can see cutting off the excess clear carrier film on things like insignias, but numbering and lettering must be a real process, yikes! I almost think it would be easier to paint certain decals rather than cut them out. Speaking about painting rather than using decals, @yvesvidal asked about how I painted the insignia. I used the Montex stencils as I mentioned a page or two earlier, but last night I watch a youtube video by Plasmo who cut out his own in doing a Buffalo (very similar plane). All he used was a circular cutter, a scalpel, and Tamiya masking tape. Easy to prepare the disk masks using the circular cutter. For the stars, he used the kit decals as a template - he put the Tamiya tape on top of the decal, then traced out the star using a scalpel. Took him like 30 seconds (probably would take me 30 minutes, but seemed very easy to do). This is the circular cutter I used by the way (and Plasmo was using) - inexpensive, and cuts circles as small as a little under 1/2"/1cm.
-
A few days ago I was looking up what to do with carrier film issues. Some suggested that it could be from air pockets between the decal and the model. To minimize this, the consensus seemed that (1) a gloss coat before decal application gives a smooth surface, so the decals can sit easier, (2) use of decal setting solutions (I've been using Micro Set and Micro Sol, but it sounds like there are others that are stronger but you have to be careful on certain kits, and (3) use a pin to pop a hole in the decal to let the solution under the decal to release the air pocket and help the decal to sit better. On my 1/72 planes, I sprayed with Future, then added Micro Set to the model before adding the decal. Once the decal was on, I added more Micro Set and a bit of Micro Sol. Had zero carrier film issues, but sitting the decal on the Micro Set led to a weaker decal that was prone to ripping. On my F3Fs, I added the decals straight to the painted finish without the Future gloss coat (didn't want to dull the aluminum finish). When applying the decals, I added water to the model, added the decal, then added Micro Set and Micro Sol on top. Much easier to manipulate the decals using just water and not Micro Set, particularly the pin striping. But, if the light hits it just right, at an acute angle you can see the carrier film edges. It was more prominent pre-final clear coat and weathering, but is still there. So I don't know what the answer is. This certainly wasn't a controlled experiment as I was using decals of different ages and from different manufacturers. Next time I might try using both water and a touch of Micro Set under the decal when positioning them. Seems like the carrier film issue is prevalent across many model and decal types though.
-
Looking great OC! My guess is that with some weathering and a final top coat, the tail code films will be even less visible.
-
Nice collection you have over there Kevin - and love the cabinet you made for it!
-
This looks really amazing - a big testament to Chris' skills as a designer to make a model with such detailed focus on developing a skeleton for the model that ensures its stability and accuracy. For me, having to figure out where to cut gunports, modifying the skeleton so it all fits together accurately, etc. in other kits were very aggravating. In this kit, Chris looks like he's set it up in such a way that you can spend more time building and adding details, which is what I most like about modeling.
-
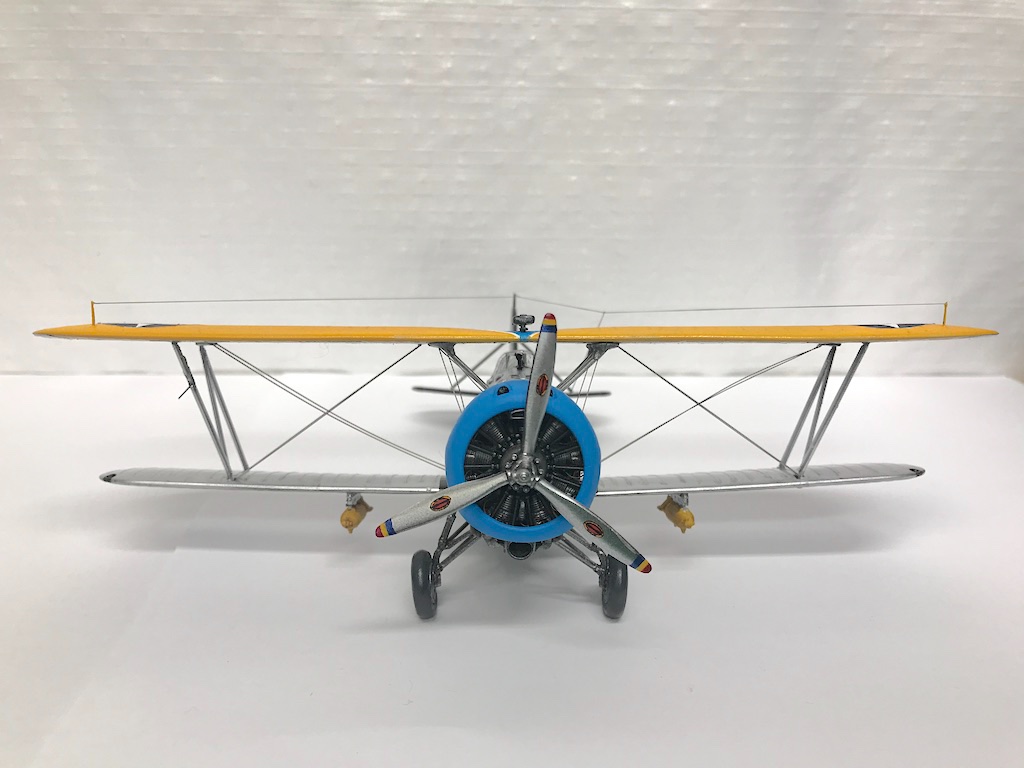
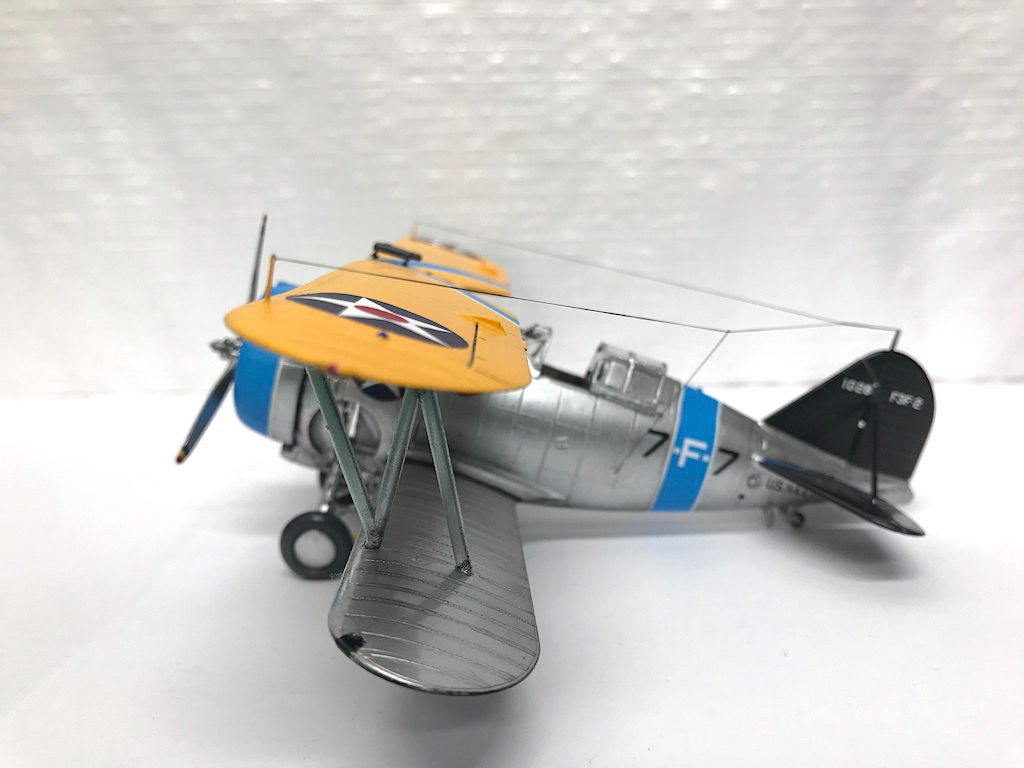
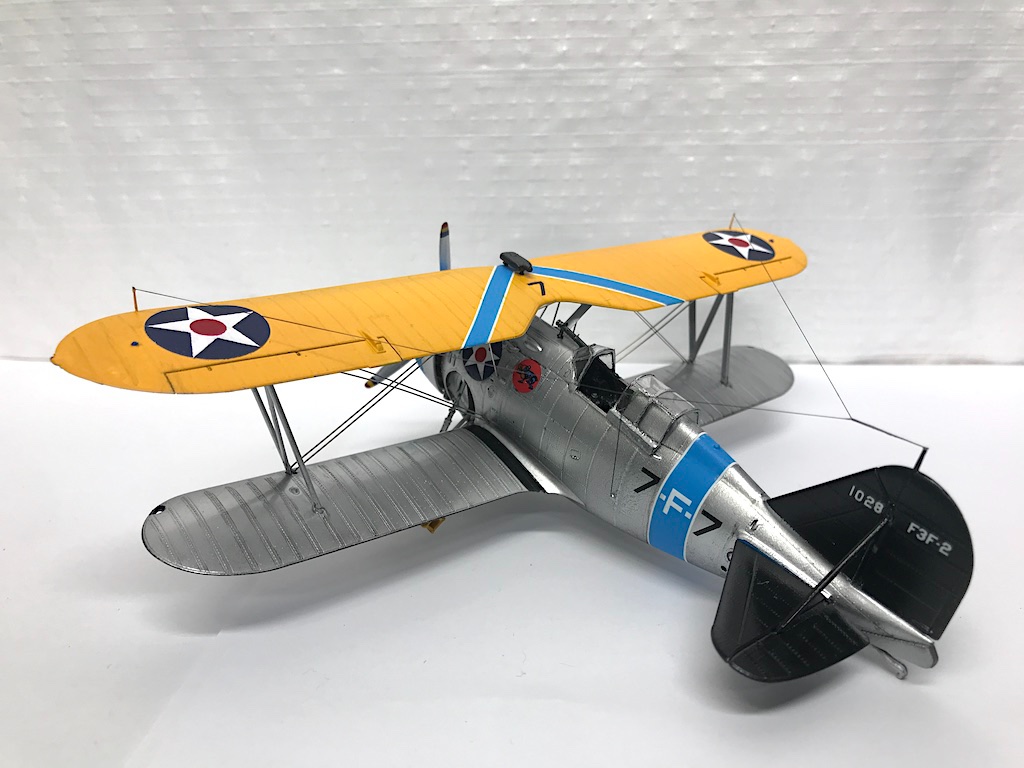
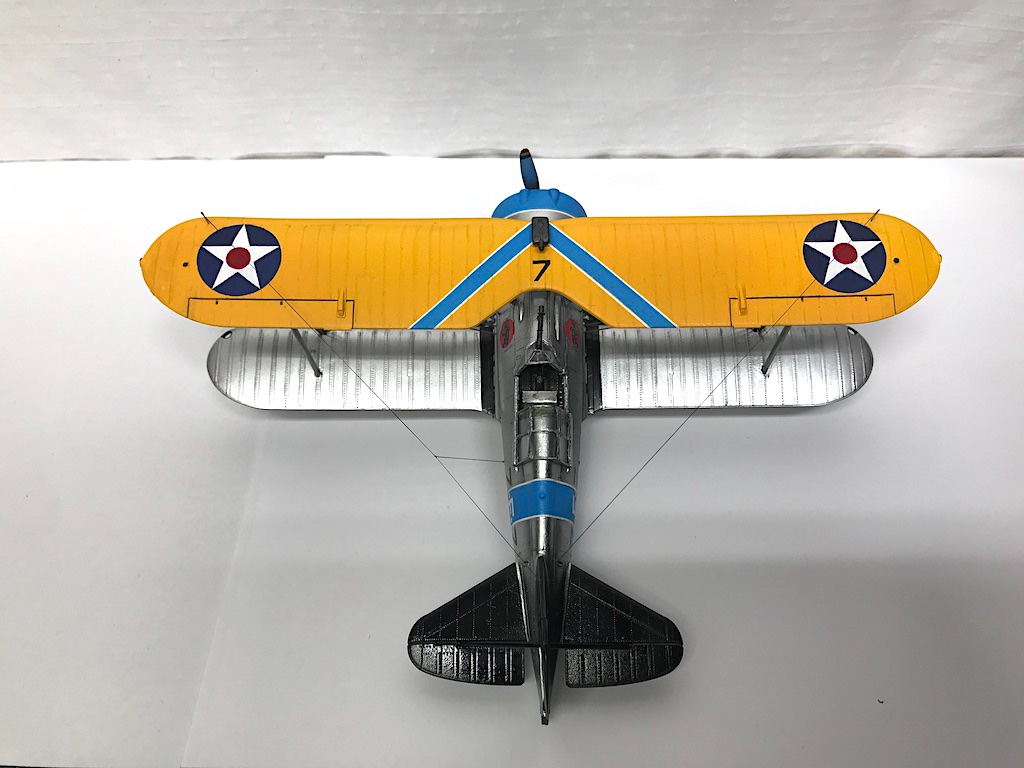
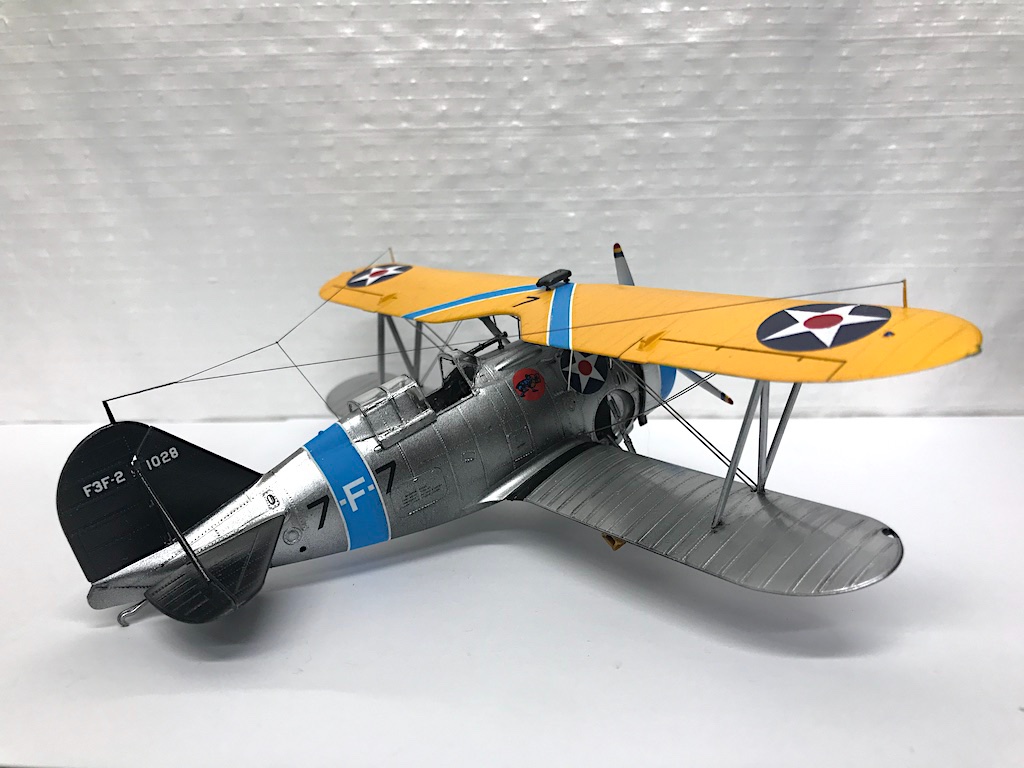
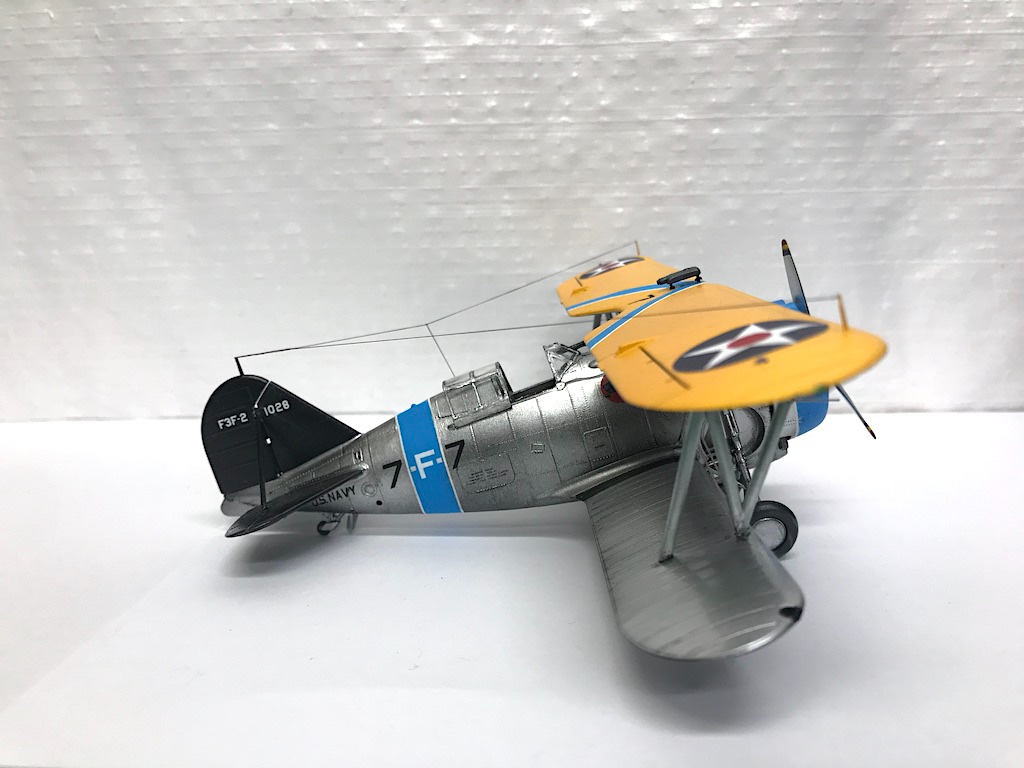
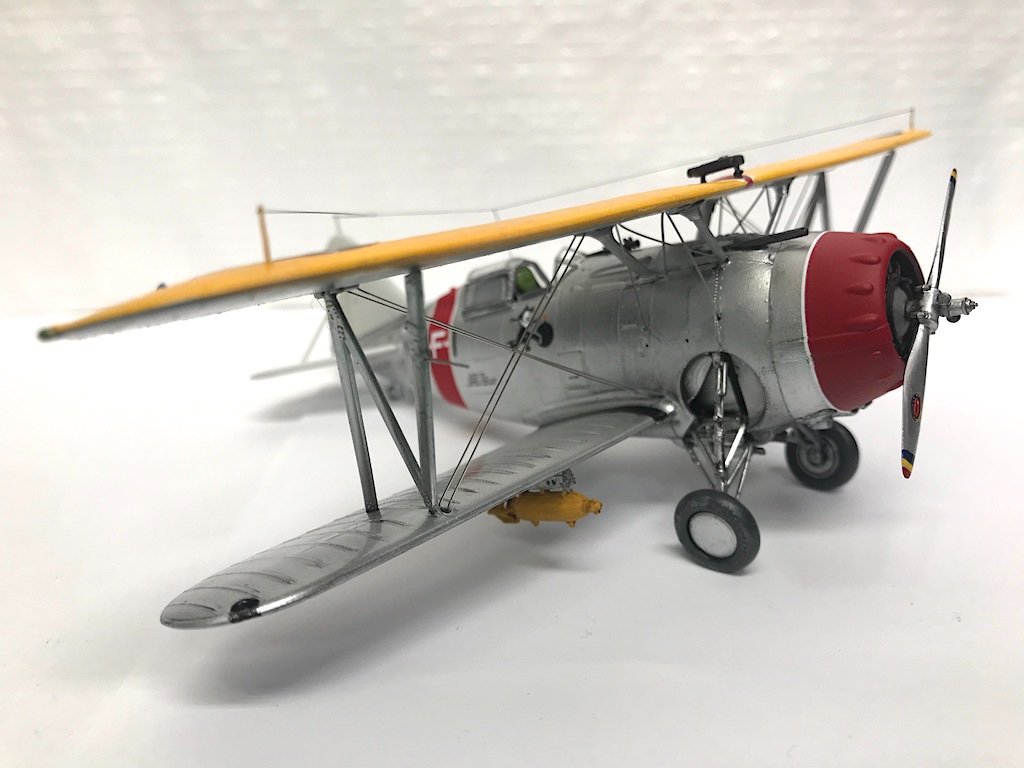
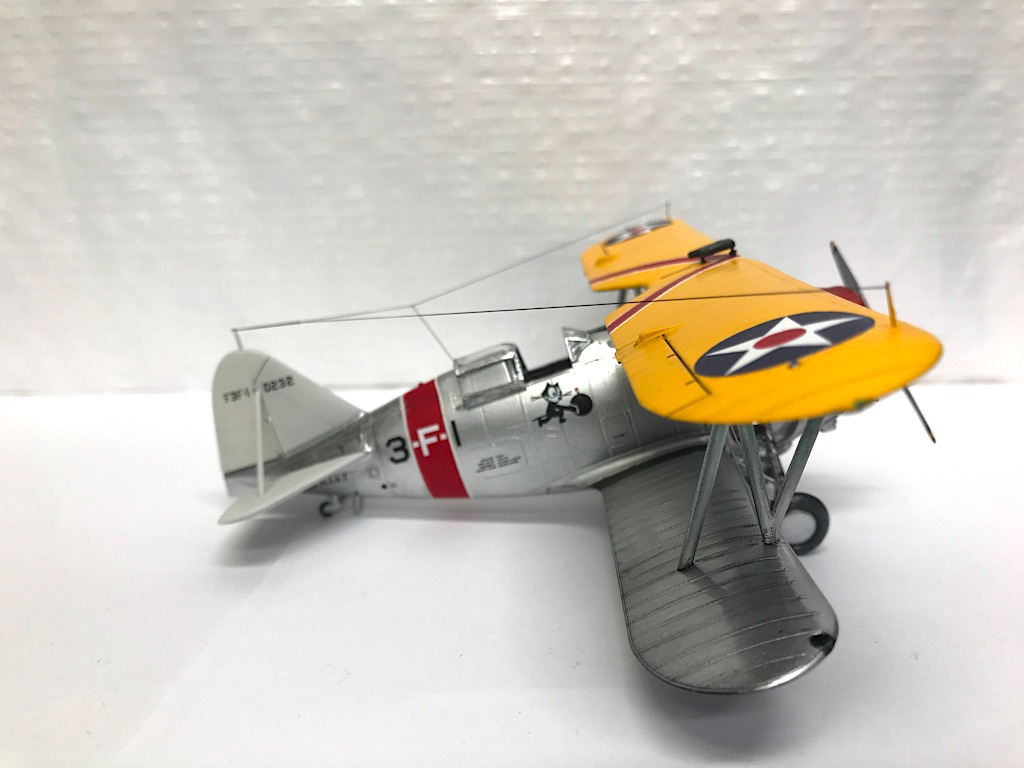
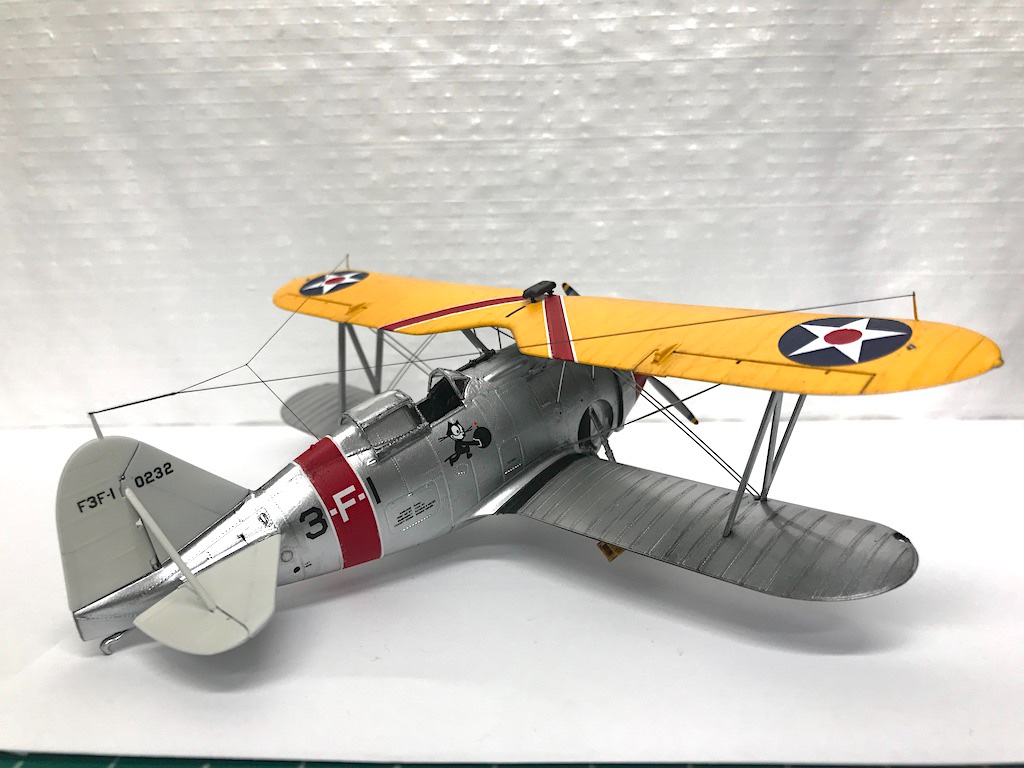
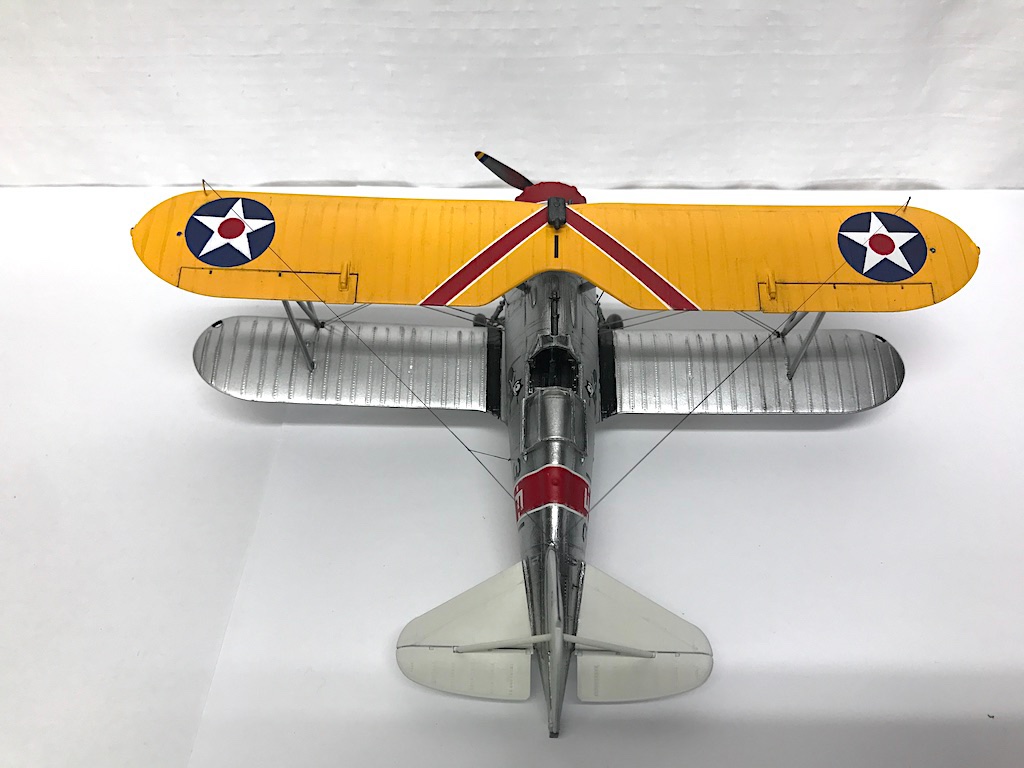
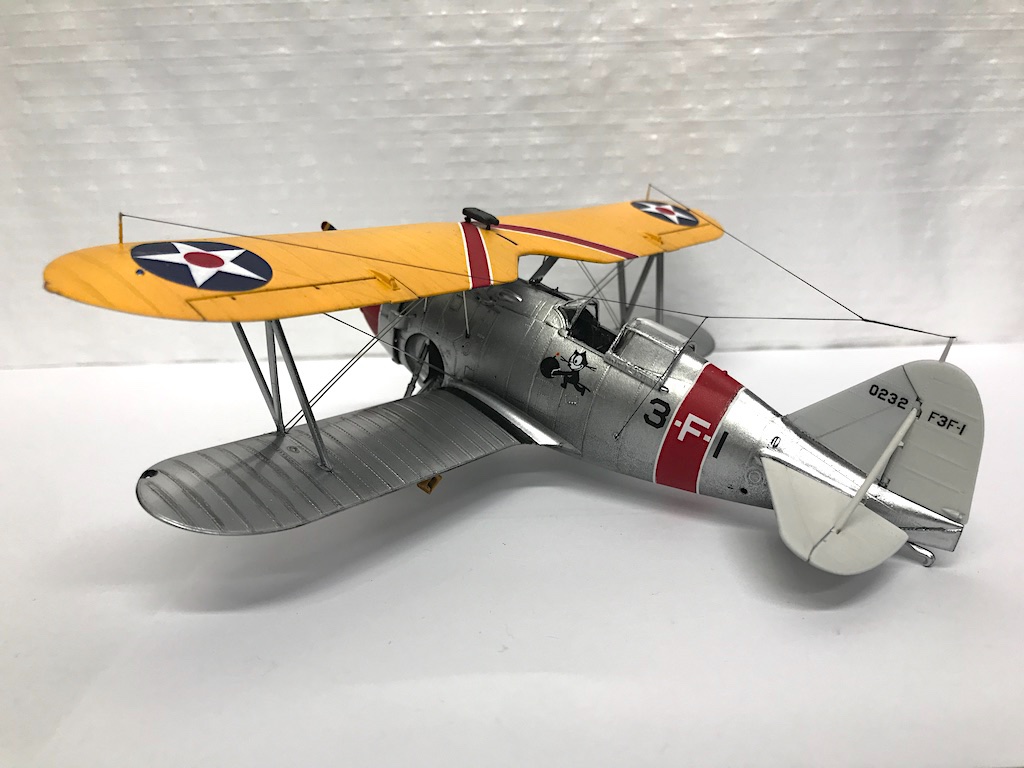
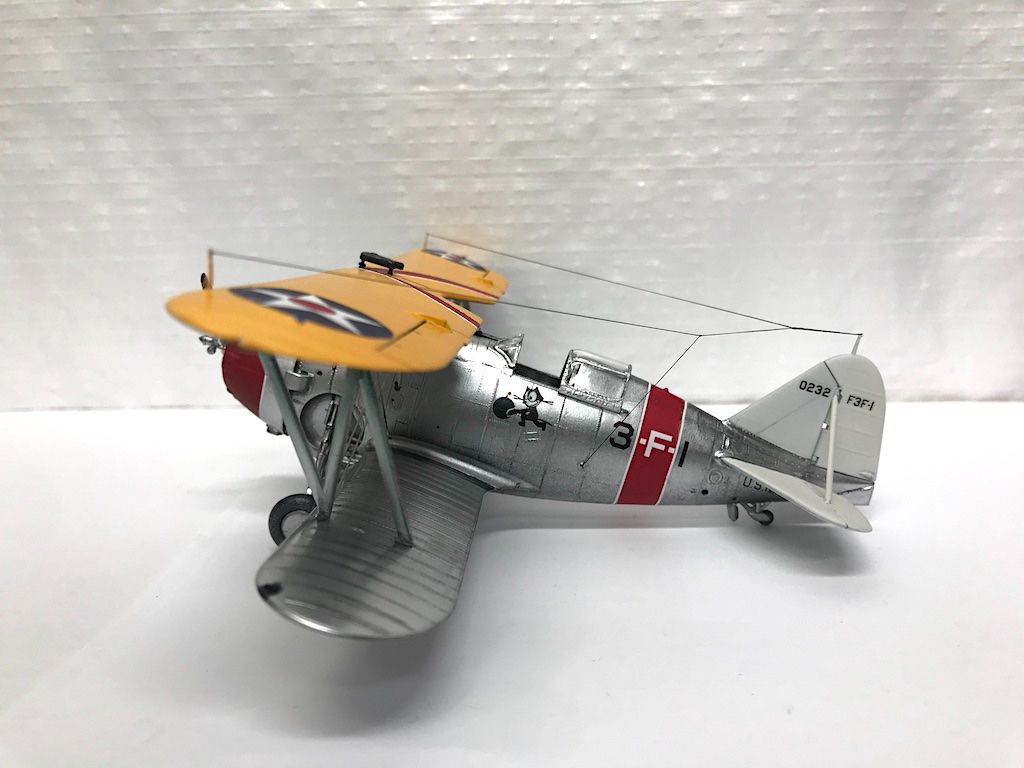
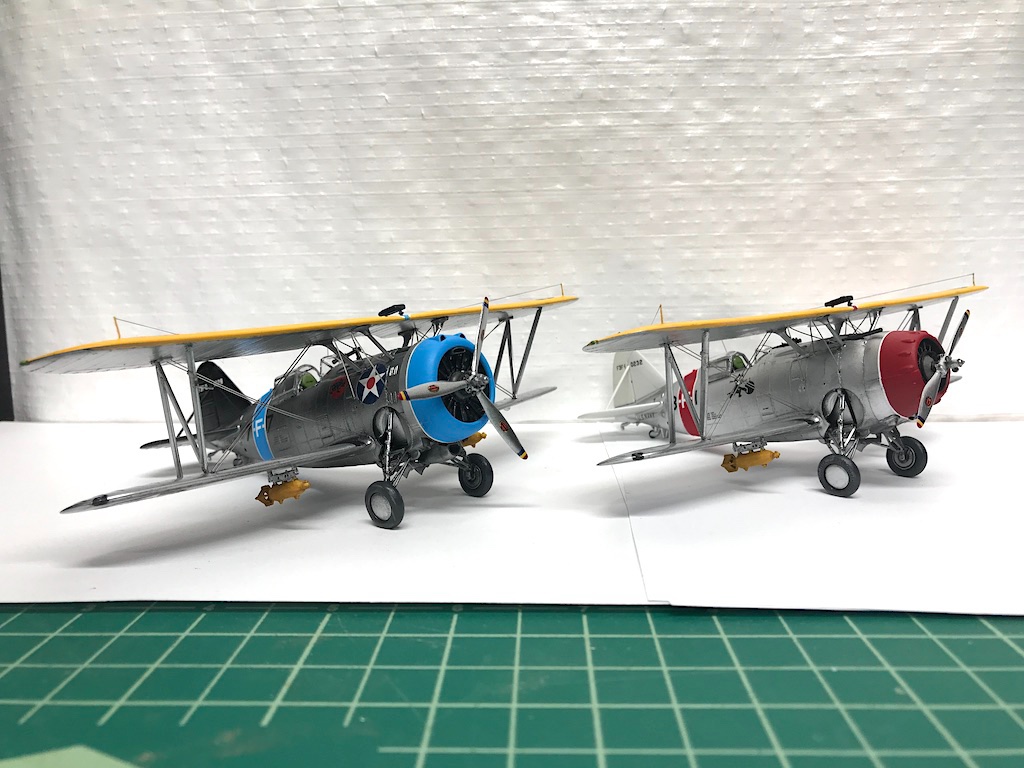
Finished the F3Fs last night. Hooray! Funny how the final details always seem to take me 10x longer to complete than I would have expected. A few post-build notes: 1. As I mentioned earlier, I decided to add a flat finish to the belly bands and painted areas of the cowl. I probably could have gone with semi-gloss, but I like the contrast against the tiny aluminum. 2. For the rigging, I used the kit's PE parts. I wouldn't say it was an easy process to include them, but they went on much easier than the PE rigging set from Starfighter that I used on my F4B-4 and P-6E. The material was stiffer, and Accurate miniatures added slots to the wings into which you could slide the rigging. 3. I added pitot tubes to the right N support. I ended up using pieces of bug pins for the tubes. The pins (used to pin bugs in bug collection) are stainless steel and come in various very thin sizes. The N support already had what looked like the wiring and other hardware, so I just found a pin that seemed to roughly match in size. 4. The radio antennae wires were made using EZ-Line fine. It worked like a real charm. I know some people pooh-pooh it because it's more flat than round, but I think you can only tell that under extreme magnification, at least for the fine size. It attaches easily with CA and stretches (supposedly up to 7 times its length) so you can get a nice taut line. Seemed much easier than stretched sprue or other materials. It was a little complicated in that the wires that run from each wing tip to the tail connect ahead of the tail and then run in a combined line to the tail, but I managed to get it to work. 5. The kit has you attach the upper wings, then attach the bottom wings and supports, suggesting that you try to do it all at the same time. Of course, it's much harder said than done. On both planes, the right side ended up a couple of millimeters higher than the other. If I had to do it again, I would probably have attached the bottom wings to the fuselage pre-painting, to avoid any seams and to better set the dihedral. I think if I had taken that approach, all I would have had to do is manage the angle of the top wing (as opposed to trying to glue the two bottom wings and the top wing, position the struts, etc. all at the same time). Learning experience for next time. I just wanted to thank everyone who has been looking in and helping me work my way through this. I really appreciate all the help so thank you! For my next plane, I'll be doing the Tamiya F4F-4 Wildcat kit as the FM-1 version using the Wolfpack wing fold conversion set. Simpler in the sense that it has limited rigging and a single wing, but I have the big Aires resin/PE detail set and the Wolfpack set, so it will be challenging in other ways.
- 128 replies
-
- 16
-
-
I'm using ebony for my Charles Morgan build, and I have to say that I don't find it as difficult to work as people tend to say. Sure you have to be careful of the dust, but you similarly have to be careful about the dust of many woods you see used in the hobby. For what it's worth, I've heard that the leather dyes can fade, so you might want to try using black stains if you go that route. On my Pegasus, I've been using General Finishes stains and the black still looks like the day I applied it. If you're looking to source ebony strip wood, try Matt at Inlay Banding. He put together a package of ebony for me a couple of years ago at a reasonable cost, dimensioned to what I needed. https://www.inlaybanding.com
-
Nice work, great job! Even more impressive that you did it at such a small scale!
-
Wow, that detail is amazing. Greg, if you don't mind, I was wondering if you could share any tips on fixing the railings to the model. Do you use CA? White glue? Do you pre-prime and paint before attaching? I'm close to adding the rails to my 1/700 destroyer and am wondering if there is a proper way to go about it. The PE is so thin, that I have to do it right the first time or it will look like garbage. Thanks in advance!
- 136 replies
-
- 3
-
-
- strasbourg
- finished
- (and 2 more)
-
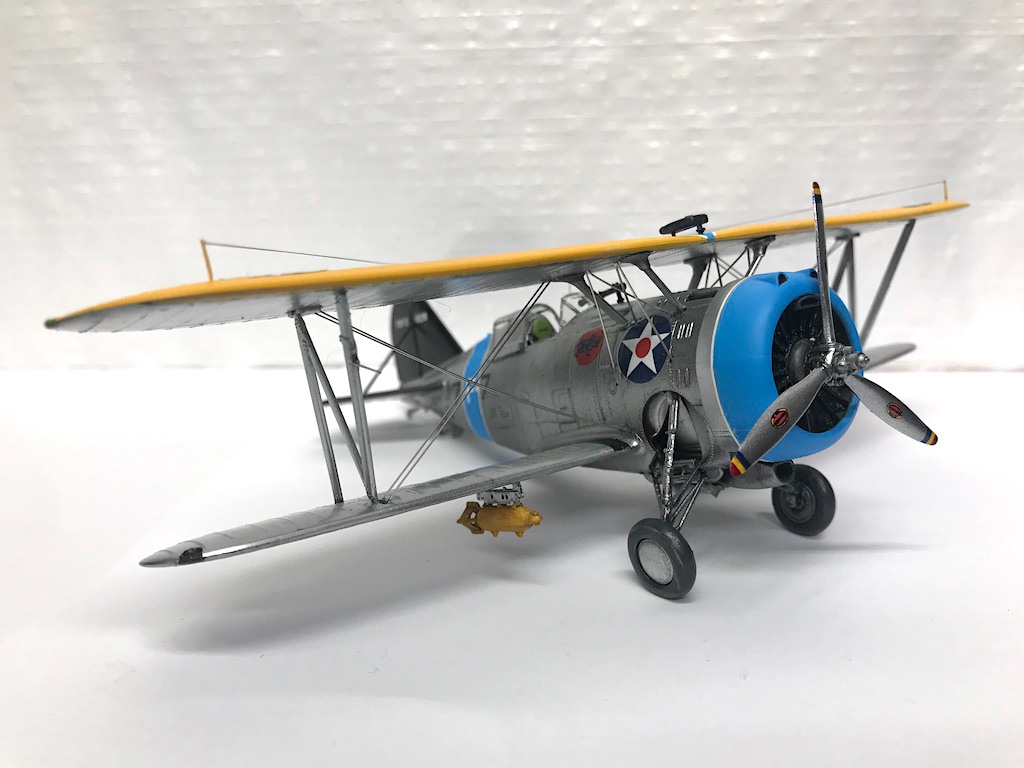
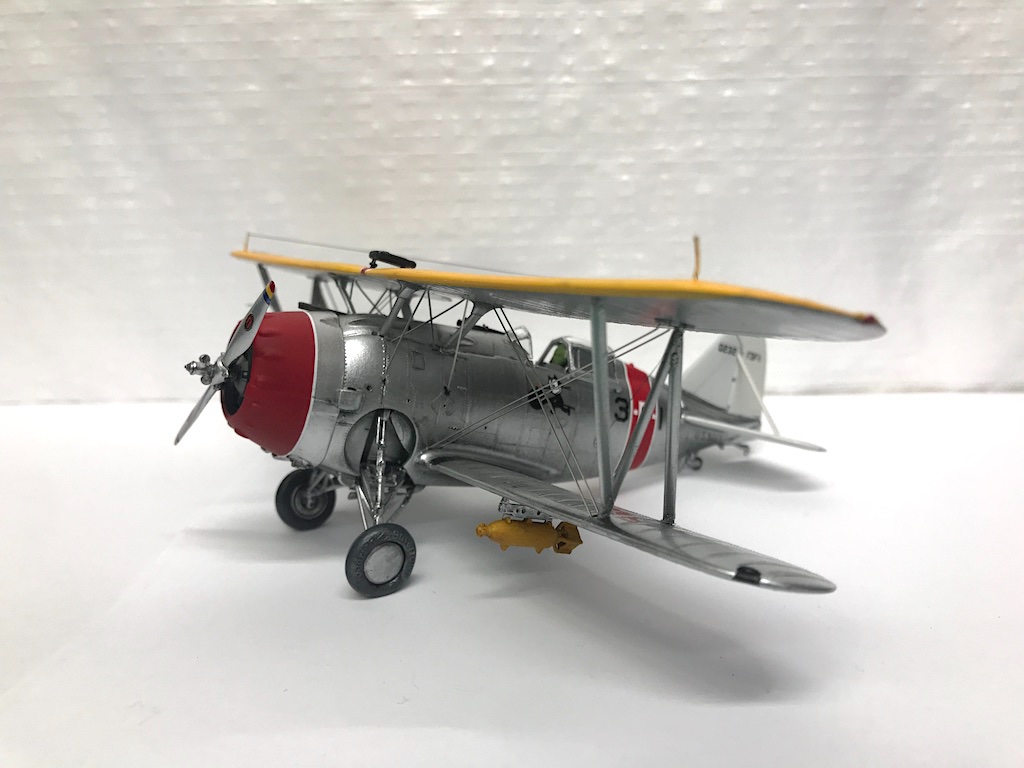
Thanks man, really appreciate the nice words and the advice! Even though these are fairly simple planes, the color schemes are anything but. Maybe I should have started with something easier, but I can say that these we have been a big learning experience for me. I'm slowly getting better and more facile with the airbrush, but I need to figure out a lighting solution, as the lights in my spray booth are super bright LEDs, and it gets tricky to see if I have sprayed too much or not enough paint on the model with certain colors like metals, paint colors on similar undercoat colors, etc. My next plane model (I think it will be the F4F-4 Wildcat converted to an FM-1, mostly because the box is in rough shape), only will have two or three colors, and no belly bands, chevrons, two-color cowls, etc. so that should be easier. Vallejo Metal Varnish. Last night I sprayed the top sections of the bottom wings with Vallejo Metal Varnish, this time adding Vallejo's thinner to the cup. Worked so much better, went on smooth without clogging the tip. So, while I've had great success shooting Vallejo paints, I think their finishes need thinner or flow improver. When I first went to use the airbrush, I was barely getting any paint flow. Took off the tip and cleaned it, and a small sheet of dried varnish came out (despite a thorough cleaning at the end of the prior session). When I went to clean the airbrush at the end of last night's session, it still was shooting good and clear. Top Wing. I also ended up top coating the top of the top wing (the yellow wing). I debated whether to go with flat or semi-gloss, but just went with Tamiya flat from the rattle can. The newer planes in museums seem to have a pretty glossy finish, but I wasn't sure if that was because they were using modern paints and finishes, wanted to protect the planes, make them shinier for museum visitors, etc. I kinda like the flat colored sections as a contrast to the aluminum, as otherwise, the whole model would just be way too shiny. Cowl. I then took a chance and sprayed the flat against the red cowl of the F3F-1. It not only dulled down the "wet" look of the red, but also seems to have minimized the orange peel appearance. So that was a relief. Next I'll do the same for the belly band and the tail, and similarly tackle the F3F-2. Just about at the finish line on these. Looking forward to knocking them out and moving on to the next subject and hopefully avoid some of the mistakes I made on these.
-
I'm not surprised - looks professional, and a testament to your skills. Very nice! You're setting the bar awfully high for me when I get to mine. 😐
-
Looking fantastic! I've always loved the lines of the Harrier.
-
Here is what I used for the wooden wands: I checked my Mr Hobby Clearcoat sprays that I’ve used on plastic models and they didn’t list wood as material to use it on. Have you thought about using Tung oil? I really like how it brings wood to life. Easy to apply with a rag and I’m sure you could similarly brush it on.
-
Are you thinking of applying the finish to the entire model? Have you considered using a rattle can finish? I made some wooden magic wands for my girls and used a spray which worked really well. Easy and quick to apply, and left no residue.
-
Non-glossy CA??
Landlubber Mike replied to rtropp's topic in Building, Framing, Planking and plating a ships hull and deck
I haven't seen one that dries flat, but note that using flat or other clear coats will cover up the glue spots. -
One place that I have had some success is Woodcraft (there's one in Springfield). It's hit or miss, but they have a section with 3" x 24" (or so) boards of various thicknesses. I believe they carry boards down to 1/8" in thickness, but again, hit or miss on sizes, species, too much figure in the grain, waviness of the board, etc. I found some sheets of bloodwood that I might try for gun carriages, and padouk that I'm using on my La Renommee build. Another option at Woodcraft is to look at their veneers. You can get long sheets of the stuff that are about the right thickness for planking. For my Renommee, I'm using cherry veneer that I found there that worked nicely. You can also find dowels in various woods and diameters at Woodcraft. I picked up a bunch of nice dowels in cherry and walnut for my Renommee and a future build. Just make sure that you check for straightness as many were a bit wavy. I rolled them on the floor to see if they rolled smoothly or were bumpy because of warping. Big loss when Hobbymill and Crown left the business
-
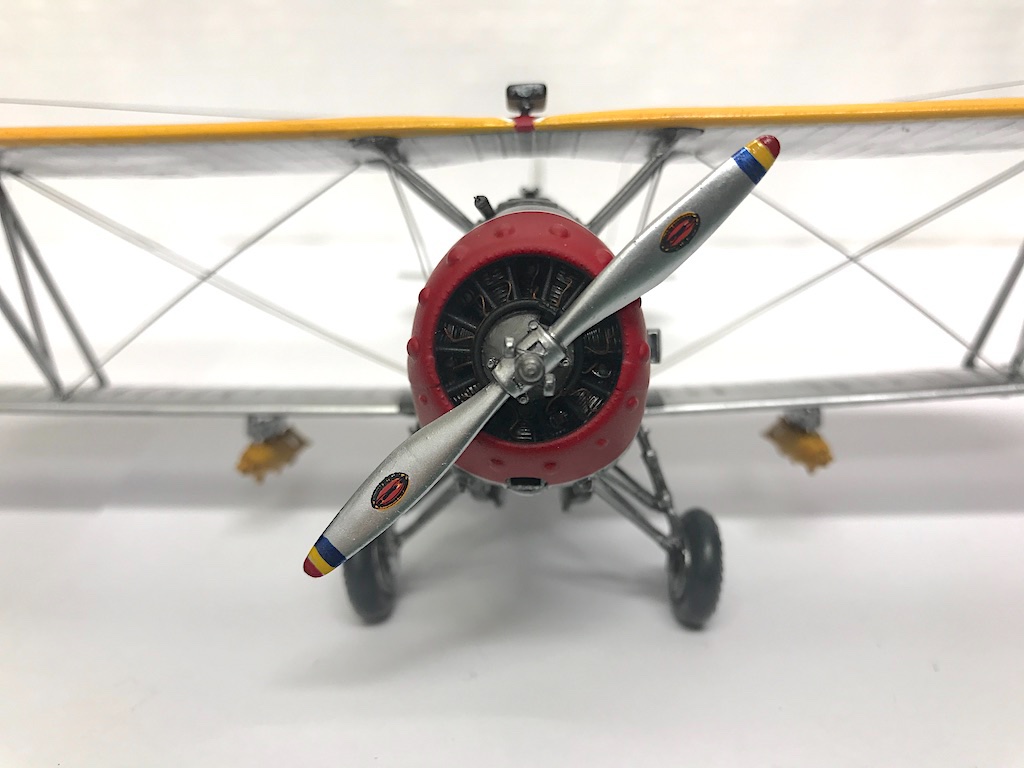
Thanks! Yeah, good learning experience for me. Part of the problem is that I was getting dry tip, so more air was shooting out than varnish, which probably accelerated things before the varnish could level. I saw a few videos where folks were suggesting adding a retarder is necessary for that product. Never needed to on their paints, but looks like the varnish is a different animal. From a normal viewing distance it doesn't look bad, just when you are up very close you can see it. What do you think of the look on the cowl? Too wet looking? I was thinking of perhaps spraying Gunze semi-gloss clear coat on it - the rattle can is fantastic and nicely self levels. That would tone things down a bit and possibly help smooth out some of the orange peel effect.
-
Wow, that came out awesome! Nice job!
-
Really nice work Joe! I love the lettering - looks fantastic! Did you find that you had to double up on the white lettering or was a single decal sufficient on the black hull? I stopped working on my Charles Morgan because I haven't quite figured out how I was to do the lettering. Dry transfers are going to be too difficult to pull off I think, and I didn't want to glue paper to the hull. I've reached out to a couple of custom decal shops to no avail. I might just try to use single letter decals like you did, and just take my time to get them into the right position. I was worried about getting them spaced and lined correctly, but it looks like it can be done. If I can't do it, maybe I'll send my hull to you to decal
- 140 replies
-
- 1
-
-
- benjamin w latham
- model shipways
- (and 1 more)