


Landlubber Mike
-
Posts
4,547 -
Joined
-
Last visited
Content Type
Profiles
Forums
Gallery
Events
Everything posted by Landlubber Mike
-
 Wow, those are great pictures, thanks! I see what you mean. Hmm, I have a little time to think about it. Do you guys know, with the panels off so you can see the engine, access the lift raft, etc., would the wings be folded or not? Now I'm wondering if I'm going to do a diorama with the engine panels off and the panels off the life raft, maybe folded is not the way to go. I paid for the Wolfpack set, so I'll probably go with the wings folded. Maybe instead of a diorama, I just build the Wildcat as a model showing off some of the interior details, sorta like how some people build the models with clear or open exterior parts.
 -
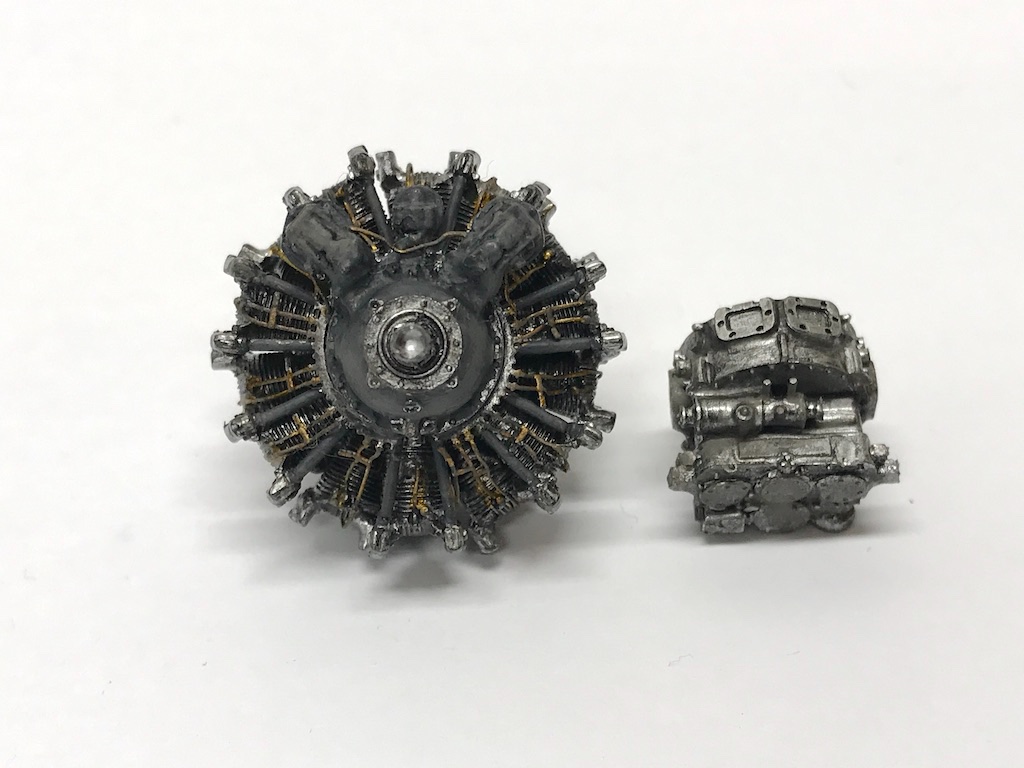
Thanks guys! I’m pretty happy with the way the engine came out. A little bit of dark wash followed by the engine grease and oil washes really goes a long way. One reason I stayed away from plastic models all these years is that I didn’t think the solid blocks of color looked very realistic. With the various washes you can use for panel lines, filters, etc., I’m slowly learning you can come up with more subtle and complex colorings that make things look more realistic. I’m still way low on the learning curve though. The wings are actually the same size (just measured them). My guess is that Wolfpack cast the Tamiya wings and modified them for the two gun per wing arrangement. I took the picture from an angle to avoid glare from the overhead lights so it’s probably just the perspective coming into play. Lou you masochist you!! In some respects I was hoping to keep this with both wings up to take up less room. But, I’ve thought about doing one wing down (and gun bay open) and one up (and gun bay closed). If I can find a picture of a real plane in that configuration maybe I’ll try that. Depending on how this one is looking, I might put it in a diorama as I picked up a few pilot and mechanic figures that might make for an interesting display.
-
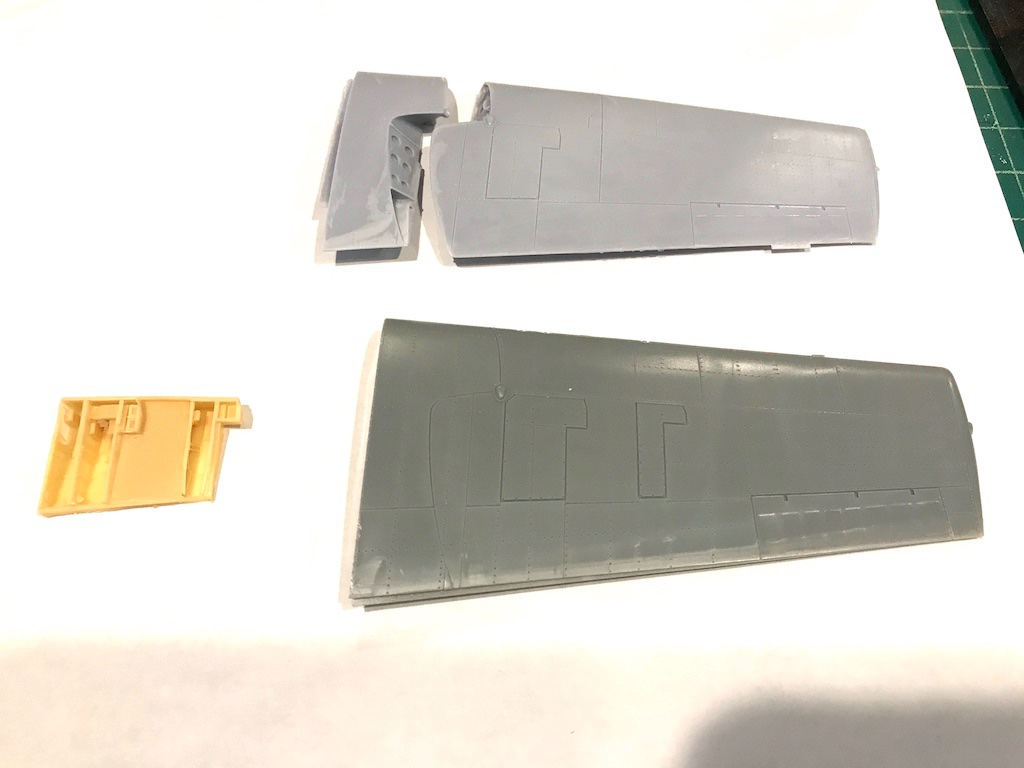
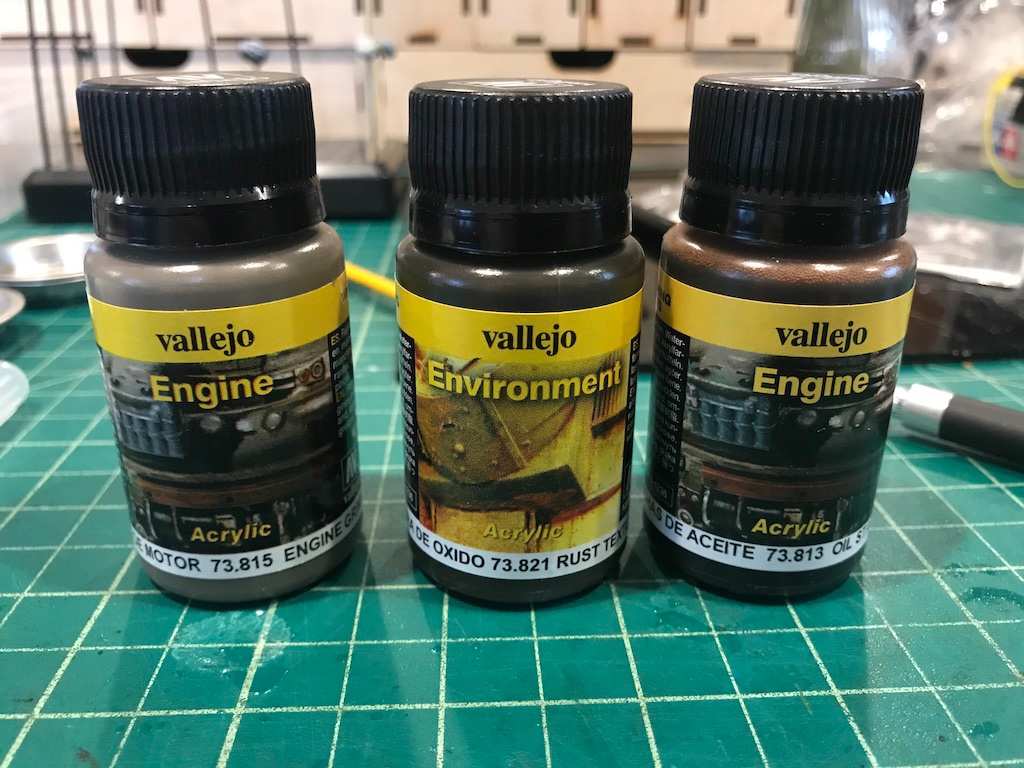
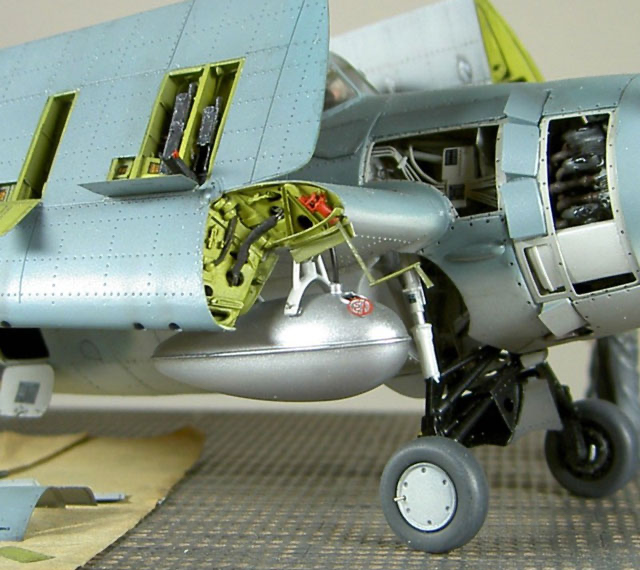
You can see how the wings on the F4F and FM-1 differ in the picture below. The top is the wing from the Wolfpack FM-1 wing fold conversion set, the bottom the kit wing. Lou, you're correct that the extra gun per wing was located further out (see the smaller second upside down "L" shape panel). To the left in yellow, is the Aires gun bay. If I wanted to open the gun bays on the FM-1, I'd have to essentially cut off the right half of the Aires resin part. You can see how the Wolfpack wings are nicely detailed. The Aires detail set also includes parts for a wing fold version. Instead of giving replacement wings, the Aires set has you cut up the wings and insert these resin parts into the open section between the top and bottom halves of the wing. The parts look fairly nice. I went with the Wolfpack set as I thought I would do the FM-1 version, and thought it was going to be a little easier using the replacement wings as opposed to cutting up the kit wings. I think I'm just about done with the engine. Lot of detail in the Aires resin for sure. These were all done with Vallejo products. Vallejo Metal "Duralinum" for the base, a mixture to get to the bluish-gray engine cover, dark rubber for the control rods, brass for the ignition wires. Then I used Vallejo black wash for the recesses, and dirtied them up a bit using these Vallejo washes (first time using them, but really like them):
-
Glad to see you back CDW! Love the subject you're working on - cars from that period are amongst my favorite. Sad looking out into the road and seeing cars completely stripped of all that cool style from back then. Nice score on the display cabinet - that looks absolutely perfect! I've been thinking about what I could get or build to store my upcoming models (assuming I get around to building them) and that one you showed couldn't be better.
-
Hang in there Chris, hope it all works out. So far looking very good!
-
Grant, I bought some Zero paints and 2k coats to try out on some upcoming car builds in large part for the sanding/polishing issue with Vallejo paints. All that being said, your model came out great! Paint job looks fantastic!
-
Grant, just out of curiosity, did you paint the body and fenders? I wasn't sure if you went with the kit parts as is, or painted them.
- 224 replies
-
- 10
-

-
Wow, how did I miss this one?? Hope all you guys with hernias saved me a seat! Maybe i'll just stand in the back and do sit ups and squats instead. This has been a fascinating log and construction hasn't started! Really appreciate all the history you guys are sharing. When you hear about the "Greatest Generation," one can think it's an overused and too grandiose a phrase. But the more I read and watch about WWII, it astounds me at the ingenuity, grit, and a bit of luck/divine assistance that accompanied these brave men and women.
-
Really nice job! The sails came out fantastic! Usually i drink the wine, but good to know there are other uses of the juice of the grape
-
It amazes me that they did all this back then without computers. Like figuring out the firing rate where guns located in the cowl itself and had to be timed to not hit the propeller. Real ingenuity!
-
I have always loved the wings on these planes. They make the plane look ready for business. Nice job!
-
Thank you guys, really appreciate all the help! I have to say, building with these detail sets makes one learn more of the inner components and workings of these planes which is really interesting (at least to me). Certainly there's a lot to learn about the exterior, but learning about the inner guts and seeing the development over time across models has been fun.
-
Thanks guys! Mark, yeah that's not a bad idea to show a gun separately. Frankly, the resin bay and guns are a bit underwhelming. I have some of the Eduard resin upgrade sets for other models and the guns and bays look much more crisp. In addition, I'd have to modify the bays as well - the F4F-4 had three guns per wing, and the FM-1 only had two. So, I'd have to reduce the Aires resin bays as well as carve out an area in the solid resin wing from Wolfpack. Speaking of the Wolfpack FM-1 set, the wing panel lines over the gun bays are properly reduced to cover a bay with only two guns. Nice to see that they were accurate in this respect.
-
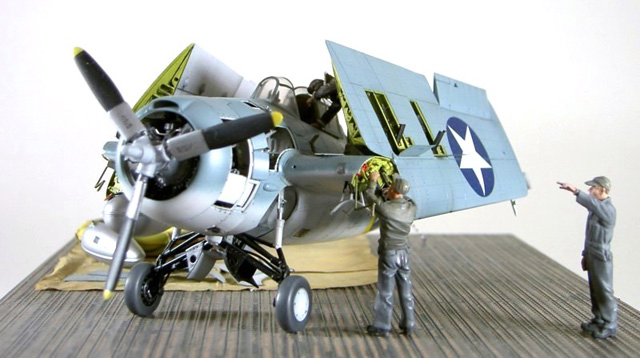
Lou (and Popeye), many thanks for that info! Makes a lot of sense on the mechanics of everything. And Lou, I believe you are correct that the pictures I show of the model above are of the F6F - good eye! It was the clearest picture I pulled to show what the PE cowl framing looks like. On the gun bays, here are a couple of pictures of a model that included them open with the wings folded. It's the Tamiya F4F-4 kit with the Aires super detail set: I guess it doesn't bother me too much if it's not technically correct that the gun bays would be open. At the same time, it wouldn't bother me too much not to include them. The Aires set has the gun bays as drop in resin parts - but since the kit wings come in two halves with a gap in between, you're not doing too much surgery, just cutting through the plastic on the top wing. The Wolfpack wings are one piece and solid resin though, so I'd pretty much have to hollow out a chunk of the wing to fit in the gun bay. Probably not too difficult, but certainly would take some work.
-
OC - good point! Tamiya says the inside of the cowl is white, so maybe the outer face of that bulkhead should be the same.
-
Thanks, appreciate the kind words! If you guys don't mind, I had some questions I was hoping you could help me with. 1. I'm not sure what you call the ring on which the engine is mounted (see below), but does anyone know or have any recommendations as to what color it should be? The inner side facing the firewall is white I believe, but I'm thinking the outer facing side should be some kind of metallic color. 2. The Aires set has you cut out panels in the cowl and replace them with PE and resin parts. I started doing that here: I cut out the panels along the kit part's panel lines. The Aires PE part doesn't seem to fit though. I'm wondering how it's supposed to attach. In the picture above, it looks like these PE parts are supposed to be sort of an under frame onto which the actual panels would be riveted onto. If so, should I glue it into the cowl from the inside? And if I do so, should I thin down the cowl from the inside to accept the PE so that it fits flush with the rest of the cowl? The kit plastic seems fairly thick, and possibly thicker than what a fuselage panel would be. I worry if I just glued the PE directly from the inside without thinning that the kit plastic would look too thick. 3. I plan on displaying this model with the wings folded. The Aires detail set has gun bay detail parts so you can open up the gun bays on the model. Would the gun bays ever be open on a plane if the wings were folded? I've seen folks do that on various models, but wasn't sure if that was technically accurate. Many thanks in advance!
-
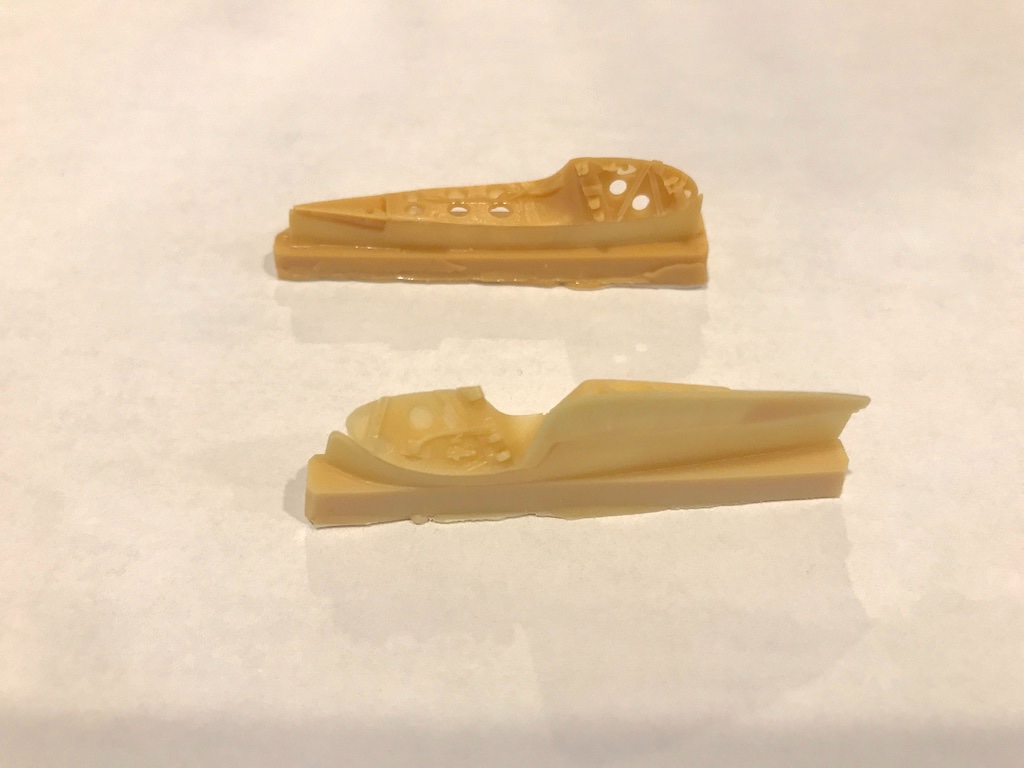
Thanks everyone for the kind words! I've made some progress over the last couple of weeks. The kit is fairly simple (but very nicely done) and my guess is one can put it together in about a week as Joe mentioned. The Aires set is probably going to double the time building this kit, at least for me. I'm still fairly new to plastic models, and this is my first super detail set that I've worked with. Engine Here's where I am with the engine. I calculated that there were 90 individual pieces when all was said and done, including the resin detail parts and the individual rods that you had to cut and add (I used thin plastic rod) Thankfully the Aires set includes a PE ring containing all the ignition wires that made things fairly easy. At this point, I painted with Vallejo Metal Color Duralinum, and added a black wash. Still need to paint the ignition wires, rods, and center cap, add a little grime and highlights, etc., but I think the engine is looking fairly nice. Cockpit The cockpit components from the Aires set are really nice when it comes to detail. Here are some of the pieces after painting and washes: Warning! The fit of the cockpit set is terrible! Apparently others have had similar complaints, so this is not my typical case of user error. The instructions essentially have you build the full cockpit, then insert the consolidated cockpit into the fuselage. The parts fit together cleanly outside the fuselage, but when you try to fit everything in, you run into bad fit problems. The tub fits perfectly fine, but the side panels and frame for the seat are off. Am definitely glad I test fitted things in advance or I would have been in for a nasty surprise. Instead of assembling the cockpit completely and popping it into the fuselage, I'm essentially modifying and gluing things like the side panels, seat frame, and instrument panel separately into the top half of the fuselage, then will pop the tub into the bottom half. A little frustrating in that this stage has taken hours but I think I have a plan forward. Bottom of fuselage/firewall/engine mount area Between the Aires set and the Wolfpack wing fold conversion, there won't be much left of the original kit. First, here is what the kit provides for the bottom of the fuselage and wings: This is what you end up with (with the Aires firewall and landing gear support included). The wings come off to add the Wolfpack wings, and the front of the fuselage where the engine mount comes off for the Aires details. The Aires instructions leave a lot to be desired. For example, they suggest that this section of the build comes after the cockpit, but for a variety of reasons, especially with the poor fit of the cockpit parts, I think it's better to nail this section down first before installing the cockpit. Speaking of fit, the firewall doesn't fit very well - it's got two winged tabs on either side that make it too wide to fit into the fuselage without surgery to the fuselage. Since those pieces aren't going to be seen, I just went ahead and removed them. I still have to include the framing and fuel tank pieces, but I think I've finally worked out a plan on how all these parts fit together and things are coming along. For colors, I understand that the interior fuselage was painted Interior Green from the firewall back, and "white" from the firewall forward. I'm using Vallejo US Light Green for the green sections. Rather than use "white" I'm using Vallejo gray primer which actually comes out like an off white with a grayish hue. I think that would be a better base than white, I can detail with washes and white highlights as need be. Landing Gear Tamiya has you essentially assemble the landing gear as one piece that is added later in the build. Aires does it a little differently, with the bottom frame already attached to the firewall, and the top halves of the landing gear legs assembled against the firewall early in the construction. So, I needed to cut off the top halves of the kit parts, and drill holes into the tops to accept the Aires parts. Wasn't too bad, but the Aires instructions don't make any mention of this. I should say that while I've been critical of the Aires detail set, it's quite nice aside from the fit issues and fairly rudimentary instructions. The parts are very crisp and the resin used is pretty robust. I read a build log where someone used the KMC resin cockpit set for this kit and the resin was so fragile, the parts were crumbling during assembly. Not the case here, though you certainly need to be careful. I'm not sure if Aires offers this set anymore, but it does pop up on eBay here and there.
- 241 replies
-
- 10
-
-
Thanks Joe, really appreciate it!
-
When I was working on the Corel Unicorn, I was considering converting it to the Lyme which had add an extra gun port per the NMM plans. To line the gun ports, the kit included brass rings. I was short one ring on each side so asked Corel if I could purchase an extra pair. I received an immediate response and received the extra rings (I believe they gave me a full set) at no charge. I was incredibly touched by their kindness and service, so highly recommend them.
-
Completely understand Mark! We'll be hear to share the next steps with you.
-
Really beautiful work Greg. You're a master at laying down colors for complex, yet subtle effects.
-
Super cool! Lot of nice detail in your skilled hands.
-
Wow, very nice job man!
-
I'm in for the ride on this one - great start on a great subject OC!