HOLIDAY DONATION DRIVE - SUPPORT MSW - DO YOUR PART TO KEEP THIS GREAT FORUM GOING! (Only 13 donations so far - C'mon guys!)
×


Piet
-
Posts
3,568 -
Joined
-
Last visited
Content Type
Profiles
Forums
Gallery
Events
Everything posted by Piet
-
 Beautiful work Ikkypaul. I reread your posts and am in awe at your work. Cheers,
- 53 replies
-
- 2
-

-
- clipper
- restoration
- (and 1 more)
-
You have an artist's eye Nils, that little touch of yellow is a great idea.
- 692 replies
-
- 3
-
-
- eagle of algier
- chebec
- (and 2 more)
-
Your lee-boards look outstanding Marcus as well as the anchors and rigging. Wow, learning al the knots for the rigging, very ambitious my friend but kudos to you for doing it. Cheers,
- 305 replies
-
- 4
-
-
- utrecht
- statenjacht
- (and 1 more)
-
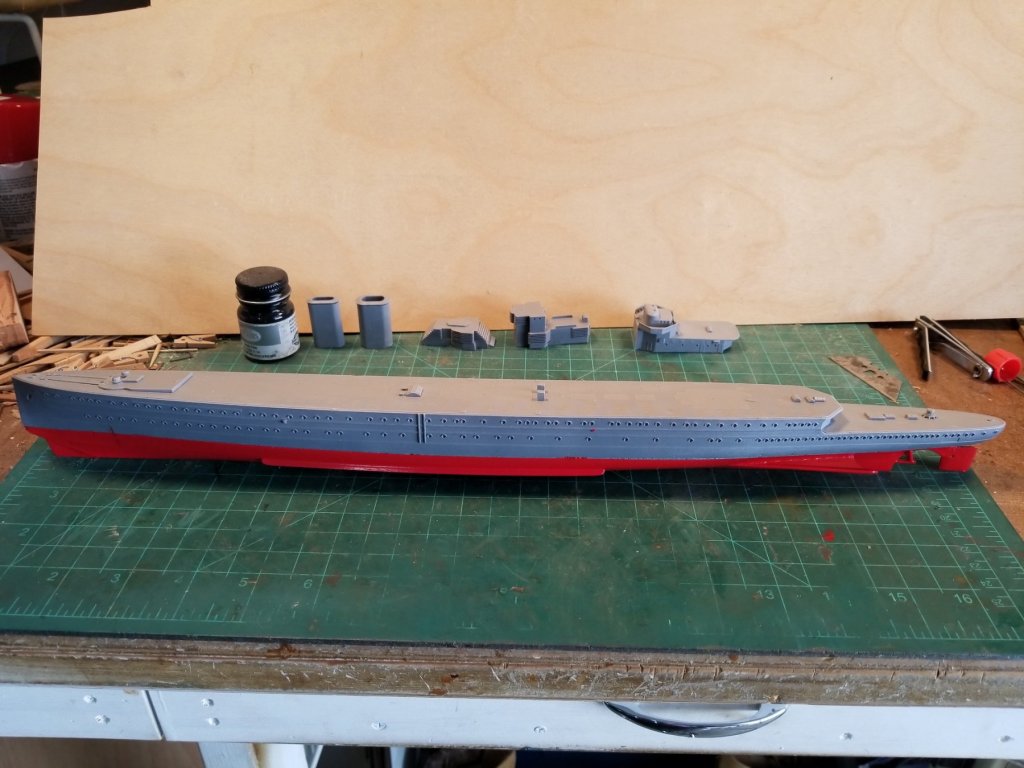
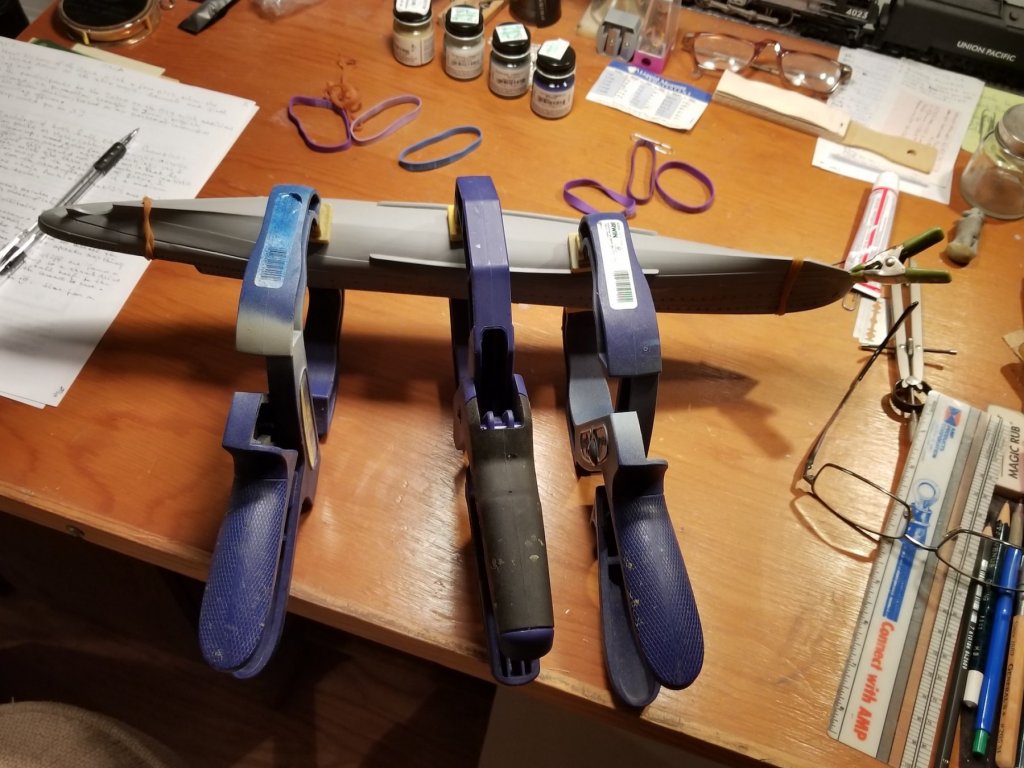
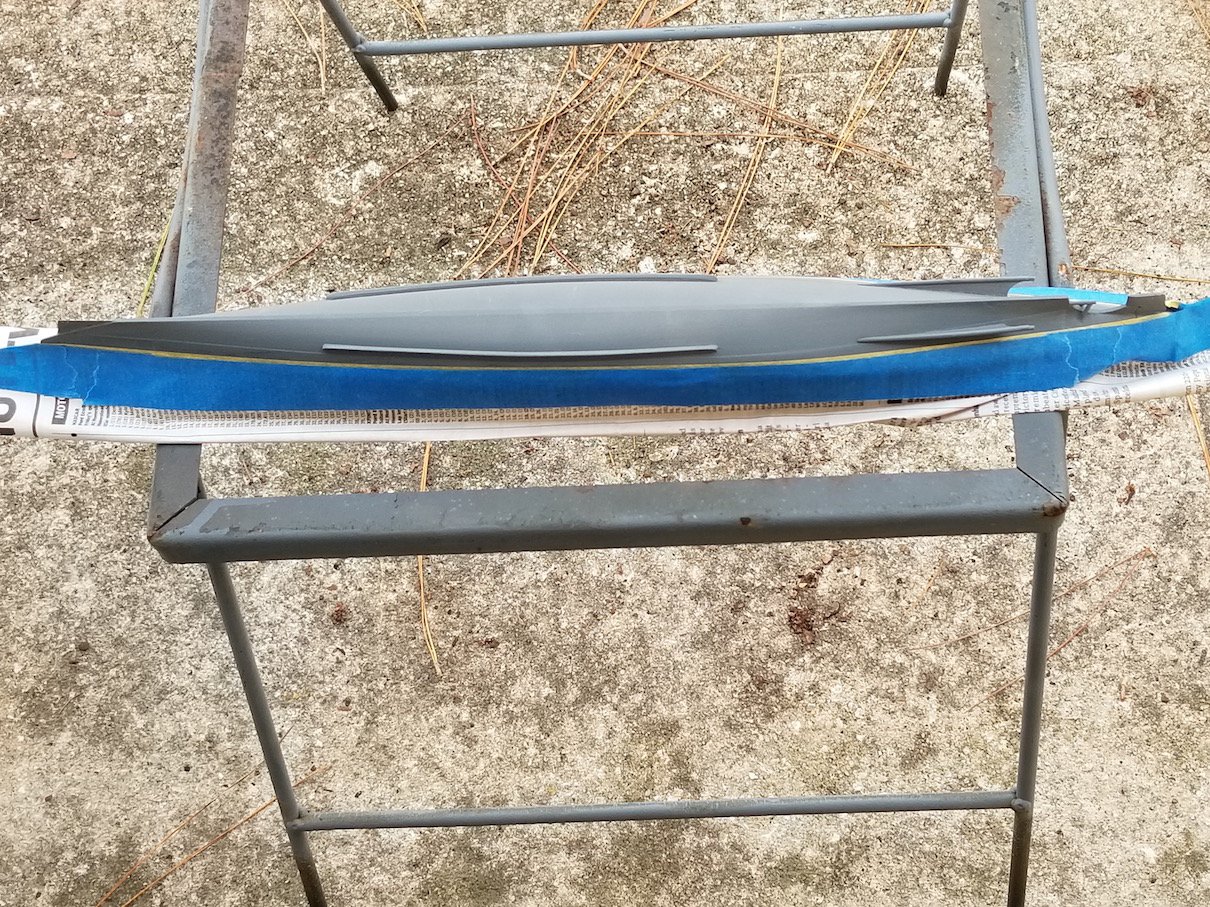
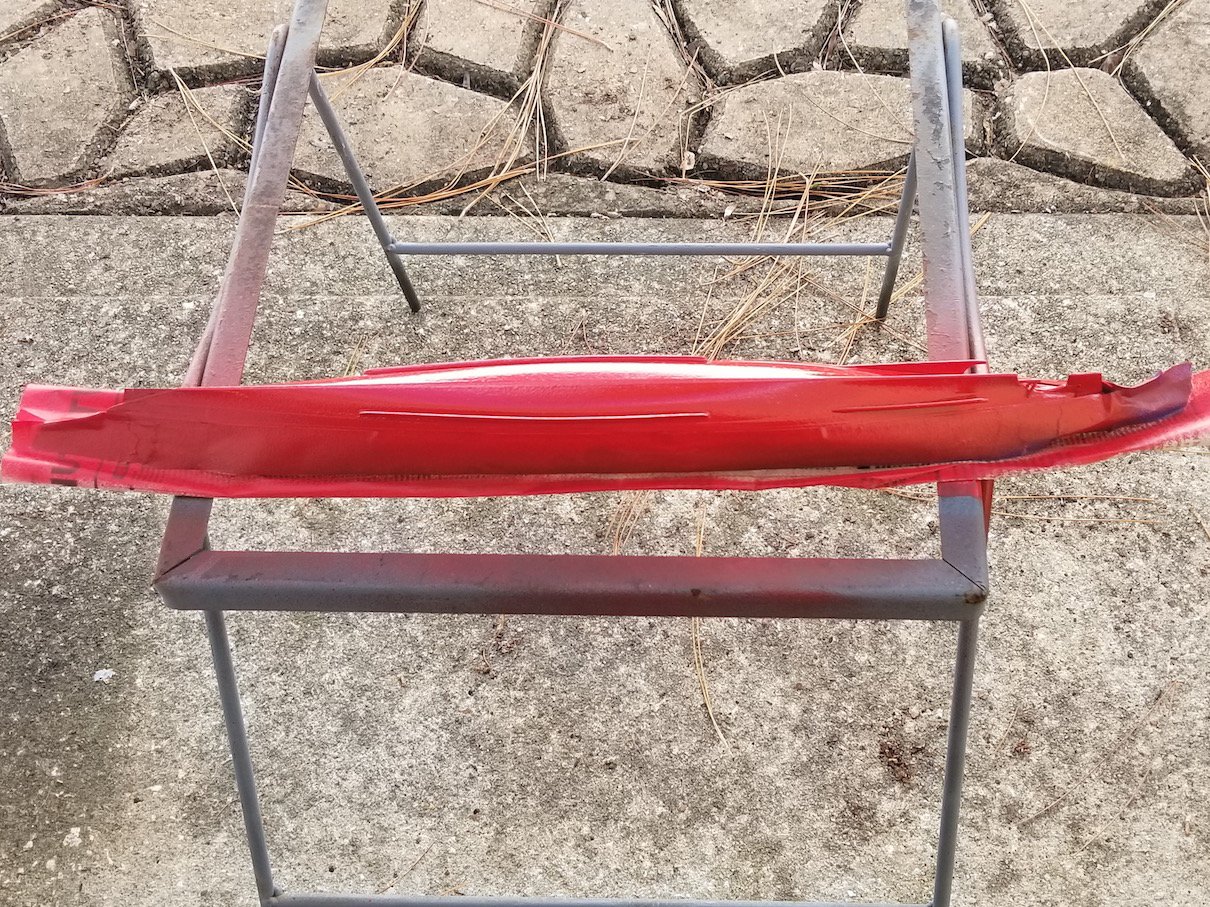
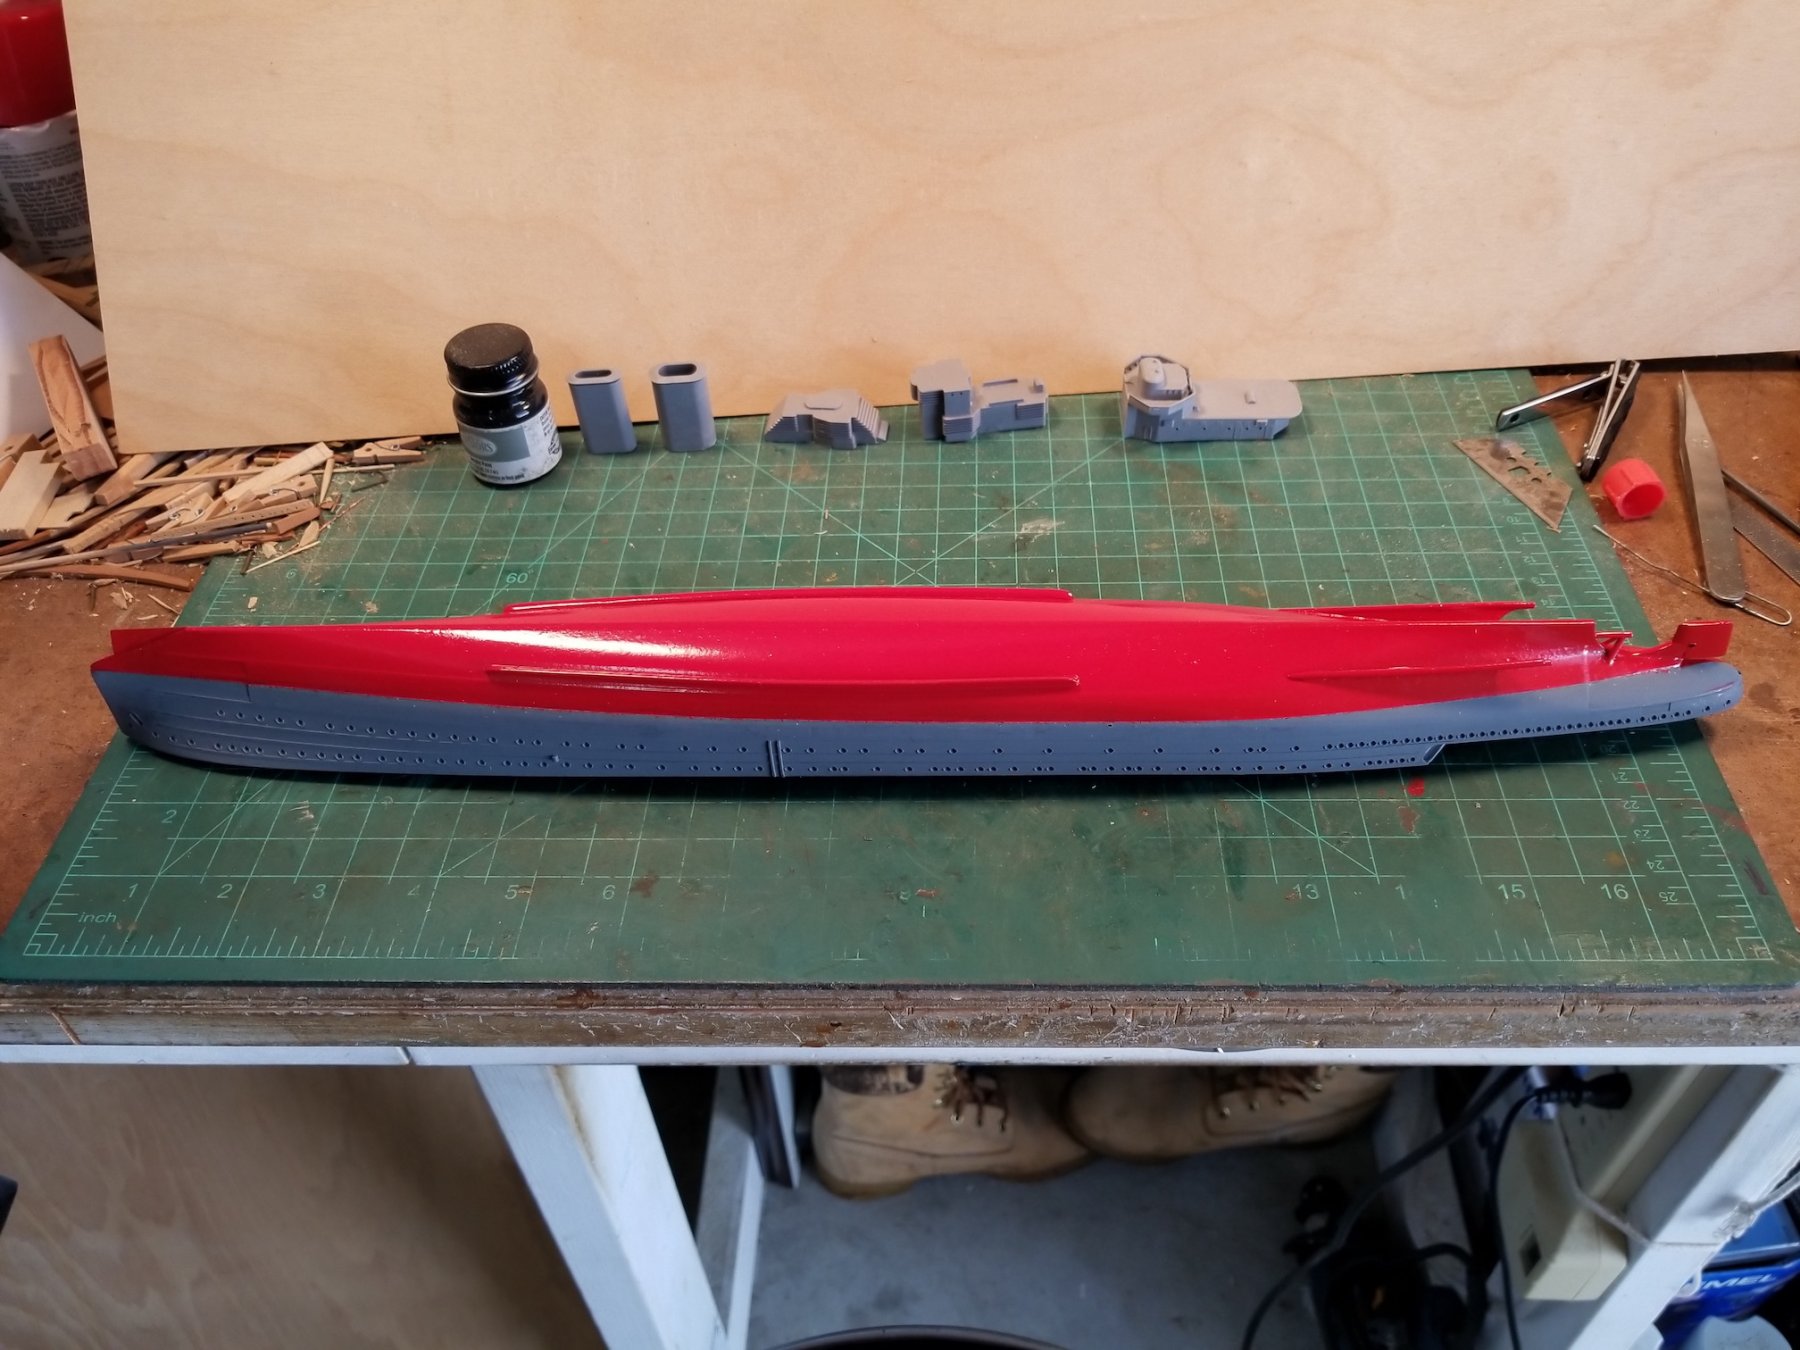
Hello everyone, Well, let's see, we are at Day Seven, November 20, 2017. The primer is cured overnight and seems to adhere quite well to the resin hull. Time to put the red paint on the bottom part. I masked the top half just above the glue line. No real need to to assure the masking tape is leak proof but old habits don't die. I did rub the paint edge good to give a neat line. This will also be a good test for the primer adhesion when pulling the masking take off. Ken's admonition is great information for those who are not familiar with painting. Metal parts too have their particular prepping needs. Okay, the hull is masked and I wiped it down again with a damp cloth with an enamel reducer to make sure no greasy fingerprints are on it. Took it outside and put it on Gwen's little steel table to paint. I used Testor's spray enamel "Fire Engine" red. Why even paint that lower part red if it's going to be mostly invisible? Well, in case I change my mind and finish the model on pedestals instead of a diorama. But no, I needed it for the high speed diorama when parts of the bottom hull are visible. After the paint had dried I removed the masking tape and to my relief no red or primer came off with it. Lucked out again While the paint was drying I painted the inside of both funnels with flat black. Done in a jiffy so I decided to part the three anchors from their mold strip to paint them as well. But - - as I held one of the anchors in my tweezers I heard the dreaded "tweng" sound and it went flying some here in my studio. Spend quite some time searching for it but had to give up, too much junk in my room. So, okay, "Java" will be missing an anchor, most likely the stern one. But wait - - - Pieter had an idea, why not make one from metal. At this point it was getting late and had to punch out, no overtime allowed At this date I was still without my iMac desktop computer but used Gwen's notebook to log on to MSW every so often to keep abreast with what's going on. Okay, here are the few pics of my painting job. Hull is masked. Red paint applied, two coats. Masking tape and paper removed. Looking good. Ship on an even keel. Looks nice already and fast. Sleek little bugger. Temporarely put the two forward parts of the superstructure together. This is the aft part, that'll have the real funnel attached to it and the vent louvers. These two parts are sitting on a folded paper towel, now you can see how small they are. Well, that's all for this day in the build. Next post will be the fabrication of the anchor. Cheers,


.thumb.jpg.401bffe3f07bfa13a4a1a6ad085304f9.jpg)
.thumb.jpg.0c715b0c9d95bcbf46aef23c50a0f042.jpg)
- 378 replies
-
- 14
-
-
- java
- pacific crossroads
- (and 2 more)
-
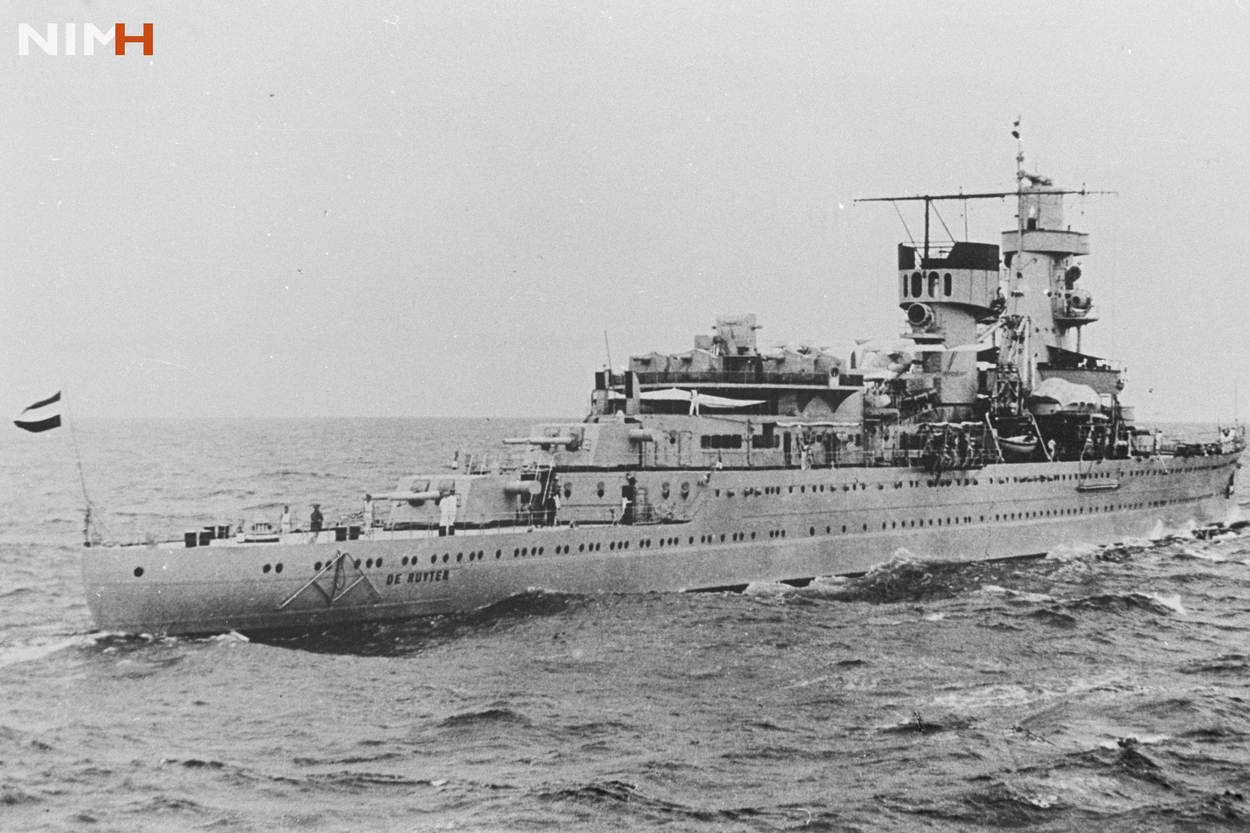
Thanks for the tip Ken, much appreciated. Model railroader eh. Love trains, the old fashioned ones, steam. Hey, I'm a certificated steam engine mechanic and boiler maker with everything that's associated with it. Never worked it though, switched to aircraft. Yeah, I'm familiar with that mold release stuff and cleaning it off first is a must. I used to own and operate an aircraft repair business in New Jersey way back when and we did a lot of airplane painting. Many parts were fiberglass molded parts and resin. I put all these fiddly little parts for the model in a bowl with dish washing soap, soft tooth brush scrub where possible, rinsed them and air dry. As long as nobody touches them after they are painted we are good to. This'll be a static model so no worry. Hey Jan, thanks for the videos. Number one I didn't have, great action. Now we can see how labor intensive these 15 cm cannons are. I'll transfer them to my "Java" file. Here is a pick of the "de Ruyter" in case you don't have that one. Really shows her very nicely, love it. Cheers,

- 378 replies
-
- 8
-
-
- java
- pacific crossroads
- (and 2 more)
-
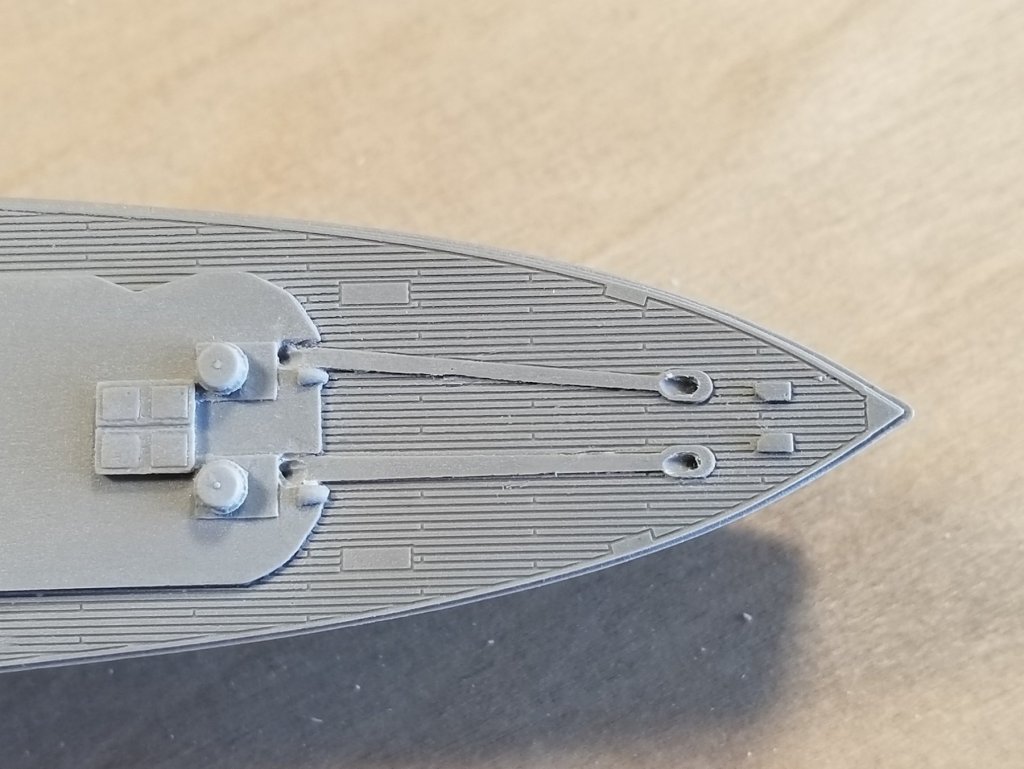
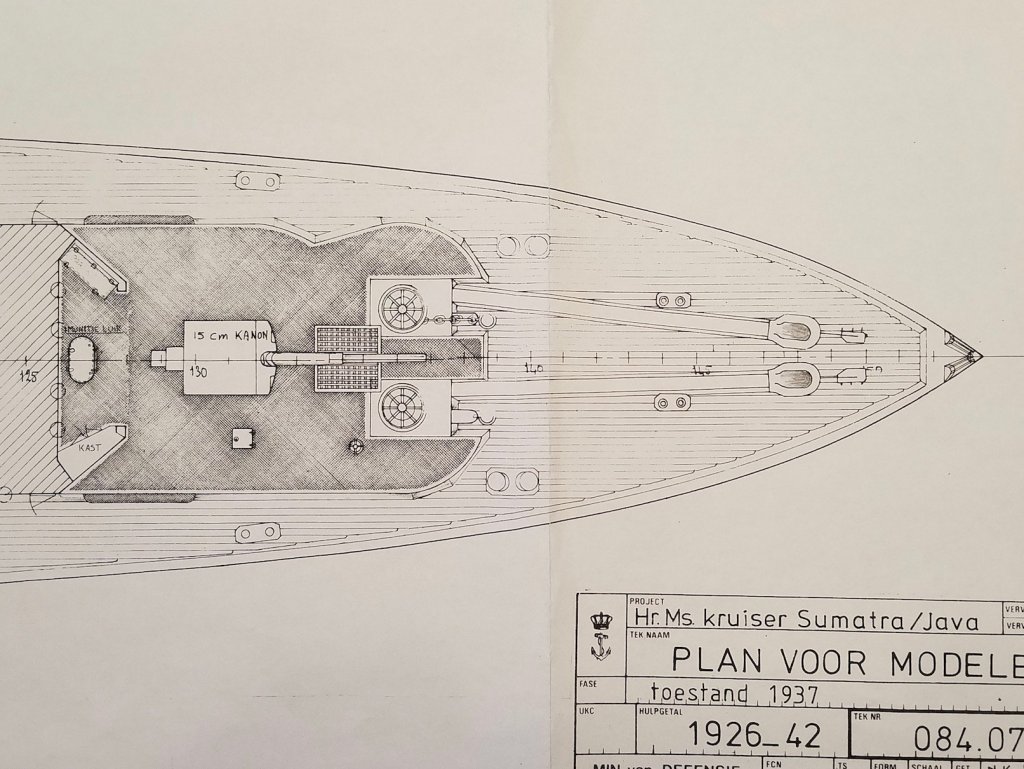
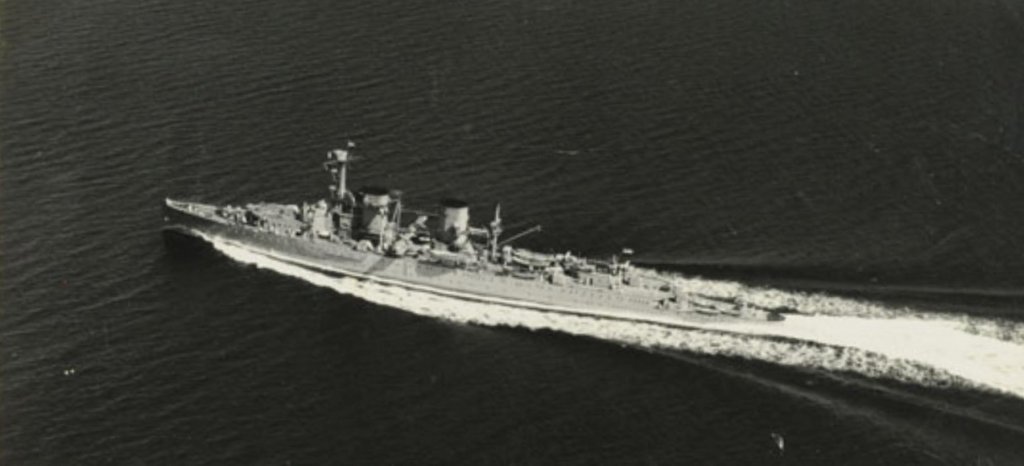
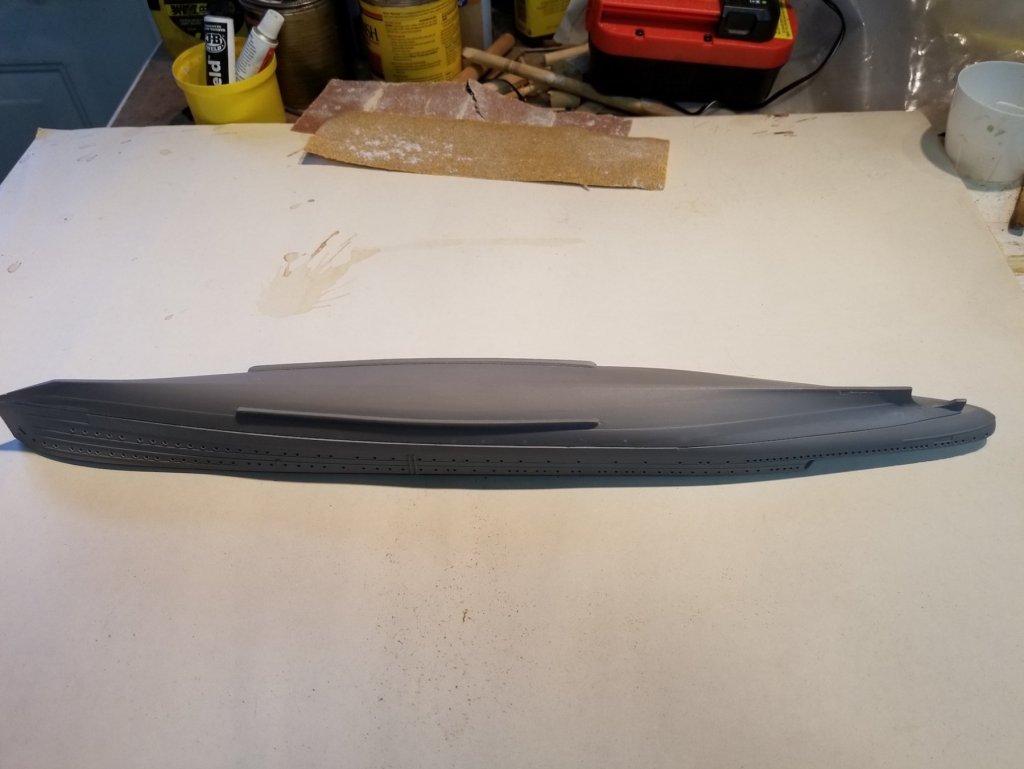
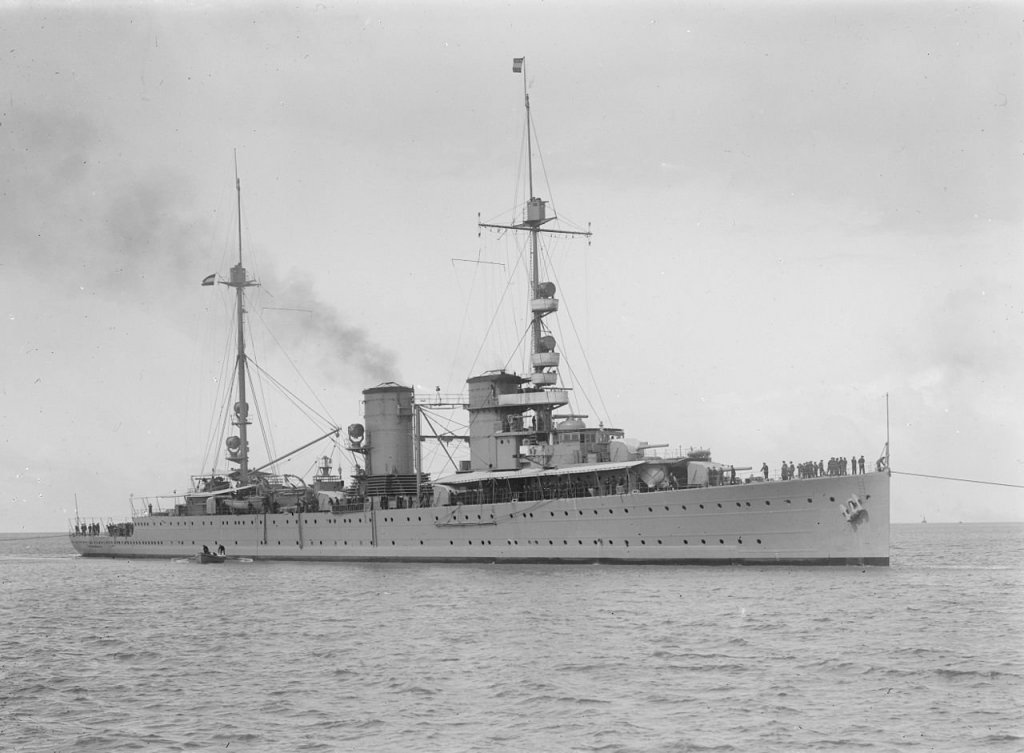
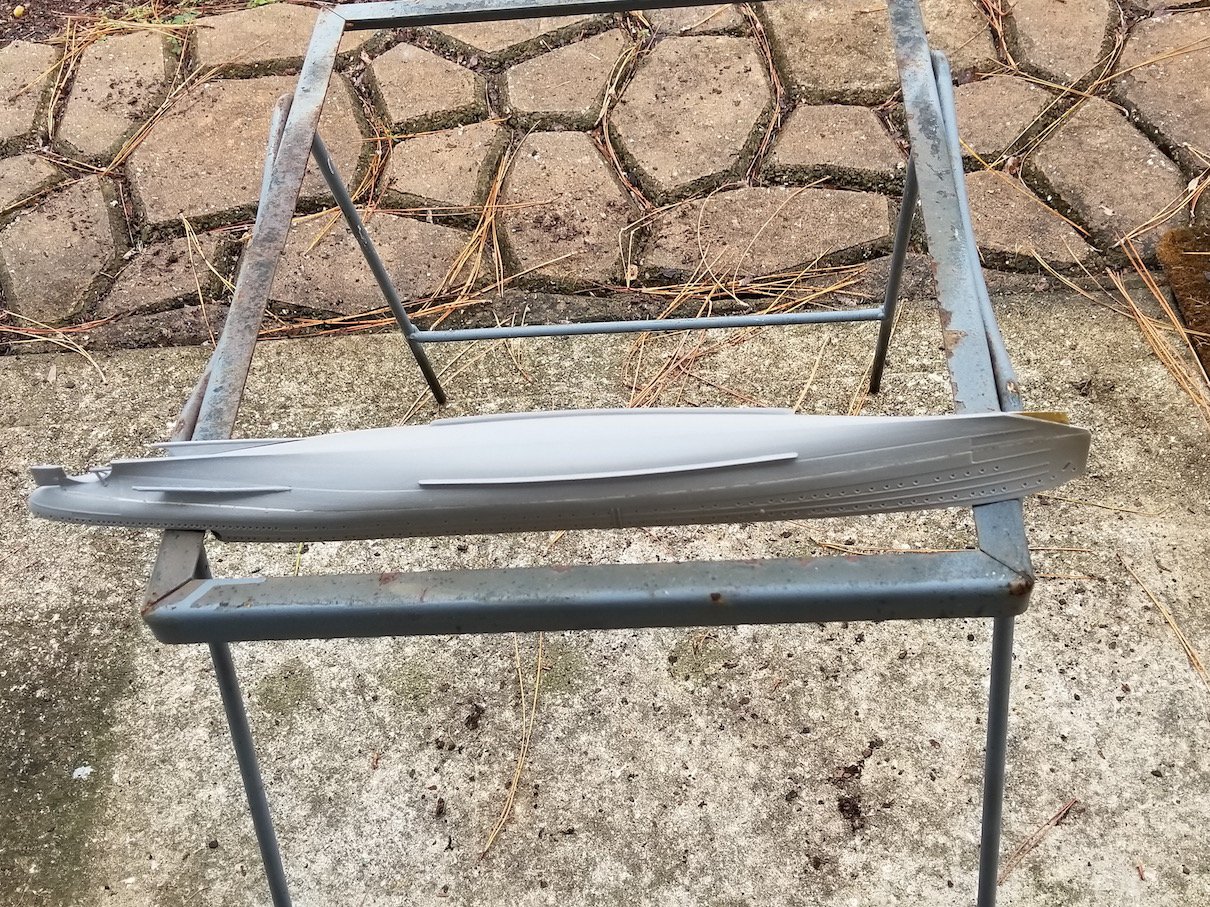
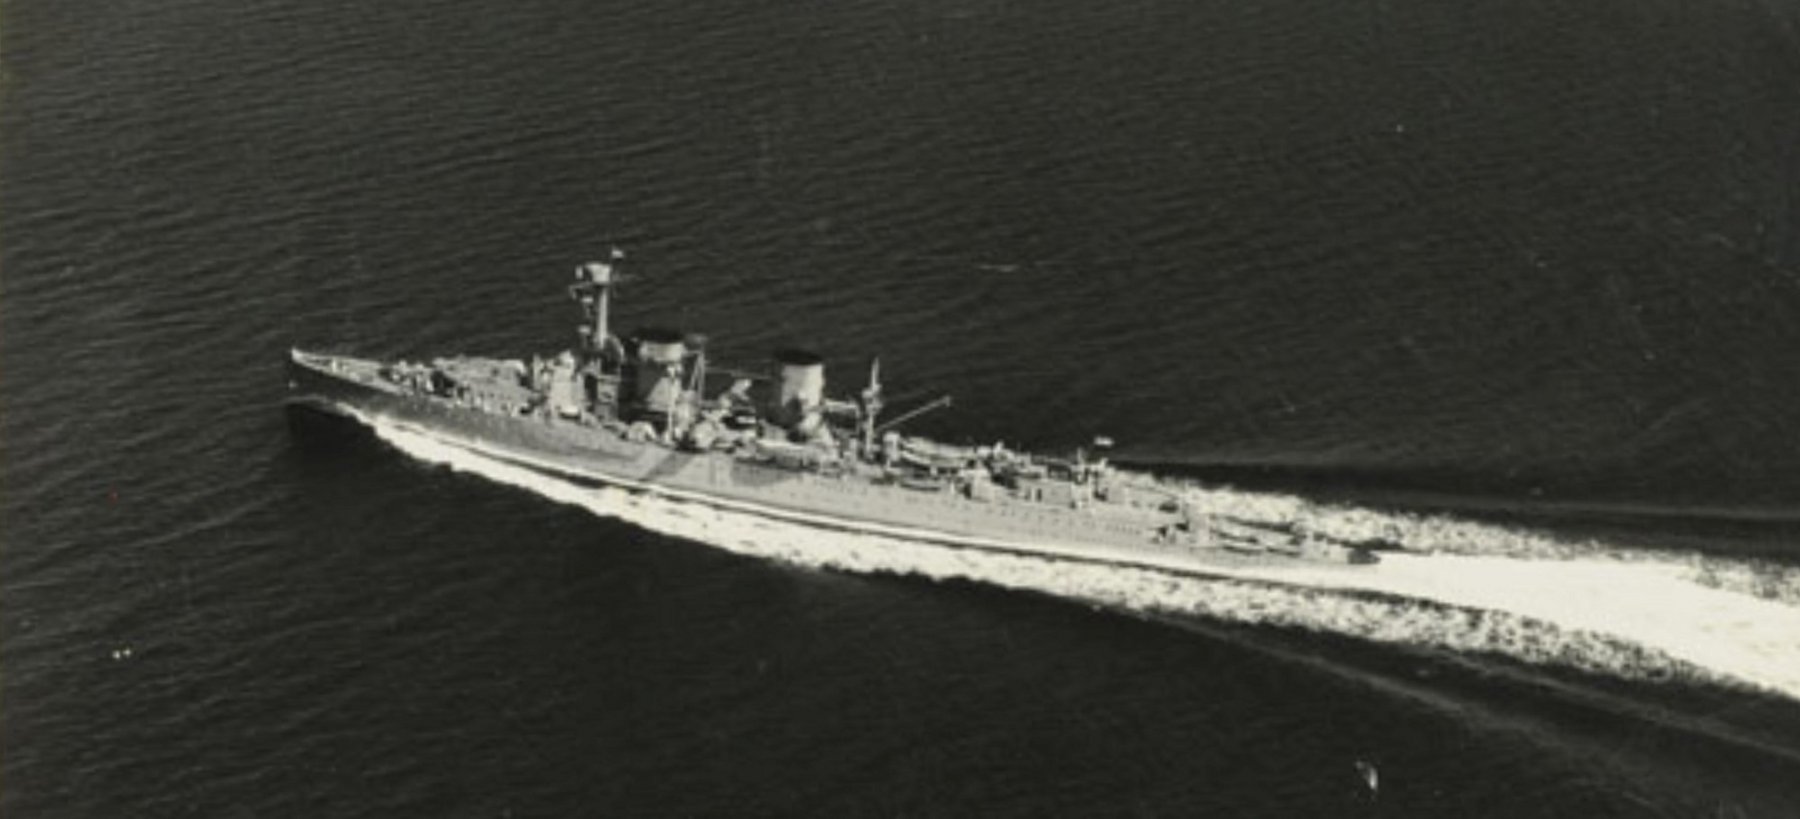
Thank you Ken for for your comments, much appreciated. Agree with your assessment on the casting quality. Most of my pictures are close-up and even then not much to do to clean them up even more, scale is too small. Thanks to all who clicked the like button. This post will be Day 6, November 19, 2017. Not being able to do much due to other pressing chores but prepped the completed hull for primer. I wiped it down with enamel reducer to remove any greasy stuff on it. I used a grey primer from a Krylon rattle can. Good for all surfaces. I should have prepped the large parts for the superstructure as well but forgot, have to do that tomorrow, I hope. I did check it all for flashing and they too need the sandpaer treatment on the bottom gluing surfaces so they sit nicely in the hull. I did paint the inside of all the cooling louvers hoping that the grey primer will not obscure it if I aim the spray nozzle downward. Time will tell. The rest of the many small parts I'll forgo the priming and just paint them in the appropriate acrylic colors. I spend some time studying the scratch build drawings for the "Java" as well as the book "Hr. Ms. Kruizers Java en Sumatra" by J. Anten. Yes, it's in Dutch but all the photos have English translations for them. Boris Mulenko from PacificCrossRoads send me a magazine devoted to the Battle of the Java Sea with some nice pics. Below are a few pics of what's done. Yesterday I mentioned that "Java" produced a rooster tale at high speed? Well here is photo of "Java" at 31 knots during her proving runs in 1928. She coold really churn up the sea. Not a good place to be when she encounters some wave action, half the stern deck would be awash, from the reports I have read. Here we have "Java" on my wife's little patio table she asked my to make hole again, which I did yesterday morning. You can now also see the paravane attaching point at the bow and the two outboard screw shaft fairings and the rudder. This is just outside my garage side door. Cheers,
tijdensdevollekrachtproef1928-09-04.jpg.dbb3cc8d5e508a776ca94e1a2790d260.jpg)

- 378 replies
-
- 7
-
-
- java
- pacific crossroads
- (and 2 more)
-
As you know I like doing miniature stuff in mm sizes but I have real difficulty wrapping may brain around sheer amount of the ultra miniature detail you have been able to stow into 8 inches of space, on several decks no less. Your Shadow is masterpiece of miniature work. My hat off yo you my friend. Cheers,
-
ancre La Salamandre by tadheus - 1:24
Piet replied to tadheus's topic in - Build logs for subjects built 1751 - 1800
Beautifully done Pawel. In real life would they also be made in one piece? Cheers, -
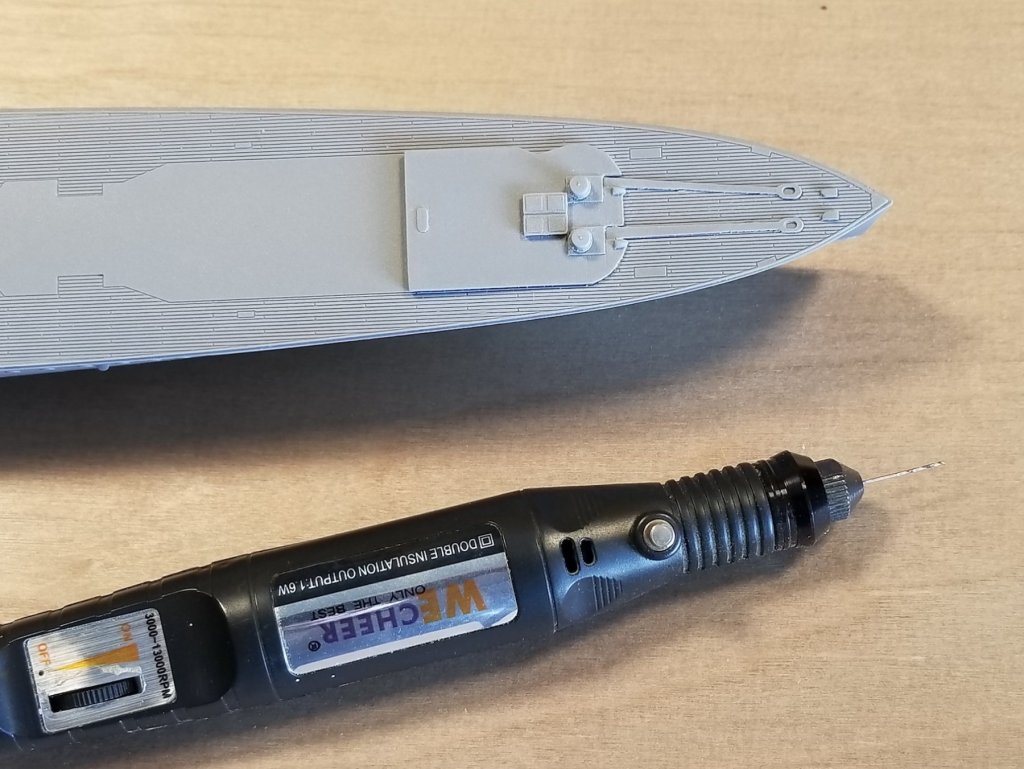
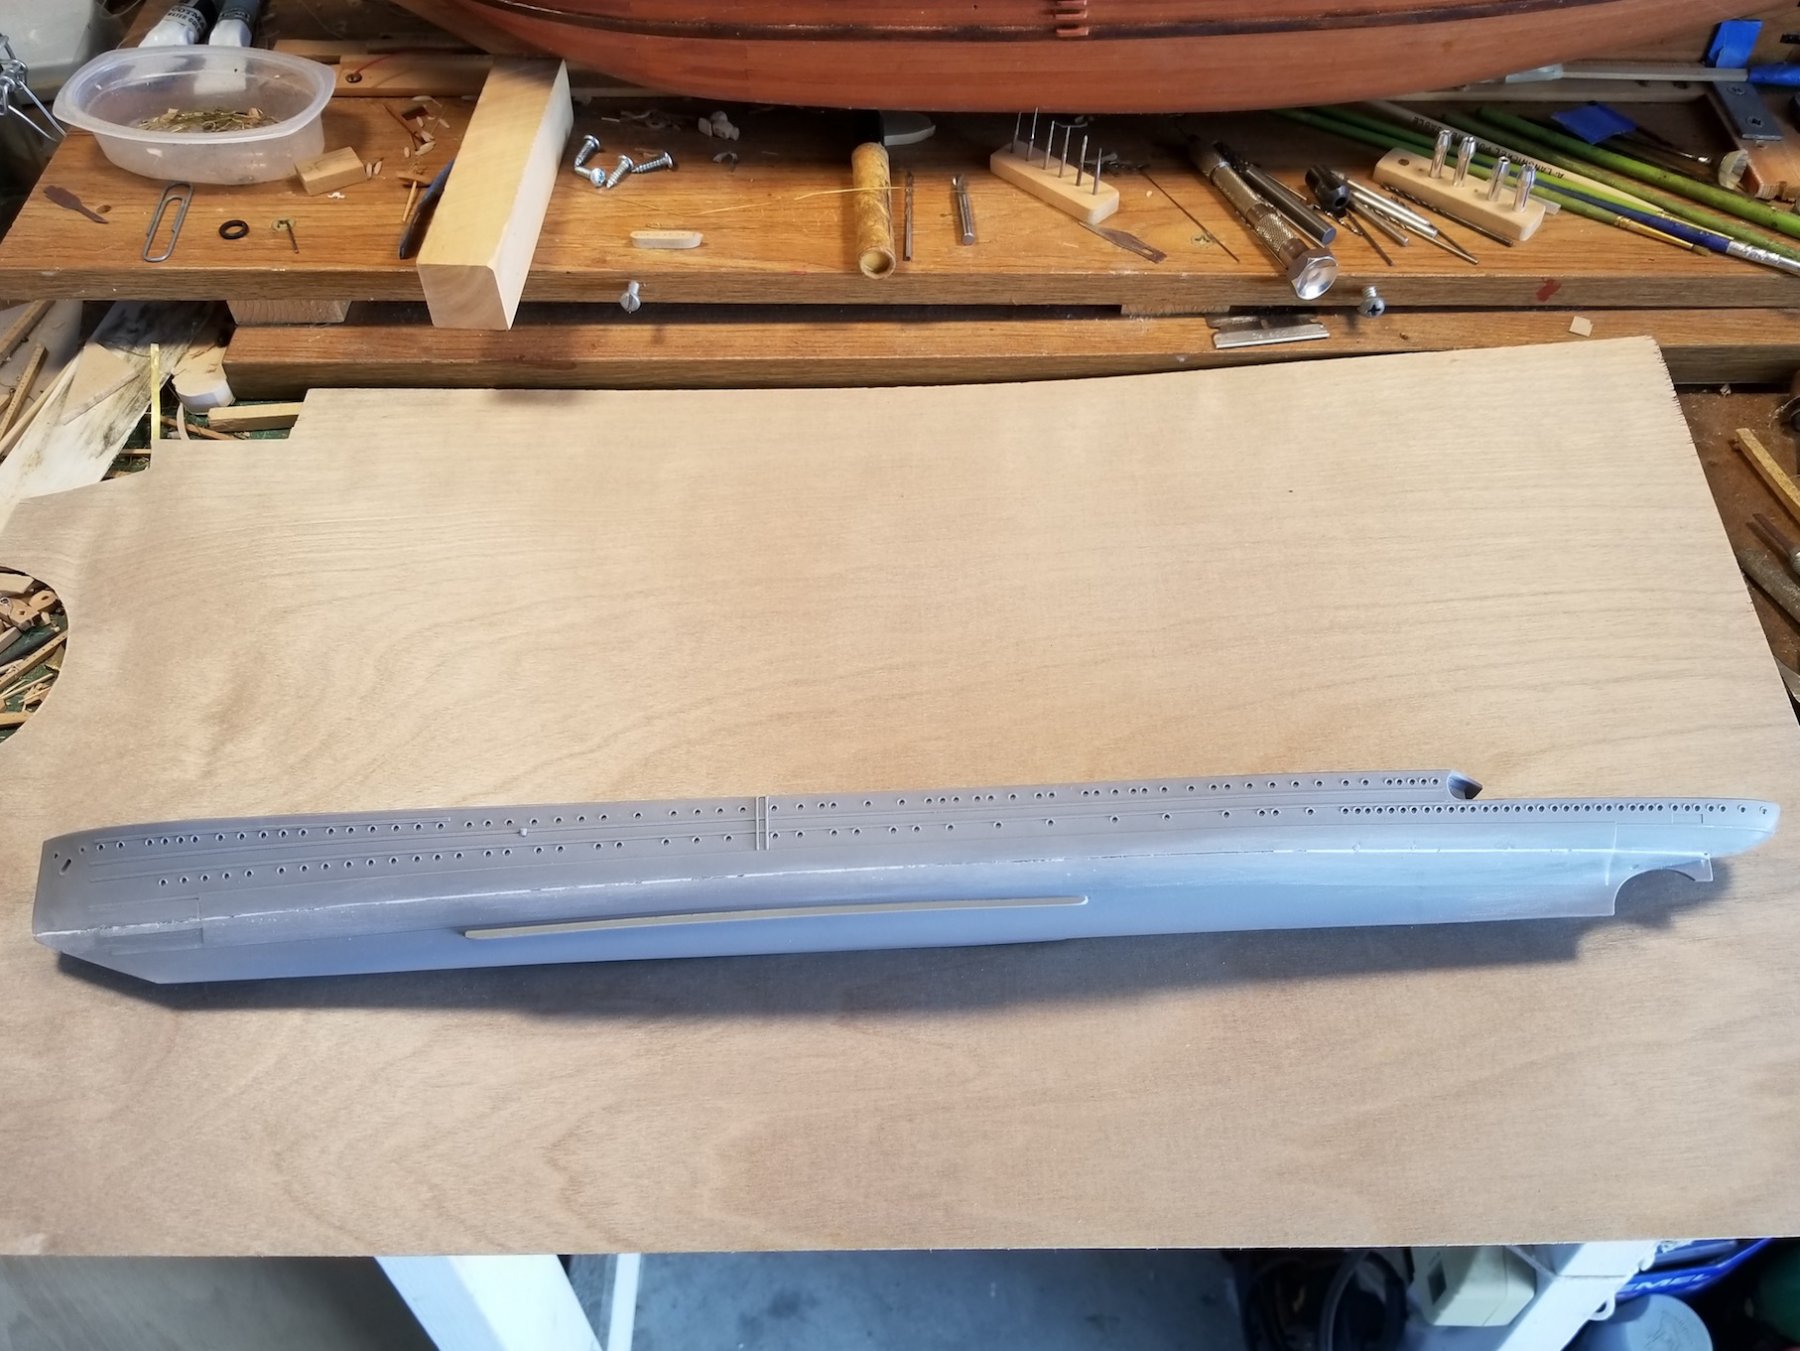
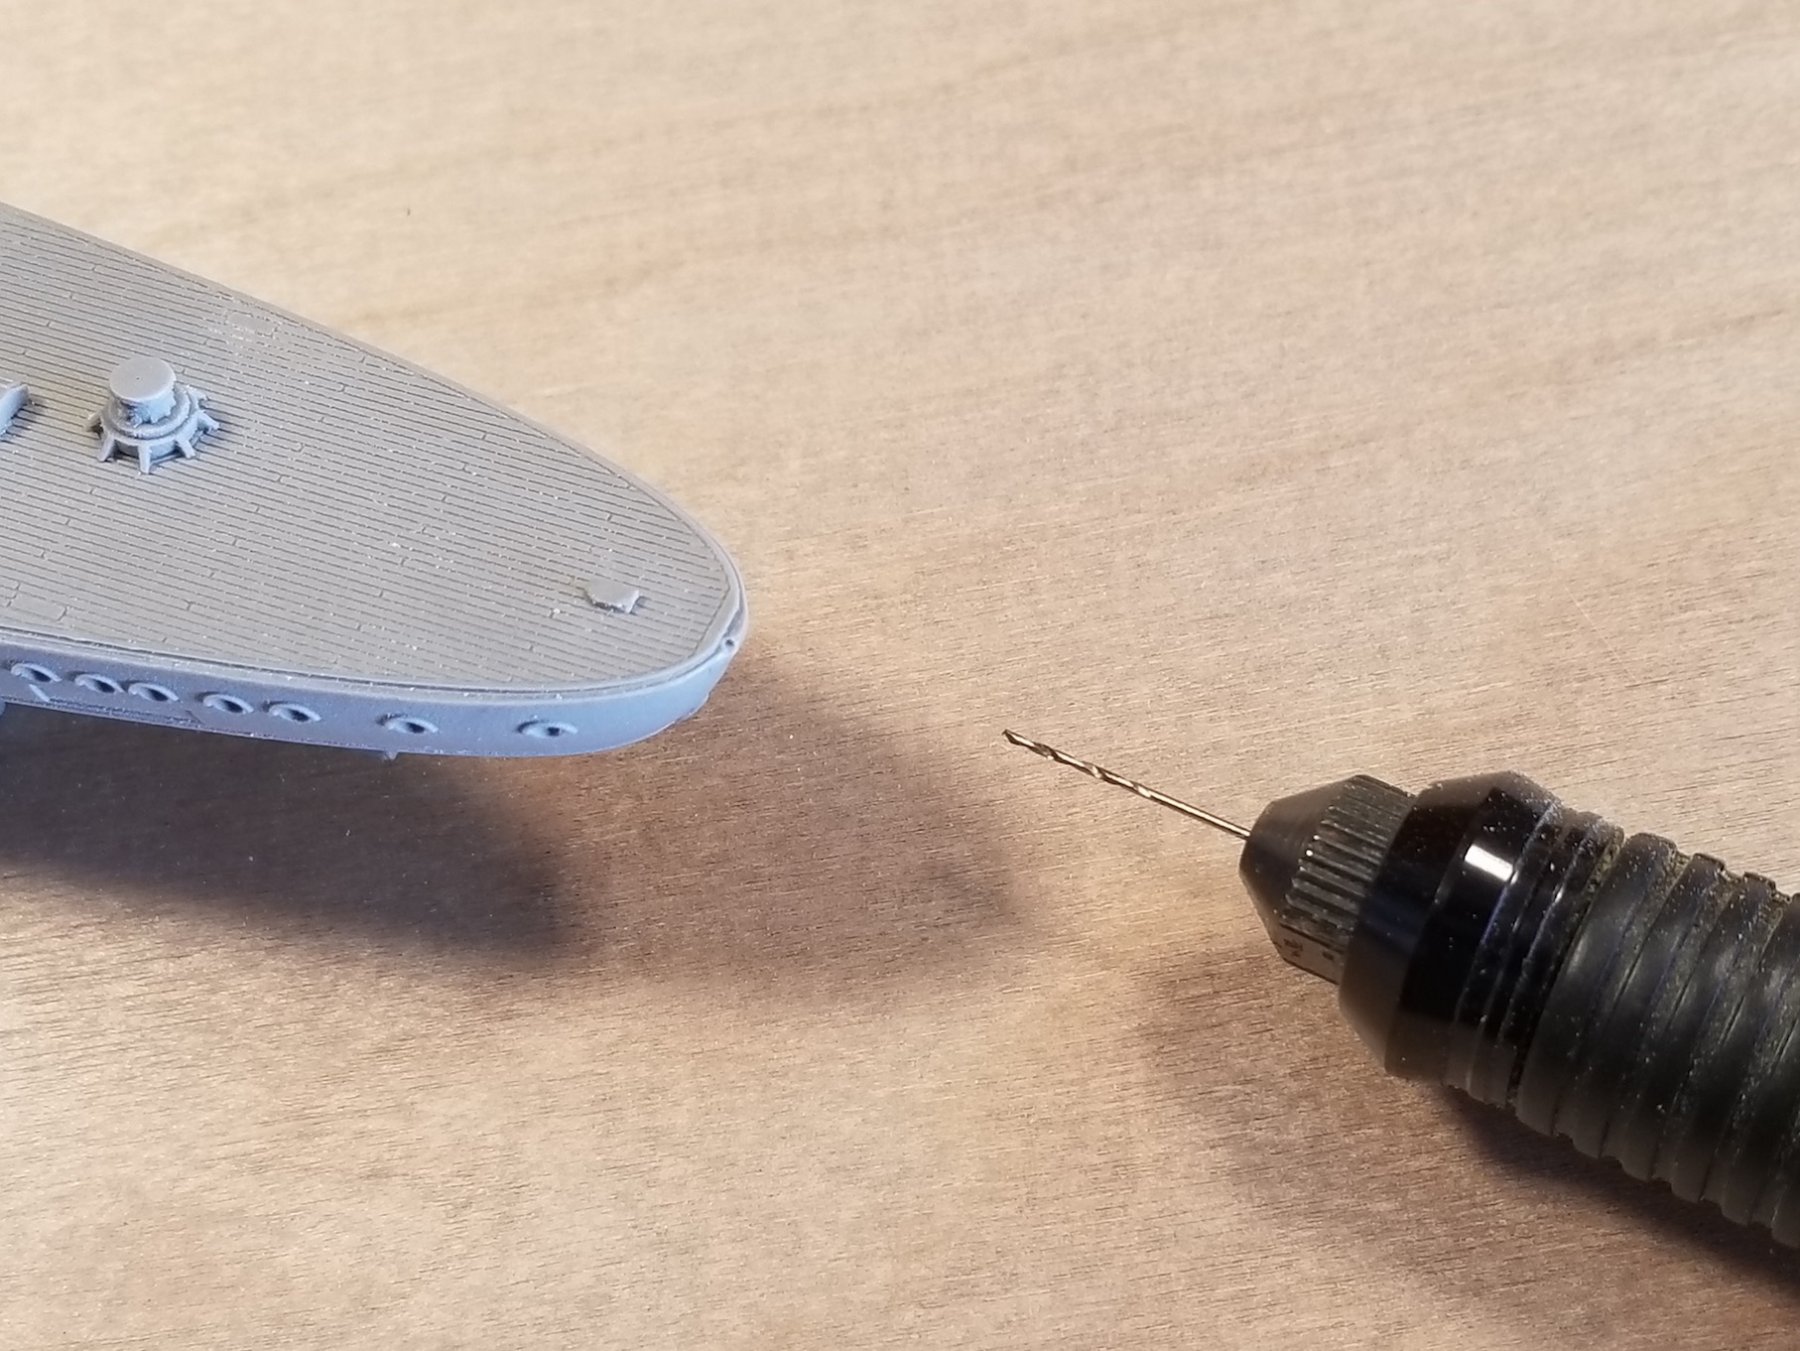
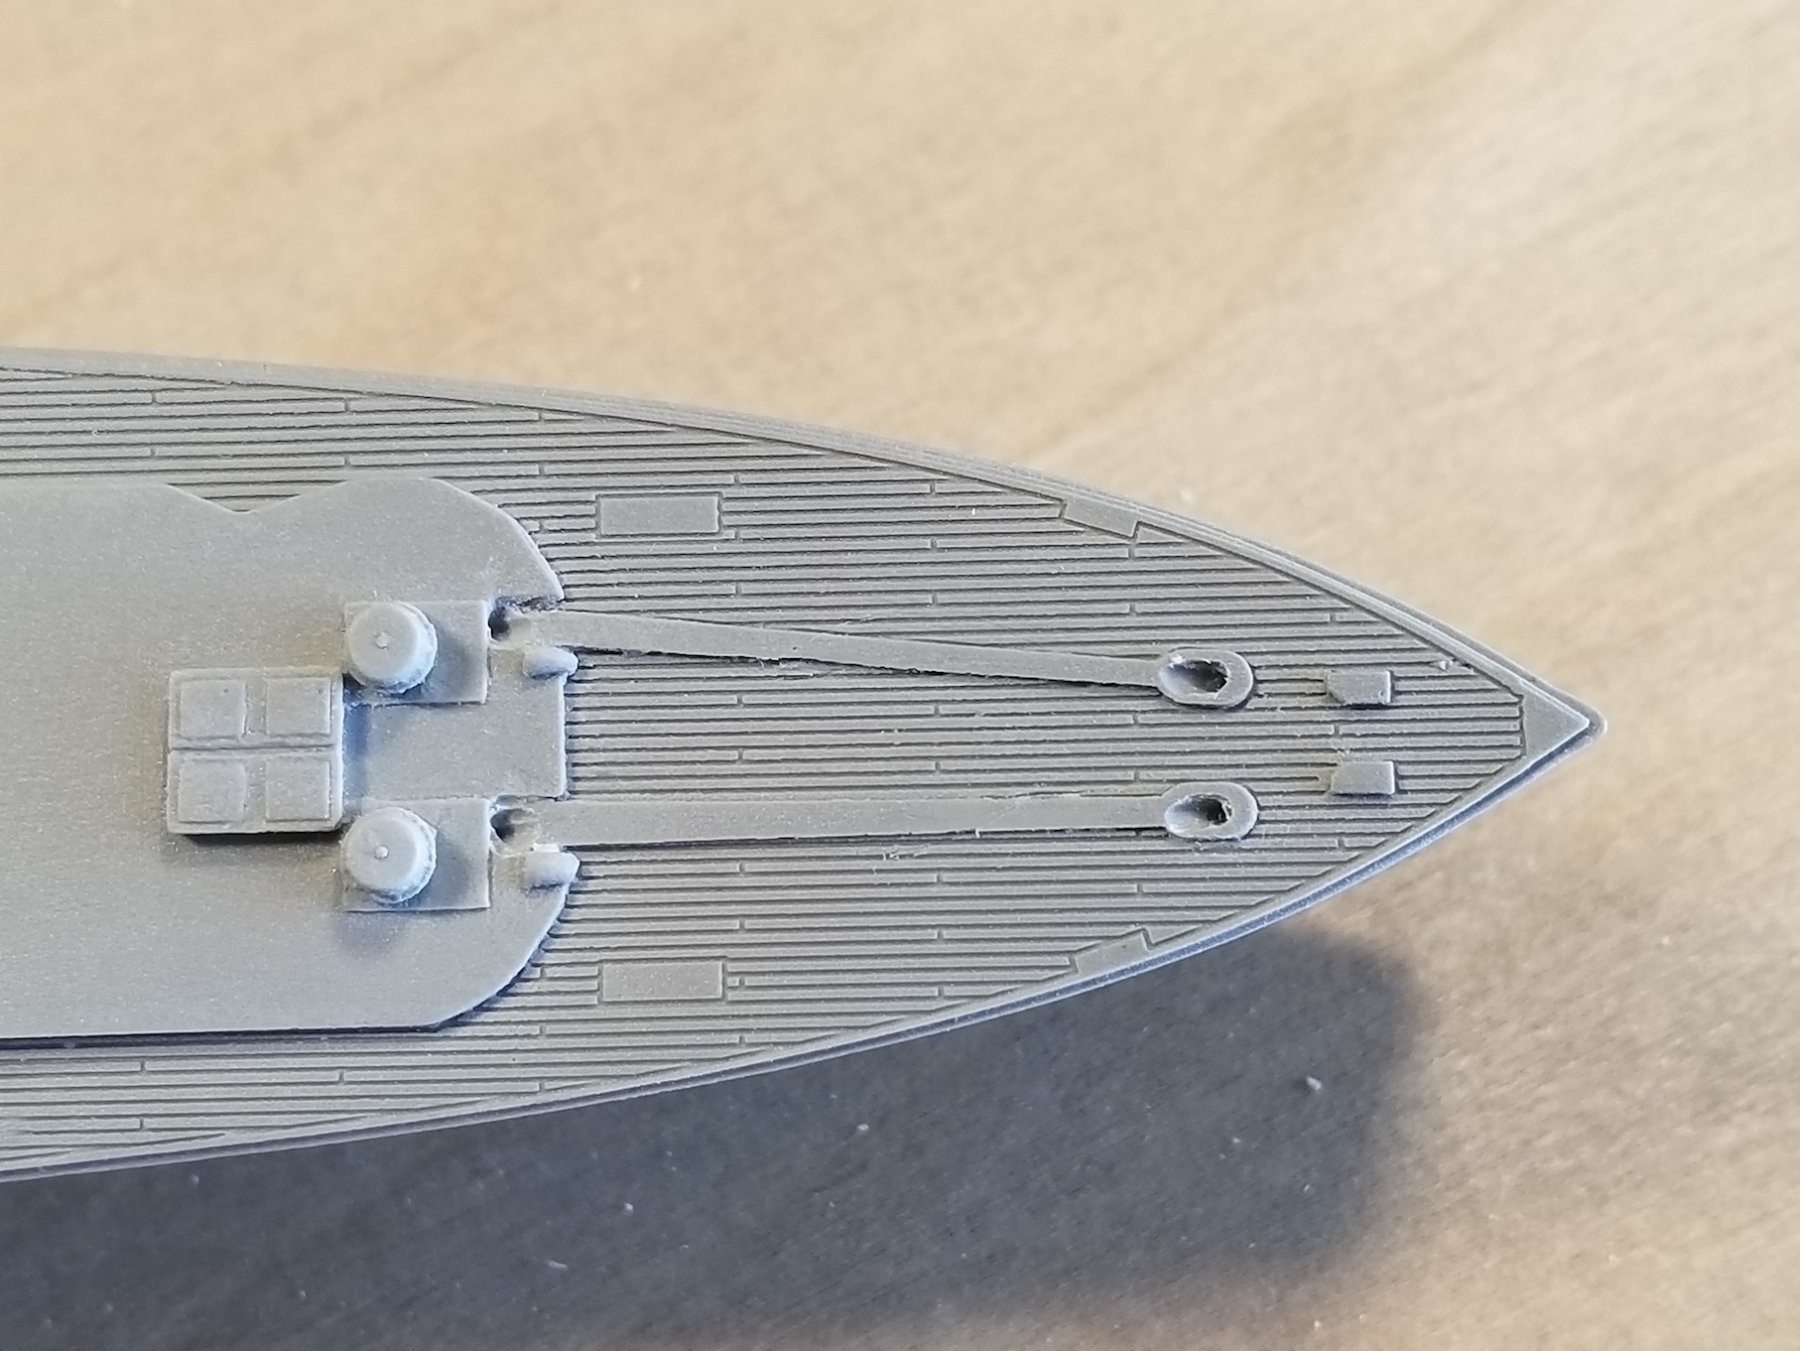
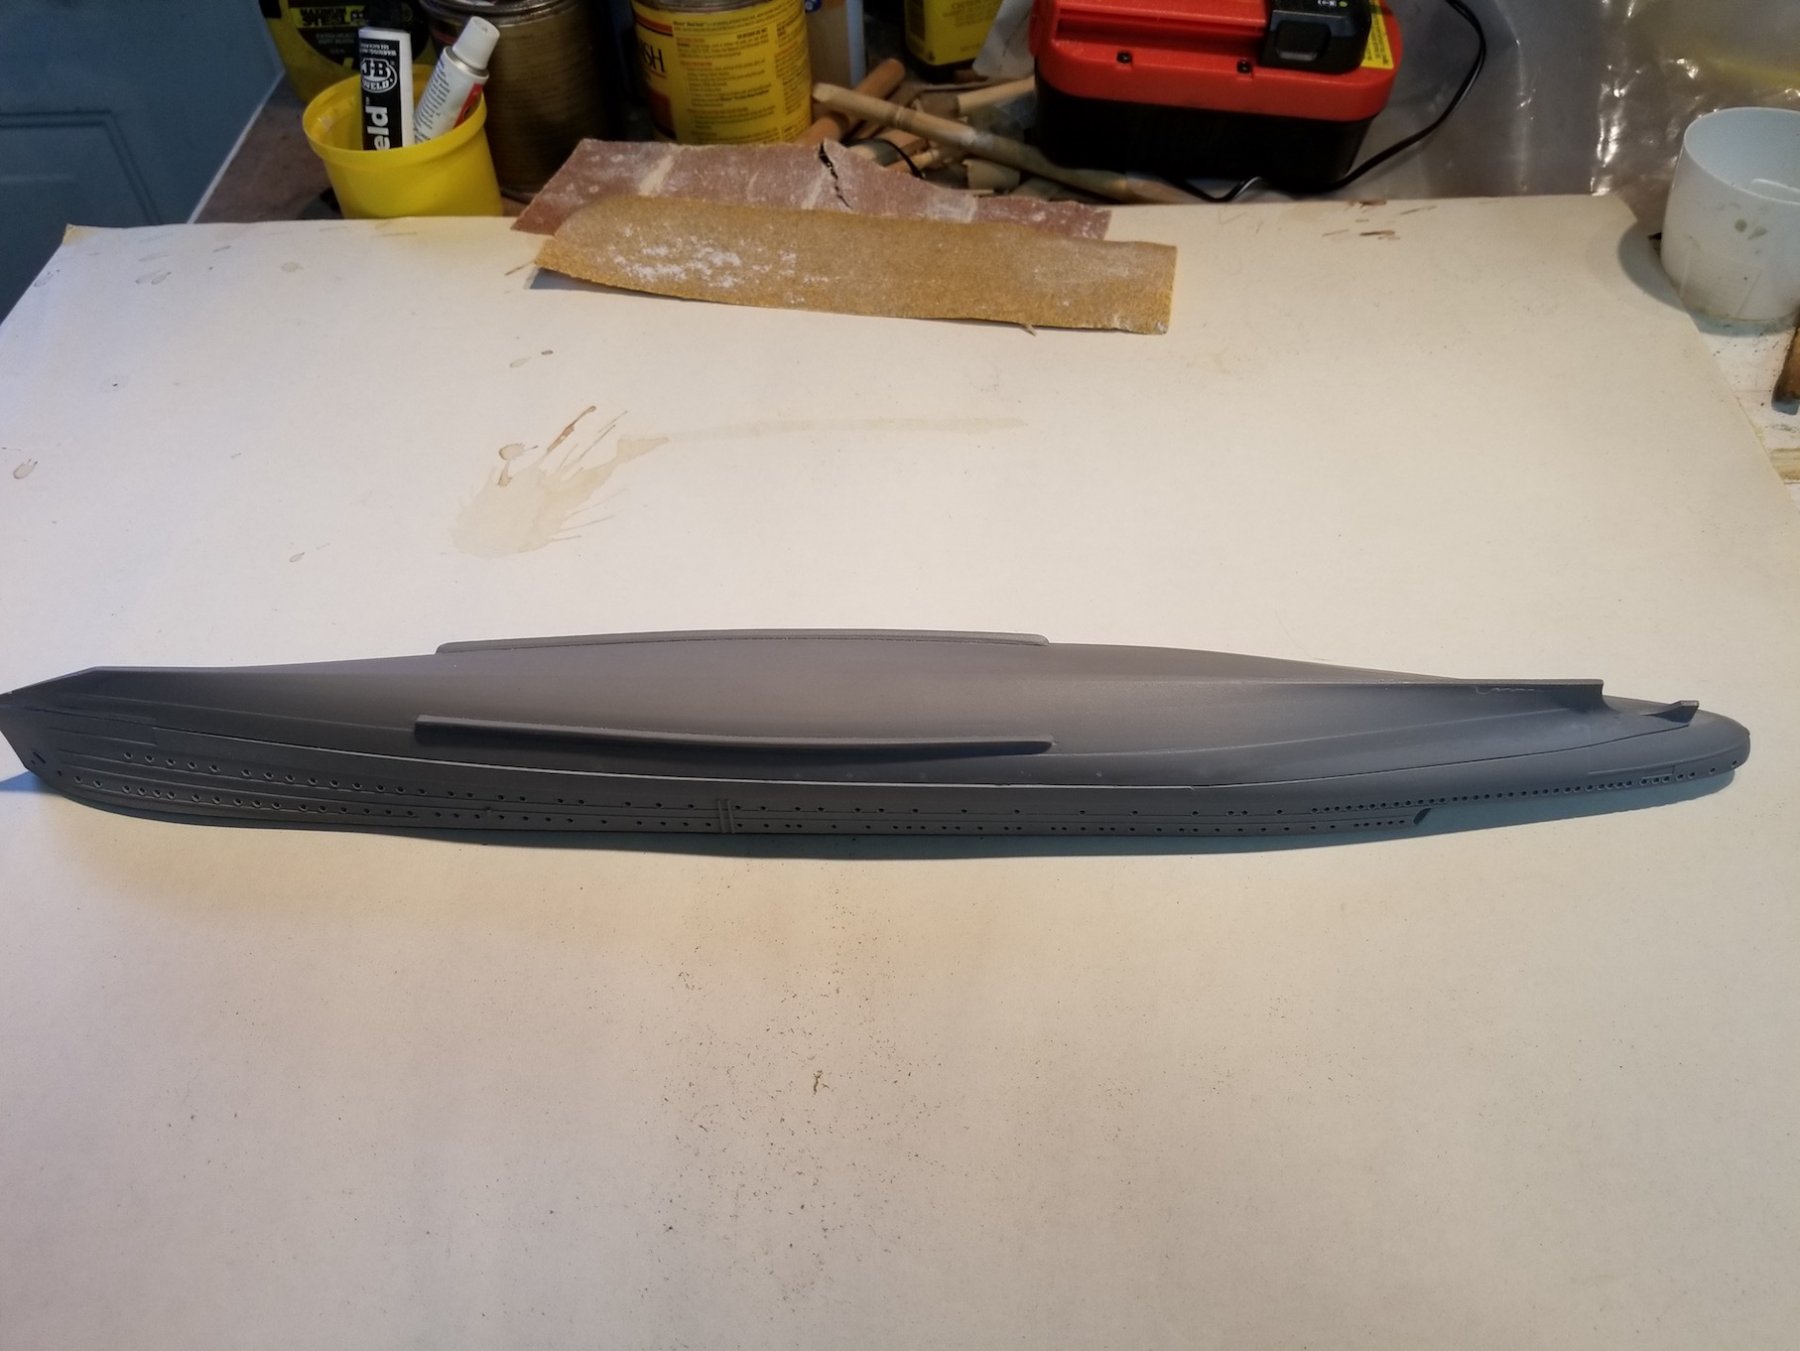
Yes Jan, and I'm glad they did. They also made a film of gunnery practice in 1941 that showed a brief moment with my father on it. He was asked, or better yet, commanded to observe the result of his gun. Presumably his as my conversation with a surviving officer indicates and a remark from one of the survivors in the water looking for him. I copied and saved the URL but not the YouTube video. The video is no longer accessible by the owner due to pirating. I would love to have a copy. Today I'll cover days 4 and 5, which brings us to November 18, 2017. I carefully dressed down the filler in the glue line from the day before. Carefully, because I didn't want to damage the detail on the castings. Fortunately this line will be painted with a black stripe and the water in the diorama will also partly cover it. Then I drilled the holes for the anchors and anchor chain On day 5 I cemented the keel extension for the paravane attaching hardware, the rudder and the propeller shaft supports. Sorry, no picture of this work. Here are a few pics I made for my archive. I used a slow curing two part epoxy cement to give me enough time to position the two halves perfectly. As it turned out I should have used a extra cement for it to ooze out but allas there were a few spots that will need a little filler. As you can see I brought it inside vecause the garage was a little cool and wanted the cement to cure faster. Cement is cured and I put some filler in the needed spots. The alignment of the hull parts came out perfect, I'm a happy camper. Here is my little electric driven all purpose drill, burr, grinder, etc tool with a small drill bit. I forgot to note the size but think it's around a #70. Ready to drill the setrn anchor hole. I drilled the forward holes a little larger so the chain can be stuffed inside with drop of CA. The chain I bought was a tad larger then scale but we'll work around it. This is a copy of the bow detail from my scratch build drawings. I think that Boris from Pacific Cross Roads a magnificent job did on the detail and accuracy in his molds. Stern anchor hole drilled. This shows "Java" at 30 knots. I added this picture to show why I decided to add the bottom half. I was afraid that in showing "Java" at 29 knots in the diorama there would not be enough hull and wind up with a gap I needed to cover with water, which would make it less realistic. No matter now, I'll have to work with the extra depth of the sea. Another note of interest, at full speed of 31 knots "Java" would kick-up a rooster tale and flood a good part of the stern deck. During the battle the fleet had to reduce speed in order for the slower ships to keep up. Another thing with "Java" was that she had a leaky stern deck and the rooster tale water would leak inside. Yeah, she was really showing her age then. Cheers,


- 378 replies
-
- 9
-
-
- java
- pacific crossroads
- (and 2 more)
-
Smoke stack looks great and even a minor setback is progress. You'll get there Kevin. Cheers,
-
Thanks Jan, yes, I think I have that one because I remember the photographer's shadow and using one of those Kodak box cameras. I think I have gotten most all the pics of "Java" from Maritiem Digitaal. True about the wooden decks and I like the contrast with the grey, adds a little color. I have been able to retrieve many good photos, some in higher res then others. There are a few I like to order from the Australian War Memorial in high res. Cheers,
- 378 replies
-
- 4
-
-
- java
- pacific crossroads
- (and 2 more)
-
Yep, that piddly stuff takes a lot of time but in the end it's all well worth it Mark. Your first one sure looks good. Cheers,
-
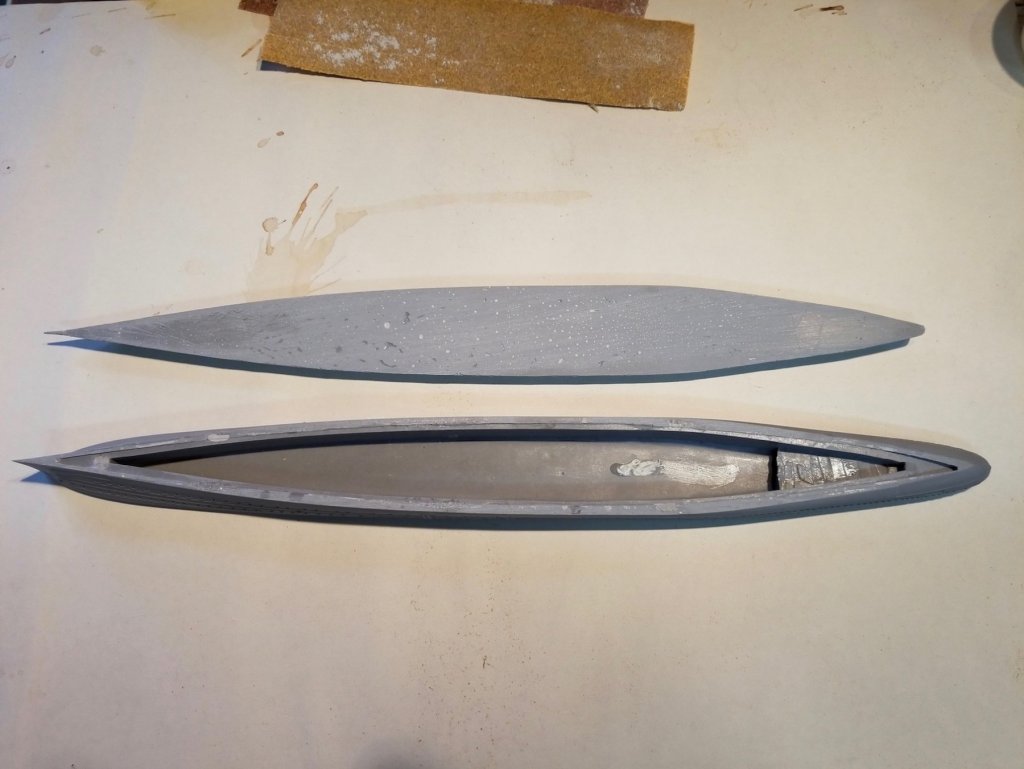
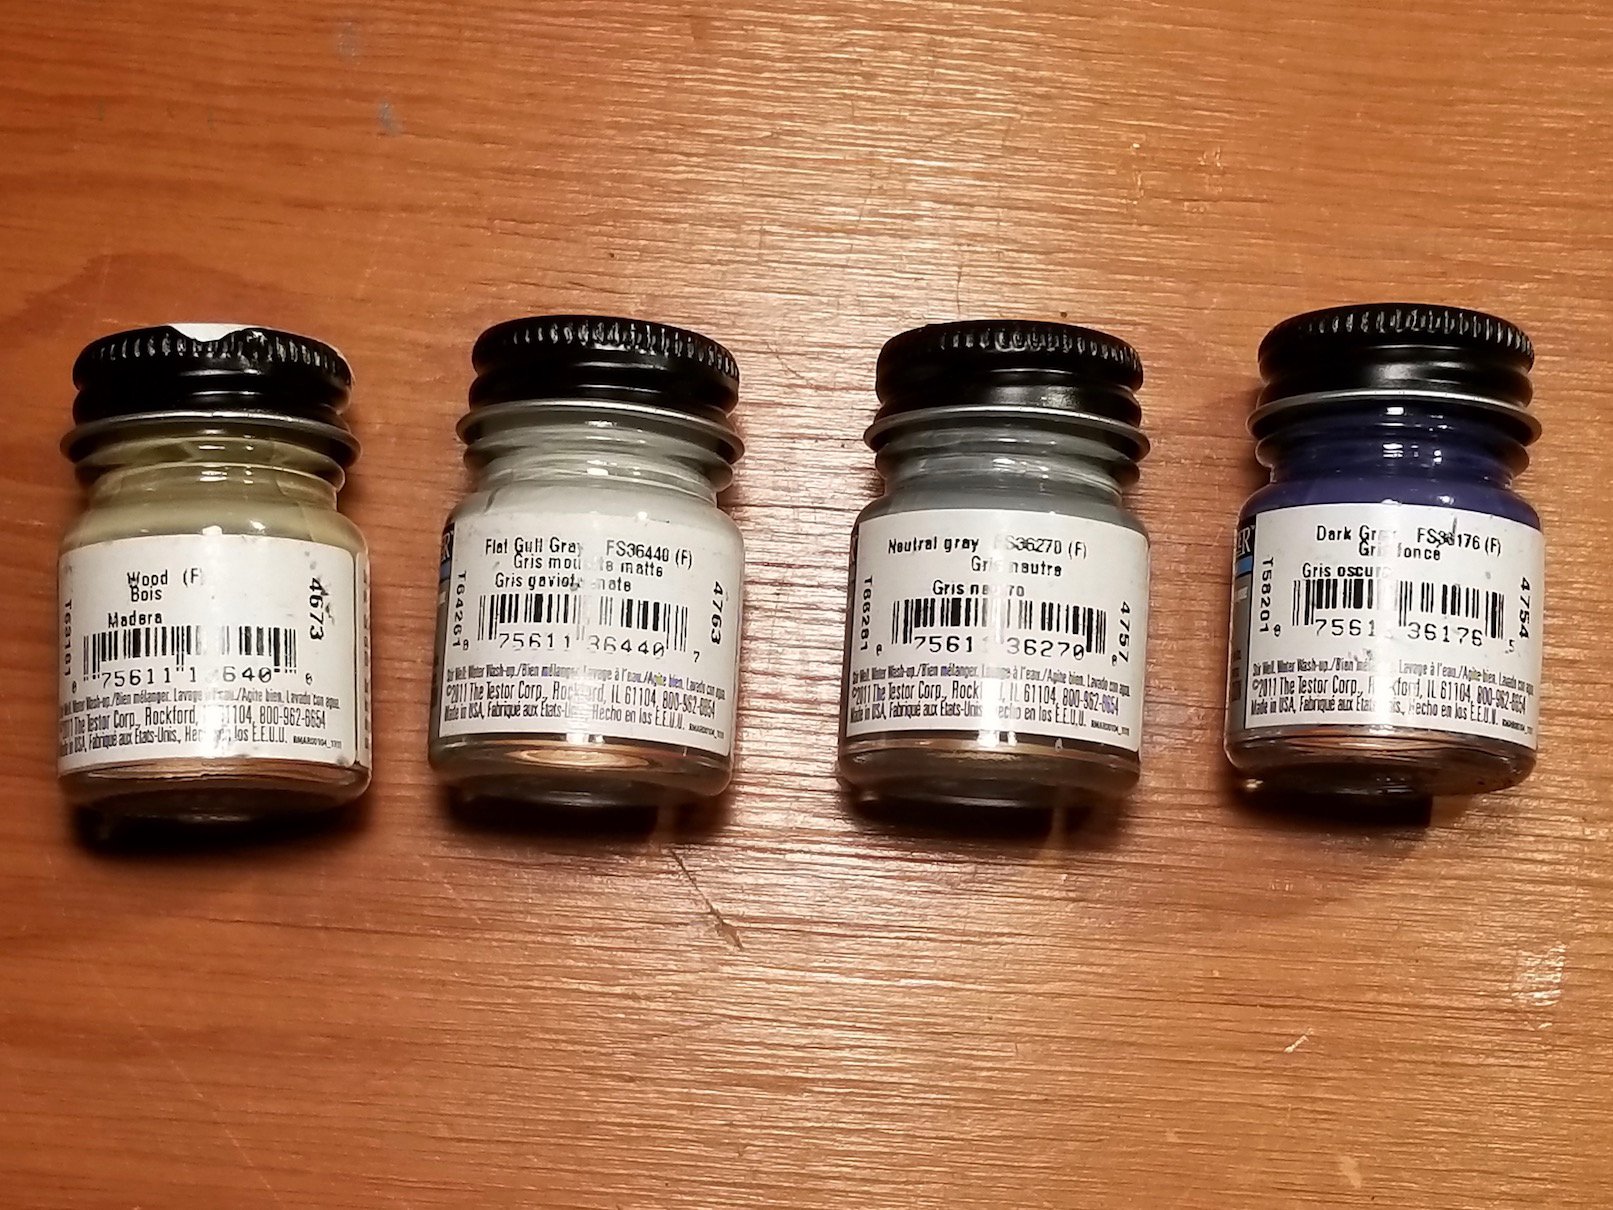
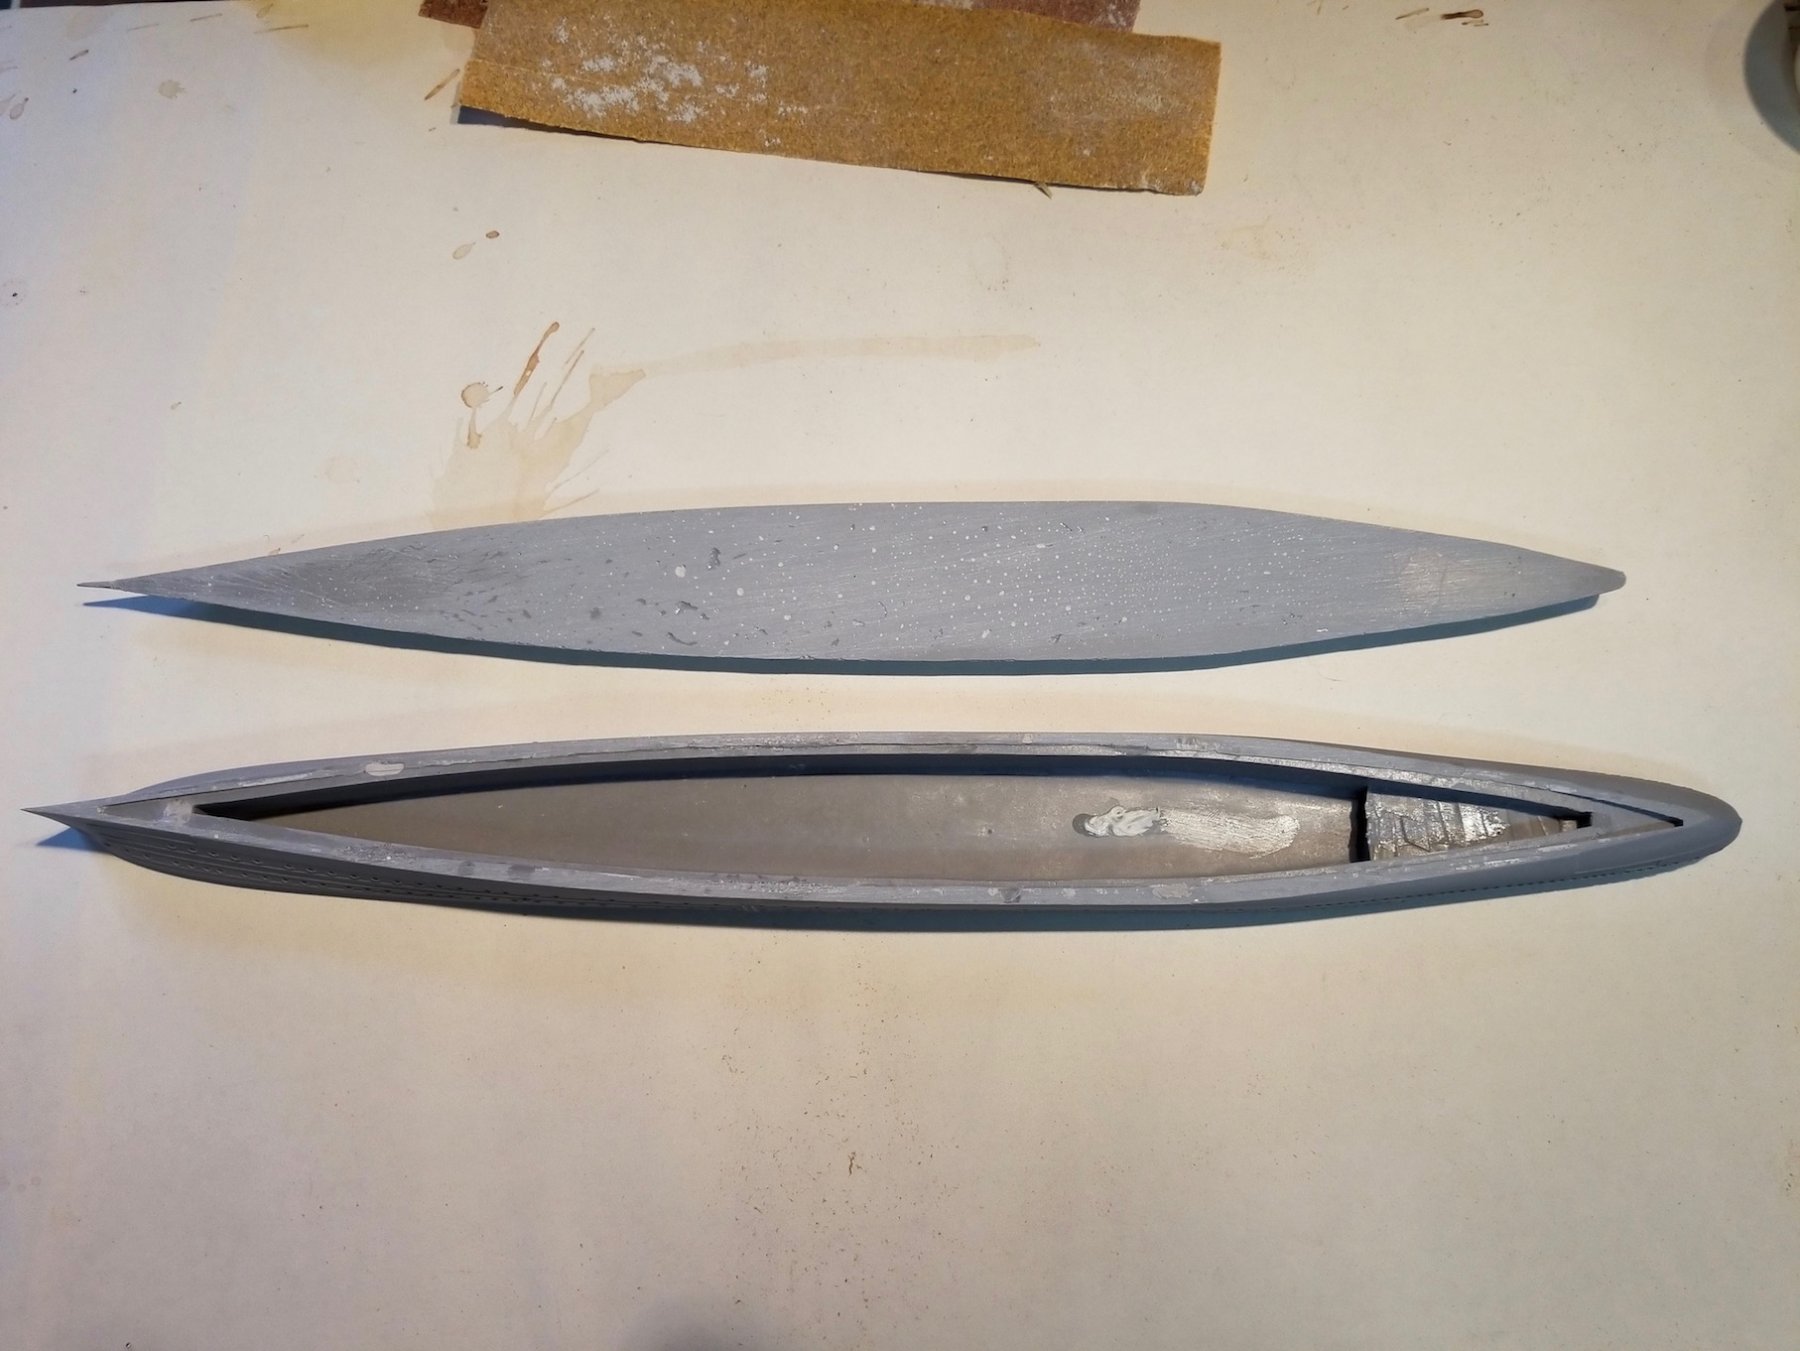
Hello all, It's been a busy day for me, a lot of yard work, getting the yard ready for spring, cleaning a lot of dead stuff away. Well you know the drill. This will be Day Two, November 15, 2017. Most of this day was taken up with busy work, like Gwen's printer would not print black, shopping etc. She has a cheapy ink jet printer and doesn't use it often. I told her to print just one page a week to keep the jets open. In retrospect I should have done that, knowing her. I tried to clear them but no luck. There were a few other problems I managed to fix for her. I went to Hobby-Lobby to get some paint for the "Java" model and bought Acrylic paint in a dark grey, a medium grey and a light grey with a bottle of wood color for the deck. It turned out that the greys were a little too light so I mixed some black into each bottle to make it come close to what Boris suggested. I also decided to paint the deck in a wood color instead of black. I picked acrylic for the ease of clean-up. As I was browsing in the store I found a metal necklace of very fine chain. Hmmmm, me thought, would look nice on "Java." Bought that as well. I started with the two hull halves that needed some dressing for a good fit. I took a long piece of 180 grit, laid it flat on my workbench and by moving the mating surface back and forth I managed to get to a pretty good fit for both halves. Well, by this time it was time to punch out and go back inside the house. We'll continue tomorrow with the cementing action of the the hull. Anchor chain for "Java." Like you didn't guessed it. Trueing up the top half of the hull. Trueing up the bottom half of the hull. Both halves close to a pretty good fit. Here are both halves loosely put together. The grey color is as all the resin parts are. Cheers,


.thumb.jpg.7eb8cefffb999c2249bf3480837ce483.jpg)
.thumb.jpg.8eb8a81e4c579ea8312452a3d0de3259.jpg)
- 378 replies
-
- 9
-
-
- java
- pacific crossroads
- (and 2 more)
-
Thank you Lawrence for your kind words. Difficult to tackle this build? Well, sort of, but it brings back memories again, some good, some not so good. This way all of us can learn something from recent history. Thanks also too all who came to visit and clicked the like button. Cheers,
- 378 replies
-
- 5
-
-
- java
- pacific crossroads
- (and 2 more)
-
Great progress Denis. She's really looking very spiffie. Cheers,
- 378 replies
-
- 5
-
-
- t78 norden
- billing boats
- (and 1 more)
-
Wow John, nice framing wok and great progress, even with everything that's going on around you. Cheers,
-
Very well done Patrick, awesome build. I showed it to Gwen and she too was awestruck. Cheers,
-
Nice work on those boats Nenad. Cheers,
- 4,152 replies
-
- 5
-
-
- cutty sark
- tehnodidakta
- (and 1 more)
-
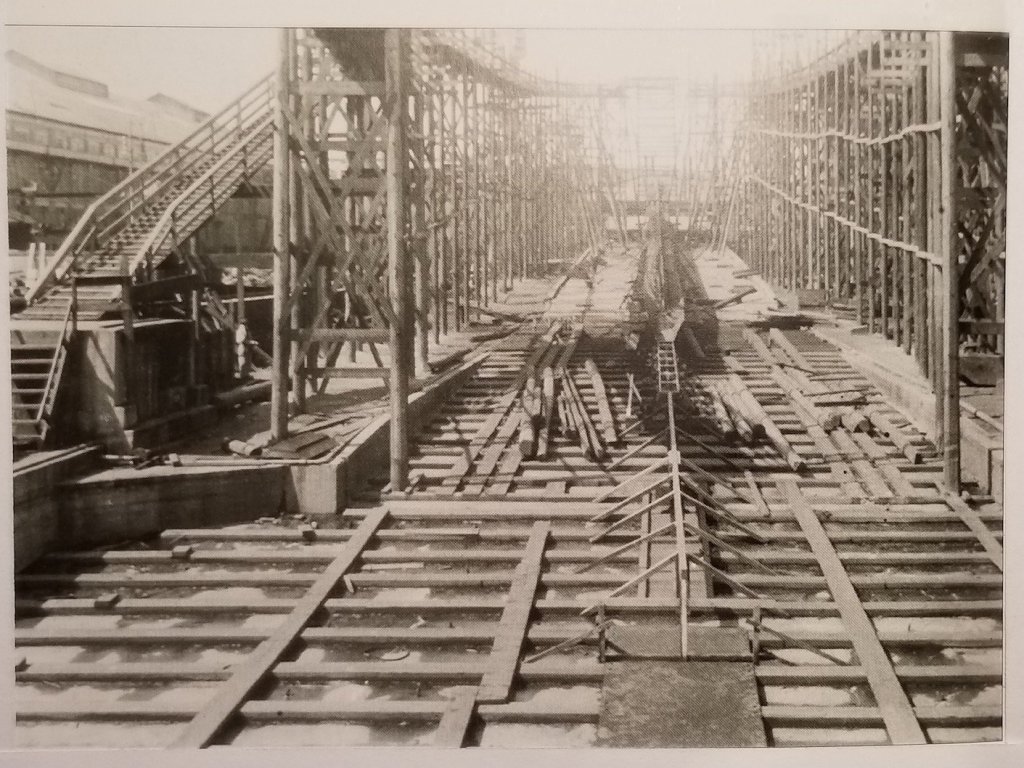
Hello everybody, Time for another post. This will be an extension to my Day One post and I like to call it "Hr. Ms. Java, the beginning." This means that there will be "the end." Not only of this build log but of the ship itself. I have gathered a few photos and will annotate the. Java's keel was laid down May 31, 1916. at the "de Schelde" shipyard in Vlissingen, the Netherlands. Hull construction in progress. The bulkhead you are looking at is where the stern section broke off when the torpedo exploded with the consequent explosion and fire from the ammunition explosion stored in there. The diver photographer Kevin Denlay, informed me that fact. "Java" ready for launch on August 9, 1916. "Java" sliding down the ways. "Java" being outfitted in "Vlissingen" to made ready for her proving runs. Hr. Ms. Java as she appeared sometime in 1926. Cheers,
.thumb.jpg.bf46952edf06fb6962c1e56152e80366.jpg)
vlakvoordetewaterlatingbijdeKon_Mij.DeScheldeteVlissingencopy.jpg.f456cba6314df3c422492a3e48dad72b.jpg)
inaanbouwbijdeKon_Mij.DeScheldeteVlissingencopy.jpg.d9491de3e538a1aa5432e4d99a6ae395.jpg)
debijdeKon_Mij.DeScheldeteVlissingencopy.jpg.2a5daf8f3a09c0e2e3f80cc2c9caec80.jpg)
debijdeKon_Mij.DeScheldeteVlissingencopy.jpg.344d5d47cd62b34af0e76e1d7a29b93e.jpg)
tijdensdeafbouwbijdeKon_Mij.DeScheldeteVlissingencopy.thumb.jpg.5e319d95adae95ddbac636bdb54e88dc.jpg)
- 378 replies
-
- 12
-
-
- java
- pacific crossroads
- (and 2 more)
-
Nice progress Marcus, she's really looking nice. Cheers,
- 305 replies
-
- 4
-
-
- utrecht
- statenjacht
- (and 1 more)
-
I like your sense of humor Nils! The added population of crew really makes the model. Guns smoke to the forum eh Nils? Well, I am building a kit model of a WW II warship in a diorama, I hope, with guns blazing. One never knows what'll appear on this forum. Cheers,
- 692 replies
-
- 6
-
-
- eagle of algier
- chebec
- (and 2 more)
-
Lots of nice looking "stuff" done Denis, great progress. Cheers,
- 378 replies
-
- 5
-
-
- t78 norden
- billing boats
- (and 1 more)
-
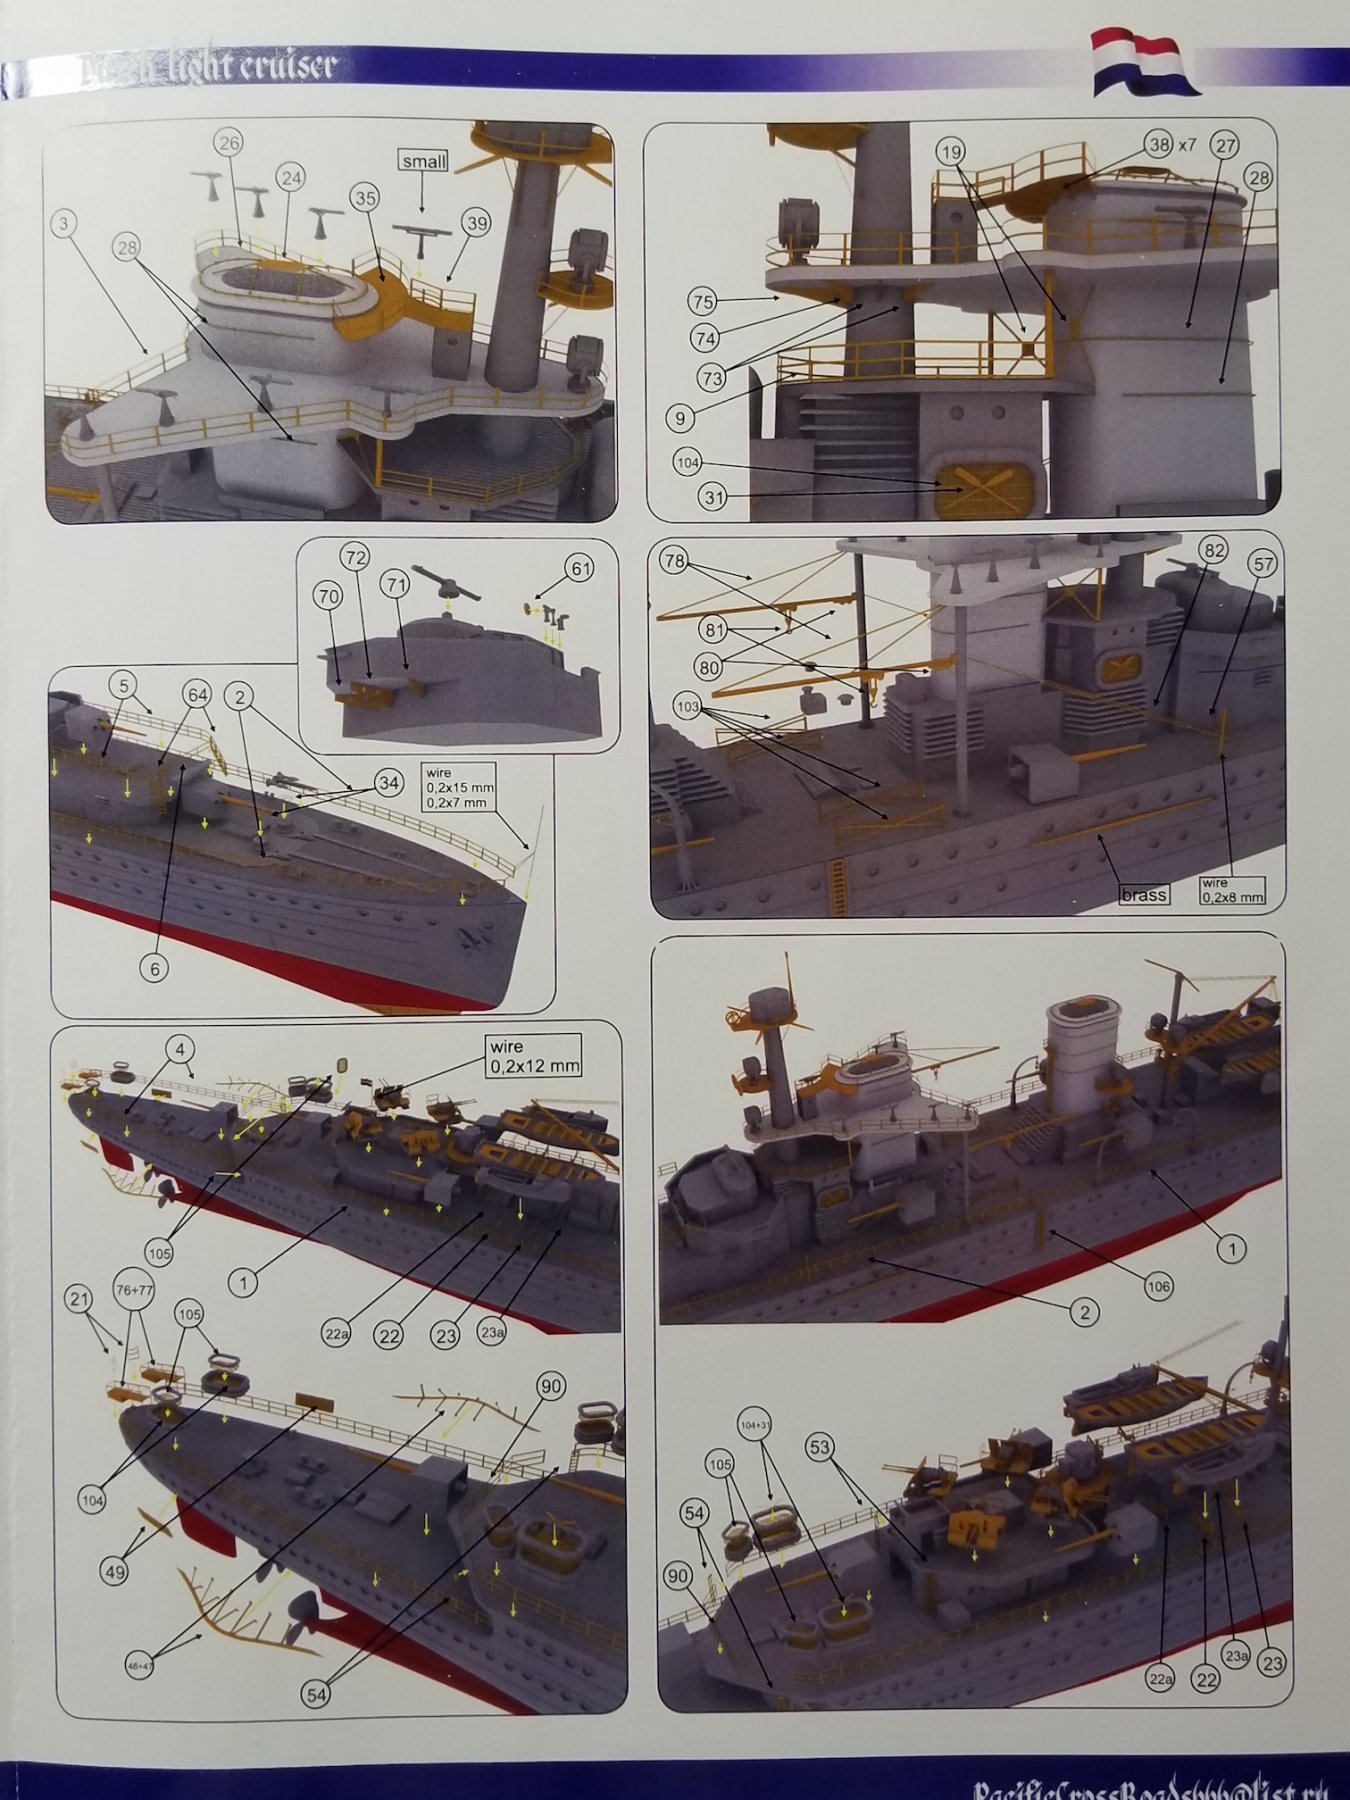
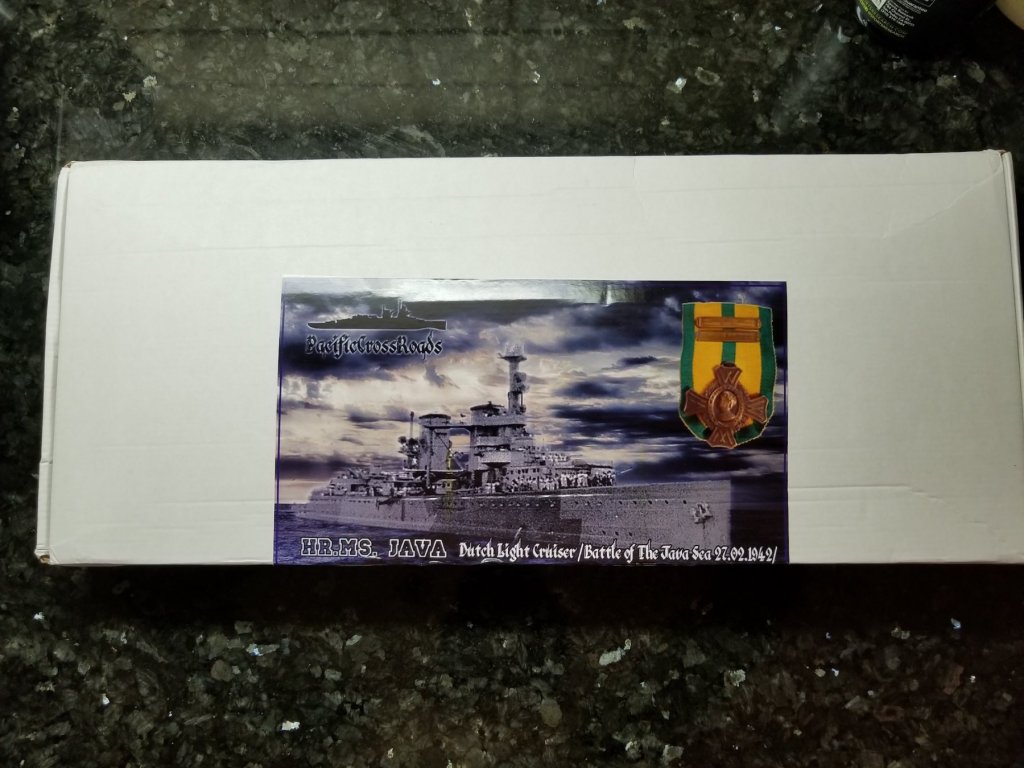
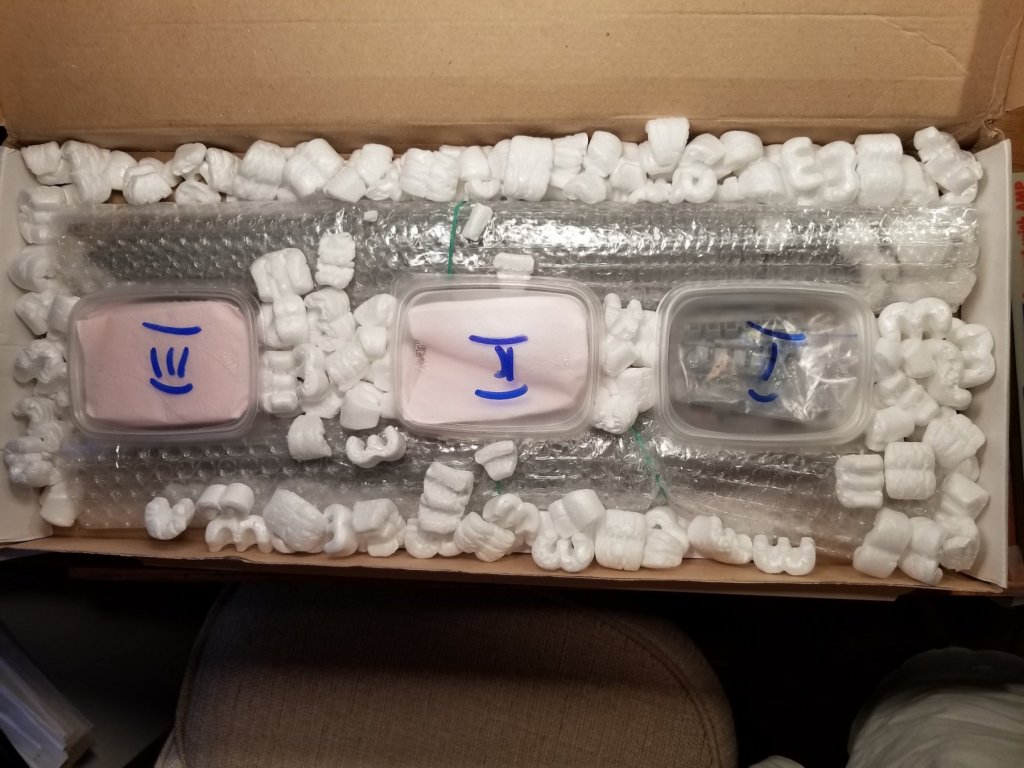
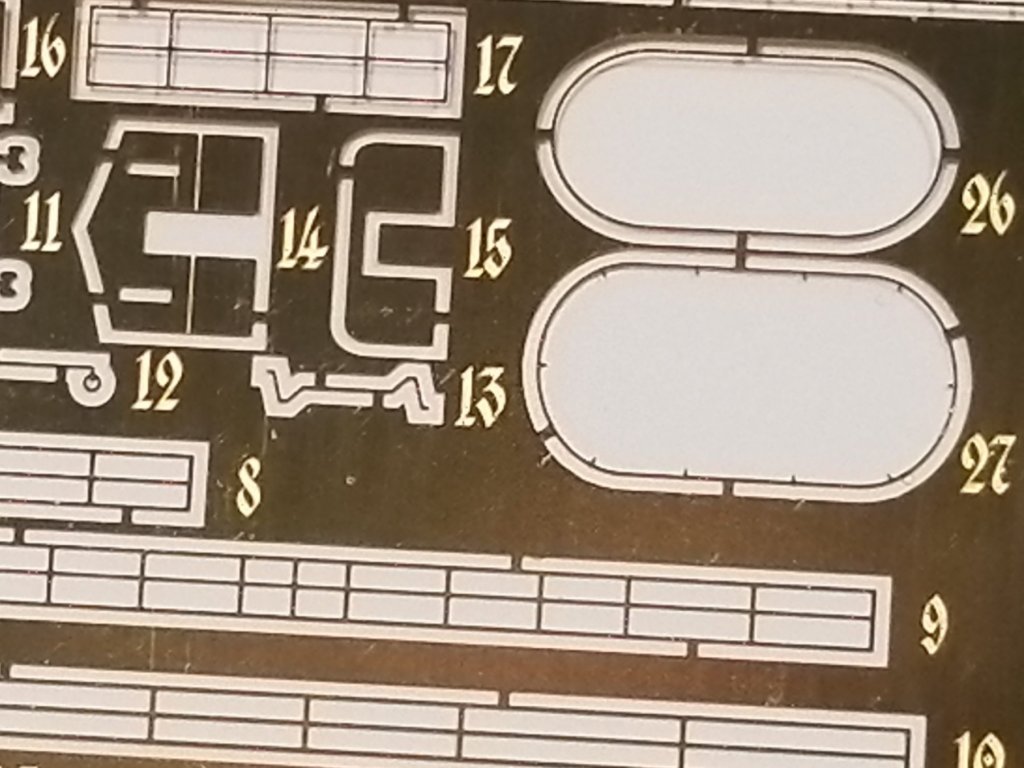
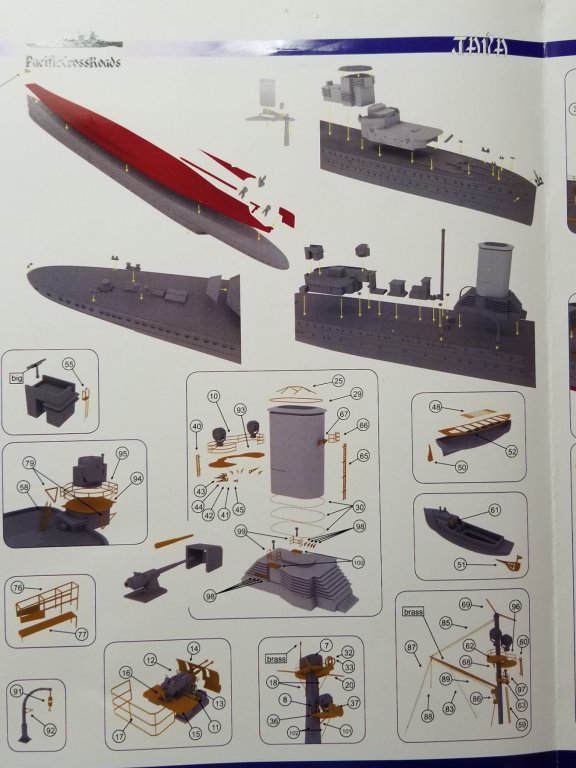
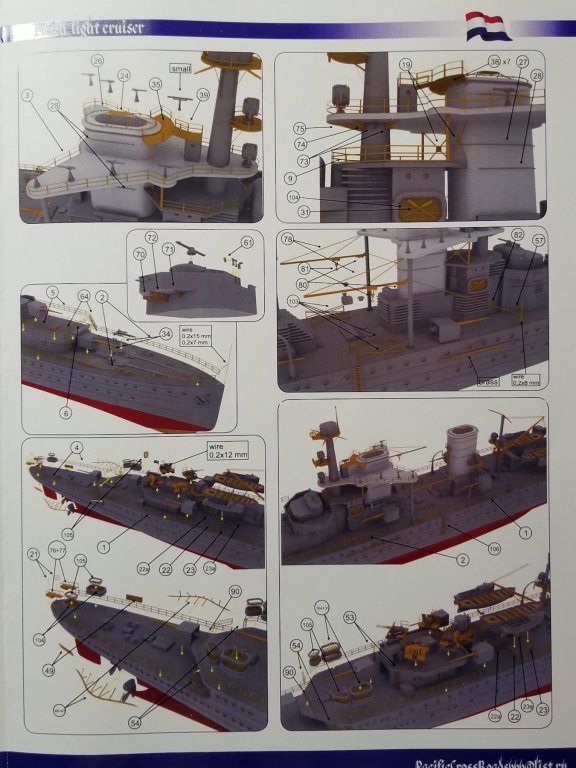
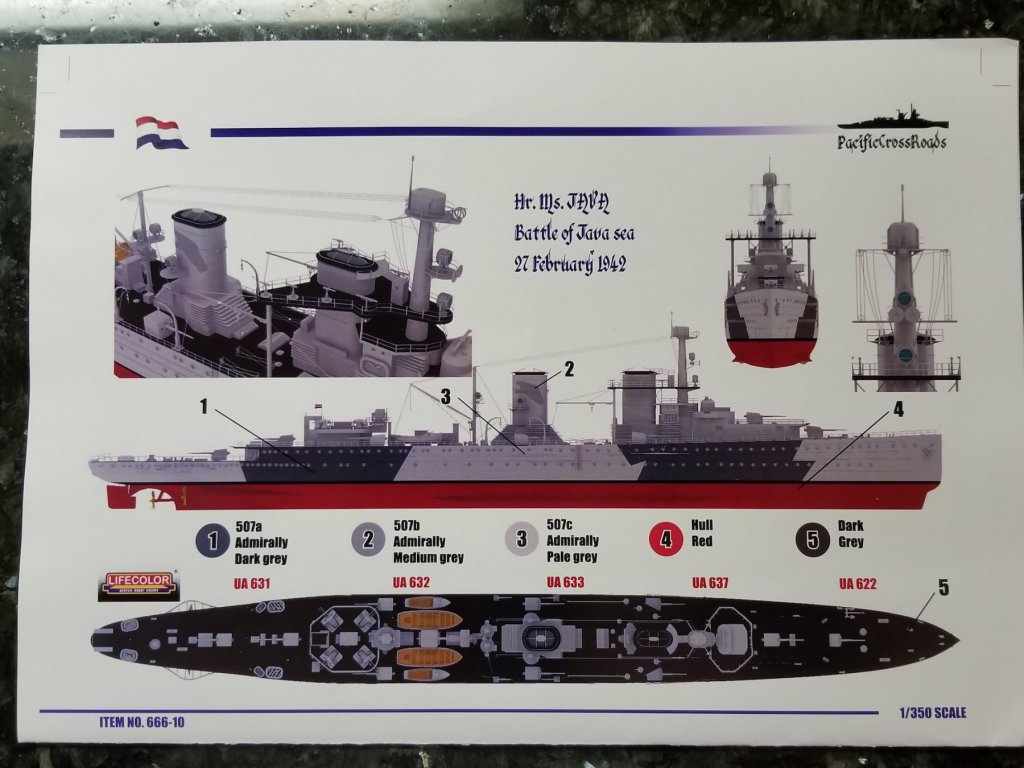
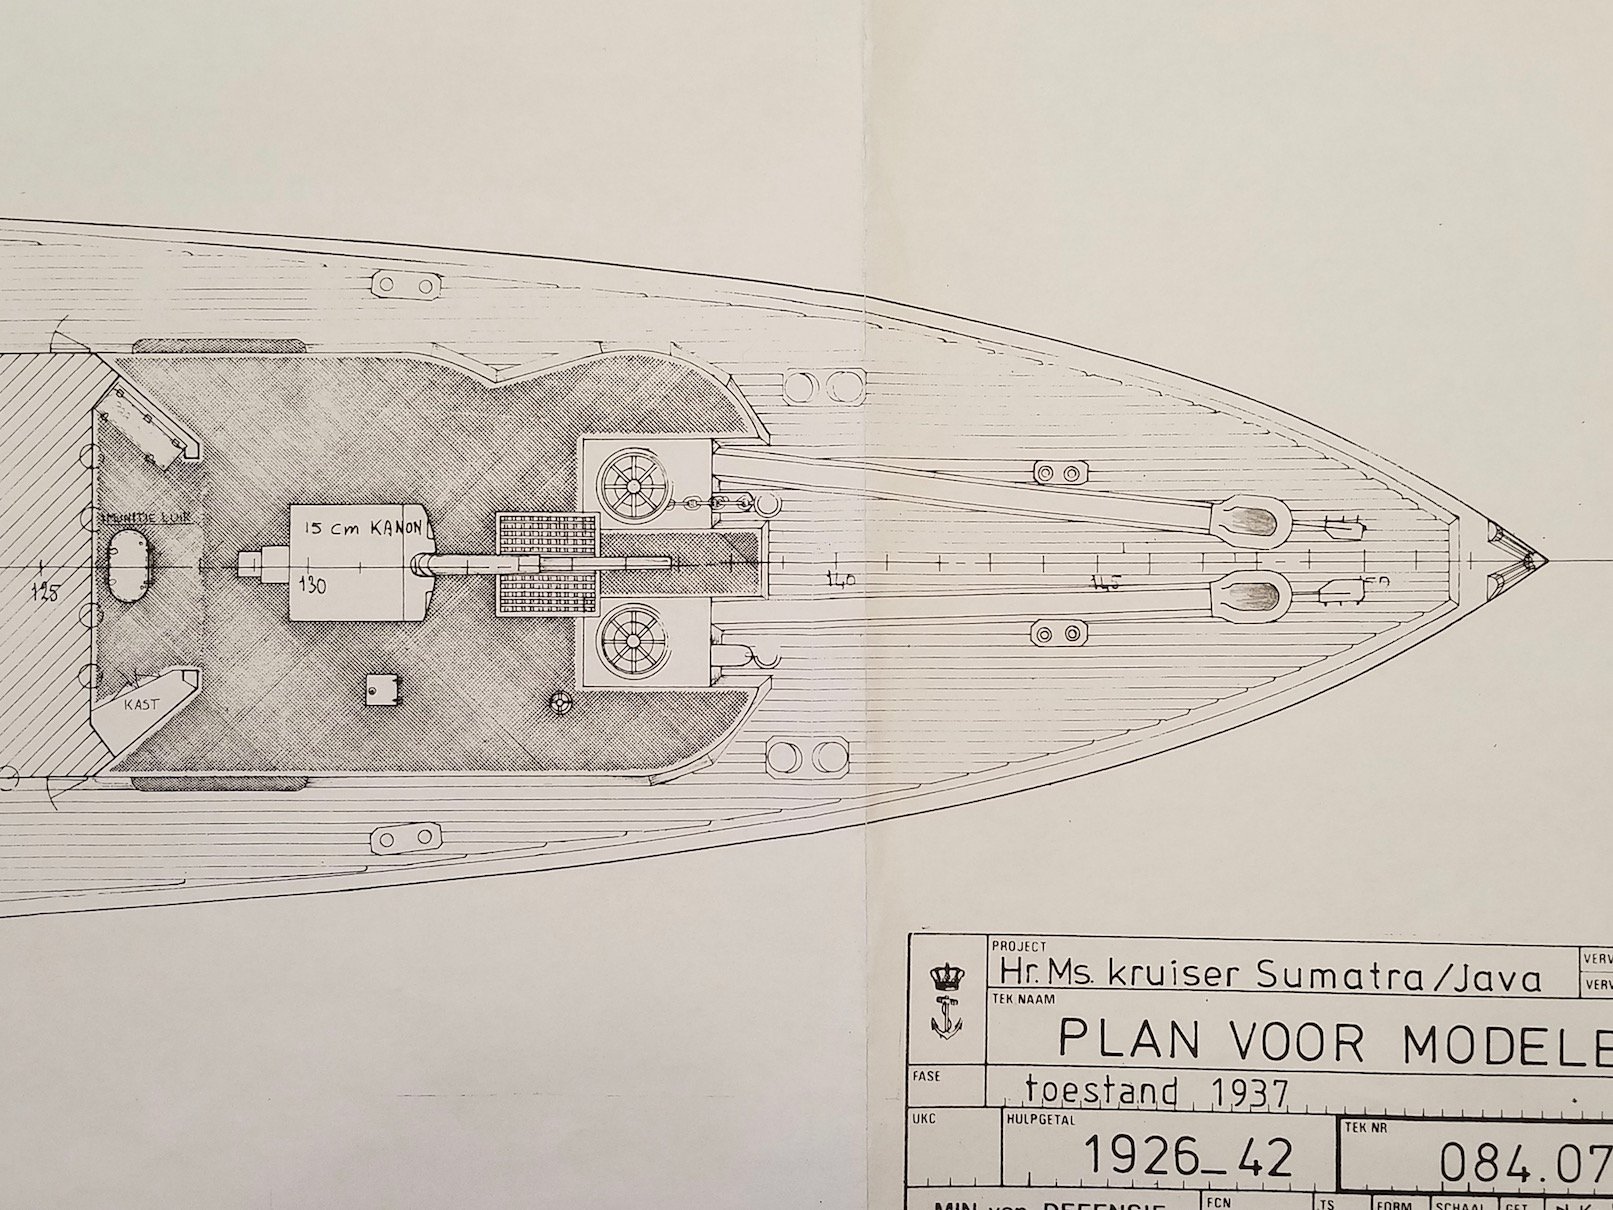
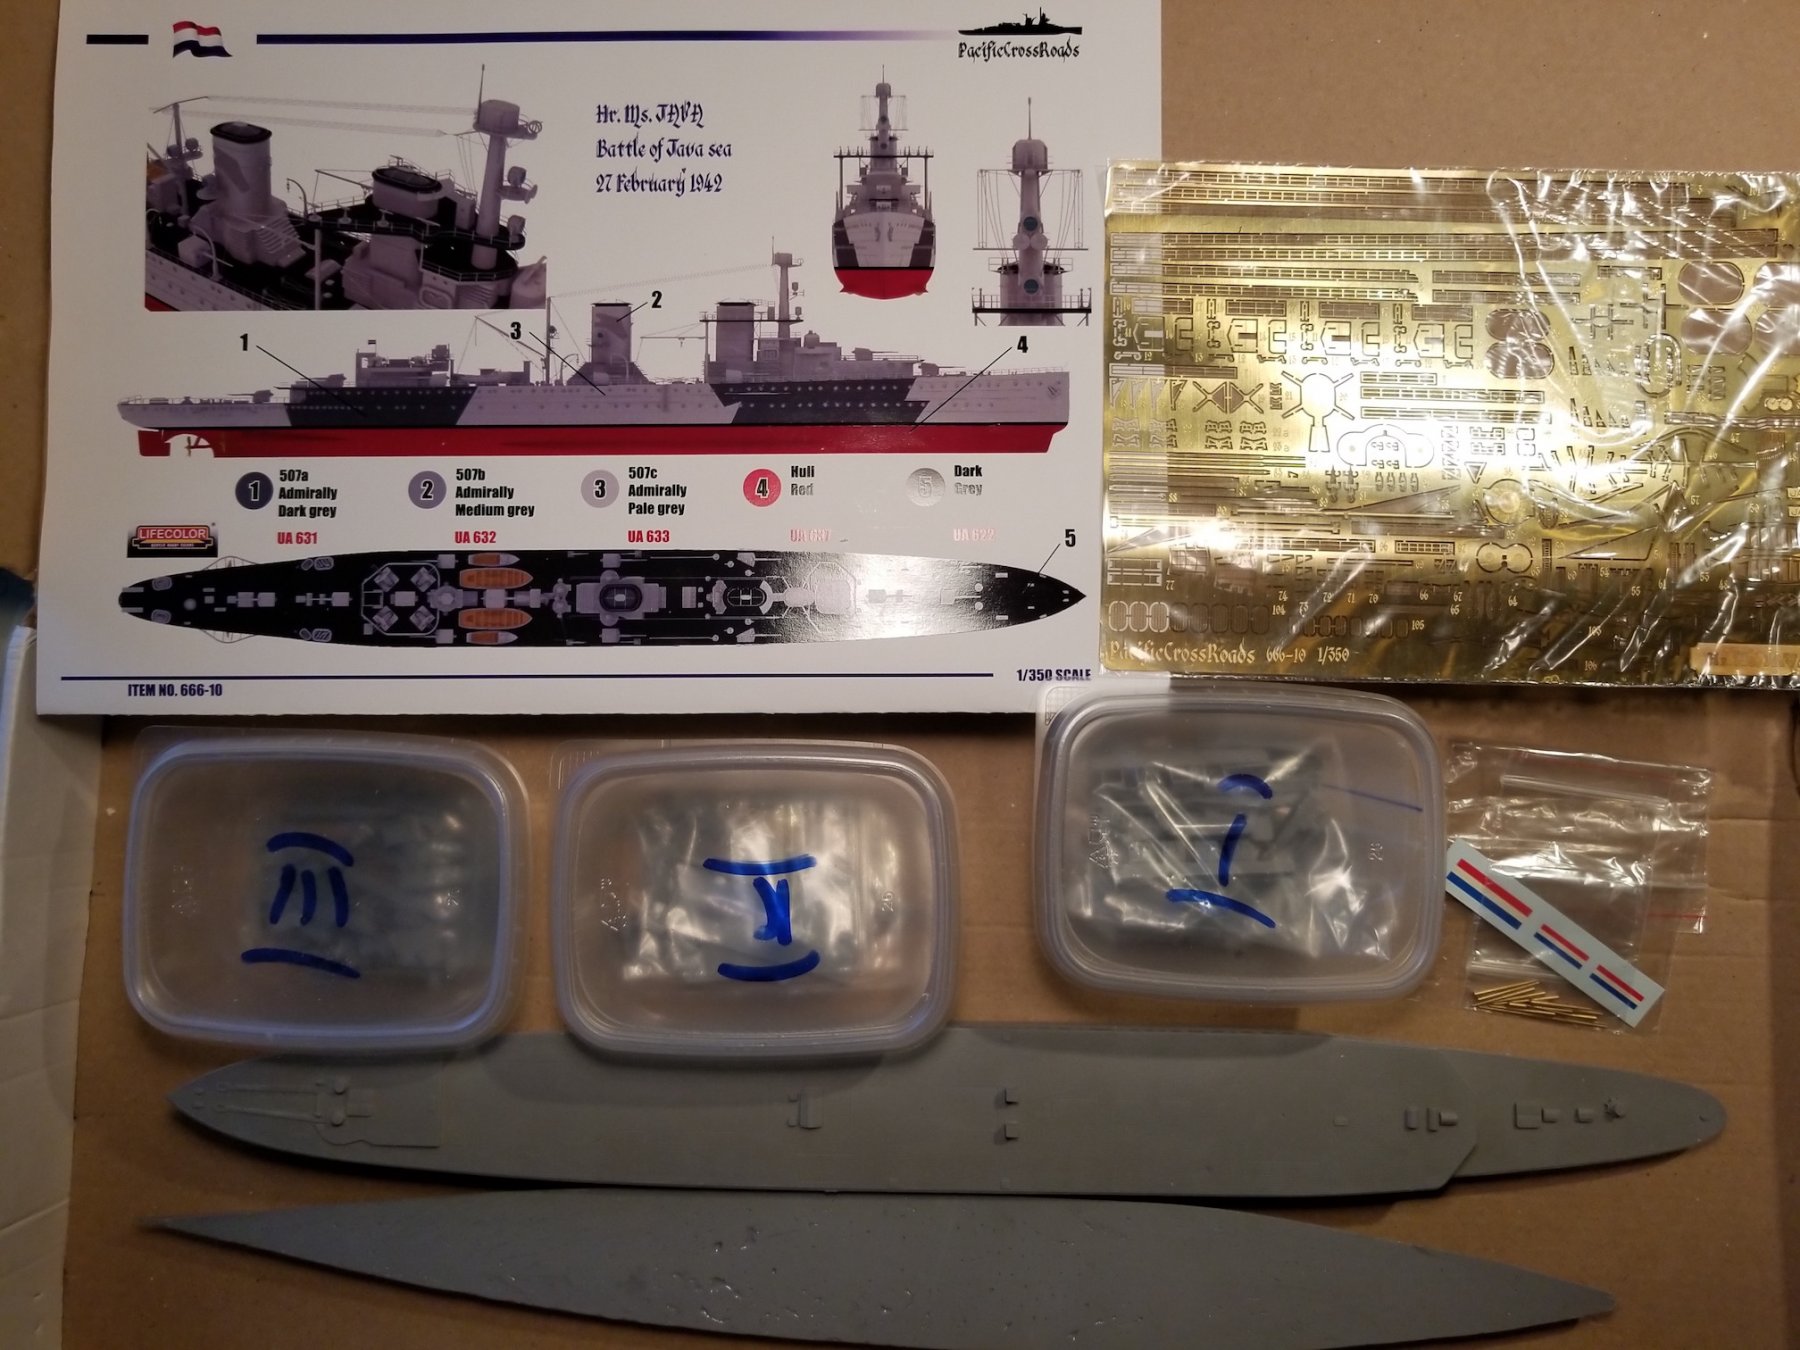
Thanks Mark for your kind words, and also my thanks to those who clicked the like button. Well, it's now time to post Day One, November 7, 2017. As I have mentioned in my introduction this build log will be reported in the past tense until we arrive at the current date. I received the postal package with the "Java" kit from PacificCrossRoads in St. Petersburg, Russia. I was naturally very anxious to open it and take a look at what the kit all contained. My first impression was the immaculate precision of the molded parts, there was hardly any flashing to clean off. The only two items that required some dressing were the separation edges of the two hull sections that needed to be cemented together. This will be accomplished in the next day or so. There were three small plastic containers with most of the small parts and a bag with the larger parts. Boris also included a second PE sheet, which I strongly recommend buying when you order this kit. With my experience, you'll need it as I have, you will damage one or more of these VERY small and delicate parts. The instructions are on a one piece of thick glossy photo paper, folded in half with photos of the parts as they are assembled with the PE parts with their numbers. I am fortunate in having a set of drawings for a 1:50 scale model for this ship and compared the two for familiarization. These drawings depict the ship in her 1937 state. I also have a large book with the history of the ship, filled with photos. These proved to be of less help because of the picture size. But it gave me enough to feel comfortable tackling the build. At first I planned to just build the model and put it on a static display like I did with the resin model of the O16. But thinking about it in the next few days I thought it would be nice to show the ship as she was during the last day of her life in the afternoon of February 27, 1942. She will be in her three color grey camouflage with guns blazing in a seascape diorama. Ambitious project for a first time effort like this but it would be impressive if I can pull it off. Normally people would only build the model from the waterline up and just setting or lightly sliding the model into the "sea." But looking at photos of "Java" at 30 knots part of the hull shows below the waterline. So, I resided to cement the two hull halves together as if she is going to be static. This means of course that the "sea" has to be thicker. How I am going to make the "sea" is not yet decided. There are several ways doing it and have not made up my mind yet because I am now dealing with the added hull thickness painted in red. So, overall, I am very impressed with the quality of the molds and look forward in tackling it. Here are the photos of the kit's contents. I may have to split it up into two posts, we'll see. Cheers,
.thumb.jpg.c93d5e941c3d839e0839a281bcfba1e3.jpg)

.thumb.jpg.5624408cb3065d6503d8e8cec0e602a9.jpg)
- 378 replies
-
- 10
-
-
- java
- pacific crossroads
- (and 2 more)
-
Wow, you have been busy catching up after anchor cable redo Nils. A bunch of lovely swivel guns and more crew members, very typical for that sort of ship I'd say. Nice work. And yes, I am a faithful follower. Cheers,
- 692 replies
-
- 4
-
-
- eagle of algier
- chebec
- (and 2 more)

.jpg.4d112cf1b1a422d2345424d7d28f1e3e.jpg)
.jpg.91dc390dad3eac39132feff1643c7b16.jpg)


.jpg.7172b494f2b13b665411e986912d4f86.jpg)
.jpg.ac32e3a62f89aa3381c82db0d6fdfe80.jpg)

.jpg.ce56e5646f924a81fc54298bc7c258ab.jpg)

tijdensdeafbouwbijdeKon_Mij.DeScheldeteVlissingencopy.jpg.7a820f99d0172177197f08bfeb606e6c.jpg)
.jpg.e67da38f9506d40dc7eb83432bf1a3e4.jpg)


.jpg.64da17d4a6d8510d1cd6abd14636ec6f.jpg)