Louie da fly
-
Posts
7,990 -
Joined
-
Last visited
Content Type
Profiles
Forums
Gallery
Events
Everything posted by Louie da fly
-
 Thanks Druxey. I don't need them at the moment, but I might try it if it becomes necessary. Steven
- 740 replies
-
- 2
-

-
- Tudor
- restoration
- (and 4 more)
-
Queen Victoria Monument - just outside Buckingham Palace Steven
-
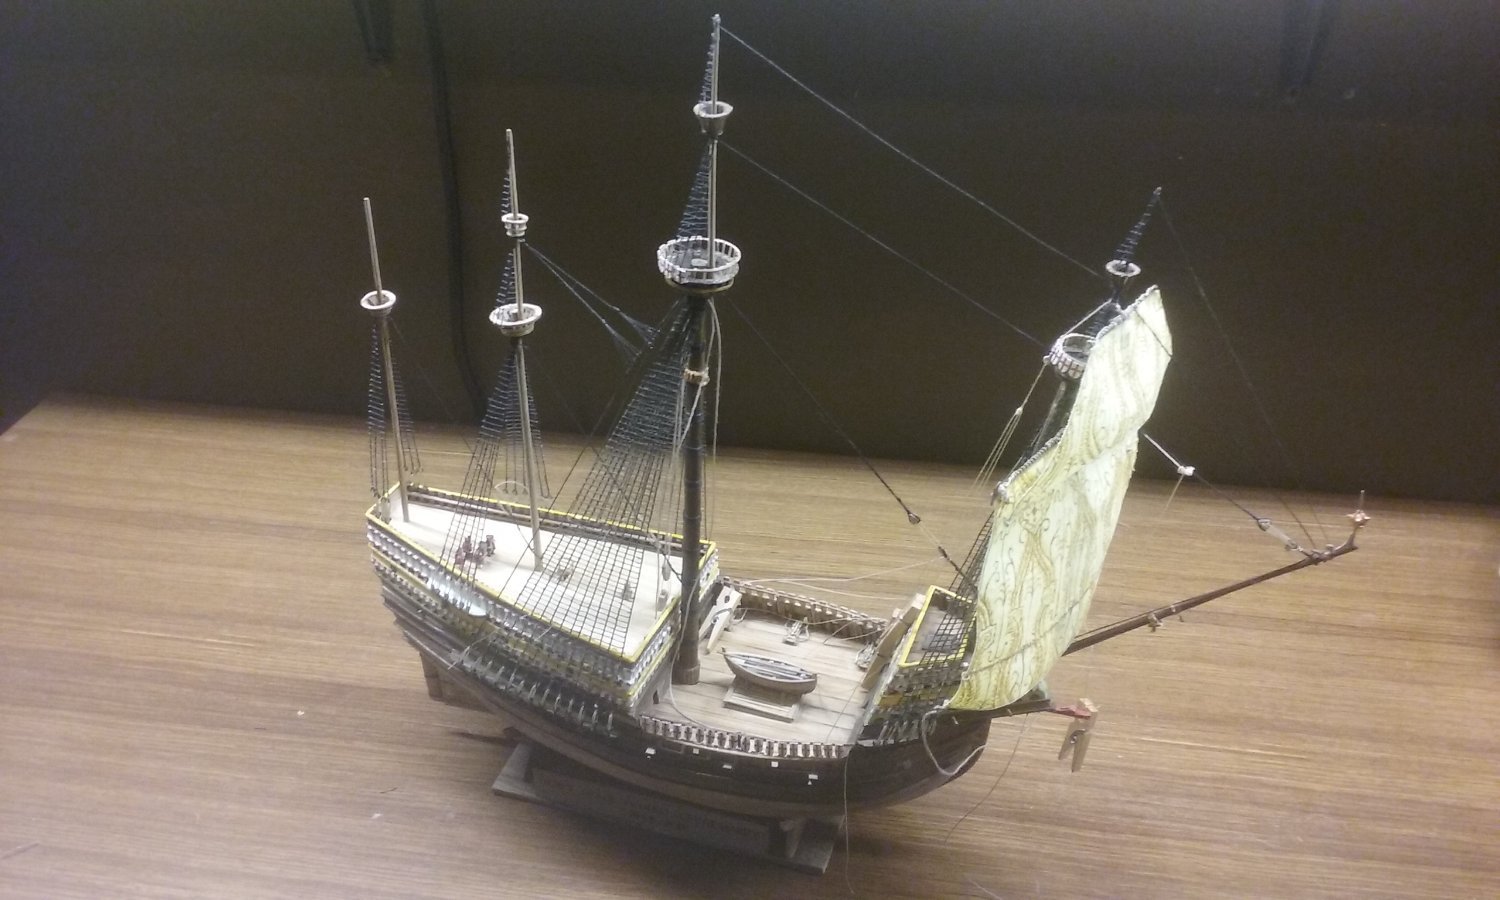
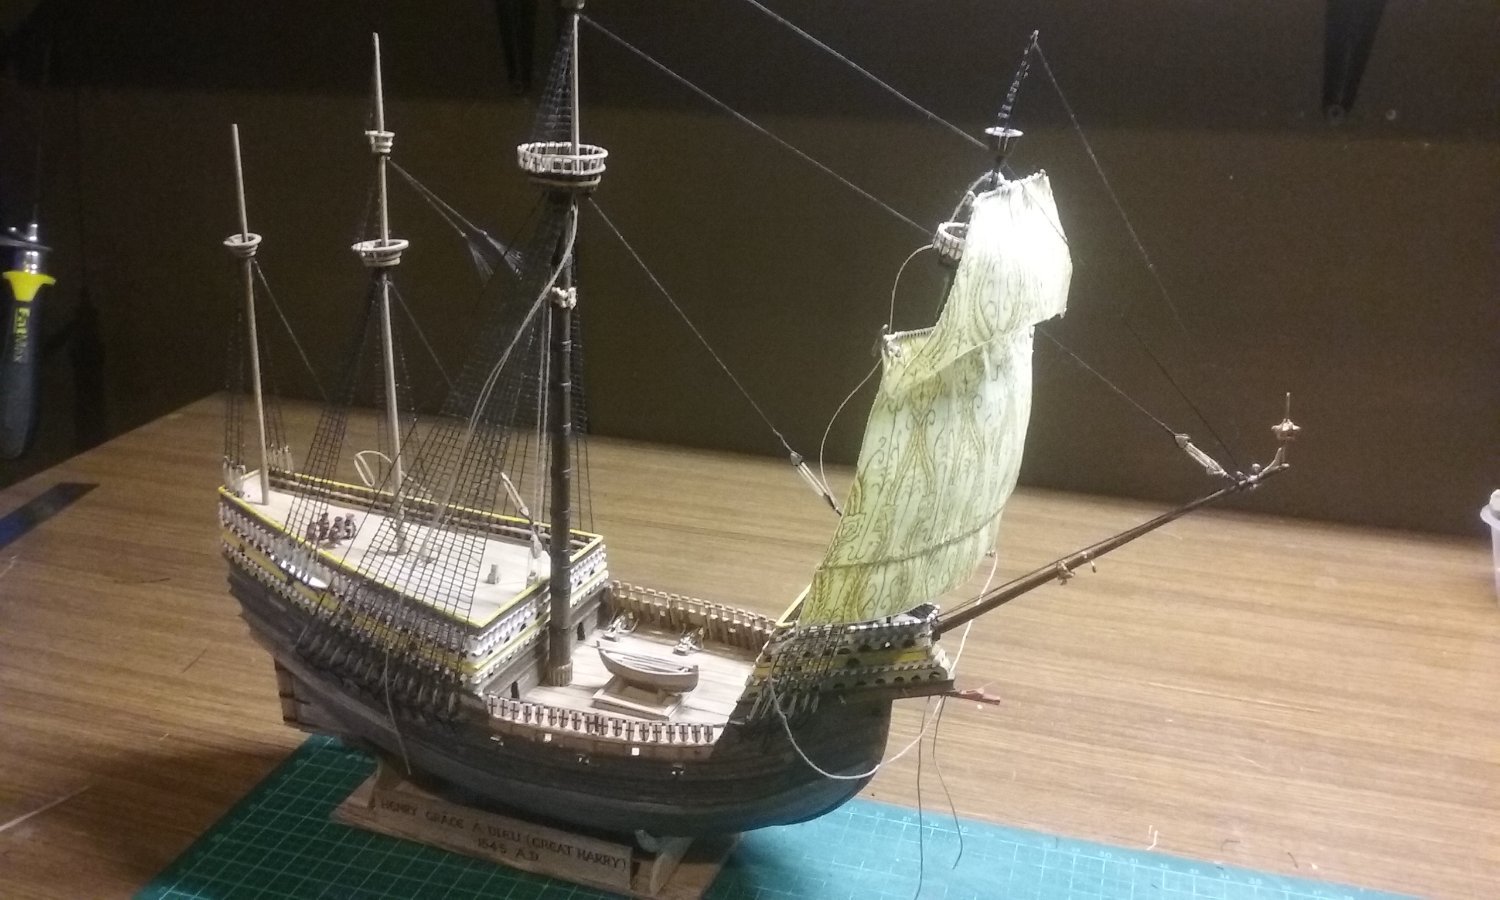
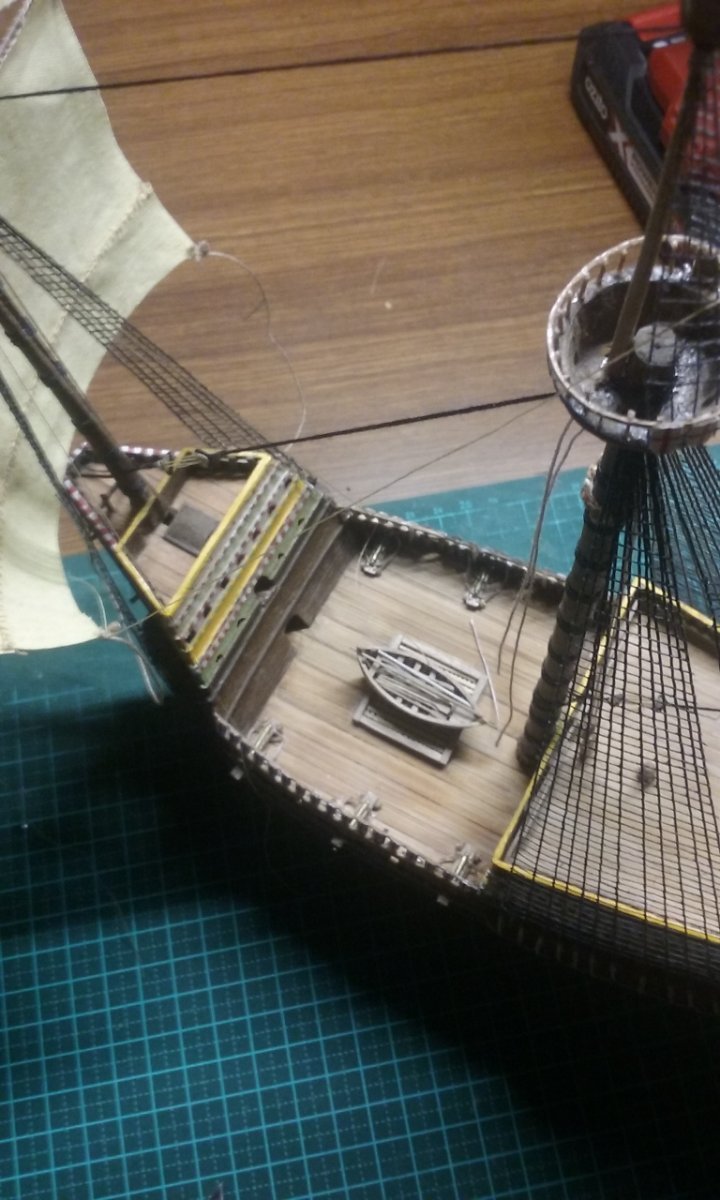
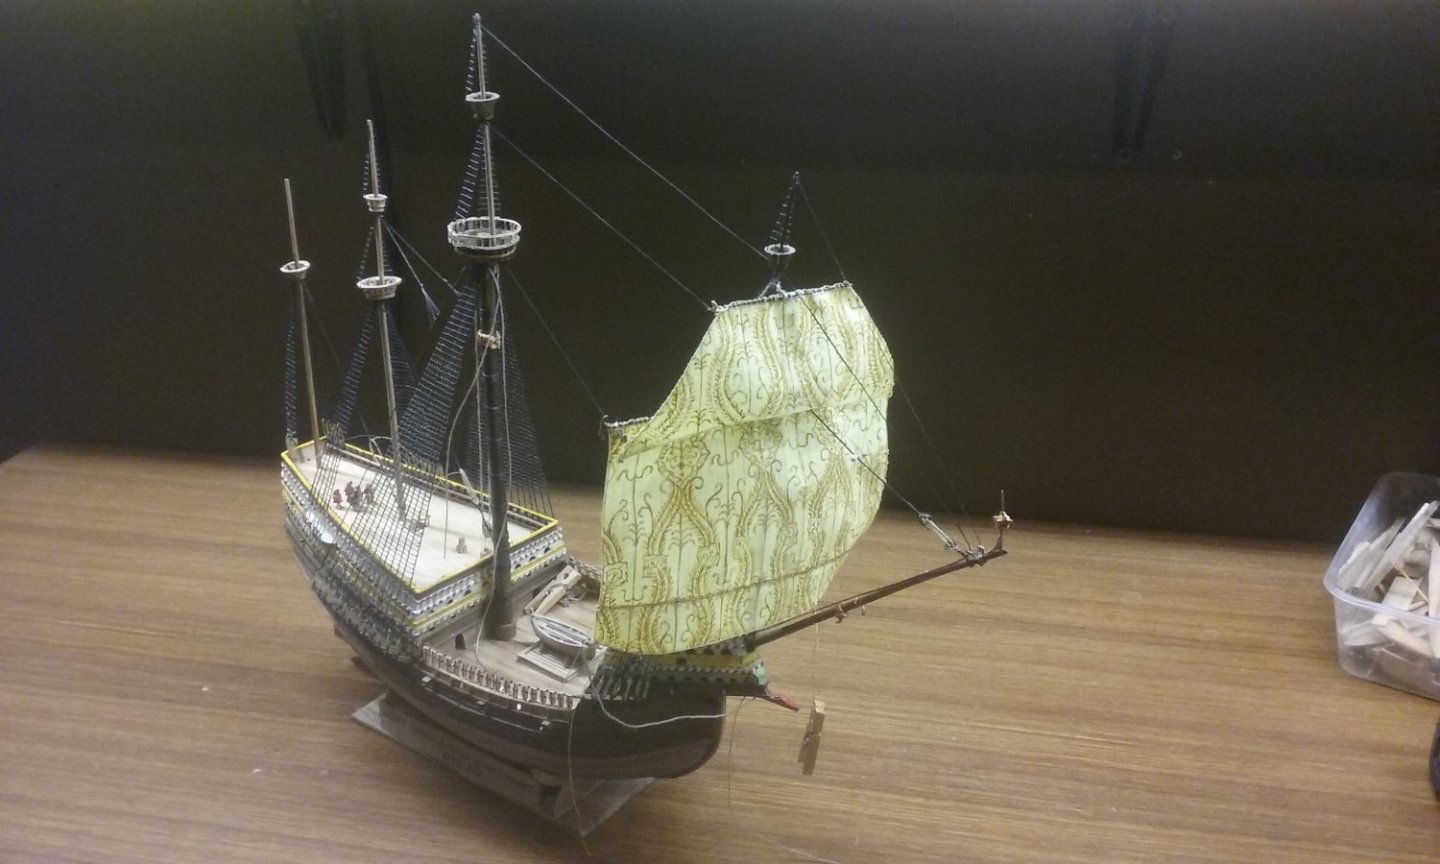
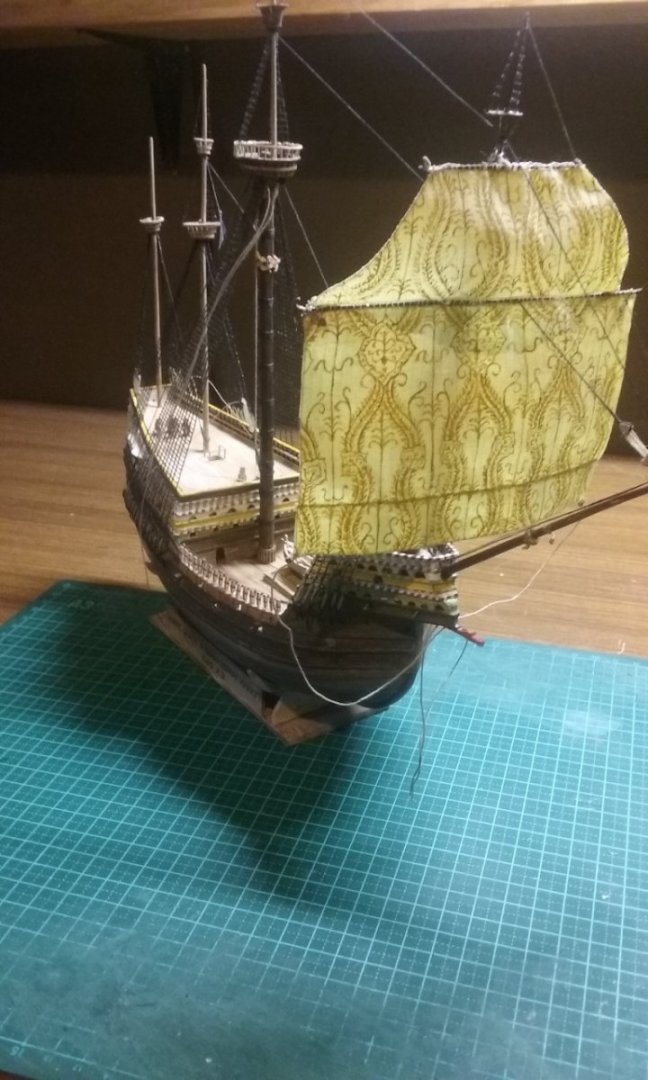
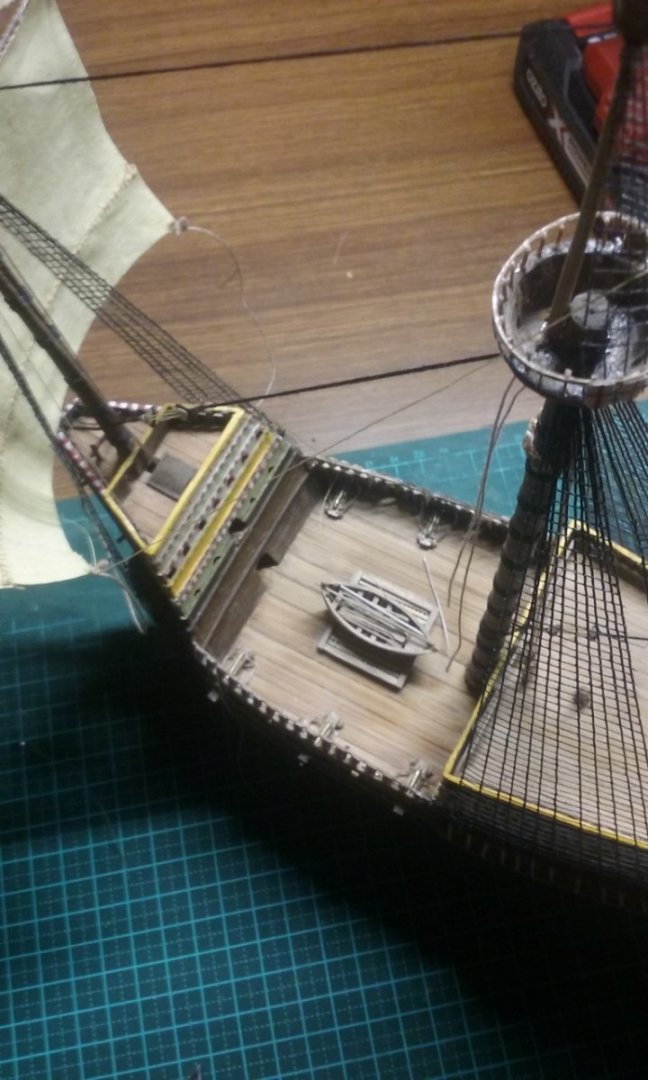
Thanks, Druxey. That certainly reduces the mucking around I have to do. I made sure I got some cotton thread today - not a perfect colour match, but close enough (particularly as thread thread this thin it's hard to make out the exact colour anyway). I thought I'd post a few progress pics of the ship as it looks overall. Coming along nicely, but so many ropes. But I'm finding it gives me a more than just intellectual understanding of how everything works together - it's all been a bit vague and conceptual up to now, so the hands-on stuff is doing me good. Oh, and the painted sails are looking nice, too - (they're actually more colourful than they show in the photos). Steven


- 740 replies
-
- 16
-
-

-
- Tudor
- restoration
- (and 4 more)
-
I had the same problem with threading the deadeyes, and I ended up doing the same thing - remove the deadeyes, thread them and put them back on again. I don't know what other people do, though. Steven
- 74 replies
-
- 1
-
-
- Santa Maria
- Amati
- (and 1 more)
-
Well, now you know. A wide range of opinions regarding whether or not to show sails. Keep in mind also that ships often had only a few sails set and the rest furled - and when a ship went into action it reduced its canvas to "fighting sails" - usually just topsails and headsails, such as in this painting of the Shannon vs Chesapeake. And here's one of the whaling ship New Phoenix, hove to with just topsails, headsail and driver set. Steven
-
I think you'll find a wide divergence in opinion on this one - I've done both, but despite the reasons you've quoted against sails, I feel sails are a sailing ship's raison d'être, so should be shown. Yes, the fabric available is never going to be fine enough to replicate real sails to scale (though even this can be largely solved by using silkspan). I think there are valid reasons for both furled and unfurled, and it's often a matter of what you're intending to portray. It would be quite interesting, for example, to show a ship hove to, so the sails on one mast are facing the opposite way to the others - or a ship with sails drying, or partially furled. As far as which ships can pull unfurled off best, I think they all look good under full sail, but I particularly like the look of the sails on ships of the late 16th/early 17th centuries. On the other hand, a lateen sail is particularly beautiful as well. All a matter or personal preference. Steven
-
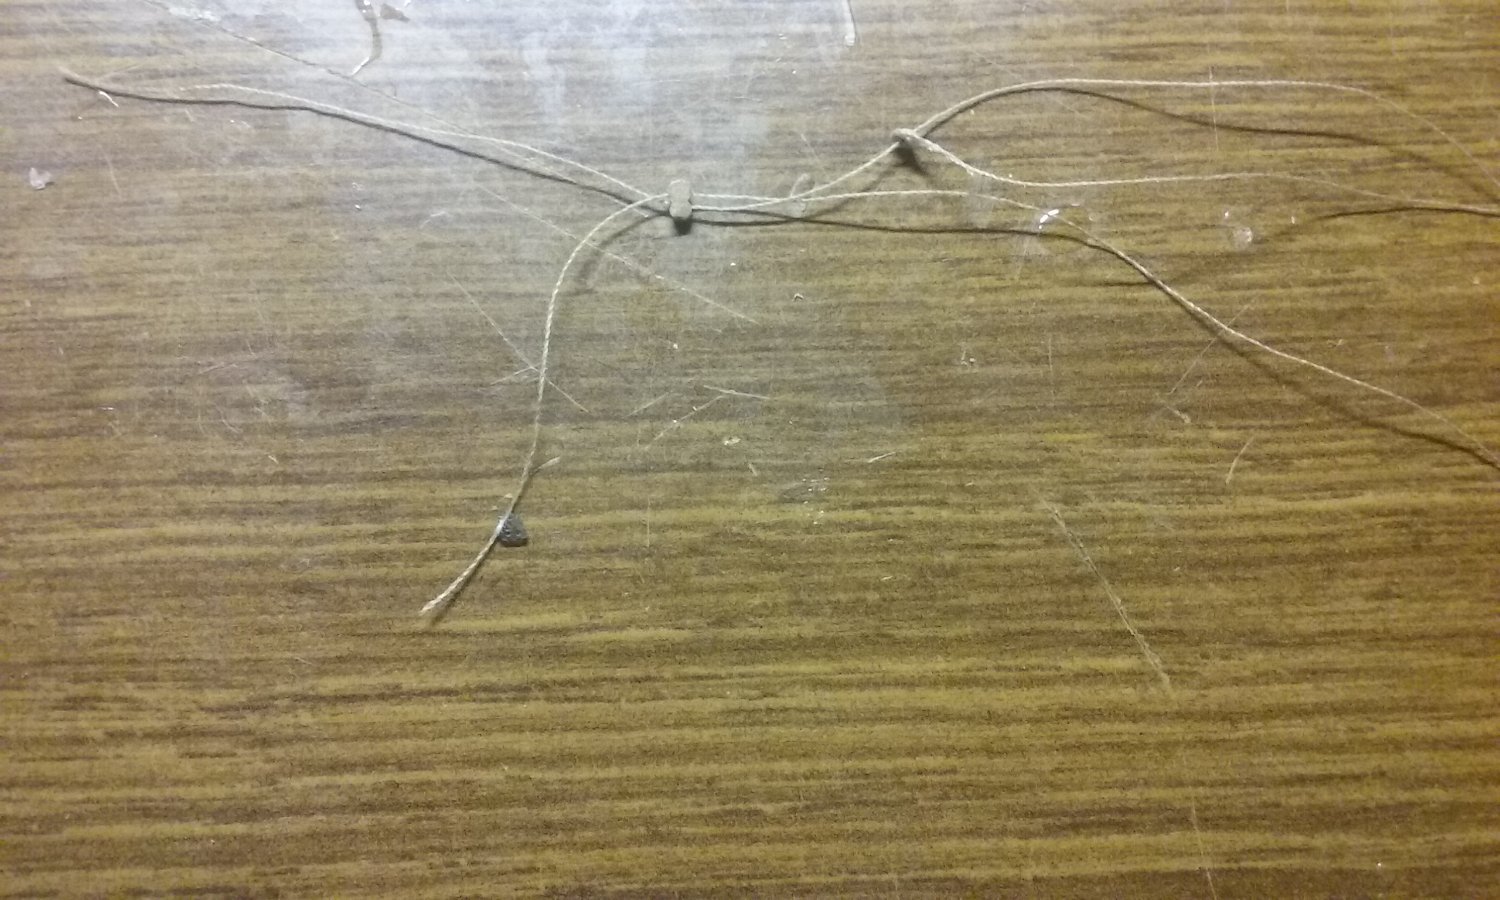
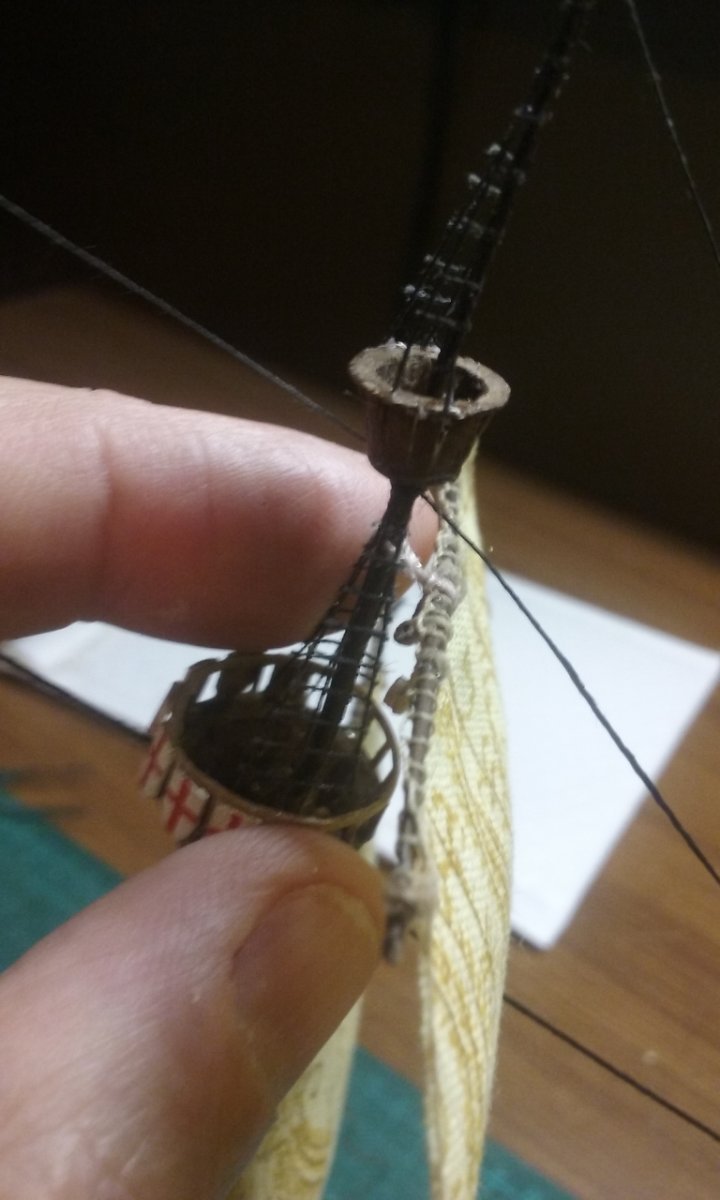
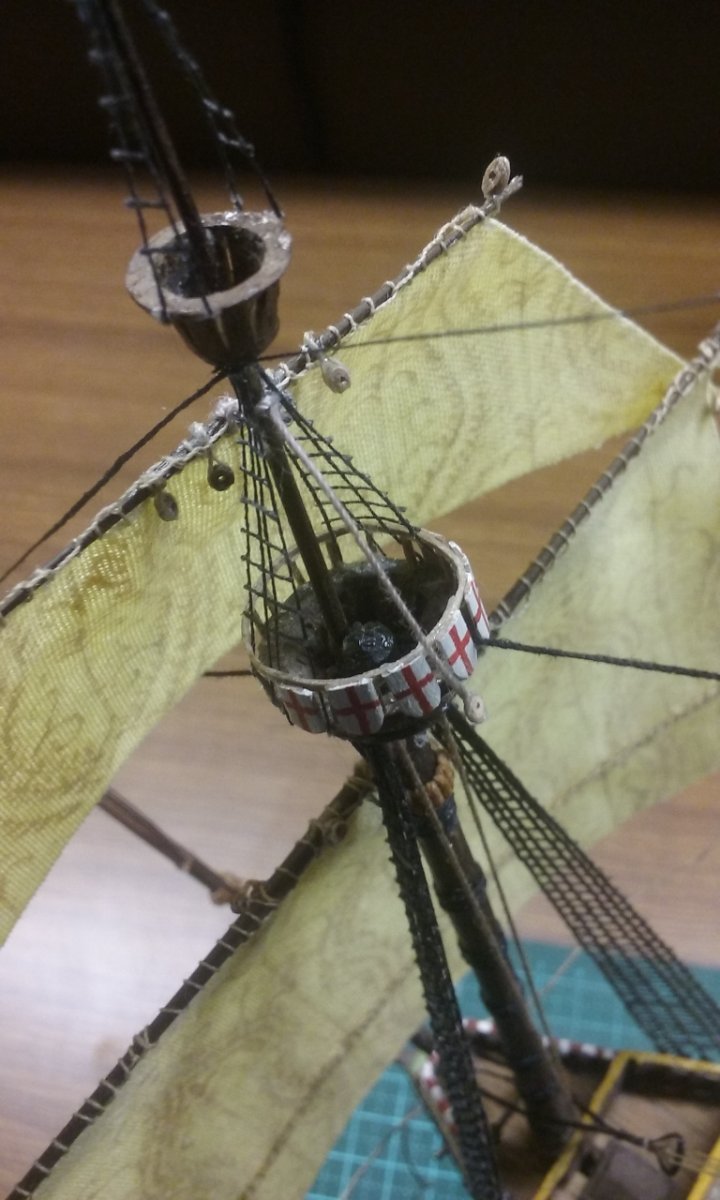
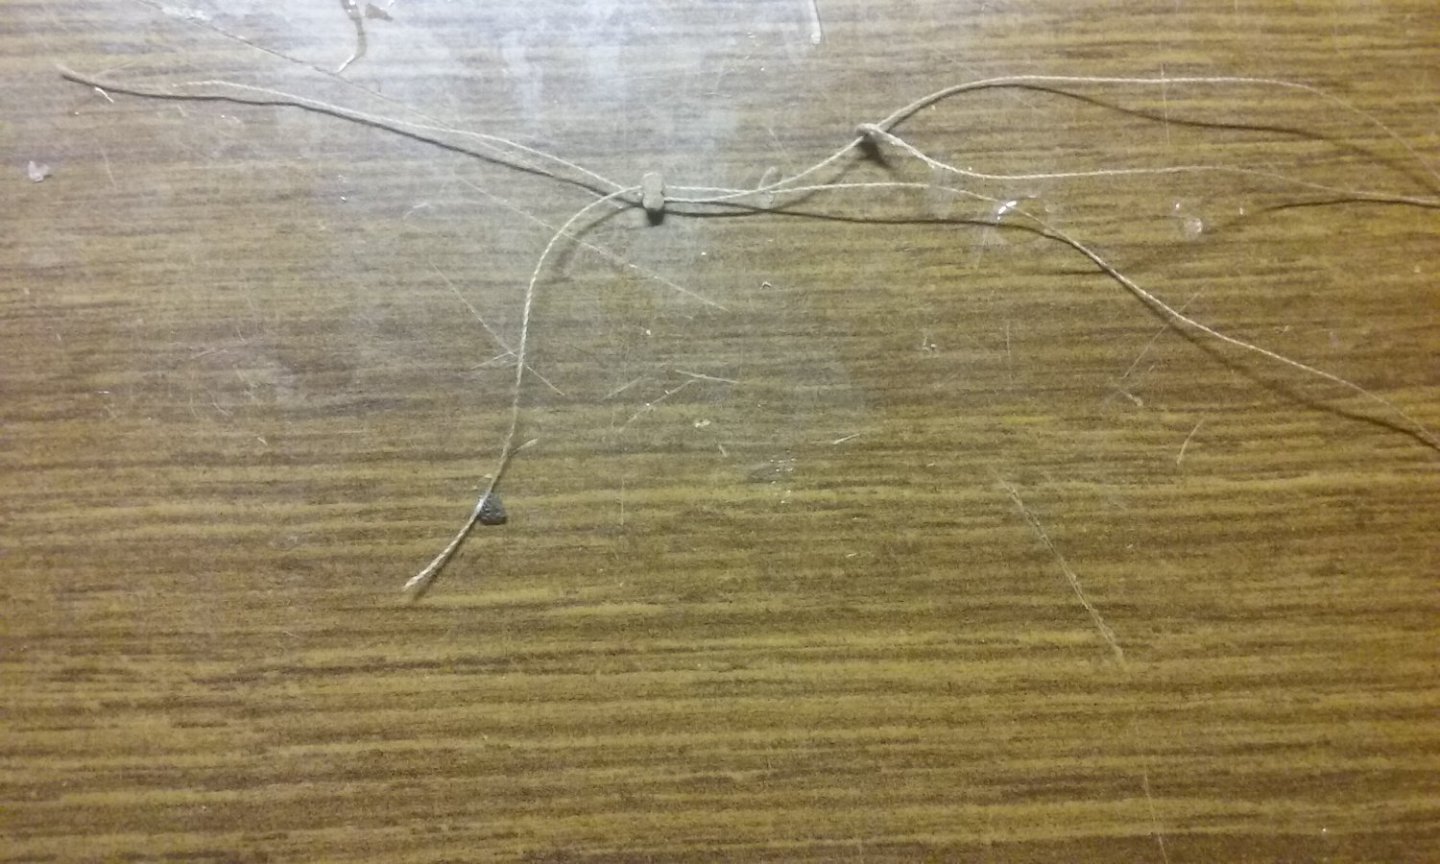
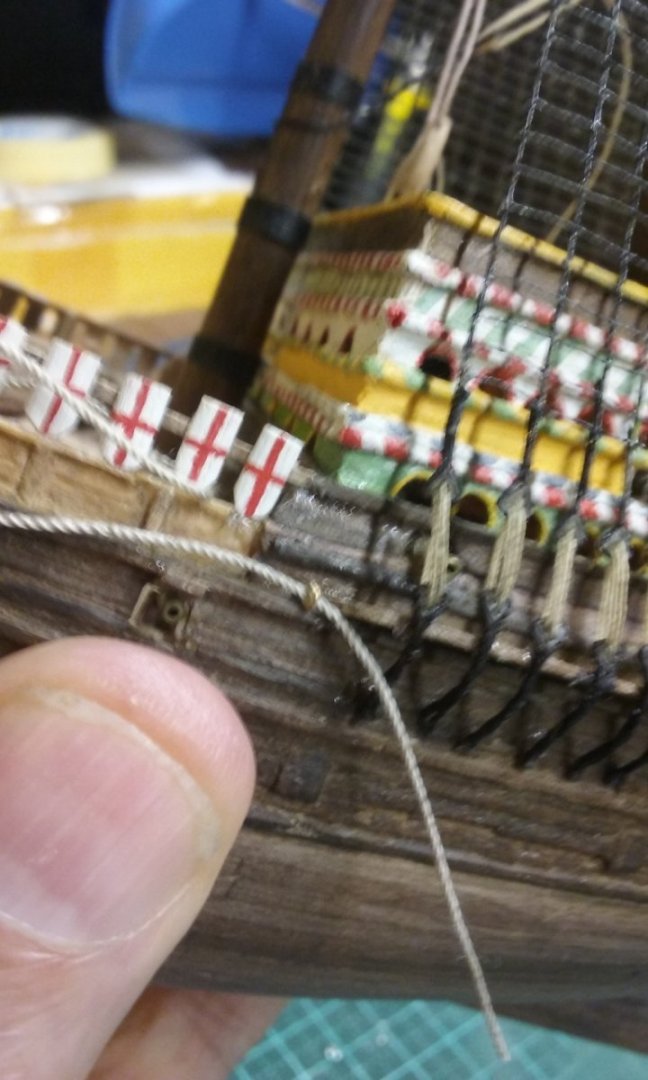
You're right, Druxey. The polyester is a b*gger to work with. I'm thinking of getting some cotton thread the same thickness, and dye it to match. It would certainly be easier. Fortunately I only have to make four sister-blocks for the whole ship - just two for each course - according the C.E. Anderson, the topsails seem either to have had martnets or buntlines, not both - and as the topsails were a lot smaller in 1545, the chances of the Great Harry having martnets on them are pretty low anyway. Steven
- 740 replies
-
- 3
-
-
- Tudor
- restoration
- (and 4 more)
-
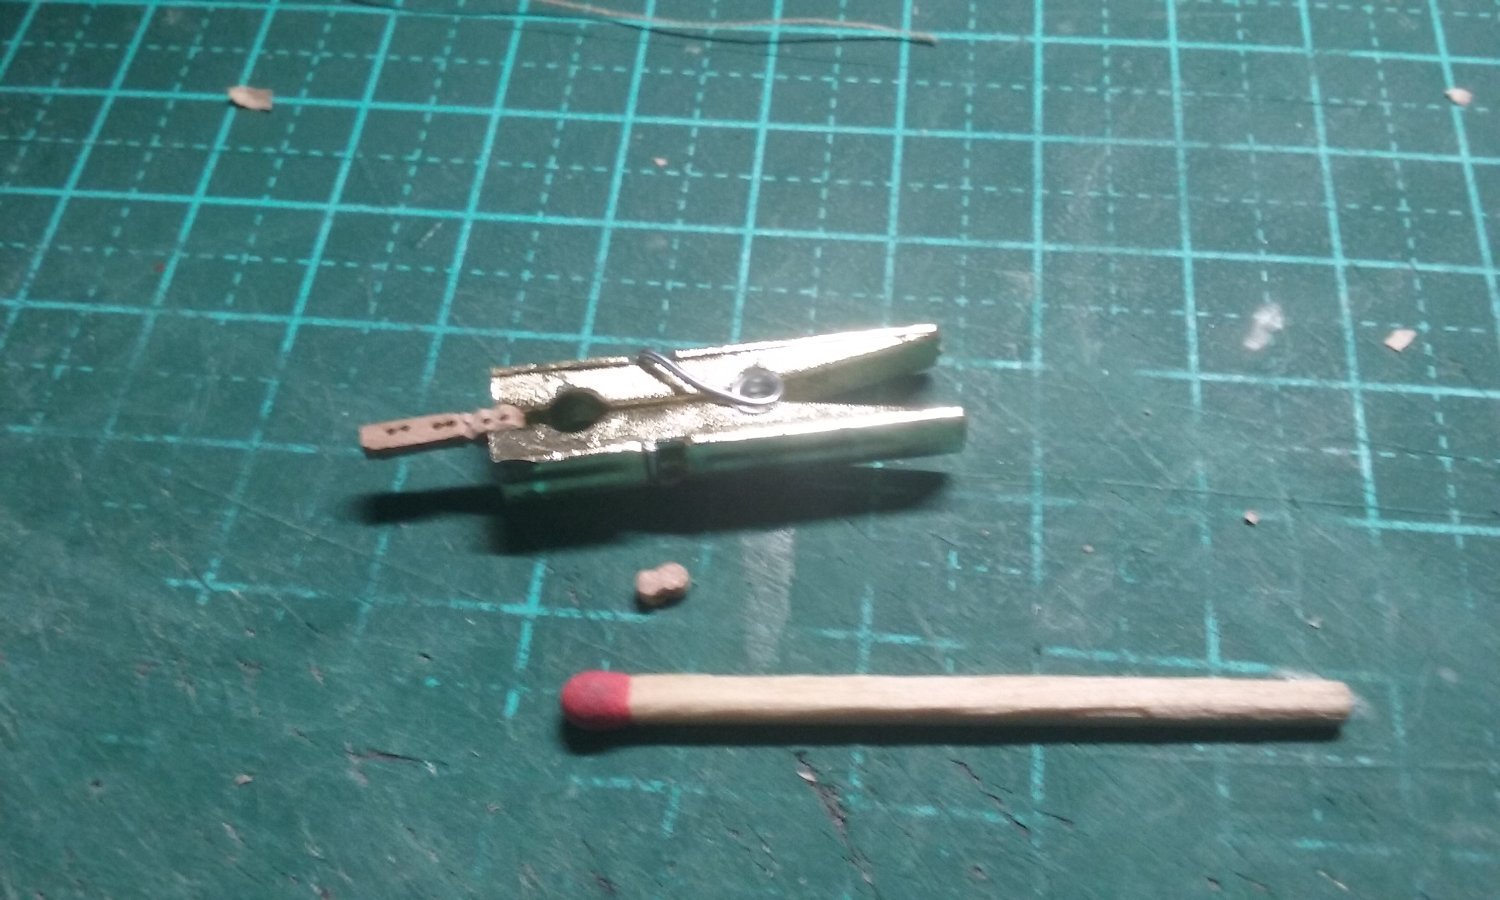
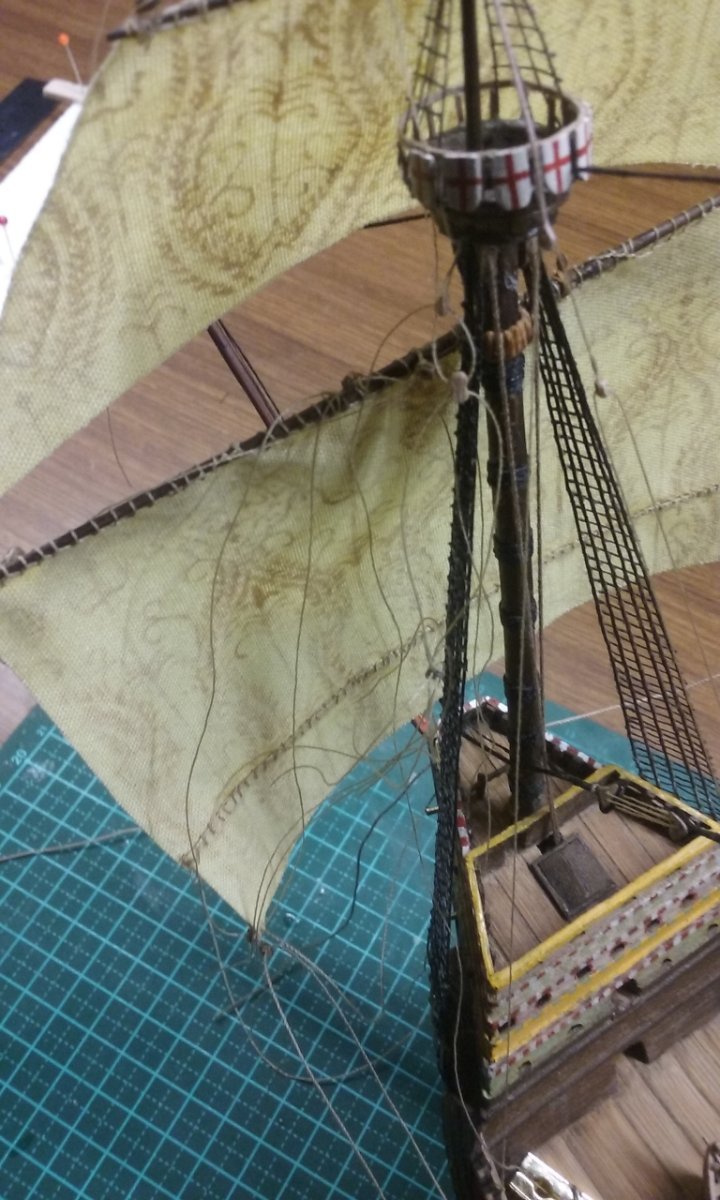
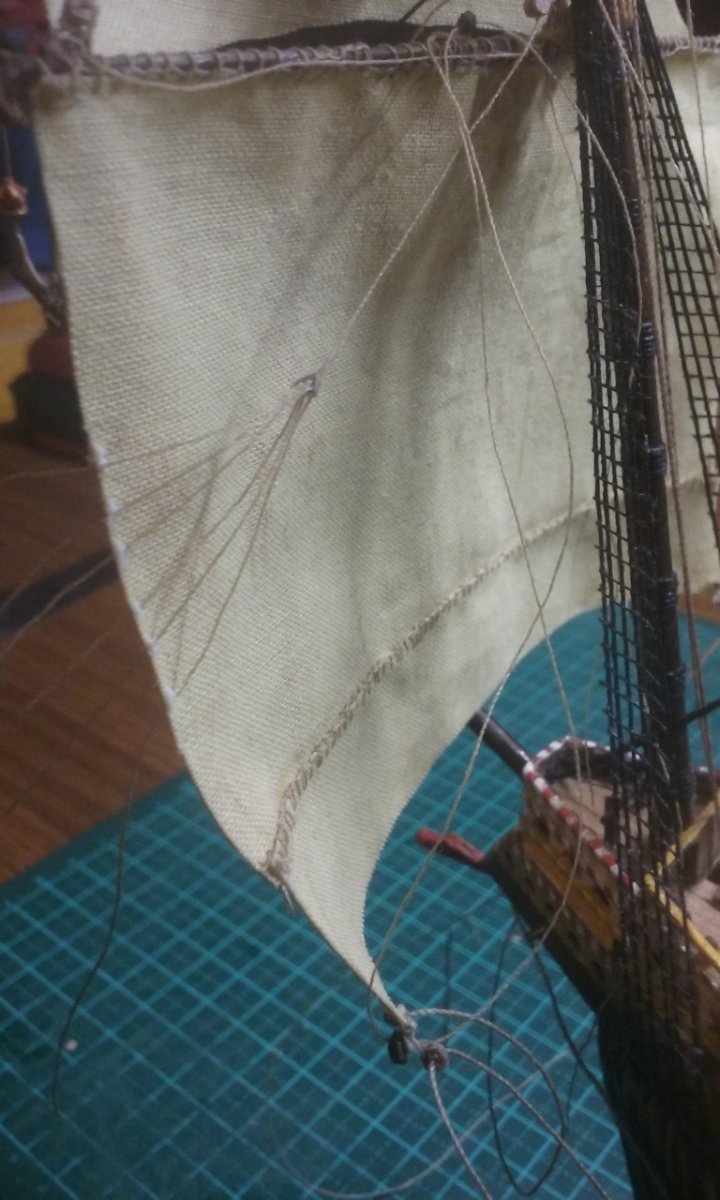
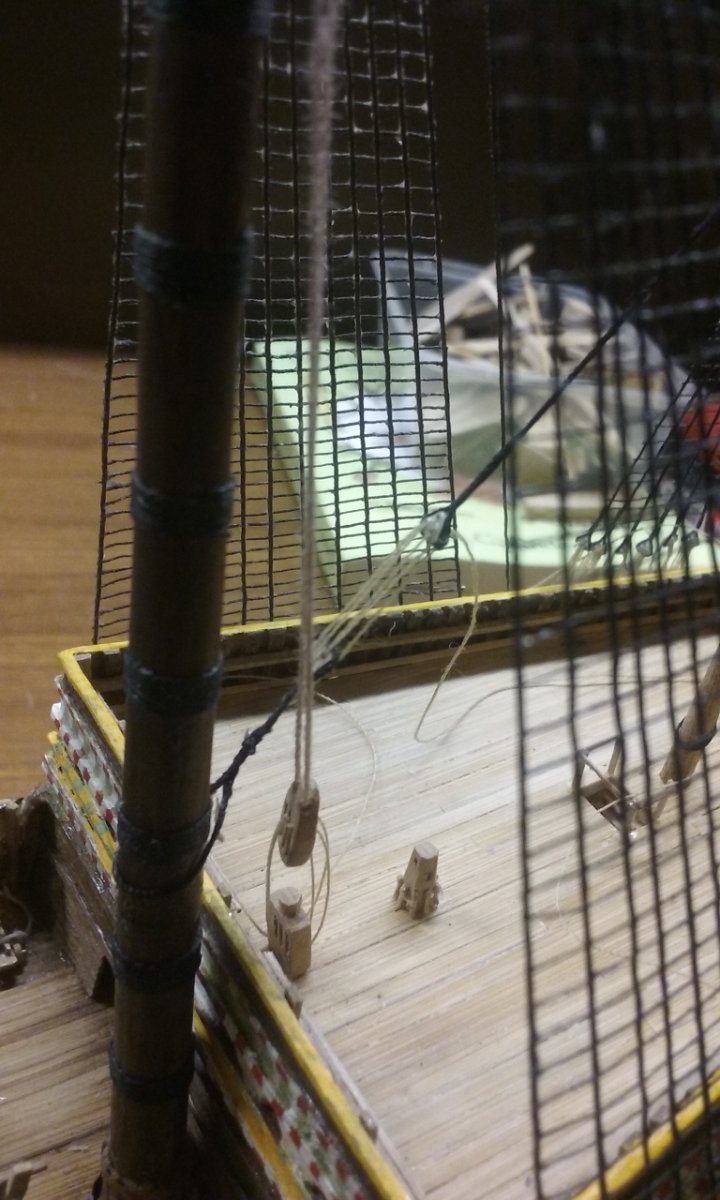
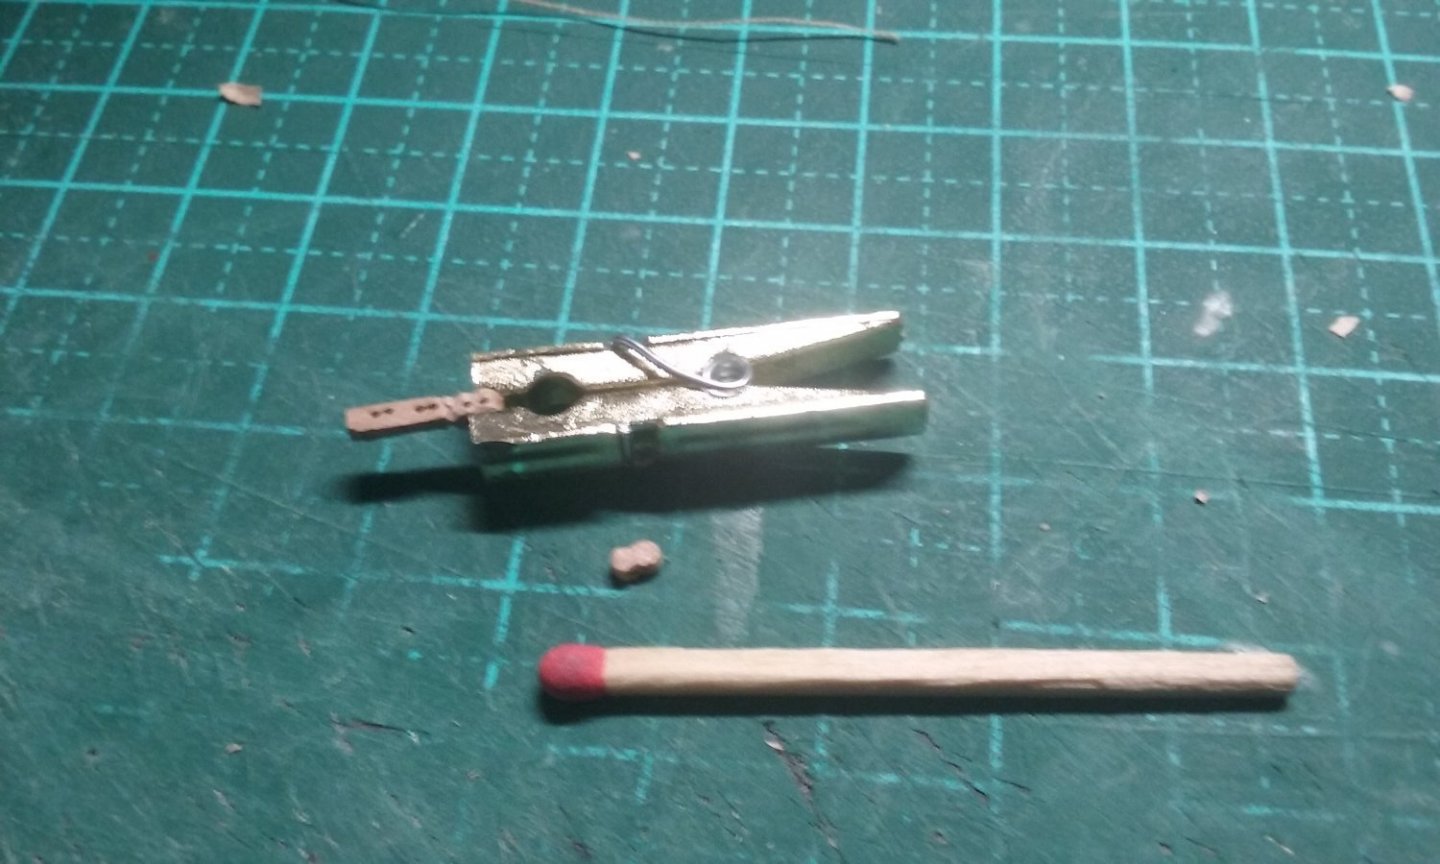
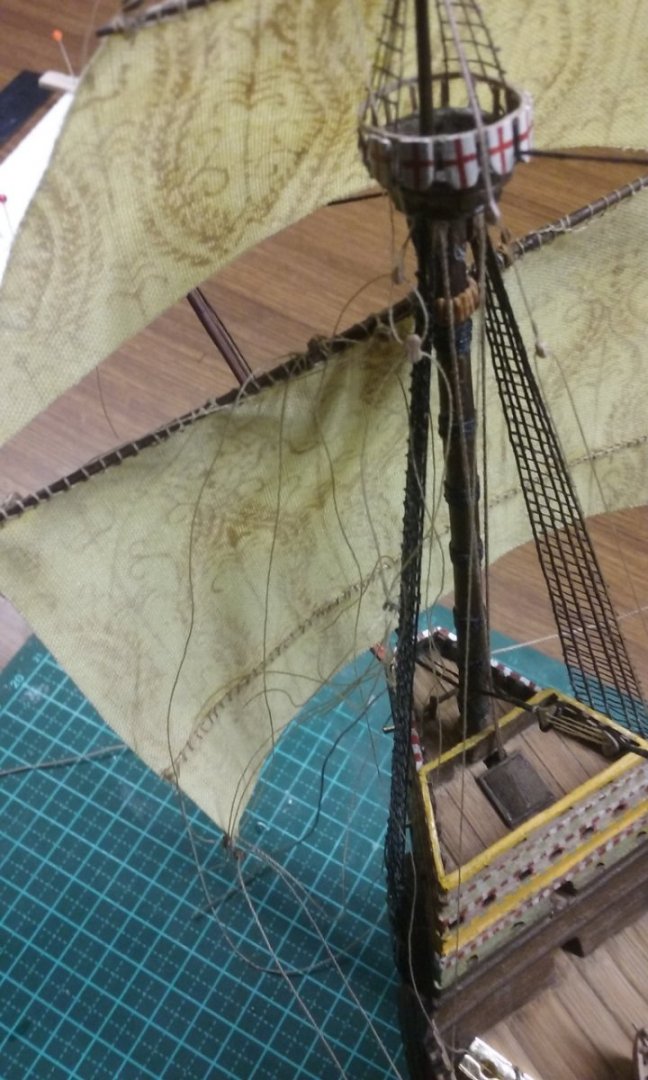
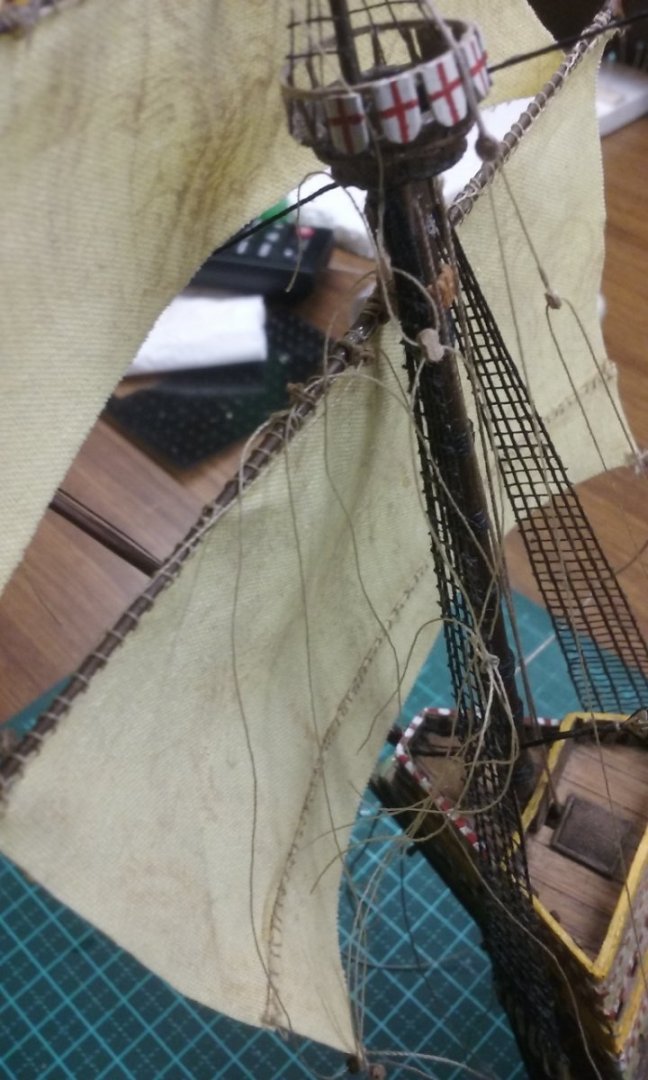
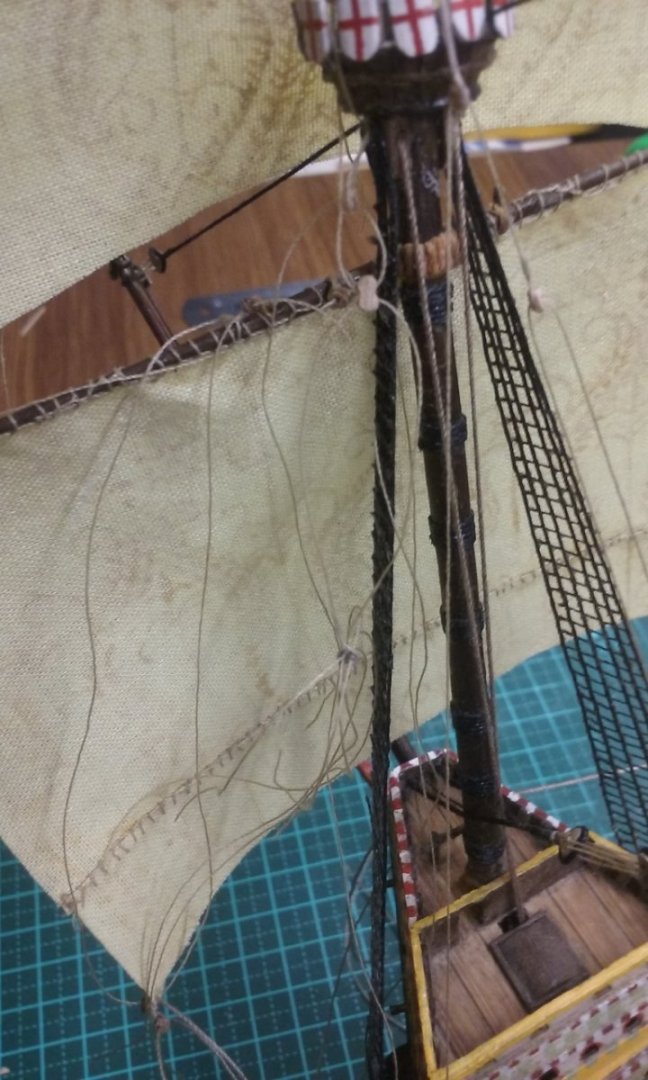
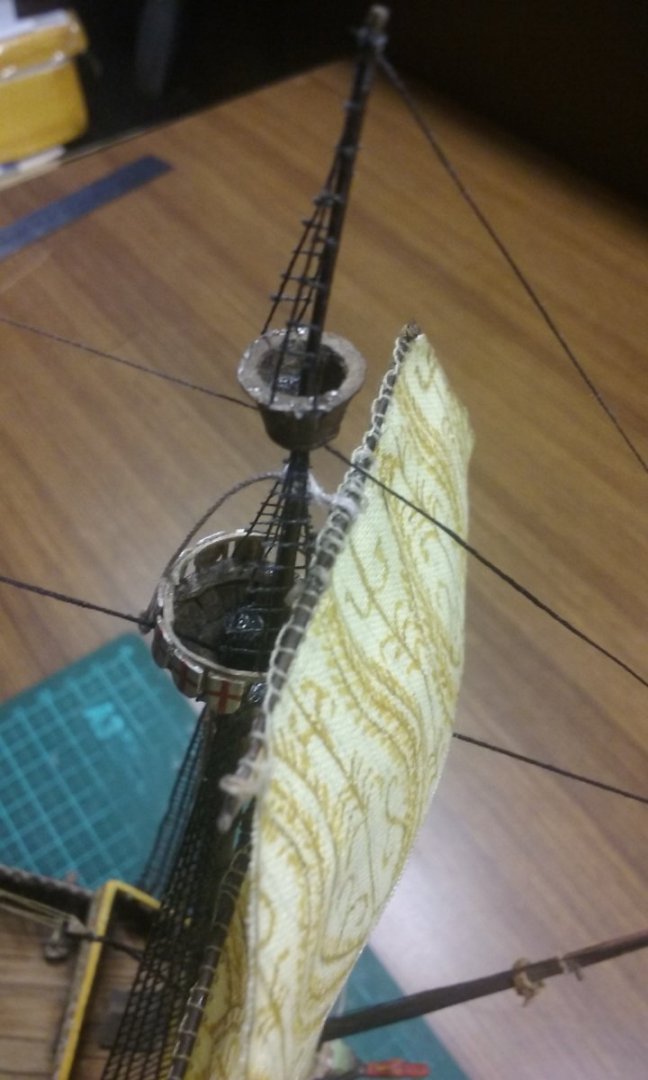
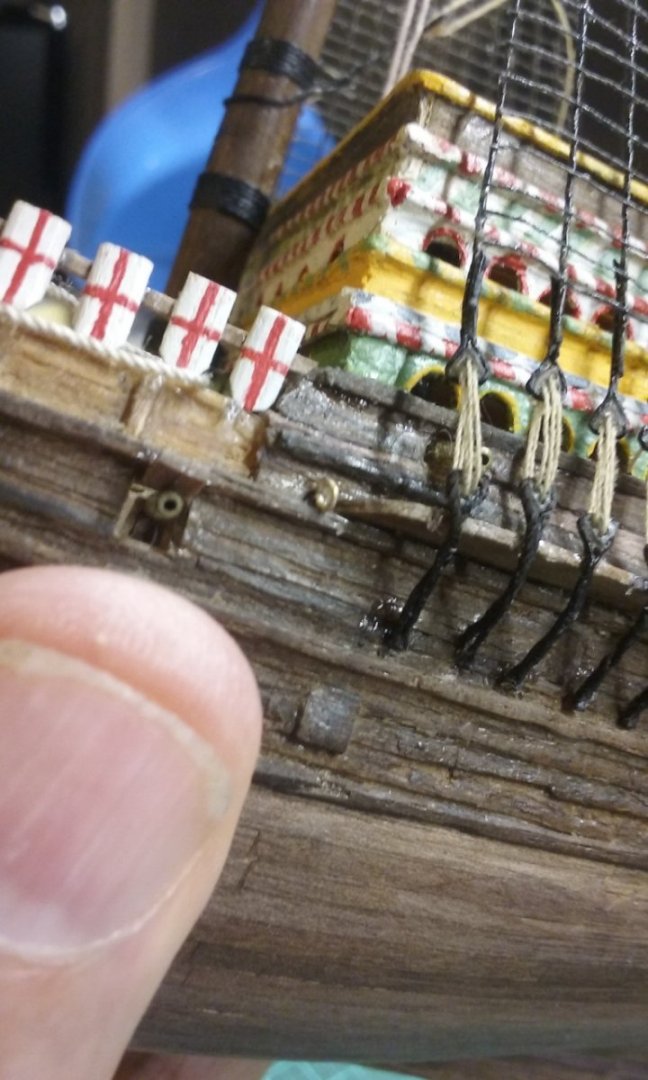
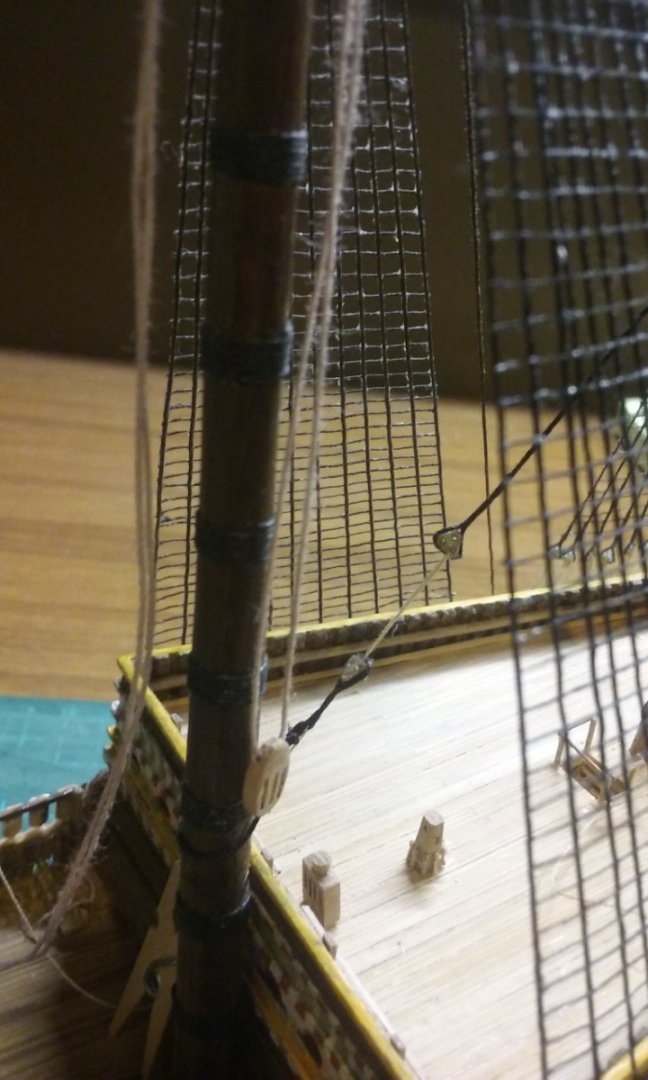
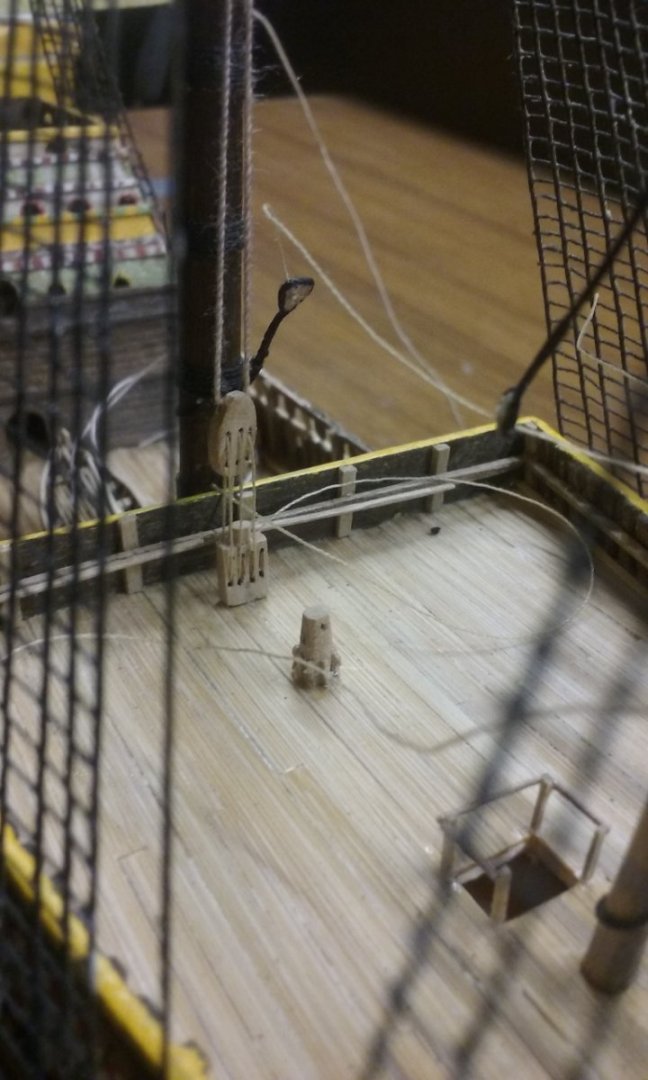
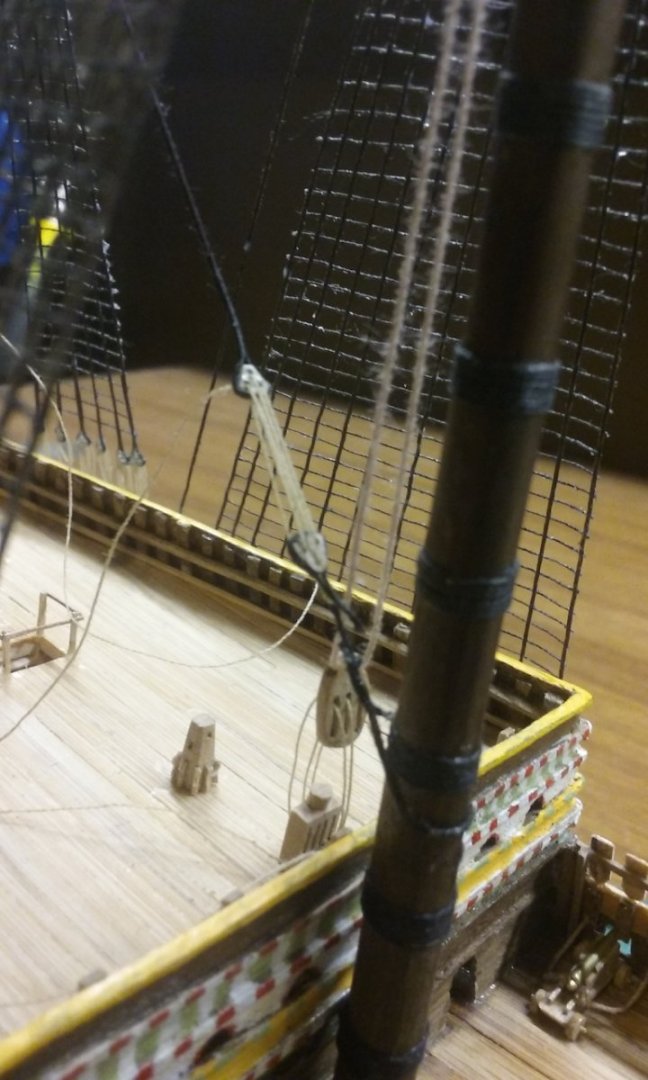
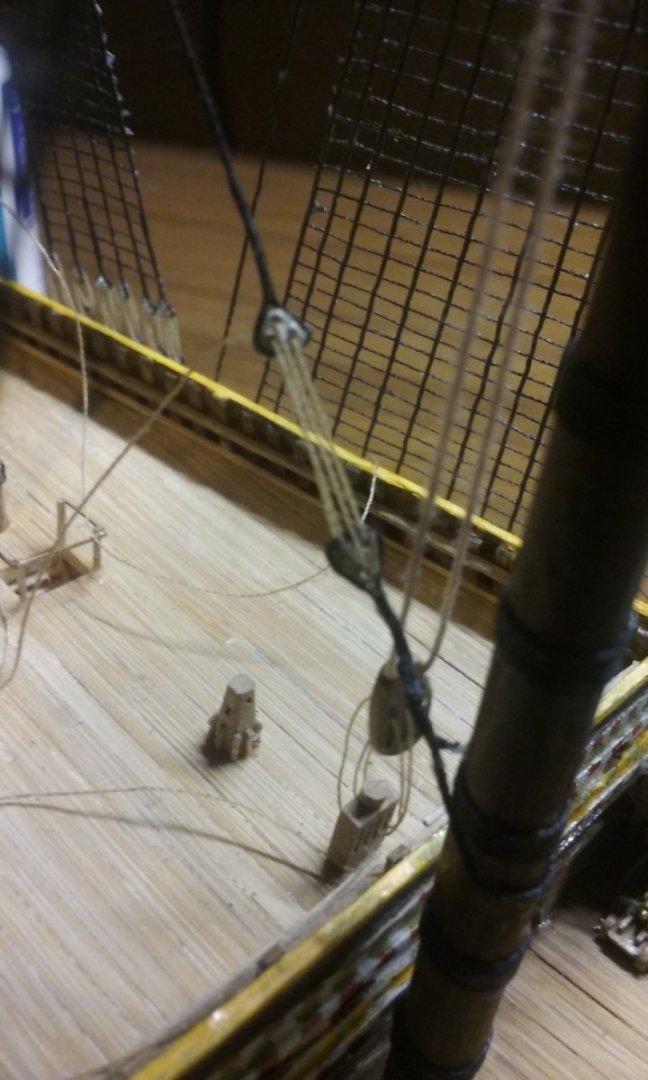
More larboard rigging for the forecourse and fore topsail. First the martnets (historically, they were the precursors to the leechlines). Quite a complex system - first I had to make a couple of sister blocks (same as a fiddle block, I think). You can see a complete one between the matchstick and the tiny peg - another in progress held in the peg - drilling 2 holes in a piece of wood so close together, it usually splits, so I've glued it back together again and held it in the peg to dry. And the tackle - one rope though the top sheave of the fiddle block, then running through another block; the other rope through the bottom sheave, running to a (triangular) deadeye - currently partly glued to the strop (thanks henrythestaffy for those wonderful 3D printed deadeyes! And in place - you can see the single block attached just below the fighting top - it's used to haul the whole assembly tight when furling the sail - and the fiddle block just below that - and running from the fiddle block is a line that runs to the deadeye (about a third of the way up the shrouds in the second photo) which has its lanyards - or more correctly, martnets -through the holes. And the martnets roughly in place - what I thought was the right placement of each lanyard on the leech turned out to be completely wrong - it all got twisted up - I had to re-do them several times, but worked out ok in the end. Then tightening the martnets so they hang right. I'm using polyester thread which is VERY springy, and I had to wet it and then glue it down to get the acute angle where the lanyards go through the holes, and to get the threads to hang naturally like rope. And finally, the martnets at the front of the sail - at the other end of the rope that goes through the bottom sheave of the fiddle block. Of course this will have to be done again on the starboard side, and then I have to repeat the whole thing for the main course. But first, I've made a start on the larboard buntlines, then the bowlines - so many ropes! I'll put photos up when I've done them. Steven

- 740 replies
-
- 12
-
-
-
- Tudor
- restoration
- (and 4 more)
-
Nice work on your first planking, and filling and sanding should smooth it off well. However, may I suggest that before you begin second planking, you check out the planking tutorials at https://modelshipworld.com/forum/98-planking-downloads-and-tutorials-and-videos/ - these show you how best to achieve the best planking finish, the way it was done with real ships. Good work! Steven
-
Success! I've found upholstery thread that does the job in the right colour, plus some other kind of thread which I can't remember that's a tiny bit thinner, in off-white cotton (which can be dyed to match the existing thread). Just started replacing the tacks and sheets, and it looks good. No photos so far. BTW, thanks everybody for the likes and supportive comments. Steven
- 740 replies
-
- 8
-
-
- Tudor
- restoration
- (and 4 more)
-
Obviously there's no defaulters on this ship - otherwise that rust would have been chipped off and painted over . . . Steven
-
Thanks, mate. If I don't get any joy with the crochet thread (today) I'll start looking at upholstery thread as an alternative. Steven
- 740 replies
-
- 3
-
-
- Tudor
- restoration
- (and 4 more)
-
Such a beautiful ship. I'm sure you'll do her justice. Steven
- 203 replies
-
- 4
-
-
- Roma
- Micromaster
- (and 4 more)
-
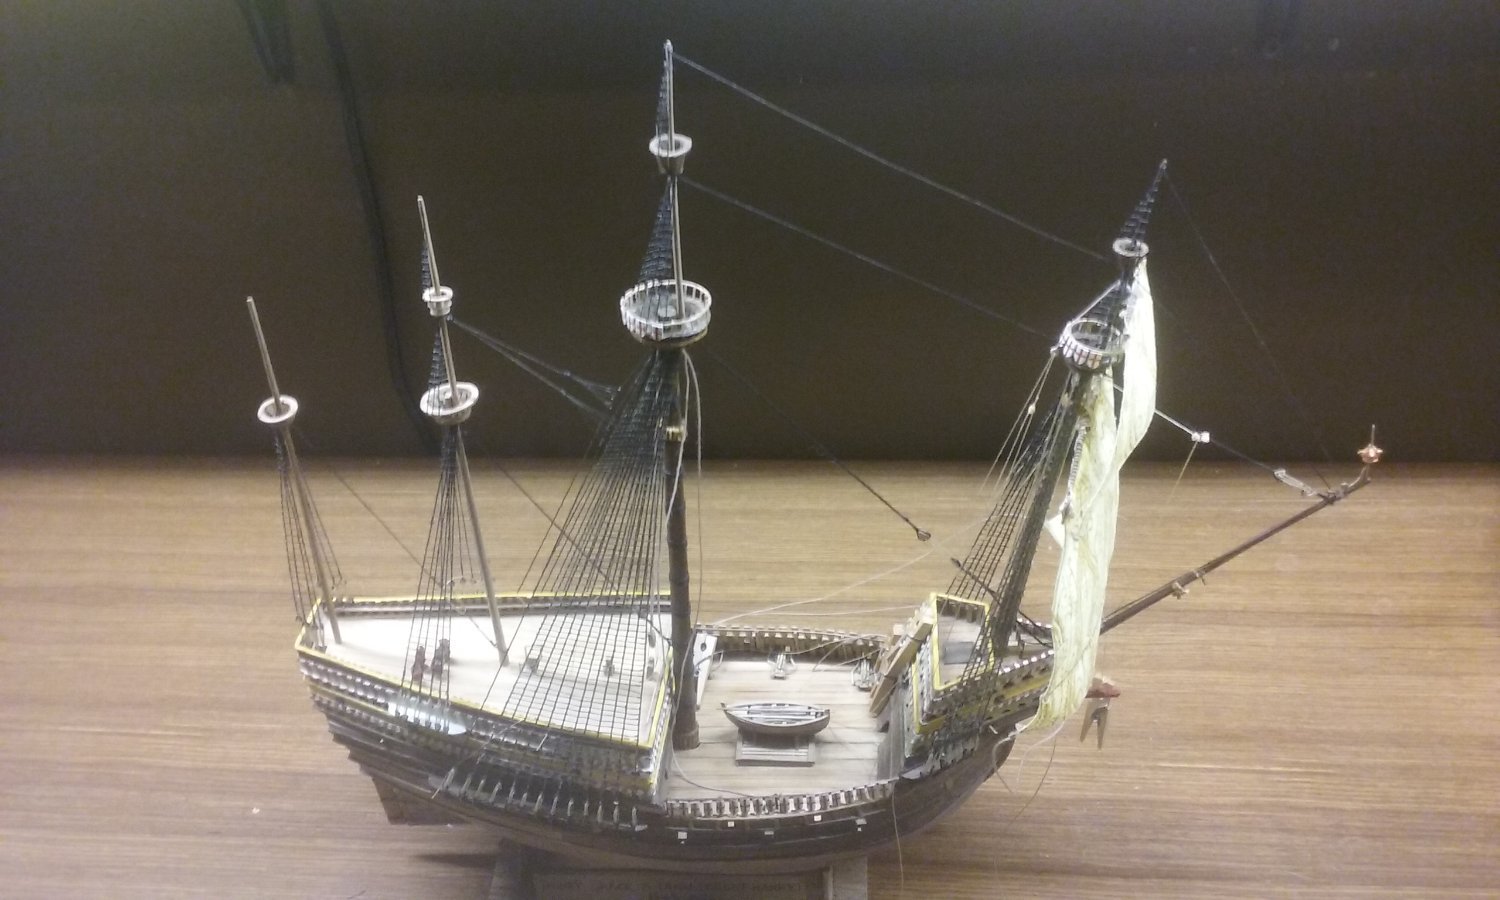
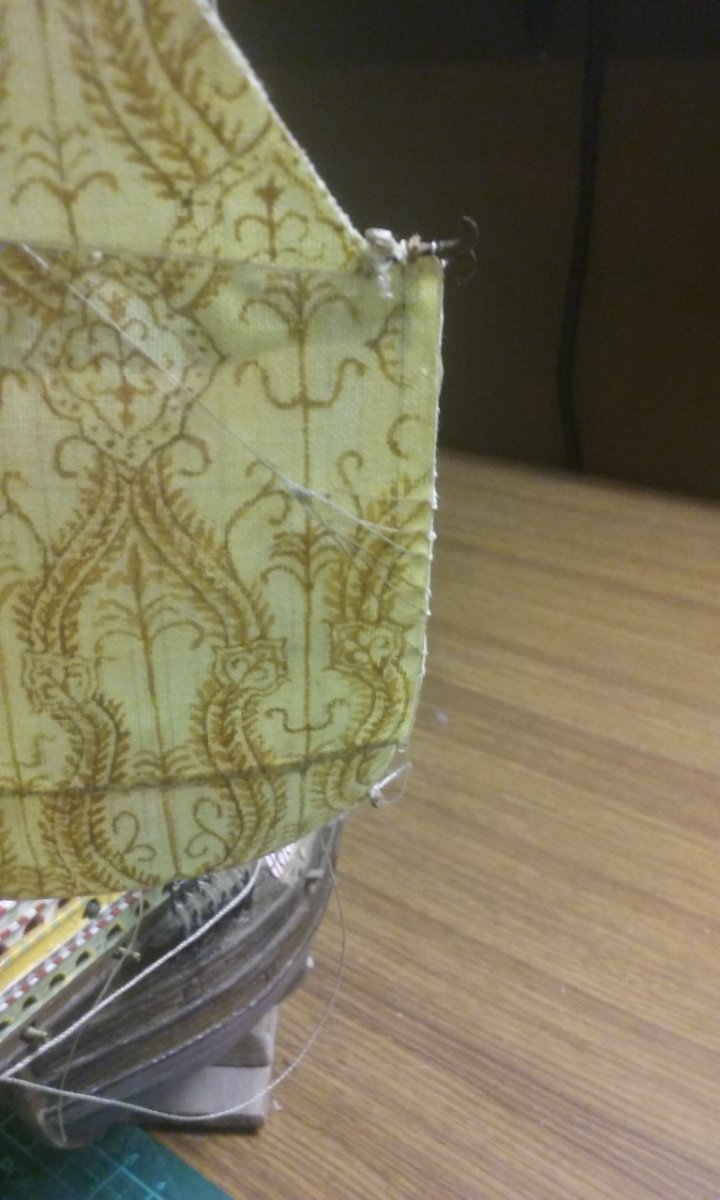
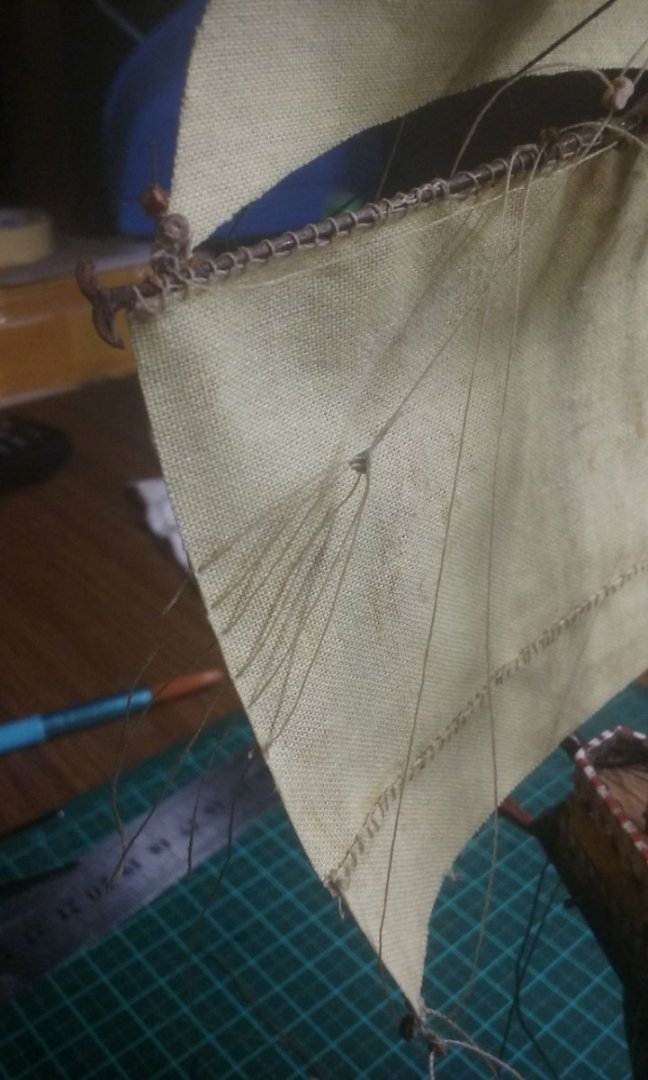
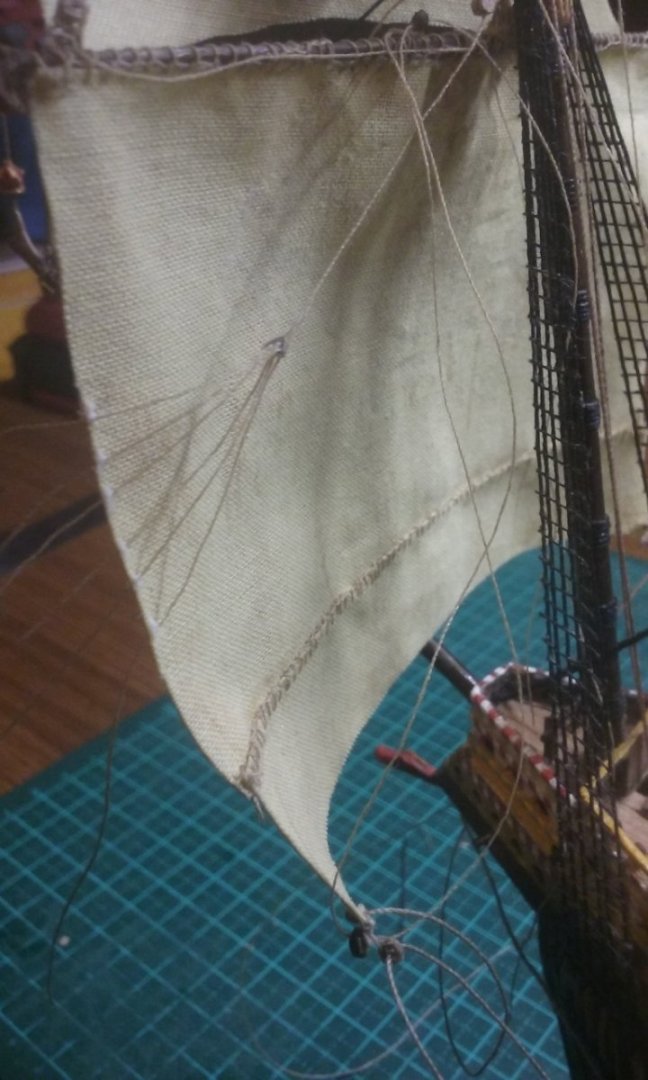
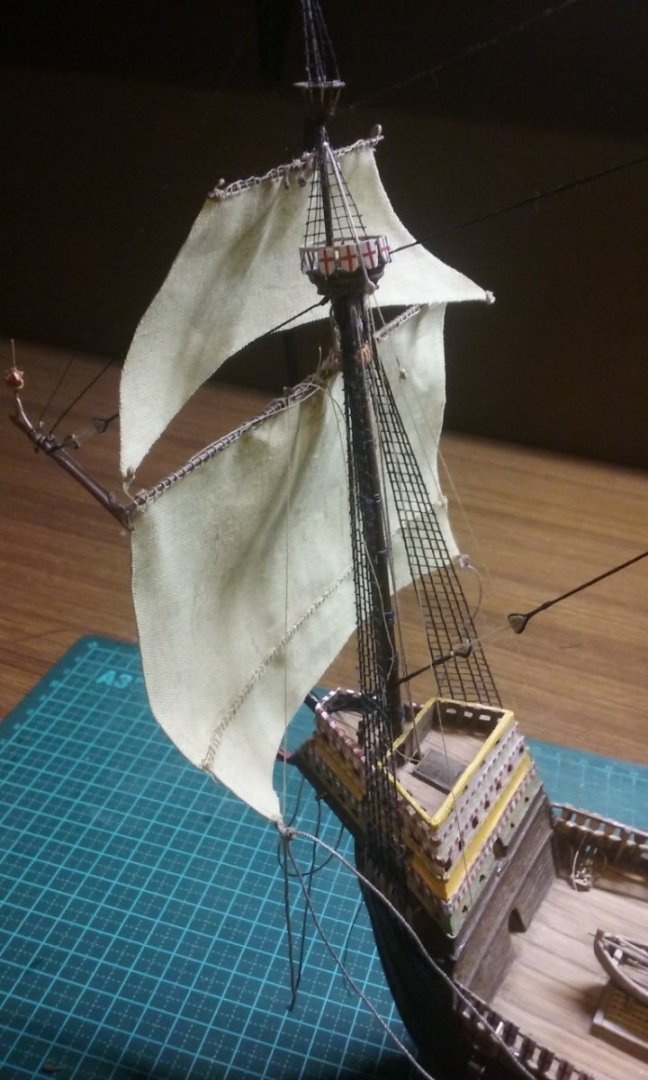
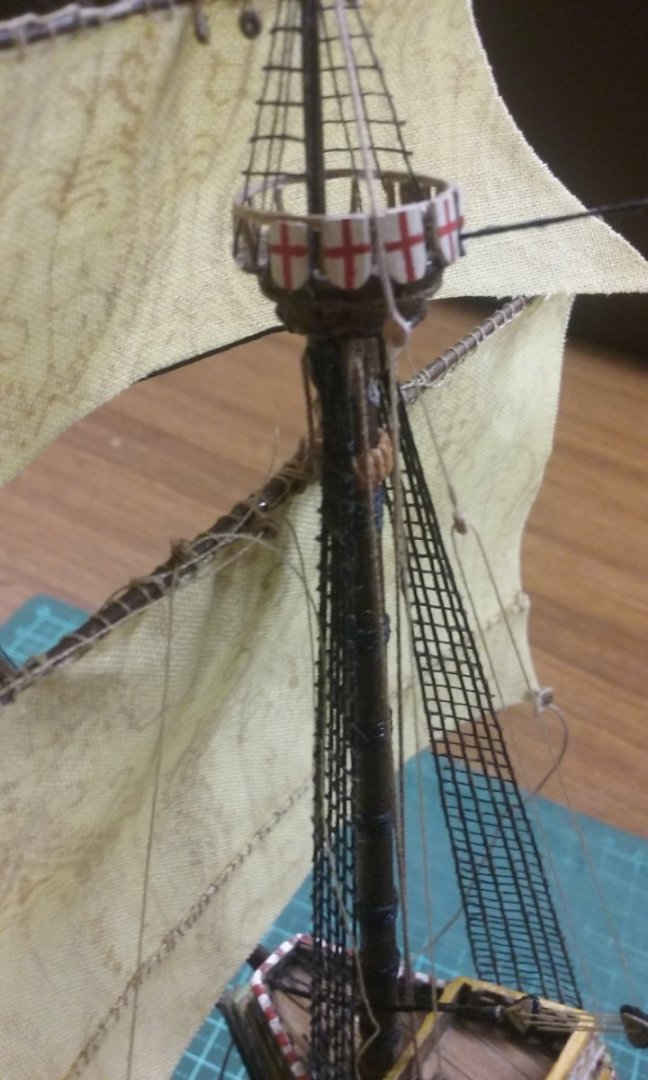
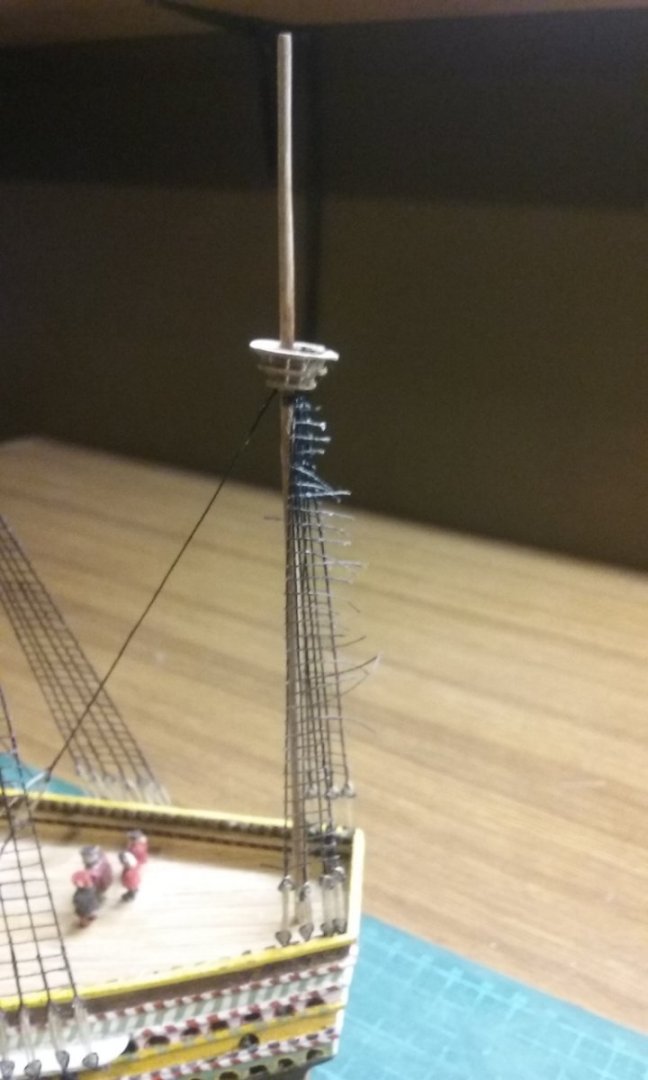
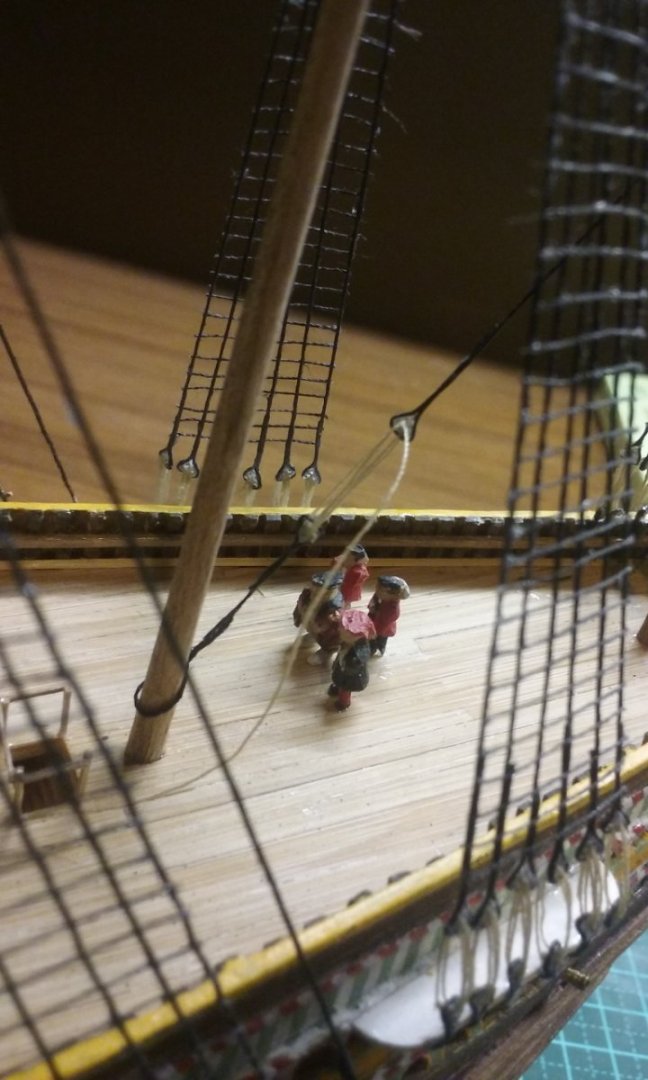
Starting to rig the fore course and topsail. I've been following Anderson, as he's the nearest thing to contemporary for this period - only 60-100 years too late. But is it just me or do others think he's really difficult to read? I find I have to have my wits about me to follow what he's saying. First thing I did was the topsail halyard and tye, but Anderson says the tye went through a sheave in the topmast. There's no way I was going to try drilling a hole in that fore topmast (or the main topmast, for that matter) - look how thin it is! So instead I faked it - a short section of tye leading out from the front of the mast, and another, longer one from the rear, running down to a block just below the base of the fighting top - apparently the same bit of rope, but in fact each wrapped around the mast by a single turn, looking rather like a parrel. I decided to leave the parrel truck off - too confusing. A "runner" goes through the block - the fixed end to the port side, the runner to another block with the halyard, which has its free end and fixed end both going to the starboard side. I decided to do ALL the rigging for the larboard side of the forecourse, and once I'd done that do the starboard side. So far I've done clewline, sheet and tack, plus the topsail sheet (all left loose for the time being). The sheet for the course is supposed to start from a ringbolt or eyebolt set into the side of the hull just in front of the main channel. I hadn't planned to bother with that - that would be pretty tiny, but then I though "Why not?" - so I got some thin wire, wrapped it around a sewing needle and actually made an eyebolt that looks right! And I've found a good way to introduce "belly" into the sails. When I added the boltropes, the scale was so small that there was no way I was going to be able to sew them on - so I just ran a bit of PVA (white) glue along each edge of the sail and glued cotton onto the edge to act as a boltrope. Now I find that if I dampen the glue and curve the sail (eg with a bit of thread holding up the clew) the curve stays in the sail when the glue dries. But now I'm a bit stuck - I began by using cotton crochet thread, which was great for the shrouds and stays, but now I need something a bit thinner for sheets, tacks etc. Unfortunately the thread I have is either too thin (sewing cotton) or too thick (crochet thread). I'm going to have to look further afield and get something in between. I know there is good rigging line available but the sizing conventions for crochet thread are in numbers - No. 10 is thick, 20 is thinner etc. and they bear no relation to actual sizes in inches or millimetres, so if I want to order from a ship rigging supplier I have no frame of reference - I can't compare the stuff I want with the stuff I already have. I'm waiting till tomorrow to go to a specialty sewing etc shop to see if I can get finer crochet thread. Otherwise . . . Steven


- 740 replies
-
- 16
-
-
-
- Tudor
- restoration
- (and 4 more)
-
Actually, that rust looks very good in the photo. But it might look different in real life, so you might be right in wanting to tone it down. Maybe leave it for a few days and come back to it with new eyes - you might find you like it after all. Steven
-
Hi Doug and Suzy, and welcome to MSW. The model's looking good so far. Are those big drill bits locating the mast positions? Interesting idea. There's a bit of a trick to turning those photos the right way up, but it might be a bit hard to explain. What I do is save the photos from my phone onto a USB stick, then open each one and if it's upside down or whatever, turn it (there's a little curved arrow) upright then move to the next - the one you've just turned gets saved upright and then you can insert it onto the page in MSW. Others my have better ways of doing it (and in fact probably do) but this works for me. I'm not sure why a paddlesteamer would be more difficult than a square-rigger - think of all that rigging you're going to have to do! Make sure you open a build log - then we get to share your progress, and you can get help and advice from the members here. I've found it an invaluable aid in my own modelling. And don't hold back from asking questions if there's something you can't figure out - the people here are very friendly and helpful. Steven
-
HMCSS Victoria 1855 by BANYAN - 1:72
Louie da fly replied to BANYAN's topic in - Build logs for subjects built 1851 - 1900
I've been following this discussion with interest but been unable to contribute to it. I'm the most hamfisted solderer in existence and blissfully ignorant about drill bits, but I can appreciate the knowledge of others which leaves me rather awestruck. Steven- 1,013 replies
-
- 3
-
-
- gun dispatch vessel
- victoria
- (and 2 more)
-
-
Thought you might like to see this - Olympias and the frigate Salamis - both ships of the Greek navy. Steven

- 310 replies
-
- 10
-
-

-
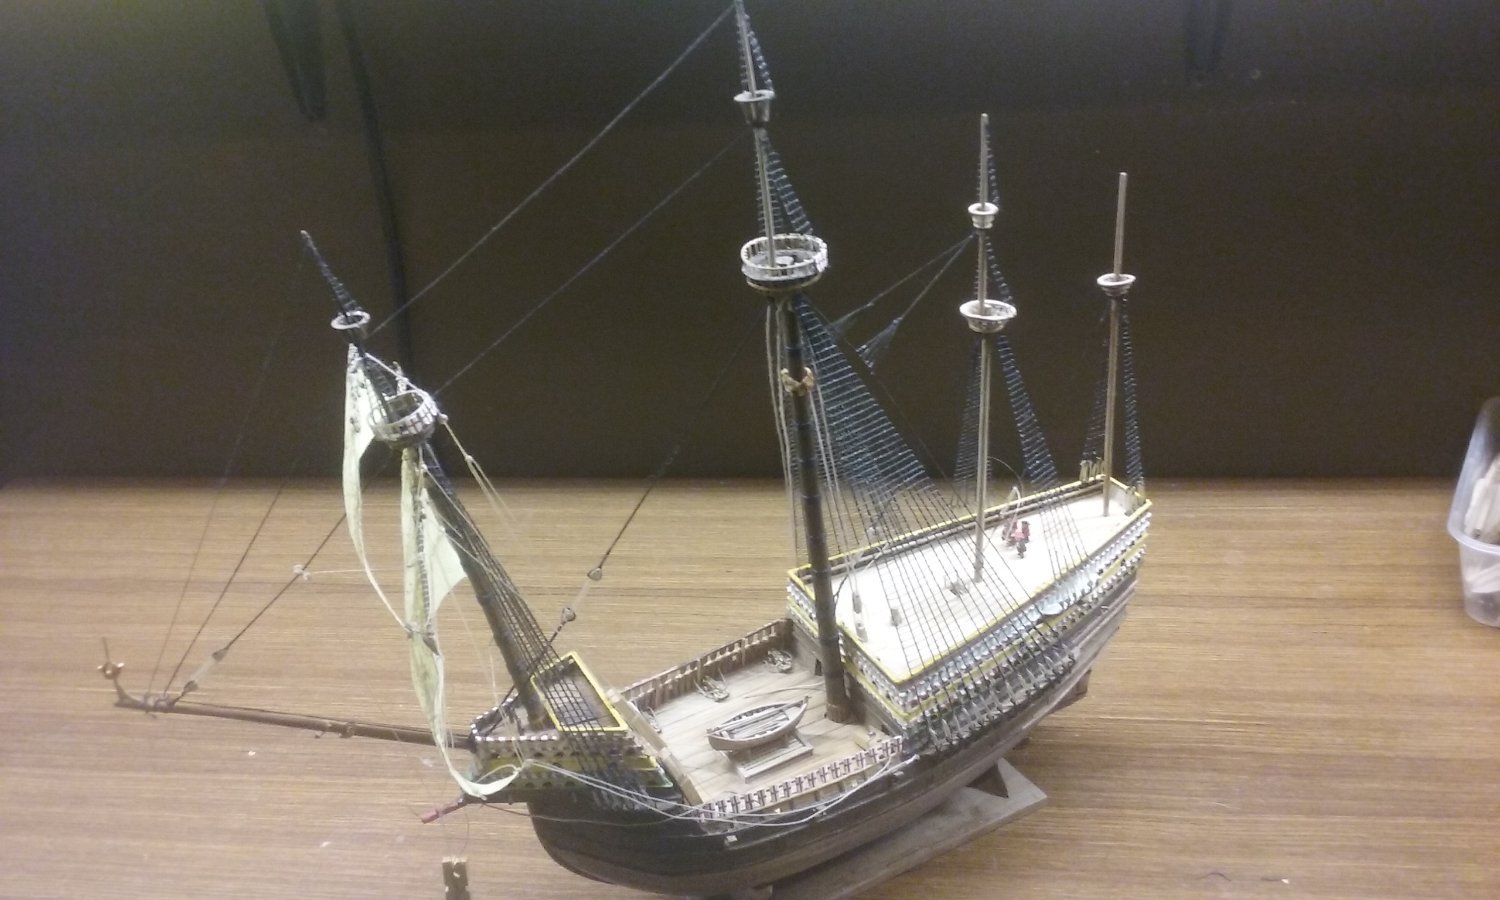
Well, after a lot of trial, and even more error, I seem to have sorted the problem out. The first problem to solve was getting the mizzen stay the right length - as it has a pair of deadeyes and lanyards as part of its length, what I did was to try attaching the two ends separately - one to the lower part of the mainmast, the other to the mizzen just below the top -and then add the lanyards. Bad idea. After many iterations and false starts I realised what I should have done is put the whole assembly together and pull the lanyards roughly to length, then attach the ends to the masts. So I did that - in fact I only threaded the lanyard through a single pair of holes in the deadeyes to start with, to see if it would work - and it worked like a charm (relatively - I discovered when I had the assembly partly threaded that I'd run the lanyard through a gap between the deadeye and the strop instead of through the hole in the deadeye, so I had to pull it all out and do it again. This kind of thing keeps happening to me - I really dread doing this fiddly stuff with ropes - they don't seem to like me and tangle at the slightest opportunity. However, I am learning bit by bit about how the rigging works, so perhaps it's all for the best). I finished threading the lanyards, and then of course I had to remove the glue from the mainmast, which had accumulated from the false starts. I think I've got rid of it all And then the same procedure with the lower bonaventure stay: I'm not totally happy with the way the ends of the strops lie against the stays - I'm considering shortening them so they look tidier, but I might be better leaving well enough alone -they're not perfect, but messing with them might make them worse (worst case scenario I might accidentally cut through the stay and have to start all over again). Then to start on the halyard, threading it through the sheaves of the knight and the block. Not all that easy - I didn't have all that much room - the knight was so close to the fore bulwark of the upper deck that it was difficult getting the tweezers in to grab the free end of the halyard - and I had to do that three times. Oh, and I'd got it through three sheaves when I discovered it was on the wrong side of the stay so I had to unthread it again and re-do it. Finally finished it, and I have to say it looks better. Apart from anything else, the knot at the end of the halyard (which holds it from pulling through the sheave) is now on the forrard side - which means it can't be seen - and what you can see is three nice parallel lines running between the knight and the block. Not only that but I discovered that when I was putting the knight in place many months ago I had inadvertently put it about 2 millimetres off-centre - just enough to avoid the problem I'd been so concerned about - that the halyards and tyes would chafe on the mizzen stay. Funny how these things turn out, that an earlier mistake solves a later problem. The mizzen stay and main halyard assembly in relation to each other. On the right hand photo you can see the free end of the strop on the lower deadeye isn't tied down properly. In this photo it's now tied down, but not totally happy with the look. As you can see, I haven't pulled the halyards and lanyards tight. I think I'll leave this for the moment and do it when I'm sure it won't have the same nasty effects as last time. On another subject, I've added all the ratlines to the lower bonaventure shrouds. This photo shows the ratlines in place and in the process of being trimmed to length (I've since completed them). Sorry about the photo quality - the automatic focus on my phone is very frustrating. Steven

- 740 replies
-
- 13
-
-
-
- Tudor
- restoration
- (and 4 more)
-
A fascinating discussion on not only the Battle and the rams, but on the development from "threes" (triremes) to "forties" and many other things, with a side journey to the SIZE of the rams from the Battle of Actium, where Augustus defeated Mark Antony. Steven
-
Just came across this video of a lecture by Boris Rankov - who was the rowing master on the Olympias -